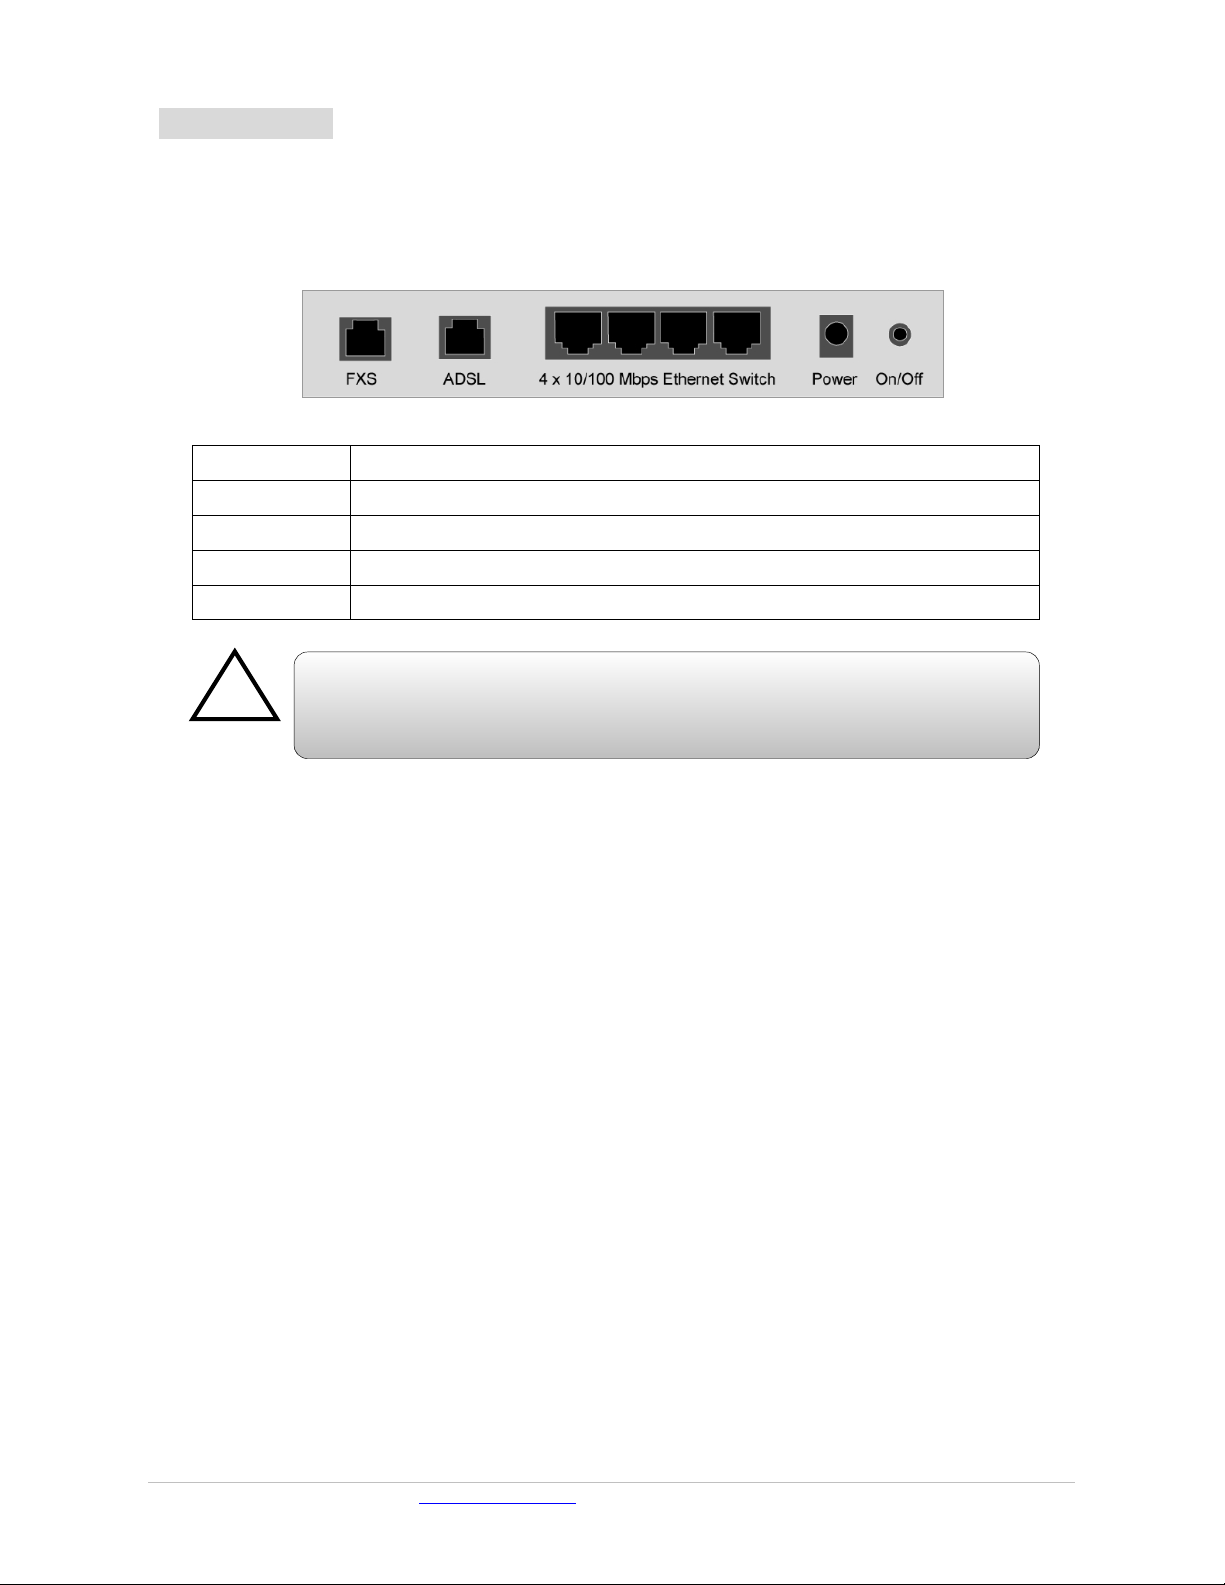
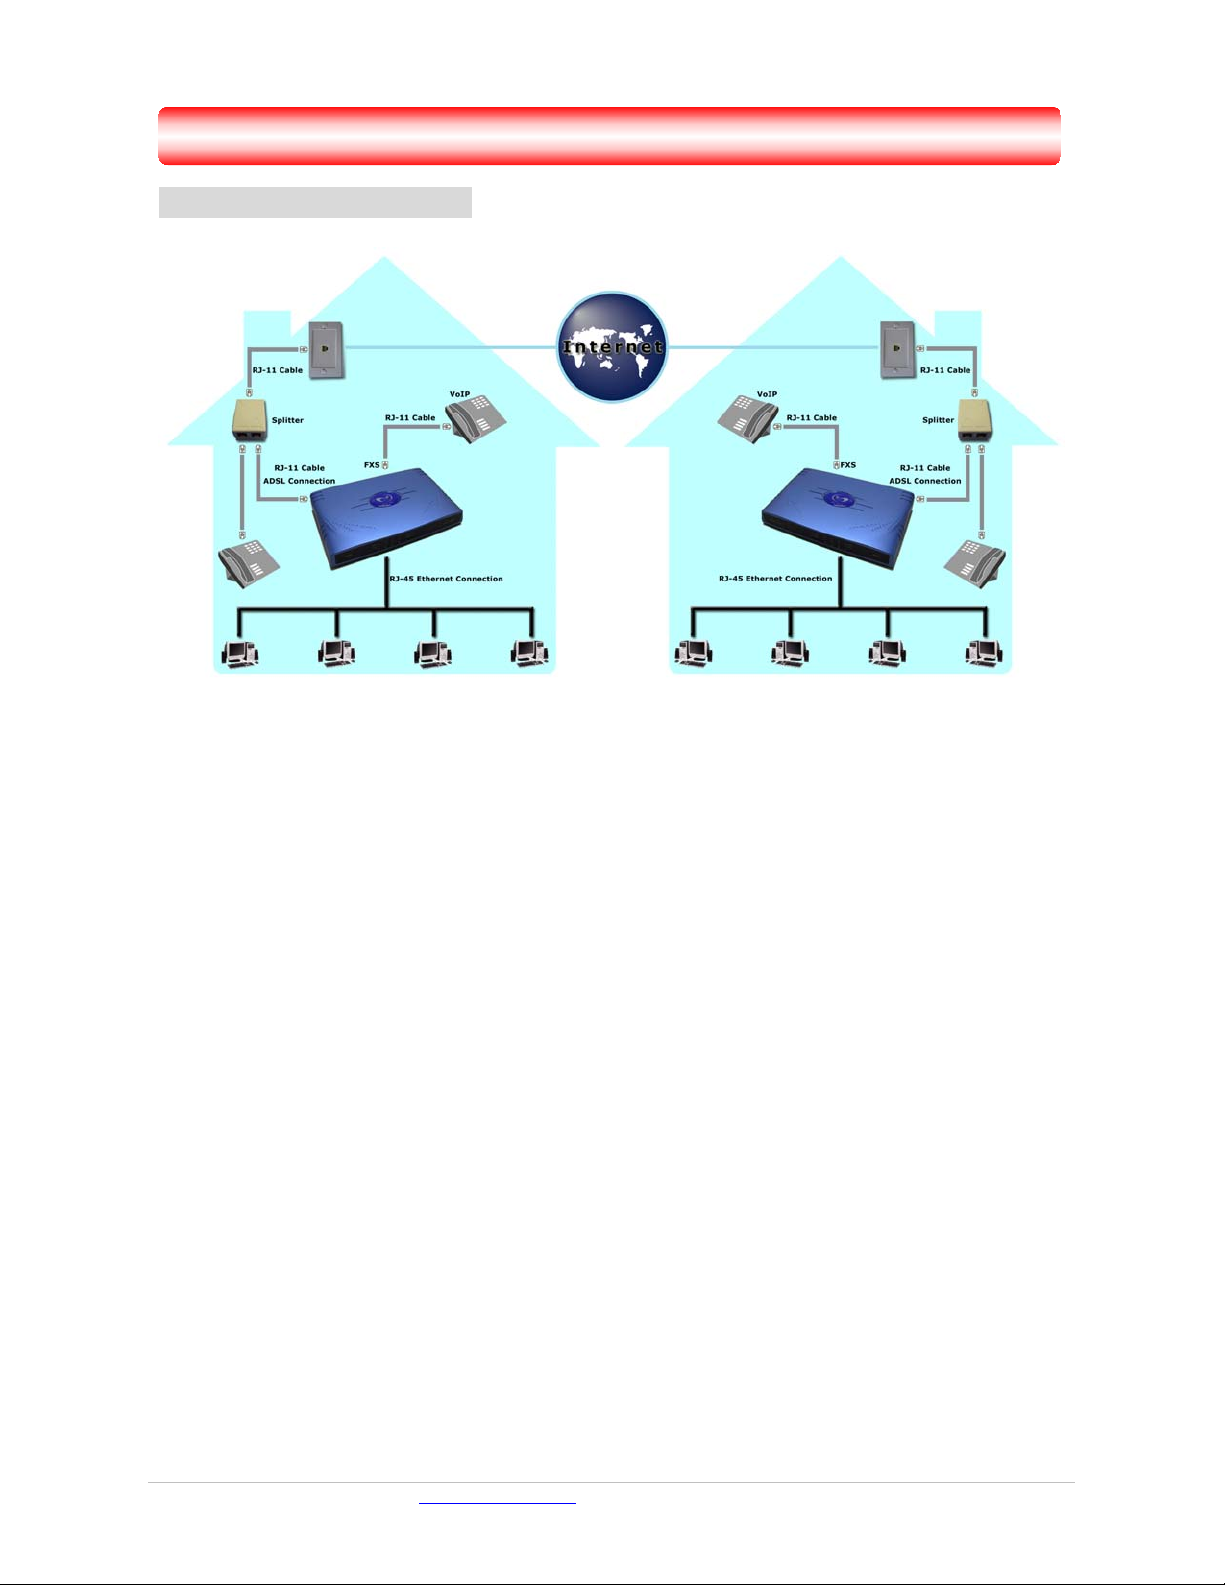
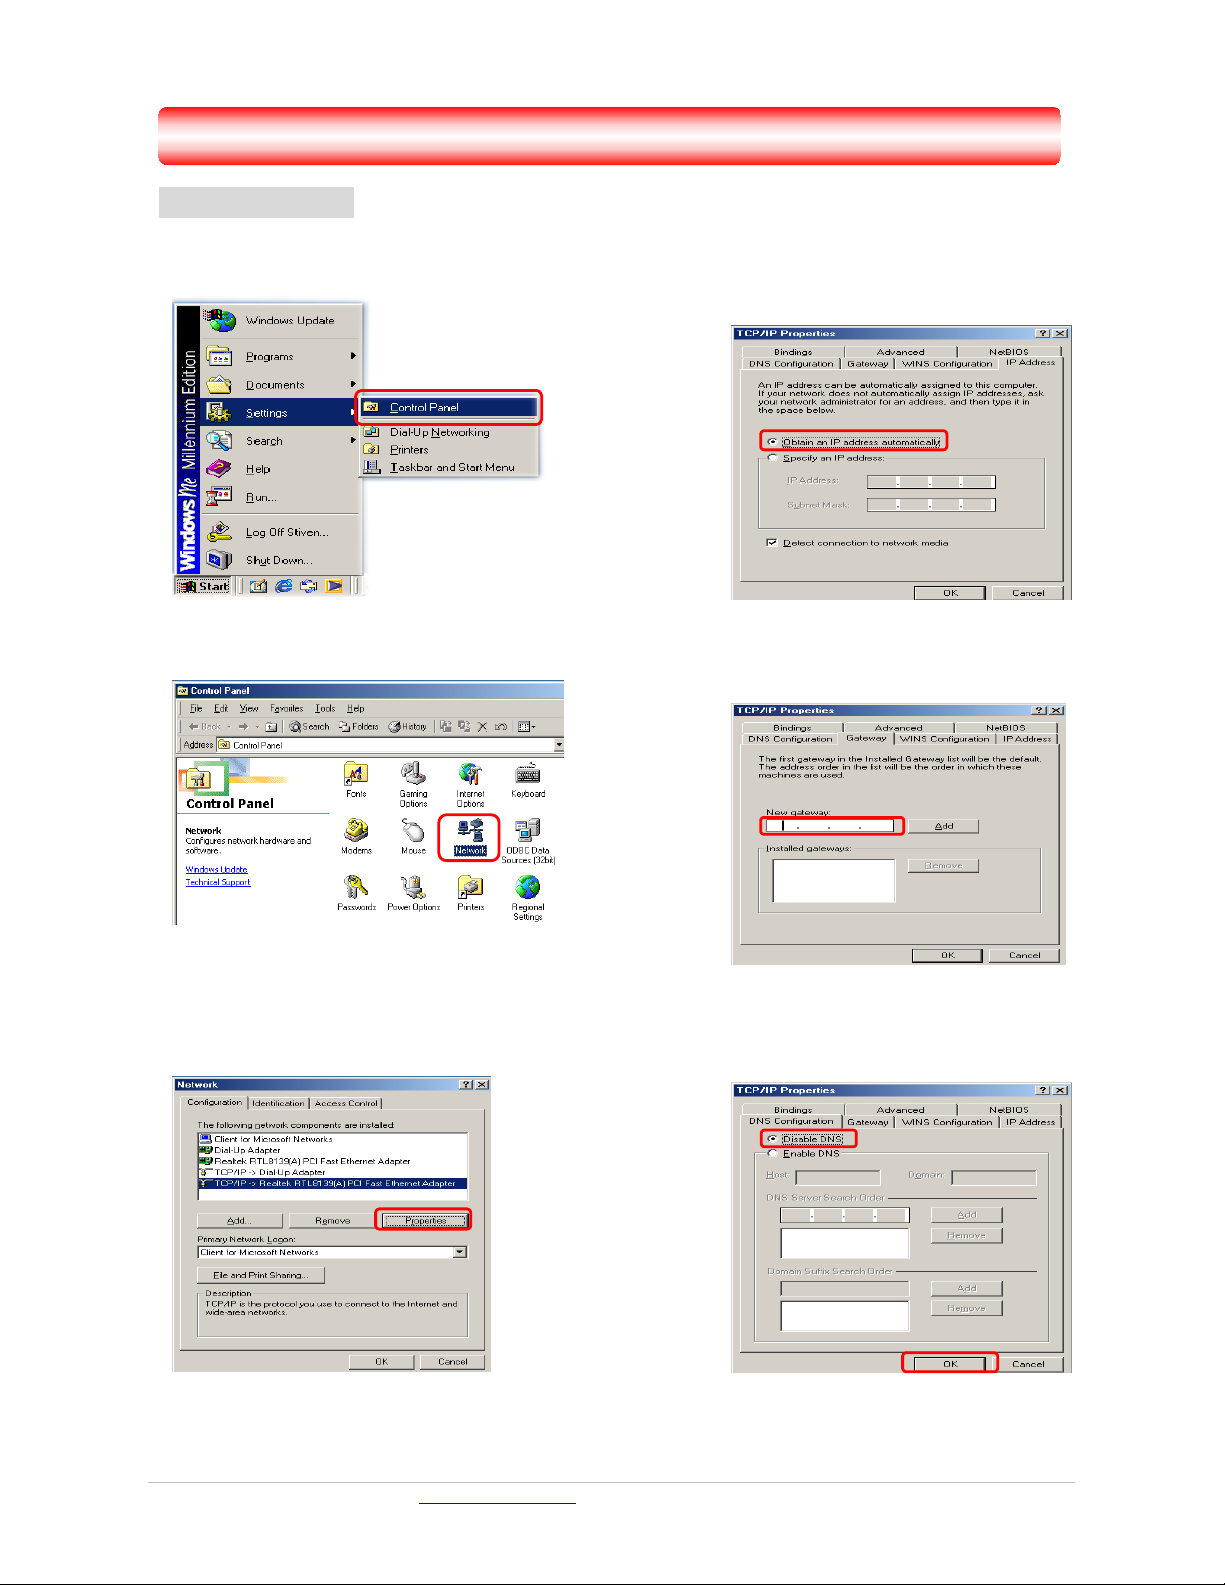
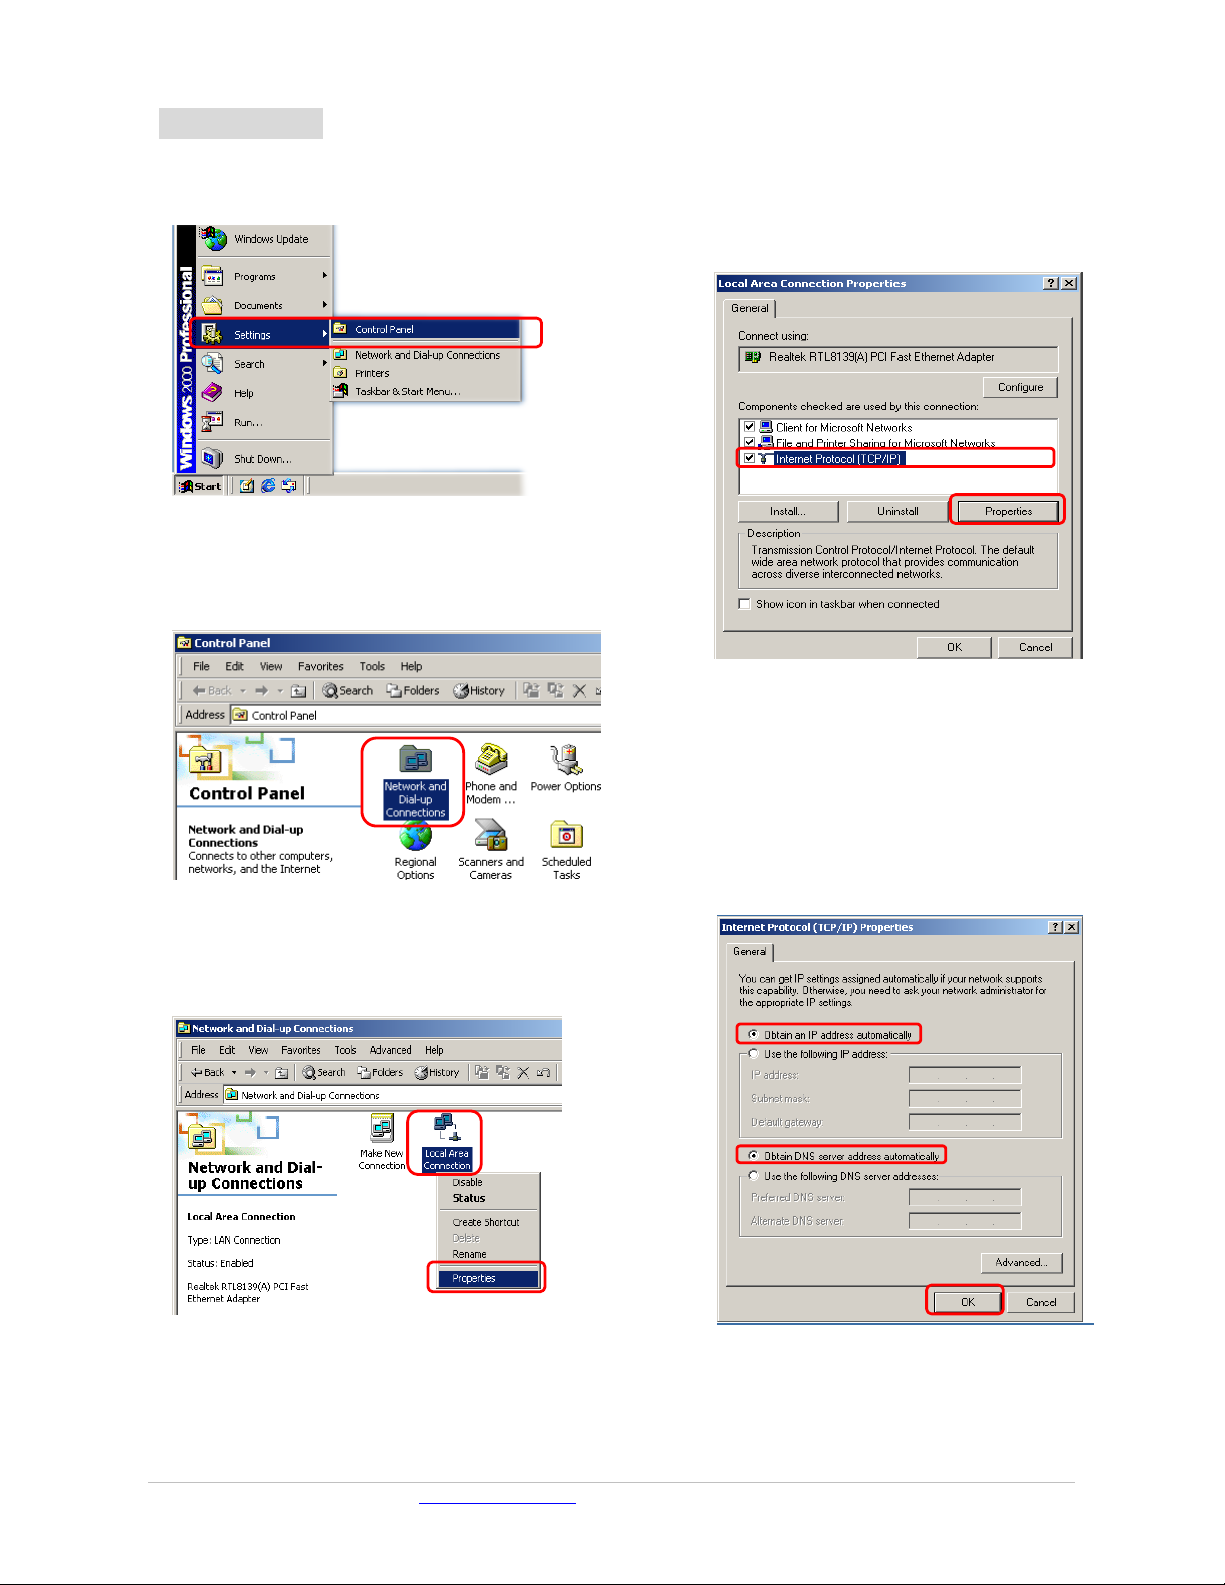
Solwise PTI-840V User manual

Solwise Ltd, www.solwise.co.uk 0
C
Co
on
nt
te
en
nt
ts
s
1. Panel Descriptions .................................................................................................................. 1
2. Connecting the 4 Ports VoIP ADSL Router ......................................................................... 3
3. Setting up the TCP/IP in Windows ....................................................................................... 5
Windows ME/98 .................................................................................................................. 5
Windows 2000 ...................................................................................................................... 6
Windows XP ......................................................................................................................... 7
4. Setting up the 4 Ports VoIP ADSL Router ........................................................................... 8
5. Making sure of Internet connection ..................................................................................... 24

Solwise Ltd, www.solwise.co.uk 1
1
1.
.
P
Pa
an
ne
el
l
D
De
es
sc
cr
ri
ip
pt
ti
io
on
ns
s
1.1 Front Panel:
The 4 Ports VoIP ADSL Router’s LED indicators display information about the device’s status.
PWR Steady green light indicates 4 Ports VoIP ADSL Router is powered on.
READY Steady green light indicates a valid ADSL connection. This will light after the
ADSL negotiation process has been settled.
ADSL 4 Ports VoIP ADSL Router status indicator. When blinking indicates 4 Ports
VoIP ADSL Router is in operation.
RXD Blinking green light indicates an active ADSL session.
1 LINK/ACT Steady green light indicates a valid Ethernet connection. Blinking green light
indicates active Ethernet session.
2 LINK/ACT Steady green light indicates a valid Ethernet connection. Blinking green light
indicates active Ethernet session.
3 LINK/ACT Steady green light indicates a valid Ethernet connection. Blinking green light
indicates active Ethernet session.
4 LINK/ACT Steady green light indicates a valid Ethernet connection. Blinking green light
indicates active Ethernet session.
FXS Steady green light indicates a valid VoIP connection. (Off-Hook)
RESET Restore the 4 Ports VoIP ADSL Router to factory default setting.
!
RESET Button:
Reboot & Restore the 4 Ports VoIP ADSL Router to factory defaults.

Solwise Ltd, www.solwise.co.uk 2
1.2 Back Panel:
The back panel of the 4 Ports VoIP ADSL Router contains FXS, ADSL, Ethernet Switches, Power
Adaptor connection and Power ON/OFF Switch.
FXS Port for connecting to the Analog Telephone device set.
ADSL Port for connecting to the ADSL Service Provider.
Ports 1~4 Four 10/100Mbps Ethernet Ports for connecting to the network devices.
DC Jack 12V DC/1A Power adapter connector.
ON/OFF Power Switch to turn the 4 Ports VoIP ADSL Router ON/OFF.
!
A
ll the Ethernet port of the 4 Ports VoIP ADSL Router support
s
auto-crossover capability.

Solwise Ltd, www.solwise.co.uk 3
2
2.
.
C
Co
on
nn
ne
ec
ct
ti
in
ng
g
4
4
P
Po
or
rt
ts
s
V
Vo
oI
IP
P
A
AD
DS
SL
L
R
Ro
ou
ut
te
er
r
2.1 Connection Mechanism:
This section describes the hardware connection mechanism of your 4 Ports VoIP ADSL Router on
your Local Area Network (LAN) to the Internet, how to configure your 4 Ports VoIP ADSL Router
for Internet access and VoIP functionalities, or how to manually configure your Internet connection.
Before you can establish an Internet and VoIP connection through your 4 Ports VoIP ADSL Router,
make sure you have the following:
1. A computer with an installed Ethernet Adaptor and an Ethernet Cable.
2. ADSL service account and configuration information provided by your Internet Service
Provider (ISP). The following configuration parameters are require in order to connect your 4
Ports VoIP ADSL Router to the Internet:
a. VPI/VCI parameters
b. Multiplexing Method
c. Host and Domain Names
d. ISP Login Name and Password
e. ISP Domain Name Server (DNS) Address
f. Fixed or Static IP Address
3. A VoIP SIP account and configuration information provided by your Internet Service Provider
(ISP) or a self-registered VoIP account parameters.

Solwise Ltd, www.solwise.co.uk 4
2.2 Steps for Connection:
Following are the steps to properly connect your 4 Ports VoIP ADSL Router:
1. Turn off your computer.
2. Connect the ADSL port of your 4 Ports VoIP ADSL Router to the wall jack of the ADSL Line
with a RJ-11 cable.
3. Connect the Ethernet cable (RJ-45) from your 4 Ports VoIP ADSL Router to the Ethernet
Adaptor in your computer.
4. Connect the FXS port of your 4 Ports VoIP ADSL Router to the analog telephone set with a
RJ-11 cable.
5. Connect the Power adaptor to the 4 Ports VoIP ADSL Router and plug the other end into a
Power outlet.
6. Turn on your 4 Ports VoIP ADSL Router.
7. Turn on your computer.
8. Refer to the next chapter to setup or configure your system’s Network Adaptor.
!
The Power light will lit after turning on the 4 Ports VoIP ADSL Router. Auto
and self-diagnostic process will turn the LED indicators ON and OFF durin
g
the process.

Solwise Ltd, www.solwise.co.uk 5
3
3.
.
S
Se
et
tt
ti
in
ng
g
u
up
p
t
th
he
e
T
TC
CP
P/
/I
IP
P
Windows Me / 98
Step 1: Click Start→Settings→Control Panel.
Step 2:Double-click the Network icon.
Step 4: Go to IP Address icon and select
Obtain an IP address.
Step 3: Go to Configuration icon, select network
adapter installed and click Properties.
Step 5: Go to Gateway icon and erase all
previous setting.
Step 6: Go to DNS Configuration icon, select
Disable DNS and click OK.
1
2
1
2

Solwise Ltd, www.solwise.co.uk 6
Windows 2000
Step 1: Click Start→Settings→Control Panel. Step 4:Select Internet Protocol (TCP/IP) and
click Properties.
Step 2:Double-click the Network and Dial-up
Connections.
Step 5:Select Obtain an IP address
automatically and DNS server address
automatically. Then, click OK.
Step 3: Right Click the Local Area Connection and
select Properties.
1
2
1
23
1
2

Solwise Ltd, www.solwise.co.uk 7
Windows XP
Step 1: Click Start→Control Panel→Classic View. Step 4:Go to General icon, select Internet
Protocol (TCP/IP) and click Properties.
Step 2: Double-click the Network Connections.
Step 5:Go to General icon, select Obtain an IP
address automatically and DNS serve
r
address automatically.
Then, click OK.
Step 3: Right Click on the Local Area Connection
and select Properties.
1
2
1
3
1
2
2

Solwise Ltd, www.solwise.co.uk 8
4
4.
.
S
Se
et
tt
ti
in
ng
g
u
up
p
t
th
he
e
4
4
P
Po
or
rt
ts
s
V
Vo
oI
IP
P
A
AD
DS
SL
L
R
Ro
ou
ut
te
er
r
1.
Launch your web browser, and enter the 4 Ports VoIP ADSL Router’s IP Address:
“10.0.0.2”
in the
address field then press the Enter key to login.
2. Enter the default User Name: “admin” and Password: “epicrouter”. Then press “OK” to login.

Solwise Ltd, www.solwise.co.uk 9
3. Click
“EZ SETUP - Automatic Setup” and proceed with the following steps to help you install
the 4 Ports VoIP ADSL Router quickly and easily.

Solwise Ltd, www.solwise.co.uk 10
Step 1 Select your country from the list and note the “Encapsulation” type. The “Encapsulation”
type differs in each country and there are two different kinds of setup windows wizard
that will pop-up.
!
Click and select “EZ SETUP -- Manual Setup” if
y
ou can’t find an
y
availabl
e
parameters from the presetting countr
y
list. Check
y
our ISP immediatel
y
fo
r
the setting/configuration details. For a UK BT phone line then the settin
g
s
should be PPPoA VcMux with VPI 0 and VCI 38. For a KC phone line then
select
PPPoA LLC with VPI 1 and VCI 50.

Solwise Ltd, www.solwise.co.uk 11
A. For countries with the following “Encapsulation” after clicking the “NEXT” button, you will
enter into “Setup – PPP” window as shown below:
PPPoA VC-Mux
PPPoA LLC
PPPoE LLC
Manually enter your “Service Name”, “User Name” and “Password” which will be provided by
your Internet Service Provider (ISP). Check this with your ISP for correct settings. Click “SAVE”
after setup.

Solwise Ltd, www.solwise.co.uk 12
B. For countries with the following “Encapsulation” after clicking the “NEXT” button, you will
enter into the Setup - Bridge window as shown below:
1483 Bridged IP LLC
In this current window, you will find two modes:
Bridge Mode: Choose either the “Disabled” or “Enabled”. Refer to your ISP for
further details on the correct setting.
IP Mode: Choose either the “Dynamic IP” or “Static IP”. Refer to your ISP for further
details on the correct setting.

Solwise Ltd, www.solwise.co.uk 13
NOTE: If the “IP mode” you selected is “Static IP”, the following window consisting of Set IP
Address, DNS Proxy and DNS Server will pop up. Check with your ISP to input the
correct setting for each boxes.

Solwise Ltd, www.solwise.co.uk 14
Step 2 Click “Save” after setup. Following windows will pop-up.
The device’s system will reboot and activate your setting. Click “VoIP” to configure your VoIP
functionality or click “Return To Home” after the reboot process. Connection to the Internet is
available.

Solwise Ltd, www.solwise.co.uk 15
Step 3 Click “VoIP” after Step 2 and the following windows will pop-up.
There are two possible ways of connecting to the Internet and enable voice function through the
Internet. Please refer to following.

Solwise Ltd, www.solwise.co.uk 16
A. If your ISP has provided you a VoIP account and configuration parameters, input all the
necessary setting provided by your ISP.
User ID: VoIP number provided by your ISP. This parameter holds the registration ID of
the user with the registrar.
Password: Password used for authentication. This parameter holds the Password used for
authentication with the registrar.
Auth User ID: User ID used for authentication. This parameter holds the Authorization
User ID for authentication with the registrar. If not specified explicitly by the Internet
Service Provider (ISP), the Auth User ID normally is same as the User ID.
Registrar Address: The Domain Name of the SIP Service Provider with which the 4
Ports VoIP ADSL Router must register in order to receive incoming calls.
Registrar Port: This parameter informs the port of the registrar on which it will listen for
Register requests from the 4 Ports VoIP ADSL Router. (1 to 65535)
Note: Range for Registrar port address is between 1~ 65535. The default port is 5060.
Proxy Address: The Domain Name of the SIP Service Provider’s Proxy Server.
Proxy Port: This parameter is the port on which the SIP proxy server will listen for
messages.
Outbound Proxy Address: The Domain Name of the SIP Service Provider’s Outbound
proxy server. This is useful in cases where the 4 Ports VoIP ADSL Router is behind a
NAT.
Outbound Proxy Port: This parameter is the port on which the outbound proxy server
listens for messages from the 4 Ports VoIP ADSL Router.
Click “SAVE” after setup. The “Save Setting” screen will pop-up.

Solwise Ltd, www.solwise.co.uk 17
The device’s system will reboot and activate your setting.
Click “Return To Home” after the reboot process. Connection to the Internet and Voice
functionality through the Internet is available.
NOTE: For more detailed information regarding settings and connections, refer to the “User
Manual”.

Solwise Ltd, www.solwise.co.uk 18
B. If you have to register your own VoIP account, then refer to the following procedures:
1.
Launch your web browser, and enter
http://fwd.pulver.com
in the
address field then press
Enter. The following window will pop-up.
2. Click “Get FWD!”.

Solwise Ltd, www.solwise.co.uk 19
3. Click
“Sign Up”.
Table of contents
Other Solwise Network Router manuals

Solwise
Solwise NET-3G-A10 User manual

Solwise
Solwise SAR-600EH User manual

Solwise
Solwise 4G-54RV User manual

Solwise
Solwise WLn-401 User manual

Solwise
Solwise SAR110 User manual

Solwise
Solwise SSR725 Manual

Solwise
Solwise SAR-600E User manual

Solwise
Solwise SAR-600E Product information sheet

Solwise
Solwise SAR-600 Instructions for use

Solwise
Solwise SAR715PV User manual