Solwise SAR-600EW Product information sheet

SAR-600EW
4-Port Ethernet USB
Wireless-G ADSL Router
Easy Start
Version 1.0
Solwise
Ltd.
www.solwiseforum.co.uk
The Solwise Forum is designed to be the first port-of-call for technical support and sales
advice for the whole Solwise product range.
Please check the forum for coverage on any technical problems you have. Many people have
trodden your path before you, and a quick check on the forum will reduce the pressure on our
support staff
Contents:
1Introduction................................................................................................................... 3
2Minimum System Requirements .................................................................................. 3
3ADSL Router Package ................................................................................................. 3
4Wireless-G Router Overview........................................................................................ 4
5Typical Wireless-G Router Connections ...................................................................... 6
6Connecting the Wireless-G Router to Your Computer/Notebook ................................ 7
7Configuring Your Ethernet Network Card / Installing Your USB Device .................... 10
8Configuring Your Internet Browser............................................................................. 17
9Setup Wireless-G Router Via Utility ........................................................................... 18
10 Setup Wireless-G Router Via Websetup Wizard ....................................................... 30
• Product warranty does not apply to damage caused by lightning, power surges or
wrong voltage usage.
• This product is for use only in UL Listed computers.

Wireless-G Router Easy Start
1 of 33
Declaration of Conformity
Marking by the above symbol indicates compliance with the Essential Requirements of the
R&TTE Directive of the European Union (1999/5/EC). This equipment meets the following
conformance standards:
EN300 328, EN301 489-17, EN60950
Countries of Operation and Conditions of Use in the European
Community
This device is intends to be operated in all countries of the European Community.
Requirement is for indoors vs. outdoors operation, license requirements and allowed
channels of operation apply in some countries as described in this document.
Note: The user must use the configuration utility provided with this product to check
the current channel of operation and confirm that the devices operating in
conformance with the spectrum usage rules for the European Community countries as
described below.
If operation is occurring outside of the allowable channels as indicated in this guide, then the
user must cease operating the product and consult with the local technical support staff
responsible for the wireless network.
This device may be operated indoors or outdoors in all countries of the European
Community using the 2.4GHz band: Channels 1 – 13, except where noted below:
·In
Italy the end-user must apply for a license from the national spectrum authority to
operate this device outdoors.
·In
France outdoor operation is only permitted using the 2.4 – 2.454 GHz band: Channels
1 – 7.

Wireless-G Router Easy Start
2 of 33
Solwise
Ltd.
13/15 Springfield Way
Anlaby
Hull HU10 6RJ
UK
Tel: 0845 458 4558 (local rate)
Fax: 0845 458 4559
Support Tel: 0845 1931320
SBV: 1100
Email sales@solwise.co.uk
Http www.solwise.co.uk
Copyright
All rights reserved. No part of this document may be reproduced in any form or by any means
without written permission from the product manufacturer.
Changes are periodically made to the information in this document. They will be incorporated
in subsequent editions. The product manufacturer may take improvement and/or changes in
the product described in this document at any time

Wireless-G Router Easy Start
3 of 33
1 Introduction
Thank you on your purchase of the SAR-600EW, 4-Port Ethernet USB Wireless-G ADSL
Router! The Wireless 4-Port Router allows you to share high-speed broadband connection
with multiple PC using a single device wired or wireless.
The SAR-600EW Router can be connected to any computer/notebook with a 10/100 Base-T
Ethernet card or USB port for wired connection or an IEEE 802.11b/g Wireless adapter. The
Ethernet ports have Auto MDI/MDIX feature which can allows both cross or straight UTP
cable to be utilized. The Wireless 4-port Ethernet Router has an in-built IEEE802.11g
Wireless LAN Access Point for wireless connectivity.
This documentation assumes that you have already installed an Ethernet card or a wireless
adapter on your computer/notebook
2 Minimum System Requirements
• Pentium®MMX 233MHz
• Ethernet card installed with TCP/IP Protocol (Required only if you are connecting to
the ETHERNET port of your DSL Router)
• Single USB port
• IEEE 802.11b Wireless adapter (Required if you are connecting to the Wireless
Access Point of the router)
• OS independent for Ethernet
• Microsoft Windows 98SE/ME/2000/XP for USB
• Web Browser support:
Microsoft Internet Explorer 4.0 (or later versions)
Netscape® Navigator 3.02 (or later versions)
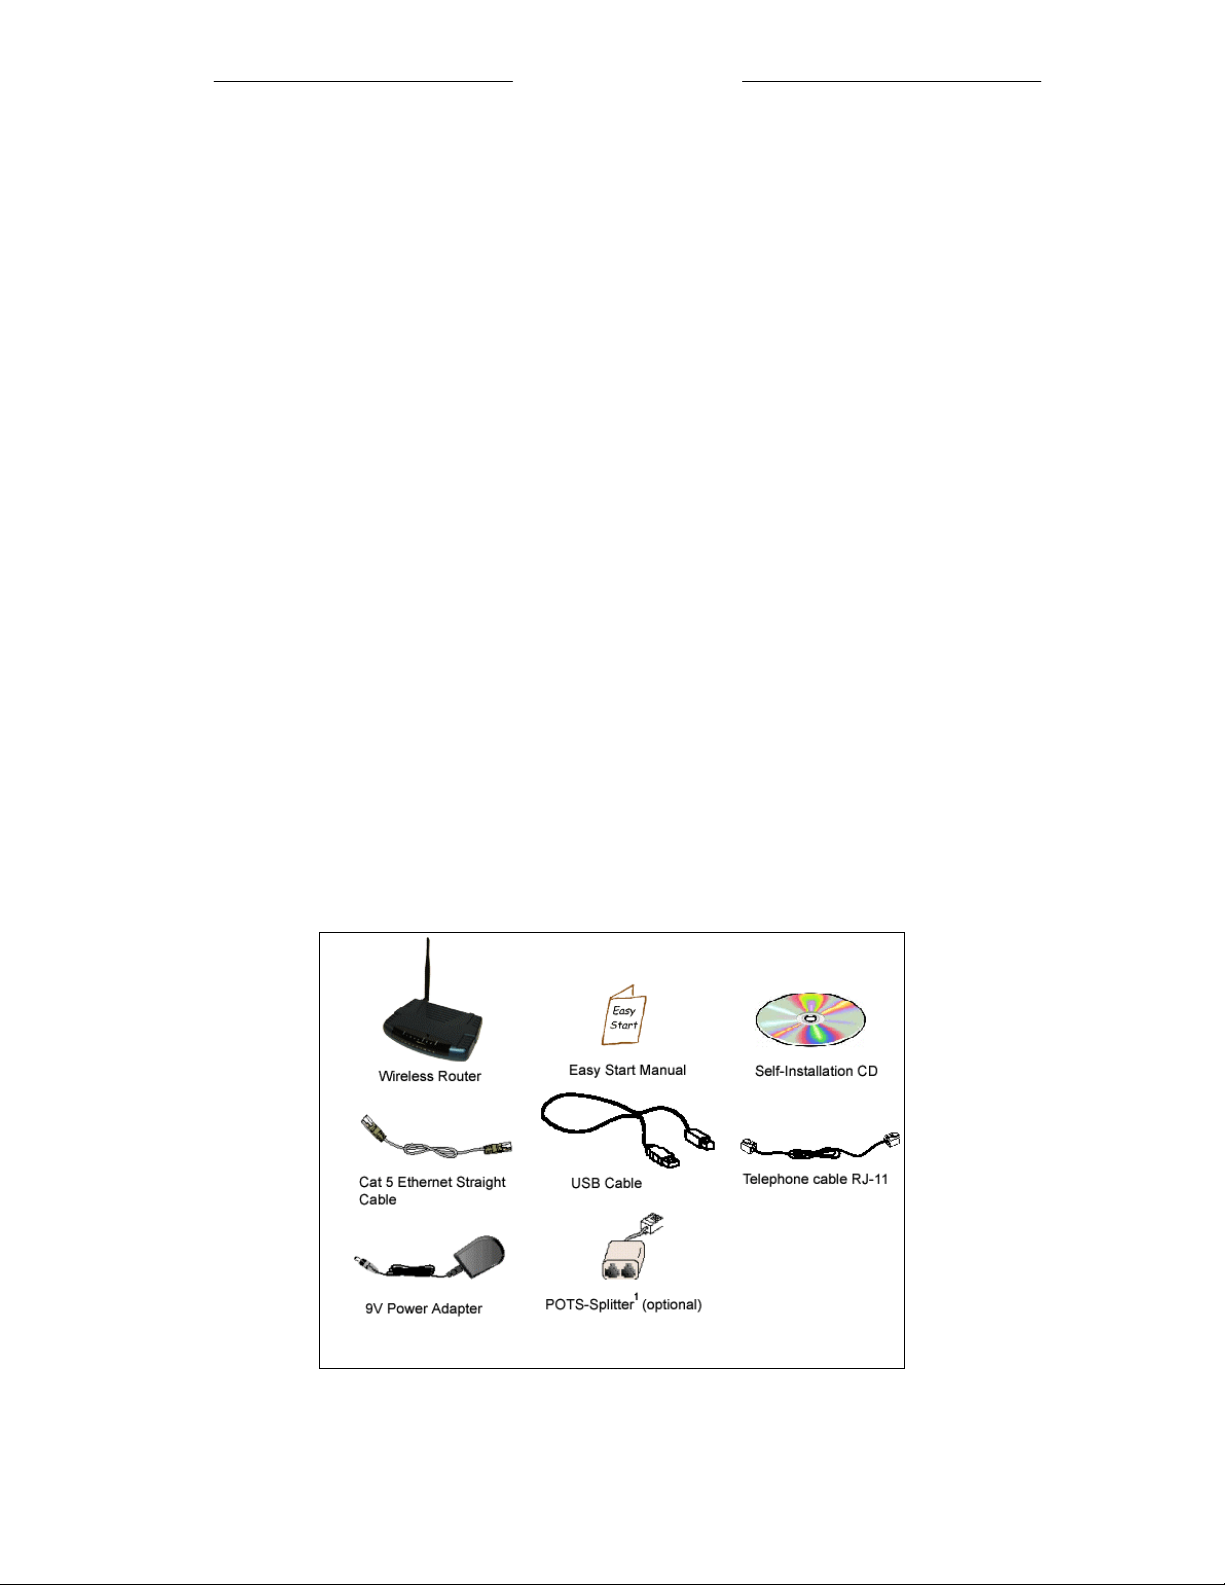
3 ADSL Router Package
For any missing items, please contact your dealer immediately.
1 Depending on your country of purchase, your package may or may not come with a
POTS Splitter. The POTS Splitter is required if you are connecting a Telephone Set to the

Wireless-G Router Easy Start
4 of 33
Ethernet Modem. Please refer to Connecting to the ADSL Line for details. POTS-Splitter
can also be purchased from your dealer.
4 Wireless-G Router Overview
4.1 Front Indicators
4 6
1 2 3 5
1 POWER
Lights up when power is supplied to the ADSL Router.
2ETHERNET (E1 ~ E4)
Lights up when the Ethernet cable is properly connected from your ADSL Router to the
Ethernet Card.
Flickers when the ADSL is transmitting/receiving data.
3 WIRELESS
Flickers when the Wireless LAN is operational.
4USB
Lights up
when the USB cable is properly connected from your ADSL Router to the
USB slot.
Lights Off when the USB cable is not connected or it is properly disconnected.
5DSL
LED light off when no Telephone jack (RJ-11) is connected.
Flickers when the ADSL Router is trying to establish a connection with the ADSL Service
Provider (Training).
Steady Green Light when the ADSL connection is established.
6Internet
Green LED Lights up when the PPP connection is established.
LED Light off when no PPP connection.

Wireless-G Router Easy Start
5 of 33
4.2 Back Panel
4 7
1 2 3 5 6
1DSL
Telephone jack (RJ-11) to connect to your Telephone Wall Socket (DSL line).
2USB
USB jack to connect to your PC’s USB slot.
3RESET
To reset your ADSL Router to factory default settings. (All customised settings that you
have saved will be lost!). Please refer to the below footer2on how to activate the reset
function.
4ETHERNET (E1-E4)
10/100 Base-T Auto-MDI/MDIX Ethernet jack (RJ-45) to connect to your PC’s Ethernet
Network card or Ethernet Hub / Switch.
5
DC IN (9V)
To connect to the Power Adapter that comes with your package.
6
POWER SWITCH
To power on or off the modem.
I - indicates ON position
O - indicates OFF position.
7 RF Antenna
180°2.4Ghz Wireless Antenna.
2To activate the reset function:
- Ensure that your ADSL Router is powered on.
- Use a paper clip or a pencil tip to depress the reset button, hold for at least 5secs

Wireless-G Router Easy Start
6 of 33
and release. At this point, the Wireless indicator and DSL indicator will go off, The
reset is in progress.
- When the Wireless indicator starts blinking, it means that the reset process is
completed. The default settings are now restored.
- DSL line is synchronized once the DSL indicator colour is steady green.
5 Typical Wireless-G Router Connections
5.1 Up to 4 PCs Connections
5.2 For More than 4 PCs Connections
To connect to more than 4 computers/notebooks, you may further expand one of the Ethernet
Ports via an Ethernet Hub/Switch. For details on how to connect to the Ethernet Switch/Hub,
please refer to the documentation that comes with the unit.
With the Auto MDI/MDIX feature, both cross and straight UTP cable can be utilized.

Wireless-G Router Easy Start
7 of 33
6 Connecting the Wireless-G Router to Your
Computer/Notebook
6.1 Connecting to the Ethernet
Connect your computer(s)/notebook(s) to the Wireless-G ADSL Router as illustrated. The
following illustration shows the connection of a single computer.
Power off your Computer/Notebook or/and any connected devices before
connecting to the ADSL Router!
NOT SURE HOW THE ETHERNET PORT LOOKS LIKE?
The following are some tips to help you locate your Ethernet Ports on you
r
Computer/Notebook. Alternatively, you may refer to the documentation that comes
with your Computer/Notebook.
Locating the Ethernet Port on your Computer/Notebook
Most Computers/Notebooks have labels describing the Ports. For Ethernet Port,
you will see either ETHERNET, ETH or RJ45 labelled near the Port.
If your Computer/Notebook does not have such descriptions, try the following.
- Picture A gives the illustration of an Ethernet Port. All Ethernet Ports have
8 conductors on it. Do not mistaken with the LINE Port (Picture B) that has only 6
conductors.
- The Ethernet Port is slightly bigger than the LINE Port.
A. ETHERNET B. LINE

Wireless-G Router Easy Start
8 of 33
6.2 Connecting to the ADSL Line
6.3 (a) To connect to the ADSL line
6.4 (b) To connect to the ADSL line and Telephone Set
The POTS Splitter (with built-in Microfilter) is a device that allows you to connect both your
Telephone cable and Telephone Set to the same Telephone Wall Socket. The device at the
same time helps to eliminate background noise on the telephone line, ensuring the best
possible phone performance.
6.5 Checking Your Connections
Please check your connections before proceeding.

Wireless-G Router Easy Start
9 of 33
6.6 Connecting to the Power Outlet
6.7 Powering On
Power on the Power Outlet that is connected to your ADSL Router.
Power on your Computer(s)/Notebook(s).
Please proceed to the next chapter.

Wireless-G Router Easy Start
10 of 33
7 Configuring Your Ethernet Network Card /
Installing Your USB Device
7.1 Configuring Your Ethernet Network Card
7.1.1 For Windows®98 Second Edition / Windows®Me
i From your Windows desktop, right-click on the Network Neighborhood icon. Select
Properties.
iiii From the
Configuration tab, select TCP/IP-> xxx where xxx refers to the model of
your Ethernet Card that is connected to your ADSL Router.
Click Properties.
(This screen shot uses 3Com EtherLink Ethernet card model as an example).
iii Click the
IP Address tab.
Click the option Obtain an IP address automatically and click OK to save the settings.
If your computer/notebook is connected to the Ethernet Port of the ADSL Router,
proceed with section 7.1. If your computer/notebook is connected to the USB Port
of the ADSL Router, proceed with section 7.2. If your computers/notebooks are
connected to both the Ethernet Port and USB Port of your ADSL Router, please
proceed with both sections!
1. Proceed with this section ONLY if your computer/notebook is connected to
the Ethernet Port of your ADSL Router.
2. The following illustrated screen shots serve only as examples. For any
dissimilarities, please follow closely the instructions prompted on your
Computer.

Wireless-G Router Easy Start
11 of 33
Ensure that your ADSL Router is powered on. Restart your system.
Proceed to the next chapter.
7.1.2 For Windows®2000 / Windows®XP
i Windows® 2000:
a) From your Windows desktop, right-click on the icon My Network Places and
select Properties.
b) At the Network and Dial-up Connections window, right-click on the Local Area
Connection icon and select Properties.
Windows® XP:
(Instructions are based on default Start menu option)
a) From your Windows desktop, click Start > All Programs > Accessories >
Communications > Network Connections.
b) Right-click on the Local Area Connection icon that reflects the model of your
Ethernet Card that is connected to your ADSL Router and click Properties.
ii Ensure that the field Connect Using indicates the model of your Ethernet Card that is
connected to your ADSL Router.
(This is important especially if you have more than one Local Area Connection icons displayed at the
Network and Dial-up Connections / Network Connections window. Ensure that you have selected the
correct one.)
Select Internet Protocol (TCP/IP) and click Properties.
(This screen shot uses 3Com EtherLink Ethernet card model as an example).
iii Select the option
Obtain an IP address automatically and click OK.

Wireless-G Router Easy Start
12 of 33
Click OK again to close.
Ensure that your ADSL Router is powered on. Restart your system.
Proceed to the next chapter.
7.2 Installing the USB Device Driver
7.2.1 Installing the
USB Device Driver - For Windows®98 Second Edition
i Power on your computer to start Windows.
ii Place the
Installation CD into your CD-ROM Drive
iii At the following prompt, and click Next.
iv Select
Search for the best driver for your device (Recommended) option and click
Next.
1. Proceed with this section ONLY if your computer/notebook is connected to
the USB Port of your ADSL Router!
2. The following screen shots illustrated serve only as examples. For any
dissimilarities, please follow closely the instructions prompted on your
Computer/Notebook.
3. For Windows® 98 Second Edition users, you may be prompted for your
Windows CD-ROM. Have it ready by your side.

Wireless-G Router Easy Start
13 of 33
v Click
CD-ROM drives option and click Next.
vi Select
The updated driver (Recommended) DSL Router USB Remote NDIS
Network Device and click Next.
vii Click
Next to proceed installation with the indicated driver.
viii Click Finish to complete the USB driver installation.
xi Restart your system when prompted.
Proceed to the next chapter.
7.2.2 Installing the USB Device Driver - For Windows®Me
i Power on your computer to start Windows.
ii Place the Installation CD into your CD-ROM Drive.
iii At the following prompt, select Specify the location of the driver (Advanced) option
and click Next.
Depending on your system configurations, you may be prompted for your Windows
CD-ROM during installation. At the prompt, replace the Installation CD in your CD-
ROM Drive with your Windows CD-ROM and click OK.
A
t the Copying Files dialog box, enter the path of your Windows CD-ROM and
click OK.

Wireless-G Router Easy Start
14 of 33
iv Click
Removable Media option and click Next
.
v Click
Next again to proceed installation with the indicated driver.
vi Click
Finish to complete the USB driver installation.
vii Restart your system when prompted.
Proceed to the next chapter.
7.2.3 Installing the USB Device Driver - For Windows®2000
i Power on your computer to start Windows.
ii Place the
Installation CD into your CD-ROM Drive.
iii At the following prompt, click Next
.

Wireless-G Router Easy Start
15 of 33
iv Select
Search for a suitable driver for my device (recommended) option and click
Next.
v Click CD-ROM drives option and click Next.
vi At the next prompt, click Next to proceed installation with the indicated driver.
vii You may be prompted with Digital Signature Not Found dialog box during installation.
(This happens when Windows detects your driver as a new version).
Click Yes to proceed with the installation.
viii Click Finish when prompted. Upon completion, proceed to the next chapter.
7.2.4 Installing the USB Device Driver - For Windows®XP
i Power on your computer to start Windows.
ii Place the
Installation CD into your CD-ROM Drive.
iii At the following prompt, select Install from a list or specific location (Advanced)
option and click Next.

Wireless-G Router Easy Start
16 of 33
iv Click Search removable media option and click Next.
v Click
Finish to complete the first stage of the USB driver installation.
vi Repeat
step ii and iii.
vii You may be prompted with Hardware Installation dialog box. (This happens when
Windows detects your driver as a new version).
Click
Continue Anyway to proceed with the installation.
viii Click
Finish when prompted. Upon completion, proceed to the next chapter.

Wireless-G Router Easy Start
17 of 33
8 Configuring Your Internet Browser
8.1 Microsoft® Internet Explorer™
(based on IE 5.5)
i From your Windows desktop, double-click on your Internet Explorer icon to launch your
Browser.
ii From the Menu, click Tools and select Internet Options... .
iii Select the
Connection tab. Click the field, 'Never dial a connection'. (This option will
be grayed off if you have not installed an analog modem on your computer/notebook
before. Proceed with 3.1 iv).
iv Click the
LAN Settings... button. Ensure that your Proxy Server is not enabled.
v Click
OK to close the dialog box.
You may now proceed to the next chapters.
8.2 Netscape® Navigator
i From your Windows desktop, double-click on your Navigator icon to launch your
Browser.
ii Depending on your Netscape versions, carry out one of the following instructions:
Click
Options > Network Preferences.
Select Proxies. Ensure that the No Proxies option is selected.
OR
Click
Edit > Preferences.
Select Advanced and click Proxies. Ensure that the option Direct Connection to the
Internet is enabled.
iii Click
OK for changes to take effect.
You may now proceed to the next chapters.

Wireless-G Router Easy Start
18 of 33
9 Setup Wireless-G Router Via Utility
9.1 For Windows 98 SE/ ME/ 2000/ XP Users ONLY
9.2 Install Wireless-G DSL Router Self-Installation Utility.
iInsert the Wireless-G DSL Router Self-Installation CD into the CD-ROM drive. The utility
will auto-run and the screen as shown below will appear. (Note: If it does not auto-run,
access to the CD-ROM drive and execute CDWizard.exe). Further information will be
available when you position the mouse cursor over the available options.
ii Upon Clicking on “Self-Install Wizard”, a note will be prompted to confirm whether you
are setting up the wireless router via Ethernet or USB. If you are setting up your
Wireless-G Router via USB, please click “Cancel” to go back to main menu and install
the USB driver before proceeding. If you are setting up via Ethernet, click “OK” to
continue.
This chapter is only for Windows User, please use the Wireless-G DSL Router
Utility Installation CD provided to setup the Wireless-G DSL Router Utility

Wireless-G Router Easy Start
19 of 33
iii Please click “Next” to proceed with the installation of the wireless-G router utility.
Table of contents
Other Solwise Network Router manuals

Solwise
Solwise SAR110 User manual

Solwise
Solwise PTI-840V User manual

Solwise
Solwise SAR-600EH User manual

Solwise
Solwise SAR-600E User manual

Solwise
Solwise SAR-600E User manual

Solwise
Solwise SAR110 Manual

Solwise
Solwise SAR-600E Product information sheet

Solwise
Solwise 4G-54RV User manual

Solwise
Solwise SAR-600EH Product information sheet

Solwise
Solwise SAR715PVW Manual