Sonel IRM-1 User manual

4
2

USER MANUAL
SOLAR RADIATION
AND TEMPERATURE METER
IRM-1
SONEL S.A.
Wokulskiego 11
58-100 Świdnica
Poland
Version 1.0229.03.2022

IRM-1 –USER MANUAL
2
IRM-1 is a modern, state-of-the art measuring instrument, easy to operate and safe. Read this manual
to avoid mistakes during the measurements and prevent operational problems.

IRM-1 –USER MANUAL
3
CONTENTS
1General information.........................................................................................5
1.1 Safety....................................................................................................................... 5
1.2 General characteristics ............................................................................................ 6
1.3 Compliance with standards......................................................................................6
2Quick start ........................................................................................................7
2.1 Turning the meter on and off, display content..........................................................7
2.2 Selection of general measurement parameters ....................................................... 7
2.2.1 Time and date..................................................................................................................7
2.2.2 Units of solar irradiance and temperature. .......................................................................8
2.2.3 Zeroing the meter inclination angle in relation to the ground............................................9
2.2.4 Compass calibration ......................................................................................................10
2.3 Pairing with a master meter ................................................................................... 12
3Measurements................................................................................................13
3.1 Live mode ..............................................................................................................13
3.2 HOLD mode........................................................................................................... 13
3.3 Inclination in relation to the ground........................................................................ 14
3.4 Geographical direction........................................................................................... 14
4Recorder .........................................................................................................15
4.1 Setting the recording interval and memory mode .................................................. 15
4.2 Recording...............................................................................................................16
5Memory of measurement results..................................................................17
5.1 Recording measurement results in the memory of the user .................................. 18
5.2 Viewing user memory data..................................................................................... 19
5.3 Deleting memory data............................................................................................20
5.3.1 Deleting user memory data............................................................................................20
5.3.2 Deleting the recorder memory........................................................................................21
6Communication..............................................................................................22
7Troubleshooting.............................................................................................22
8Power supply..................................................................................................23
8.1 Monitoring the power supply voltage...................................................................... 23
8.2 Replacing the battery............................................................................................. 23
8.3 Charging rechargeable battery .............................................................................. 23
8.4 General rules for using Li-Ion rechargeable batteries............................................ 23
9Cleaning and maintenance ...........................................................................24
10 Storage............................................................................................................24
11 Dismantling and disposal .............................................................................24
12 Technical data................................................................................................25
12.1 Basic information ................................................................................................... 25
12.1.1 Measurement of solar irradiance....................................................................................25
12.1.2 Temperature measurement of the PV module and the environment...............................25
12.1.3 Measuring of the inclination angle..................................................................................25

IRM-1 –USER MANUAL
4
12.1.4 Measuring the geographical position of the location –compass.....................................25
12.2 Other technical specifications ................................................................................25
13 Accessories....................................................................................................26
13.1 Standard accessories ............................................................................................ 26
13.2 Optional accessories..............................................................................................26
14 Manufacturer ..................................................................................................27
15 Laboratory services.......................................................................................28

IRM-1 –USER MANUAL
5
1 General information
The following international symbols are used in the device and/or in this manual:
WARNING
See explanation in
the manual
Do not dispose of with
other household waste
Declaration of
Conformity with EU
directives (Conformité
Européenne)
1.1 Safety
To avoid damage to the device and to ensure its safe operation, the user must observe the notes and
warnings provided in these operating instructions.
Before you proceed to operate the device, acquaint yourself thoroughly with this manual and
observe the safety regulations and specifications defined by the producer
Any application that differs from those specified in this manual may result in damage to the device
and constitute a source of danger for the user.
Using this manual does not exclude the need to comply with occupational health and safety
regulations and with other relevant fire regulations required during the performance of a particular
type of work. Before starting the work with the device in special environments, e.g. potentially fire-
risk/explosive environment, it is necessary to consult it with the person responsible for health and
safety.
Do not make any electrical contact between the temperature probe sensors and exposed live parts.
It is unacceptable to operate:
it is damaged and completely or partially out of order,
its cords and cables have damaged insulation,
of the device and accessories mechanically damaged,
it was stored for an excessive period of time in disadvantageous conditions (e.g. excessive
humidity) After moving the device from a cool to a warm place with a high level of relative humidity,
do not start measurements until the device is warmed up to the ambient temperature
(approximately 30 minutes).
Remember that symbol appearing on the display indicates insufficient voltage of power
supply and the need to recharge the battery. Measurements performed with the meter supplied with
insufficient voltage are burdened with additional errors that are impossible to be estimated by the
user. Such measurements must not be used to confirm correctness of the tested photovoltaic
installation or network.
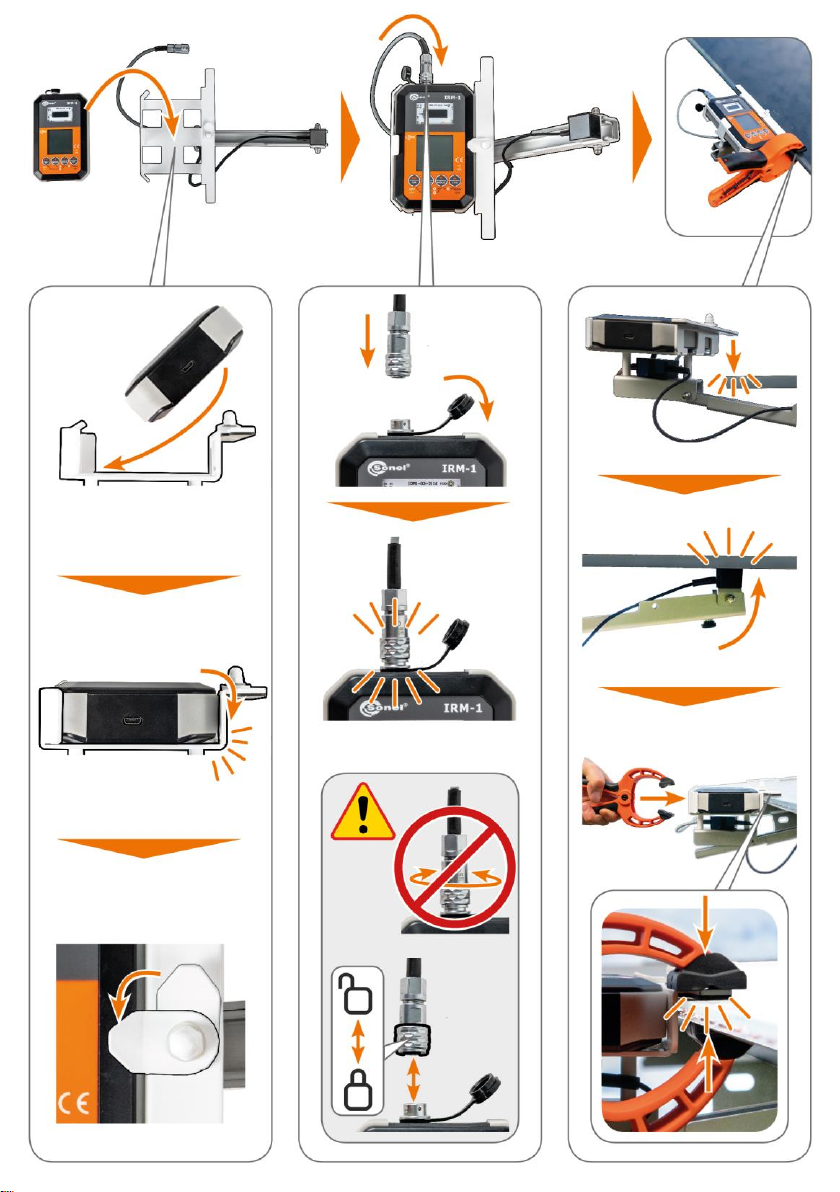
Opening the socket plug of the temperature probe results in the loss of its declared tightness,
leading to a possible damage in adverse weather conditions. It may also expose the user to the risk
of electric shock.
Repairs may be performed only by an authorised service point.
The battery may be replaced only by an authorised service point.
NOTE!
The temperature sensor cannot be installed on damaged surface of the PV module.
Installation on a damaged surface may result in a short circuit to the metal part of the
temperature sensor.
Only accessories intended for a given device should be used, as listed in section 13.
Using other accessories may cause damage to measuring terminals, introduce
additional measurement errors and create a risk for the user.
The included charger is not intended for outdoor use as it is not protected against the
ingress of moisture.

IRM-1 –USER MANUAL
6
Due to continuous development of the meter’s software, the actual appearance of the
display, in case of some of the functions, may slightly differ from the display presented in
this operating manual.
1.2 General characteristics
IRM-1 meter is a device for measuring environmental conditions during measurements of
photovoltaic systems. The very high tightness class of the device (IP65) ensures measurements in
diverse weather conditions.
Measured parameters:
solar irradiance on the surface i.e. the power per unit area received from the sun that reaches
the earth's surface, measured in W2or BTU/ft2h,
air temperature,
temperature of the cell(s) in a photovoltaic module,
inclination of the photovoltaic system in relation to the ground surface,
the geographical direction in which the photovoltaic system is oriented.
The meter is equipped with two sockets:
socket for connecting the temperature probe (without the probe, other functions in the device
work properly),
micro-USB socket (for charging the device and communicating with a PC in order to collect
measurement results).
The meter has a built-in LoRa radio interface for communication with the master device.
IRM-1 is a meter designed for measuring solar irradiance and the temperature of
photovoltaic cells and their environment. The data it provides is necessary to convert the
measured values to the STC conditions. The standardized values enable the user to
determine whether the photovoltaic system is working with optimal efficiency and to check
the PV modules for potential damage.
1.3 Compliance with standards
IRM-1 meets the requirements of the following standards:
Safety standards:
IEC 61010-1 –Safety requirements for electrical equipment for measurement, control, and
laboratory use –Part 1: General requirements.
Standards for electromagnetic compatibility:
IEC 61326-1 –Electrical equipment for measurement, control and laboratory use –EMC
requirements –Part 1: General requirements.
IRM-1 –USER MANUAL
7
2 Quick start
2.1 Turning the meter on and off, display content
The white marks on the buttons refer to the functions that can be activated in the meter. Orange
markings refer to appropriate commands for changing device settings.
Briefly press button to turn on the meter. Press it for a longer time to turn it off (OFF is
displayed).
Briefly press button during the meter operation to see the following indications:
temperature, angle (compass), clock.
2.2 Selection of general measurement parameters
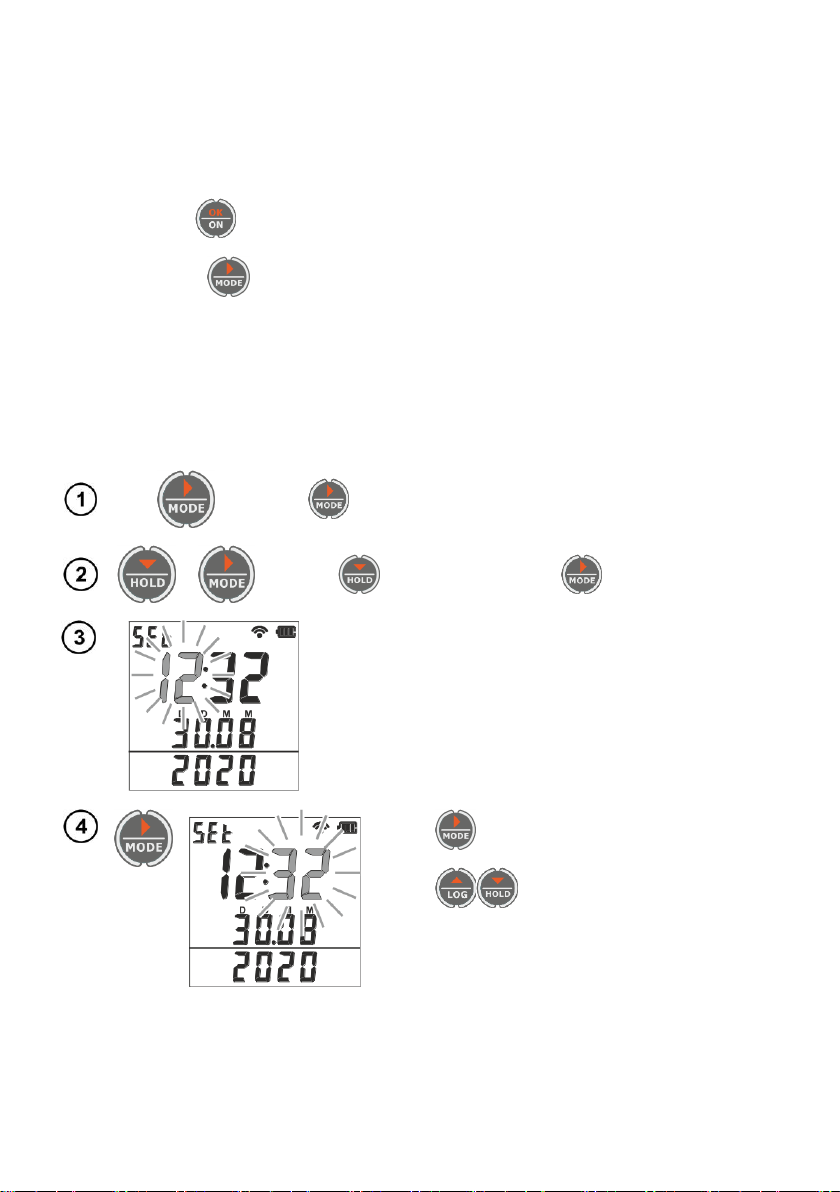
2.2.1 Time and date
Use button to enter the screen with the time and date.
+
Keeping button depressed, press .
The parameter to be changed flashes.
Use button to switch between parameters.
Use buttons to change the setting.
IRM-1 –USER MANUAL
8
Press button to confirm the changes and go to the measurement
function or exit the settings without confirming the changes by
simultaneously pressing and .
If the IRM-1 communicates with the master meter, the master meter changes the IRM-
1 clock settings to synchronize time in both devices.
Do not change time in the IRM-1 when it is synchronized with the master meter.
However, if you change the time, the data in both devices will be desynchronized, and
then the time in the IRM-1 will be corrected by the master meter.
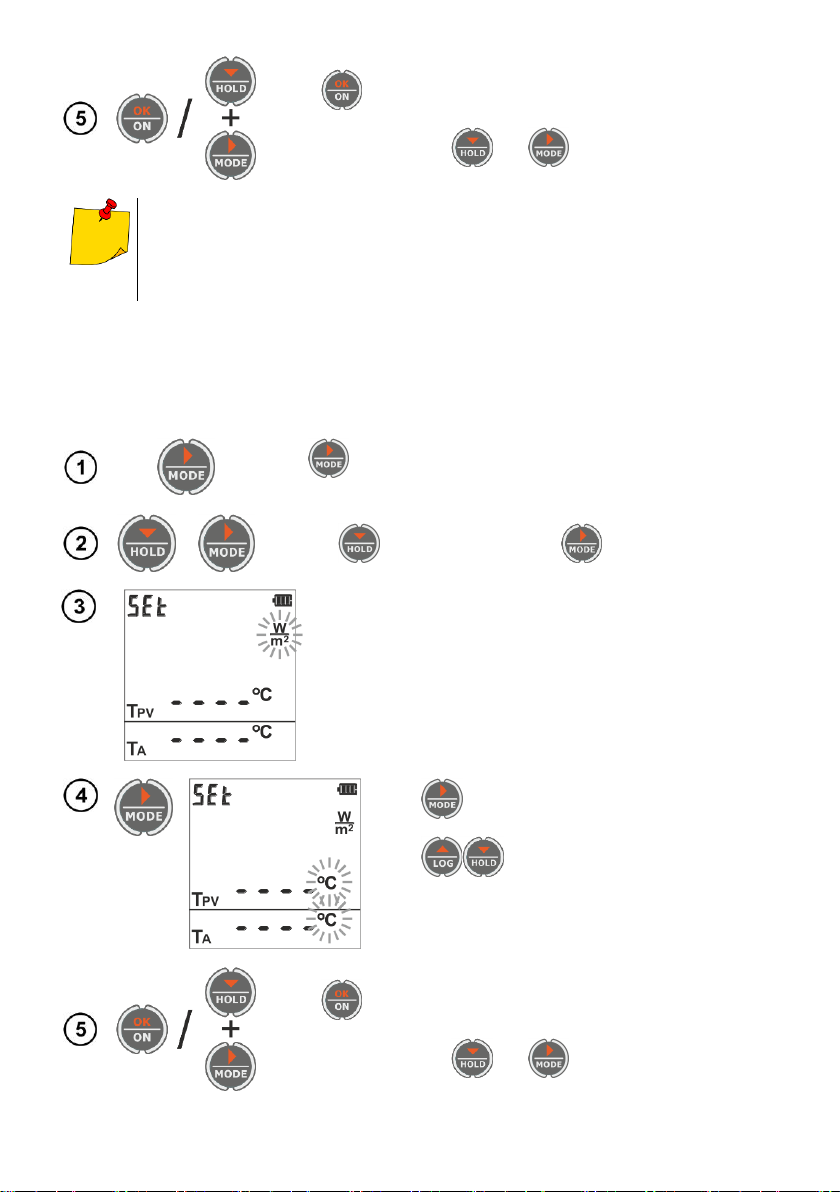
2.2.2 Units of solar irradiance and temperature.
Irradiance measurements may be performed using two units (W/m2and BTU/ft2h) and the results
with selected unit may be saved in the memory. Measurements of ambient temperature and solar cell
(module) temperature may be also carried out in two units (°C and °F) and saved in the memory using
these units.
Use button to enter the screen with solar irradiance
and temperature.
+
Keeping button depressed, press .
The parameter to be changed flashes.
Use button to switch between parameters.
Use buttons to change the setting.
Press button to confirm the changes and go to the measurement
function or exit the settings without confirming the changes by
simultaneously pressing and .
IRM-1 –USER MANUAL
9
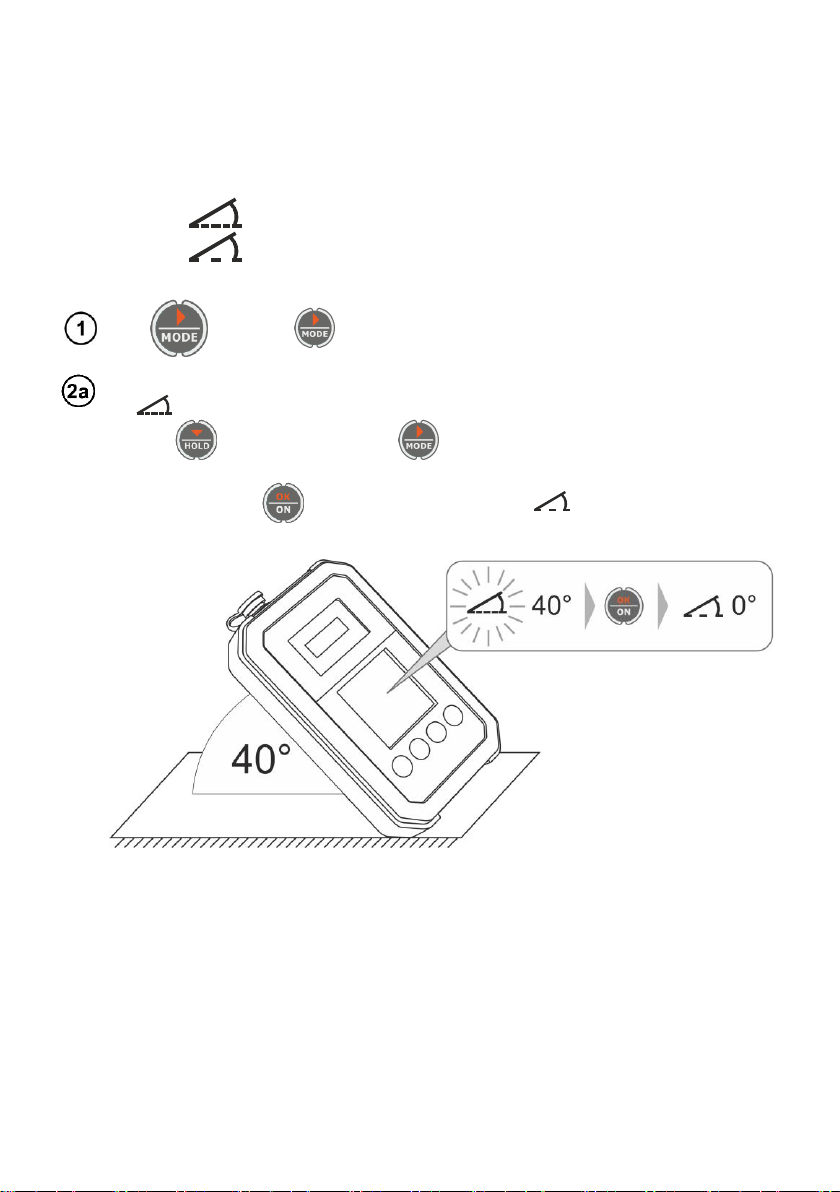
2.2.3 Zeroing the meter inclination angle in relation to the ground
The default position of IRM-1 relative to the ground is parallel, i.e. its inclination angle in relation to
the ground is 0º. The user can change this reference angle. This is useful when you need to specify the
inclination angle in relation to any surface.
The type of the reference angle –default or user –is indicated by relevant icon on the display.
Default reference angle (0º)
User-set reference angle (e.g. 40º)
Use button to enter the screen with solar irradiance and angle.
In order to change the reference angle from the default, make sure you see the default angle
icon on the screen. It procedures are as follows:
keeping button depressed, press ,
set the meter to the new reference angle. Its value will be shown on the display,
confirm by pressing . The angle symbol changes to . From now on, the meter will
determine the inclination using the new reference angle.

IRM-1 –USER MANUAL
10
In order to change the reference angle to the default value (0º), make sure you see the angle
icon on the screen. It procedures are as follows:
keeping button depressed, press ,
the angle of the meter does not matter,
press . The angle symbol changes to . From now on, the meter will determine the
inclination using the default reference angle, i.e. 0º.
2.2.4 Compass calibration
Use button to enter the screen with the meter inclination and its
deviation angle from the north.
+
Keeping button depressed, press .
Use button to go to the compass calibration
screen.

IRM-1 –USER MANUAL
11
Press button to activate the calibration or exit the settings
without confirming the changes by simultaneously pressing and
.
For 3 minutes, move the device in a way that will rotate it in as many directions as possible.
The movement should be performed in each axis of the device.
The compass should be calibrated after noticing significant deviations of its indications
from the real world directions. This can happen in environments, where magnetic
materials are present (magnets, metals, etc.) or where there is a high magnetic field.
During calibration, no peripheral devices may be connected to the IRM-1.
If it is necessary to complete the calibration within 3 minutes, press button.
After leaving the "magnetic" environment, the compass must be recalibrated.
When using the product, you may need to recalibrate the compass. It should be done
in a free space, away from magnetic fields and materials.

IRM-1 –USER MANUAL
12
2.3 Pairing with a master meter
Turn on the meter.
+
Keeping HOLD button depressed, press OK.
The device is in pairing mode.
Perform pairing on the master meter.
Successful pairing is indicated by a message. Then, the device
returns to displaying the measurement readings.
The IRM-1 may be paired with up to 3 master meters. Each subsequent pairing will
delete the oldest pairing with a master meter from the memory.
Once paired with a master meter, the IRM-1 will remember it. When the device comes
within the range of the paired master meter, which sends a connection request, the
connection will be made automatically.

IRM-1 –USER MANUAL
13
3 Measurements
3.1 Live mode
Use button to switch between screens. The display is
done in a loop.
Main reading –solar irradiance value
TPV –temperature of the tested object
TA–air temperature
Main reading –solar irradiance value
/ –inclination of the meter in relation to the
reference angle. See sec. 3.3
–angle of deviation from the north. See sec. 3.4
Main reading –hour
DDMM –current date (day –month –year)
The cell is protected by a special glass that transmits the spectrum of solar radiation in
the measured range. In order to maintain the accuracy of the measurement, the
protective glass should be kept clean.
3.2 HOLD mode
This function is used to 'freeze' the measurement result on the display. To do this, shortly press
button. When the function is enabled, the display shows symbol H .
To return to the normal operation mode of the device, press button again.

IRM-1 –USER MANUAL
14
3.3 Inclination in relation to the ground
The inclination value changes as shown in the figure below.
3.4 Geographical direction
The geographical direction is indicated as an angle in the range of 0°… 359°. North (in the northern
hemisphere) or south (in the southern hemisphere) is indicated when the angle is 0°. Angle rise –
clockwise.
IRM-1 –USER MANUAL
15
4 Recorder
The recorder allows you to save one or more records, i.e. sets of measurement records. The
maximum cumulative number of records in the memory is 5000. The lowest number of records is
1 record, which means that you can record up to 5000 single records.
You can enable and disable recordings in the recorder. Each recording has its own unique tag.
This allows unambiguous assignment of records to the recording data. This solution prevents confusing
records from different recordings after transferring them to the computer
The recorder memory may work in one of two modes: linear or circular. In the linear mode, the
memory is full until the last cell is used, then recording is stopped. In the circular mode, recording
continues until the battery is discharged or until the device is turned off by the user. The results are
saved in a loop, i.e. after the memory is full, the oldest records are overwritten with the newest ones.
The last 5000 records are stored. Recording is made at the preset interval.
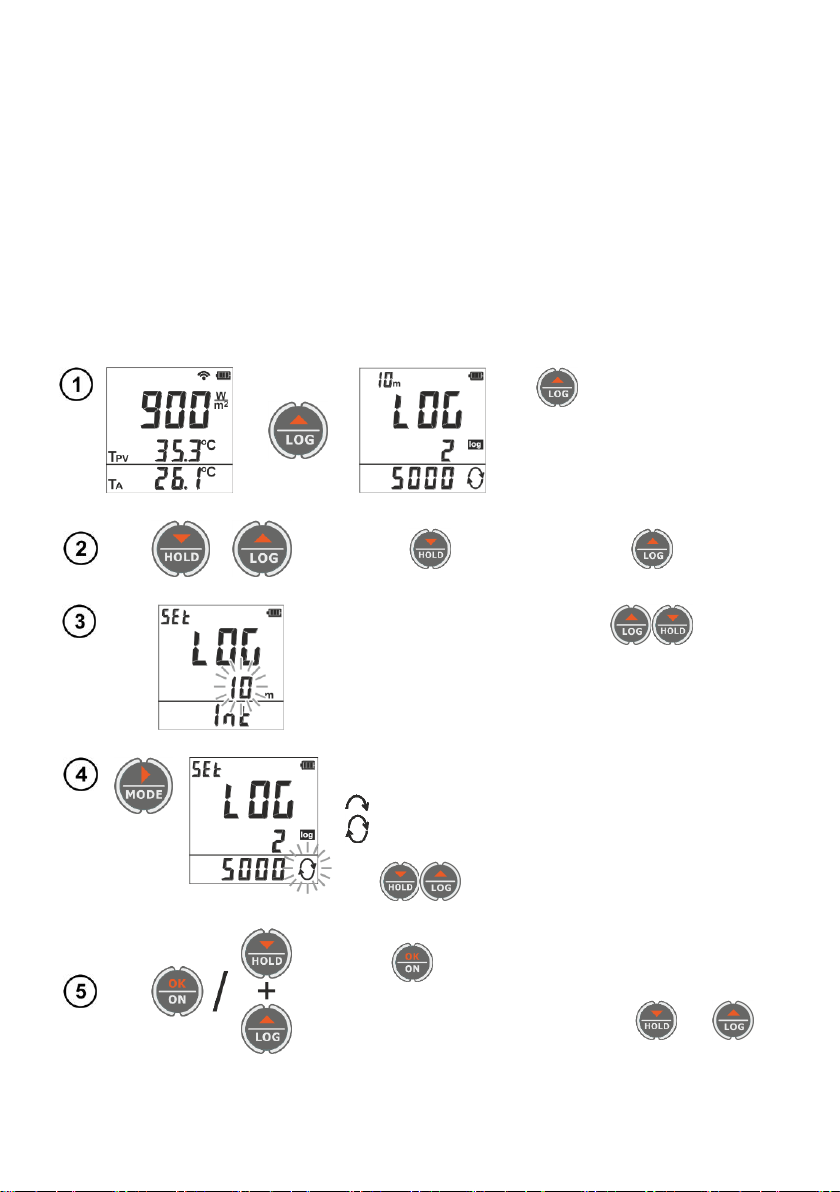
4.1 Setting the recording interval and memory mode
►►
Press button to turn on the
recorder.
+
Keeping button depressed, press .
Changing the recording interval. Use buttons to
change the setting (1… 59 s, then 1… 30 min).
Changing the memory mode.
–line mode
–circular mode
Use buttons to change the setting.
Press button to confirm the changes and go to the
measurement function or exit the settings without confirming
the changes by simultaneously pressing and .

IRM-1 –USER MANUAL
16
4.2 Recording
Press button to turn on the recorder. The screen
displays the following:
interval (here: 10 m[inutes]),
number of saved records (here: 1 record),
number of free memory cells (4900) saved in the line mode
().
Press to activate recording.
You will hear a short beep. The LOG will start flashing, the
recording number will increase by 1. Short presses on the
buttons will not cause any reaction. The screen will go blank
after 10 seconds.
The LOG message will be displayed for 0.5 s every 10 seconds.
To temporarily activate the main screen of the
recorder, briefly press any button.
/ / /
▼
2 s
To disable recording:
briefly press any button to activate the main
screen of the recorder,
press and hold . You will hear 3 beeps.
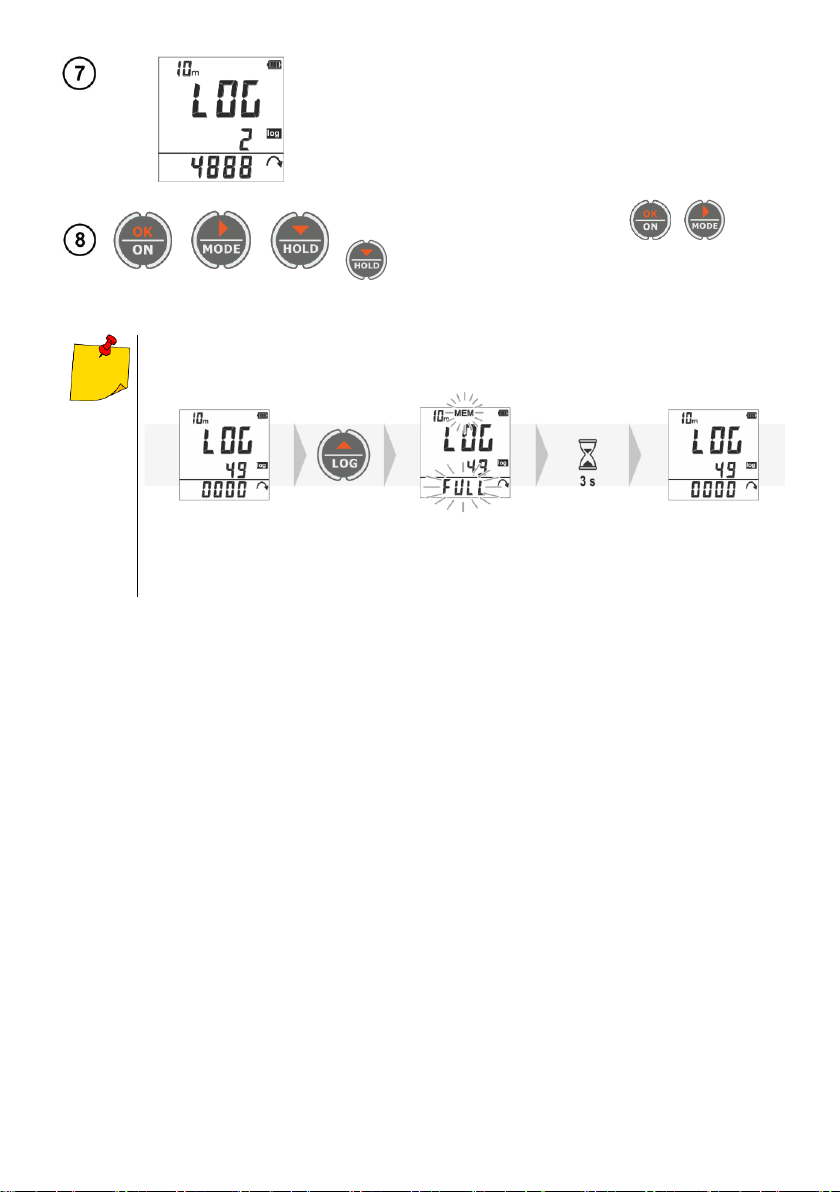
IRM-1 –USER MANUAL
17
The recorder is ready for the next recording.
/ /
To exit the recorder mode, press briefly , or
when no recording is taking place,
If the memory of the meter is full, the attempt to start recording will end with FULL
message, and the recording will not start.
In this case, you should do one of two things:
switch the memory mode from linear to circular,
clear the memory as described in sec. 5.3.2.
5 Memory of measurement results
The meter is equipped with three independent memories:
user measurement memory –999 records,
recorder memory –5000 records,
temporary memory –1200 records.
The memory with the measurement results is not erased after the meter is turned off. Results from
the user memory and recorder can be transferred to a computer via USB.
Each record has a time stamp and all the values measured during the recording i.e. solar
irradiance, air temperature TA, temperature of the photovoltaic cell TPV, angle of inclination to the
reference surface, geographical direction. The measurement results are stored with the measurement
unit set at the recording time, i.e. if the solar irradiance was measured in W/m2, then the result value
will be saved in W/m2. The information about the set measuring unit is included in the record.
User measurement memory can be viewed directly on the IRM-1. You can save it, view it, delete it.
The recorder memory cannot be viewed in the IRM-1 device. It can only be deleted.
The temporary memory is not available to the user. It activates when the IRM-1 is communicating
with the master meter and the connection is lost. Then, the internal recording of measurements is
activated with an interval of 1 second. The results are saved in a loop, i.e. after the memory is full, the
oldest records are overwritten with the newest ones. Due to the size of the memory, the records of the
last 20 minutes of are saved in this mode.
After restoring the connection with the master meter, the IRM-1 shares the temporary memory with
the master meter to supplement the missing data on environmental parameters.
IRM-1 –USER MANUAL
18
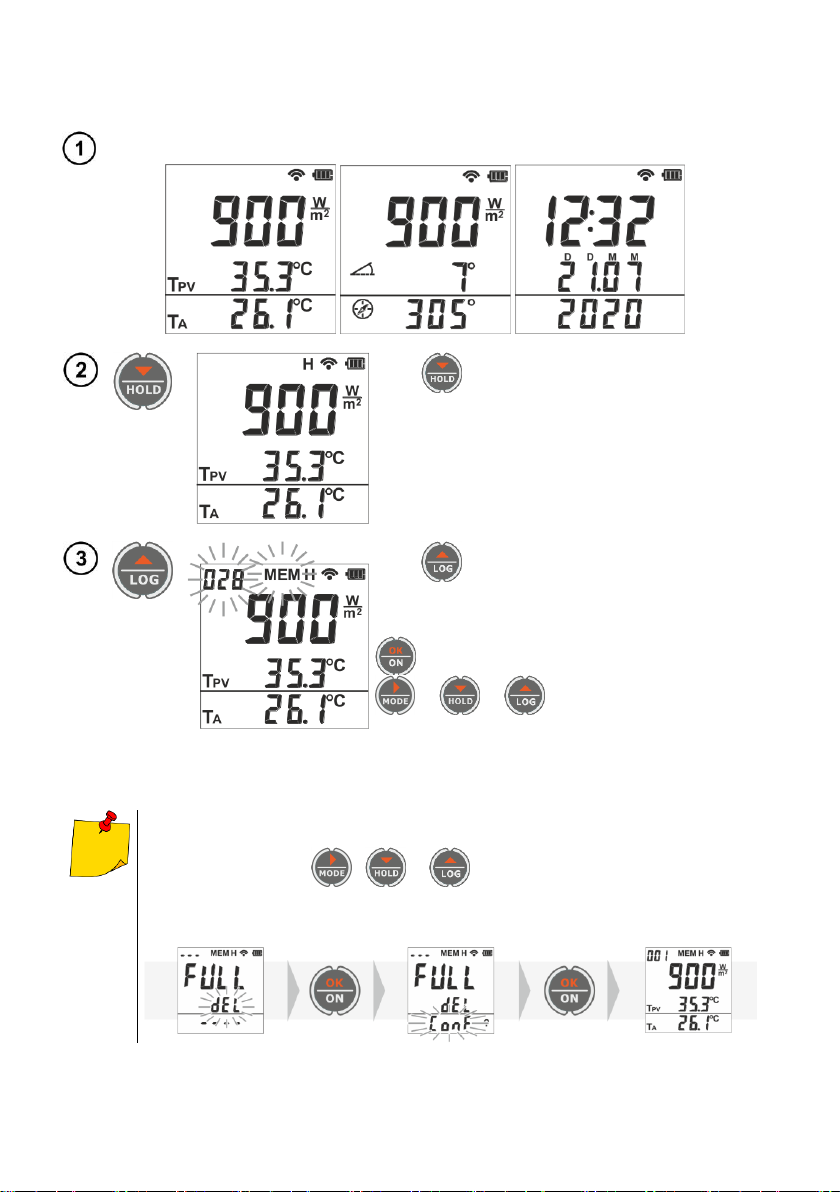
5.1 Recording measurement results in the memory of the user
The device is in the solar irradiance measurement mode.
Press . Hsymbol is displayed on the screen.
Press . The device shows the screen with saving
the result to the user memory. The cell number under
which the result will be saved is blinking.
–saving the result to the user's memory
/ / –return to the measurement
screen without saving the result
If the memory is full, the meter will ask for erasing it before saving. This request must be
accepted or rejected.
If it is rejected, press , or .
If it is accepted, proceed as described below. After erasing the memory, the result is
saved in the cell number 1.
Table of contents
Other Sonel Measuring Instrument manuals

Sonel
Sonel MIC-10k1 User manual

Sonel
Sonel WMGBCMP3kR User manual

Sonel
Sonel MRU-120HD User manual

Sonel
Sonel CMP-3000 User manual

Sonel
Sonel CMP-200 User manual

Sonel
Sonel CMP-200F User manual

Sonel
Sonel MRU-30 User manual

Sonel
Sonel MZC-304 User manual

Sonel
Sonel CMP-1010 User manual

Sonel
Sonel CMP-1015-PV User manual

Sonel
Sonel PQM-700 User manual

Sonel
Sonel PQM-702 User manual

Sonel
Sonel CMP-400 User manual

Sonel
Sonel MPI-536 User manual

Sonel
Sonel MIC-5010 User manual

Sonel
Sonel MPI-506 User manual

Sonel
Sonel MIC-10k1 User manual

Sonel
Sonel MIC-5001 User manual

Sonel
Sonel PQM-707 User manual

Sonel
Sonel MIC-05s1 User manual


