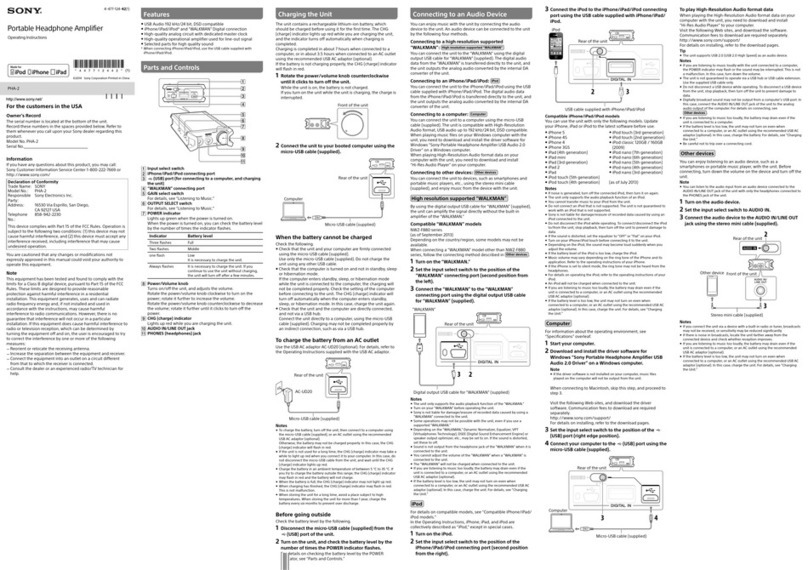
Sony PHA-3 Guide

English
1Charging the unit
ʓRotate the power/volume knob counterclockwise until it clicks
to turn off the unit.
The battery charges only when the unit is off. Rotate the power/
volume knob clockwise to turn on the unit. Rotate it more to adjust the
volume.
Front of the unit
ʔBoot your computer,then connect it to the unit using the
micro-USB cable (supplied).
POWER CHG (charge) indicator lights up in red.
Charging is completed in about 15 hours, or in about 6 hours when
connected to an AC outlet using the recommended USB AC adaptor
AC-UD20 (sold separately).The indicator turns off when the battery is
completely charged.
If the battery is not charging properly, the POWER CHG (charge)
indicator flashes in red.
Note
The charge will continue for about 10 hours, then the timer function of
the charge protection circuit will stop the charging. If you want to
continue charging, disconnect and reconnect the micro-USB cable.
Rear of the unit Computer
Micro-USB cable
(supplied)
Front of the unit
To charge the battery from an AC outlet
Use the USB AC adaptor AC-UD20 (sold separately). For details, refer
to the operating instructions supplied with the USB AC adaptor. AC-UD20
Micro-USB cable (supplied)
Rear of the unit
2Turn on the connecting audio device
Computer : When connecting the unit to a computer, install
the driver software and player.
(For Mac, there is no need to install a driver.)
ŞDownload and install the driver software for Windows “Sony USB
Device Driver” onto a Windows computer.
ŞWhen playing High-Resolution Audio format data on your computer
with the unit, install “Hi-Res Audio Player.”
To download the driver software and “Hi-Res Audio
Player”
Visit the following website, and download the driver software.
http://www.sony.com/support/
For details on installing, refer to the website.
The unit needs to be connected to your Windows computer at a
certain point while installing the driver software.
In this case, connect the Windows computer to the Xperia/
WALKMAN/PC (USB AUDIO) connecting port of the unit using the
micro-USB cable (supplied).
For details concerning connection,refer to the illustration of“Digital
output supported WALKMAN®/Xperia, Computer” in step 3.
3Set the INPUT switch on the unit and connect the audio device to the unit
Select the port position of the connecting audio device from among
the four types input ports with the INPUT switch.
Digital output supported WALKMAN®/Xperia, Computer
WALKMAN®: Digital cable for WALKMAN® (supplied)
Xperia: Digital cable for Xperia (supplied)
Computer: Micro-USB cable (supplied: shared with
charging cable)
Rear of the unit
WALKMAN®
Xperia
Left edge
position Computer
iPhone/iPad/iPod
USB cable supplied with iPhone/iPad/iPod
Rear of the unit
iPhone
iPad
iPod
Second
position from
the left
Optical output jack supported device
Rear of the unit
Digital optical cable (optional)
For example,
a PCM recorder
Second
position from
the right
Other devices
Rear of the unit
Stereo mini cable (supplied)
Right edge
position
Right edge
position
Other devices
Be sure to connect the headphones to the
(headphones) NORMAL jack on the
front of the unit.
In this case, the balanced connection is
not available.
4Listening to music with the headphones
To listen to music with a device such as an active speaker,connected to
the AUDIO IN/LINE OUT jack, refer to the Help Guide.
ʓConnect the headphones to the unit.
The sound of the AUDIO IN/LINE OUT (analog input) is not output from
the (headphones) BALANCED L/R jack. Make sure to connect
standard stereo headphones to the (headphones) NORMAL jack.
If you connect the headphones which has the L-shaped stereo mini
plug to the (headphones) NORMAL jack, position it so that its cable is
on the right side of the jack, avoiding the ridge on the left of the jack,
and ensure the plug is fully inserted.
To connect the headphones that support
balanced connection
To connect the headphones with a standard 3-pole
stereo mini plug
Front of the unit
Plug L Plug R
ʔSet the OUTPUT switch to “”.
Rear of the unit
ʕRotate the power/volume knob clockwise to turn on the unit.
Notes
In the following cases, the relay in the internal circuit will make a
sound.
ŞWhen the unit is turned on
ŞWhen the OUTPUT switch is moved
ŞWhen the INPUT switch is moved to/from the position of the AUDIO
IN/LINE OUT jack (right edge position)
Front of the unit
ʖPlay back the connected audio device.
When playing High-Resolution Audio format data on your computer
with the unit, use “Hi-Res Audio Player.”
For details on installing “Hi-Res Audio Player,” visit the following site at
http://www.sony.com/support/
Hi-Fs (High Sampling Frequency) indicator
The indicator lights up when the unit is being input with;
Şthe linear PCM digital signal of sampling frequencies above 48
kHz
Şthe DSD digital signal of the High-Resolution Audio format
DSD indicator
The indicator lights up when the unit is being input with the DSD
signal of the High-Resolution Audio format.
Front of the unit
ʗAdjust the volume.
Adjust the volume by the power/volume knob. Depending on the
headphones, the volume may remain low, even if you turn the knob to
the maximum setting.
When using balanced connection with headphones that have low
impedance (less than 16 ohms), the limiter prevents excessive output,
which may cause the sound to be cut off.
In this case, turn down the volume of the unit.
ŞWhen the volume is low: turn off the unit, set the GAIN select switch
to HIGH, then turn on the unit. In normal use, the setting should be
NORMAL.
ŞAbout DSEE HX: If you set the DSEE HX switch to ON, compressed file
sources such as MP3 are upgrade to a high resolution than CDs and
provide a dynamic sound.
The DSEE HX is not activated in the following cases;
Şwhen inputting optical
Şwhen inputting analog
Şwhen inputting linear PCM digital of sampling frequencies more than
88.2 kHz
Şwhen inputting DSD digital
Front of the unit
Side of the unit
After using the unit
Rotate the power/volume knob counterclockwise until it clicks to turn off the
unit.
Front of the unit
For details on how to use the silicon belt and the protection sheet, refer to the Help Guide.
Français
1Mise en charge de l’appareil
ʓTournez le bouton d’alimentation/de volume dans le sens
contraire des aiguilles d’une montre jusqu’au déclic pour
éteindre l’appareil.
La batterie se charge uniquement lorsque l’appareil est éteint. Tournez
le bouton d’alimentation/de volume dans le sens des aiguilles d’une
montre pour allumer l’appareil.Tournez-le davantage pour régler le
volume.
Avant de l’appareil
ʔDémarrez votre ordinateur, puis raccordez-le à l’appareil en
utilisant le câble micro-USB (fourni).
Le témoin POWER CHG (charge) s’allume en rouge.
La charge complète prend environ 15heures ou environ 6heures lors
du raccordement à une priseCA à l’aide de l’adaptateur CA USB
AC-UD20 (vendu séparément) recommandé. Le témoin s’éteint lorsque
la charge de la batterie est terminée.
Si la batterie n’est pas chargée correctement, le témoin POWER CHG
(charge) clignotera en rouge.
Remarque
La charge de l’appareil continuera pendant environ 10 heures,puis la
minuterie coupe-courant du circuit de protection de charge
interrompra la charge.Débranchez puis raccordez le câble micro-USB si
vous souhaitez poursuivre la charge.
Arrière de l’appareil Ordinateur
Câble micro-USB
(fourni)
Avant de l’appareil
Pour charger la batterie à partir d’une priseCA
Utilisez l’adaptateur CA USB AC-UD20 (vendu séparément).Pour plus
de détails, reportez-vous au mode d’emploi fourni avec
l’adaptateurCA USB.
AC-UD20
Câble micro-USB (fourni)
Arrière de l’appareil
2Allumez le périphérique audio raccordé
Ordinateur : Installez le pilote logiciel et le lecteur lors du
raccordement de l’appareil à l’ordinateur.
(Pour un ordinateur Mac,aucun pilote n’est requis.)
ŞTéléchargez et installez le pilote logiciel pour Windows«Sony USB
Device Driver» sur un ordinateur Windows.
ŞLors de la lecture de données au format audio haute résolution sur
votre ordinateur avec l’appareil, installez «Hi-Res Audio Player».
Téléchargement du pilote logiciel et de «Hi-Res Audio
Player»
Visitez le siteWeb suivant et téléchargez le pilote logiciel.
http://www.sony.com/support/
Pour plus de détails sur l’installation, reportez-vous au siteWeb.
L’appareil doit être raccordé à votre ordinateur Windows à un certain
moment pendant l’installation du pilote logiciel.
Dans ce cas, raccordez l’ordinateur Windows au port de raccordement
pour Xperia/WALKMAN/PC (USB AUDIO) de l’appareil à l’aide du
câble micro-USB (fourni).
Pour plus de détails sur le raccordement, reportez-vous à l’illustration
de «WALKMAN®/Xperia, ordinateur avec prise en charge de sortie
numérique »à l’étape 3.
3Réglez le sélecteur INPUT de l’appareil et raccordez le périphérique audio
Sélectionnez la position du port du périphérique audio raccordé parmi
les quatre types de ports d’entrée avec le sélecteur INPUT.
WALKMAN
®
/Xperia, ordinateur avec prise en charge de sortie numérique
WALKMAN®: Câble numérique pour WALKMAN® (fourni)
Xperia: Câble numérique pour Xperia (fourni)
Ordinateur: Câble micro-USB (fourni: partagé avec le
câble de charge)
Arrière de l’appareil
WALKMAN®
Xperia
Première
position
à gauche
Ordinateur
iPhone/iPad/iPod
Câble USB fourni avec le iPhone/iPad/iPod
Arrière de l’appareil
iPhone
iPad
iPod
Deuxième
position à partir
de la gauche
Portable Headphone Amplifier
PHA-3
Start Guide
Guide de prise en main
Guía de inicio
4-547-087-13(1)
©2014 Sony Corporation
Printed in China
Manuals supplied/Manuels fournis/Manuales suministrados
The 3 following manuals are included./Les 3manuels suivants sont compris./Se incluyen los 3 manuales que aparecen a continuación.
Start Guide (this document)
Provides you with instructions on how to connect the unit with
devices and basic operations.
Guide de prise en main (le présent document)
Le guide présente les instructions de connexion de l’appareil avec
des périphériques et son fonctionnement de base.
Guía de inicio (este documento)
Brinda información sobre cómo conectar la unidad con dispositivos
y otras operaciones básicas.
Reference Guide (exhibit document)
Provides you with precautions and product specifications.
Guide de référence (document en annexe)
Le guide indique les précautions à respecter et décrit les
spécifications du produit.
Guía de referencia (documento anexo)
Le proporciona precauciones y especificaciones del producto.
Help Guide (Operating Instructions)
Read the Help Guide on your computer or smartphone, when you
want to know how to use the unit in greater detail.The Help Guide
also contains a troubleshooting guide which provides you with
remedies for the problems you might encounter.
Manuel d’aide (Mode d’emploi)
Lisez le Manuel d’aide sur votre ordinateur ou téléphone intelligent
lorsque vous souhaitez davantage de renseignements concernant
l’utilisation de l’appareil.Le Manuel d’aide dispose également d’un
guide de dépannage vous offrant des solutions aux problèmes
éventuels rencontrés.
Guía de Ayuda (Manual de instrucciones)
Lea la Guía de Ayuda en su equipo o smartphone cuando desee
saber cómo usar la unidad más detalladamente. La Guía de Ayuda
también contiene una guía de resolución de problemas que le
proporciona recursos para los problemas que puede encontrar.
URL:
http://rd1.sony.net/help/mdr/pha-3/h_uc/
Two-dimensional code:
Code bidimensionnel:
Código bidimensional:

Périphérique doté d’une prise de sortie optique
Arrière de l’appareil
Câble numérique optique (en option)
Par exemple,
enregistreur PCM
Deuxième
position à
partir de la
droite
Autres périphériques
Arrière de l’appareil
Mini-câble stéréo (fourni)
Première position
à droite
Première position
à droite
Autres
périphériques
Assurez-vous de bien avoir raccordé le
casque d’écoute à la prise (casque
d’écoute) NORMAL à l’avant de l’appareil.
En pareil cas, les connexions équilibrées
ne sont pas disponibles.
4Écoute de la musique avec le casque d’écoute
Pour écouter de la musique avec un périphérique, tel qu’une enceinte
active, raccordé à la prise AUDIO IN/LINE OUT, reportez-vous au Manuel
d’aide.
ʓRaccordez le casque d’écoute à l’appareil.
Le son de AUDIO IN/LINE OUT (entrée analogique) n’est pas émis par la
prise (casque d’écoute) BALANCED L/R.Assurez-vous de raccorder
un casque d’écoute stéréo standard à la prise (casque d’écoute)
NORMAL.
Si vous raccordez un casque d’écoute muni d’une mini-fiche stéréo en
L à la prise (casque d’écoute) NORMAL,placez-la de manière à ce
que le câble soit sur le côté droit de la prise,en évitant la pièce en
saillie à gauche de la prise, puis assurez-vous que la fiche est
complètement insérée.
Pour raccorder un casque d’écoute pour
les connexions équilibrées
Pour raccorder un casque d’écoute avec une mini-fiche
stéréo à 3pôles normale
Avant de l’appareil
PriseL PriseR
ʔRéglez le sélecteur OUTPUT à «».
Arrière de l’appareil
ʕTournez le bouton d’alimentation/de volume dans le sens des
aiguilles d’une montre pour allumer l’appareil.
Remarques
Dans les cas suivants, le relais du circuit interne émettra un son.
ŞLorsque vous allumez l’appareil
ŞLorsque vous déplacez le sélecteur OUTPUT
ŞLorsque vous déplacez le sélecteur INPUT vers/depuis la position de
la prise AUDIO IN/LINE OUT (première position à droite)
Avant de l’appareil
ʖReproduisez la musique avec le périphérique audio raccordé.
Lors de la lecture de données au format audio haute résolution sur
votre ordinateur avec l’appareil, utilisez «Hi-Res Audio Player».
Pour plus de détails sur l’installation de«Hi-Res Audio Player», visitez
le site Web suivant
http://www.sony.com/support/
Témoin Hi-Fs (fréquence d’échantillonnage élevée)
Le témoin s’allume lorsque l’appareil reçoit en entrée :
Şun signal numérique PCM linéaire avec fréquences
d’échantillonnage supérieures à 48 kHz
Şun signal numérique DSD au format audio haute résolution
Témoin DSD
Le témoin s’allume lorsque l’appareil reçoit en entrée un signal DSD
au format audio haute résolution.
Avant de l’appareil
ʗRéglez le volume.
Réglez le volume à l’aide du bouton d’alimentation/de volume.Selon
le casque d’écoute utilisé, le volume peut demeurer faible même si
vous tournez le bouton à la valeur maximale.
Lors de l’utilisation d’une connexion équilibrée avec un casque
d’écoute dont l’impédance est faible (inférieure à 16ohms), le limiteur
prévient les niveaux de sortie excessifs,qui pourraient entraîner une
interruption du son.
En pareil cas, réduisez le volume de l’appareil.
ŞLorsque le volume est faible: Éteignez l’appareil,réglez le sélecteur
GAIN à HIGH, puis allumez l’appareil. Lors d’une utilisation normale,
le sélecteur devrait être réglé à NORMAL.
ŞÀ propos de DSEE HX: Les sources avec fichiers compressés comme
les MP3 passent à une résolution plus élevée que les CD et offrent un
son dynamique quand le sélecteur DSEE HX est à ON.
La fonction DSEE HX n’est pas activée dans les cas suivants:
Şlors de l’utilisation de signaux d’entrée optiques
Şlors de l’utilisation de signaux d’entrée analogiques
Şlors de l’utilisation de signaux d’entrée numériques PCM linéaires
dont les fréquences d’échantillonnage sont supérieures à 88,2 kHz
Şlors de l’utilisation de signaux d’entrée numériques DSD
Avant de l’appareil
Côté de l’appareil
Après l’utilisation de l’appareil
Tournez le bouton d’alimentation/de volume dans le sens contraire des aiguilles
d’une montre jusqu’au déclic pour éteindre l’appareil.
Avant de l’appareil
Pour plus de détails sur l’utilisation de la courroie en silicone et la feuille de protection,reportez-vous au Manuel d’aide.
Español
1Carga de la unidad
ʓGire la perilla de encendido/volumen en el sentido contrario
de las agujas del reloj para apagar la unidad.
La batería se carga solamente cuando la unidad se encuentra apagada.
Gire la perilla de encendido/volumen en el sentido de las agujas del
reloj para encender la unidad. Gírelo más para ajustar el volumen.
Parte frontal de la unidad
ʔInicie su equipo, luego conéctelo a la unidad con el cable
micro USB (suministrado).
El indicador de POWER CHG (carga) se enciende en rojo.
La carga se completa en aproximadamente 15 horas; o cuando se
conecta a una salida de CA con el adaptador CA USB AC-UD20
recomendado (se vende por separado) se completa en
aproximadamente 6 horas.El indicador se apaga cuando la batería
está completamente cargada.
Si la batería no se carga de manera adecuada,el indicador de POWER
CHG (carga) parpadeará en rojo.
Nota
La carga continuará aproximadamente durante 10 horas.Luego, la
función de temporizador del circuito de protección de carga detendrá
la carga del dispositivo. Si desea continuar la carga, desconecte y
vuelva a conectar el cable micro USB.
Parte posterior de la unidad Equipo
Cable micro USB
(suministrado)
Parte frontal de la unidad
Para cargar la batería desde una salida de CA
Utilice el adaptador CA USB AC-UD20 (se vende por separado). Para
obtener más información, consulte el manual de instrucciones
suministrado con el adaptador CA USB.
AC-UD20
Cable micro USB (suministrado)
Parte posterior de la unidad
2Encienda el dispositivo de audio conectado
Equipo : cuando se conecta la unidad a un equipo,instale
el software del controlador y el reproductor.
(Para Mac,no es necesario instalar un controlador.)
ŞDescargue e instale el software del controlador para Windows “Sony
USB Device Driver” en un equipo con Windows.
ŞCuando reproduce datos con formato de audio de alta definición en
su equipo con la unidad, instale“Hi-Res Audio Player”.
Para descargar el software del controlador y “Hi-Res
Audio Player”
Visite el siguiente sitio web y descargue el software del controlador.
http://www.sony.com/support/
Para obtener más información acerca de la instalación, consulte el
sitio web.
La unidad necesita estar conectada a su computadora con Windows
en algún punto de la instalación del software del controlador.
En este caso, conecte la computadora con Windows al puerto de
conexión Xperia/WALKMAN/PC (USB AUDIO) de la unidad con el
cable micro USB (suministrado).
Para obtener más detalles sobre la conexión, consulte la ilustración
“Equipo con salida digital compatible WALKMAN®/Xperia”en el paso
3.
3Configure el interruptor INPUT en la unidad y conecte el dispositivo de audio a la unidad
Seleccione la posición del puerto del dispositivo de audio de conexión
entre los cuatro puertos de entrada con el interruptor INPUT.
Equipo con salida digital compatible WALKMAN®/Xperia
WALKMAN®: cable digital para WALKMAN® (suministrado)
Xperia: cable digital para Xperia (suministrado)
Equipo: cable micro USB (suministrado: compartido con la
carga del cable)
Parte posterior de la unidad
WALKMAN®
Xperia
Posición
al borde
izquierdo
Equipo
iPhone/iPad/iPod
Cable USB suministrado por iPhone/iPad/iPod
Parte posterior de la unidad
iPhone
iPad
iPod
Segunda
posición de la
izquierda
Dispositivo compatible con la toma óptica
Parte posterior de la unidad
Cable óptico digital (opcional)
Por ejemplo,
un grabador
PCM
Segunda
posición de
la derecha
Otros dispositivos
Parte posterior de la unidad
Mini cable estéreo (suministrado)
Posición al borde
derecho
Posición al borde
derecho
Otros
dispositivos
Asegúrese de conectar los auriculares a la
toma (auriculares) NORMAL en la parte
delantera de la unidad.
En este caso, la opción conexión
balanceada no se encuentra disponible.
4Escuchar música con los auriculares
Para escuchar música con un dispositivo como un altavoz activo
conectado a la toma AUDIO IN/LINE OUT,consulte la Guía de Ayuda.
ʓConecte los auriculares a la unidad.
El sonido de AUDIO IN/LINE OUT (entrada analógica) no se emite desde
la toma BALANCED L/R de (auriculares). Asegúrese de conectar los
auriculares estéreo estándar a la toma NORMAL de (auriculares).
Si conecta los auriculares que contienen la miniclavija estéreo en forma
de L a la toma NORMAL de (auriculares), colóquelos de manera que
el cable se encuentre del lado derecho de la toma para evitar que el
pliegue quede del lado izquierdo de la toma, y asegúrese de que la
clavija se introduzca completamente.
Para conectar los auriculares que admiten
la conexión balanceada
Para conectar los auriculares con un mini enchufe
estéreo de 3 polos estándar
Parte frontal de la unidad
Enchufe L Enchufe R
ʔConfigure el interruptor OUTPUT en “”.
Parte posterior de la unidad
ʕGire la perilla de encendido/volumen en el sentido de las
agujas del reloj para encender la unidad.
Notas
En los siguientes casos, el relé en el circuito interno emitirá un sonido.
ŞCuando la unidad se encuentra encendida
ŞCuando se mueve el interruptor OUTPUT
ŞCuando se cambia la posición del interruptor INPUT o se mueve a la
posición del conector AUDIO IN/LINE OUT (posición al borde derecho)
Parte frontal de la unidad
ʖReproduzca el dispositivo de audio conectado.
Cuando reproduce datos con formato de audio de alta definición en su
equipo con la unidad, utilice“Hi-Res Audio Player”.
Para obtener información sobre la instalación de “Hi-Res Audio Player”,
visite el siguiente sitio en
http://www.sony.com/support/
Indicador Hi-Fs (Frecuencia de muestreo alta)
El indicador se ilumina cuando hay una entrada de sonido a la
unidad con lo siguiente:
Şla señal digital lineal PCM de frecuencias de muestreo superiores
a 48 kHz;
Şla señal digital de modulación DSD con el formato de audio de
alta definición.
Indicador DSD
El indicador se ilumina cuando hay una entrada de sonido a la
unidad con la señal DSD del formato de audio de alta definición.
Parte frontal de la unidad
ʗAjuste el volumen.
Ajuste el volumen con la perilla de encendido/volumen. Según los
auriculares, puede que el volumen permanezca bajo, incluso si
aumenta la perilla al máximo.
Al utilizar una conexión balanceada con auriculares de baja impedancia
(menor a 16 ohms), el limitador previene la salida excesiva, lo que
puede causar que el sonido se corte.
En tal caso, disminuya el volumen de la unidad.
ŞCuando el volumen es bajo: apague la unidad, configure el
interruptor de selección GAIN en HIGH y luego encienda la unidad.
Durante el uso normal, debe ajustarse en NORMAL.
ŞAcerca de DSEE HX: Si configura el interruptor DSEE HX a ON, las
fuentes de archivos comprimidos como MP3 se actualizan a una
resolución alta que los CDs y proporcionan un sonido dinámico.
El DSEE HX no se activa en los siguientes casos:
Şal utilizar una entrada óptica
Şal utilizar una entrada analógica
Şal utilizar una entrada de audio digital PCM lineal de frecuencias de
muestreo superiores a 88,2 kHz
Şal utilizar DSD digital
Parte frontal de la unidad
Parte lateral de la unidad
Después de usar la unidad
Gire la perilla de encendido/volumen en el sentido contrario de las agujas del
reloj para apagar la unidad.
Parte frontal de la unidad
Para obtener más detalles sobre cómo utilizar el cinturón de silicona y la lámina protectora, consulte la Guía de Ayuda.

SONY.
Portable
Headphone
Amplifier
Amplificateur
portatif
pour
casque
d'ecoute
Amplificador
portatil
de
auriculares
4-547-088-11(2)
Reference
Guide
Guide
de
reference
Guia de referenda
©
2014
Sony
Corporation
Printed
in
Ch
i
na
htlp://www.sony.neV 11
11111111111111111111111111
1
1111111111111111111111111
• 4 5 4 7 0 8 8 1 1 • (2)
Manuals supplied
The 3 following manuals are included.
0
0
-Reference Guide (this document)
Provides you with precautions and product
specifications.
Start Guide (exhibit document)
Provides
you
with
instructions
on
how
to
connect
the unit with devices and
basic
operations.
Help Guide (Operating Instructions)
Read
the Help Guide on your computer or
smartphone, when you want
to
know how
to
use
the unit in greater detail. The Help Guide also
contains a troubleshooting guide which provides
you with remedies for the problems you might
encounter.
URL:
http:
//rd1
.sony.
net/help/mdr/pha-3/h_uc/
Two-dimensional code:
For
the
customers in
the
USA
Owner's Record
The serial number
is
located at the bottom
of
the unit.
Record
these numbers in the spaces provided below.Refer
to
them whenever you call upon your Sony dealer regarding this
product.
Model
No.
PHA-3
Serial
No.
____
____
___
_
Information
If
you have any questions about this product,you may call:
Sony Customer Information Service Center 1-800-222-
7669
or
http://www.sony.com/
Declaration
of
Conformity
Trade Name:
SONY
Model No.:
PHA-3
Responsible Sony Electronics Inc.
Party:
Address:
Telephone
No
.:
16530
Via
Esprillo,
San
Diego,
CA
92127
USA
858-942-2230
This device complies with Part
1S
of
the
FCC
Rules.
Operation
is
subject
to
the following
two
conditions:
(1)
this device may not
cause harmful interference, and
(2)
this device must accept any
interference received, including interference that may
cause
undesired operation.
You
are cautioned that any changes or modifications not
expressly approved
in
this manual could void your authority
to
operate this equipment.
Note
This
equipment has been tested and found to comply with the
limits for a
Class
Bdigital device, pursuant
to
Part
15
of
the
FCC
Rules.
These limits are designed
to
provide reasonable
protection against harmful interference in a residential
installation. This equipment generates,
uses
and
can
radiate
radio frequency energy and,
if
not installed and used
in
accordance with the instructions, may cause harmful
interference
to
radio
communications
. However, there
is
no
guarantee that interference
will
not
occur
in
a particular
installation.
If
this equipment does cause harmful interference to
radio
or
television reception, which
can
be
determined by
turning the equipment
off
and on, the user
is
encouraged
to
try
to correct the interference by one
or
more
of
the following
measures:
-Reorient
or
relocate the receiving antenna.
-Increase
the separation between the equipment and receiver.
-Connect the equipment into
an
outlet on a circuit different
from that
to
which the receiver
is
connected.
-Consult
the dealer or
an
experienced radio/TV technician for
Troubleshooting
If
you run into any problems using this unit, use the following
checklist and read the product support information on our
website. Should any problem per
sis
t, consult your nearest Sony
dealer.
No sound
~
Check that the unit and the audio device are connected
correctly.
--+
Check
that the connected device
is
turned
on.
~
Check that the unit
is
turned on.
~If
the
POWER
CHG
(charge) indicator does not light up,
charge the battery.
~
Check
that the
INPUT
switch
is
in the correct position for the
connected audio device.
~
Check that the
OUTPUT
switch
is
in the correct position
for
the outputjack.
--.
Turn
up
the volume of the connected device.
~
Turn
up the volume
of
the unit.
~
Connect the headphone plug firmly
to
the unit.
~
Check
that the unit, amplifier and active speaker are
connected correctly.
~
Check
that the connected headphones are stereo, not
monaural.
The unit does not support monaural headphones.
Do
not
connect monaural headphones.It may cause a malfunction.
When connected
to
a computer, there
is
no sound
or
the
sound
is
not
played back properly.
~
The computer does not recognize the unit
as
a
USB
device.
Restart your computer.
Install the driver software for Windows "Sony
USB
Device
Driver" on your Windows computer. Visit the following
website, and install the software.
http://www.sony.com/supportl
~
Turn up the volume
of
your computer
or
software.
~
If
the unit was connected
to
the computer while using audio
playback software, restart the audio playback software.
~
When playing High-Resolution Audio format data on your
computer with the unit, use the audio playback software
compatible with the High-Resolution Audio format data, such
as
"Hi-Res Audio Player."
When "Hi-Res Audio Player"
is
not installed, install
it
on your
computer.Visit the following website, and install the
software.
http://www.sony.com/supportl
~
If
the computer enters standby, sleep or hibernation mode,
while the music
is
played back by using the audio playback
software, restart the audio playback software.
~
Check that the sound device settings
of
your computer are
correct
~
For Windows
8/8
.1
Press
and hold the [Windows] and
[X
]
keys
to
display the
menu, select [Control Panel]. [Hardware and Sound],
[Sound],[Playback] tab, select [Sony
PHA-3
]for the
playback device, then click [Set default].
~
For Windows
7/Windows
Vista
Click the [Start] menu, select [Control Panel], [Hardware and
Sound].[Sound],[Piayback] tab, select [Sony
PHA-3]
for the
playback device, then click [Set default].
~
For Macintosh
Click the (Apple] menu, select [System Preferences],
[Sound]. [Output] tab, then select
[PHA
-
3]
for [Select a
device for sound output].
~
The volume control
of
your computer
or
the audio playback
software
is
set to suppress the sound. Cancel the setting.
~
The
CD-ROM
drive does
not
support the digital reproduction
function.
Use
a
CD-ROM
drive that supports the digital
reproduction function.
~
Digitally broadcast sound may not
be
output from a
computer's
USB
port.
In
this
case,
connect the
AUDIO
IN/LINE
OUT
jack
of
the unit
to
the analog audio
output
of
the
computer.
low
sound
--+
Turn
up
the volume of the connected device.
~
Turn up the volume
of
the unit.
~
When using high-impedance headphones, set the
GAIN
select switch
to
HIGH
.
~
Use
headphones
that
have a stereo mini plug.The unit only
supports headphones that have a stereo mini plug.
If
you use
headphones/headset with a remote control
or
microphone,
there may
be
low
sound
or
no sound.
The unit does
not
turn on.
~
Charge the battery
of
the unit.
~
When battery life reduces
to
half, the battery
is
approaching
the end
of
its service life. Consult your nearest Sony dealer
for replacement.
Distorted sound
~
If
the audio device
is
connected
to
the
AUDIO
IN/LINE
OUT
jack
of
the unit. turn down the volume
of
the connected
device.
~
Set
the equalizer setting
of
the connected device to
off
.
~
Charge the battery
of
the unit.
The battery cannot be charged.
--+
Turn
off the unit.
~
Check that the unitand your computer are firmly connected
using the micro-USB cable (supplied).
~
Check that the computer
is
turned on and not
in
standby,
sleep
or
hibernation mode.
~
Check that the unitand the computer are directly connected,
and not
via
a
USB
hub.
~
Try
the
USB
connection procedure again in
cases
other than
those stated above.
~The
USB
port
of
the connected computer may have a
problem. Connect the unit
to
another
USB
port
of
the
computer
if
available.
~
A
USB
AC
adaptor that
is
not recommended
is
being used.

-The battery
is
fully charged.
If
the battery
is
fully charged, the
POWER
CHG
(charge)
indicator may blink and
go
off, and charging may
not
start.
This is not a malfunction.
-
If
the
unit
is
not
used for a long
time
,the
POWER
CHG
(charge) indicator may take a while
to
light
up red when you
connect
it
to
your computer.
In
this
case,
do
not
disconned
the micro-USB cable from the unit, and wait until the
POWER
CHG
(charge) indicator lights up red.
Charging
time
is
too
long.
-Check that the unit and the computer
are
dir
ec
tly
connected,
not
via a
USB
hub.
- A cable which is not supplied
is
u
se
d.
- A
USB
AC
adaptor
that
is
not
recommended
is
being used.
Noise is
generated
.
-When connecting an audio device
to
the
AUDIO
IN/LINE
OUT
jack
of
the unit,adjust the volume
of
the connected device,
then turn up the volume
of
the
unit.
-
Keep
the computer away from the unit.
-Restart the audio playback software.
-Turn
off
the connected audio device, then turn it on again.
Sound is
interrupted
when
connecting
to
the
computer
.
-
The
CPU
of
your computer
is
overloaded.
Clo
se other
applications.
-Other
USB
devices are connected
to
your computer and
being used simultaneously. Quit operating other
USB
devic
es
.
The
remote
control
of
the
headset
does
not
work
.
-Remote control operation
is
not supported by this unit.
The
microphone
of
the
headset
does
not
work
.
-Headset microphones are
not
supported by this unit.
A connected radio or TV cannot receive a signal/Noise
is
generated
.
-
Keep
the connected device away from the unit.
Compatible
iPhone/iPad/iPod
models
You
can
use the
unit
with
only the following models.Update
your iPhone,
iPad
or
iPod to the latest software before use.
•
iPhone
Ss
• iPod
touch
(5th generation)
•
iPhone
Sc
• iPod
touch
(4th generation)
•
iPhone
5 • iPod
touch
(3rd
generation)
• iPhone
4s
• iPod touch {2nd generation)
• iPhone 4 •
iPo
d classic 120GB/160GB
• iPho
ne
3GS
(2009)
•
iPad
Air • iPod
nano
(7th generation)
• iPad
mini
with
Retina
display
• iPod
nano
(6th
generation)
• iPad
(4th
generation)
• iPod
nano
(5t
h generation)
• iPad mini • iPod
nano
(
4th
generation)
• iPad (3rd generation) • iPod nano
(3
rd generation)
• iPad 2
• iPad (As
of
Jul
y 2014)
'
Design and specifications are subject
to
change
without
notice.
Precautions
On
Safety
•
Do
not
put
weight
or
pressure
on
this
unit
as
it
may
cause
the
unit
to
deform
during
l
ong
storage.
• Do
not
drop
th
e
unit
or
subject
it
to
external
shock, as
it
ma
y cause a
malfun
ct
i
on
.
• Clean
the
unit
wit
h a
soft
dry
cloth
.
•
If
there
is
noise
while
listening
to
the
radio, etc.,
mo
ve
the
unit
farther
away
from
the
connected
device.
On
placement
• Do
no
t place
the
unit
in a
lo
catio
n where it is:
-Sub
ject
to
extreme
high
temperature
(such as in a car
with
it
s
windows
closed).
-Subject
to
direct sun
ligh
t
or
near
a
heat
source.
-S
ubj
ect
to
mechanical
vibration
or
shock.
-Subje
ct
to
a
magnetic
field
.
(such
as
near a
magnet,
speak
er
or
TV).
-Subjec
t
to
excessive
dust.
On
charging
When
the
unit
is
stored
for
a
long
period,
to
prevent
excessive
discharge
,
charge
the
un
it
every
half
year
or
so.
Specifications
Frequency range
10Hz
-100 kHz (AUD
IO
IN
i
nput
)
Distortion
0.01
%or
less
(1
kHz)
Supported
impedance
80-6000
Maximum
input
2V
rm
s
(AU
DIO
IN
)
Maximum
output
(when
using
the
built-in
lithium-ion
rechargeable
battery)
Balanced connection
Approx
.320
mW
+ 320
mW
(32
Q,
1
%distortion}
Normal connection
Approx.
100
mW
+100
mW
(32
Q,
1
%distortion)
Output
jack
3-pole
min
i
jack
(rl
(headphones)
BALANCED-
l)
3-pole
mini
ja
ck (rl {h
eadphones)
BALANCED-R)
Ster
eo
mini
jack*1 (rl (
headphone
s)-NORMA
L)
Stereo
mini
jack*1
(Switching
the
input
and
output
of
the
AUDIO IN/LINE OUT
jack
by
the
OUTPUT
switch)
Input
jack/port
Computer/WALKMAN
®
/Xperia
connecting
por
t
iPho
ne/i
Pad/iPod
connecting
port
Optical
input
connecting
port
(OPT IN
port)
Stereo
mini
jack*1 (Swi
tch
i
ng
the
input
and
output
of
the
AUDIO IN/
LINE
OUT
jack
by
the
OUTPUT
sw
itch
)
"'1
Only
a
3-pole
stereo
min
i
plug
is
supported.
Oth
er
plugs
,
includ
ing
2-pole
mini
plug
or
4-pole
ste
re
o
mini
plug,
are
not
supported
.
Operating
temperature
0
"C
to
40
"C
(32"F
to
104"F)
Charging
temperature
5
"C
to
35
"C
(
4W
to
9S"F)
Power source
DC
3.7 V:
built-in
lithium-ion
rechargeable
battery
DC
SV:
when
c
harging
via
USB
Battery
life*'
A
nalog
connection:
Approx
.
28
hours*
2
Digital (balanced)
connection:
Approx.
s
hours*l
Charging
time
When
connected
to
a
computer:
App
rox. 15 h
ours
*3
When
connected
to
an
AC
outlet
using
the
recommended
USB
AC
adaptor
{sold separately):
Approx.
6
hours*
3
*2
when
using
the
un
it
at
1
mW
+1
mW
output
(24 Q). Time
may
vary,
depending
on
the
immediate
enviro
nment
or
conditions
of
use.
*3
Time
required
for
empty
battery
to
recharge.
Dimensions
Approx.
80
mm
x
29
mm
x 140.5
mm
(3
1
/4
x 13/,6 x 5 5
/s
in)
{w/
h/d,
projecting
parts
are
not
included)
Mass
Approx.
300
g (10.58 oz)
Supported
sampling
frequencies/bit
PCM:
when
connecting
a
computer:
Maximum
384 kHz
/32
bit
when
connecting
iP
hon
e/
iPad/iPod:
Maximum
48
kHz/24
bit
when
connecting
optical
link:
Maximum
192
kH
z/24
bit
DSD: 2.8 MHz, 5.6 MHz
Included
items
Portable
Headphone
Amplifier
(this
unit)
(
1)
Digital cable
for
WALKMAN®(1)
Digital cable
for
Xperia
(1)
Micro-USB cable
(1)
Stereo mini cable
(1)
Silicone
belt
(4)
Protection sheet
(1)
Start
Guide
(1)
Reference
Guide
(this
document)
(1)
Recommended accessory
USB
AC
adaptor:
AC·UD20 (sold separa
tel
y)
Operating
environment
Compliant
OS:
Windows
8.
1/Windows
8.1
Pro/Windows
8/Windows
8 Pro
Windows7
Starter
{SP1
or lat
er)/
H
ome
Basic
(SP1
or
lat
er)/
Hom
e
Premium
(SP1
or
later
)/
Professional
(SP
1
or
la
ter
)
/Uitimate
(SP1
or
later)
Windows
Vista
Home
Basic
(S
P2
or
later
)/
Home
Prem
ium
(SP2
or
lat
er)/Busi
ne
ss
(S
P2
or
la
ter)/U
itimate
(SP2
or
later)
Mac
OS
X (v10.6.8
or
lat
er)
CPU:
Int
el Core 2 Processor
1.
6 GHz
or
better
Memory
:1
GB
or
bett
er
USB
port
{USB
2.0
High
Speed)
• One
of
the
above
OS
need
to
be
installed
to th
e
computer
at
the
factory.
• The
unit
is
not
guaranteed
to
operate
wit
h all
computers.
• The
unit
is
not
guaranteed
to
operate
with
home
built
computers,
operating
systems
that
are
personally
upgraded
,
or
multiple
operating
systems.
• The
unit
is
not
guaranteed
to
operate
with
functions
such
as
standby,
sleep,
or
hibernation,
on
any
computer
.
Design
and
specifications are
subject
to
change
without
no
tice.
Trademark
Notices
•
WALKMAN~
and
WALKMAN
~
logo
are registered
trademarks
of
Sony
Corporation.
•
~xperia"
and
"Xperia Tab
let"
are
trademarks
of
Sony
Mobile
Communications
AB.
•
iP
ad, iPhone, iPod, iP
od
classic, iPod
nano,
iPod
touch
.
and
Retina are
trademark
s
of
Apple
Inc., registered in
the
U.S.
and
other
count
ri
es. iPad Air,
and
iPad
mini
are
trademarks
of
Apple
In
c.
• N
Mad
e
for
iPod
,"
"
Made
for
iPhone
,"
and
"Made
for
iPad"
mean
that
an
electronic accessory has
been
designed
to
co
nnect
specifically
to
iPod,
iPhone
or
iPad, respectively,
and
has
been
cert
ified
by
the
developer
to
meet
Apple
performance
standards.
Apple
is
not
respons
ibl
e
for
the
operation
of
this
de
vice
or
its
compliance
with
safety
and
regulatory
standards. Please
note
that
t
he
use
of
thi
s accessory
wi
th
iPod,
iPhone
,
or
iPad
may
affect
wireless
performance.
•
Macintosh
and
Mac
OS
are
trademarks
of
Apple
Inc.,
registered
in
the
U.S
.
and
other
countries.
•
Microsoft,
Windows
and
Windows
Vista are
registered
trademark
s
or
trademarks
of
Microsoft
Corporation
in
the
United
States
and/or
other
co
untries.
• All
other
trademarks
and
r
egistered
trademarks
are
trademarks
or
registered tra
demarks
of
their
res
pective
holders. In
this
manual,
TM
and
®
mar
ks
are
not
spec
ified.
•;;•um
Manuels
fournis
Les
3 manuels ci-dessous sont inclus.
0
0
Guide
de
r<!ference (le
present
document)
Vous pr€sente les precautions et les specifications
du produit.
Guide
de
prise
en
main
(document
en
annexe)
Le
guide presente les instructions de connexion de
l'appareil avec des peripheriques et son
fonctionnement
de
base.
Manuel
d'aide
(Mode
d'emploi)
Lisez
le
Manuel d'aide al'ordinateur ou sur votre
telephone intelligent pour obtenir
de
plus amples
renseignements sur le fonctionnement de
l'appareil.
Le
Manuel d'aide renferme egalement
un guide de depannage proposant des solutions
aux probl€mes que vous pourriez eventuellement
rencontrer.
URL:
http
:
//rd1
.
sony
.
net/help/mdr/pha·3/h_uc/
Code bidimensionnel :

Used wisely, your
new
sound
equipment
will provideyears
of
fun
and enjoyment.
Since hearing damagefrom
loud
noise
is
often
undetectable until
it
is
too
late, this
manufacturer,
CEA
and
ASHA
recommend
that
you avoid prolonged exposure
to
excessive noise.The following list
of
sound levels
is
included foryour information
so
that
you can betterprotect your hearing.
DECIBEL
LEVEL
EXAMPLES:
30Whisper
40
Quiet room
50
Moderate
rainfall
60
Normalconversation
70
Busytraffic, vacuum cleaner
80
Alarm clock
CONSTANT
EXPOSURE
TO
THESE
NOISES
CAN
BE
DANGEROUS:
90
Lawn mower, motorcycle
100
Chain saw
11
0 Rock concert
120
Jet plane
takeoff
130
Jackhammer
140
Firecrackers
This information courtesy
of
the American Speech-Language-Hearing Association
(ASHA),
the
national professional, scientific and credentialing association for more
than 135,000 audiologists, speech-language pathologists, and speech, language
and hearing scientists.
For information on protection against noise-induced hearing
loss,
call the
ASHA
Action Center (800-638-8255), Monday
through
Friday, 8:30 a.m.
to
5 p.m.
To
find
an audiologist in your
area,
visit www.asha.org/findpro. Parents can find helpful
information about
how
to
protect
their
children's hearing and
how
to
teach
them
about
safe
listening at www.listentoyourbuds.org,
an
ASHA
award-winning public
education campaign sponsored in part by
CEA.
A safety
tip
from the Consumer Electronics Association, 1919 South
Eads
Street,
Arlington,
VA
22202 and the American Speech-Language-Hearing Association,
2200
Research
Boulevard, Rockville, MD 20850.
41
Consumer
Electronics
Association
www.CE.org Q
AMERICAN
SF£ECH-lANGUAGE-
HEARING
AssociATION
®
www.asha.org
Listening
for
a
Lifetime
-~·--
Q
1111111111111111111111111111111111111111111111111111111
* 4 4 0 9 0 1 9 1 1 * (1)
AMERICAN
SPEECH-lANGUAGE-
HEARING
AssociATION
4-409-019-11(1)

Selecting fine audio
equipment
such
as
the
unit
you've
just
purchased
is
only
the
start
of
your musical enjoyment.
Now
it's
time
to
consider
how
you can maximize
the
fun and excitement
your
equipment
offers.This manufacturer,
the
Consumer
Electronics Association
(CEA)®
and
the
American Speech-Language-Hearing
Association
(ASHA)
want
you
to
get
the
most
out
of
your
equipment
by
playing
it
at a safe level; a level
that
lets
the
sound come
through
clearly
without
annoying
blaring
or
distortion and, most importantly,
without
damaging
your
sensitive
hearing.
Sound can be deceiving. Over
time
your
hearing"comfort level"adapts
to
higher
volumes
of
sound.
So
what
sounds"normal"can actually be loud and harmful
to
your
hearing. Guard against this
by
setting
your
equipment
at a safe level
BEFORE
your
hearing adapts.
TO
ESTABLISH
A
SAFE
LEVEL:
• Set
your
volume control
to
the
lowest level where you can hear
the
music
comfortably and clearly. Prolonged exposure
to
anything over
85
decibels can
cause gradual hearing loss.
• Once you have established a sound level where you can hear
the
audio
comfortably, clearly and
without
distortion, set
the
dial and leave
it
there.
•
See
if
your
music player
has
a volume limiter
that
allows you
to
set a safe
listening level by establishing a maximum volume level on your player.This
is
a
great solution for parents
to
ensure
their
children listen at a
safe
level.
• Limit listening
time
to
give
your
hearing"quiet breaks:'
BE
SURE
TO
OBSERVE
THE
FOLLOWING
GUIDELINES
WHEN
WEARING
YOUR
HEADPHONES
OR
EARBUDS:
• Do
not
turn
up
the
volume
so
high
that
you can't hear sounds around you.
• Do
not
use headphones
or
earbuds while operating a motorized vehicle;
it
may
create atraffic hazard and
is
illegal in many
areas.

SONy;
Consumer
Warranty
Sony
of
Canada
Ltd.
(hereinafter
referred
to
as
"Sony")
hereby
warrants,
subject
to
the
terms
and
conditions
herein
set
forth,
this
product
against
defects
in
material
and
workmanship
during
the
specified
warranty
period.
In
the
event
of
a
defect
of
material
or
workmanship
during
the
specified
warranty
period,
Sony
will,
without
charge
for
parts
or
labour,
either
repair
the
product,
effecting
all
necessary
parts
replacements
with
either
new
or
refurbished
parts,
or
at
Sony's
sole
discretion,
replace
the
product
with
a
refurbished
product
of
equal
or
better
quality.
This
limited
warranty
is
valid
only
in
Canada.
The
Warranty
Period:
1.
Labour:
ONE
YEAR
from
the
date
of
original
purchase
at
retail.
2.
Parts:
ONE
YEAR
(thermal
head
and
projector
lamp:
90
days)
from
the
date
of
original
purchase
at
retail.
3.
Commercial
or
Rental
Use:
NINETY
DAYS
parts
and
labour
from
the
date
of
original
purchase.
Void
or
limited
warranty:
This
limited
warranty
is
void
if
the
product
has
been
previously
altered,
modified,
repaired
or
serviced
by
anyone
other
than
the
service
facilities
authorized
by
Sony,
if
the
serial
number
on
the
product
has
been
altered
or
removed,
or
if
the
product
has
been
subject
to
accident,
misuse,
abuse,
acts
of
God
or
operated
contrary
to
the
instructions
contained
in
the
Owner's
Manual.
This
product
is
not
intended
for
commercial
or
rental
use.
Should
this
product
be
used
for
commercial
or
rental
use,
Sony's
standard
ninety
day
commercial
warranty
will
apply.
The
opinion
of
Sony
with
respect
to
these
matters
shall
be
final.
Proper
Delivery
for
Service:
The
product
must
be
shipped,
freight
prepaid,
or
delivered
to
one
of
the
nearest
Sony
service
facilities
in
Canada
in
either
its
original
package
or
similar
package
affording
an
equal
degree
of
protection,
and
with
instructions
indicating
a
location
within
Canada
to
which
the
product
should
be
returned.
The
repaired
product
will
be
returned
to
customer
freight
prepaid.
Prior
to
shipping
or
delivering
the
product
for
repair,
all
accessories,
media
and
other
attachments
should
be
removed
from
the
product
and
all
data
and
software
must
be
backed
up.
It
is
likely
that
stored
data
and
software
will
be
lost,
corrupted
or
reformatted
in
the
course
of
service
and
Sony
will
not
be
liable
for
lost,
corrupted
or
reformatted
data
or
software.
If
more
than
the
product
is
sent
for
repair,
all
items
must
be
listed
individually
on
the
packing
slip
for
the
shipping
documentation.
Sony
shall
have
no
liability
whatsoever
for
loss
or
damage
to
items
that
are
not
listed
on
the
shipping
documentation.
Defective
accessories
should
be
returned
to
Sony
as
a
separate
repair
item.
On-site
service
for
televisions
of
certain
dimensions
may
be
available
to
a
customer
living
within
a
50km
radius
of
an
authorized
Sony
service
facility,
provided
the
residence
can
be
accessed
by
an
on-road
service
vehicle.
Please
go
to
www.fastracservice.ca
or
call1-877-899-7669
to
determine
if
on-site
service
applies
to
your
television
and
residential
location.
11111111111111111111111111111
4-460-228-41
Proof
of
Original
Purchase:
This
limited
warranty
applies
to
the
product
from
the
date
of
original
purchase.
Therefore,
the
owner
must
furnish
proof
of
original
purchase
at
retail
for
the
consumer
warranty.
For
the
commercial
warranty,
the
owner
must
furnish
proof
of
original
purchase
at
retail
or
from
a
distributor.
For
subsequent
purchasers,
the
date
the
first
user
acquired
the
product
will
apply
as
the
original
purchase
.
This
limited
warranty
does
not
extend
to
cosmetic
damage,
broken
or
damaged
casing,
accessories,
exposed
antennas
and
styluses,
consumable
items
(such
as
batteries)
provided
with
the
product,
parts
wearing
out
due
to
normal
wear
and
tear,
damage
caused
by
operation
of
the
product
with
incompatible
equipment
or
attachments,
software
issues
(consult
the
End-User
License
Agreement
for
software
terms
and
conditions,
otherwise
software
is
provided
"AS
IS")
or
to
products
sold
"AS
IS".
This
limited
warranty
does
not
cover
regular
product
maintenance
such
as
cleaning,
lubrication
or
evaluation.
No
Other
Warranties;
Limitation
and
Exclusion
of
Liability:
EXCEPT
TO
THE
EXTENT
PROHIBITED
BY
APPLICABLE
LAW,
ALL
OTHER
WARRANTIES
AND
CONDITIONS,
EXPRESS
OR
IMPLIED,
AND
WHETHER
ARISING
BY
LAW,
BY
STATUTE,
BY
COURSE
OF
DEALING
OR
USAGE
OF
TRADE,
INCLUDING
WITHOUT
LIMITATION
IMPLIED
WARRANTIES
OF
MERCHANTABILITY,
MERCHANTABLE
QUALITY
AND
FITNESS
FOR
A
PARTICULAR
PURPOSE
ARE
DISCLAIMED.
UNDER
NO
CIRCUMSTANCES
SHALL
SONY
BE
LIABLE
FOR
AN
AMOUNT
GREATER
THAN
THE
ACTUAL
PURCHASE
PRICE
OF
THE
UNIT,
FOR
ANY
LOSS,
DAMAGE
OR
CORRUPTION
OF
DATA,
OR
FOR
ANY
SPECIAL
INCIDENTAL
OR
CONSEQUENTIAL
DAMAGES
SUSTAINED
IN
CONNECTION
WITH
SAID
UNIT
AND
SONY
NEITHER
ASSUMES
NOR
AUTHORIZES
ANY
REPRESENTATIVE
OR
OTHER
PERSON
TO
ASSUME
FOR
IT
ANY
OBLIGATION
OR
LIABLILITY
OTHER
THAN
SUCH
AS
IS
EXPRESSLY
SET
FORTH
HEREIN.
Product
Registration
and
Customer
Support:
Thank
you
for
choosing
a
Sony
product.
At
Sony,
we
strive
to
create
products
of
the
highest
quality
to
enhance
your
experience
and
enjoyment.
To
provide
the
best
support
for
your
product,
we
request
that
you
complete
a
product
registration
form
at
www.Sony.ca/
registration
within
ninety
(90)
days
of
purchase.
For
service
assistance,
product
information,
product
registration
or
to
locate
an
authorized
service
facility
please
go
to
www.
fastracservice.ca,
or
call:
1-877-899-7669.
For
information
about
a
Sony
Care
Extended
Warranty,
please
call
1-800-7
7
3-966
7
0
For
online
product
support
and
updates
at
any
time,
please
visit:
www.sony.ca/support,
or
call
the
Sony
Customer
Information
Centre
at
1-877-899-7669.
Printed
in
China

SONY:
Garantie
protegeant
les
consommateurs
Sony
du
Canada
ltee
(ci-apres
designee
Sony),
sous
reserve
des
modalites
et
conditions
indiquees
aux
presentes,
garantit
le
present
produit
contre
tout
defaut
de
fabrication
ou
de
materiaux
pour
Ia
periode
de
garantie
specifiee.
Si
un
defaut
de
fabrication
ou
de
materiaux
survient
pendant
Ia
periode
de
garantie
specifiee,
Sony
veillera
a
reparer
le
produit
en
y
effectuant
tous
les
rem
placements
de
pieces
necessaires
par
des
pieces
neuves
ou
remises
a
neuf
et
ce,
sans
frais
de
pieces
ou
de
main-d'reuvre.
A
se
seule
discretion,
Sony
peut
aussi
choisir
de
remplacer
le
produit
par
un
produit
reusine
de
qualite
egale
ou
superieure.
La
presente
garantie
n'est
val
ide
qu'au
Canada.
La
periode
de
garantie
:
1.
Main-d'reuvre
:
UN
AN
a
compter
de
Ia
date
d'achat
originelle
au
detail.
2.
Pieces:
UN
AN
(90
jours
pour
tetes
thermiques
et
lam
pes
de
projecteur)
a
compter
de
Ia
date
d'achat
originelle
au
detail.
3.
Usage
commercial
ou
locatif
:
QUATRE-VINGT-DIX
jours
sur
pieces
et
main-d'oeuvre
a
compter
de
Ia
date
d'achat
originelle.
Garantie
nulle
ou
limitee
:
La
presente
garantie
limitee
est
nulle
si
le
produit
a
ete
anterieurement
transforme,
modifie,
repare
ou
entretenu
par
quiconque
autre
que
les
installations
de
service
autorisees
par
Sony,
si
le
numero
de
serie
du
produit
a
ete
modifie
ou
enleve,
ou
si
le
produit
a
fait
I'
objet
d'un
accident,
d'un
mauvais
usage,
d'un
abus,
d'une
calamite
naturelle,
ou
s'il
a
ete
utilise
contrairement
aux
instructions
du
manuel
du
proprietoire.
Le
present
produit
n'est
pas
destine
a
I'
usage
commercial
ou
locatif.
Advenant
que
le
produit
soit
utilise
a
des
fins
commerciales
ou
locatives,
Ia
garantie
commerciale
de
quatre-vingt-dix
de
Sony
s'appliquera.
L'opinion
de
Sony
a
cet
effet
est
definitive.
Livraison
appropriee
pour
entretien
:
Le
produit
doit
etre
expedie,
port
prepaye,
ou
livre
a
l'une
des
installations
de
service
Sony
les
plus
ropprochees
au
Canada,
soit
dans
son
emballoge
d'origine,
soit
dans
un
emballage
similaire
affront
un
degre
de
protection
comparable,
et
occompagne
d'instructions
indiquant
I'
endroit
au
Canada
ou
le
produit
do
it
etre
retourne.
Le
produit
repare
sera
retourne
au
client
port
paye.
Avant
d'
expedier
ou
de
livrer
le
produit
pour
reparation,
tous
les
accessoires,
supports
et
autres
peripheriques
doivent
etre
retires
du
produit,
et
le
consommateur
doit
effectuer
une
copie
de
securite
de
toutes
les
donnees
et
de
tous
les
logiciels.
II
est
plus
que
probable
que
les
donnees
et
logiciels
seront
perdus,
corrompus
ou
reformates
lors
de
l'entretien,
et
Sony
n'est
pas
responsable
des
donnees
ou
logiciels
perdus,
corrompus
ou
reformates.
Si
plus
d'un
produit
est
envoye
pour
reparation,
tousles
articles
doivent
etre
enumeres
individuellement
sur
le
bordereau
d'expedition
pour
Ia
documentation
d'expedition.
Sony
n'est
nullement
responsable
de
Ia
perte
ou
des
dommages
aux
articles
qui
ne
figurent
pas
sur
Ia
documentation
d'expedition.
Les
accessoires
defectueux
doivent
etre
retournes
a
Sony
com
me
articles
a
reparer
distincts.
Le
service
a
domicile
pour
les
televiseurs
de
certaines
dimensions
peut
etre
disponible
a
tout
client
qui
hobite
dons
un
rayon
de
50
km
d'une
installation
de
service
autorisee
Sony,
et
dont
Ia
residence
est
accessible
a
un
vehicule
de
service
routier.
Rendez-vous
a
www.
fastracservice.ca
ou
composez
le
1-877-899-7669
afin
de
determiner
si
le
service
a
domicile
s'applique
a
votre
televiseur
eta
I'
emplacement
de
votre
residence.
Preuve
de
date
d'
ochot
:
La
presente
garantie
limitee
s'applique
au
produit
a
compter
de
Ia
date
d'achat
originelle
au
detail.
Par
consequent,
le
proprietaire
doit
presenter
une
preuve
de
date
d'achat
originelle
au
detail
pour
se
prevaloir
de
Ia
presente
garantie.
Pour
Ia
garantie
commerciale,
le
proprietaire
doit
presenter
une
preuve
de
date
d'achat
originelle
au
detail
ou
d'un
distributeur.
En
ce
qui
a
trait
aux
acheteurs
subsequents,
Ia
date
a
laquelle
le
premier
usager
a
acquis
le
produit
s'appliquera
com
me
date
d'
a
chat
originelle.
La
presente
garantie
limitee
ne
couvre
pas
les
dommages
cosmetiques,
les
boTtiers
brises
ou
endommages,
les
accessoires,
les
antennes
et
stylets
exposes,
les
articles
consomptibles
(comme
les
piles)
fournis
avec
le
produit,
Ia
defaillance
de
pieces
decoulant
de
leur
usure
normale,
les
dommages
causes par
!'operation
du
produit
avec
de
l'equipement
ou
des
accessoires
non
compatibles,
les
problemes
de
logiciels
(consultez
!'entente
de
licence
d'usager
pour
connaTtre
les
modalites
afferentes
aux
logiciels;
sinon,
les
logiciels
sont
fournis
«
TELS
QUELS
»),
ou
les
produits
vendus
«
TELS
QUELS
».
La
presente
garantie
limitee
ne
couvre
pas
l'entretien
regulier
du
produit
comme
le
nettoyage,
Ia
lubrification
ou
les
verifications.
Aucune
autre
garantie;
limite
et
exclusion
de
responsabilite
:
SAUF
DANS
LA
MESURE
00
LA
LOI
APPLICABLE
L'INTERDIT,
TOUTES
LES
AUTRES
GARANTIES
ET
CONDITIONS,
EXPRESSES
OU
IMPLICITES,
RELEVANT
OU
NON
D'UNE
LOI,
D'UN
ACTE
LEGISLATIF,
D'HABITUDES
COMMERCIALES
ETABLIES
OU
D'USAGES
DU
COMMERCE,
Y
COMPRIS,
SANS
S'Y
LIMITER,
TOUTE
GARANTIE
IMPLICITE
DE
QUALITE
MARC
HAN
DE
OU
DE
L'ADAPTABILITE
A
UNE
FIN
PARTICULIERE,
SONT
DESAVOUEES.
SONY
NE
SAURAIT
EN
AUCUN
CAS
ETRE
RESPONSABLE
D'UN
MONTANT
SUPERIEUR
AU
PRIX
REEL
D'ACHAT
DU
PRODUIT;
ET
SONY
NE
SAURAIT
EN
AUCUN
CAS
ETRE
RESPONSABLE
DE
PERTES,
DOMMAGES
OU
CORRUPTION
DE
DONNEES,
Nl
DE
DOMMAGES
SPECIAUX,ACCESSOIRES
OU
CONSECUTIFS
SUBIS
RELATIVEMENT
AU
PRODUIT.
SONY
N'ASSUME
Nl
N'AUTORISE
AUCUN
REPRESENTANT
OU
QUICONQUE
A
ASSUMER
EN
SON
NOM
UNE
OBLIGATION
OU
RESPONSABILITE
AUTRE
QUE
CELLES
QUI
SONT
EXPRESSEMENT
DECRITES
AUX
PRESENTES.
Enregistrement
du
produit
et
soutien
de
Ia
clientele
:
Nous
vous
remercions
d'avoir
choisi
un
produit
Sony.
A
Sony,
nous
nous
effon;ons
de
creer
des
produits
de
Ia
plus
haute
qualite
afin
de
renforcer
votre
experience
et
votre
satisfaction.Afin
d'assurer
le
meilleur
soutien
qui
soit
pour
votre
produit,
nous
vous
demandons
de
remplir
un
formulaire
d'enregistrement
a
www.Sony.ca/enregistrement
et
ce,
dans
les
quatre-vingt-dix
(90)
jours
suivant
Ia
date
d'achat.
Pour
obtenir
de
!'aide
concernant
le
service,
des
renseignements
sur
le
produit,
!'enregistrement
du
produit,
ou
pour
localiser
une
installation
de
service
autorisee,
visitez
www.fastracservice.ca
ou
composez
le
1-877-899-7669.
Pour
obtenir
des
renseignements
concernant
Ia
garantie
prolongee
Sony
Care,
composez
1-800-773-9667.
Pour
obtenir
un
soutien
de
produit
en
ligne
et
des
mises
a
jour
en
tout
temps,
visitez
www.sony.ca/fr/support,
ou
appelez
le
Centre
d'information
de
Ia
clientele
de
Sony
au
1-877-899-7669.

111111111111111111111111111111111111111111111111111111111111
4-460-427-01
SON
" !Portable Audiol
.1®
. .
LIMITED
WARRANTY(u.s
.
only}
Sony Electronics Inc.
("Sony")
warrants this product against defects in material
or
workmanship
for
the
time
periods and as set forth belowwhen purchased directly
from
Sony
or
a Sony Retailer. Pursuant
to
this Limited
Warranty, Sonywill, at its option,
(i)
repair
the
productusing
new
or
refurbished parts
or
(ii) replace the product
with
a
new
or
refurbished product. For purposes
of
thisLimitedWarranty, "refurbished" means aproduct
or
part
that
has been returned to its original specifications.
In
the
event
of
a defect,
these
are
your
exclusive
rem-
edies.
labor:
For a period
of
ninety
(90)
days
from
the
original date
of
purchase
of
the product ("LaborWarranty"),
Sonywill, at its option, repair
or
replace
with
new
or
refurbished product, productdetermined
to
be defective.
If
Sony elects
to
replace
the
product afterthis LaborWarranty has expired but whilethe Parts Warranty
below
is
still in effect, itwill
do
so
for
the applicable laborcharge.
Parts: Fora period
of
one
(1)
year
from
the original date
of
purchase
of
product ("Parts Warranty"), Sony will
supply
new
or
refurbished replacement parts in exchange
for
parts determined
to
be defective.
This Limited Warranty covers only the hardware components packaged
with
the Product. It does
not
cover
technical assistance
for
hardware
or
software usageand
it
does
not
coveranysoftware productswhether
or
not
contained in
the
Product; any such software is provided
"AS
IS"
unless expressly provided
for
in any enclosed
software LimitedWarranty. Please refer
to
the
End User License Agreements included
with
the
Product
for
your
rights and obligations
with
respect
to
the
software.
Instructions:
To
obtain warranty service, you
must
deliver the product, freight prepaid, in either its original
packaging
or
packaging affording an equal degree
of
protection
to
theSonyauthorized service facility specified.
It
is
your
responsibility
to
backup
any
data,
software
or
other
materials
you
may
have
stored
or
pre-
served
on
your
unit.
It
is
likely
that
such
data,
software,
or
other
materials
will
be
lost
or
reformatted
during
service
and
Sony
will
not
be
responsible
for
any
such
damage
or
loss. A dated purchase receipt
from
Sony
or
a Sony Retailer is required. For specific instructions on
how
to
obtain warranty service
for
your
product,
Visit Sony's Web Site:
www.sony.com/support
Or
call the
Sony
Customer
Information
Service
Center
1-800-222-SONY (7669)
For
an
accessory
or
part
not
available
from
your
authorized dealer, call:
1-800-488-SONY (7669)
Repair
I
Replacement
Warranty
:This LimitedWarrantyshall apply
to
any repair, replacement part
or
replace-
ment
product
for
the remainder
of
the original Limited Warranty period
or
for
ninety
(90)
days, whichever
is
longer.
Any
parts
or
product replaced underthis Limited Warranty will become
the
property
of
Sony.
ThisLimited Warranty
only
covers productissuescaused bydefects in material
or
workmanshipduring ordinary
consumeruse; itdoes
not
coverproduct issuescaused
by
anyotherreason, including but
not
limited
to
product
issues due
to
commercial use, acts
of
God, misuse, limitations
of
technology,
or
modification
of
or
to
anypart
of
the
Sonyproduct
or
productpurchased
from
otherthan Sony
or
aSonyRetailer.
To
determine
if
a retailer is
part
of
the
Sony Retailer Network, please contact Sony's Customer Service Call Center
or
go
to
www.sonv.com/
support.This LimitedWarrantydoes
not
cover
Sony
productssoldAS
IS
or
WITH ALL FAULTS
or
consumables
(such
as
fuses
or
batteri
es).
This Limited Warrantyis invalid
ifthe
factory-appliedserial
number
has been altered
or
removed
from
the
product. This Limited Warranty
is
valid onlyin the United States.
liMITATION
ON
DAMAGES: SONY SHALL NOT
BE
LIABLE
FOR
ANY
INCIDENTAL
OR
CONSEQUENTIAL
DAMAGES
FOR
BREACH
OF
ANY
EXPRESS
OR
IMPLIED WARRANTY ON THIS
PRODUCT.
DURATION OF IMPLIED WARRANTIES:
EXCEPT
TO THE EXTENT
PROHIBITED
BY APPLICABLE LAW,
ANY
IMPLIEDWARRANTY
OF
MERCHANTABILITY
OR
FITNESS
FOR
A
PARTICULAR
PURPOSE
ON
THIS PRODUCT
IS
LIMITED IN DURATION TO THE DURATION OF THIS WARRANTY.
Somestates
do
not
allow
theexclusion
or
limitation
of
incidental
or
consequentialdamages,
or
allowlimitations
on
how
longan impliedwarrantylasts,so
the
above limitations
or
exclusions
may
not
apply
to
you.ThisLimited
Warranty givesyou specific legal rights and you
may
have other rights which vary
from
state
to
state.
Printed in China
Other manuals for PHA-3
5
Table of contents
Other Sony Amplifier manuals

Sony
Sony TAD-M30 User manual

Sony
Sony XM-S400D User manual

Sony
Sony TA-AX390 User manual

Sony
Sony TA-1140 User manual

Sony
Sony XM-CD61X User manual

Sony
Sony TA-VE150 User manual

Sony
Sony TA-VE610 User manual

Sony
Sony XM-GTR2022 User manual

Sony
Sony XM-C6000 User manual

Sony
Sony XM-D500X Operating & Mounting User manual
Popular Amplifier manuals by other brands

Monacor
Monacor IMG STAGELINE TXS-872BOOST operating instructions

Trafomatic Audio
Trafomatic Audio EVOLUTION PHONO ONE user manual

Neural DSP
Neural DSP Archetype Plini user guide

Fender
Fender '57 user manual

Extron electronics
Extron electronics MPA 152 user guide

Musical Paradise
Musical Paradise MP-402 owner's manual