•~mil
This instruction
manual
explains
how
to
u
se
lenses. Precautions common
to
all lenses such
as
not
es
on use are
found
in
the
separate
"Precautions
before
using
".
Be sure
to
read
both
docume
nt
s before u
si
ng
your
lens.
This lens is designed
fo
r Sony a camera sys
tem
E
-mou
nt
cameras.
You
cannot u
se
it
on
A-mount
cameras.
Th
e
FE
24-70mm
F2.8
GM
II
is
compatible
with
the
range of a 3Smm
format
image sensor.
A came
ra
equ
ipp
ed
with
a
35mm
format
image
se
nsor can also be
se
t
to
shoot
at
APS-C si
ze
.
For details
on
h
ow
to set
your
camera, refer
to
its
instruction manual.
For
further
inform
at
ion
on
compatib
ilit
y,
visit
the
web
si
te
of
Sony in
your
area,
or
consult
your
dealer
of
So
ny
or
local
author
ized service facility of Sony.
For
Customers
in
the U.S.A.
F
or
question
regarding your
product
or
for
th
e Sony
Servi
ce
Center n
ea
rest you,
ca
ll 1-800-222-SONY(7669).
Supplier's Declaration
of
Conformity
Trade Name :
SONY
Model
: SEL2470GM2
Responsible
Party:
Sony
El
ectroni
cs
Inc.
Address:
16535
Vi
a Esprill
o,
San
Diego,
CA
92127
U
.S.
A.
Telephone
Number:
858-942-2230
This device complies
with
part
15
of
the
FCC
rules.
Operation is subject
to
the
following
two
conditio
ns:
(1)
This device
may
not
cause
harmful
int
e
rf
erenc
e,
and (2)
thi
s device
must
accept any interference
received, including interference
that
may
cause
undesired operation.
Notes on Use
•
Do
not leave the lens exposed to the
sun
or a bright
light source. Internal malfunction
of
the camera
body and len
s,
smoke, or afire may result due to the
effect
of
light focu
si
ng. If
ci
rcumstan
ces
necessitate
leav
in
g the lens in
sun
light,
be
sure to attach the lens
caps.
When shooting against the sun, keep the sun
completely out of the angle
of
view.
• When
ca
rr
ying a camera
wit
h the lens attached,
always firmly hold both the camera and the le
ns.
•
Do
not hold the lens by its extended part.
•
Thi
s l
ens
is not water-proof,although designed with
dust-proofne
ss
and
sp
l
ash
-proofness
in
mind.
If
using
in the rain etc., keep water drops away from the lens.
• Ifthe l
ens
alone is shaken or
if
a camera with the lens
attach
ed
is shaken wh
il
e the camera
is
turned o
ff
,
an internal component
of
the l
ens
may rattle.
Thi
s,
however, does not indicate a malfunction.
In
addition, while you carry around the len
s,
yo
ur
movement m
ay
cause the internal l
ens
groups to
sh
ake.
Thi
s,
however, does not affect the performance
of
the
lens
groups.
• Using this unit with products from other
manufacturers may affect its performance, leading to
acc
identsor malfunction.
Precautions on using a flash
• With
ce
rta
in
co
mbinati
ons
of lens and flash, the lens
may partially block the light of the fl
as
h, resulting
in
a shadow at the bottom
of
the pictu
re.
In
suc
h a
case,
ad
just the focal length or the shooting distance before
shooting.
Vignetting
• When using the len
s,
the corners
of
the screen
become darker than the center.
To
reduce this
phenomena
(ca
ll
ed
vignetting
).
cl
ose
the aperture
by
1to 2 stops.
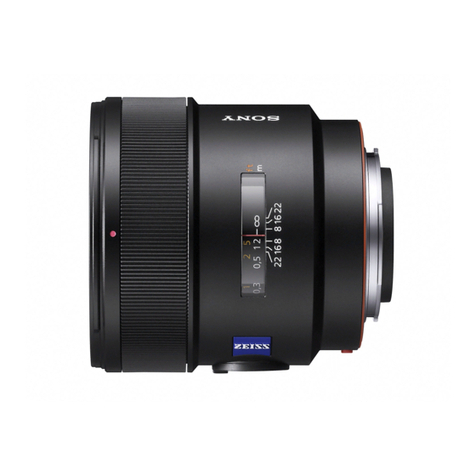
E:.1
Identifying
the
Parts
1 Lens
hood
index
2 Focusing ring
3
Zooming
ring
4 Focal-length scale
5 Focal-length index
6
Ap
erture ring
7
Aperture
sca
le
8
Aperture
index
9 Lens contacts*
10 Lens
hood
11
Pola
rizing-filt
er
window
12
Focus
hold
button
13
Fo
cus
mode
sw
it
ch
14
IRIS
LOCK
switch
15
Mounting
ind
ex
16 Lens
mount
rubb
er ring
17
H
ood
release
button
18
Aperture
cli
ck
sw
it
ch
19
Zoom
smoo
thn
ess
switch
*
Do
not touch the lenscontacts.
Ii) Attaching and Detaching
the
Lens
• Before attaching/detaching the len
s,
hold the l
ens
by its mounting body. Do not hold it by any
of
its
operation control
s,
such
as
the focusing ring.
To
attach the lens
(See illustration liJ-[I].)
1 Remove the rear lens
cap
and the camera
body cap.
2 Align
the
white
index
on
the
lens barrel
with the white index
on
the camera
(mounting index), then insert the lens
into the camera
mount
and rotate it
clockwise until it locks.
•
Do
not press the lens rele
ase
button
on
the
camera when mounting the len
s.
•
Do
not mountthe lens at an angl
e.
3 Remove the front lens cap.
•
You
can
attach/deta
ch
the front l
ens
cap
in
two
ways,
(1)
and
(2)
.
To
remove the lens
1 Attach
the
front
lens cap.
2 While
holding
down
the
lens release
button
on
the
camera, rotate
the
lens
counterclockwise
until
it
stops,
then
detach
the
lens. (See illustration l;l-[gl,)
[!I
Attaching the Lens Hood
It
is
recommended
that
yo
u use a lens h
ood
to
reduce flare and ensure
maximum
im
age quality.
Align the
red
line
on
the
lens hood with the
red line
on
the lens (lens hood index), then
insert the lens hood into the lens mount and
rotate it clockwise until it
clicks
into place
and the red dot
on
the lens hood
is
aligned
with the red line
on
the
lens
(1).
•
Th
e polarizing-filter wind
ow
can
be
open
ed
(2)
to
allow the polarizing filter (sold separatel
y)
to rotate
without having to remove the lens hood. While
shooting without filter operations or
ca
rr
ying around
the
len
s,
however,
keep
the window closed.
• Ifthe lens hood is not rotated until it c
li
cks
into
place, there
is
a possibility that a shadow appears
on
captured images or the lens hood fa
ll
soff.
• Ifthe fl
as
h light is partia
ll
y blocked
by
the lens hood,
a shadow may appear at the bottom
of
captured
images.
In
such
a
case,
remove the lens hood.
• When storing, fit the
lens
hood onto the l
ens
backwa
rd
s
(3).
To
remove the lens hood
While holding
down
the hood release button
on
the lens hood, rotate the lens hood
counterclockwise.
I!] Zooming
Rotate
the
zooming
ring
to
the
desired focal
length.
About the zoom smoothness switch
(See illustration
l!l-a.)
You can set
the
ten
sion
for
rotating
the
zooming
ring
with
the
zoom smoothness switch.
To
decrease
the
tension, s
lide
the
zoom smoothness
sw
it
ch
to
"SMOOTH."
To
increase
the
tension
, slide
th
e
zoom
smooth
n
ess
switch to "
TIGHT."
To
keep
the
tension
for
rotating
th
e
zooming
ring
lig
ht
,
it
is
recommended
that
th
e
zoom
s
moothness
sw
itch be set
to
"SMOO
TH.
"
To
prevent
unint
e
nd
ed
movement
of
the
lens end
while shooting at an
upward/downward
angle or
carrying
around
the
lens,
it
is
recommended
that
the
zoom
smoothness sw
it
ch
be
set
to
"TIGHT
."
Ii
Focusing
•
Th
e focus mode switch of this l
ens
does notfunction
with some camera models.
For further informati
on
on compatibilit
y,
visit the web
site of
Sony
in your
area,
or
co
n
su
lt your dealer
of
So
ny or l
oca
l author
iz
ed
service f
ac
ility
of
So
n
y.
To
switch
AF
(auto focus)/
MF (manual focus)
Th
e focus
mode
ca
n be swi
tched
between
AF
and
MF
on
the
lens.
For
AF
photography,
bo
th
the
camera and lens
should be set
to
AF.
F
or
MF
photography,
either
or
both
the
camera
or
lens sh
ou
ld be set
to
MF.
To
set
the
focus
mode
on
the
lens
Slide the focus mode switch to the
appropriate mode,
AF
or
MF
(1)
.
• Refer to the camera manuals to
se
t the focus mode
of
the
ca
mer
a.
•
In
MF,
turn the f
ocus
in
g ring to adjust the focus
(2)
while looking through the viewfinder, etc.
To
use a camera equipped
with
an
AF/MF
control button
•
By
pressing the AF/MF
con
t
rol
button during
AF
operation,you
can
temporarily swit
ch
to
MF.
•
Pr
ess
ing the AF/MF
co
ntrol button during
MF
operation letsyou temporarily switch to
AF
if
the lens
is set to
AF
and the camera to
MF.
Ii
Using
the
Focus Hold Buttons
•
Th
e focus hold button of this l
ens
does not function
with some camera models.
For
further
inf
ormation
on
compatibilit
y,
visit the web
site of
So
ny in your ar
ea,
or consult your dealer
of
So
ny or l
oca
l authorized
se
rvice facility of
So
ny.
Pr
ess
th
e focus hold
button
in
AF
to
cancel
AF.
Th
e
focus is fixed and you
ca
n release
the
s
hutter
on
the
fi
xe
d focus. Release
the
focus hold
button
while
pressing
the
shutter
button
halfway
to
s
tart
AF
again.
[i:l
Adjusting
the
Aperture
IRIS
LOCK
switch
• Lock:
You
can
lock the aperture ring at "A"
on
the
aperture
sca
l
e,
or rotate it between f/2.8 and
f/22.
• Release:
You
can
rotate the apertu
re
ring between
"A"
and
f/2.8
on the aperture scale.
When you align "A" on
the
aperture
sca
le
to
the
aperture index,
th
e camera is set
to
auto
iris
mode
and
the
exposure is set
by
the
camera.
And
you
can
ad
ju
st
the
amount
of
li
ght
manually
between
f/2.8
and
f/22
by
rot
at
ing
the
aperture ring.
Notes
Set
the
aperture click switch
to
"O
FF
"
whe
n
shooting
movies. (See illus
tration
@-a
.)
When
the
aperture click switch
is
set
to
"O
FF
,"
th
e
sound of
the
aperture
ring
is
reduced. (For
movie
recording)
If
you change
the
ape
rtur
e
va
lue
wh
ile sh
ooti
ng a
movie
with
the
aperture c
li
ck
switch set
to
"ON,"
th
e
sound
of
the
aperture ring will be recorded.
Specifications
Product name
FE
24-70mm
F2
8
GM
II
(Model name)
(SEL2470GM2)
F
oca
l length (mm)
3Sm
m equivalent
focal length
*1
(mm)
L
ens
groups-elements
Angle
of
view 1
•2
24-70
36-
105
15-
20
84°-34°
Angle
of
view
2*2
61
°
-23
°
Minimum focus*3(m (feet)) 0.21-0.3
(0
.69-0.99)
Maximum magnification
(X)
0.32
Minimum aperture
Filter diameter (mm)
Dimensions (maximum
diameter x height)
(approx.,
mm
(i
n.
))
Mass
(approx., g
(oz))
SteadyShot
f/22
82
87.8
X
119.9
(3
1
/2
X 4 3/4)
695 (24.6)
No
*1
This isthe
eq
ui
va
lent focal length in 35mm format
when mounted
on
an
Interchangeable Lens
Dig
ital
Camera equipped with
an
APS-C
sized image senso
r.
•2
Angle
of
view 1isthe value
for
35mm cameras, and
angle
of
view 2
is
the
va
lu
e for Interchangeable Lens
Digital Cameras equipp
ed
with
an
APS-C
sized image
se
n
so
r.
*3
Minimum focus isthe distance from the image
se
nsor to the subject.
• Depending on the lens mechanism, the focal length
may
cha
nge with any change in shoot
in
g distance.
Th
e focal lengths given above assume the lens is
focused at infini
ty.
Included
items
(The
numb
er in parentheses indi
ca
tes
the
number
of pieces
.)
Lens
(1),
Front lens cap (1
),
Rear lens cap
(1),
Lens h
ood
(1),
Lens case
(1),
Set
of
printed
documentation
D
es
ign
and
specifications are subject
to
change
without
notice.
(J{
and~
are
tr
ademarks
of
So
ny Group Corporation.
