3-205-184-12(1)
Digital Photo Printer
Operating Instructions – Advanced Operations
Before operating this printer, please read this manual
thoroughly and retain it for future reference.
This manual explains advanced operations for the
printer including:
– Editing and adjusting an image
– Adding a special effect to an image
–
Ma ing a variety of prints such as split-images, calendar,
card, and stic er
– Changing printer settings
– Viewing, deleting, or saving images in a “Memory
Stic ” or PC card
Before reading this manual, read “Operating Instructions
– Basic Operations.” Also refer to “Operating
Instructions – Software Guide/Additional Information.”
m
m
m
To cancel operation
Press CANCEL while the cursor is in the SET sub
menu. The settings will be reverted.
To display another sub menu
Press V until the current sub menu disappears. Then
press B/b to move the cursor to the desired item on
the menu bar and press ENTER.
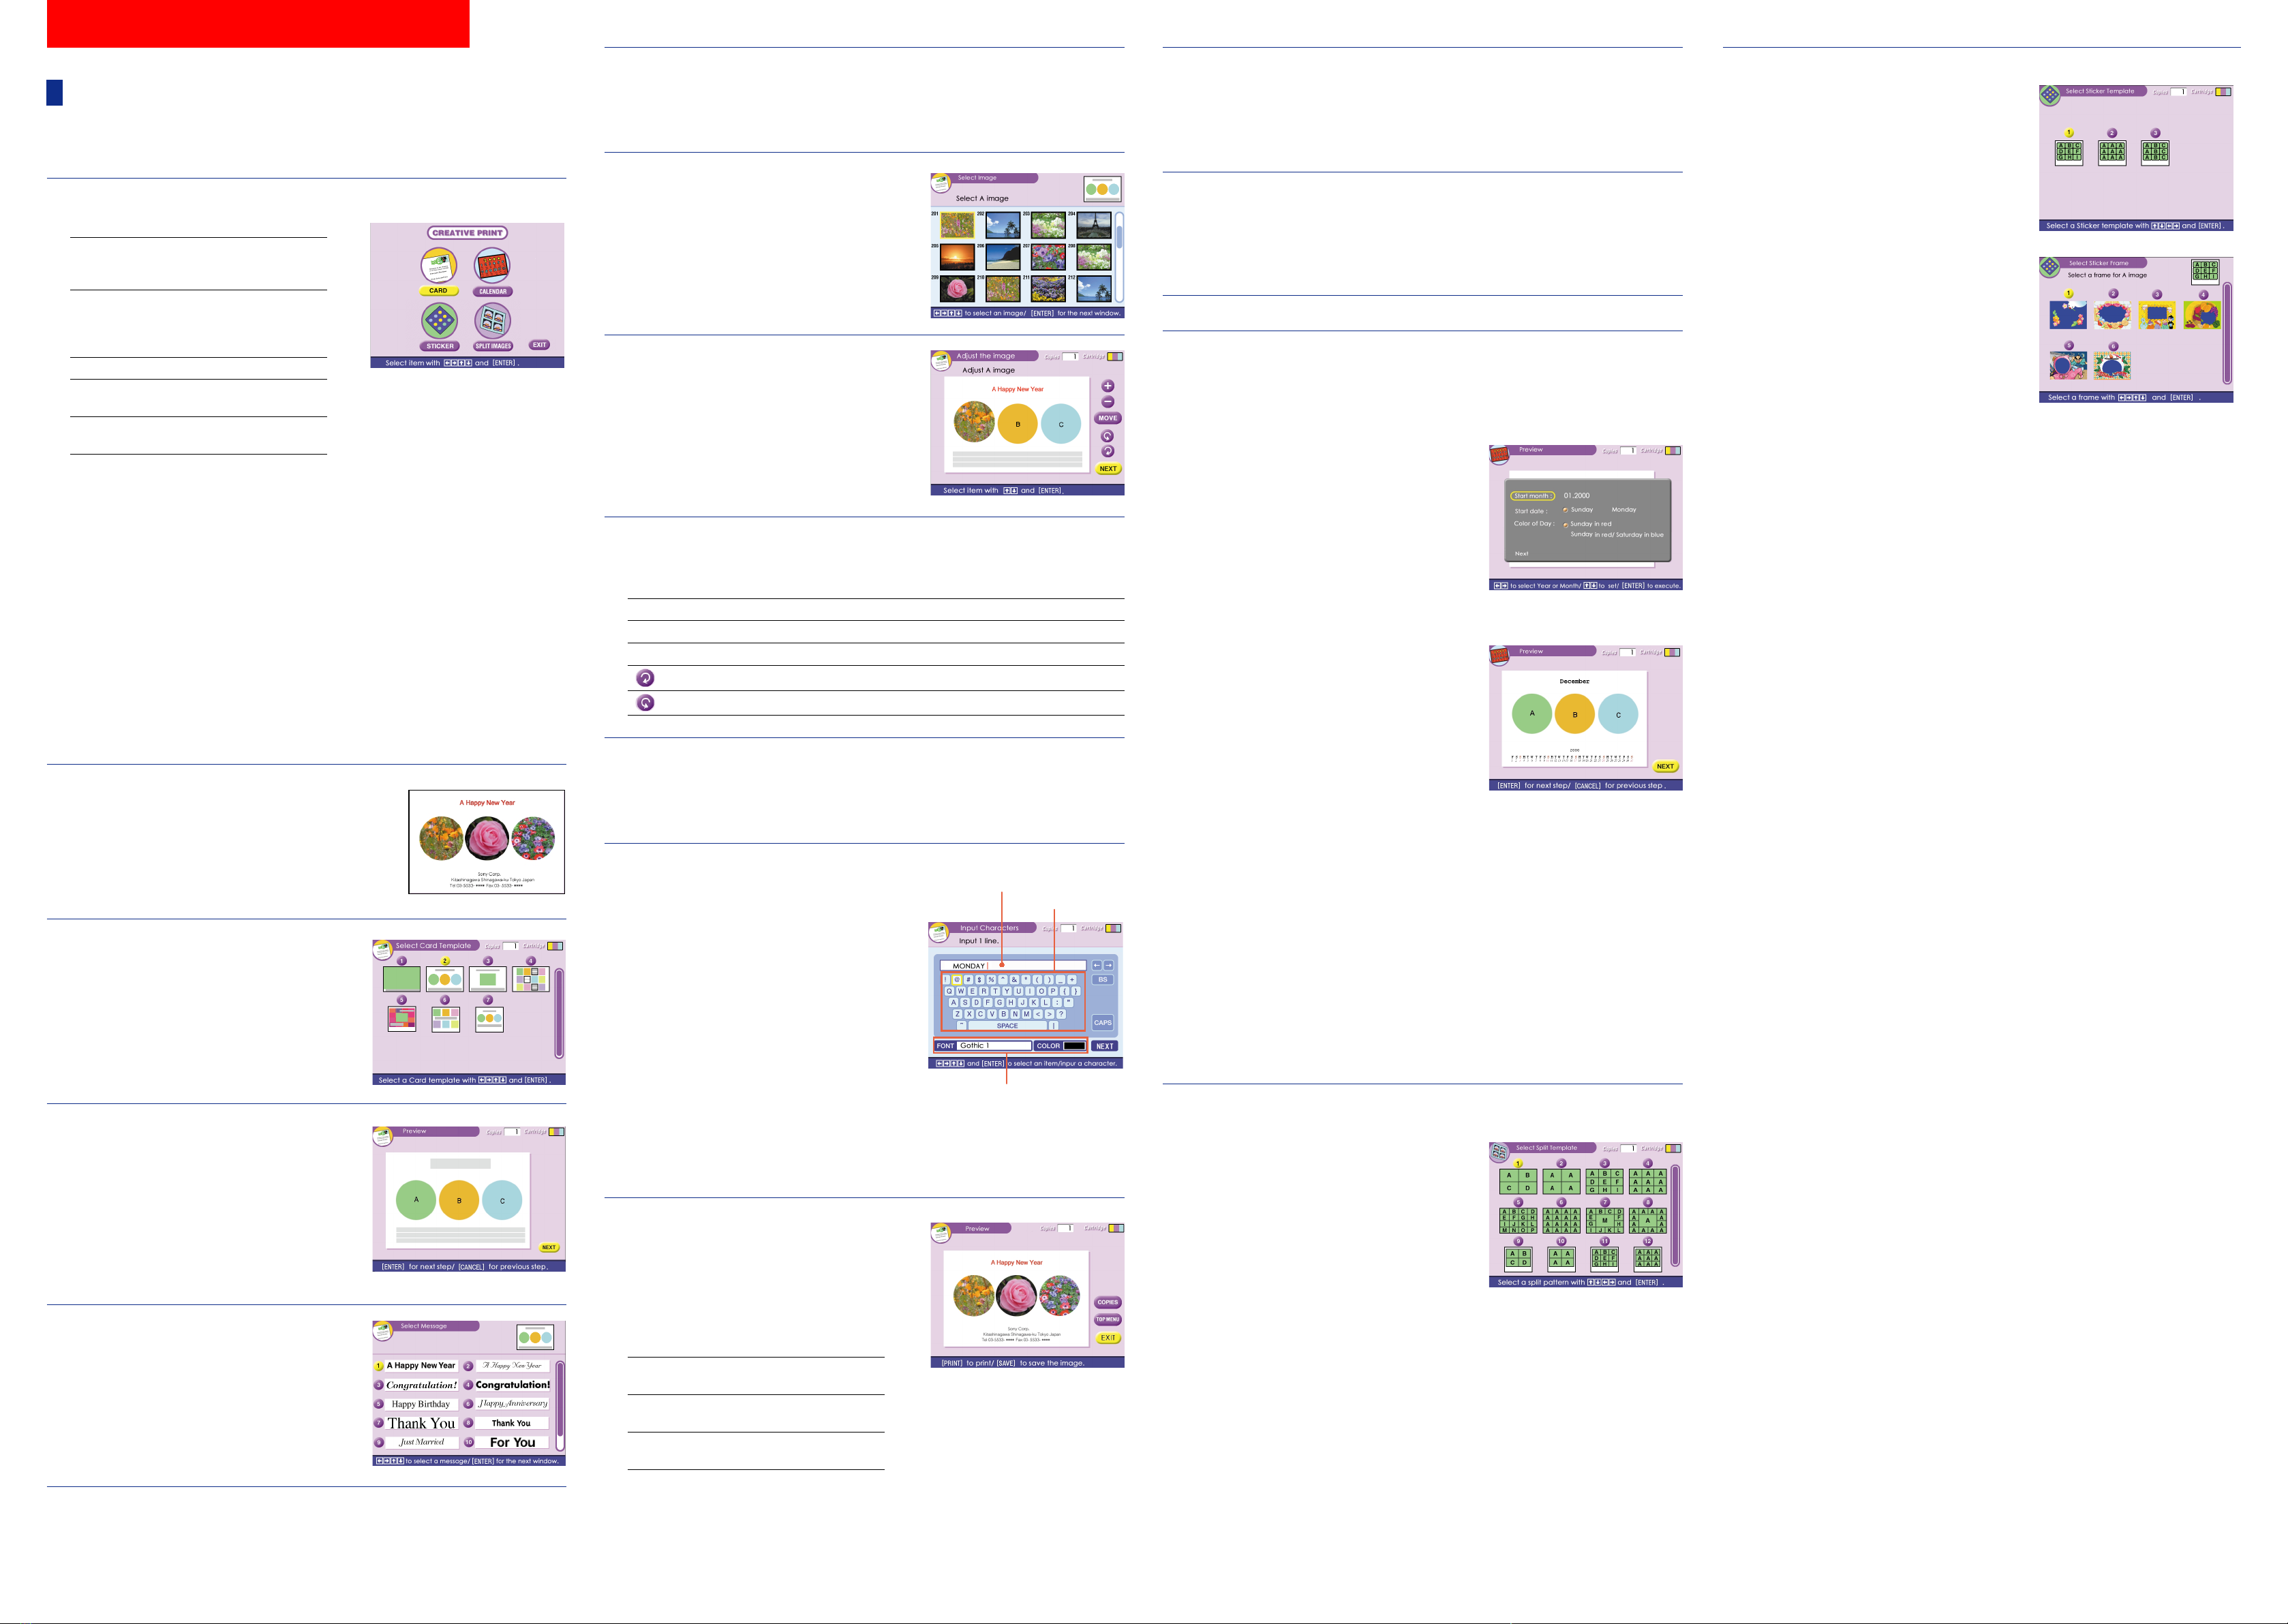
Changing the printer settings
You can change the printer settings using the SET
menu as follows:
1Press MENU.
The MENU bar is displayed.
2Press B/b to move the cursor to “SET” and press
ENTER.
The cursor moves to the SET sub menu.
3Press V/v to move the cursor to the desired
setting item and press B/b and ENTER to change
the setting.
For detailed settings, see “Setting items.”
4After finishing setting, press MENU.
The settings become effective and the previous
screen is displayed.
The settings remain effective even after you turn off
the printer until they are changed.
Notes
•If the “Memory Stic ” or PC card is in write
protect status, you cannot save an image on the
“Memory Stic ” or PC card.
•During saving the image, do not turn off the power
or remove the “Memory Stic ” or PC card from the
insertion slot. The “Memory Stic ” or PC card
may be damaged.
Saving an image to a
“Memory Stick” or PC card
You can save the image being edited by the EFFECT menu, or processed by the CREATIVE
PRINT menu onto a “Memory Stic ” or PC card.
1Press SAVE.
When either “Memory Stic ” or PC card is inserted, a confirmation dialog box is displayed.
When both “Memory Stic ” and PC card are inserted, a dialog box to select the destination is
displayed.
2Press the arrow (B/b/V/v) button to select “Yes” or the destination (“Memory Stic ” or PC
card) and press ENTER.
The image is saved.
from the insertion slot. The “Memory Stic ” or PC
card may be damaged.
•An image, once deleted, will be lost forever. Before
deleting an image, double-chec that it is the right
one.
•When formatting a “Memory Stic ,” all the files
except for the image files will be deleted.
Notes
•If the “Memory Stic ” or PC card is in write
protect status, you cannot delete images or format
the “Memory Stic .”
•During deleting or formatting, do not turn off the
power or remove the “Memory Stic ” or PC card
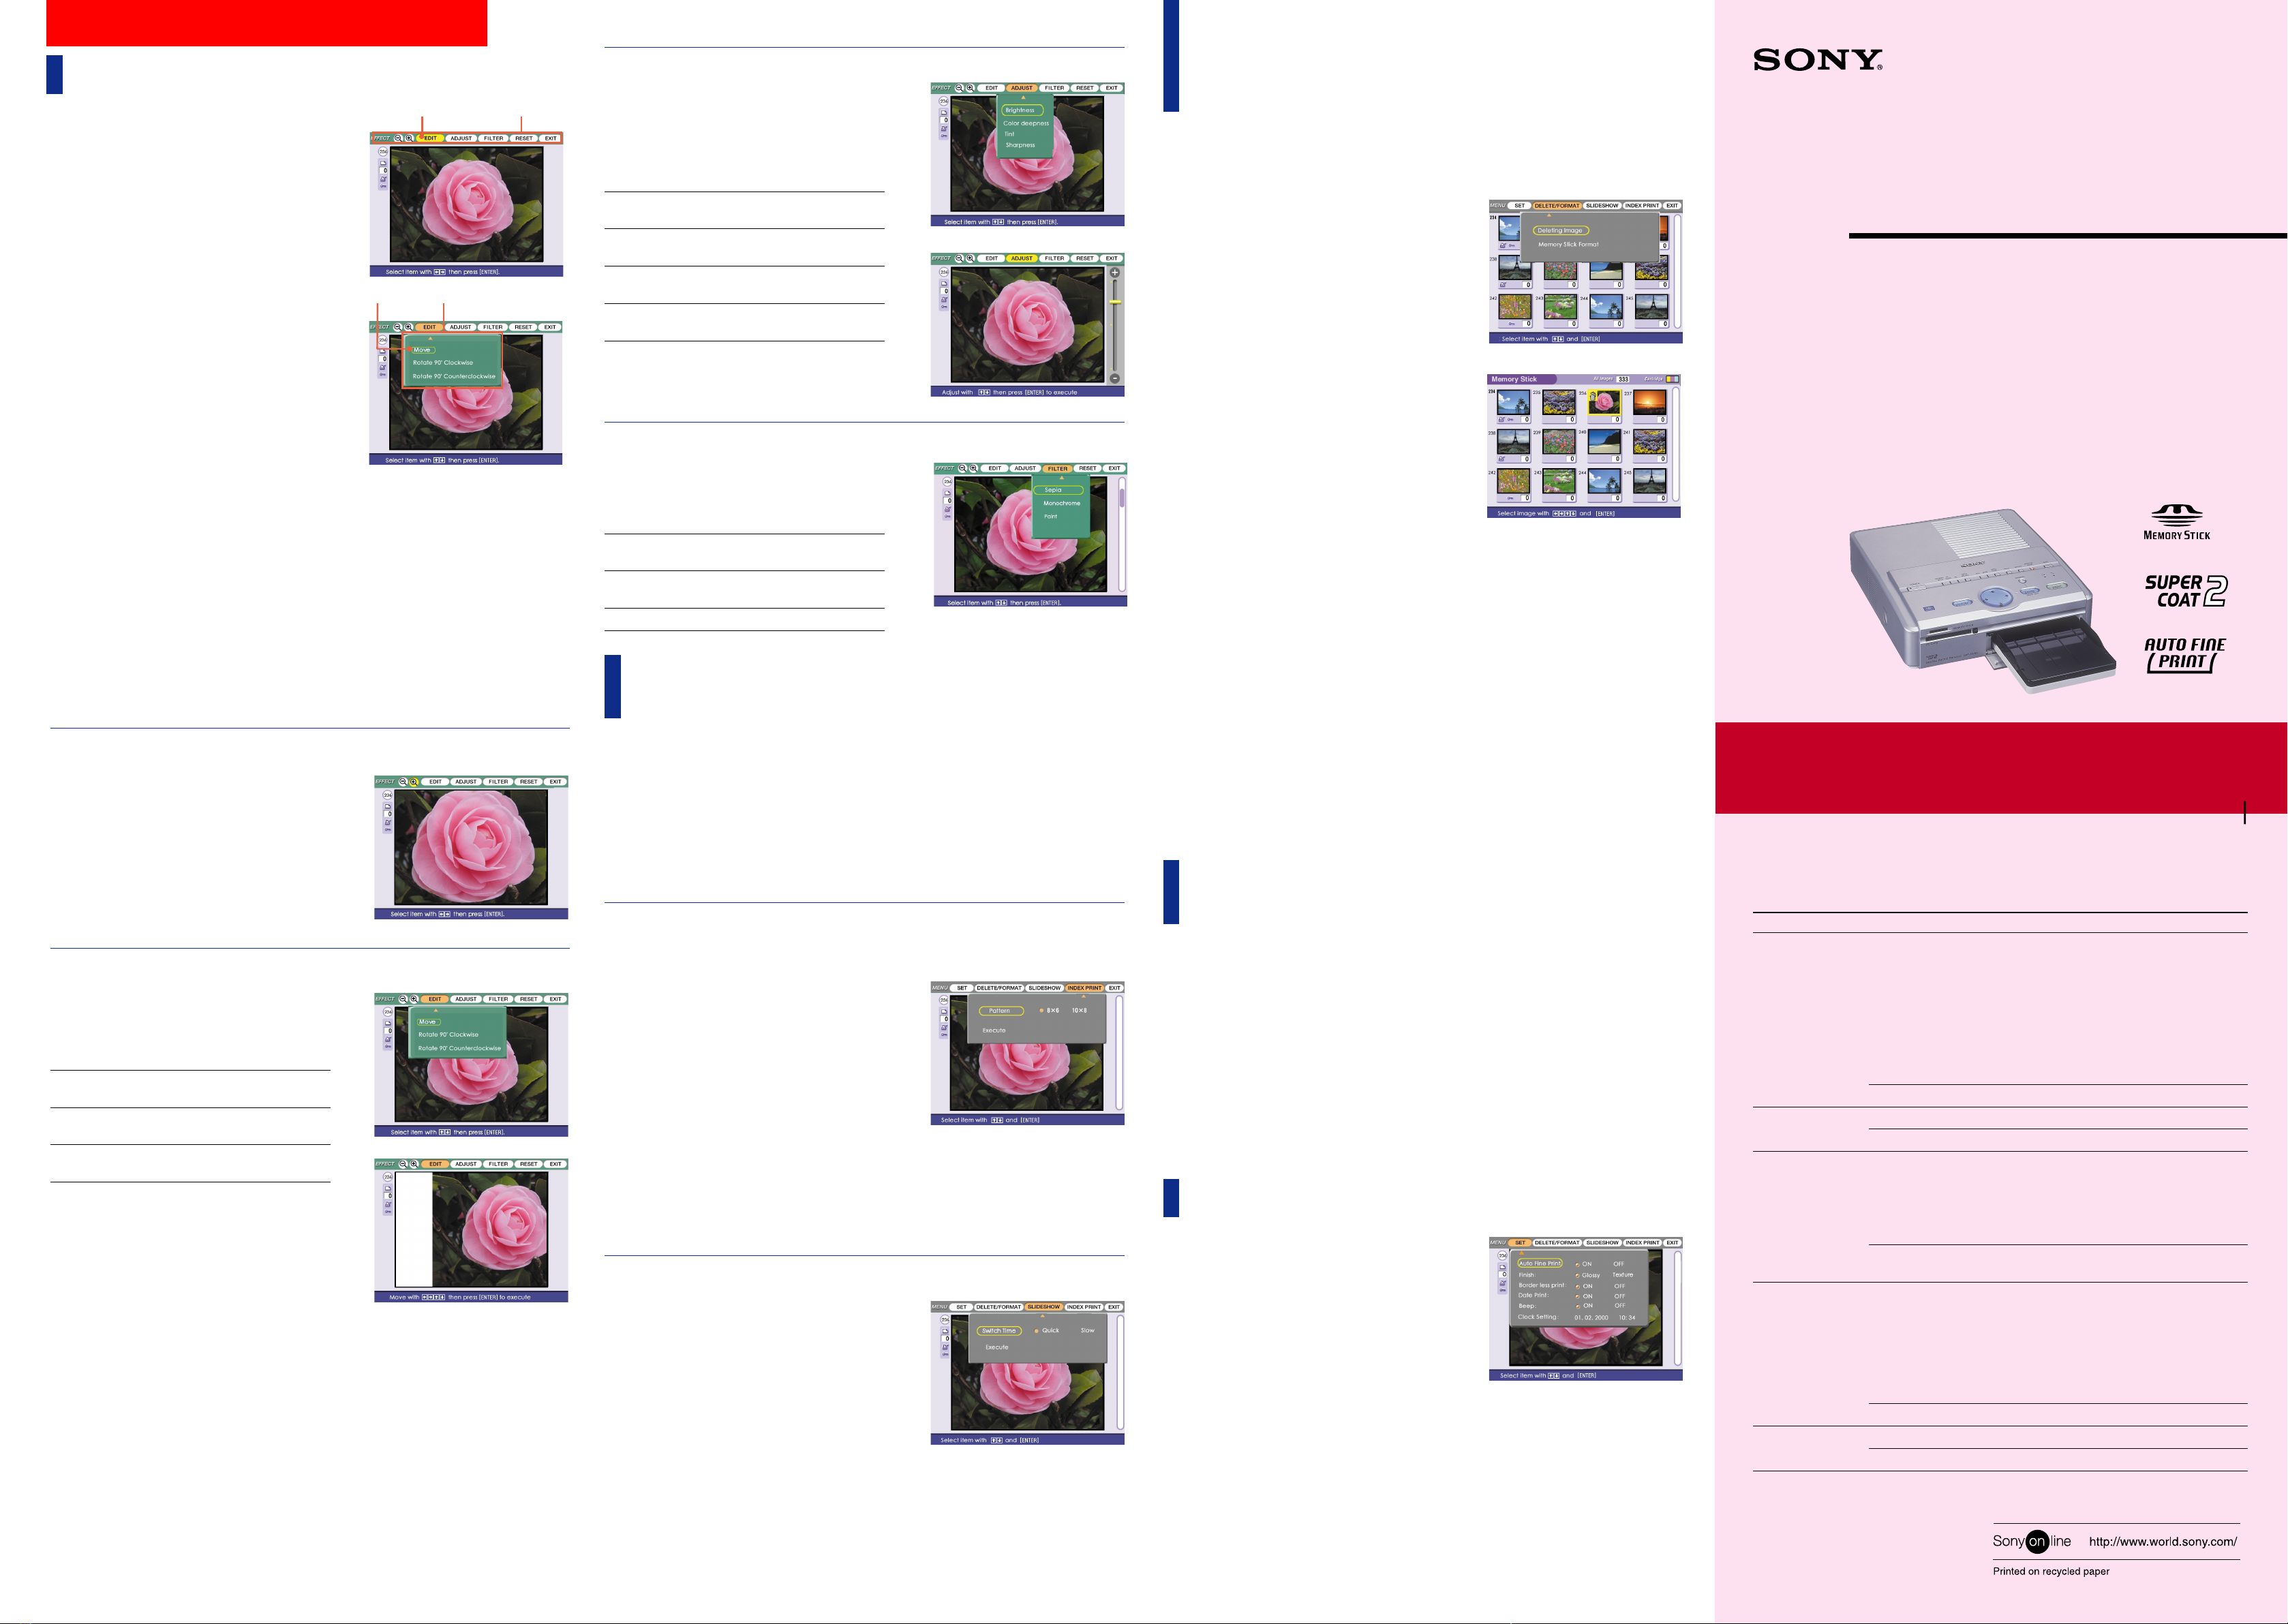
Deleting images of a
“Memory Stick” or PC card
You can delete the selected images on a “Memory
Stic ” or PC card.
1Press INPUT SELECT to light on “MEMORY
STICK” or PC CARD indicator.
2Press MENU.
The MENU bar is displayed.
3Press B/b to move the cursor to “DELETE/
FORMAT” and press ENTER.
The cursor moves to the sub menu.
4Press V/v to move the cursor to “Deleting Image”
and press ENTER.
The thumbnail list is displayed. When you
displayed a preview image in step 1, the trash
icon is attached to that image.
5Press the arrow (B/b/V/v) button to move the
trash icon to the image you want to delete, then
press ENTER.
6Press ENTER.
A confirmation dialog box is displayed.
7Press the arrow (B/b) button to select “Yes” and
press ENTER.
The selected image is deleted. You cannot delete
an image protected or preset by DPOF.
To delete other images, repeat steps 5 through 7.
To return to the preceding procedure, press
CANCEL.
Formatting a “Memory Stick”
You can format a “Memory Stic .” In step 4, select
“Memory Stic Format” and press ENTER. When the
confirmation dialog box is displayed, press the arrow
(B/b) button to select “Yes” and press ENTER. The
“Memory Stic ” is formatted and all the image files
and other files are deleted at one time.
Setting items
Items Settings Contents
Auto Fine Print ON Adjusts an image automatically for printing in
better picture quality. Auto Fine Print function is
especially effective to adjust a dar and low-
contrast image.
Notes
• The image displayed on the screen is not adjusted.
• When printing from a computer, the Auto Fine Print
function does not wor .
• You cannot change the setting during the CREATIVE
PRINT mode.
OFF Prints an image without ma ing adjustments.
Finish Glossy Prints an image vividly with glossy finish.
Texture Prints an image softly with uniform uneven finish.
Border less print ON Prints an image without borders around the image.
Notes
• You cannot ma e borderless print with Small Size print
paper.
• When printing 4:3 picture, the upper and bottom ends
of the image are cut and printed in a 3:2 picture.
OFF Prints an image with borders around the image.
(Both 4:3 and 3:2 pictures will not be cut off.)
Date Print ON Prints an image with the date recorded together
with the image shot with your digital still camera.
Notes
• You can print the date only when the image’s date data
is recorded in the DCF (Design rule for Camera File
system) format.
• You cannot change the setting during the CREATIVE
PRINT mode.
OFF Prints an image without the data.
Beep ON The warning and operation sound beeps.
OFF The warning and operation sound does not beep.
Image moves
Editing, Setting, and Saving Images
Editing an image
By using the EFFECT menu, you can edit and
adjust an image. The basic operations for the
EFFECT menu follow:
1Select the image to be edited in the thumbnail list
or press PICTURE to display the preview of the
image to be edited.
2Press EFFECT.
The preview image and the EFFECT menu bar are
displayed.
3Press B/b to move the cursor to the desired item
on the menu bar and press ENTER.
The cursor moves to the sub menu.
4Press V/v to move the cursor to the desired sub
menu item and press ENTER.
The selected sub menu item is displayed. When
adjustments or settings are required, follow the
guide message on the screen.
When editing ends...
To print the edited image: Press PRINT.
To return to the previous screen: Press EFFECT.
To perform other editing: Repeat steps 3 and 4.
To save an edited image: Press SAVE to save the
edited image in the “Memory Stic ” or PC card.
To reset to the previous image settings
Press B/b to select RESET and press ENTER. When
a confirmation dialog box appears, press B/b to
select “Yes” and press ENTER.
To cancel operation
Press CANCEL to return to the screen of the
preceding procedure.
To display another sub menu
Press V until the current sub menu disappears.
Then repeat steps 3 and 4 to display and wor in a
sub menu of another menu item.
Notes
•It may ta e longer to process an edited image after
you press PRINT.
•Do not remove “Memory Stic ” or PC card during
the EFFECT mode. If you do, the EFFECT mode
ends forcibly and any editions you have done are
canceled.
Enlarging/Reducing an image
To enlarge an image, select “+” on the menu bar
with B/b.
To reduce an image, select “–” with B/b.
Then press ENTER. Each time you press ENTER,
the image is enlarged or reduced:
•–: up to 60%
•+: up to 200%
Note
The picture quality of an enlarged image may be
deteriorated depending on its size.
Changing an image position
Press B/b to move the cursor to “EDIT” on the
menu bar and press ENTER. Then press V/v to
move the cursor to the desired item on the EDIT
sub menu and press ENTER:
Move Move the picture with
B/b/V/v, then press ENTER.
Rotate 90° The image rotates 90°
Cloc wise cloc wise.
Rotate 90° The image rotates 90° counter-
Countercloc wise cloc wise.
Adjusting the pictures
Press B/b to move the cursor to “ADJUST” on the
menu bar and press ENTER. Then press V/v to
move the cursor to the desired adjustment item
and press ENTER. The adjustment slider appears
in the right on the screen. Adjust the level as
follows and press ENTER.
Brightness Press V to brighten the picture or
v to dar en it.
Color deepness Press V to deepen the colors or v
to lighten the colors.
Tint Press V to ma e the picture
reddish or v to ma e it bluish.
Sharpness Press V to sharpen the outlines or
v to reset them.
Note
The picture quality of the image being displayed on
the screen may differ from that of the printed image.
Adding a special filter to an image
Press B/b to move the cursor to “FILTER” on the
menu bar and press ENTER. Then press V/v to
move the cursor to the desired filter you want to
add to the image then press ENTER:
Sepia Ma es the image li e an old
photograph with faded colors.
Monochrome
Ma es the image into a monochrome
picture.
Paint
Ma es the image li e a painted picture.
Viewing the “Memory
Stick” or PC card images
You can ma e an index list of the images saved in a “Memory Stic ” or PC card (Index Print),
or perform the slide show of the images. When you want to search for an image, you can find it
easily with these functions.
Note
Before you begin, ma e sure that either ALL or DPOF
indicator of AUTO PRINT button does not light.
To return to the previous image
Press B/b to select “Exit” and press ENTER. Or
press MENU.
To display another sub menu
Press V until the current sub menu disappears. Then
press B/b to move the cursor to the desired item on
the menu bar and press ENTER.
Making an index print of “Memory Stick” or
PC card images
1Press INPUT SELECT to light on “MEMORY
STICK” or PC CARD indicator.
2Press MENU.
The MENU bar is displayed.
3Press B/b to move the cursor to “INDEX PRINT”
and press ENTER.
4Press B/b to move the cursor to the desired split
pattern and press ENTER.
5Press the arrow (B/b/V/v) button to move the
cursor to “Execute,” then press ENTER.
The index list of the “Memory Stic ” or PC card
images is printed with each image in the selected
pattern. Each thumbnail has a corresponding image
number. When the “Date Print” is selected, the shot
date (year, month and day) is also printed.
Viewing the slideshow
1Press INPUT SELECT to light on “MEMORY
STICK” or PC CARD indicator.
2Press MENU.
The MENU bar is displayed.
3Press B/b to move the cursor to “SLIDESHOW”
and press ENTER.
4Press B/b to move the cursor to the desired
switch time of images and press ENTER.
5Press the arrow (B/b/V/v) button to move the
cursor to “Execute,” then press ENTER.
The images in the “Memory Stic ” or PC card are
displayed one after another in the selected switch
time li e a slideshow.
To stop slideshow
Press CANCEL.
DPP-SV55
2000 Sony Corporation
Effect menu bar
Cursor Sub menu
m
Printed in Japan
Cursor
Notes
•Depending on the image, it may ta e time
to be displayed.
•You cannot view the slideshow during the
CREATIVE PRINT or EDIT mode.
Notes
•You cannot ma e an index print during
the CREATIVE PRINT or EDIT mode.
•An image which is not displayed because
it is damaged or has some ind of trouble
will not be printed.
Note
You cannot delete an image during the
CREATIVE PRINT or EDIT mode.
Note
The items which cannot be changed are
displayed in gray and cannot be selected.