Sony UP-DP10 User manual

2000 Sony Corporation
3-203-973-11(1)
Operating Instructions Page 2
Mode d’emploi Page 37
GB
FR
UP-DP10
Digital Photo Printer

WARNING
THIS APPARATUS MUST BE EARTHED.
WARNING
To prevent fire or shock hazard,
do not expose the unit to rain or
moisture.
To avoid electrical shock, do not
open the cabinet. Refer servicing
to qualified personnel only.
If you have any questions about this product, you
may call : SONY Customer Information Center 1-
800-222-SONY (7669) or write to : Sony
Customer Information Center 1 Sony Drive, Mail
Drop #T1-11, Park Ridge, NJ 07656.
Declaration of Conformity
Trade Name: SONY
Model No: UP-DP10
Responsible Party: Sony Electronics Inc.
Address: 1 Sony Drive, Park Ridge,
NJ.07656 USA
Telephone No.: 201-930-6972
This device complies with Part 15 of the FCC
Rules. Operation is subject to the following two
conditions: (1) This device may not cause
harmful interference, and (2) this device must
accept any interference received, including
interference that may cause undesired
operation.
For the customers in the USA
This equipment has been tested and found to
comply with the limits for a Class B digital device,
pursuant to Part 15 of the FCC Rules. These
limits are designed to provide reasonable
protection against harmful interference in a
residential installation. This equipment generates,
uses and can radiate radio frequency energy and,
if not installed and used in accordance with the
instructions, may cause harmful interference to
radio communications. However, there is no
guarantee that interference will not occur in a
particular installation. If this equipment does
cause harmful interference to radio or television
reception, which can be determined by turning the
equipment off and on, the user is encouraged to
try to correct the interference by one or more of
the following measures:
— Reorient or relocate the receiving antenna.
— Increase the separation between the
equipment and receiver.
— Connect the equipment into an outlet on a
circuit different from that to which the receiver
is connected.
— Consult the dealer or an experienced radio/TV
technician for help.
This device requires shielded interface cable to
comply with FCC emission limits.
You are cautioned that any changes or
modifications not expressly approved in this
manual could void your authority to operate this
equipment.

Table of Contents 3
English
GB
Introduction ............................................................................. 4
What the Digital Photo Printer Can Do ..................................4
Checking the Packing List......................................................4
Requirements .......................................................................... 5
Names of Parts ........................................................................ 6
Setup and Connection ............................................................ 7
Attaching the Stands to the Printer .........................................7
Connecting the Printer to a Computer .................................... 7
Connecting the Power Supply ................................................ 8
Turning the Power On/Off......................................................8
Installing the Printer Driver .................................................... 9
With Windows 98...................................................................9
With Windows 95.................................................................12
With the Macintosh OS ........................................................ 13
Preparing to Print.................................................................. 14
Preparing a Print Pack .......................................................... 14
Loading the Ink Ribbon Cartridge and Printing Paper .........16
Removing the Ink Ribbon Cartridge and the Printing Paper 19
Making Printer Setting from your Computer ...................... 20
With Windows......................................................................20
With the Macintosh .............................................................. 25
Miscellaneous........................................................................ 31
Maintaining the Performance of the Printer .........................31
Troubleshooting....................................................................31
If the Paper Jams ..................................................................33
Main Specifications .............................................................. 35
Table of Contents

4
Introduction
What the Digital Photo Printer
Can Do
High-quality Photo Printing
The sublimation printing process used by this
printer makes it possible to print images with fine
photographic quality.
Prints with no white border
The paper that is used for printing has
perforations near both edges that allow you to
tear off the blank strips of paper on each edge.
Laminate Patterns
Because laminate processing is performed while
photos are printed, the photos will not become
discolored over time. You can select from
among the following laminate options:
• Glossy: Produces a glossy print.
• Texture: Produces a textured print.
• Matte: Produces a matte print.
Compact, Thin, and Light Design
The printer itself is thin and the size of an A4
sheet. The printer can operate either in a vertical
position or in a horizontal position. The printer
weighs only 2.7kg, making it light and easy to
handle.
Paper Jams Can Be Cleared Easily
If the paper jams, it can be easily cleared simply
by removing the cover.
Checking the Packing List
Check the contents of the box against the packing
list.
Paper supply/eject tray (1)
Stands (2)
Power cord (1)
Traycase(1)
Ink ribbon cartridge (sufficient for printing 10 sheets) (1)
Print paper (5 sheets each of UPC-10P23 and UPC-
10P34) (1)
CD-ROM(driver,application)(1)
OperatingManual(thismanual)(1)
Software license agreement (1)
Warranty(1)
Notes
• We recommend saving the box and the packing
materials in case it is necessary to transport or
ship the printer.
• When shipping the printer, remove the ink
cartridge and the paper supply/eject tray from
the printer.

5
Requirements
Printing processing is performed faster when
there is more memory and hard disk space
available. Therefore, we recommend allocating
as much memory and hard disk space as possible.
The following environment is required in order to
use the UP-DP10.
When using a Windows computer
<Requirements in order to connect to a
USB port:
• A personal computer on which Microsoft
Windows 98 runs normally
• At least 32MB of RAM
• At least 30MB of hard disk space
• A USB port*
*Connection requires a USB cable with a
male type A connector and a male type B
connector. (Refer to the illustration
elsewhere on this page.)
<Requirements in order to connect to a
printer port:
• A personal computer on which Microsoft
Windows 98 or Windows 95 runs normally
• At least 32MB of RAM
• At least 30MB of hard disk space
• A printer port*
*Please see the user's manual provided with
your computer for the appropriate type of
printer cable.
Note
When using device driver
(Windows\system\lpt.vxd) version 4.00.953
in Windows 95, normal printing might be
impossible. In this event, obtain the most
recent driver from your Windows 95
distributor.
When using a Macintosh
• A Power Macintosh computer running Mac OS
8.6 or later, and which is equipped with a USB
port as a standard feature
• ColorSync2.5 or later
• At least 64MB of RAM
• At least 30MB of hard disk space
*Connection requires a USB cable with a male
type A connector and a male type B connector.
(Refer to the illustration below.)
Male type A
connector Male type B
connector
6
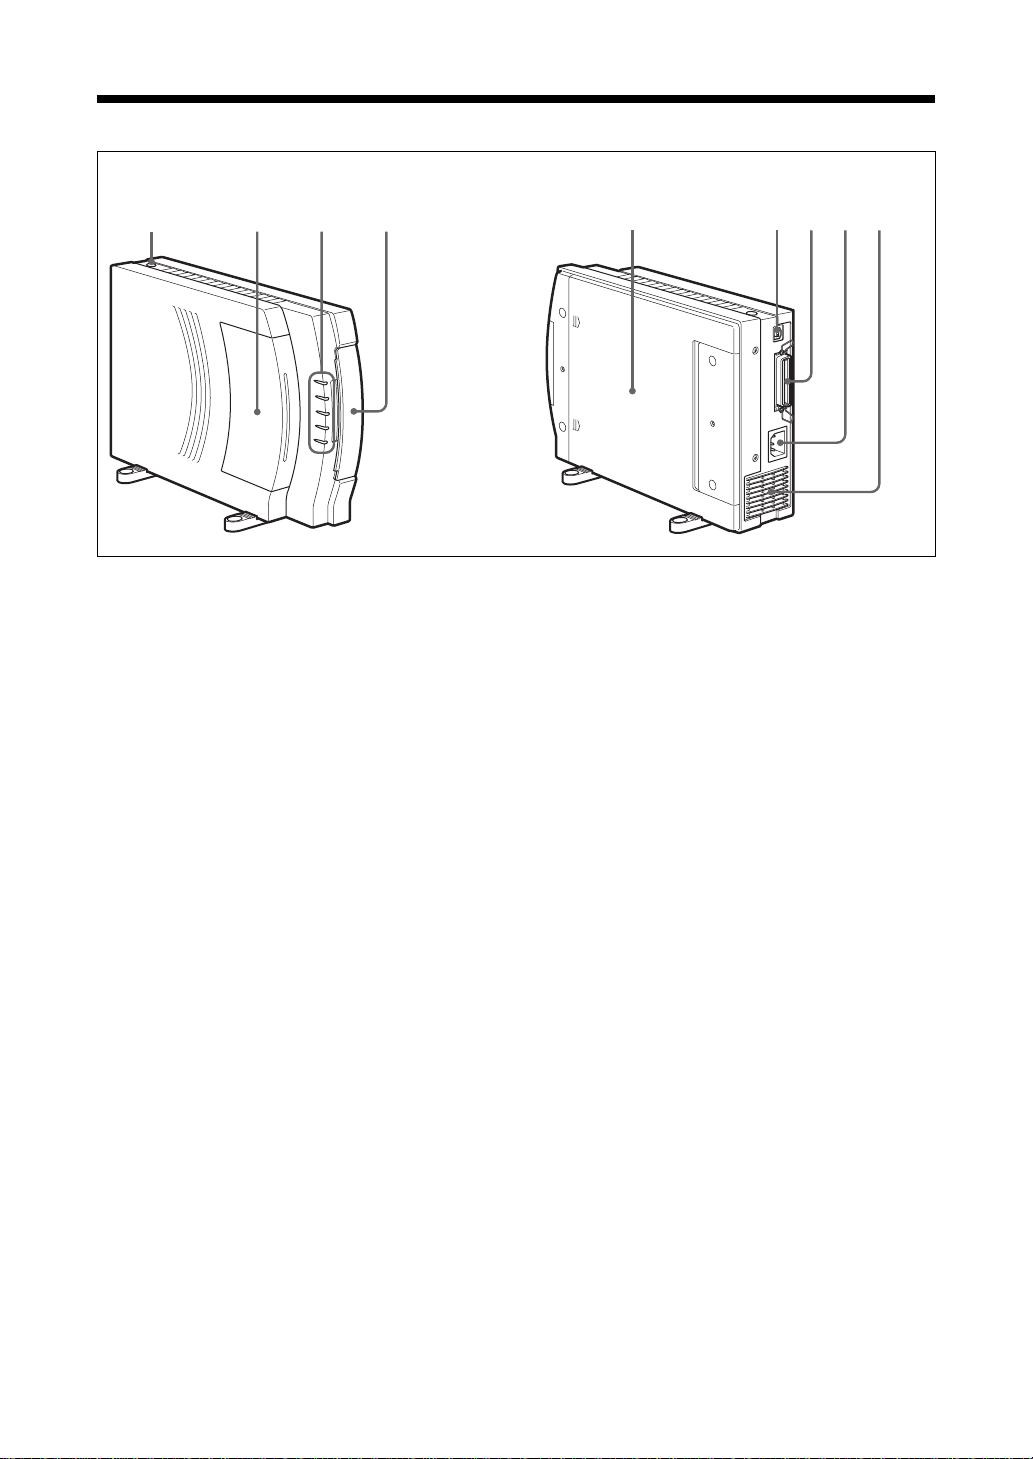
Names of Parts
<Front View> <Rear View>
1234 75 6 8 9
1Operation switch
2Ribbon cartridge cover
3Lamps
POWER lamp
PRINT lamp
PAPER lamp
RIBBON lamp
ALARM lamp
The lamps indicate the printer status by
lighting or flashing. For details, refer to
page 32.
4Paper supply/eject tray cover
5Bottom cover
6USB port
7Parallel port
8AC power inlet
9Ventilation holes

7
Setup and Connection
Attaching the Stands to the
Printer
The stands can be attached by screws. The
mounting of the stands depends on whether the
printer is going to be used in the vertical position
or the horizontal position. (Refer to the
illustration.)
<For vertical orientation>
<For horizontal orientation>
Connecting the Printer to a
Computer
Notes
• Before connecting the printer to a computer, be
certain to first turn off the power for the printer,
the computer, the monitor, etc.
• Read the operating manual for the personal
computer carefully.
• When connecting to a printer port, we
recommend using a shielded printer cable not
more than 2m long and with a double-ended
ferrite core.
• Make sure that you insert the cable connectors
all of the way when making the connections.
• The driver provided with this printer does not
support usage through a network.
• Proper operation can not be assured when USB
connection is made through a hub.
• The printer cannot be connected using both a
USB cable and a parallel cable. Connect it using
one type of cable or the other.
When connecting to a USB port
Note
Only the USB port can be used for connection to
a Macintosh computer. (This printer cannot be
used with a Macintosh that does not have a USB
port as a standard feature.)
To USB port (B connector end)
To USB port
(A connector
end)
USB cable
(purchased separately)
Windows 98 computer
Macintosh
Setup and Connection
8
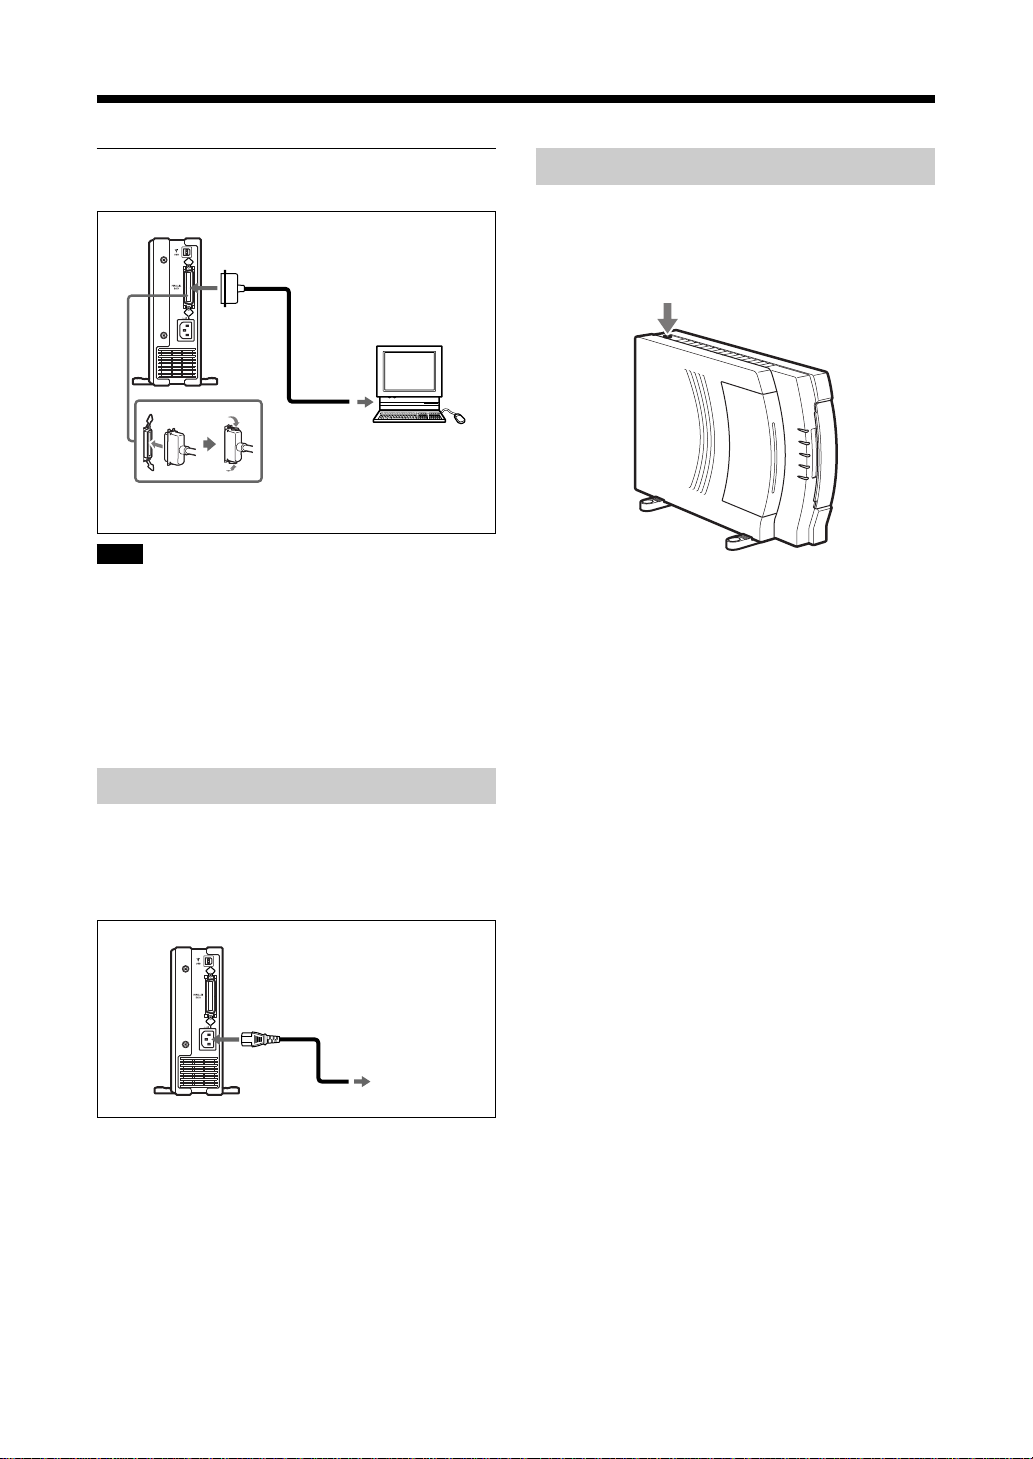
When connecting to a printer port
Note
When using the printer in fast transfer mode
(ECP mode), use an IEEE1284-compliant cable.
Note that in order to use fast transfer mode, the
parallel port must be set up on the personal
computer side. For details, refer to the operating
manual for the personal computer.
Connecting the Power Supply
Plug the female end of the power cord into the
AC power inlet on the printer, and then plug the
other end into an AC power outlet.
Turning the Power On/Off
Press the Operation switch so that the POWER
lamp is on. To turn the printer off, press the
Operation switch again.
Printer cable
(purchased separately)
Windows 95/98
computer
To parallel port
(Amphenol 36-pin connector)
To printer port
Plug
To outlet

9
Installing the Printer Driver
WithWindows 98
Install the printer driver that is contained in the
CD-ROM that is provided with the printer. The
“printer driver” is the software that allows you to
print on the UP-DP10, using the Print function of
typical application software.
Before installing the printer driver, turn the
computer and the printer off, and then connect
the printer to the computer.
When the Printer Is Connected by a
USB Cable
1Turn the printer on first, and then turn the
computer on. Once Windows 98 starts up,
the “Add New Hardware Wizard” window
appears.
If the “Add New Hardware Wizard” dialog
box does not appear when Windows 98 starts
up, install the printer by selecting [Start] t
[Settings] t[Printers] t[Add Printer].
2Click [Next].
The window changes as shown below.
3Select [Search for the best driver for your
device], and then click [Next].
The window changes as shown below.
4Place the “Printer Software UP-DP10” CD-
ROM in the CD-ROM drive.
5Select the [Specify a location] option, click
[Browse], specify the [Win98\English] folder
in the CD-ROM, and then click [Next].
The window changes as shown below.
6Click [Next].
After the file is copied, the window changes
as shown below.

Installing the Printer Driver
10
7Click [Finish].
The window changes as shown below.
8Click [Next].
The window changes as shown below.
9Select [Search for the best driver for your
device], and then click [Next].
The window changes as shown below.
10Select the [Specify a location] option, click
[Browse], specify the [Win98\English] folder
in the CD-ROM, and then click [Next].
The window changes as shown below.
11Click [Next].
The window changes as shown below.
12If necessary, you can type a name for the
printer in the [Printer name] field. Then,
click [Finish].
The window changes as shown below.
13Click [Finish].
The wizard ends. Installation is now
complete.
Other manuals for UP-DP10
1
Table of contents
Languages:
Other Sony Printer manuals

Sony
Sony UP-DF500 User manual

Sony
Sony UP-DR80MD User manual

Sony
Sony UP-27MD User manual

Sony
Sony UP-D898MD User manual

Sony
Sony FVP-1/1E User manual

Sony
Sony UP-X898MD User manual

Sony
Sony UP-CR25L User manual

Sony
Sony UP-5500 User manual

Sony
Sony DPP-SV55 User manual

Sony
Sony DPP FP70 - Picture Station Photo Printer User manual


