SA-VE525 (GB/CS) 4-233-674-61(1)
E
H
G
F
D
ON/STANDBY indicator
AA
BB
Front (Right)
WS-FV10A
Subwoofer
Rear (Right)
Front (Left)
Rear (Left)
Micro Satellite System
SA-VE525
WS-WV10A
(for rear speakers)
WS-TV10A
LEVEL MODE
MIN MAX
MOVIE MUSIC
POWER
ON
/
STANDBY
1234
Screws
POWER LEVEL MODE
AUTO
OFF
POWER
SAVE
Foot pads
IJ
Center
•
•
•
×
× ×
× ×
× ×
× ×
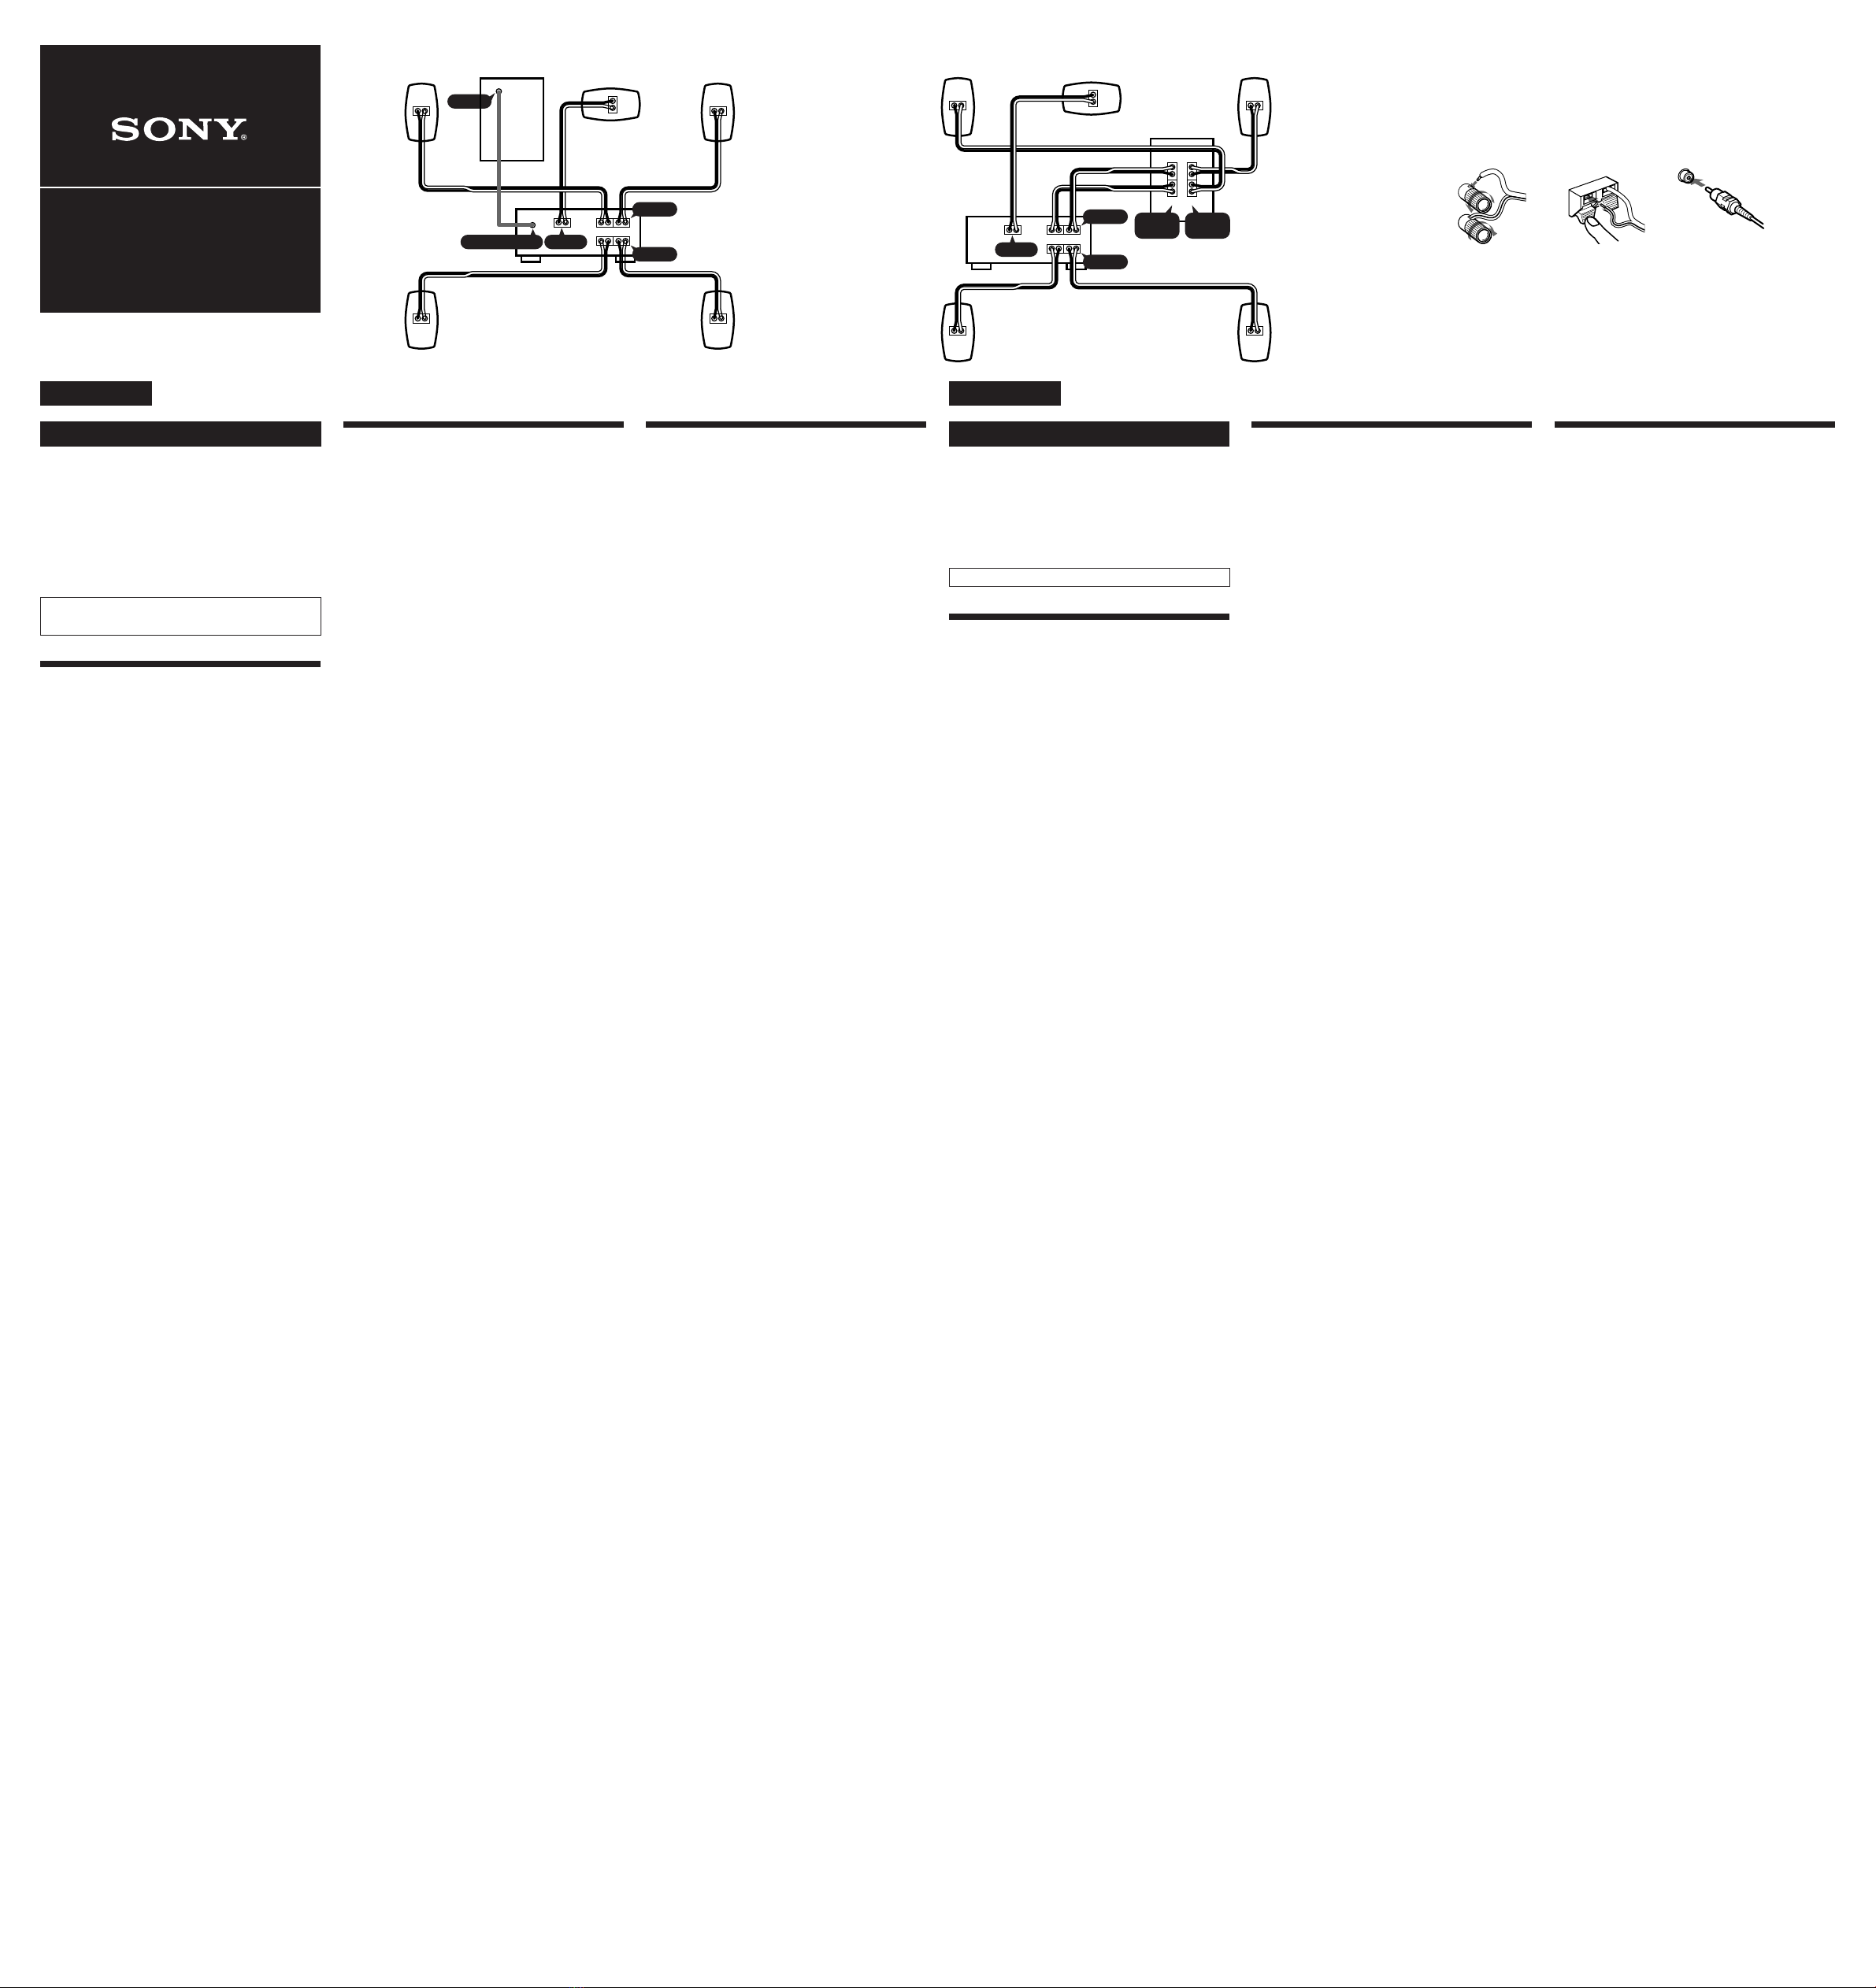
I
1
2
•
•
•B
•
A
B
•
•
•
•
•
D
AB
•
•
E
1
2
3
4
F
G
H
I
1
2
3
J
English
There is hum or noise in the speaker output.
•Make sure all the connections have been
correctly made.
•Make sure none of the audio components are
positioned too close to the TV set.
The sound has suddenly stopped.
•Make sure all the connections have been
correctly made. Contact between bare
speaker wires at the speaker terminals may
cause a short-circuit.
Specifications
SS-MS525 (front, center, and rear speakers)
Speaker system Full range ×2,
magnetically shielded
Speaker units 5 cm, balance drive
type
Enclosure type Bass reflex
Rated impedance 8 ohms
Power handling capacity
Maximum input power: 120 watts
Sensitivity level 87 dB (1 W, 1 m)
Frequency range 120 Hz - 20,000 Hz
Dimensions (w/h/d)
When attached speaker grille:
Approx. 89 ×144 ×130
mm
When attached supplied speaker stand:
Approx. 89 ×128 ×143
mm
(pointed upwards)
Approx. 89 ×122 ×143
mm
(pointed
downwards)
Mass
When attached speaker grille:
Approx.
750 g
When attached supplied speaker stand:
Approx.
850 g
SA-WMS525 (subwoofer)
Speaker system Active subwoofer,
magnetically shielded
Speaker unit Woofer: 20 cm, cone
type
Enclosure type Advanced SAW type
Reproduction frequency range
26 Hz - 250 Hz
Amplifier section
Rated Power Output 120 W (8 ohms 20 Hz - 20
kHz, THD 0.8%)
Inputs
LINE IN (input pin jack)
SPEAKER IN (input terminals)
Outputs
LINE OUT (output pin jack)
SPEAKER OUT (output terminals)
General
Power requirements 220 V AC, 50/60 Hz
Power consumptions 90 W
1 W (standby mode)
Dimensions (w/h/d) Approx. 230 ×392 ×
464 mm, including front
grille
Mass
Approx. 13.2 kg
Supplied accessories
Foot pads (16)
Center speaker stand (1)
Screw (for the center speaker stand) (1)
Washer (for the center speaker stand) (1)
Audio connecting cord (1)
Speaker connecting cords, 10 m (2)
Speaker connecting cords, 3.5 m (3)
Speaker connecting cords, 2.5 m (2)
Design and specifications are subject to change without
notice.
Adjusting the sound
Slight adjustments to the system can enhance your sound
enjoyment.
Adjusting the subwoofer (I)
1Set MODE according to the program
source as follows:
Source MODE
DVD, LD, video cassette MOVIE
or other video source
MD, CD, cassette tape MUSIC
or other audio source
2Rotate LEVEL to adjust the volume.
Set the volume level to best suit your
preference according to the program
source.
Notes
• Some amplifier functions for enhancing the sound may
cause distortion in the subwoofer. If such distortion
occurs, turn off those functions.
• To enjoy high-quality sound, do not turn the
subwoofer volume too high.
• To increase the bass sound from the subwoofer,
connect the system using “Hookup B”.
• The bass sound is enhanced in MOVIE mode rather
than in MUSIC mode. Therefore, if you change the
mode to MOVIE while listening to some sources that
do not include the bass sound, you may not be able to
get the effect.
Setting amplifier to enjoy movies
For the Dolby Digital
If your amplifier is connected internally or externally
with a Dolby Digital processor, you should use the setup
menus for the amplifier to specify the parameters of your
speaker system.
See the table below for the proper settings. For details on
the setting procedure, refer to the manual that was
provided with your amplifier.
Select Micro Satellite Position if a Sony amplifier
provides it.
When “Hookup A” is used
(Speaker setup)
For Set to
Front speakers SMALL
Center speaker SMALL
Rear speakers SMALL
Subwoofer ON (or YES)
When “Hookup B” is used
(Speaker setup)
For Set to
Front speakers LARGE
Center speaker SMALL
Rear speakers SMALL
Subwoofer OFF (or NO)
For the Dolby Pro Logic
If your amplifier is connected internally or externally
with a Dolby Pro Logic processor, you should set the
surround effect mode to “NORMAL” on the amplifier for
your particular speaker system.
For details on the setting procedure, refer to the manual
that was provided with your amplifier.
Troubleshooting
Should you encounter a problem with your speaker
system, check the following list and take the indicated
measures. If the problem persists, consult your nearest
Sony dealer.
There is no sound from the speaker system.
•Make sure all the connections have been
correctly made.
•Make sure the volume on the amplifier has
been turned up properly.
•Make sure the program source selector on the
amplifier is set to the proper source.
•Check if headphones are connected. If they
are, disconnect them.
There is distortion in the subwoofer sound
output.
•Check if any sound-enhancing functions have
been activated on the amplifier. If they have,
turn them off.
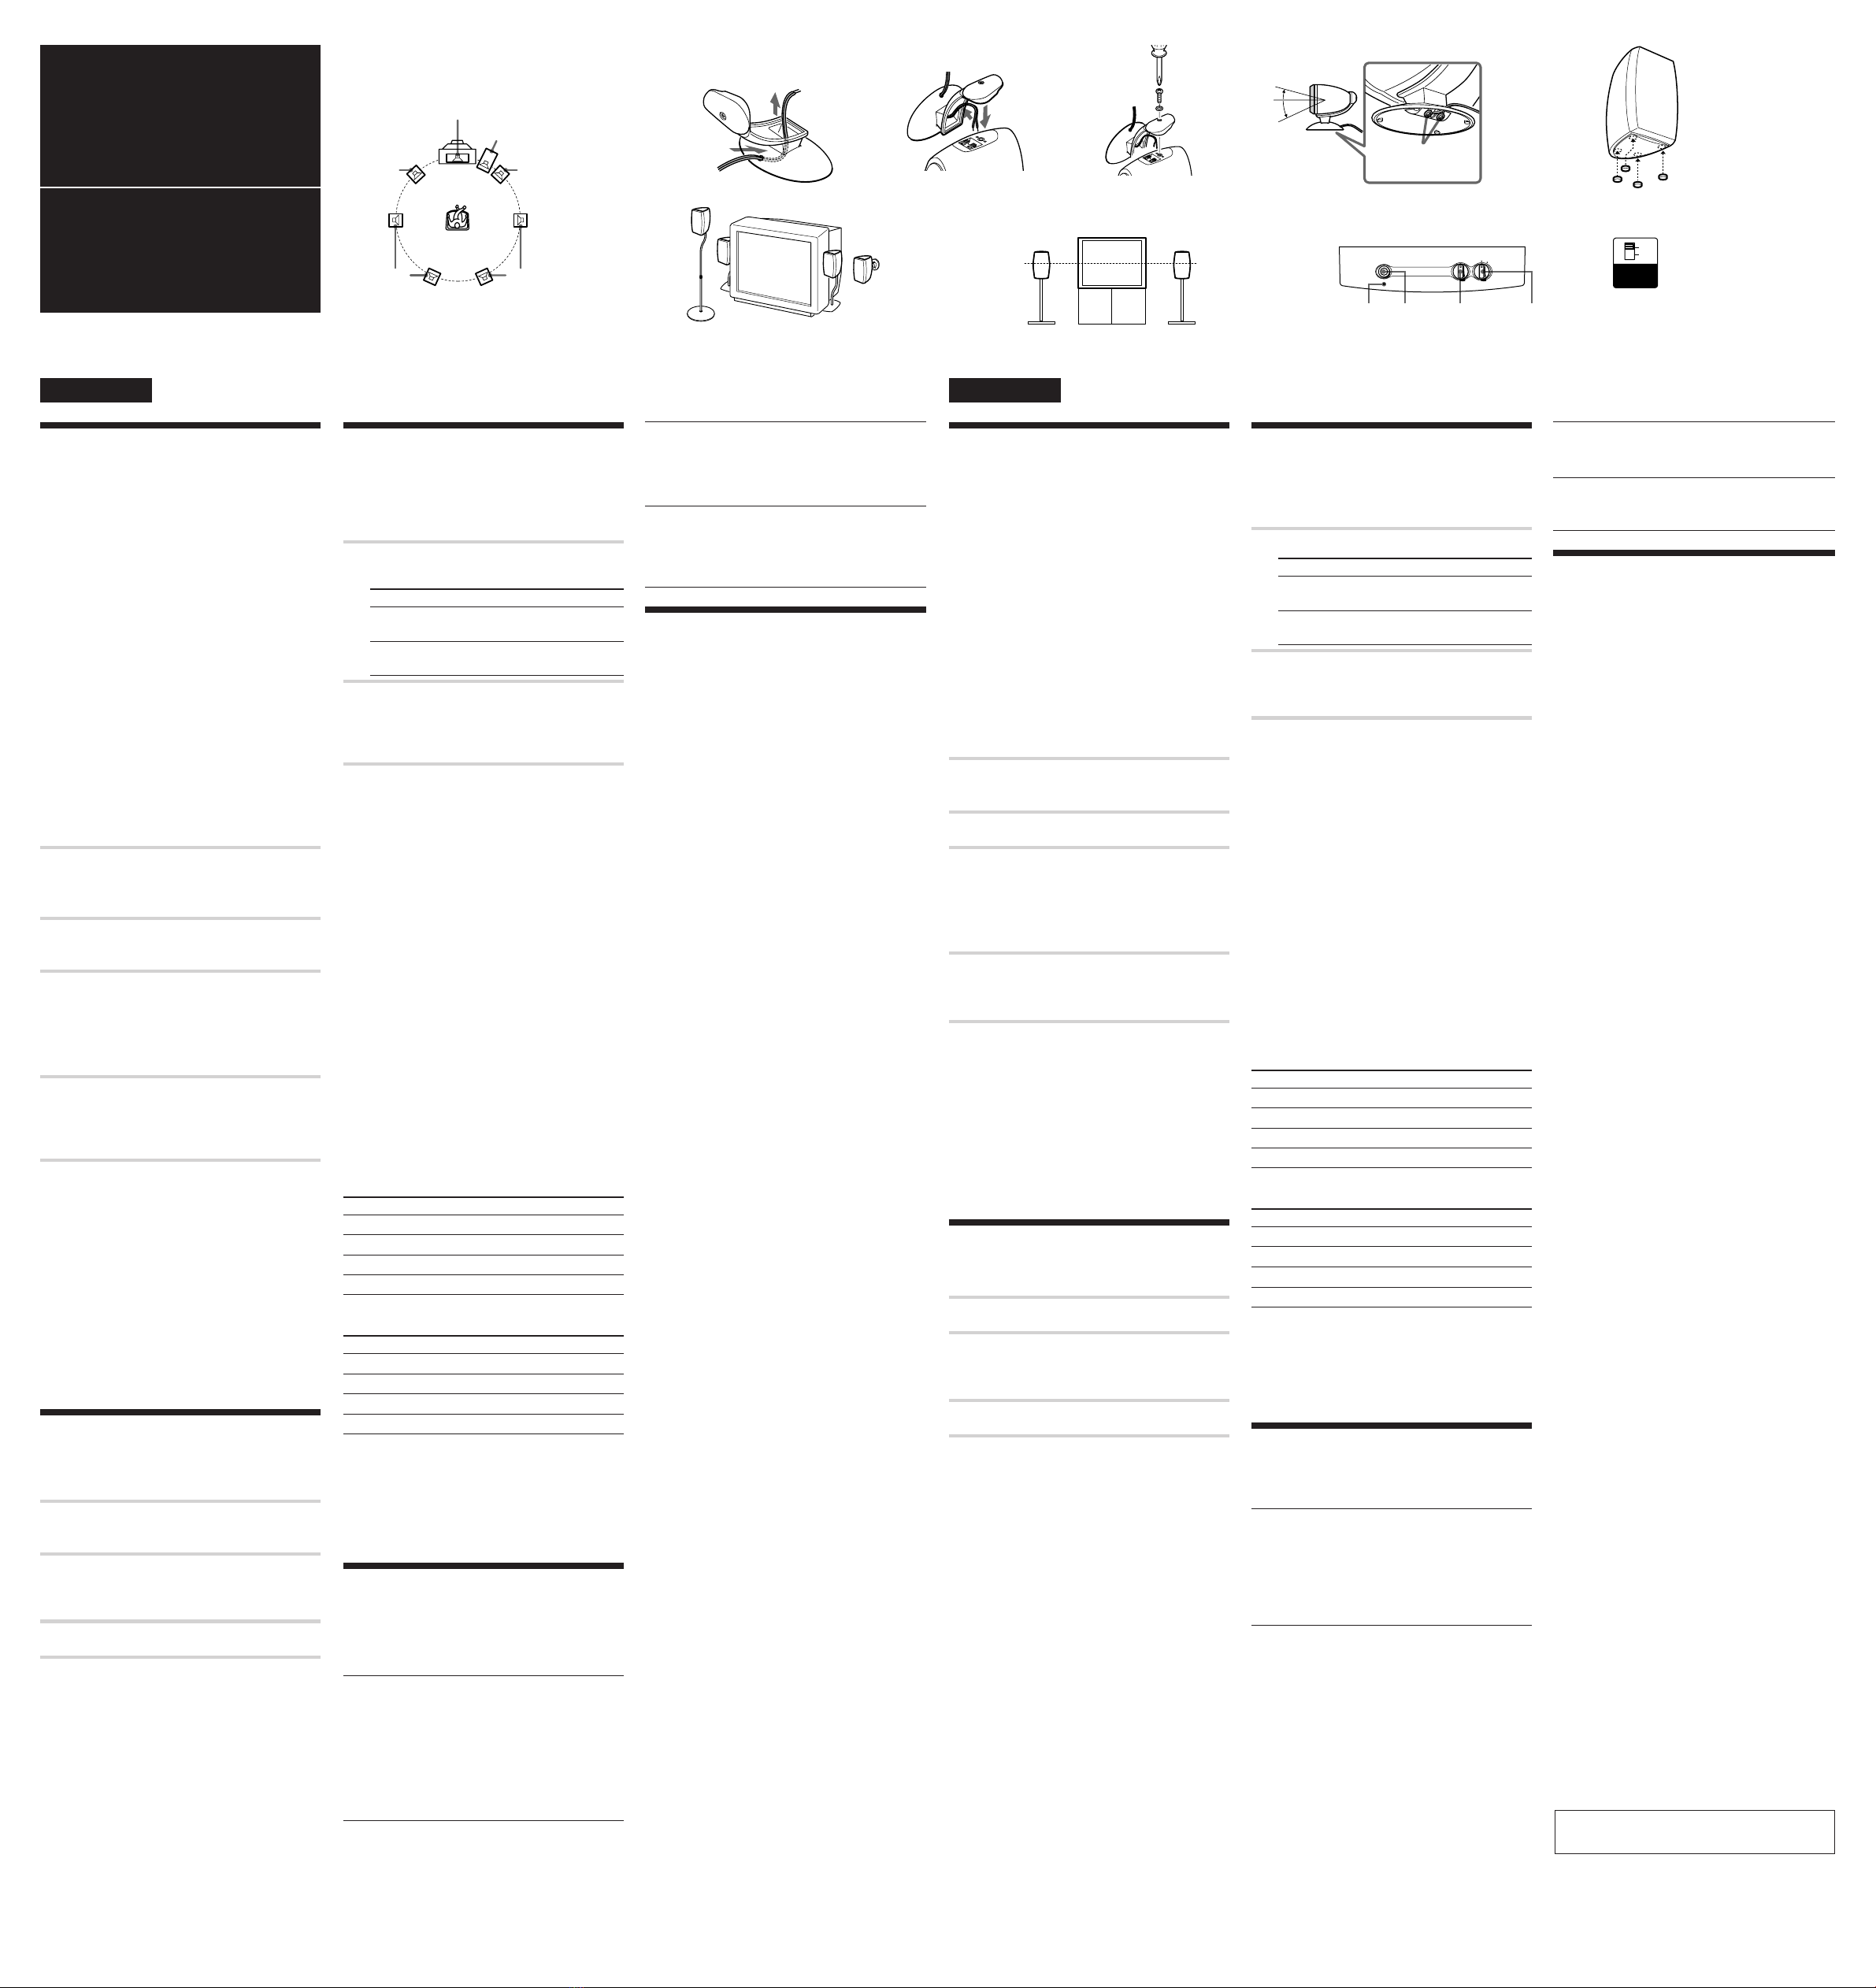
Positioning the speakers
Location of each speaker (D)
Each speaker should face the listening position. Better
surround effect will result if all speakers are set at the
same distance from the listening position.
Place the front speakers at a suitable distance to the left
and right of the television.
Place the subwoofer on either side of the television.
Place the center speaker on the top-center of the TV set.
The placement of rear speakers greatly depends on the
configuration of the room. The rear speakers may be
placed on both sides of the listening position Aor
behind the listening position B.
Tips
• Movies are best enjoyed in a room that produces no
echoes (as in one with surrounding curtains).
• Music (especially classical music) is best enjoyed in a
room that produces some echo.
Positioning the center speaker
(E)
Attach the center speaker to the supplied speaker stand
and place it on a top of the TV set.
For optimum listening enjoyment, the speaker should
face directly towards the listener. Adjust the angle of the
speaker stand for that purpose.
1Pass the speaker cord into the hole on
the back of the stand and out from the
hole at the center of the stand.
2Connect the speaker cord to the speaker
terminal.
3Using the supplied screw and washer,
secure the speaker to the stand.
Note
Do not remove the supplied speaker grille from the
speaker while attaching the speaker to the speaker stand.
4Adjust the angle of the speaker stand.
Loosen the two screws under the base to
adjust the angle. Then tighten them again
afterwards.
Setting the speakers
To prevent speaker vibration or movement while
listening, attach the supplied foot pads to the bottom of
the front speakers and rear speakers (F).
The optional speaker stands (G)
For greater flexibility in the positioning of the speakers,
use the optional WS-FV10A (floor stand),
WS-TV10A (TV stand), or WS-WV10A (wall mount
bracket) speaker stand (available only in certain
countries).
Tip
The height of the front speakers should be adjusted to
about the center of the TV screen (H).
Listening to the sound (I)
First, turn down the volume on the amplifier. The
volume should be set to minimum before you begin
playing the program source.
1Turn on the amplifier and select the
program source.
2Press POWER on the subwoofer.
The ON/STANDBY indicator on the
subwoofer lights up green.
3Play the program source.
Power turns on and off automatically — Auto
power on/off function (J)
When the subwoofer is on (i.e, the ON/STANDBY
indicator lights up green) and there is no signal input for
a few minutes, the ON/STANDBY indicator changes to
red and the subwoofer enters power saving mode. While
in this mode a signal is input to the subwoofer, the
subwoofer automatically turns on (auto power on/off
function).
To turn this feature off, slide the POWER SAVE switch
on the rear panel to OFF.
Note
If you turn down the volume level of the amplifier too
low, the auto power on/off function may activate,
causing the subwoofer to enter power saving mode.