Table
of
Contents
Before
using
the
DAT
(Digital
Audio
Tape)
deck
Digital
audio
tape
..
Features
of
DTC-70
Precautions
...........+.
Location
and
function
of
controls
....
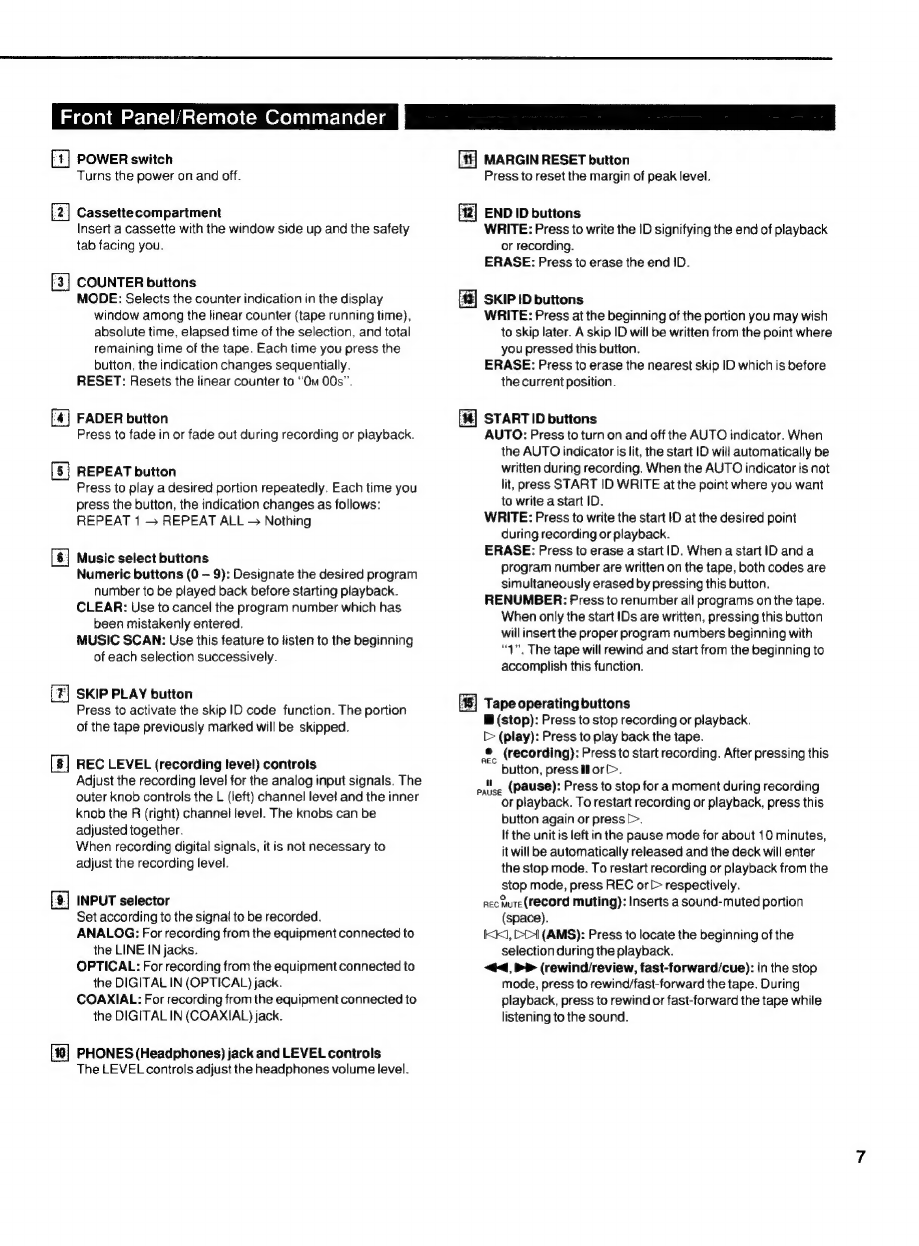
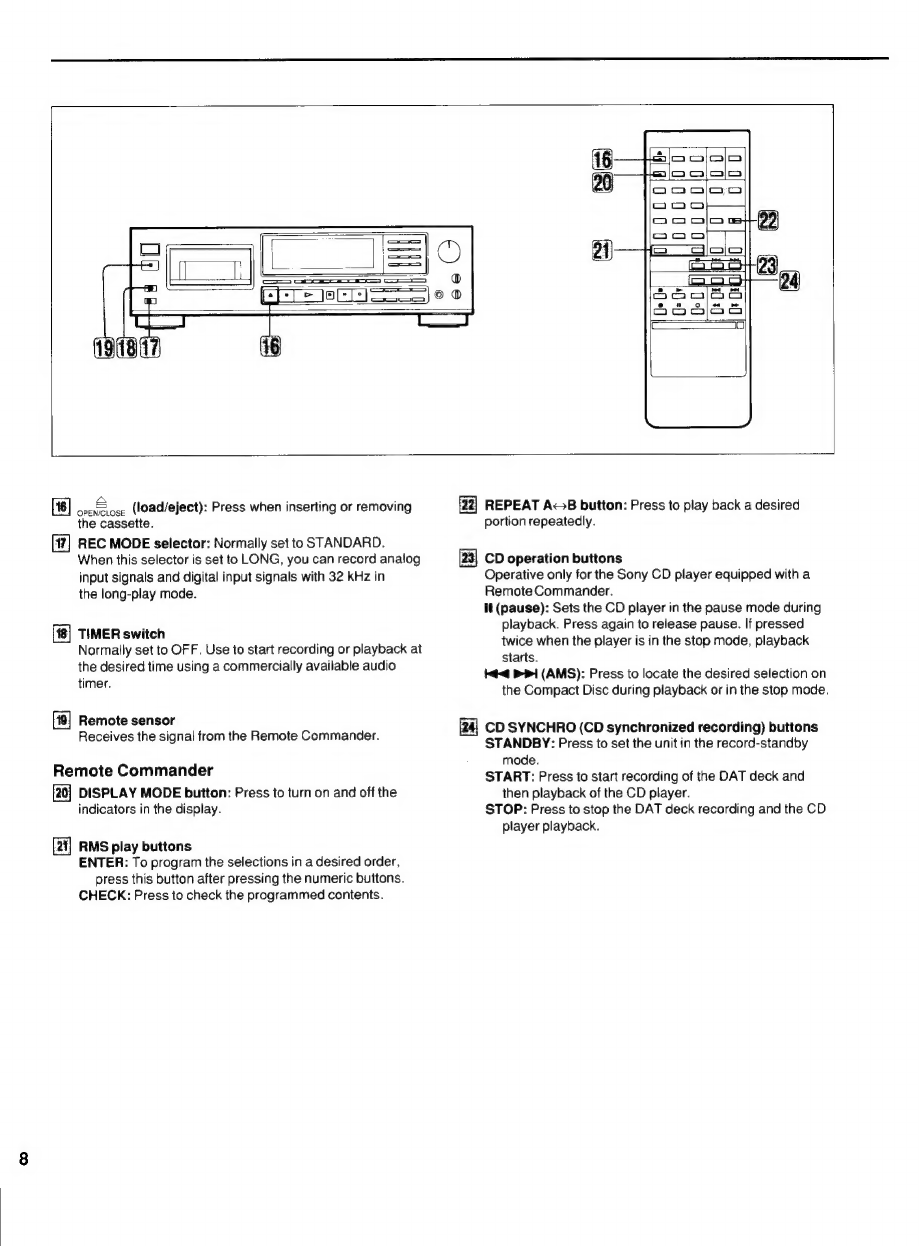
Front
panel/Remote
Commander
Display
window
...
Connections
..............
Rear
panel
jacks
...........
212
Connection
examples
Cassette
loading
Recording
Before
recording
Blank
section
and
sound-muted
portion
ae
Absolute
time
codes
................
sa
Le
Recording
18
Inserting
a
sound-muted
portion
between
selections
(POCO
INDI)
wi. dsc
scstcsne
crceenssnnerisnedsarsersenn
clemrbearaeds
21
To
leave
no
blank
section
(end
search).......
w
22
Fade-in/tade-out
recording
......
CD
synchronized
recording
....
Writing
sub
codes
Sub
codes
Writing
start
!D
....
Writing
start
ID
automatically
during
recording
Writing
start
ID
manually
during
recording
...
Writing
start
ID
manually
during
playback
x
Adjusting
start
ID
position
..............
we
BO
Erasing
start
ID
........0.......
Writing
program
numbers
Writing
program
numbers
automatically
during
PCONIIG
v
ceiccicanigiasicr
cnccueernqus
Matteson
leptin
mactressdenpsanseves
31
Renumbering
program
numbers
.
Erasing
a
program
number
...
Writing
skip
ID
Writing
skip
ID
during
recording
....
Writing
skip
1D
during
playback
Erasing
skip
ID
Writing
end
ID
Writing
end
ID
during
recording
Writing
end
ID
during
playback
....
Erasing
ORG
D
e055.
cise
Seys
caysesdeide
bbs
eescetzeesasetenends
ta
gevansede
Playback
Playback
Using
the
display
window
ais
Restarting
playback
after
rewinding
(auto
play)
..............
40
Fast-forwarding/rewinding
the
tape
by
designating
the
amount
in
minutes
(time
search)
0.0...
cee
40
Various
playback
operations
Playing
with
fade-in/tade-out
.
Playing
repeatedly
(repeat
play)
Locating
the
beginning
of
the
selection
............0.00
44
Listening
to
the
beginning
of
each
selection
successively
AITIOSIC
SOON
is
csatialswepeiaieds
scicva
onestcewiavand
datedissvantesantnncys
Designating
the
desired
selection
Skipping
an
unwanted
portion
Playing
the
selections
in
a
desired
order
(RMS
play)
Timer
activated
operation
Maintenance
...............
Technical
information
...
Troubleshooting
guide
.
Specifications
.
back
cover
Digital
Audio
Tape
DAT
(Digital
Audio
Tape)
is
a
new
recording
system
which
digitalizes
the
audio
signal
and
records
it
on
a
DAT
cassette
tape.
DAT
records
the
audio
signal
by
converting
the
analog
sound
into
a
digital
signal.
This
converting
system
is
called
the
PCM
(Pulse
Code
Modulation),
and
its
accurate
processing
of
the
audio
signal
allows
recording/playback
with
lower
wow
and
flutter,
wider
dynamic
range,
lower
distortion
rate,
and
superb
signal-to-noise
ratio.
In
addition,
various
control
codes
called
sub
codes
can
be
written
on
the
DAT
cassette
tape
separately
from
the
audio
signal.
They
are
written
for
a
variety
of
convenient
playback/tape
editing
operations,
and,
except
for
the
absolute
time,
can
be
rewritten
after
audio
signal
recording
has
been
completed.