SPORLASTIC GENUDYN CI STEP THRU User manual

REF
DE
EN
FR
IT
PL
DA
Artikelnummer
Article number
Référence
Numero articolo
Numer artykułu
Varenummer
LOT
DE
EN
FR
IT
PL
DA
Fertigungslosnummer, Charge
Production batch number, batch
Numéro de lot de fabrication
Numero di lotto di produzione, partita
Numer partii produkcyjnej, szarża
Batchnummer, batch
PZN
DE
EN
FR
IT
PL
DA
Pharmazentralnummer
Pharmaceutical registration number
Numéro central de la pharmacie
PZN (Germania)
Numer centralny farmacji
Farmacentralnummer
SPORLASTIC GmbH
Medizinische Produkte
Weberstraße 1 • 72622 Nürtingen • Germany
Postfach 14 48 • 72604 Nürtingen • Germany
Telefon +49 70 22/70 51 81 • Fax +49 70 22/70 51 13
sporlastic orthopaedics
Besser in Bewegung
Ref. 937782/V01 | 05/21 | 130x280 mm
MD
genudyn®ci step thru
REF
de
Knieorthese zur Führung und dynamischen Stabilisierung
Sehr geehrte Patientin, sehr geehrter Patient,
wir bitten Sie, die beiliegende Gebrauchsanweisung sorgfältig zu beachten. Bei auftretenden Fragen wenden Sie sich bitte an den
behandelnden Arzt, an Ihr nächstliegendes Fachgeschäft oder direkt an uns.
en
Knee brace for guidance and dynamic stabilisation
Dear patient,
We ask you to carefully follow the enclosed instructions for use. If you have any questions, please contact the doctor looking after
you, your nearest specialist store or us directly.
Fr
Orthèse du genou pour le guidage et la stabilisation dynamique
Chers patients,
Nous vous demandons de lire attentivement le mode d’emploi ci-joint. Si vous avez des questions, adressez-vous à votre méde-
cin traitant, à votre magasin spécialisé le plus proche ou contactez-nous directement.
it
Ortesi di ginocchio per la guida e la stabilizzazione dinamica
Gentili pazienti,
Vi preghiamo di osservare scrupolosamente le presenti istruzioni per l’uso. Se avete delle domande, vi raccomandiamo di rivol-
gervi al vostro medico curante, al negozio specializzato più vicino oppure direttamente a noi.
pl
Orteza stawu kolanowego do prowadzenia i dynamicznej stabilizacji
Droga pacjentko, drogi pacjencie,
prosimy o uważne przestrzeganie załączonej instrukcji obsługi. W razie jakichkolwiek pytań prosimy o kontakt z lekarzem
prowadzącym, najbliższym sklepem specjalistycznym lub bezpośrednio z nami.
da
Knæortose til styring og dynamisk stabilisering
Information til patienten
Læs denne brugsanvisning nøje igennem. Hvis du har spørgsmål, så kontakt din behandlende læge, din lokale specialforretning,
eller henvend dig direkte til os.
a r t.- n r. 0 7782
genudyn®ci step thru
1 2
3 4
5 6
geBrauchsanweisung de
ZWECKBESTIMMUNG
GENUDYN® CI STEP THRU ist eine Rahmenorthese zur Führung und Stabilisierung des Kniegelenks nach dem 4-Punkt-
Stabilisierungsprinzip mit Extensions-/Flexionsbegrenzung.
INdIKaTIoNEN
• Verletzungen des Knies mit Beteiligung des Bandapparates
• Nach Bandverletzungen/-rekonstruktionen ACL (vorderes Kreuzband), PCL (hinteres Kreuzband) oder kombiniert (CI)
• Instabilitäten mit entsprechenden Schubladen-Zeichen
KoNTraINdIKaTIoNEN
• Allergische, entzündliche oder verletzungsbedingte Hautveränderungen (z. B. Schwellungen, Rötungen) der zu ver-
sorgenden Körperbereiche.
• Beeinträchtigungen der Zirkulation oder lymphatische Weichteilschwellungen.
• Neurogen bedingte Störungen der Sensorik und Hauttrophik im zu versorgenden Körperbereich (Gefühlsstörungen
mit und ohne Hautschäden).
NEBENWIrKUNGEN
Bei sachgemäßer Anwendung und korrekter Anlage sind bis heute keine allgemeinen Nebenwirkungen, folgeträchtigen
Unverträglichkeiten oder allergischen Reaktionen bekannt.
VorGESEHENE PaTIENTENZIELGrUPPE
Zielgruppe sind alle Patienten unter Berücksichtigung der Indikationen und Kontraindikationen. Eine Einweisung und
Zuordnung der korrekten Größe wird durch medizinisches Fachpersonal vorgenommen.
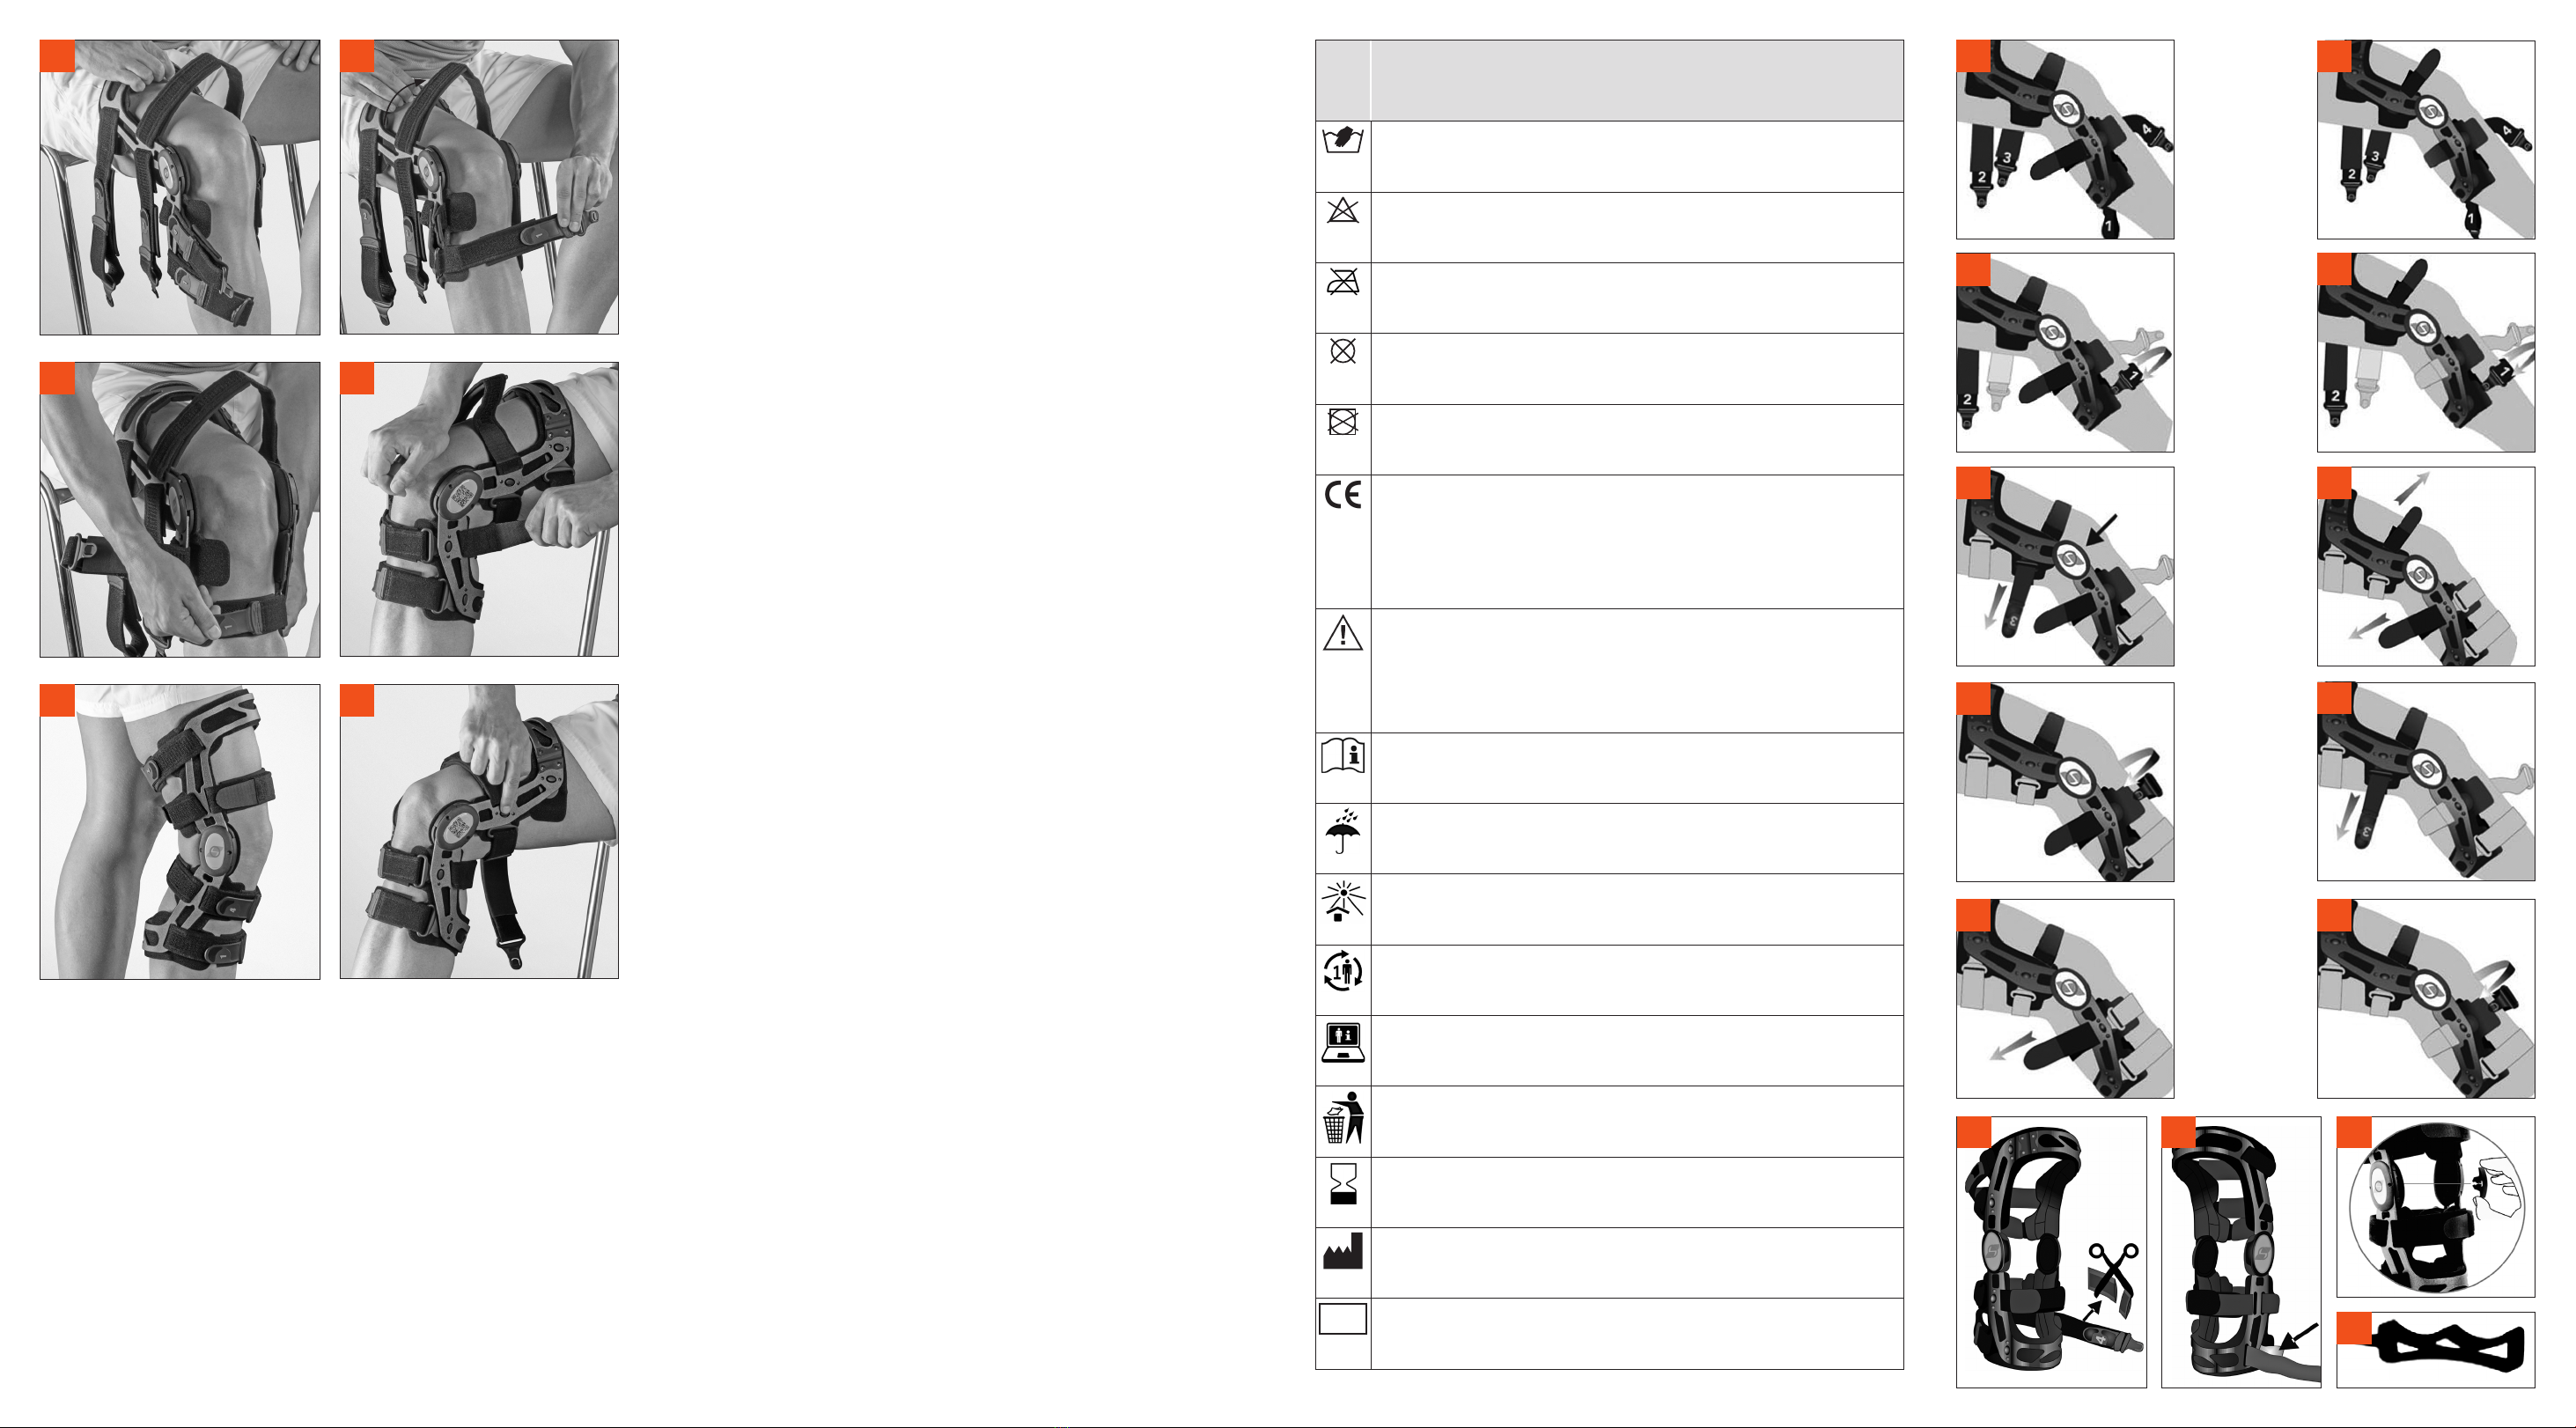
aNLEGEN UNd NUTZUNG
• Öffnen der Klickverschlüsse: Lösen Sie die vier Gurte durch Drücken des Klickverschlussknopfes an der Innenseite
der Orthese. Wiederholen Sie dies bei allen vier Gurten.
• Anlegen der Orthese: Setzen Sie sich an den Rand eines Stuhles und legen Sie die Orthese bei circa 30°- Kniebeu-
gung auf das Bein. Die Gelenkmitte sollte in Höhe Oberkante der Kniescheibe (Patella) sein 1.
• Anlegen der Gurte: Ziehen Sie den Gurt 1 straff und stellen Sie sicher, dass der Gurt nicht verdreht ist. Führen Sie
den Gurt um Ihren Unterschenkel herum. Verschließen Sie diesen durch Einführen in den Klickverschluss auf der
Innenseite der Orthese. Ein kurzes Klickgeräusch bestätigt das korrekte Verschließen. Achten Sie darauf, dass der
Gurt 1 oberhalb des Wadenbauches verläuft 2.
• Spannung der Gurte: Die nötige Gurtspannung erhalten Sie, indem Sie das Gurtende am Klettverschluss lösen und
den Gurt anschließend anziehen, sodass die Orthese eng anliegt. Wiederholen Sie anschließend diese Schritte für
die Gurte 2 – 4. Beachten Sie, dass sich beim Festziehen von Gurt 2 die Wadenmanschette um ca. 1 cm über das
Schienbein hebt. Dies ist normal und für einen guten Sitz der Orthese notwendig 3.
• Schließen der vorderen Klettverschlüsse: Der vordere Waden- und der Oberschenkelgurt müssen nur beim ersten
Anpassen durch den Orthopädietechniker eingestellt werden 4.
• Überprüfung: Überprüfen Sie die Position der Orthese im Stehen bei gestrecktem Bein. Die Gelenkmitte der Orthese
sollte auf der Oberkante der Kniescheibe (Patella) liegen. Die Gurte können Sie nach Bedarf nachjustieren, um einen
festen Sitz zu gewährleisten 5.
• Abnehmen der Orthese: Drücken Sie nacheinander die Klickverschlussknöpfe an der Innenseite der Orthese. Danach
können Sie die Orthese nach vorne über Ihren Fuß wegziehen 6.
HINWEISE FÜr dEN orTHoPÄdIETECHNIKEr
• GENUDYN® CI STEP THRU wird mit einer korrekten Gurtreihenfolge zur Erzeugung einer dynamischen Vorspannung
bei vorderer Schublade (ACL) ausgeliefert. Die Gurtreihenfolge darf nicht vertauscht werden, damit die korrekte
Schließreihenfolge der Nummerierung entspricht.
• Passform, Gelenkposition und Gurtung müssen stets auch bei stehendem Patienten auf Korrektheit kontrolliert wer-
den. Bei einer korrekt angepassten und gut eingestellten Orthese ist es nicht nötig, die Klettverschlüsse der Gurte zu
öffnen.
Die vorderen Gurte bleiben beim An- und Ablegen geschlossen und die hinteren Gurte werden über die Schnellver-
schlüsse geöffnet und geschlossen. Der vordere Oberschenkelgurt ist zur reinen ACL-Versorgung nicht notwendig und
könnte entfernt werden. Alle Gurte sollen fest geschlossen werden, jedoch nicht zu Abschnürungen führen.
• Der Orthesenrahmen ist aus Aluminium und kann vom Orthopädietechniker individuell angebogen werden. Die
Orthesengelenke sollten möglichst nahe an den Kondylen sitzen. Aufgrund des Living Hinge ist eine parallele Aus-
richtung der Orthesengelenke nicht erforderlich. Die Anlage an den Kondylen kann zusätzlich durch Austausch ver-
schieden dicker Kondylenpolster individuell angepasst werden.
• Gurtpolster sind abnehmbar, sollten mittig platziert werden und können bei Bedarf gekürzt werden.
• Alle Gurtlängen werden bei der Anpassung eingestellt und sollten später vom Patient nur im Falle von Problemen,
beispielsweise wegen Umfangsveränderungen, geändert werden.
a) anpassung Bei Beteiligung des Vorderen KreuZBandes
• Die Nummerierung der Gurte entspricht der Reihenfolge beim Schließen. Öffnen Sie alle Gurte und legen Sie die
Orthese bei circa 30° Flexion auf das Bein. Die Gelenkmitte sollte in Höhe Oberkante Patella sein 1A.
• Hängen Sie Gurt 1 in den Schnappverschluss ein. Stellen Sie die Gurtlänge mittels Klettverschluss auf der anderen
Gurtseite ein. Die Polster können abgenommen und bei Bedarf gekürzt werden. Achten Sie auf mittige Positionierung
der Polster.
Wiederholen Sie diesen Schritt mit Gurt Nummer 2; 2A.
• Hängen Sie nun Gurt 3 in den Schnappverschluss ein und ziehen Sie diesen derart straff, so dass das Orthesengelenk
circa 1,5 cm nach hinten, hinter die Mitte der Kondylen, gezogen wird 3A.
• Hängen Sie anschließend Gurt 4 ein und ziehen Sie ihn so weit straff, dass die Gelenke wieder zurück zur Kniemitte
gezogen werden 4A.
• Schließen Sie dann den Gurt an der Wade. Bitte beachten Sie, dass dieser keine Ziffer besitzt. Zum Schluss wird der
Gurt am Oberschenkel (ebenfalls ohne Ziffer) geschlossen. Die Gurte sollen eng anliegen aber nicht abschnüren 5A.
B) anpassung Bei Beteiligung des hinteren KreuZBandes
• HINWEIS: Die Nummerierung der Gurte entspricht der Reihenfolge beim Schließen. Öffnen Sie alle Gurte und legen
Sie die Orthese bei circa 30° Flexion auf das Bein. Die Gelenkmitte sollte in Höhe Oberkante Patella sein 1B.
• Hängen Sie Gurt 1 in den Schnappverschluss ein. Stellen Sie die Gurtlänge mittels Klettverschluss auf der anderen
Gurtseite ein. Die Polster können abgenommen und bei Bedarf gekürzt werden. Achten Sie auf mittige Positionierung
der Polster. Wiederholen Sie diesen Schritt mit Gurt Nummer 2; 2B.
• Nun wird die Orthese durch die beiden nicht nummerierten Gurte einmalig derart eingestellt, dass eine dynamische
Vorspannung eine hintere Schublade optimal stabilisiert. Schließen und spannen Sie den hinteren Wadengurt derart,
dass die Orthesengelenke circa 1,5 cm hinter das Zentrum der Kondylen zu liegen kommen. Mit dem vorderen Gurt
am Oberschenkel werden die Orthesengelenke wieder nach vorne gezogen, so dass die Gelenkzentren mittig zu den
Kondylen zu liegen kommen 3B.
• Hängen Sie nun Gurt 3 in den Schnappverschluss ein und ziehen Sie diesen straff 4B.
Symbol
Symbol
Symbole
Simbolo
Symbol
Symbol
DE
EN
FR
IT
PL
DA
Denition
Denition
Dénition
Denizione
Denicja
Denition
DE
EN
FR
IT
PL
DA
Handwäsche, Höchsttemperatur 40°C
Hand wash, maximum temperature 40°C
Lavage à la main, température maximale 40 °C
Lavaggio a mano, temperatura massima 40°C
Mycie rąk, maks. temperatura 40°C
Håndvask, maks. temperatur 40 °C
DE
EN
FR
IT
PL
DA
Nicht bleichen
Do not bleach
Ne pas utiliser d’eau de Javel
Non candeggiare
Nie wybielać
Undgå blegemiddel
DE
EN
FR
IT
PL
DA
Nicht bügeln
Do not iron
Ne pas repasser
Non stirare
Nie prasować
Undgå strygning
DE
EN
FR
IT
PL
DA
Keine Chemische Reinigung
No dry cleaning
Pas de nettoyage à sec
Non usare detergenti chimici
Nie czyścićchemicznie
Ingen kemisk rens
DE
EN
FR
IT
PL
DA
Nicht imWäschetrockner trocknen
Do not tumble dry
Ne pas mettre au sèche-linge
Non asciugare in asciugatrice
Nie suszyćw suszarce
Undgå tørring i tørretumbleren
DE
EN
FR
IT
PL
DA
CE-Kennzeichnung
Bestätigung der Erfüllung der EU-Anforderungen
CE marking
Conrmation of compliance with EU requirements
Marquage CE
Attestation de la conformité aux exigences de l‘UE
Contrassegno CE
Conferma della conformità ai requisiti UE
Oznaczenie CE
Potwierdzenie spełnienia wymagań UE
CE-mærkning
Bekræftelse af overholdelse af EU-krav
DE
EN
FR
IT
PL
DA
Achtung Lesen Sie alle Warnhinweise
und Vorsichtsmaßnahmen in der Gebrauchsanweisung
Attention Read all warnings and precautionary measures in the
instructions for use
Attention Lire toutes les mises en garde et mesures de précaution
du mode d’emploi
Attenzione Leggere tutte le avvertenze e le misure di precauzione
riportate nelle istruzioni per l’uso
Uwaga Przeczytaj wszystkie ostrzeżenia i środki ostrożności zawarte w instrukcji obsługi
Bemærk Læs alle advarsler og sikkerhedsanvisninger i
brugsanvisningen
DE
EN
FR
IT
PL
DA
Gebrauchsanweisung
Instructions for use
Mode d’emploi
Istruzioni per l’uso
Instrukcja obsługi
Brugsanvisning
DE
EN
FR
IT
PL
DA
Trocken aufbewahren vor Feuchtigkeit schützen
Keep dry protect against moisture
Conserver au sec Protéger à l’abri de l’humidité
Conservare in un luogo asciutto lontano dall’umidità
Przechowywaćw suchym miejscu i chronić przed wilgocią
Opbevares tørt beskyttes mod fugt
DE
EN
FR
IT
PL
DA
Vor Sonnenlicht schützen
Protect from sunlight
Protéger des rayons du soleil
Tenere al riparo dalla luce solare
Chronićprzed promieniowaniem słonecznym
Beskyttes mod sollys
DE
EN
FR
IT
PL
DA
Einzelner Patient, mehrfach anwendbar
Single patient, multiple use
Patient unique, application polyvalente
Singolo paziente, uso multiplo
Jeden pacjent, wielokrotne użycie
Én patient, kan anvendes flere gange
DE
EN
FR
IT
PL
DA
Webseite zur Patienteninformation
Patient information website
Site Internet d’informations pour les patients
Sito web con informazioni per i pazienti
Strona internetowa z informacjami dla pacjentów
Hjemmeside til patientoplysninger
DE
EN
FR
IT
PL
DA
Nach Gebrauch wegwerfen
Discard after use
Usage unique. Jeter après utilisation
Smaltire dopo l’uso
Wyrzucićpo użyciu
Bortskaf efter brug
DE
EN
FR
IT
PL
DA
Verwendbar bis
Usable until
Date d'expiration
Utilizzabile fino a
Data ważności
Kan bruges indtil
DE
EN
FR
IT
PL
DA
Hersteller des Produktes
Manufacturer of the product
Fabricant du produit
Produttore dell’articolo
Producent produktu
Producent
MD
DE
EN
FR
IT
PL
DA
Medizinprodukt
Medical device
Dispositif médical
Prodotto medico
Urządzenie medyczne
Medicinsk produkt
1a
2a
3a
4a
5a
1B
2B
3B
4B
5B
1C 2C 3C
4C

• Hängen Sie anschließend Gurt 4 ein und spannen Sie diesen. Kontrollieren Sie Passform, Gelenkposition und Gurtung
bei stehendem Patienten auf Korrektheit 5B.
C)
weitere einstell- und anpassMÖglichKeiten:
• Kondylenpolster: Die medialen und lateralen Kondylenpolster sollten gut am Knie anliegen.
Bei Abständen oder unterschiedlichem Sitz der medialen oder lateralen Seite sind die zusätzlichen Kondylenpolster in
5 oder 15 mm Stärke für einen perfekten Sitz an beiden Seiten zu verwenden (10 mm Polster benden sich in der
Orthese).
• Die nicht nummerierten Gurte werden vom Techniker bei der Anpassung nur einmalig eingestellt und sollten später
nur bei Umfangsveränderungen des Beines geändert werden.
• Anpassen der Polsterlänge: Für einen optimalen Sitz und Tragekomfort müssen die Gurtpolster beim Anziehen der
Gurte mittig am Bein auiegen. Ist ein Gurtpolster zu lang, nehmen Sie es vom Gurt ab und schneiden es mit einer
Schere passend zu 1C.
• Anpassen der Gurtlänge: Zum Anpassen der Gurtlänge öffnen Sie den Schnellverschluss.
Lösen Sie die Klettverbindung des anderen Gurtendes und passen Sie die Länge entsprechend an 2C.
• Einstellen der Gelenke: Im Auslieferungszustand ist der auf 0° eingestellte Extensionskeil bereits vormontiert.
Weitere Keile für Extensions- (EXT) und Flexionsbegrenzung (FLEX) sind im Lieferumfang inkludiert. Außerdem liegt
der Orthese ein Stift bei, der das Wechseln der Keile vereinfacht. Beim Auswechseln der Extensions- bzw. Flexionsbe-
grenzung ist stets zu prüfen, ob sowohl die medialen als auch lateralen Gelenkanschläge identisch eingestellt sind.
• Folgende Gelenkanschläge sind möglich:
EXT: 0°, 10°, 20°, 30°
FLEX: 0°, 10°, 20°, 30°, 45°, 60°, 90°
Immobilisierung bei 0°, 10°, 20°, 30° möglich
• Einstellen der FLEX und EXT Anschläge: Im Auslieferungszustand sind die 0° Extensionskeile bereits vormontiert.
• Die Keile zur Bewegungslimitierung können werkzeuglos schnell und einfach gewechselt werden - auch ohne die
Orthese abzulegen.
1. Ziehen Sie hierzu einfach die entsprechenden Keile, jeweils an beiden Gelenken, aus dem Gelenk 3C.
2. Setzen Sie dann die gewünschten Keile auf demselben Weg ein. Das korrekte Einrasten der Keile ist deutlich spür--
und hörbar.
• Immobilisierung:
Wenn eine Immobilisierung gewünscht ist, müssen die Keile in nachfolgender Reihenfolge eingesetzt werden (an
beiden Gelenken synchron):
1. FLEX Keile einsetzen
2. EXT Keile einsetzen
Die Demontage erfolgt in umgekehrter Reihenfolge.
• Zum leichteren Entfernen der Keile wird ein kleines Hebelwerkzeug mitgeliefert. Führen Sie die Spitze in die entspre-
chenden Löcher in den Gelenken ein und hebeln Sie damit die Keile heraus 4C.
WICHTIGE HINWEISE
• Grundsätzlich sollte hinsichtlich Indikation und Tragedauer eines orthopädischen Hilfsmittels ganz allgemein sowie
bei Vorhandensein nachfolgender Krankheitszustände im Besonderen eine Absprache mit dem behandelnden
Arzt erfolgen.
• Überprüfen Sie die Funktion des Produktes gemeinsam mit Ihrem Arzt oder Fachhandel.
• Das Produkt ist zur Versorgung für einen Patienten bestimmt.
• Tragen Sie das Produkt nicht auf offenen Wunden.
• Damit das Produkt eine lange Lebensdauer und Funktion bietet, darf es nicht im Zusammenhang mit fett- und
säurehaltigen Mitteln, Salben oder Lotionen getragen werden.
• Es ist zulässig das Produkt mit Spritzwasser in Berührung zu bringen.
• Bitte schließen Sie die Klettverschlüsse, falls welche vorhanden sind, stets ordnungsgemäß. Schäden, die durch
unsachgemäßes Schließen der Klettverschlüsse verursacht werden, stellen grundsätzlich keinen Reklamations-
grund dar.
• Bei schwerwiegenden Vorfällen bei Anwendung dieses Hilfsmittels wenden Sie sich umgehend bei Ihrem Arzt,
Ihrem Sanitätsfachhandel oder direkt bei SPORLASTIC unter: [email protected], um das Vorkommnis zu melden.
• Nicht fachgerechte Veränderungen am Produkt und/oder nicht zweckbestimmte Verwendung des oben angeführten
Produktes schließen eine Produkthaftung des Herstellers aus.
• Das Produkt kann metallische Gegenstände enthalten. Wir empfehlen diese nicht mit elektromagnetischen Interferen-
zen in Verbindung zu bringen.
• Mögliche gesundheitliche wechselseitige Risiken oder sonstige Nachteile bei bestimmten Behandlungen, die sich im
Zusammenhang mit der Verwendung des Produktes ergeben können, sind mit dem behandelnden Arzt abzusprechen.
Bitte führen Sie die Verpackung und das Produkt dem örtlichen Wertstoffsammelsystem zu. Bitte beachten Sie
dabei die örtlichen Bestimmungen.
Die SPORLASTIC GmbH ist einem Rücknahmesystem für Verpackungen angeschlossen und kommt somit
den in der Bundesrepublik Deutschland geltenden verpackungsrechtlichen Bestimmungen vollständig nach.
PFLEGE
Reinigen der Orthese
Die Polster müssen je nach Aktivitätsgrad und Schweißabsonderung regelmäßig abgenommen und gereinigt werden.
Alle Polster und Pads werden von Klettverschlüssen gehalten und sind somit leicht vom Gestell, den Scharnieren und
Gurten abzunehmen.
Wischen Sie die Pads ab oder waschen die Polster von Hand in einer milden, antibakteriellen Seifenlauge (30°C), anschlie-
ßend gut ausspülen und an der Luft trocknen lassen. Trocknen Sie das Produkt nicht im Wäschetrockner, auf der Heizung
oder in der Mikrowelle. Bringen Sie die Polster und Pads wieder an, indem Sie sie fest an die entsprechenden Punkte
drücken.
Reinigen der Gelenke
Die Gelenke der Orthese sind vorgeschmiert. Sollte jedoch Sand, Schmutz oder Wasser in die Scharniere gelangen, so
müssen sie eventuell gereinigt und geschmiert werden.
Entfernen Sie das Kondylenpad, lösen die Scharnierschrauben mit dem Inbusschlüssel, reinigen das Scharnier gründlich
und schmieren Sie es dann mit einem handelsüblichen, synthetischen Schmiermittel. Überprüfen Sie nun, ob das Schar-
nier einwandfrei funktioniert. Bringen Sie dann das Kondylenpad und die Scharnierschrauben wieder an.
TraNSPorT- UNd LaGErBEdINGUNGEN
Bitte achten Sie darauf, dass das Produkt trocken aufbewahrt wird und vor Feuchtigkeit und Sonnenlicht geschützt ist.
Lagern Sie das Produkt bei üblicher Temperatur und Luftfeuchtigkeit.
QUaLITÄTSMaNaGEMENT-SySTEM
Alle Produkte der SPORLASTIC GmbH unterliegen der Produktprüfung innerhalb unseres Qualitätsmanagement-Sys-
tems. Sollten Sie dennoch Beanstandungen an unserem Produkt haben, bitten wir Sie, sich mit Ihrem Fachgeschäft in
Verbindung zu setzen.
Eine Online-Version der Gebrauchsanweisung nden Sie auf unserer Homepage unter www.sporlastic.de.

instructions For use en
INTENdEd USE
GENUDYN® CI STEP THRU is a frame brace for guiding and stabilising the knee joint according to the 4-point stabilisation prin-
ciple with extension/exion limitation.
INdICaTIoNS
• Injuries of the knee with involvement of the ligamentous apparatus
• After ligament injuries/reconstructions ACL (anterior cruciate ligament), PCL (posterior cruciate ligament) or combined (CI)
• Instabilities with corresponding drawer signs
CoNTra-INdICaTIoNS
• Allergic, inammatory or injury-related skin changes (e.g. swelling, redness) of the body areas to be cared for.
• Impaired circulation or lymphatic soft tissue swelling.
• Neurogenic disorders of the sensory system and skin trophism in the body area to be cared for (sensory disorders with
and without skin damage).
SIdE-EFFECTS
If used appropriately and correctly, there are no general side effects, intolerances with long-term effects or allergic reactions
known to date.
INTENdEd PaTIENT TarGET GroUP
The target group is all patients, taking into account indications and contraindications. Instruction and allocation of the correct
size is carried out by medical professionals.
PUTTING IT oN aNd USE
• Open the click locks: Release the four straps by pressing the click lock button on the inside of the brace. Repeat this
for all four straps.
• Putting on the brace: Sit on the edge of a chair and place the brace on the leg with the knee bent at about 30°. The
centre of the joint should be at the level of the upper edge of the kneecap (patella) 1.
• Putting on the straps: Pull the strap 1 tight and make sure that the strap is not twisted. Guide the strap around your
lower leg. Close it by inserting it into the click closure on the inside of the brace. A short clicking sound conrms
correct closure. Make sure that the strap 1 runs above the calf belly 2.
• Tensioning the straps: You get the necessary strap tension by loosening the strap end at the Velcro fastener and then
tightening the strap so that the brace ts tightly. Then repeat these steps for straps 2 - 4. Note that when tightening
strap 2, the calf cuff rises about 1 cm above the shin. This is normal and necessary for a good t of the brace 3.
• Closing the front Velcro fasteners: The front calf and thigh straps only need to be adjusted by the orthopaedic techni-
cian during the rst tting 4.
• Check: Check the position of the brace while standing with the leg extended. The joint centre of the brace should be
on the upper edge of the kneecap (patella). You can readjust the straps as needed to ensure a tight t 5.
• Removing the brace: Press the click lock buttons on the inside of the brace one after the other. You can then pull the
brace forwards over your foot 6.
NoTES For THE orTHoPaEdIC TECHNICIaN
• GENUDYN® CI STEP THRU is delivered with a correct belt sequence for generating dynamic pre-tensioning at front
drawer (ACL). The belt sequence must not be interchanged so that the correct closing sequence corresponds to the
numbering.
• The t, joint position and strapping must always be checked for correctness even when the patient is standing. With
a correctly tted and well adjusted brace, it is not necessary to open the Velcro fasteners of the straps. The front
straps remain closed when putting on and taking off and the rear straps are opened and closed via the quick-release
fasteners. The front thigh strap is not necessary for ACL-only tting and could be removed. All straps should be
closed tightly but should not cause strangulation.
• The brace frame is made of aluminium and can be individually bent by the orthopaedic technician. The orthotic
joints should be as close as possible to the condyles. Due to the Living Hinge, parallel alignment of the orthotic
joints is not necessary. The support on the condyles can also be individually adapted by exchanging condylar pads of
different thicknesses.
• Seat belt pads are removable, should be placed centrally and can be shortened if necessary.
• All strap lengths are set during tting and should only be changed later by the patient in case of problems, for examp-
le due to circumference changes.
a) adJustMent in case oF inVolVeMent oF the anterior cruciate ligaMent
• The numbering of the straps corresponds to the order in which they are closed. Open all straps and place the brace
on the leg at about 30° exion. The centre of the joint should be at the level of the upper edge of the patella 1A.
• Hook strap 1 into the snap lock. Adjust the strap length using the Velcro fastener on the other side of the strap. The
pads can be removed and shortened if necessary. Make sure the pads are positioned centrally.
Repeat this step with belt number 2; 2A.
• Now hook strap 3 into the snap lock and pull it tight so that the brace joint is pulled back about 1.5 cm behind the
centre of the condyles 3A.
• Then hook strap 4 and pull it tight enough to pull the joints back to the centre of the knee 4A.
• Then close the strap at the calf. Please note that this has no digit. Finally, close the strap at the thigh (also without a
digit). The straps should be tight but not constricting 5A.
B) adJustMent in case oF inVolVeMent oF the posterior cruciate ligaMent
• NOTE: The numbering of the straps corresponds to the order in which they are closed. Open all straps and place the
brace on the leg at approximately 30° exion. The centre of the joint should be at the level of the upper edge of the
patella 1B.
• Hook strap 1 into the snap lock. Adjust the strap length using the Velcro fastener on the other side of the strap. The
pads can be removed and shortened if necessary. Make sure the pads are positioned centrally. Repeat this step with
belt number 2; 2B.
• Now the brace is adjusted once by the two unnumbered straps in such a way that a dynamic pre-tension optimally
stabilises a rear drawer. Close and tighten the rear calf strap in such a way that the orthotic joints come to rest about
1.5 cm behind the centre of the condyles. With the front strap on the thigh, the orthotic joints are pulled forward again
so that the joint centres are centred on the condyles 3B.
• Now hook strap 3 into the snap lock and pull it tight 4B.
• Then hook in and tighten strap 4. With the patient standing, check that the t, joint position and belting are correct 5B.
C)
Further adJustMent and custoMisation options:
• Condylar pads: The medial and lateral condylar pads should t the knee well.
In case of gaps or different t of the medial or lateral side, use the additional condylar pads in 5 or 15 mm thickness for
a perfect t on both sides (10 mm pads are in the brace).
• The unnumbered straps are only adjusted once by the technician during tting and should only be changed later if the
circumference of the leg changes.
• Adjusting the pad length: For optimal t and wearing comfort, the belt pads must be centred on the leg when the straps
are tightened. If a strap pad is too long, remove it from the strap and cut it to t 1C with scissors.
• Adjusting the strap length: To adjust the strap length, open the quick release.
Loosen the Velcro on the other end of the strap and adjust the length accordingly 2C.
• Adjusting the joints: The extension wedge set to 0° is already pre-assembled when delivered. Additional wedges for
extension (EXT) and exion (FLEX) limitation are included in the delivery. In addition, the brace comes with a pin that
simplies changing the wedges. When changing the extension or exion limitation, always check that both the medial and

lateral joint stops are set identically.
• The following joint stops are possible:
EXT: 0°, 10°, 20°, 30°
FLEX: 0°, 10°, 20°, 30°, 45°, 60°, 90°
Immobilisation at 0°, 10°, 20°, 30° possible
• Adjusting the FLEX and EXT stops: When delivered, the 0° extension wedges are already pre-assembled.
• The wedges for limiting movement can be changed quickly and easily without tools - even without taking off the brace.
1. To do this, simply pull the corresponding wedges, each at both joints, out of joint 3C.
2. Then insert the desired wedges in the same way. The correct engagement of the wedges can be clearly felt
and heard.
• Immobilisation: If immobilisation is desired, the wedges must be inserted in the following order (synchronously at
both joints):
1. insert FLEX wedges
2. insert EXT wedges
Disassembly is done in reverse order.
• A small lever tool is supplied to make it easier to remove the wedges. Insert the tip into the corresponding holes in the
joints and use it to lever the wedges out 4C
.
IMPorTaNT INForMaTIoN
• Essentially, the indication for and duration of wearing of any orthopaedic device in general, as well as the presence of
any of the conditions below in particular, should be discussed with the doctor who is in charge of your treatment.
• Check the functioning of the product with your doctor or specialist retailer.
• The product is designed to treat one patient.
• Do not wear the product directly against open wounds.
• In order for the product to have a long service life and function, it may not be worn in conjunction with oily/greasy or
acidic products, ointments or lotions.
• The product can come into contact with splash water.
• Please always close any Velcro fasteners present properly. Damage caused by improper closing of the Velcro fasteners
does not constitute a reason for complaint.
• In the event of serious incidents when using this aid, immediately contact your doctor, your health care supply retailer
or contact SPORLASTIC directly at [email protected] to report the incident.
• Any improper modications to the product and/or improper use of the above-mentioned product exclude any product
liability on the part of the manufacturer.
• Product may contain metallic objects. We recommend not putting them in contact with electromagnetic interference.
• Possible health-related mutual risks or other disadvantages with certain treatments that may arise in association with
the use of the product must be discussed with the doctor in charge of treatment.
Please return the packaging and the product to the local recycling collection system. Please comply with local
regulations.
SPORLASTIC GmbH is afliated with a returns system for packaging and therefore fully complies with the pa
ckaging legislation in the Federal Republic of Germany.
CarE
Cleaning the brace
The pads need to be removed and cleaned regularly depending on the level of activity and perspiration. All pads and
cushions are held in place by Velcro fasteners and are therefore easy to remove from the frame, hinges and straps.
Wipe the pads or wash the pads by hand in a mild, antibacterial soapy water (30°C), then rinse well and allow to air
dry. Do not dry the product in the tumble dryer, on the heater or in the microwave. Reattach the pads and cushions by
pressing them rmly against the corresponding points.
Cleaning the joints
The joints of the brace are pre-lubricated. However, if sand, dirt or water gets into the hinges, they may need to be
cleaned and lubricated.
Remove the condylar pad, loosen the hinge screws with the Allen key, clean the hinge thoroughly and then lubricate it
with a commercially available synthetic lubricant. Now check that the hinge works properly. Then ret the condylar pad
and the hinge screws.
TraNSPorT aNd SToraGE CoNdITIoNS
Please ensure that the product is stored in a dry place and is protected against moisture and sunlight. Store the product
at a normal temperature and humidity.
QUaLITy MaNaGEMENT SySTEM
All products from SPORLASTIC GmbH are subject to product inspection as part of our quality management system. If you
still have any complaints about our product, we kindly ask that you contact your specialist retailer.
An online version of the instructions for use can be found on our website at www.sporlastic.de.
This manual suits for next models
1
Table of contents
Languages:
Other SPORLASTIC Personal Care Product manuals

SPORLASTIC
SPORLASTIC omo-hit ABDUCTION User manual

SPORLASTIC
SPORLASTIC Manudyn SUPREME User manual

SPORLASTIC
SPORLASTIC VERTEBRADYN SENSO User manual

SPORLASTIC
SPORLASTIC TRIAC II User manual

SPORLASTIC
SPORLASTIC MALLEODYN S3 User manual

SPORLASTIC
SPORLASTIC PATELLADYN 07085 User manual

SPORLASTIC
SPORLASTIC GENUDYN OA User manual

SPORLASTIC
SPORLASTIC EPIDYN SUPREME User manual


