Steren AMP-210CD User manual

Product / Producto: AUDIO
AMPLIFIER / AMPLIFICADOR DE
AUDIO
Model / Modelo: AMP-210CD
Brand / Marca: Steren
CONDICIONES
1. Para hacer efectiva esta garantía se requiere: La presentación de esta póliza y del producto, en el lugar en donde fue adquirido o en ELECTRONICA STEREN S.A. DE C.V.
2. ELECTRONICA STEREN S.A. DE C.V. se compromete a reparar el producto en caso de estar defectuoso sin ningún cargo al consumidor.
3. El tiempo de reparación en ningún caso será mayor a 30 días contados a partir de la recepción del producto en cualquiera de los sitios en donde pueda hacerse efectiva la
garantía.
4. El lugar donde puede adquirir partes, componentes, consumibles y accesorios, así como hacer válida esta garantía es: En cualquiera de las direcciones arriba mencionadas.
ESTA GARANTIA NO ES VALIDA EN LOS SIGUIENTES CASOS:
1. Cuando el producto ha sido utilizado en condiciones distintas a las normales.
2. Cuando el producto no ha sido operado de acuerdo con el instructivo de uso.
3. Cuando el producto ha sido alterado o reparado por personas no autorizadas por ELECTRONICA STEREN S.A. DE C.V.
Nota: El consumidor podrá solicitar que se haga efectiva la garantía ante la propia casa comercial, donde adquirió el producto. Si la presente garantía se extraviara, el
consumidor puede recurrir a su proovedor para que le expida otra póliza de garantía, previa presentación de la nota de compra o factura respectiva.
DATOS DEL DISTRIBUIDOR
DISTRIBUTION / NOMBRE / DISTRIBUIDOR:
ADDRESS / DOMICILIO:
PRODUCT / PRODUCTO: BRAND / MARCA:
MODEL / MODELO: SERIAL NUMBER / No. DE SERIE:
DATE OF DELIVERY / FECHA DE ENTREGA:
Call Center / Centro de Atención a Clientes
del Interior 01 800 500 9000
Mexico City / Cd. de México: 53 54 22 90
Warranty
CONDITIONS:
1. This warranty card with all the required information, the invoice or purchase ticket, the product box or package, and the product, must be presented with the product
when warranty service is required.
2. If the product stills on the warranty time, the company will repair it free of charge even the transportation charges.
3. The repairing time will not exceed 30 natural days, from the day the claim was received.
4. Steren sells parts, components, consumables and accessories to customer, as well as warranty service, at any of the following addresses:
THIS WARRANTY IS VOID ON THE NEXT CASES:
If the product has been damage by an accident, acts of God, mishandling, leaky batteries, failure to follow enclosed instructions, improper repair by unauthorized
personal, improper safe keeping or otherwise.
Notes:
a) The customer can also claim the warranty service on the purchase establishment.
b) If you lose the warranty card, we can reissue it just showing the invoice or purchase ticket.
Póliza de Garantía
This Steren product is warranted under
normal usage against defects in
workmanship and materials to the original
purchaser for one year from the date of
purchase.
Garantiza este producto por el término de
un año en todas sus partes y mano de obra
contra cualquier defecto de fabricación y
funcionamiento, a partir de la fecha de
entrega.

INSTRUCTION MANUAL FOR AUDIO AMPLIFIER
Model: AMP-210CD
Brand: Steren
Before using your new Audio Amplifier, please read this instruction
manual to prevent any damage. Put them away in a safe place for
future references.
Your new amplifier has a CD player and bass and treble knobs, three
microphone inputs (non-balanced), one auxiliary input and one line output.
150W maximal output power.
IMPORTANT
Do not use this equipment if the power cord is broken or damaged.
Do not try to open the equipment, may cause malfunction and warranty
repeal.
Do not expose to extreme temperatures.
Clean only with a soft, dry cloth.
Do not use solvents.
Do not use or store the equipment near wet places. May cause
malfunction or shock hazard.
Put the equipment in a place with enough ventilation.
Do not block the ventilation grooves.
Before to change the fuse, unplug the power cord from the AC outlet,
otherwise may cause an electric shock .
Put all the volume controls to the minimal level, before to turn the
equipment on.
Plug the equipment to a grounded outlet only.
When you want to unplug the equipment, pull the plug & release from the
AC outlet. Never pull from the power cord.
SYMBOLS USED ON THE EQUIPMENT
This symbol is an alert. Probably there are a dangerous voltage inside of
the equipment. May cause damages or an electric shock to people.
This symbol alerts you about important operations and maintenance
instructions.
Ground terminal
AC
This symbol means Pay Attention.
This symbol means Caution, to prevent damages or even user's death
INSTRUCTIVO DE USO DE AMPLIFICADOR DE AUDIO
Modelo: AMP-210CD
Marca: Steren
Antes de utilizar su nuevo Amplificador de Audio lea este instructivo
para evitar cualquier mal funcionamiento. Guárdelo para futuras
referencias.
Su nuevo amplificador cuenta con un reproductor de CD, así como
controles de agudos y graves, tres entradas para micrófono no
balanceado, 1 entrada auxiliar y 1 salida de línea. La potencia de salida es
de 150W RMS.
IMPORTANTE
No utilice el equipo si se encuentra dañado el cable de alimentación.
No intente abrir el equipo, puede ocasionar malfuncionamiento y
anulación de la garantía.
No exponga el equipo a temperaturas extremas.
Siempre utilice un paño suave, limpio y seco para limpiar el equipo.
No utilice solventes.
No use ni almacene este equipo en lugares donde existan goteras o
salpicaduras de agua. Puede causar un mal funcionamiento o un choque
eléctrico.
Coloque el equipo en un lugar con suficiente ventilación.
No coloque objetos que puedan bloquear las ranuras de ventilación.
Antes de realizar el cambio de fusible, desconecte el cable de
alimentación del contacto de CA, de otra forma puede causar un choque
eléctrico.
Antes de encender el equipo asegúrese de que los controles de volumen
estén al mínimo.
Conecte el equipo únicamente a un contacto aterrizado.
Para desconectar el equipo, jale de la clavija y retírela del contacto. Nunca
jale el cable de alimentación para desconectar el equipo.
SIGNIFICADO DE SÍMBOLOS UTILIZADOS EN EL EQUIPO
Alerta al usuario de presencia de un voltaje peligroso no
asegurado dentro del producto. Puede ser de suficiente
magnitud para constituir un riesgo de choque eléctrico para
las personas.
Alerta al usuario de la presencia de una importante operación e
instrucciones de mantenimiento.
Terminal de protección aterrizada
Corriente alterna
Este símbolo marca que el operador debe poner atención.
Describe la precaución que debe observar para prevenir el
daño o muerte del usuario.

MAIN FEATURES
High quality in design and construction
Frequency response from 50 to 15 000Hz + 3dB
Low distortion and noise level
3 input jacks for non-balanced microphones
1 auxiliary input
1 line output
CD player
Isolated transform of complete outputs: 4, 8, 16ohm; 25, 70 and 100V
Independent volume control for bass and treble functions
Output line
Self-protective circuit
Graphical output signal indicator, made with LEDs
FRONTAL PANEL CONTROLS
1.- On / Off ……………..................… Power on / power off the
equipment
2.- LP lamp ....................................... Lit on when the equipment is
in use
3.- Output signal indicator ………… Display the output signal level
4.- Microphone inputs
5.- Microphone volume control ....... Set the volume level from the
connected microphones to the
amplifier
6.- Auxiliary volume control ............. Set the volume level of the
auxiliary equipment connected
to the amplifier
7.- Bass volume control .................... Set the bass level
8.- Treble volume control .................. Set the treble level
9.- Master volume control
10.- CD player LCD screen
11.- CD player volume control ........... Set the volume level from the
CD player
12.- CD player On / Off button
BACK PANEL CONTROLS
1.- AC input .......................................... Main AC connection with fuse
2.- AC selector ..................................... AC switch from 100 - 120V~ /
220 - 240V~
3.- Ground ........................................... If the main contact doesn't counts
with a ground lead, this screw
offers you the possibility to
ground the amplifier's metallic
parts
4.- Line output ...................................... Allow one to connect an external
audio system
5.- Auxiliary input .................................. Allow one to connect an external
audio system
6.- Low and High impedance output … Allow one to connect speakers
with low or high impedance
CARACTERÍSTICAS
Alta calidad en el diseño y construcción
Respuesta de frecuencia de 50 a 15 000 Hz + 3dB
Bajo nivel de distorsión y ruido
3 entradas para micrófono no balanceado
1 entrada auxiliar
1 salida de línea
Reproductor de CD
Transformador aislado de salidas completas 4, 8, 16 ohms; 25, 70 y 100V
Controles de tono individuales para graves y agudos
Salida de línea
Circuito auto-protector
Barra gráfica de medidor de nivel de salida VUM elaborada con LEDs
CONTROLES PANEL FRONTAL
1.- Encendido / Apagado ...................... Enciende o apaga el equipo
2.- Lámpara LP ..................................... Indica que el amplificador está
encendido
3.- Medidor de nivel de salida .............. Indica el nivel de salida
4.- Entradas de micrófono
5.- Control de volumen de micrófonos . Ajusta el nivel de volumen de los
micrófonos conectados al
amplificador
6.- Control de volumen del Auxiliar ...... Ajusta el nivel de volumen del
equipo conectado a la entrada
Auxiliar
7.- Control de Graves ........................... Ajusta el nivel de graves
8.- Control de Agudos ........................... Ajusta el nivel de agudos
9.- Control de volumen maestro
10.- Pantalla LCD del reproductor de CD
11.- Control de volumen del CD ............ Ajusta el nivel de volumen del
reproductor de CD
12.- Encendido / Apagado del
reproductor de CD
CONTROLES PANEL TRASERO
1.- Entrada CA ...................................... Conexión principal de energía
CA con fusible
2.- Selector de energía CA ................... Interruptor de CA de 100-120V~
/ 220-240V~
3.- Tierra ............................................... Permite aterrizar el equipo al
chasis o bastidor donde puede
estar instalado el amplificador
4.- Salida de Línea ............................... Permite conectar un equipo de
audio externo
5.- Entrada de Auxiliar .......................... Permite conectar un equipo de
audio externo
6.- Salida de baja y alta impedancia ..... Permite conectar bocinas a alta
o baja impedancia

Note:
The AC (~) selector can be modified only by the manufacturer.
INTERFERENCE
If you hear some interference when connect the equipment, the THD (Total
Harmonic Distortion) will be bigger than 10%
INSTALLATION
Before to use the unit by first time, make sure that the voltage is the same
that the electrical current system voltage.
POWER SOURCE CONNECTION
Verify that the power source matches with the amplifier's input.
If the source has a different value in accord to the amplifier, do not try to
change the connections from the selector by yourself, this change only can
be performed by the manufacturer.
INPUT CONNECTIONS
Non-balanced microphone connections
1.- Use a cable with mesh.
2.- Connect the central conduit from the cable to the terminal 1 from the
same connector.
Auxiliary connections
Use this input to connect a radio tuner, a deck, a pre-amplifier sound mixer
or another high level source.
OUTPUT CONNECTIONS
Never touch naked conduits from the output ends on the amplifier,
when they're in use, may cause serious damages or an electrical
shock.
Replace the protector cover once you have finished the connection
process.
Low impedance output
1.- The total of the connected speaker's impedance must to correspond to
the selected ends to make the connection.
2.- The sum of the speaker's power cannot be minor than the amplifier's
power.
3.- The cable length must be shorter as possible.
Nota:
El selector de CA (~) puede ser modificado únicamente por el fabricante.
INTERFERENCIA
Si al conectar el equipo escucha alguna interferencia, el THD (distorsión
armónica total) será mayor del 10%.
CONEXIONES DE INSTALACIÓN
Antes de utilizar esta unidad por primera vez asegúrese que el voltaje del
equipo sea el adecuado al voltaje de la red de suministro eléctrico.
CONEXIÓN DE LA FUENTE DE ENERGÍA
Verifique que la fuente de alimentación corresponde a la entrada del
amplificador.
Si la fuente es de un valor diferente al de su amplificador no intente
cambiar las conexiones del selector por usted mismo, esto sólo puede ser
realizado por el fabricante.
CONEXIONES DE ENTRADA
Conexiones de micrófono no balanceado
1.- Utilice un cable con malla.
2.- Conecte el conductor central del cable a la terminal 1 del mismo
conector.
Conexiones de Auxiliar
Mediante esta entrada puede conectar un sintonizador de radio, un
reproductor de cassettes, un mezclador de sonido pre-amplificador o
alguna otra fuente de alto nivel.
CONEXIONES DE SALIDA
Nunca toque los conductores desnudos de las terminales de salida
del amplificador cuando esté en operación, podría ocasionar un
choque eléctrico.
Coloque nuevamente las cubiertas protectoras una vez que se hayan
realizado las conexiones.
Constante de líneas de baja impedancia
1.- El total de la impedancia de las bocinas conectadas debe corresponder
a las terminales seleccionadas para realizar la conexión.
2.- La suma de potencia de las bocinas no debe ser menor que la
potencia del amplificador.
3.- La longitud de los cables conectados debe ser lo más corta posible.

High voltage output
1.- Each speaker must be equipped with a line transformer.
2.- The sum of the speaker's power mustn't exceed the amplifier's
power.
3.- The cable length must be shorter as possible.
4.- Line out allow one to connect another amplifier or a recorder.
POSSIBLE CONNECTIONS
CD PLAYER CONTROLS
1.- On / Off ........................................ Power on / Power off the CD
player
2.- Open / Close ................................ Pressing this button you can
open or close the CD tray
3.- Play / Pause ................................. Press to start to play a CD or
make a pause during
reproduction
4.- Level ............................................. Set the volume level
5.- Stop .............................................. Stops the reproduction
6.- B. Skip / Rew ................................ Jump to previous track
7.- F. Skip / FF ................................... Jump to next track
8.- Repeat .......................................... Allow one to enter to repeat mode
(repeat one and repeat all)
9.- Prog ............................................... Allow one to enter to Program
Mode
Constante de líneas de alto voltaje
1.- Cada bocina debe estar equipada con un transformador de línea.
2.- La suma de las potencias de las bocinas no debe exceder la potencia
del amplificador.
3.- La longitud de los cables debe ser lo más corta posible.
4.- Line Out permite conectar otro amplificador o una grabadora.
POSIBLES CONEXIONES
CONTROLES DEL REPRODUCTOR DE CD
1.- Encendido / Apagado ……………… Enciende / Apaga el reproductor
de CD
2.- Abrir / Cerrar (Open / Close) ……… Al presionar la bandeja del CD
se abre o se cierra
3.- Reproducir / Pausa (Play / Pause) .. Presione para comenzar la
reproducción del CD
4.- Volumen (Level) …………………..… Permite ajustar el nivel de
volumen
5.- Detener (Stop) ……………………… Detiene la reproducción actual
6.- Regresar (B. Skip / Rew) ………..… Regresa a una pista previa
7.- Adelantar (F. Skip / FF) ……….....… Salta a la siguiente pista
8.- Repetir (Repeat) .............................. Entra al modo de repetición de
la canción actual (repeat) o
repetición de todo el CD (repeat
all)
9.- Programar (Prog) ............................. Entra al modo de Reproducción
Programada

HOW TO USE
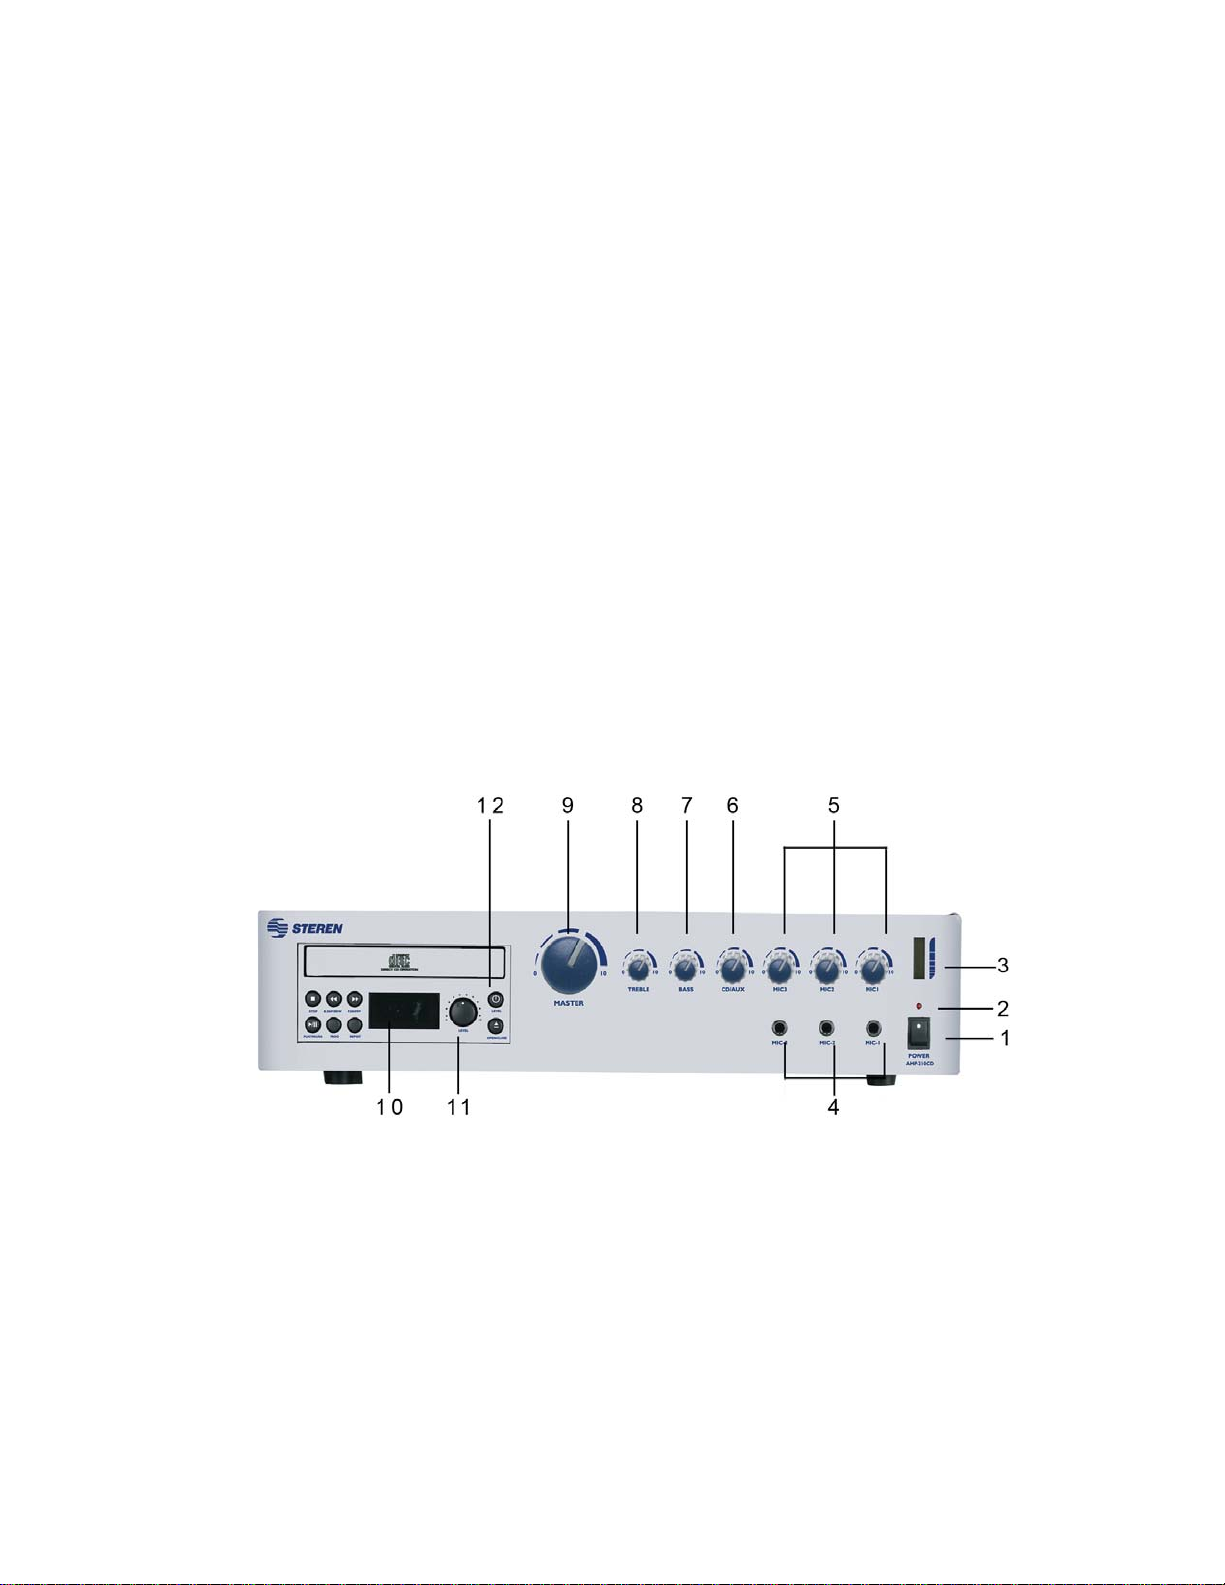
1.- Set the volume level to the minimum.
2.- Press On/Off button.
3.- Power on the device that you want to use (CD player, microphones or
an external audio system).
4.- Gradually, raise the volume level to an optimum level.
5.- Set the treble and bass controls in accord to your preferences.
6.- If you want to use the CD player, press On /Off button.
7.- The LCD screen lights on, press Open / Close button.
8.- Place an Audio CD into the CD tray. Press Open / Close button once
again.
9.- Press Play to start to play the CD.
10.- When you don't want to use the amplifier, press On / Off button.
TROUBLESHOOTING
SPECIFICATIONS
Power output: 150W RMS 210W maximum
Output regulation: Less than 2dB without and full charge and
Output: 150W: 4ohm (24,5V)
8ohm (34,7V)
16ohm (49V)
25V
70V
100V
Line output: 1V + 0,3V
Frequency response: 50 to 15 000Hz
DHT: Less than 1% a 1kHz
SNR Aux: 80dB less than nominal power
(Tone control at the middle) Mic: 80dB less than nominal power
All control to the minimum level
Tone controls: Bass: +10dB a 100Hz
Treble: +10dB a 10kHz
Input: Aux: 20kOhm -18 +2dB
Mic : 600ohm -54 +3dB non-balanced
Indicators: Use indicators
Output level meter
Input voltage: 120V~ 60Hz
Consumption: 380W to nominal output
Dimensions: 17,7 x 3,93 x 13,18in
Weight: 27lb
Note:
Product design and specifications are subject to change, without notice.
OPERACIÓN
1.- Ajuste el volumen del equipo que desee utilizar al mínimo.
2.- Presione el interruptor de encendido.
3.- Encienda el equipo que desee utilizar (CD, micrófonos o un equipo de
audio externo).
4.- Gradualmente ajuste el volumen a un nivel óptimo.
5.- Ajuste los controles de agudos y graves de acuerdo a sus preferencias.
6.- Si desea utilizar en reproductor de CD integrado, presione el botón de
encendido.
7.- La pantalla de LCD se enciende, presione el botón de abrir.
8.- Inserte un disco de audio. Presione nuevamente el botón de cerrar.
9.- Presione Reproducir para comenzar la reproducción del disco.
10.- Cuando ya no requiera utilizar su amplificador, presione el interruptor
de Apagado.
PROBLEMAS Y SOLUCIONES
ESPECIFICACIONES
Potencia de salida: 150W RMS 210W máximo
Regulación de salida: Menor de 2dB sin carga y a plena carga
Salidas: 150W: 4ohms (24,5V)
8ohms (34,7V)
16ohms (49V)
25V
70V
100V
Salida de línea: 1V + 0,3V
Frecuencia de respuesta: 50 a 15 000Hz
Distorsión armónica total: Menos de 1% a 1kHz
Relación Señal-Ruido: Aux: 80dB debajo de energía nominal
(Control de tono al centro) Mic: 80dB debajo de energía nominal
Todos los controles al mínimo
Controles de tono: Bass: +10dB a 100Hz
Treble: +10dB a 10kHz
Entrada: Aux: 20kOhms -18 +2dB
Mic : 600 ohms -54 +3dB no balanceado
Indicadores: Indicador de energía LED
Medidor de nivel de salida LED
Voltaje de entrada: 120V~ 60Hz
Consumo: 380W a salida nominal
Dimensiones: 450 x 100 x 335mm
Peso: 12,35kg
Nota:
El diseño del producto y las especificaciones pueden cambiar sin previo
aviso.
Problema Solución
Trouble Solution
El equipo no enciende Revise el fusible. De ser necesario acuda con un técnico para su reemplazo
Revise que el equipo no esté conectado a un contacto vivo
El termostato del transformador interno se reinició. Presione el botón de
Apagado (Off) y espere unos minutos
The equipment can't power on Check the fuse. If is necessary go with a technician for fuse replacement
Check if the equipment is not connected to a live outlet
Probably the thermostat of the internal transformer restarted. Press Off button
and wait for a few minutes
El ventilador no funciona Revise el fusible. De ser necesario acuda con un técnico para su reemplazo
Revise que el equipo no esté conectado a un contacto vivo
The fan cannot works Check the fuse. If is necessary go with a technician for fuse replacement
Check if the equipment is not connected to a live outlet
No se escucha ningún sonido Revise el selector de funciones
Ajuste el nivel de volumen
Revise las conexiones de las bocinas
Can't hear any sound on the equipment Check the function selector
Set the volume level
Check the speakers connections
El indicador de nivel de salida indica Normal La auto-protección del equipo puede estar activada. Apague el equipo y
pero no hay audio en las bocinas espere unos minutos antes de volver a encenderlo
The graphic indicator displays as Normal The self-protection may be activated. Turn the equipment off and
but there are no sounds on the speakers wait a few minutes before to turn it on again.
Other manuals for AMP-210CD
1
Table of contents
Other Steren Amplifier manuals

Steren
Steren AMP-210CD User manual

Steren
Steren AMP-020 User manual

Steren
Steren EP-128 User manual

Steren
Steren AMP-010 User manual

Steren
Steren AMP-009 User manual

Steren
Steren AMP-120 User manual

Steren
Steren BAF-1595 User manual

Steren
Steren AMP-045CD User manual

Steren
Steren AMP-040AR User manual

Steren
Steren AMP-012 User manual

Steren
Steren AMP-005 User manual

Steren
Steren AMP-017 User manual

Steren
Steren AMP-014 User manual

Steren
Steren AMP-040SD User manual

Steren
Steren AMP-210SD User manual

Steren
Steren AMP-160 User manual

Steren
Steren BAF-1280 User manual

Steren
Steren AMP-020 User manual

Steren
Steren AMP-021 User manual

Steren
Steren AMP-160 User manual