Por su seguridad, conecte una tierra física al temporizador. Esto brinda protección contra choques
eléctricos en determinadas condiciones.
Si su cableado no cuenta con tierra física, consulte a un electricista calicado antes de empezar
la instalación.
Solo conecte el SWI-630 a un circuito de polo único, ya que no está hecho para la conmutación de
3 vías. Si su cableado no coincide con la descripción de un circuito de polo único, consulte a un
electricista calicado.
Producto: Apagador con temporizador digital
Modelo: SWI-630
Marca: Steren
PÓLIZA DE GARANTÍA
Esta póliza garantiza el producto por el término de un año en todas sus partes y mano de obra, contra cualquier defecto de fabricación y
funcionamiento, a partir de la fecha de entrega.
CONDICIONES
1.- Para hacer efectiva la garantía, presente esta póliza y el producto, en donde fue adquirido o en Electrónica Steren S.A. de C.V.
2.- Electrónica Steren S.A de C.V. se compromete a reparar el producto en caso de estar defectuoso sin ningún cargo al consumidor. Los gastos de
transportación serán cubiertos por el proveedor.
3.- El tiempo de reparación en ningún caso será mayor a 30 días,contados a partir de la recepción del producto en cualquiera de los sitios donde
pueda hacerse efectiva la garantía.
4.- El lugar donde puede adquirir partes, componentes, consumibles y accesorios, así como hacer válida esta garantía es en cualquiera de las
direcciones mencionadas posteriormente.
ESTA PÓLIZA NO SE HARÁ EFECTIVA EN LOS SIGUIENTES CASOS:
1.- Cuando el producto ha sido utilizado en condiciones distintas a las normales.
2.- Cuando el producto no ha sido operado de acuerdo con el instructivo de uso.
3.- Cuando el producto ha sido alterado o reparado por personal no autorizado por Electrónica Steren S.A. de C.V.
El consumidor podrá solicitar que se haga efectiva la garantía ante la propia casa comercial donde adquirió el producto. Si la presente garantía se
extraviara, el consumidor puede recurrir a su proveedor para que le expida otra póliza, previa presentación de la nota de compra o factura respectiva.
DATOS DEL DISTRIBUIDOR
Nombre del Distribuidor _________________________________________
Domicilio _____________________________________________________
Producto _____________________________________________________
Marca _______________________________________________________
Modelo ______________________________________________________
Número de serie _______________________________________________
Fecha de entrega ______________________________________________
ELECTRÓNICA STEREN S.A. DE C.V.
Camarones 112, Obrero Popular, 02840, México, D.F. RFC: EST850628-K51
STEREN PRODUCTO EMPACADO S.A. DE C.V.
Biólogo Maximino Martínez No. 3408 Int. 3 y 4, San Salvador Xochimanca,
México, D.F. 02870, RFC: SPE941215H43
ELECTRÓNICA STEREN DEL CENTRO, S.A. DE C.V.
Rep. del Salvador 20 A y B, Centro, 06000, México. D.F. RFC: ESC9610259N4
ELECTRÓNICA STEREN DE GUADALAJARA, S.A.
López Cotilla No. 51, Centro, 44100, Guadalajara, Jal. RFC: ESG810511HT6
ELECTRÓNICA STEREN DE MONTERREY, S.A.
Colón 130 Pte., Centro, 64000, Monterrey, N.L. RFC: ESM830202MF8
ELECTRÓNICA STEREN DE TIJUANA, S.A. de C.V.
Calle 2a, Juárez 7636, Centro, 22000, Tijuana, B.C.N. RFC: EST980909NU5
En caso de que su producto presente alguna falla, acuda
al centro de distribución más cercano a su domicilio y
en caso de tener alguna duda o pregunta por favor llame
a nuestro Centro de Atención a Clientes, en donde con
gusto le atenderemos en todo lo relacionado con
su producto Steren.
Centro de Atención a Clientes
01 800 500 9000
Antes de utilizar su nuevo producto Steren, lea este instructivo para evitar
cualquier mal funcionamiento.
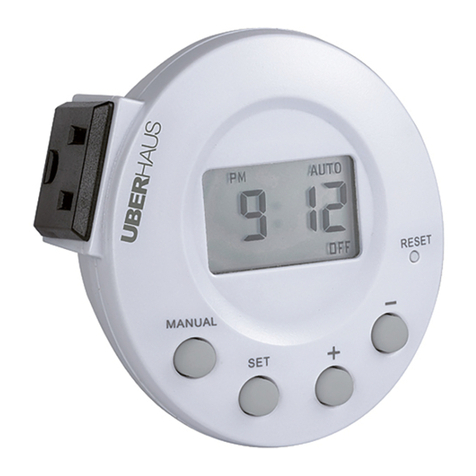
Fabricado en plástico color blanco, tiene 6 tiempos preestablecidos entre 1 y 60
minutos para una fácil operación.
Además, tiene otro botón para modo manual o selección rápida del último lapso
seleccionado.
• Solo para uso en interiores.
• Tiempos de retardo: 1, 5, 10, 20, 30 y 60 minutos.
• Compatible con caja chalupa de 60 x 102 x 60 mm
• Encendido manual
Encienda el equipo a controlar presionando el botón del
tiempo deseado o el botón grande (encendido / apagado).
Si pulsa este, activará el último temporizador utilizado.
• Apagado manual
Mientras un temporizador esté activo, puede presionar el
botón grande para apagar el equipo a controlar.
• Cambiar el tiempo seleccionado
Si decide incrementar o disminuir el tiempo de encendido,
solo presione el botón con el tiempo de su elección para
reiniciar el temporizador.
• Modo de operación continua.
Para activar el modo continuo, es decir, para usarlo
como cualquier interruptor, pulse y sostenga el botón
grande por más de 3 segundos.
Los 7 LEDs se apagarán y el equipo a controlar se
encenderá. Para apagarlos, pulse y suelte el botón de
nuevo. Se prenderán 2 LEDs y el interruptor cortará la
corriente.
Alimentación/Salida: 120 V~ 60 Hz
Potencia: 0 - 800 W para lámparas incandescentes.
0-800 VA para lámparas uorescentes.
1/4 HP en motores.
Temperatura de operación: 0°C a 55°C
Humedad relativa: 95%, no condensada
Para probar el temporizador:
• El LED debajo el botón grande (encendido / apagado) debe estar encendido cuando
el interruptor esté desactivado, así como el LED del último temporizador usado. Pulse
el botón grande. El equipo a controlar debe comenzar a funcionar. El equipo a contro-
lar deberá apagarse después de que el tiempo seleccionado haya transcurrido. Puede
desactivarlo antes pulsando el botón grande.
El ventilador y/o la luz no encienden (el indicador debajo el botón grande está
encendido):
• Compruebe el estado del equipo a controlar.
• Desconecte la alimentación del circuito y compruebe las conexiones.
• El equipo a controlar no enciende (el indicador debajo del botón grande está
desactivado):
• Desconecte la alimentación del circuito y compruebe las conexiones.
• Asegúrese de que el interruptor esté encendido y funcionando.
La luz o el ventilador no se apagan:
• Pulse el botón grande. Si el equipo a controlar no se apaga, desconecte la
alimentación del circuito y compruebe las conexiones.
Una los cables de su instalación eléctrica junto con los
cables del temporizador como se indica en el dibujo.
Asegúrelos con los capuchones incluidos.
Conecte el cable verde o no aislado de tierra de su cableado
con el cable de tierra verde del SWI-630.
Conecte el cable de alimentación del cableado (“vivo”) con el
cable negro del SWI-630.
Conecte el otro cable de alimentación de la lámpara y/o
ventilador (carga) con el cable rojo del SWI-630.
Conecte el cable neutro del cableado con el cable blanco
del SWI-630.
La información que se muestra en este manual sirve únicamente
como referencia sobre el producto. Debido a actualizaciones pueden
existir diferencias.
Por favor, consulte nuestra página web (www.steren.com) para
obtener la versión más reciente del instructivo.
El diseño del producto y las especicaciones pueden variar sin previo aviso.
Este producto es compatible con chalupas de 60 x 102 x 60 mm
