PÓLIZA DE GARANTÍA
Esta póliza garantiza el producto por el término de un año en todas sus partes y
mano de obra, contra cualquier defecto de fabricación y funcionamiento, a partir de
la fecha de entrega. CONDICIONES
1.- Para hacer efectiva la garantía, presente ésta póliza y el producto, en donde fue
adquirido o en Electrónica Steren S.A. de C.V.
2.- Electrónica Steren S.A de C.V. se compromete a reparar el producto en caso de
estar defectuoso sin ningún cargo al consumidor. Los gastos de transportación serán
cubiertos por el proveedor.
3.- El tiempo de reparación en ningún caso será mayor a 30 días,contados a partir de
la recepción del producto en cualquiera de los sitios donde pueda hacerse efectiva
la garantía.
4.- El lugar donde puede adquirir partes, componentes, consumibles y accesorios,
así como hacer válida esta garantía es en cualquiera de las direcciones mencionadas
posteriormwente.
ESTA PÓLIZA NO SE HARA EFECTIVA EN LOS SIGUIENTES CASOS:
1.- Cuando el producto ha sido utilizado en condiciones distintas a las normales.
2.- Cuando el producto no ha sido operado de acuerdo con el instructivo de uso.
3.- Cuando el producto ha sido alterado o reparado por personal no autorizado por
Electrónica Steren S.A. de C.V.
El consumidor podrá solicitar que se haga efectiva la garantía ante la propia casa
comercial donde adquirió el producto. Si la presente garantía se extraviara, el
consumidor puede recurrir a su proveedor para que le expida otra póliza de
garantía, previa presentación de la nota de compra o factura respectiva.
DATOS DEL DISTRIBUIDOR
Nombre del Distribuidor
Domicilio
Producto
Marca
Modelo
Número de serie
Fecha de entrega
ELECTRONICA STEREN S.A. DE C.V.
Camarones 112, Obrero Popular, 02840, México, D.F. RFC: EST850628-K51
STEREN PRODUCTO EMPACADO S.A. DE C.V.
Biólogo MaximIno Martínez No. 3408 Int. 3 y 4, San Salvador Xochimanca, México, D.F. 02870,
RFC: SPE941215H43
ELECTRONICA STEREN DEL CENTRO, S.A. DE C.V.
Rep. del Salvador 20 A y B, Centro, 06000, México. D.F. RFC: ESC9610259N4
ELECTRONICA STEREN DE GUADALAJARA, S.A.
López Cotilla No. 51, Centro, 44100, Guadalajara, Jal. RFC: ESG810511HT6
ELECTRONICA STEREN DE MONTERREY, S.A.
Colón 130 Pte., Centro, 64000, Monterrey, N.L. RFC: ESM830202MF8
ELECTRONICA STEREN DE TIJUANA, S.A. de C.V.
Calle 2a, Juárez 7636, Centro, 22000, Tijuana, B.C.N. RFC: EST980909NU5
Before using your new Electronic insect killer, please read
this instruction manual to prevent any damage. Put it away in
Antes de utilizar su nuevo Temporizador digital de 6 eventosSteren,
lea este instructivo para evitar cualquier mal funcionamiento.
Guárdelo para futuras referencias.
Before using your new Electronic insect killer, please read this
instruction manual to prevent any damage. Put it away in a
El diseño del producto y las especificaciones pueden
cambiar sin previo aviso.
En caso de que su producto
presente alguna falla, acuda al
centro de distribución más cercano
a su domicilio y en caso de tener
alguna duda o pregunta por favor
llame a nuestro Centro de Atención
a Clientes, en donde con gusto le
atenderemos en todo lo relacionado
con su producto Steren.
Centro de Atención a Clientes
01 800 500 9000
•Mantenga el dispositivo fuera del alcance de los niños.
•No conecte el temporizador en otro interruptor de un temporizador.
•No conecte ningún dispositivo que esté realizando un movimiento mecánico
directamente en el temporizador.
•No insertar agujas o cualquier otro objeto metálico al enchufe del temporizador.
•No intente abrir el equipo, puede ocasionar mal funcionamiento y se anulará la
garantía.
•No exponga el equipo a temperaturas extremas.
•No use ni almacene este equipo en lugares donde existan goteras o salpicaduras de
agua. Puede causar un mal funcionamiento o un choque eléctrico.
•Evite las caídas del equipo, ya que podría sufrir daños.
•Siempre utilice un paño suave y seco para limpiar el equipo.
El temporizador digital de 6 eventos tiene un tamaño compacto y es ideal para
luminarias y lámparas, entre otros.
Es fácil de programar y gracias a su batería de respaldo recargable interna no se
desprogramará aún si existen cortes de energía eléctrica.
El tiempo programado es por periodos de 5 minutos, tiene modo aleatorio en
periodos de 30 minutos, su clavija es polarizada, así como su contacto o tomacorriente,
la pantalla es de LCD y muestra la hora y programación del temporizador.
6 eventos programables, Batería de respaldo para reloj, Periodos de programación de
5 minutos, Potencia máxima 625W.
Producto: Temporizador digital de 6 eventos
Modelo: TEM-300
Marca: Steren
IMPORTANTE
CARACTERÍSTICAS
AJUSTE DE HORA ACTUAL
PROGRAMACIÓN DE EVENTOS (ON/OFF)
EVENTOS ALEATORIOS
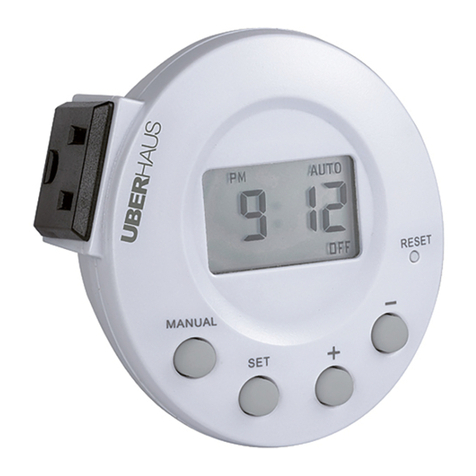
CONTROLES
ESPECIFICACIONES
BOTÓN RESET
AJUSTE MANUAL
123
4
5
En caso de que la pantalla no se active, cargue la batería del
TEMP-300 enchufando la unidad en un tomacorriente durante 1 hora.
1.- SET : Use para ajustar la hora
actual y programar la hora de apagado/
encendido de los eventos.
2.- + / - : Ajusta (aumentar/disminuir)
las horas/minutos en la hora actual y en
eventos de programación.
3.- ON / OFF : Permite congurar el encendido/apagado en modo AUTO y
MANUAL.
AUTO: Ejecuta todos los eventos en forma automática, según los eventos que
usted haya congurado. La palabra “AUTO” (Automático) se señalará con la echa
de la pantalla.
MANUAL: Se enciende y se apaga el dispositivo conectado sólo cuando el
usuario presiona el botón de encendido y apagado.
4.- RESET : Presione para borrar todos los parámetros.
5.- ENCHUFE: Conecte sus luminarias y lámparas, entre otros.
Alimentación: 125V~ 60Hz 5A máx.
Salida: 125V~ 60Hz 5A máx.
Temperatura de operación: 0°C a 40°C
Carga resistiva: 625Wmax
Carga lámpara de tungsteno: 250Wmax
En caso de que ocurra una falla operacional del temporizador, presione el botón
RESET (Reinicio) para borrar las conguraciones y volver a comenzar.
En la pantalla aparecerá el mensaje “0:00” y el temporizador apagará el equipo que
este conectado.
Usted podrá escoger modo ON manual, OFF manual con el botón ON/OFF, esto permite
al usuario encender o apagar el equipo conectado al temporizador de forma manual.
Para regresar al modoAUTO presione ON/OFF de modo que en la pantalla se señale el
mensaje AUTO en ON, así se ejecutan todos los eventos de forma automática.
En el modo de control manual la función aleatoria (RANDOM) se cancelará.
Para entrar al modo RANDOM (aleatorio), presione al
mismo tiempo los botones SET y ON/OFF.
Notará que aparece en la pantalla un icono con la letra “R”.
Cuando usted usa esta opción se ejecutarán los eventos
de modo aleatorio. Ésta es una característica de seguridad
en la cual los horarios de encendido y apagado dieren en
+ /-30min de las horas programadas, logrando aparentar la
“presencia” de personas cuando no se encuentra en casa.
Para salir de este modo presione nuevamente los botones
SET y ON/OFF al mismo tiempo.
No congure los eventos de encendido o apagado con 60 minutos o menos de
diferencia entre ellos si planea usar el modo RANDOM (Aleatorio), ya que pueden
superponerse los eventos entre sí, lo que causaría que el temporizador no funcione
de la forma que se desea.
1.- Cuando el temporizador esté en el modo principal (visualización de hora), presione
el botón SET. Notará que la hora comienza a parpadear.
2.- Use los botones + ó – para ajustar la hora. Deje presionado más de un segundo
los botones (+ ó –) si desea aumentar o disminuir la hora con mayor
velocidad.
3.- Nuevamente presione el botón SET, comenzarán a parpadear los
minutos para su ajuste.
4.- Use los botones + ó – para modicar los minutos.
5.- Al igual que en el ajuste de hora, si desea incrementar o disminuir
el ajuste de los minutos con mayor velocidad, deje presionado por
más de un segundo los botones de (+ ó –).
6.- Presione SET.
7.- Espere unos segundos, el reloj se actualizará.
1.- Luego de congurar el reloj, presione el botón SET varias
veces hasta que en la pantalla aparezca el número del evento que
desea programar. Por ejemplo si desea programar el evento “1”
observará que en la pantalla aparece parpadeando el titulo
“ PROG 1 ON”.
2.- Presione los botones + ó – para ajustar la hora en la que desea
que se encienda (ON) el equipo conectado.
3.- Cuando complete el ajuste de la hora (ON), presione nuevamente el botón SET
para ajustar la hora en que se apagará (OFF) el primer evento. Observará que en la
pantalla aparece parpadeando el titulo “ PROG 1 OFF”.
4.- Use los botones + ó – para ajustar la hora de apagado para el primer evento.
5.- Si desea borrar la hora de la programación del evento, presione los botones
+y – al mismo tiempo, aparecerá el mensaje “- - : - -”.
6.- Para programar los otros 5 eventos repita las instrucciones del paso 1 al 4.
7.- Luego de que terminó la programación de eventos presione el botón SET varias
veces hasta regresar al modo principal (visualización de hora).
