Stihl SP 81 User manual

Instruction Manual
STIH)
STIHL SP 81
BA_SP81_01_U_C6.book Seite 0 Mittwoch, 15. März 2006

1SP 81
English
BA_SE_109_004_01_02.fmPrinted on chlorine-free paper.
Printing inks contain vegetable oils; paper can be recycled.
© ANDREAS STIHL AG & Co. KG, 2006
04584130121. M0. F6.
STIHl
Contents
Guide to Using this Manual .............. 2
Safety Precautions and
Working Techniques ......................... 3
Approved Power Tool
Attachments ...................................... 9
Using the Harvester ........................ 12
Assembling the Machine ................ 13
Adjusting the Throttle Cable ........... 14
Fuel ................................................ 15
Fueling ............................................ 16
Fitting the Harness ......................... 17
Starting / Stopping the Engine ........ 17
Operating Instructions .................... 20
Cleaning the Air Filter ..................... 21
Adjusting the Carburetor ................ 21
Spark Arresting Screen
in Muffler ......................................... 23
Checking the Spark Plug ................ 23
Replacing the Starter Rope
and Rewind Spring ......................... 24
Storing the Machine ........................ 27
Lubricating the Gearbox ................ 27
Maintenance ................................... 28
Maintenance Chart ......................... 30
Minimize Wear and
Avoid Damage ................................ 31
Main Parts and Controls ................. 32
Specifications ................................. 33
Special Accessories ....................... 34
Maintenance and Repairs ............... 34
Quality Certification ........................ 34
Dear Customer,
Thank you for choosing a quality
engineered STIHL product.
This machine has been built using
modern production techniques and
comprehensive quality assurance.
Every effort has been made to ensure
your satisfaction and troublefree use
of the machine.
Please contact your dealer or our
sales company if you have any
queries concerning your machine.
Hans Peter Stihl

2
English
SP 81
Pictograms
All the pictograms attached to the
machine are shown and explained in
this manual.
The operating and handling instructions
are supported by illustrations.
Symbols in text
The individual steps or procedures
described in the manual may be marked
in different ways:
:A bullet marks a step or procedure
without direct reference to an
illustration.
A description of a step or procedure that
refers directly to an illustration may
contain item numbers that appear in the
illustration.
Example:
Loosen the screw (1)
Lever (2) ...
In addition to the operating instructions,
this manual may contain paragraphs
that require your special attention. Such
paragraphs are marked with the
symbols described below:
Warning where there is a risk of an
accident or personal injury or
serious damage to property.
Caution where there is a risk of
damaging the machine or its
individual components.
Note or hint which is not essential
for using the machine, but may
improve the operator’s under-
standing of the situation and result
in better use of the machine.
Note or hint on correct procedure in
order to avoid damage to the
environment.
Equipment and features
This instruction manual may refer to
several models with different
features. Components that are not
installed on all models and related
applications are marked with an
asterisk (*). Such components may
be available as special accessories
from your STIHL dealer.
Engineering improvements
STIHL’s philosophy is to continually
improve all of its products. As a result,
engineering changes and improvements
are made from time to time. If the
operating characteristics or the
appearance of your machine differ from
those described in this manual, please
contact your STIHL dealer for
assistance.
Therefore some changes, modifications
and improvements may not be covered
in this manual.
Guide to Using this Manual

3SP 81
English
Special safety
precautions must be
observed when working
with this power tool
because the rakes move
at a high stroke rate.
It is important that you
read and understand the
instruction manual before
using the unit for the first
time. Keep the manual in
a safe place for future
reference. Non-observance of the safety
precautions in the instruction manual
may cause serious or even fatal injury.
Always observe local safety regulations,
standards and ordinances.
If you have not used this type of power
tool before: Have your dealer or other
experienced user show you how to
operate your power tool or attend a
special course of training in power tool
operation.
Minors should never be allowed to use a
power tool.
Bystanders, especially children, and
animals should not be allowed in the
area where a power tool is in use.
When the power tool is not in use (work
break), shut it off so that it does not
endanger others and secure it against
unauthorized use.
The power tool user is responsible for
avoiding injury to third parties or damage
to their property.
Lend or rent your power tool only to
persons who are familiar with this model
and its operation and only with the
instruction manual.
To operate the power tool you must be
rested, in good physical condition and
mental health.
If you have any condition that might be
aggravated by strenuous work, check
with your doctor before operating a
power tool.
Persons with pacemakers only: The
ignition system of your unit produces an
electromagnetic field of a very low
intensity. This field may interfere with
some pacemakers. To reduce health
risks, STIHL recommends that persons
with pacemakers consult their physician
and the pacemaker manufacturer before
operating this tool.
Do not operate the power tool if you are
under the influence of any substance
(drugs, alcohol) which might impair
vision, dexterity or judgment.
Use your power tool only for harvesting
fruit about the size of coffee berries,
nuts, olives, sloes, etc.
It must not be used for any other
purpose since it may result in accidents
or damage to the machine. Never
attempt to modify your power tool in any
way since this may result in accidents or
damage to the machine.
Safety Precautions and
Working Techniques

4
English
SP 81
Only mount tools and accessories that
are explicitly approved for this power
tool model by STIHL or are technically
identical. If you have any questions in
this respect, consult a servicing dealer.
To reduce the risk of accidents or
damage to the machine, use only high
quality tools and replacement parts.
STIHL recommends the use of STIHL
original tools and accessories. The
characteristics of these components are
specifically designed to match your
machine and meet your performance
requirements.
Clothing and Equipment
Wear proper protective clothing and
equipment.
Clothing must be sturdy
and snug-fitting but allow
freedom of movement,
e.g. an overall and jacket
combination, do not wear
a coat.
Avoid scarves, neckties, jewellery or
anything that could get caught on
branches or brush or moving parts of the
machine. Tie up and confine long hair
(e.g. with a hair net, cap, hard hat, etc.)
Wear sturdy footwear with non-slip
soles.
Wearasafety hard hat
where there is a danger of
head injuries from falling
objects. To reduce the risk
of injury to your eyes from
swirled up or thrown
objects, always wear a face shield and
safety glasses.
Warning! A face shield alone does not
provide adequate eye protection.
Wear hearing protection, e.g. earplugs
or ear muffs.
Wear heavy-duty
gloves, preferably made
of leather.
STIHL offers a comprehensive range of
protective clothing and equipment.
Transporting the Unit
Always turn off the engine.
Carry the unit suspended from harness
or by the drive tube. Avoid touching hot
parts of the machine, especially the
muffler and gear housing – you could
suffer serious burns.
Transporting in a vehicle: Properly
secure your unit to prevent turnover, fuel
spillage and damage.
Fueling
Gasoline is an
extremely flammable
fuel. Keep clear of naked
flames and fire. Do not
spill any fuel – do not
smoke.
Always shut off the engine before
refueling.
Do not fuel a hot engine – fuel may spill
and cause a fire.
Open the fuel cap carefully to allow any
pressure build-up in the tank to release
slowly and avoid fuel spillage.

5SP 81
English
Fuel your power tool in a well-ventilated
area, outdoors only. If you spill fuel, wipe
the machine immediately – if fuel gets on
your clothing, change immediately.
Your power tool comes standard with
either a screw-type or bayonet-type fuel
cap.
After fueling, tighten down
the screw-type fuel cap as
securely as possible.
Insert the fuel cap with
hinged grip (bayonet type
cap) correctly in the
opening, turn it clockwise
as far as stop and fold the
grip down.
This reduces the risk of unit vibrations
causing the fuel cap to loosen or come
off and spill quantities of fuel.
To reduce the risk of serious or fatal
burn injuries, check for fuel leakage. If
fuel leakage is found, do not start or run
the engine until leak is fixed.
Before Starting
Check that your power tool is properly
assembled and in good condition – refer
to appropriate chapters in the instruction
manual:
– Slide control / stop switch must
move easily to STOP or 0
– Smooth action of throttle trigger
interlock (if fitted) and throttle trigger
– throttle trigger must return
automatically to idle position.
– Rakes: Securely mounted and in
good condition (clean, move freely,
not warped or cracked).
– Check that spark plug boot is secure
– a loose boot may cause arcing
that could ignite combustible fumes
and cause a fire.
– Never attempt to modify the controls
or safety devices.
– Keep the handles dry and clean,
free from oil and dirt, for safe
control.
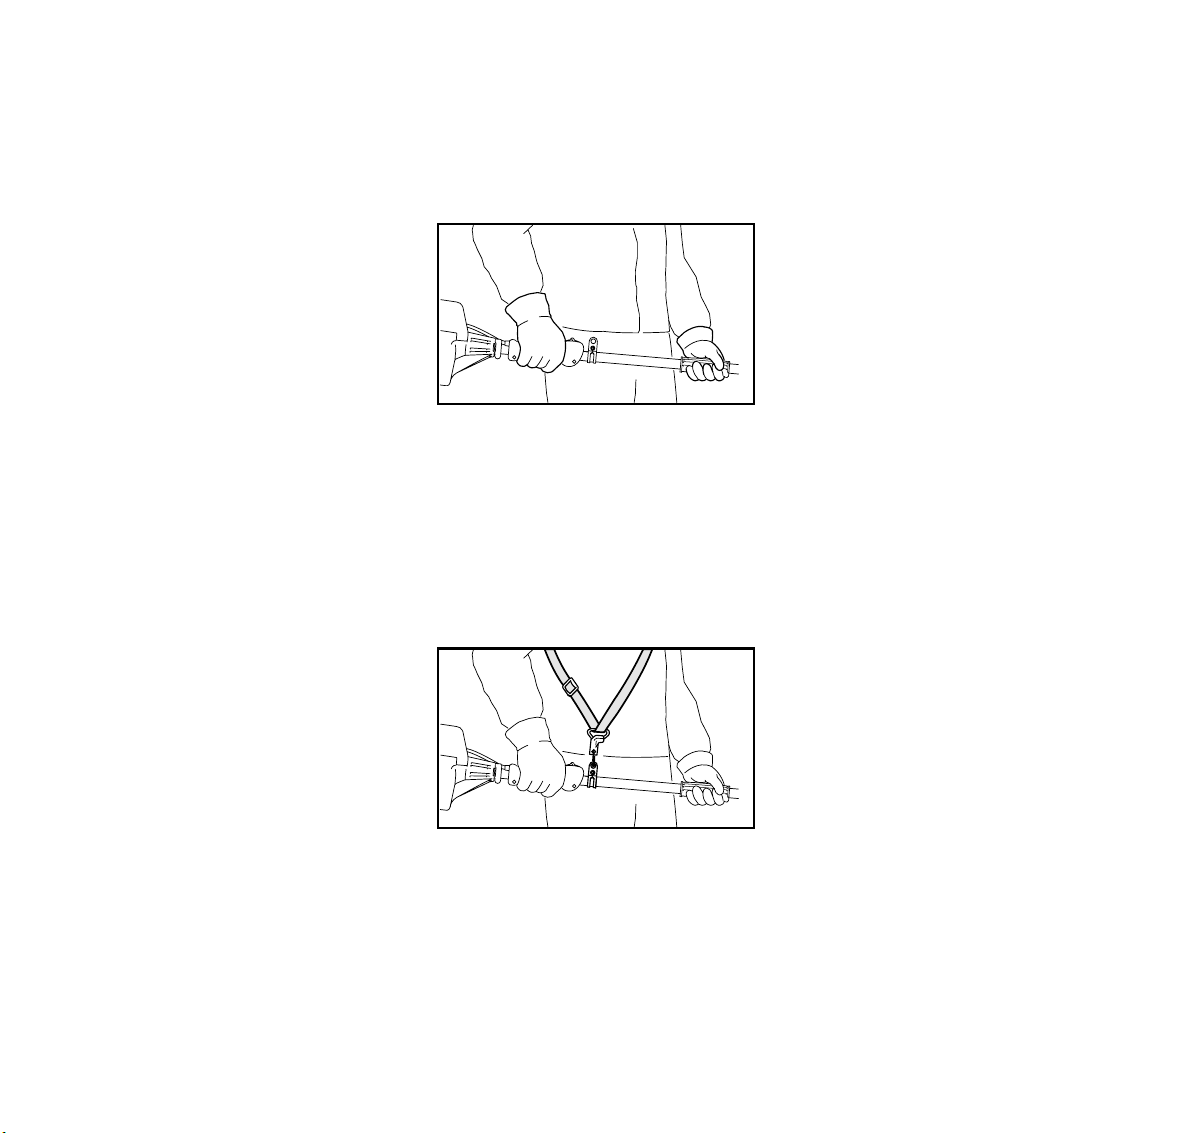
– Adjust harness to suit your height
and reach. See chapter on "Fitting
the Harness“.
To avoid the risk of accidents and
personal injury, do not operate your unit
if it is not in a safe operating condition.
Be prepared for an emergency when
wearing a harness: Practise quickly
setting down the unit. To avoid damage,
do not throw the machine to the ground
when practising.
Starting the Engine
Start the engine at least 3 meters from
the fueling spot, outdoors only.
Place the unit on firm ground in an open
area. Make sure you have good balance
and secure footing. Hold the unit
securely – be sure the rakes are clear of
the ground and all other obstructions
because they may begin to run when the
engine starts – also allow space for
movement of the rakes.

6
English
SP 81
Your power tool is a one-person unit. To
reduce the risk of injury from thrown
objects or contact with the rakes, do not
allow other persons within a radius of 5
meters of your own position – even
when starting.
To reduce the risk of injury, avoid contact
with the rakes.
Do not drop start the power tool. The
correct starting procedure is described
in your instruction manual. Note that the
rakes continue to run for a short period
after you let go of the throttle trigger
(flywheel effect).
Check the idle speed setting. The rakes
must not move when the engine is idling
with the throttle trigger released.
To reduce risk of fire, keep hot exhaust
gases and hot muffler away from easily
combustible materials (e.g. wood chips,
bark, dry grass, fuel).
Holding and Controlling the
Machine
Always hold the unit firmly with both
hands on the handles. Make sure you
always have good balance and secure
footing.
Wrap your fingers and thumbs around
the handles. Right hand on the control
handle, left hand on the handle on the
drive tube. Left handers should follow
these instructions too.
The machine can be carried on a
harness to relieve the load on the
operator’s arms.
During Operation
In the event of imminent danger or in an
emergency, switch off the engine
immediately – move the slide control /
stop switch to STOP or 0.
To reduce the risk of injury from falling
objects, do not allow bystanders within
5 meters of your own position.
Make sure the idle speed setting is
correct. The rakes must not move when
the engine is idling with the throttle
trigger released.
Check and correct the idle speed setting
at regular intervals. If the rakes still
move, have your dealer check your
machine and make proper adjustments
or repairs.
Take special care in slippery conditions
– damp, snow, ice, on slopes, uneven
ground, etc.
Watch out for obstacles: Roots, tree
stumps or holes which could cause you
to trip or stumble.
Make sure you always have firm and
secure footing.
413BA002 KN413BA001 KN

7SP 81
English
When working at heights:
– Use a lift bucket
– Never work on a ladder
– Never work in the tree
– Never work on an insecure support
– Never operate your unit with one
hand
Be particularly alert and cautious when
wearing hearing protection because
your ability to hear warnings (shouts,
alarms, etc.) is restricted.
To reduce the risk of accidents, take a
break in good time to avoid tiredness or
exhaustion.
Work calmly and carefully – in daylight
conditions and only when visibility is
good – ensure you do not endanger
others – stay alert at all times.
Your power tool produces
toxic exhaust fumes as
soon as the engine is
running. These fumes
may be colorless and
odorless. Never run the
engine indoors or in poorly ventilated
locations, even if your model is equipped
with a catalytic converter.
To reduce risk of fire, do not smoke
while operating or standing near your
power tool. Note that combustible fuel
vapor may escape from the fuel system.
If your power tool is subjected to
unusually high loads for which it was not
designed (e.g. heavy impact or a fall),
always check that it is in good condition
before continuing work – see also
“Before Starting”.
Check in particular that the fuel system
is properly sealed (no leaks) and the
safety devices are working properly. Do
not continue operating your power tool if
it is damaged. In case of doubt, have the
machine checked by your servicing
dealer.
Do not operate your power tool with the
starting throttle lock engaged as you do
not have control of the engine speed in
this position.
Shut off the engine before leaving the
machine unattended.
If the rakes become blocked: Release
the throttle trigger – shut off the engine –
clear the blockage.
Opening the throttle while the rakes are
blocked increases the load and reduces
engine speed. The clutch then slips
continuously and this causes
overheating and damage to important
components (e.g. clutch, polymer
housing components) – and this can
increase the risk of injury from the rakes
moving while the engine is idling.
Keep the rakes clear of foreign objects –
such objects may be caught and thrown
and damage the rakes.

8
English
SP 81
Check the rakes and drive shaft at
regular short intervals during operation
or immediately if there is a noticeable
change in the tool’s behavior:
– Turn off the engine and hold the unit
firmly.
– Check condition and tightness, look
for cracks.
– Replace damaged parts
immediately, even if they have only
superficial cracks.
– To reduce the risk of injury, always
shut off the engine and remove the
spark plug boot before replacing
rake components.
Never continue using or attempt to
repair a damaged or cracked rake.
Vibrations
The function of this
harvester causes
vibrations. Some of these
vibrations are transmitted
to the handles. Therefore,
the permissible period of
daily use for one operator is restricted.
It is not possible to give a general
recommendation for the period of use
because it is influenced by a number of
factors.
The period of use is extended by:
– Protecting your hands (warm
gloves).
– Taking regular work breaks.
The period of use is shortened by:
– Personal disposition to poor
circulation – symptoms: frequent
cold fingers, tingling sensations.
– Low outside temperatures
– The force with which the handles
are held. Gripping the handles with
excessive pressure restricts blood
circulation.
STIHL recommends that one and the
same operator uses the unit for only a
short period per workday. Operators in
a work group should share the work by
rotating at regular intervals.
Seek medical advice immediately if any
of the following symptoms appear:
– Fingers turning white – especially in
cold weather.
– Tingling sensations and numbness
in fingers.
– Constant pains in muscles or joints.
– Difficulty gripping or holding small
objects, such as screws, nails, etc.
Operators with the above symptoms
should not use the machine until further
notice.

9SP 81
English
Maintenance and repairs
The machine must be serviced regularly.
Do not attempt any maintenance or
repair work not described in your
Owner’s Manual. All other work should
be carried out by a servicing dealer.
STIHL recommends that maintenance
and repair work be carried out only by
authorized STIHL dealers. STIHL
dealers receive regular training and are
supplied with technical information.
Use only high-quality replacement parts,
in order to avoid the risk of accidents or
damage to the machine. Contact a
dealer if in doubt.
STIHL recommends the use of genuine
STIHL spare parts. Such parts have
been optimized for the machine and the
user's requirements.
Before starting any maintenance or
repair work and before cleaning the
machine, always stop the engine and
disconnect the spark plug boot to
avoid all risk of injury if the engine
starts up inadvertently. – Exception:
adjustment of carburetor and idle speed.
Do not service or store the machine near
a naked light – risk of fire due to the
fuel.
Check fuel cap regularly for tightness.
Use only the spark plugs approved by
STIHL – see Specifications.
Inspect ignition lead (insulation in good
condition, secure connection).
To reduce the risk of fire due to ignition
outside the cylinder, move the slide
control / stop switch to STOP or 0before
turning the engine over on the starter
with the spark plug boot removed or the
spark plug unscrewed.
Check that the muffler is in perfect
working condition.
Do not use the machine if the muffler is
damaged or missing – risk of fire! –
Hearing damage!
Do not touch the hot muffler – risk of
burns!
The condition of the anti-vibration
buffers influences the machine's
vibrations – they must be examined
regularly.
STIHL power tool attachments are
available for converting the single
purpose unit into other power tool
combinations.
Approved Power Tool
Attachments

10
English
SP 81
Your power tool is therefore the basic
power unit for a number of different
attachments with a broad range of
applications.
1) Loop handle with barrier bar
required – see “Retrofitting Loop
Handle”
2) Loop handle without barrier bar
required. A loop handle with barrier
bar may be used – see “Retrofitting
Loop Handle”
3) The handle hose on the drive tube of
the basic power tool is used as the
left handle
Mounting the Attachment
:Mount the carrying ring (1) – see
”Assembling the Machine”.
:The handle hose (2) remains on the
drive tube.
:Mount the attachment – see
instruction manual supplied with the
attachment.
Retrofitting Loop Handle
Refer to table for required type of
loop handle.
Suitable loop handles are available as
accessories from STIHL servicing
dealers.
Positioning the handle
:Push the handle hose (2) up to the
carrying ring (1).
:Fit the loop handle (3) on the drive
tube about 20 cm (A) forward of the
control handle (4).
Mounting loop handle with barrier bar
Insert the square nuts (5) in the
barrier bar (6) and line up the holes.
Attachment Application
BF 1) Cultivator
FH 1) Power Scythe
HL 0° 2) Hedge Trimmer
HL 30° 1) Hedge Trimmer
HL 0-90° 1) Hedge Trimmer,
adjustable
HL 135° 1) Hedge Trimmer,
adjustable
HT 3) Pole Pruner
4
3
A
21
413BA005 KN
6
55
413BA006 KN

11SP 81
English
:Place the clamp (7) in the loop
handle (3) and position them both
against the drive tube (8).
:Fit the clamp (9) and place the
barrier bar (6) on the handle,
making sure it is positioned as
shown.
:Line up the holes.
:Insert the screws (10) in the holes
and screw them into the barrier bar
as far as stop.
:Go to “Adjusting the handle”.
Mounting loop handle without
barrier bar
:Place the clamp (7) in the loop
handle (3) and position them both
against the drive tube (8).
:Fit the clamp (9) and line up the
holes.
:Fit the washers (11) on the screws
(10) and insert the screws in the
holes. Screw them into the square
nuts (5) as far as stop.
:Go to “Adjusting the handle”.
Adjusting the handle
:Line up the handle and adjust it to
the most favorable position for the
user and application.
Distance Amust not be more than
55 cm. About 35 cm is
recommended.
:Tighten down the screws on handle
firmly.
Removing the handle
It is advisable to remove the loop
handle to use the basic power tool
for its original purpose.
:Remove the loop handle and keep
all the parts in a safe place for future
use.

12
English
SP 81
This power tool is used for harvesting
nuts and fruits.
The influences of ripeness, variety and
size of fruits or nuts determines whether
this power tool is suitable for harvesting.
The performance of this special
harvester is affected by the above-
mentioned factors.
This unit is not recommended for
harvesting fruit intended for the table,
e.g. cherries, plums, apples and pears.
To avoid damage to the special
harvester, do not run the rakes (1)
off load.
The forkhead (2) performs rapid
reciprocating movements during
operation. Take care not to damage
branches.
Working technique
Use the following working technique for
best results:
:Accelerate the engine and comb the
branches with the rakes. Use the
throttle trigger to obtain the optimum
rake stroke rate (stroke = opening
and closing motion of rakes).
:Keep the throttle open only as long
as the rakes are engaged in the
branches.
:Do not accelerate the engine when
the rakes are not engaged in the
branches.
:Re-position the rakes.
:Repeat this procedure for all
sections of the tree.
:Pay attention to the tree’s limb
structure during operation.
:Comb the tree or bush from the
inside outwards in the direction of
the tips of the branches.
:Process the whole tree even if it
has only very little fruit.
:Do not hold the unit in one spot for
too long so as not to damage leaves
and branches.
:Always shut off the engine before
leaving the unit unattended.
Using the Harvester
1
413BA008 KN
1
413BA009 KN
2

13SP 81
English
In order to avoid consequential
damage, do not continue working
with the machine if a rake (1) or one
of its tines (2) is broken. Always
replace a damaged rake – see
chapter on “Maintenance”.
Mounting the Carrying Ring
:Mount the carrying ring (1) about
1 cm (distance A) in front of the
control handle (2) as follows.
:Position the open carrying ring (1)
on the drive shaft with its tapped
hole on the left (user side).
:Squeeze the ends of the carrying
ring together and insert the M6x14
screw (3).
:Line up the carrying ring.
Tighten down the screw firmly.
Mounting the Gearhead
:Place the power tool on the ground
so that it rests on the machine
support.
:Loosen the clamp screws (1) on the
gearhead – do not remove them.
:Apply a mark (with pencil or crayon)
at distance A(40 mm) from the end
of the drive tube.
:Remove the protective cap from the
end of the drive tube.
Assembling the Machine
A
1
3
1
413BA012 KN
2
2
1
413BA013 KN
1
413BA014 KN

14
English
SP 81
:Apply a mark (with pencil or crayon)
at distance A(40 mm) from the end
of the drive tube.
:Push the gearhead (2) onto the
drive tube (3) – turn it back and forth
at the same time – until it reaches or
covers the mark on the drive tube.
Alternative check: The drive tube is
correctly positioned when it
completely closes the slot in the
gearhead’s clamp (see arrows).
:Line up the rakes parallel to the
machine support or level with the
ground.
:Tighten down the clamp screws on
the gearhead.
:Move the handle hose (4) to the
most comfortable working position.
A properly adjusted throttle cable is
the precondition for correct
operation in the full throttle, starting
throttle and idle positions.
Adjust the throttle cable only after
the unit is fully assembled
:Use a suitable tool to push the slide
to the bottom of the slot
413BA015 KN
A
2
413BA016 KN
3
413BA017 KN
Adjusting the Throttle Cable
002BA163 KN

15SP 81
English
:Press down the trigger interlock (1)
and squeeze the throttle trigger (2)
(full throttle) – this sets the throttle
cable correctly.
Your engine requires a mixture of
gasoline and engine oil.
For health reasons, avoid direct skin
contact with gasoline and avoid inhaling
gasoline vapor.
STIHL MotoMix
STIHL recommends the use of STIHL
MotoMix. This ready-to-use fuel mix
contains no benzol or lead, has a high
octane rating and ensures that you
always use the right mix ratio.
STIHL MotoMix is specially
formulated for use in STlHL engines
and guarantees a long engine life.
MotoMix is not available in all markets.
Mixing Fuel
Unsuitable fuels or lubricants or mix
ratios other than those specified
may result in serious damage to the
engine. Poor quality gasoline or
engine oil may damage the engine,
sealing rings, hoses and the fuel
tank.
Gasoline
Use only high-quality brand-name
gasoline with a minimum octane rating
of 90 – leaded or unleaded.
If your machine is equipped with a
catalytic converter, you must use
unleaded gasoline.
A few tankfuls of leaded gasoline
will greatly reduce the efficiency of
the catalytic converter.
Engine Oil
Use only quality two-stroke engine oil.
We recommend STIHL two-stroke
engine oil since it is specially
formulated for use in STlHL engines
and guarantees a long engine life.
If STIHL two-stroke engine oil is not
available, use only quality two-stroke oil
designed for use in air cooled engines.
Do not use oils designed for water
cooled engines or engines with a
separate lubricating system (e.g.
conventional four-stroke engines).
Use only STIHL 50:1 two-stroke
engine oil for the fuel mix in models with
a catalytic converter.
2
1
002BA161 KN
Fuel

16
English
SP 81
Mix Ratio
STIHL 50:1 two-stroke engine oil:
50 parts gasoline to 1 part oil
Other high-quality two-stroke engine
oils:
25 parts gasoline to 1 part oil
Examples
:Use a canister approved for storing
fuel. Pour oil into the canister first,
then add gasoline and mix
thoroughly.
Storing Fuel
Store fuel only in approved safety-type
fuel canisters in a dry, cool and safe
location protected from light and the sun.
Fuel mix ages:
Only mix sufficient fuel for a few weeks
work. Do not store fuel mix for longer
than 3 months.
Exposure to light, the sun, low or high
temperatures can quickly make the fuel
mix unusable.
:Thoroughly shake the mixture in the
canister before fueling your
machine.
Pressure may build up in the
canister – open it carefully.
:Clean the fuel tank and canister
from time to time.
Dispose of remaining fuel and
cleaning fluid properly in
accordance with local regulations
and environment requirements.
:Before fueling, clean the filler cap
and the area around it to ensure that
no dirt falls into the tank.
:Always thoroughly shake the
mixture in the canister before
fueling your machine.
Take care not to spill fuel while fueling
and do not overfill the tank. STIHL
recommends use of the STIHL filling
system (special accessory).
After fueling, tighten fuel cap as
securely as possible by hand.
Gaso-
line
STIHL
engine oil
50:1
Other high-
quality two-
stroke engine
oils:
25:1
Liters Liters (cc) Liters (cc)
1 0.02 (20) 0.04 (40)
5 0.10 (100) 0.20 (200)
10 0.20 (200) 0.40 (400)
15 0.30 (300) 0.60 (600)
20 0.40 (400) 0.80 (800)
25 0.50 (500) 1.00 (1000)
Fueling
389BA031 KN

17SP 81
English
Replacing the fuel pickup body
:Change of fuel pickup body every
year.
:Drain the fuel tank.
:Use a hook to pull the fuel pickup
body out of the tank and take it off
the hose.
:Push the new pickup body into the
hose.
:Place the pickup body in the tank.
:Put on the shoulder strap (1).
:Adjust the length of the strap so that
the carabiner (2) is about a hand’s
width below your right hip.
Controls
Throttle trigger interlock (1), throttle
trigger (2) and slide control (3).
Positions of slide control
STOP-O(4) – engine off – the igniton is
switched off
#(5) – normal run position – the engine
is running or can start
START (6) – the engine is switched on,
the engine can start
389BA032 KN
Fitting the Harness
2
1
413BA019 KN
Starting / Stopping
the Engine
3
STOP
2
5
6
4
7
002BA181 KN
START
STOP-
1

18
English
SP 81
Symbol on slide control
h(7) – stop symbol and arrow – to stop
the engine, push the slide control in the
direction of the arrow on the stop symbol
(h) to STOP-O.
Starting
:Hold down the trigger interlock and
pull the throttle trigger.
:Keep both levers in that position.
:Move the slide control to START
position and hold it there.
:Now release the throttle trigger,
slide control and trigger interlock in
that order. This is the
starting-throttle position.:Set the choke lever (8):
For cold start to g
For warm start to e
(also use this setting if the engine
has been running but is still cold)
:Press the fuel pump bulb (9) at least
five times – even if the bulb is filled
with fuel.
:Place the unit on the ground: It must
rest securely on the engine support.
Rest the gearhead on a raised
support (high mound) or the fork of
a branch. Check that the rakes are
not touching the ground or any other
obstacles.
:Make sure you have a firm footing.
:Press the unit firmly against the
ground with your left hand. Your
thumb should be under the fan
housing.
:Pull the starter grip slowly with your
right hand until you feel it engage –
and then give it a brisk strong pull.
Do not pull out starter rope to full
length – it might break.
:Do not let the starter grip snap back
– guide it slowly into the housing so
that the starter rope can rewind
properly.
:Continue cranking.
393BA017 KN
8
8
393BA018 KN
9
413BA020 KN

19SP 81
English
When engine begins to fire
:Set the choke lever to e
:Continue cranking.
As soon as engine runs
:Blip the throttle trigger so that the
slide control moves to the normal
run position # and the engine settles
down to idle speed.
Make sure the carburetor is
correctly adjusted – the rakes must
not run when the engine is idling.
The rakes run when the control
handle is in the starting throttle
position with the throttle trigger
released.
Your machine is now ready for
operation.
Alternative method of starting:
:Make sure you have a firm footing.
:Hold the powerhead securely with
your left hand on the fan housing –
your thumb should be under the fan
housing.
:Pull the starter grip slowly with your
right hand until you feel it engage –
and then give it a brisk strong pull.
Do not pull out starter rope to full
length – it might break.
:Do not let the starter grip snap back
– guide it slowly into the housing so
that the starter rope can rewind
properly.
:Continue cranking.
:When engine begins to fire, follow
procedure described under “When
engine begins to fire”
To shut down the engine
:Move the slide control in direction of
arrow (h) to STOP-O.
At very low outside temperatures
As soon as the engine runs:
:Blip the throttle trigger to disengage
the starting throttle position –
the slide control moves to the run
position #and the engine settles
down to idle speed.
:Open the throttle slightly and allow
engine to warm up for a brief period.
If the engine does not start
Choke lever
If you did not move the choke lever to
equickly enough after the engine
began to fire, the combustion chamber is
flooded.
:Set the choke lever to e
:Set the slide control, interlock lever
and the throttle trigger to the
starting throttle position.
:Start the engine by pulling the
starter rope firmly. 10 to 20 pulls
may be necessary.
413BA021 KN
Table of contents
Other Stihl Lawn And Garden Equipment manuals

Stihl
Stihl HT-KM User manual

Stihl
Stihl PolyCut 28-2 User manual

Stihl
Stihl AHT 600.0 User manual

Stihl
Stihl KombiMotor KMA 130 R User manual

Stihl
Stihl KM 90 R User manual

Stihl
Stihl FS-MM User manual

Stihl
Stihl SPA 130.0 User manual

Stihl
Stihl FS 90 User manual

Stihl
Stihl MM 56 User manual

Stihl
Stihl RLE 540 User manual

Stihl
Stihl STIHL PC 70 User manual

Stihl
Stihl RL 540 User manual

Stihl
Stihl KB-MM User manual

Stihl
Stihl HSE 61 User manual

Stihl
Stihl RL-MM User manual

Stihl
Stihl HSA 60.0 User manual

Stihl
Stihl BF-MM User manual

Stihl
Stihl STIHL PC 70 User manual

Stihl
Stihl BT 120 C User manual

Stihl
Stihl KA 85 R User manual