Stocker 233 User manual

Via Industria 1/7 Industriestraße - I-39011 Lana (BZ)
Tel. +39 0473 563277 - Fax +39 0473 563482
Art. 233, 234
MANUALE DI ISTRUZIONI
MANUAL DE INSTRUCCIONES
BENUTZERHANDBUCH
USER MANUAL
Micronizzatore elettrico 5 l / 10 l
Pulverizador eléctrico 5 l / 10 l
Elektrisches Sprühgerät 5 l / 10 l
Electric Sprayer 5 l / 10 l

Art. 233, Art. 234
Micronizzatore elettrico 5 l / 10 l
Art. 233, Art. 234
Micronizzatore elettrico 5 l / 10 l
Per ulteriori informazioni sul prodotto si prega di contattare
2 3
Per novità e informazioni iscriviti alla newsletter:
www.stockergarden.com/newsletter
L’uso di questo micronizzatore le farà risparmiare molto tempo,
lavoro e denaro nella gestione dei suoi campi. Perciò, prima di
metterlo in funzione e affinché ottenga le massime soddisfazioni,
le chiediamo di leggere attentamente le seguenti istruzioni.
Descrizione generale
1
Uso
2
1. Introduca due pile di tipo R-20 1’5 V (preferibilmente
alcaline) all’interno del tubo porta pile, collocando il polo
positivo verso il davanti.
2. Introduca l’erbicida nel serbatoio e se lo metta sulla schiena.
3. Il liquido cade per gravità, per cui la testa deve andare più in
basso del livello del serbatoio.
4. Apra con il pollice la leva-pulsante e si metterà in funzione
il motore.
5. Nello stesso momento in cui inizia a funzionare il motore, il
liquido inizia ad uscire polverizzato.
6. Controlli la buona circolazione del liquido da polverizzare,
dall’uscita del serbatoio all’uscita dell’ugello finale.
7. Per fermare il funzionamento, rimuova con il dito la sicura.
8. Per separare il serbatoio dal micronizzatore, sviti il dado e
separi il tubo insieme con la valvola. Questa operazione si
può effettuare anche se il serbatoio contiene del liquido
3
Manutenzione
• Fare in modo che lo stato delle pile sia corretto.
• Se si dilaziona nel tempo l’applicazione, è meglio togliere le
pile dall’apparecchio.
• Non lavare mai la testa: se è sporca, si limiti a pulirla con un
panno.
• Seguire le norme che consiglia il foglietto del prodotto da
utilizzare.
• Se si smontano le connessioni, riconnettere rosso con rosso
e nero con nero.
4
Guasti
Se l’apparecchio non funziona correttamente, deve controllare:
• che le pile non siano esaurite;
• che siano nella posizione corretta;
• che l’interruttore faccia un contatto normale;

Art. 233, Art. 234
Micronizzatore elettrico 5 l / 10 l
Art. 233, Art. 234
Micronizzatore elettrico 5 l / 10 l
Per ulteriori informazioni sul prodotto si prega di contattare
4 5
Per novità e informazioni iscriviti alla newsletter:
www.stockergarden.com/newsletter
• che la molla che sostiene le pile faccia pressione sulle
stesse e che sia pulita per fare un buon contatto;
• che i cavi di connessione siano propriamente fissati al
motore;
• che il motore sia nelle corrette condizioni;
• che il disco diffusore non si trovi frenato.
Componenti e ricambi
6
Avviso all’utente
5
Le raccomandazioni e le informazioni che diamo sono frutto di numerosi
studi. Ciò nonostante, durante l’utilizzo si possono presentare diversi
fattori che sfuggono al nostro controllo (prodotti, miscele, applicazione
indebita, climatologia, ecc.).
1231/1 Interruttore e porta batteria
2231/2 Serbatoio 10 l (Art. 233, 234)
3231/3 Filtro
4233/1 Diffusore
5233/2 Ugelli
6231/6 Cinghie (Art. 234)
6232/2 Cinghie (Art. 233)
7231/7 Tubo
8232/1 Serbatoio 5 l (Art. 234, 233)
9231/8 Clip di chiusura
10 231/9 Chiusura serbatoio 10 l
11 232/2 Chiusura serbatoio 5 l
Componenti e ricambi
6
9
10
11

Pulverizador eléctrico 5 l / 10 l Pulverizador eléctrico 5 l / 10 l
Para más informaciones sobre el producto póngase en contacto con
67
Para noticias e informaciones suscríbase al boletín:
www.stockergarden.com/newsletter
Art. 233, Art. 234 Art. 233, Art. 234
El uso de este pulverizador, le economizará mucho tiempo, trabajo
y dinero en el cuidado de sus campos, por lo que, antes de ponerlo
a funcionar y para que obtenga las máximas satisfacciones,
rogamos lea detenidamente las siguientes instrucciones.
Descripción general
1
Uso
2
1. Introduzca dos pilas tipo R-20 1’5 v. (preferentemente alcalinas)
en el interior del tubo porta-pilas, colocando el polo positivo
hacia delante.
2. Introduzca el herbicida en el tanque y póngaselo a la espalda.
3. El líquido cae por gravedad, por lo que el cabezal debe ir más
bajo que el nivel del tanque.
4. Apriete con el dedo pulgar la palanca-pulsador y se pondrá en
funcionamiento el motor.
5. En el mismo momento que funciona el motor, empieza a salir
el líquido pulverizado.
6. Compruebe la buena circulación del liquido a pulverizar, desde
la salida del tanque hasta la salida de la boquilla final.
7. Para parar el funcionamiento retire con el dedo el seguro.
8. Para separar el tanque del pulverizador, desenrosque la tuerca
y separe la manguera junto con la válvula. Esta operación se
puede realizar aunque el tanque contenga líquido.
3
Mantenimiento
• Procurar que el estado de las pilas sea correcto.
• Si se va a espaciar la aplicación, es conveniente sacar las
pilas del aparato.
• No lavar nunca el cabezal; si está sucio limítese a limpiarlo
con un trapo.
• Seguir las normas que aconseja el folleto del producto a
utilizar.
• Si se desmontan las conexiones, volver a conectar rojo con
rojo y negro con negro.
4
Averías
Si el aparato no funciona correctamente, debe observar que:
• las pilas no estén agotadas;
• las pilas estén en la posición correcta;
• el interruptor haga contacto normal;

Pulverizador eléctrico 5 l / 10 l Pulverizador eléctrico 5 l / 10 l
Para más informaciones sobre el producto póngase en contacto con
89
Para noticias e informaciones suscríbase al boletín:
www.stockergarden.com/newsletter
Art. 233, Art. 234 Art. 233, Art. 234
Componentes y recambios
6
• el muelle que sujeta las pilas, que presione sobre las
mismas y que esté limpio para que haga buen contacto;
• los cables de conexión estén debidamente fijados al motor;
• el motor esté en correctas condiciones;
• el disco difusor no se encuentre frenado.
Advertencia al usuario
5
Las recomendaciones e informaciones que facilitamos, son fruto
de numerosos estudios. Sin embargo en la utilización se pueden
presentar diversos factores que se escapan a nuestro control
(productos, mezclas, aplicación indebida, climatología, etc.).
1231/1 Interruptor y porta pilas
2231/2 Tanque 10 l (Art. 233, 234)
3231/3 Filtro
4233/1 Difusor
5233/2 Boquillas
6231/6 Correas (Art. 234)
6232/2 Correas (Art. 233)
7231/7 Tubo
8232/1 Tanque 5 l (Art. 234, 233)
9231/8 Clips de cierre
10 231/9 Cerradura tanque 10 l
11 232/3 Cerradura tanque 5 l
Componentes y recambios
6
9
10
11

Elektrisches Sprühgerät 5 l / 10 l Elektrisches Sprühgerät 5 l / 10 l
Für weitere Informationen zum Produkt senden Sie uns bitte eine E-Mail an
10 11
Abonnieren Sie unseren Newsletter um aktuelle
Informationen von Stocker zu erhalten:
www.stockergarden.com/newsletter
Art. 233, Art. 234 Art. 233, Art. 234
Die Verwendung dieses Sprühgeräts spart Ihnen Zeit, Geld und
Arbeit bei der Pflege ihrer Felder. Bevor Sie das Gerät in Betrieb
nehmen, lesen Sie bitte die folgenden Hinweise sorgfältig durch.
Generelle Beschreibung
1
Verwendung
2
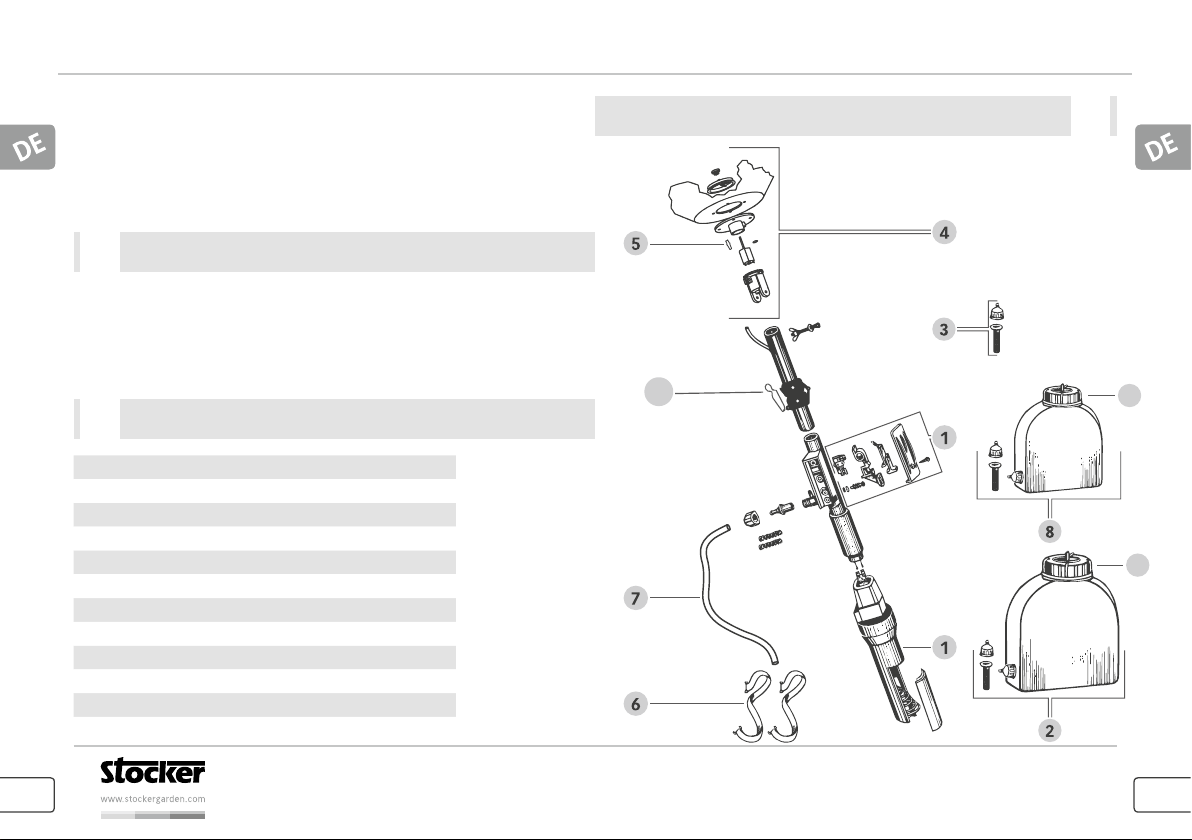
1. Legen Sie zwei Batterien R-20 1.5 V (vorzugsweise
alkalische) in das Batteriefach, wobei der Pluspol nach
vorne zeigt.
2. Füllen Sie das Herbizid in den Tank und nehmen Sie ihn
anschließend auf die Schultern.
3. Der Sprühkopf muss tiefer sein als der Tank.
4. Drücken Sie den Einschalter und der Motor startet.
5. Im selben Moment beginnt das Sprühen der zerstäubten
Flüssigkeit.
6. Es ist wichtig die Zirkulation der zu sprühenden Flüssigkeit
zu kontrollieren, vom Austritt aus dem Behälter bis zum
Austritt aus der Düse.
7. Halten Sie das Gerät an, indem sie den Sicherungsknopf
ziehen.
8. Um den Tank vom Sprühgerät zu trennen, Schrauben
lösen, Schlauch und Ventil entfernen. Dies kann auch dann
geschehen, wenn der Tank Flüssigkeit enthält.
3
Instandhaltung
• Achten Sie darauf, dass die Batterien in gutem Zustand sind.
• Wenn sich das Aufsprühen im Laufe der Zeit ausdehnt,
sollten die Batterien herausgenommen werden.
• Niemals den Sprühkopf abwaschen, wenn er verschmutzt
ist, reinigen Sie ihn nur mit einem Tuch.
• Befolgen Sie bei Verwendung der Herbizide, die vom
Hersteller mitgelieferten Gebrauchshinweise.
• Wenn die Anschlüsse getrennt wurden, schließen Sie rot mit
rot und schwarz mit schwarz wieder zusammen.
4
Problembehebung
Wenn das Gerät nicht ordnungsgemäß funktioniert, überprüfen Sie:
• dass die Batterien vollständig geladen sind;
• dass die Batterien korrekt positioniert sind;
• dass der Kontakt des Einschalters normal funktioniert;

Elektrisches Sprühgerät 5 l / 10 l Elektrisches Sprühgerät 5 l / 10 l
Für weitere Informationen zum Produkt senden Sie uns bitte eine E-Mail an
12 13
Abonnieren Sie unseren Newsletter um aktuelle
Informationen von Stocker zu erhalten:
www.stockergarden.com/newsletter
Art. 233, Art. 234 Art. 233, Art. 234
Bestandteile
6
• dass die Feder, welche die Batterien stützt, Druck auf die
Batterien ausübt und dass sie sauber ist;
• dass die Anschlusskabel richtig am Motor befestigt sind;
• dass der Motor in gutem Zustand ist;
• dass die Diffusorscheibe nicht gebremst wird.
5
Hinweise
Unsere Empfehlungen und Informationen sind das Ergebnis
zahlreicher Studien. Dennoch kann es während des Gebrauchs
mehrere Faktoren geben, die sich unserer Kontrolle entziehen
(Produkte, Mischungen, unsachgemäße Anwendung, Klima usw.)
1231/1 Ein/Aus-Schalter und Batteriefach
2231/2 Tank 10 l (Art. 233, 234)
3231/3 Filter
4233/1 Sprühkopf
5233/2 Düsen
6231/6 Tragegurt (Art. 234)
6232/2 Tragegurt (Art. 233)
7231/7 Schlauch
8232/1 Tank 5 l (Art. 234, 233)
9231/8 Verschlussclip
10 231/9 Verschluss Plastikbehälter 10 l
11 232/3 Verschluss Plastikbehälter 5 l
Bestandteile
6
9
10
11

Electric Sprayer 5 l / 10 l Electric Sprayer 5 l / 10 l
For further information about the product, please contact
14 15
Sign up to our newsletter and keep up to date with
our latest news www.stockergarden.com/newsletter
Art. 233, Art. 234 Art. 233, Art. 234
The use of this sprayer will save you a lot of time, work and
money in the care of your fields, so, before putting it to work,
and to get the maximum satisfaction, please read the following
instructions carefully.
General description
1
Use
2
1. Insert two R-20 1.5 V batteries (preferably alkaline) into the
battery compartment, with the positive pole in front.
2. Fill the herbicide into the tank and then put it on your
shoulders.
3. The liquid drops by gravity, so the head should be lower than
the tank level.
4. Press the power switch and the sprayer starts.
5. At the same moment, spraying of the atomized liquid begins.
6. It is important to control the circulation of the liquid to be
sprayed, from the outlet from the tank to the outlet from the
nozzle.
7. Stop the unit by pulling the safety button.
8. To disconnect the tank from the sprayer, loosen the screws,
remove the hose and valve. This can also happen if the
container contains liquid.
3
Maintenance
• Make sure that the batteries are in good condition.
• If the application expands over time, remove the batteries.
Do not wash the spray head, if it is soiled, only clean with a
cloth.
• When using the herbicides, follow the instructions supplied
by the manufacturer.
• When the connections are disconnected, connect red with
red and black with black.
4
Troubleshooting
If the device does not work properly, check:
• that the batteries are fully charged,
• that the batteries are positioned correctly,
• that the switch-on contact works normally,
• that the spring that supports the batteries exerts enough
pressure on the batteries and that it is clean,

Electric Sprayer 5 l / 10 l Electric Sprayer 5 l / 10 l
For further information about the product, please contact
16 17
Sign up to our newsletter and keep up to date with
our latest news www.stockergarden.com/newsletter
Art. 233, Art. 234 Art. 233, Art. 234
Components and spare parts
6
• that the connecting cables are correctly attached to the
motor,
• that the motor is in good condition,
• that the diffuser disc is not braked.
Notes
5
The recommendations and information we provide are the result
of numerous studies. However, there may be several factors
beyond our control (products, mixtures, misapplication, climatic
conditions, etc.).
1231/1 On/Off switch with battery compartment
2231/2 Tank 10 l (Art. 233, 234)
3231/3 Filter
4233/1 Spray head
5233/2 Nozzles
6231/6 Shoulder straps (Art. 234)
6232/2 Shoulder straps (Art. 233)
7231/7 Tube
8232/1 Tank 5 l (Art. 234, 233)
9231/8 Locking clip
10 231/9 Tank stop 10 l
11 232/3 Tank stop 5 l
Components and spare parts
6
9
10
11
This manual suits for next models
1
Table of contents
Languages:
Other Stocker Paint Sprayer manuals

Stocker
Stocker 240 User manual

Stocker
Stocker Geyser Evo 25 L User manual

Stocker
Stocker 248 User manual

Stocker
Stocker 230 User manual

Stocker
Stocker 247 User manual

Stocker
Stocker 245 User manual

Stocker
Stocker 256 User manual

Stocker
Stocker 249 User manual

Stocker
Stocker 1247 User manual

Stocker
Stocker 235 User manual