Sunny 6 Series User manual

Installation and Operation
EX Series - Type FEX Series - Type C,W
SL Series - Type RSL Series - Type C,W
USER MANUAL
Emergency Exit Sign Light Series 6
Status Indicators and Testing Buttons
Caution: Please always read the manual prior to installation and operation.
1. Install the emergency exit sign light fixture by securing it in the desired location for displaying
the emergency exit symbol.
2. Install properly and securely to prevent accidents that could cause damage to the unit or
other people and property.
3. Plug the device's power plug into the power outlet of the building or household with an electrical
voltage of 220-240VAC/50Hz. The emergency exit sign lights will illuminate. Please observe the
operation of the device as follows:
3.1 The LED “AC” will turn on indicating that the unit is receiving power.
3.2 LED “On/Test” lit indicates the status of the unit ready to use.
3.3 The LED “Charge/Full“ will be on when the battery is charging.
3.4 The LED “Charge/Full” will be off when the battery is fully charged.
4. When the unit is operational, tests can be performed.
4.1 Press the Off/Test button on the emergency exit sign light fixture. The light from the sign will
continuously illuminate.
5. When you want to turn off the light without plugging in the emergency exit sign light fixture,
press the Off/Test button.
Switch Off/Test
LED AC
LED Charge/Full
IR
LED On/Test
LED Fail
Press to turn off the lamp and the system of the unit
(while the power is off or the unit is not plugged in) /
Press to test the device’s availability
(during normal circumstance and the unit is plugged in)
Indicates that the unit is receiving a power supply
Indicates that the unit’s battery is charging
Infrared signal receiver
Indicates that the unit is receiving a power /
Indicates if the unit is performing a self-test
Indicates there is a problem with the battery
1

Indication
Lights Display Meaning
- A continuous green light
- Slow blinking green
light every 2 seconds
- Fast blinking green
light every 1 seconds
- A red light blinks three
times every 15 seconds
- A red light blinks four
times every 15 seconds
- When pressing “OFF” to turn off the automatic battery
test system (Auto Test) from the remote.
- When pressing “ON” to turn on the automatic battery
test system (Auto Test) from the remote.
- The unit is performing a battery test (Auto Test).
- “Battery Fail” When the emergency light unit supply
backs up the lighting for less than 120 minutes, or less
than the time tested with a remote control.
- “Charging fail” When the battery charging system does
not charge, the charger does not cut off, the charging
circuit cuts off, but the battery charge decreases too
quickly.
On/ Test
- A continuous red light
- The red light turns off
- The battery is charging.
- The battery is fully charged.
AC
Fail
Charge/Full
1. The unit should be installed indoors, out of direct sunlight and humidity. It should not be
installed in environment with temperatures higher than 50 degrees Celsius.
2. The unit should be stored in temperatures under 25 Degree Celsius and the battery should
be charged every 3 months to maintain its operational life.
3. Please always read the manual carefully prior to operating the unit for the saftest and most
effective use of the product.
Important Note on Using the Unit
- A continuous orange light
- The orange light turns off
- The unit is receiving a normal AC power supply.
- The unit is not receiving an AC power supply.
Indicators
2

Remote Testing
Button for testing the device's function for 5 seconds.
Button for testing the device's function for 30 minutes.
Button for testing the device's function for 60 minutes.
Button for turning on auto battery test system.
Button for turning off auto battery test system.
Remote Testing
Initial Trouble Shooting
Problem Cause What to do
- Power not getting to the unit
after plugging in. The LED AC
light does not turn on.
- The unit and lamp does not
illuminate when the power
goes out
- The unit’s lamp only turns on for
a short duration after the power
has gone out.
- The power socket might not have any
power.
- The junction is loose.
- The AC fuse is blown.
- Check the 220-240VAC power
supply.
- Check the junction.
- Contact customer service.
- The battery is not fully charged.
- The battery is past its operational
lifetime or has deteriorated
- Take the unit to charge until the
“LED Charge” indicator turns off.
- Contact customer service to
replace the battery
- The lamp is faulty
- The circuit's wiring is loose.
- The DC fuse is blown
- Contact customer service.
Button for turning ON/OFF the light bulb.
(during normal circumstance and the unit is plugged in)
Button for deactivate the light bulb.
(while the power outage)
3

Types Of Mounting Options
Ceiling (Type C)
(installation without accessories)
Suspended (Optional)
(installation with kit not included)
EX SERIES
Wall (Type W)
(installation without accessories)
Flag (Type F)
(installation without accessories)
Suspended (Optional)
(installation with kit not included)
Ceiling (Type C)
(installation without accessories)
SL SERIES
Recessed (Type R)
(installation without accessories)
Wall (Type W)
(installation with kit included)
4

Installation Steps
*Units are in millimeters.
SLS6-10LED (R)
Step 1Step 2Step 3
Step 1Step 2Step 3
Drill holes in the ceiling
as shown in the picture.
Embed anchors bolt or fastening
devices and secure screws into
the ceiling.
Use a screwdriver to disassemble
the device as shown in the picture.
Step 4Step 5
Secure the top cover onto
the ceiling.
Assemble the bottom cover
onto the top cover.
382
84
42
8
398
8
18.5 345 18.5
165216
*Units are in millimeters.
SLS6-10LED (C)
Embed the anchor bolt and
secure the slide rail into the ceiling.
Attach the exit sign to the slide rail. Push the exit sign to the end of
the rail as shown in the picture.
230
5

*Units are in millimeters.
Step 1Step 2
*Units are in millimeters.
Suspended (Optional)
SLS6-10LED (W)
Embed the anchor bolt and
fasten the screw into the wall.
Assemble the mounting accessories
for hanging on the slide rail.
Assemble the Hanger Rod with
the mounting accessories.
Attach the exit sign to the screw.
Attach the exit sign to the slide rail.
Step 1Step 2Step 3
230
6

EXS6-10LED (C)
1
2
Use a screwdriver to
press the hanging hole.
Embed the anchor bolt and
fasten the screw into the ceiling.
Attach the exit sign to the screw.
*Units are in millimeters.
205
Step 1Step 2Step 3
*Units are in millimeters.
EXS6-10LED (W)
Use a screwdriver to
press the hanging hole.
Embed the anchor bolt and
fasten the screw into the wall.
Attach the exit sign to the screw.
Step 1Step 2Step 3
205
7

*Units are in millimeters.
1
EXS6-10LED (F)
Remove the side panel.
Drill the mounting accessories
according to the size of
the Hanger Rod.
Assemble the device with
the mounting accessories
using the securing screws.
Secure the box to the wall. Insert the exit sign into the box.
40
145
8
*Units are in millimeters.
Suspended (Optional)
Step 1Step 2Step 3
Step 1Step 2Step 3
Step 4
1
2
Assemble the Hanger Rod with
the mounting accessories.
Remove the screws from
the device at positions 1 and 2.

For any further questions about your product
please feel free to contact SUNNY’s customer
service department.
Tel. (+66) 02-948-4450-2
E-mail: [email protected]
1. The Warranty will only be covered if the customer fills in the “warranty registration form” and
mail the return part back to the company within 7 days from the day of purchase. If this is not
carried out the warranty will be considered void.
2. The warranty only covers the unit’s internal parts. The conditions and durations for the warranty of
each part is as specified and the duration of the warranty is calculated from the date of purchase.
3. Please show your warranty card every time you contact our service center or the dealer you
purchased the product from.
4. Products that fall into the following category are considered not covered by the warranty.
The product was used in a way not specified in the manual.
The product was used with accessories not meeting the required specifications specified in
the manual.
The product seems to have been damaged from being dropped or from strong impact, for
example, the parts are loose, dented, scrapped or misshapen.
The product has been repaired or modified by personnel not authorized by our company.
The Warranty Void sticker is torn or removed.
The product is damaged from careless use or incorrect maintenance, for example, the battery
is swollen from overcharging, quick charging was used on the battery, the battery terminals
have been short-circuited, the unit was used until the battery was completely discharged and
not recharged immediately, the product was stored for long periods until the Battery Checker
warning activates and still it is not plugged-in to charge or taking the battery to normal
temperature conditions and not recharging it every 1 month.
The product was stored in an unsuitable environment, for example, a location with moisture
or water vapor.
The product was supplied with a faulty AC power supply such as electrical overvoltage,
electrical current surges, or lightning strikes entering the AC power line.
Damages from natural causes such as fire, being summered in fluids, humidity, chemicals or
force majeure.
Damages from insects or animals.
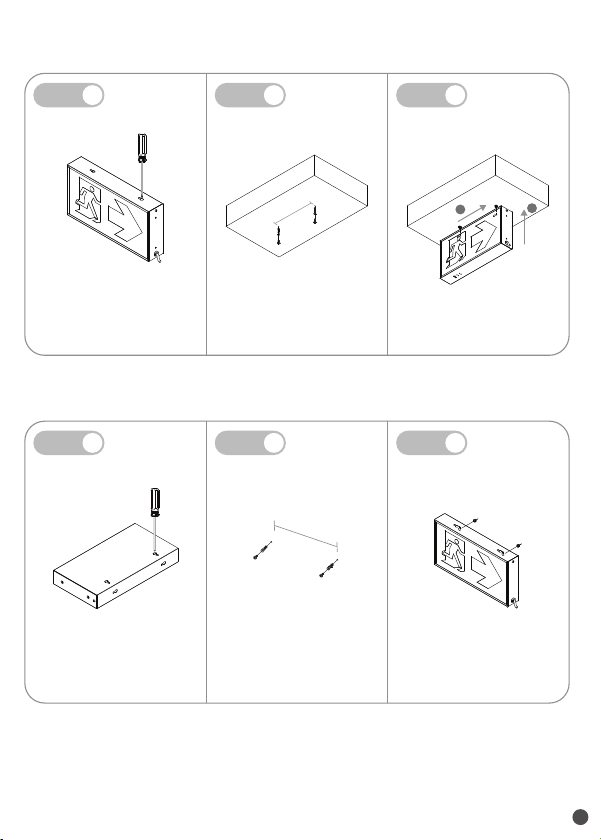
Note : Please read the manual carefully before installation and operation to understand how to
properly operate the unit.
IsOn Import-Export Co., Ltd.
2915-2917 Ladprao Road, Klongjan,
Bangkapi, Bangkok 10240
Terms for Warranty and Service
9
Table of contents
Other Sunny Lighting Equipment manuals

Sunny
Sunny CU-IP66 Series User manual

Sunny
Sunny MEL Series User manual

Sunny
Sunny SG Series User manual

Sunny
Sunny SG-IP66 Series User manual

Sunny
Sunny SNP Series User manual

Sunny
Sunny SG Series User manual

Sunny
Sunny SG-R Series User manual

Sunny
Sunny Emergency Exit Series User manual

Sunny
Sunny TM Series User manual

Sunny
Sunny MCU Series User manual