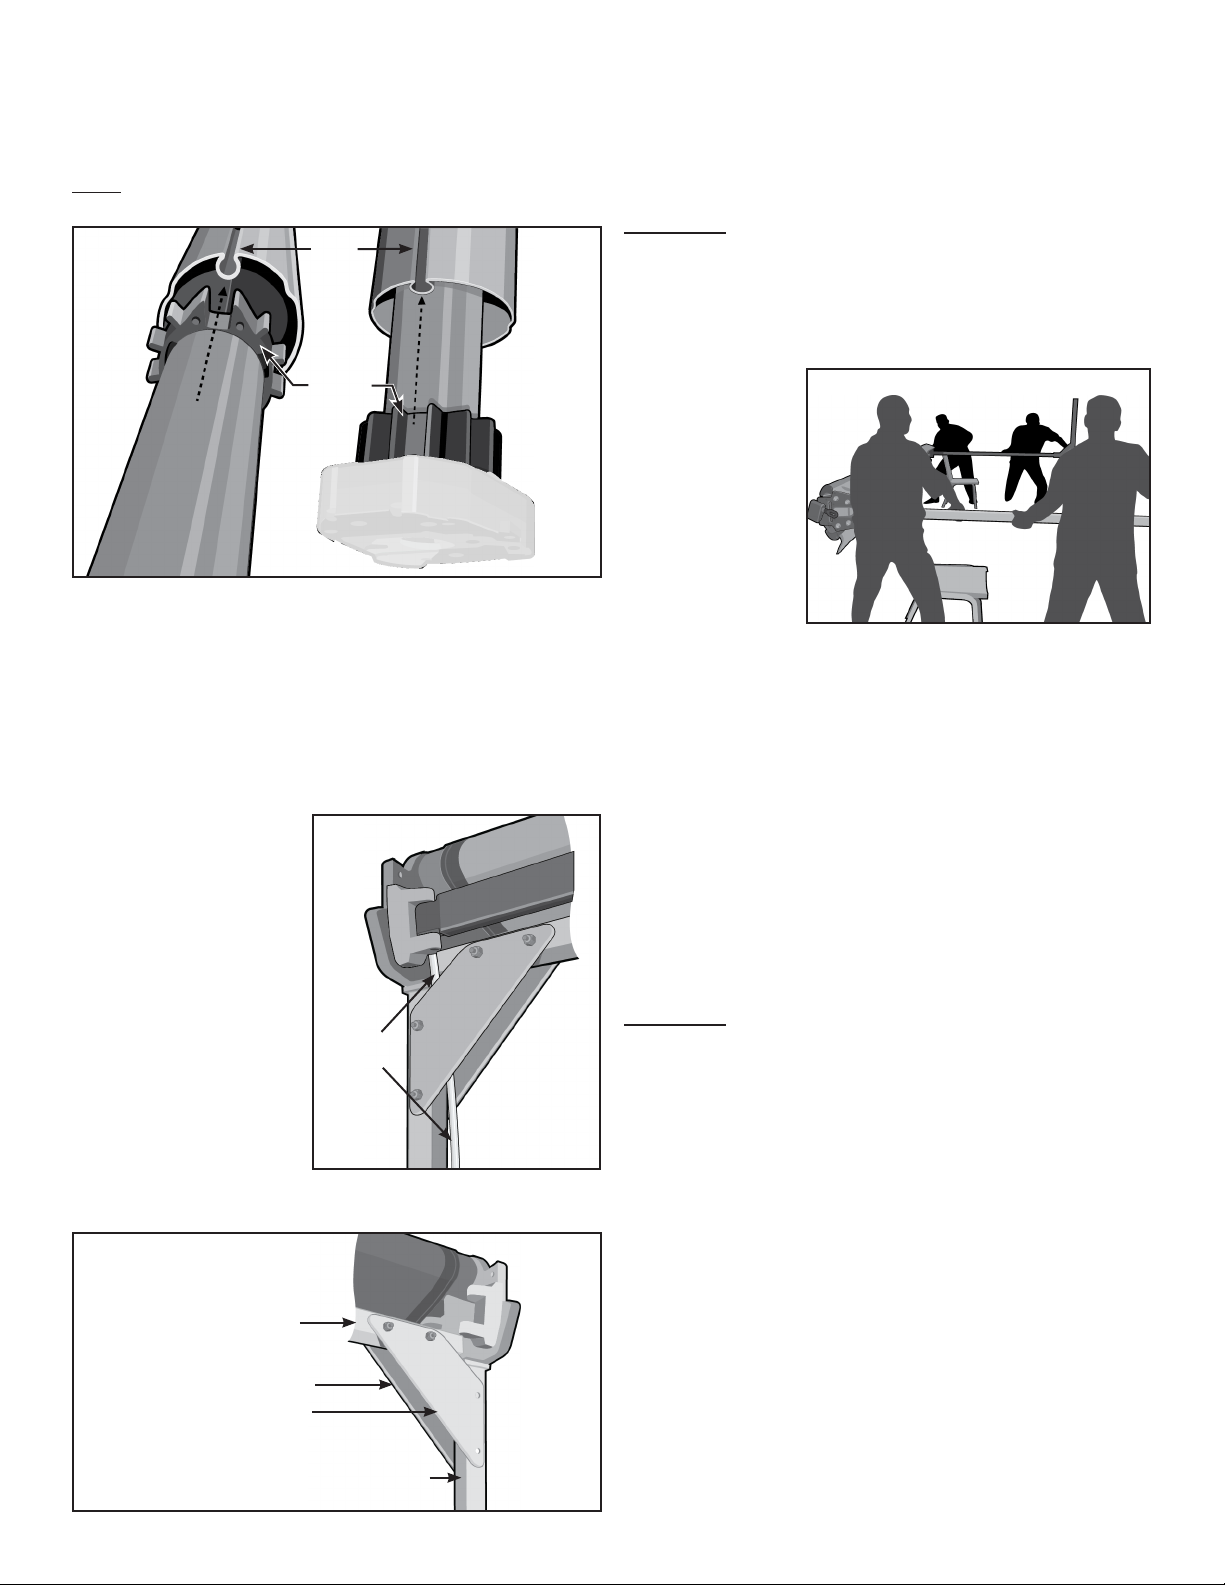
manuals.online logo
Brands
  1. Home
  2. •
  3. Brands
  4. •
  5. SunSetter
  6. •
  7. Accessories
  8. •
  9. SunSetter Oasis Guide

SunSetter Oasis Guide

RETRACTABLE AWNINGS
For Technical Support visit us at www.sunseer.com/ownerscorner
or Call Toll Free 800-670-7071 • Fax 877-224-4944
©SunSeer Products, a Massachuses Limited Partnership, 184 Charles Street, Malden, MA 02148
Motorized Oasis Awning
Sunea Motor Replacement Instrucons
*Helpers Needed*
Tools Needed: 
Parts Supplied:
WARNING: FAILURE TO FOLLOW THESE INSTRUCTIONS CAN RESULT IN PERSONAL INJURY!! PLEASE READ
THESE INSTRUCTIONS IN ITS ENTIRETY BEFORE ATTEMPTING TO COMPLETE THIS PROCEDURE.
Note: If you cannot close your Awning using the Crank Wand, complete the following procedure (Steps 1
through 5), then connue with Step 8. If you can close your Awning using the Crank Wand, connue with
Step 6.
WARNING: MAKE SURE THAT NO ONE STANDS IN FRONT OF THE AWNING DURING THIS PROCEDURE, IN
CASE THE AWNING SPRINGS OPEN.
1.Note: outside the Awning, not under the Awning
Figure 1
Figure 1








Step 1

 


2
2.

3.

4.

 Figure 2
Figure 2









5.Step 8
6.


7.
Figure 2
8.
WARNING: THE FOLLOWING PROCEDURE SHOULD BE ACCOMPLISHED BY FOUR PEOPLE.
9.Figure 3

10.Figure 3


11.Figure 3


Figure 4

Figure 4
Figure 3

12


13
Do Not Remove
four bolts

Figure 5
14
Step 13,
Figure 6
15



Figure 6
Figure 5











Step 13
Figure 6




Step 14


Step 15


Note: Before performing the next step, note
the orientaon of the Motor on the Top Bracket
Assembly. See Figure 7
16

This is necessary to keep the Roller Bar from coming
out of the Top Bracket while the Motor is unbolted
from the other side.
17


Note or mark the holes in the Top Bracket that the
bolts are removed from. See Figure 7.
18

Make sure the other helper does not allow the Roller
Bar to come out of the End Bracket on the opposite
side.
19


Figure 8
Figure 8
Figure 7





Step 17




20

Figure 9
Note: If the Motor will not slide into the Roller Bar,
you have selected the wrong slots.
21


22
Be very careful not to
cross-thread the Hex Bolts

23



Figure 10
24





Step 14
 Step 15
Figure 11
Figure 11




25

26

WARNING: THE FOLLOWING PROCEDURE SHOULD BE
ACCOMPLISHED BY FOUR (4) PEOPLE.
27Figure 12


28


Figure 12






29Fig 12



30



31

WARNING: FAILURE TO PLUG THE ELECTRIC MOTOR
CORD INTO A GROUND FAULT INTERRUPTER (GFI)
OUTLET CAN RESULT IN PERSONAL INJURY.
32


Appendix A
33
Figure 10




Figure 12
Figure 9




MOTOR
5
Appendix A

CloseOpen
Tools needed:
WARNING: THIS PROCEDURE MUST BE FOLLOWED THOROUGHLY AND COMPLETELY.
WARNING: ALL STEPS MUST BE FOLLOWED EXACTLY AND COMPLETELY.
 
 CLOSEOPEN

NoteThe Awning now moves ONLY while holding down the CLOSE or
OPEN buon.
 OPEN 
Watching from the motorized endroll
from the top
 my 

OPEN 

 Closed
 my OPEN 
Open
 myStopOpen
 Open
 my CLOSE 
CloseLet the Awning stop on its own
Closed
my 
OpenClose
Programming

NoteOPEN 
CLOSE 
OPEN 
CLOSE 
Programming
Buon
Located Inside
this Small
Opening
Rear View
OPEN
Front View
my/Stop
CLOSE
Channel
Indicator
Lights
To Add an Addional Control Device to the Awning;
 

 


Channel
Selector
Buon
SunSeer Products, a Massachuses Limited Partnership, 184 Charles Street, Malden, MA 02148
 
TO CHANGE THE OPEN LIMIT:
 Openlet it stop on its own
 OPENCLOSE

 Open
OPENCLOSE
 my
my 
 Open
TO CHANGE THE CLOSED LIMIT:
 Closedlet it stop on its own
 OPENCLOSE

 Closed
OPENCLOSE
 my 
my 
 Closed
To adjust current OPEN or CLOSE stop posion sengs, use the following procedures.

Other manuals for Oasis

6

Other SunSetter Accessories manuals

SunSetter Oasis Guide

SunSetter

SunSetter Oasis Guide

SunSetter Platinum Plus Guide

SunSetter

SunSetter Platinum Plus Guide

SunSetter Vista Series User manual

SunSetter

SunSetter Vista Series User manual

SunSetter Motorized Series Original instructions

SunSetter

SunSetter Motorized Series Original instructions

SunSetter EASYSHADE Use and care manual

SunSetter

SunSetter EASYSHADE Use and care manual

SunSetter Oasis Guide

SunSetter

SunSetter Oasis Guide

SunSetter 900XT User manual

SunSetter

SunSetter 900XT User manual

SunSetter Gaviota Quick start guide

SunSetter

SunSetter Gaviota Quick start guide

SunSetter Platinum Plus Series Original instructions

SunSetter

SunSetter Platinum Plus Series Original instructions

SunSetter VISTA Operating instructions

SunSetter

SunSetter VISTA Operating instructions

SunSetter EASYSHADE Guide

SunSetter

SunSetter EASYSHADE Guide

SunSetter 900XT User manual

SunSetter

SunSetter 900XT User manual

SunSetter EASYSHADE Original instructions

SunSetter

SunSetter EASYSHADE Original instructions

SunSetter 900XT Use and care manual

SunSetter

SunSetter 900XT Use and care manual

SunSetter 900XT Installation guide

SunSetter

SunSetter 900XT Installation guide

SunSetter Oasis Guide

SunSetter

SunSetter Oasis Guide

SunSetter PRO Operating and safety instructions

SunSetter

SunSetter PRO Operating and safety instructions

SunSetter Oasis Use and care manual

SunSetter

SunSetter Oasis Use and care manual

SunSetter VISTA Original instructions

SunSetter

SunSetter VISTA Original instructions

SunSetter EASYSHADE Use and care manual

SunSetter

SunSetter EASYSHADE Use and care manual

SunSetter 900XT User manual

SunSetter

SunSetter 900XT User manual

SunSetter Wireless Wind Sensor User manual

SunSetter

SunSetter Wireless Wind Sensor User manual

SunSetter VISTA Quick start guide

SunSetter

SunSetter VISTA Quick start guide

SunSetter Oasis Guide

SunSetter

SunSetter Oasis Guide

Popular Accessories manuals by other brands

Quincy lab 140AE-1 operating manual

Quincy lab

Quincy lab 140AE-1 operating manual

HomePro ZIR000 user manual

HomePro

HomePro ZIR000 user manual

DOL 20SCR Technical user guide

DOL

DOL 20SCR Technical user guide

RAB Smart Task installation manual

RAB

RAB Smart Task installation manual

Kemppi KMS 300 quick guide

Kemppi

Kemppi KMS 300 quick guide

Stearns 57,500 Series Installation and service instructions

Stearns

Stearns 57,500 Series Installation and service instructions

iGuzzini TWILIGHT COPENAGHEN manual

iGuzzini

iGuzzini TWILIGHT COPENAGHEN manual

Adelaide Annexe & Canvas Avan Deluxe installation guide

Adelaide Annexe & Canvas

Adelaide Annexe & Canvas Avan Deluxe installation guide

OHAUS 5000 instruction manual

OHAUS

OHAUS 5000 instruction manual

HOME8 WLS1300 quick start guide

HOME8

HOME8 WLS1300 quick start guide

MAXBOTIX MaxSonar quick start guide

MAXBOTIX

MAXBOTIX MaxSonar quick start guide

ioSmart iSmart56 Installation and user guide

ioSmart

ioSmart iSmart56 Installation and user guide

Focusrite Scarlett 18i8 user guide

Focusrite

Focusrite Scarlett 18i8 user guide

Velleman ED38105 user manual

Velleman

Velleman ED38105 user manual

JumpSport SkyBounce user manual

JumpSport

JumpSport SkyBounce user manual

Prima-Temp PRIYA Instructions for use

Prima-Temp

Prima-Temp PRIYA Instructions for use

Tefcold BC85I-BC85I W user manual

Tefcold

Tefcold BC85I-BC85I W user manual

Vaisala WMS302 user guide

Vaisala

Vaisala WMS302 user guide

manuals.online logo
manuals.online logoBrands
  • About & Mission
  • Contact us
  • Privacy Policy
  • Terms and Conditions

Copyright 2025 Manuals.Online. All Rights Reserved.