manuals.online logo
Brands
  1. Home
  2. •
  3. Brands
  4. •
  5. SunSetter
  6. •
  7. Accessories
  8. •
  9. SunSetter Oasis Guide

SunSetter Oasis Guide

RETRACTABLE AWNINGS
For Technical Support visit us at www.sunseer.com/ownerscorner
or Call Toll Free 800-670-7071 • Fax 877-224-4944
©SunSeer Products, a Massachuses Limited Partnership, 184 Charles Street, Malden, MA 02148
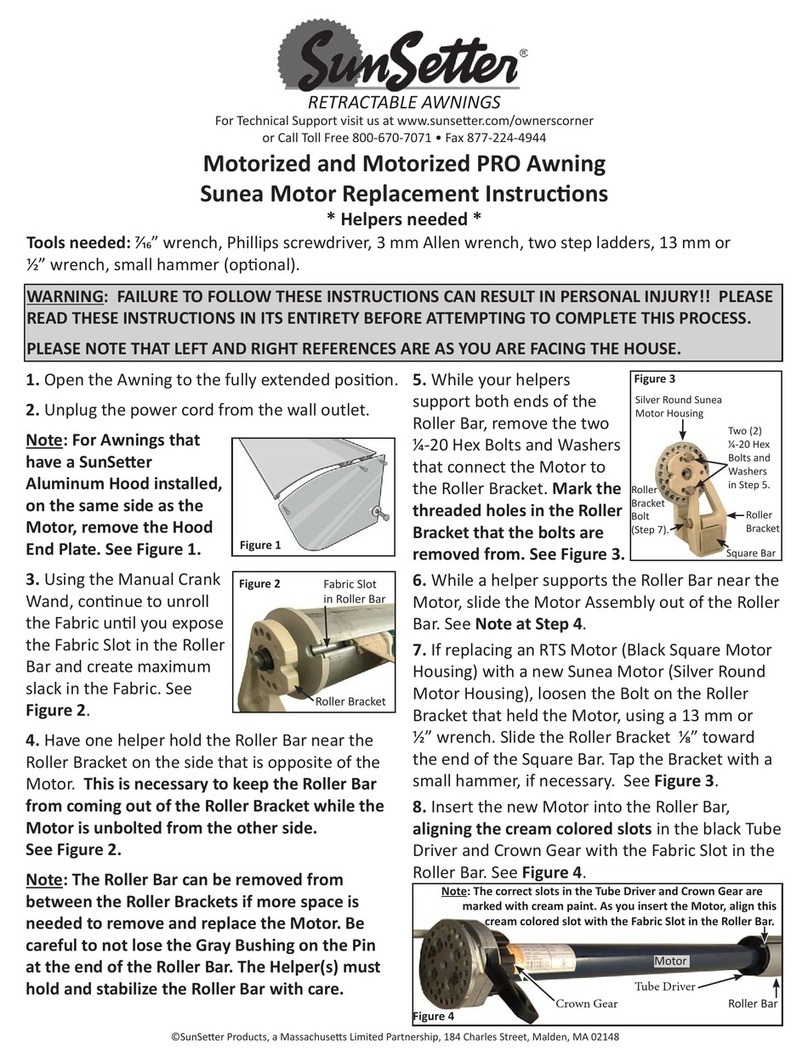
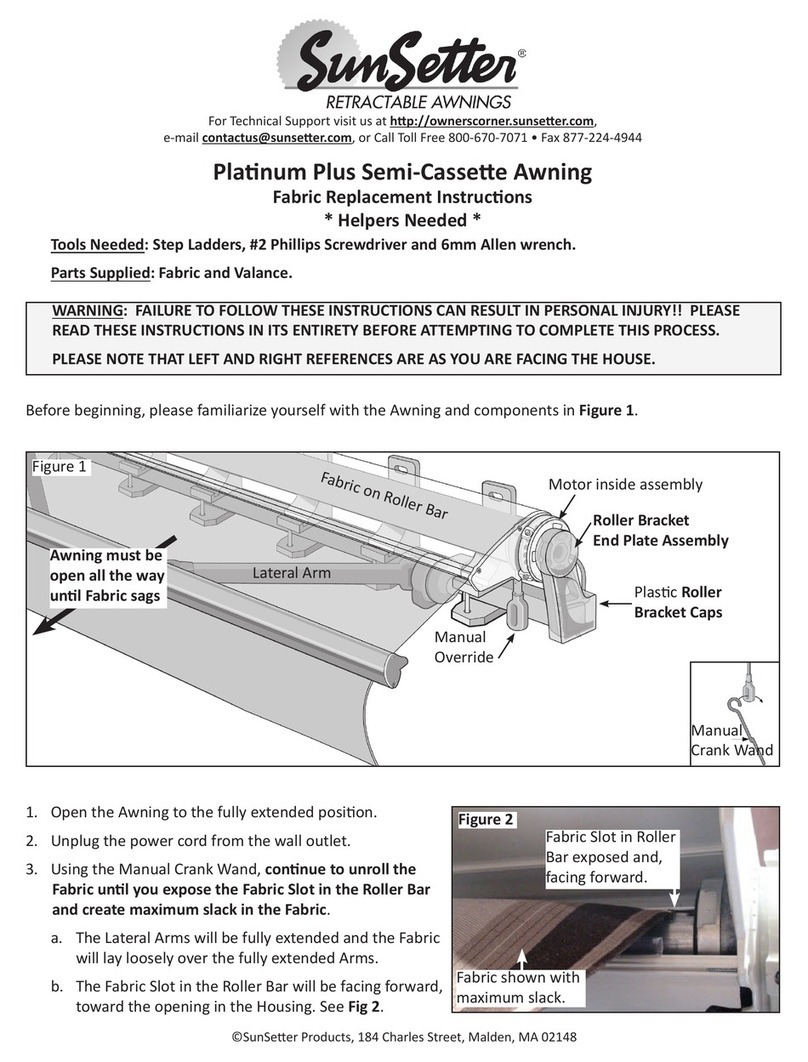
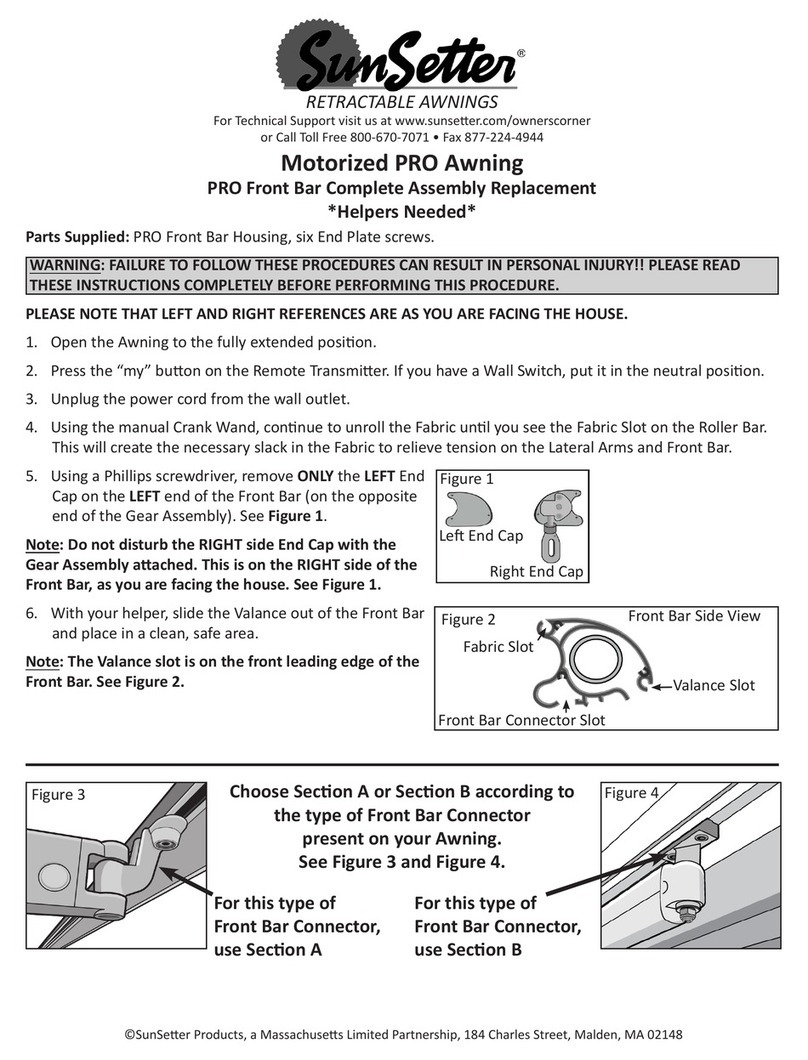
Secon A
Manual OASIS Awning
Roller Bar Replacement Instrucons
*Helpers Needed*
Note: If you can close your Awning using the Crank Wand, connue with Step 7.
If you cannot close your Awning using the Crank Wand, complete the following procedure (Steps 3 through
6), then connue with Step 9.
WARNING: MAKE SURE THAT NO ONE STANDS IN FRONT OF THE AWNING DURING THIS PROCEDURE, IN
CASE THE AWNING SPRINGS OPEN.
Motor/Gear Assembly End
Figure 1: Underside View
Inside Bolt
Front Bar Connector
Lateral Arm
Lateral Arm
Front Bar Front Bar
Front Bar
Connector
Tools Needed:

Parts Supplied
WARNING: FAILURE TO FOLLOW THESE INSTRUCTIONS CAN RESULT IN PERSONAL INJURY!! PLEASE READ
THESE INSTRUCTIONS COMPLETELY BEFORE ATTEMPTING TO PERFORM THIS PROCEDURE.
 
 


For Manual OASIS, use Secon A, page 1.
For Motorized OASIS, use Secon B, page 6.
2

Gear Assembly

Gear Assembly
Front Bar

Arm Assembly Elbow
Horizontal

Figure 2
  (Note: Outside the Awning, not under the
AwningFigure 2
 

 

Figure 3
 
 
 
Figure 3
3
Figure 3
Figure 4
 
Figure 4
Gear Assembly End
Figure 6

Front Bar Connector
Lateral Arm
Lateral Arm
Front Bar Front Bar
WARNING: THE FOLLOWING PROCEDURE SHOULD BE ACCOMPLISHED BY FOUR (4) PEOPLE
Figure 5


Figure 5


Figures 4 & 5
Note: Make sure that the Crank Loop is accessible aer the Awning
is laying on the sawhorses or chairs.
opposite the Gear Assembly

Figure 6
Figure 5
4
opposite the Gear Assembly
Figure 7

igure 8
Do not allow the Top Bracket Assembly to come out of the Horizontal Square Bar
Note: During the following step, your helpers will need to guide the Fabric so that it does not wrap around
the Roller Bar as you unroll the Fabric.



On the Roller Bar end that is opposite the Gear

Do not lose the Dark Gray
Bushing that is on the pin end of the Roller Cap.
See Figure 9





Roller Bar Insert with the Square Sha

Note: Orient the Replacement Roller Bar so the end of the Roller Bar with the Square Sha faces the end of
the Awning with the Gear Assembly.
Figure 9



Corner Braces

Figure 7
End opposite the Gear Assembly
Figure 8

Tap this edge, in Step 15
End opposite the Gear Assembly
5





Note: Make sure that the dark Gray Bushing is sll on the pin end of the Roller Cap.



Figure 10


Note: The Fabric should roll over the top of the Roller Bar, from the right side,
while facing the Gear Assembly.




WARNING: THE FOLLOWING PROCEDURE SHOULD BE ACCOMPLISHED BY FOUR (4) PEOPLE.








Figure 11
Figure 10
Gear Assembly End
Figure 11: Underside View
Inside Bolt
Front Bar Connector
Lateral Arm
Lateral Arm
Front Bar Front Bar



Note: If you have unrolled the Awning past the point where the Lateral Arms are fully open, the Fabric will
begin to sag. To correct this, simply reverse the rotaon of the Hand Crank and close the Awning unl the
Fabric is ght.
6
Figure 1

Motor Assembly

Assembly
Front Bar
Connector

Arm Assembly
(Re: Step 1)
Horizontal
 Front Bar



Motor Assembly
Secon B
Motorized Oasis Awning
Roller Bar Replacement Instrucons
*Helpers Needed*
Tools Needed: Step Ladder, Sawhorses or chairs, 
Parts Supplied:
WARNING: FAILURE TO FOLLOW THESE INSTRUCTIONS CAN RESULT IN PERSONAL INJURY!! PLEASE READ
THESE INSTRUCTIONS IN ITS ENTIRETY BEFORE ATTEMPTING TO COMPLETE THIS PROCEDURE.
Note: If you cannot close your Awning using the Crank Wand, complete the following procedure (Steps 1
through 5), then connue with Step 8. If you can close your Awning using the Crank Wand, close the Awning
now and connue with Step 6.
WARNING: MAKE SURE THAT NO ONE STANDS IN FRONT OF THE AWNING DURING THIS PROCEDURE, IN
CASE THE AWNING SPRINGS OPEN.
1.Note: Outside the Awning, not under the Awning)
Figure 1
7
2. Unplug the Power Cord

3.

4.
slide one of the supplied Safety Sleeves on to the Arm
Assembly Figure 2
Figure 2
Elbow
Front Bar Connector


Arm Assembly


Front Bar Connector
Arm Assembly
5.Step 8
6.


7.
Figure 2
8.
WARNING: THE FOLLOWING PROCEDURE SHOULD BE ACCOMPLISHED BY FOUR PEOPLE.
9.Figure 3) at each Leg Assembly

10.Figure 3


11.Figure 3), the two people


See Figure 4

Figure 4
Figure 3
8
12


13
Do Not Remove
the four bolts

See Figure 5
14
loosened in Step 13,
Figure 6
15


See Figure 6
Figure 5
Horizontal

Corner
Braces


Assembly

to Loosen


(Re: Step 13)
Figure 6
Horizontal

One Bolt

(Re: Step 14)
Two Bolts

(Re: Step 15)


Note: Before performing the next step, note
the orientaon of the Motor on the Top Bracket
Assembly. See Figure 7
16

This is necessary to retain the Gray Bushing on the
Round Pin, which holds the Roller Bar in the Top
Bracket.
17



Note or mark the holes in the Top Bracket and the
Motor that the bolts are removed from. See Figure 7.
Figure 7

holes on the

Motor, then



(Re: Step 17)
18.
Figure 8
19
the Roller Bar near the
Motor, slide the Motor


20.




21. Orient the Replacement Roller Bar so the end of
the Roller Bar without an End Cap will be on the same

22.

23.

24.

Corner
Braces
Motor
Cord
Figure 8
9
25. 


Figure 9
Note: If the Motor will not easily slide into the Roller
Bar, you may have selected the wrong slot.
Note: Make sure that the dark Gray Bushing is sll
on the Round Pin end of the Roller Cap on the end of
the Roller Bar opposite the Motor. See Figure 10.
26. 



See Figure 10
27.




See Figure 7 
See Figure 11
28. 
Figure 8
29. Align the holes in the Corner Braces and



30.





WARNING: THE FOLLOWING PROCEDURE SHOULD BE
ACCOMPLISHED BY FOUR (4) PEOPLE.
31.

each Leg Assembly


the OASIS is placed in

See Figure 12

Figure 9



Slot
MOTOR



Figure 10
Figure 11
Figure 12
10
32. 
Figure 12
33.

34

35
WARNING: FAILURE TO PLUG THE ELECTRIC MOTOR CORD INTO A GROUND FAULT INTERRUPTER (GFI)
OUTLET CAN RESULT IN PERSONAL INJURY.
36.
37
OPEN
Front View
my
CLOSE
LED light
Tesng the Open and Close Posions
 Press and Release the OPEN
CAUTION: The Fabric must roll o the RIGHT side of the Roller Bar, as you face the motorized
end of the Awning.
 Let the Awning open and stop on its own
 
 Press and Hold the CLOSE and OPEN

 OPENNote: The Fabric must roll o the
Roller Bar to the right side, as you face the motorized end of the Awning
 Press and Hold the “my
 Press and Release the CLOSE
 Let the Awning close and stop on its own
 
 Press and Hold the CLOSE and OPEN

 CLOSENote: The Fabric must roll on the Roller Bar from
the right side, as you face the motorized end of the Awning
 Press and Hold the “my
 
 OPEN or STOP

 For assistance SunSeer at 800-670-7071
Remote
Transmier
11
APPENDIX A
Reset the Motor’s Open and Close Stop Posions
To Acvate
 
 
 Remote Transmier

 Wireless Wind Sensor

 
 
To Acvate Your Wireless Wind Sensor
Programming
Rear View
WARNING: ALL STEPS MUST BE FOLLOWED EXACTLY AND COMPLETELY.
OPEN
Front View
my
CLOSE
LED light
 
 Press and Hold the my 
 
 
 
 
 Press and hold the Programming

Note: A single jog is dened as a quick two-direcon movement of the motor.
 Press and Hold the CLOSE and OPEN
Note: The Awning now moves ONLY while holding down the CLOSE or OPEN buon.
 Press the OPEN 
roll from the top
my 
Press the OPEN 
Closed
Press and Hold the my and OPEN Open
Press the myStop the Awning at the desired Open
Open
Press and Hold the my and CLOSE 
begins to CloseLet the Awning stop on its own at the Closed
Press and Hold the my Open and
Close
SET PROPER DIRECTION OF MOTOR ROTATION
SET THE CLOSED AND OPEN POSITIONS
PREPARE MOTOR
Press and Hold the Programming
NoteOPEN or CLOSE 
OPEN and CLOSE 
FINALIZE PROGRAMMING OF MOTOR
Note: If steps 8 - 15 fail, unplug the Awning, plug it back in, then begin again from step 8.
SunSeer Products, a Massachuses Limited Partnership, 184 Charles Street, Malden, MA 02148
 
A PLACE FOR YOUR NOTES

Other manuals for Oasis

6

Other SunSetter Accessories manuals

SunSetter Oasis Guide

SunSetter

SunSetter Oasis Guide

SunSetter EASYSHADE Use and care manual

SunSetter

SunSetter EASYSHADE Use and care manual

SunSetter VISTA Original instructions

SunSetter

SunSetter VISTA Original instructions

SunSetter 900XT User manual

SunSetter

SunSetter 900XT User manual

SunSetter Oasis Guide

SunSetter

SunSetter Oasis Guide

SunSetter Oasis Use and care manual

SunSetter

SunSetter Oasis Use and care manual

SunSetter PRO Operating and safety instructions

SunSetter

SunSetter PRO Operating and safety instructions

SunSetter EASYSHADE Original instructions

SunSetter

SunSetter EASYSHADE Original instructions

SunSetter Motorized PRO Guide

SunSetter

SunSetter Motorized PRO Guide

SunSetter 900XT User manual

SunSetter

SunSetter 900XT User manual

SunSetter EASYSHADE Use and care manual

SunSetter

SunSetter EASYSHADE Use and care manual

SunSetter VISTA Operating instructions

SunSetter

SunSetter VISTA Operating instructions

SunSetter 900XT Use and care manual

SunSetter

SunSetter 900XT Use and care manual

SunSetter Wireless Wind Sensor User manual

SunSetter

SunSetter Wireless Wind Sensor User manual

SunSetter Oasis Guide

SunSetter

SunSetter Oasis Guide

SunSetter Vista Series User manual

SunSetter

SunSetter Vista Series User manual

SunSetter Platinum Plus Guide

SunSetter

SunSetter Platinum Plus Guide

SunSetter Gaviota Quick start guide

SunSetter

SunSetter Gaviota Quick start guide

SunSetter Motorized Series Original instructions

SunSetter

SunSetter Motorized Series Original instructions

SunSetter Oasis Guide

SunSetter

SunSetter Oasis Guide

SunSetter EASYSHADE Use and care manual

SunSetter

SunSetter EASYSHADE Use and care manual

SunSetter EASYSHADE Guide

SunSetter

SunSetter EASYSHADE Guide

SunSetter Oasis Guide

SunSetter

SunSetter Oasis Guide

SunSetter Platinum Plus Series Original instructions

SunSetter

SunSetter Platinum Plus Series Original instructions

Popular Accessories manuals by other brands

ESTEBAN ART EDITION Instructions for use

ESTEBAN

ESTEBAN ART EDITION Instructions for use

Hama 00173223 operating instructions

Hama

Hama 00173223 operating instructions

Pogo Bounce House Tropical Marble 35' Dual Lane Slip N Slide manual

Pogo Bounce House

Pogo Bounce House Tropical Marble 35' Dual Lane Slip N Slide manual

StarTech.com ST128HD20 quick start guide

StarTech.com

StarTech.com ST128HD20 quick start guide

CALECTRO Uniguard Superflow UG3-A-SENSE Installation instruction

CALECTRO

CALECTRO Uniguard Superflow UG3-A-SENSE Installation instruction

turck LUS211 Series Instructions for use

turck

turck LUS211 Series Instructions for use

Garmin GDL 90 installation manual

Garmin

Garmin GDL 90 installation manual

GE RSEN-LG Installation instructions manual

GE

GE RSEN-LG Installation instructions manual

Edirol EDIROL FA-101 owner's manual

Edirol

Edirol EDIROL FA-101 owner's manual

Masimo Rainbow RAS-45 Directions for use

Masimo

Masimo Rainbow RAS-45 Directions for use

Motorline professional MR27 User's and installer's manual

Motorline professional

Motorline professional MR27 User's and installer's manual

Campbell NR01 instruction manual

Campbell

Campbell NR01 instruction manual

Clearaudio Clarify user manual

Clearaudio

Clearaudio Clarify user manual

Pepperl+Fuchs R1000 Series manual

Pepperl+Fuchs

Pepperl+Fuchs R1000 Series manual

Julabo FT200 operating manual

Julabo

Julabo FT200 operating manual

Dynasty Energy saver user manual

Dynasty

Dynasty Energy saver user manual

RTX RTX4069 instruction manual

RTX

RTX RTX4069 instruction manual

Agilent Technologies N2780A User's and service guide

Agilent Technologies

Agilent Technologies N2780A User's and service guide

manuals.online logo
manuals.online logoBrands
  • About & Mission
  • Contact us
  • Privacy Policy
  • Terms and Conditions

Copyright 2025 Manuals.Online. All Rights Reserved.