Adjusting level volume
غLENS ADJUSTMENT
If the entire image is too dark or bright, or the backlight
compensation is not correct even after (1) is set to "ON",
you need to adjust the level volume.
CCW (Low) Closes the lens iris, making the entire image darker
CW(High) Opens the lens iris, making the entire image drighter
SECOND VIDEO OUT CONNECTOR
If installer do setting with protable monitor, this connector should
be connected.
غCAMERA SETTINGS for CB90HL-Interface board
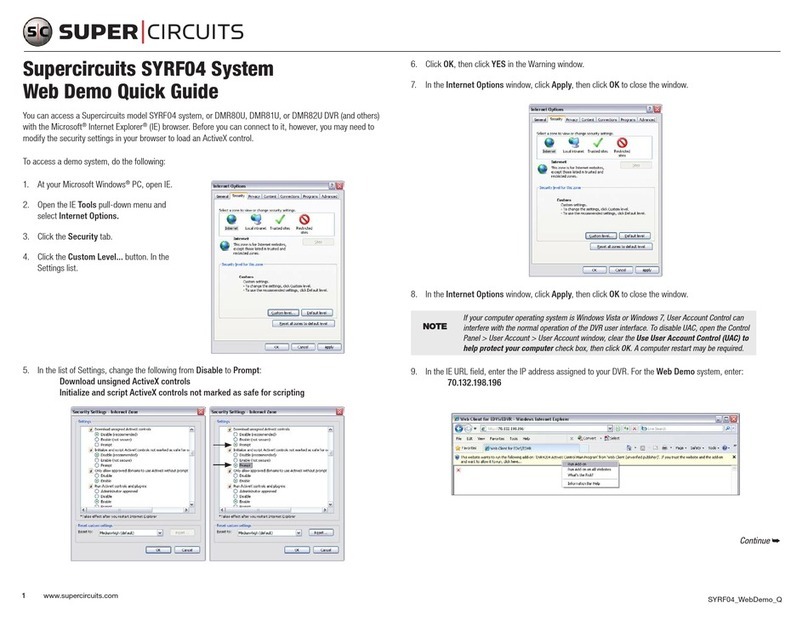
(7) Setting monitor synchronization
(AC 24V adaptor users)
Vertical sync disturbance may occur when a selector is used to
switch between multiple cameras connected to one monitor.
To prevent vertical sync disturbance, adjust (7).
CAUTION
* When using the DC 12V adaptor, sync setting is set to internal sync.
مDIP SWITCH FUNCTION
(1) Compensating for backlight (2) Confirming the iris setting
ON When back light is so bright ME The default setting when DC auto-iris lens is installed
OFF Normal setting AE The default seeting when fixed iris lens is installed
CAUTION : It will be correctly set by adjusting DC Lens control. CAUTION : The iris setting is preadjusted as the best condition for
use at time of factory shipment, so it isn't necessary to change settings
(3) Confirming the White Balance (4)Setting gain control (AGC)
AWC Ues this under light source below 2500K and over 9500K of natrium. For adjusting the sensitivity of the camera. Use this setting for shooting
in dark environments.
ON Normal setting
OFF Set this when there is excessive noise
ATW Use this under lightsource between 2500K and 9500K of flourescent lamp
,incandescent light
1. Adjust the panning(360ԕ) and tilt(90ԕ) position.
2. Setting the zoom position by using Zoom Lever Screw.
3. Setting the focus by using Focus Lever Screw.
CONNECTIONS AND CAMERA SETTINGS
ͳͽʹ
;ͶͲͶ
ͲΈͳ
Ͳʹ
͵ʹͺΣΚΤΧΠΝΦΞ
ΟΕ·ΚΕΖΠΠΦ
ͽΚΟΖͽΠΔΜ
