switel M910 User manual

1
M910 Mobile Phone
1
2
3
4
5
6
8
9
15
12
14
13
7
11 10
16 17 18
19
20
Operating Manual
Please read and observe the following informa
tion and keep the operating manual nearby for
future reference!
Safety information
WARNING!
• Risk of explosion!
ÆOnly use the power adapter plug supplied!
ÆOnly use the battery supplied or ones of the same type!
ÆAlways treat batteries with due care and attention and only use them
as described.
• Risk of fatal injury with heart pacemakers!
ÆAlways keep the phone a minimum safety distance of at least 15 cm
to heart pacemakers.
• Risk of suffocation through small objects, packaging and protective
foil!
ÆKeep children away from the product and its packaging!
• Batteries represent a hazard to health and the environment!
ÆNever open, damage or swallow batteries or allow them to pollute the
environment.
CAUTION!
• Risk of hearing damage!
ÆAvoid listening at full receiver volume.
ATTENTION!
• Risk of property damage.
ÆPrevent exposure to environmental influences, e.g. smoke, dust,
vibration, chemicals, moisture, heat and direct sunlight.
ÆOnly allow repairs to be completed by qualified personnel.
Please note that certain services must be activated by your mobile ser
vice provider before they can be used.
Intended use
This mobile phone is designed for telephoning and sending/receiving SMS mes
sages when connected to a mobile phone network. Any other use is considered
unintended use. Observe all local directives and regulations. Unauthorised
modification or reconstruction is not permitted. Under no circumstances open
the device or complete any repair work yourself.
Operating elements
1Standby mode: Ring tone louder / softer
During telephone conversation: Speaker louder / softer
2Switch radio on/off
3 Earpiece
4 Signal LED
5 Display
6Inbox In standby mode: Open menu
7 Right softkey: Function is shown in display at bottom right
8/ In menu: Navigate / mark menu point
Standby mode: Open main menu, Open phone book
9End / Reject call
Standby mode: Press and hold to switch phone on/off
Menu: Return to standby mode / navigate to right
10 Standby mode: Press and hold to switch ringing tone off/on
Writing text message: Change entry mode
11 Text entry: Access special characters
12 Digit keys 0-9
13 Accept calls
In menu: navigate to left
14 Left softkey: Function is shown in display at bottom left
15 , , : One-touch dialing keys
16 LED torch
17 Emergency call button
18 Loudspeaker
19 Charging socket
20 Switch torch on/off
Icons
Radio signal strength
Battery charge state
Unread text message
Alarm active
Headset connected
Bluetooth active
Ringer switched off
Ringer switched on
Vibration only
First vibrate, then ring
Ring and vibrate
Package contents
- 1 Mobile phone - 1 USB cable
- 1 li-ion battery - 1 Headset
- 1 Charger - 1 Instruction manual

2
Inserting the SIM card and battery
ATTENTION!
• The SIM card could be damaged.
ÆPay attention that the SIM card remains clean and undamaged.
Insert the SIM card the correct way around.
• The battery or phone could be damaged.
ÆPay attention that the battery is inserted correctly.
Switch the mobile phone off before removing the battery compartment cover.
Only switch it on again when the battery compartment cover has been replaced.
ÆInstall the battery and SIM card as shown in Figures A to C.
ÆInstall the battery compartment cover.
Fig. A: Remove the battery com
partment cover
Fig. C: Insert the battery
Fig. B: Insert the SIM card
Fig. D: Charge the battery
Charging the battery
ATTENTION!
ÆObserve the safety instructions provided at the beginning of this
manual.
When charging the battery for the first time, it should be charged for at
least 12 hours. Aid a long service life of the battery by allowing the bat
tery to fully discharge and then recharge it completely.
ÆConnect the power adapter plug according to Fig. D.
Display and notation of operating sequences
Press the key depicted
2 sec. Press and hold down the key depicted for 2 seconds
Mark following menu point with navigation keys / and
confirm with left softkey.
/ Highlight next menu point, without confirming with left
softkey.
ÊSequence for correct entry
Enter numbers or letters
[Example] Texts in brackets give instructions to select something or
make an entry.
Phonebook Example of display test
Select Example of softkey function
Icon in the display (example)
Standby mode
The system switches to Standby mode by pressing the key, several times
if necessary.
The display switches off after a certain time in Standby mode. It appears again
after pressing any key.
All the descriptions in this manual assume that the mobile phone is in
Standby mode and that the key lock is deactivated.
Entering text
The keys on the keypad are also labelled with letters for the entry of text.
The mobile phone is provided with various methods with which to enter
text. Not every method is always available for each application.
Entering text and digits with the multitap function
ÆPress the key containing the letter required as often as necessary until the
letter appears in the display. If you want the "A" for example, press the
key once; if you need the "B", press the key twice, and so on.
ÆTo enter a further character assigned to the same key, wait approx. 2
seconds after entering the first character, until the cursor has moved to the
next position.
ÆThen enter the next letter in the same way as described above.
Entering text with text entry aid
ÆWhen the text entry aid is active, it is only necessary to press the key with
the desired letter once. Then continue immediately with the next letter. The
text entry aid attempts to recognize the word you want. The recommenda
tions are displayed. Select the correct recommendation with / and
insert it into the text with Select.
Switch between text entry methods
Æ
Display indicators for text entry
The display indicates which input method is active and whether text will be
entered in upper and/or lower case:
•Upper case only
•Lower case only
•Upper case only with text entry aid
•Lower case only with text entry aid
•Entry of digits
The text entry methods are also available in various languages, indicated
by the corresponding letters.
Entering a space
Æ
Entering punctuation marks and special characters
Æ[Select character]
Some frequently required punctuation marks and special characters
can also be generated.
Deleting characters
ÆClear
Moving the cursor left or right
Æ/
Telephoning
As an alternative you can also press Options and Call dial to
make a call, when you have selected an entry.
Dial phone number
Æ[Enter emergency call number]
Select phone number from the phone book
Æ[Open phone book]
Æ/ [Select entry]
Select phone number from call list
ÆMenu CallCentre Allcalls / Missedcalls /
Dialledcalls / Receivedcalls [Select entry]
One-touch dialing M1-M3
Your can save phone numbers from the phone book on keys to as one-
touch dial numbers.
Save phone number on one-touch dialing key
ÆMenu Phonebook [Select entry] setM1 / setM2
/ setM3 Yes [Confirm prompt]
Delete phone number on one-touch dialing key
ÆMenu Settings M1-M3settings
setM1numbersetM2number setM3number Delete
Clear [Confirm prompt]

3
Dialling with one-touch dialling keys
Æ/ /
ÆYes [Confirm prompt]
Speed dial numbers
Your can save phone numbers from the phone book on keys to as speed
dial numbers.
Save phone number as speed dial number
ÆOptions Phonebooksettings
ÆSpeeddial Setnumbers [Select entry]
ÆInputnewPIN2 Divertifunreachable
Æ[Select entry from phone book]
Switching speed dial off
ÆOptions Phonebooksettings
ÆSpeeddial Status On / Off
Dialling using a speed dial key
Æ2 sec. -
Functions available when telephoning
Handsfree mode on/off
The following can be heard during the dial tone:
ÆH-Free / H-Held
Muting (microphone) off/on
ÆSilent / Unmute
Putting call on hold / retrieving
ÆOptions Holdsinglecall / Retrievesinglecall
Activating/Deactivating touch-tone dialing
ÆOptions / DTMF On / Off
[Open phone book]
ÆOptions Phonebook
[Open text message menu]
ÆOptions Messages
Setting up a conference call
While conversing with a caller, it is possible to set up a conference call with a third
person.
It may be necessary to have this service activated by your mobile service
provider and could involve additional costs.
ÆOptions Holdsinglecall ÊFirst call on hold.
ÆOptions Newcall [Enter number] ÊCalling other
subscriber.
If the call is taken:
ÆOptions Conference message flashes continually in the dis
play.
Switch between calls
ÆOptions Holdsinglecall ÊFirst call on hold.
Æ[Accept / make other call]
ÆOptions Swap
[Phone book]
The phone book can be reached with this key or via the menu.
Creating a new phone book entry
When you create a new phone book in your phone memory, you can add
additional information to the phone book entry, such as email address,
etc.
ÆAddnewcontact Select ToSIM / Tophone
Æ[Enter name] Select
Æ[Enter phone number] OK
Deleting individual phone book entries
Æ[Select entry] Options Clear Yes [Confirm
prompt]
Deleting a number of phone book entries
ÆOptions Markcontacts
Æ[Mark entries] Options Clear Yes [Confirm prompt]
Deleting all phone book entries
ÆOptions Markcontacts Options Markall
ÆOptions Clear Yes [Confirm prompt]
Copying / moving individual phone book entries
Æ[Select entry] Options Copy / Move
ÆTophone / ToSIM Yes [Confirm prompt]
Copying / moving a number of phone book entries
ÆOptions Markcontacts [Mark entries] Options
Copy / Move
ÆTophone / ToSIM Yes [Confirm prompt]
Copying / moving all phone book entries
ÆOptions Markcontacts Options Markall
ÆCopy / Move
ÆTophone / ToSIM Yes [Confirm prompt]
Changing the memory location for phone book entries
ÆOptions Phonebooksettings
ÆPreferredstorage SIM / Phone / Both
Displaying the phone book memory status
ÆOptions Phonebooksettings Storagestatus
SMS text messages
Writing and sending an SMS message
ÆMenu Messages Writemessage
Æ[Write message] Options Sendto
ÆEnternumber / AddfromPhonebook
Æ[Enter number] OK / [Select contact]
ÆOptions Send ÊText message being sent
Sending a text message to a number of contacts
You can send a text message to a number of receivers simultaneously. For this
purpose enter additional phone numbers or select contacts in phone book. The
receivers selected are displayed in a list following each selection.
Using SMS templates
Transferring templates to a text
ÆMenu Messages Writemessage
ÆOptions Inserttemplate [Select template]
Editing templates
ÆMenu Messages Templates
Æ[Select template to be changed] Edit
Æ[Change template] OK Save
Reading a text message
The blue sign LED flashes, indicating that unread text messages are present in
the menu Inbox. Unread text messages in the menu Inbox are indicated by
a closed envelope.
ÆMenu Messages Inbox / Drafts / Outbox [Select
text message]
Alternatively the Inbox menu can also be reached with the key.
When a text message has been received, it can be displayed immediately by
pressing the View softkey.
Answering a text message
Æ[Select text message] Options Reply

4
Deleting individual text messages
ÆMenu Messages Inbox / Drafts / Outbox [Select
text message] Options Clear Yes [Confirm prompt]
Deleting al text messages in a folder
ÆMenu Messages Inbox / Drafts / Outbox [Select
text message] Options Deleteall Yes [Confirm prompt]
Forward / resend text message
ÆMenu Messages Inbox / Outbox [Select test mes
sage] Options Forward / Resend
Calling sender
Æ[Select text message] Options Callsender
Use number from text message
ÆMenu Messages Inbox / Drafts / Outbox [Select
text message] Options Insertcontacts Usenumber
[Select number] Options Call / Savenumber /
Sendtextmessages
Copying individual text messages
ÆMenu Messages Inbox / Drafts / Outbox [Select
text message] Options Insertcontacts Copytophone /
CopytoSIM
Moving individual text messages
ÆMenu Messages Inbox / Drafts / Outbox [Select
text message] Options Insertcontacts Movetophone /
MovetoSIM
Copying / moving all text message
ÆMenu Messages Inbox / Drafts / Outbox [Select
text message] Options Insertcontacts Copyall /
Moveall FromSIM / Fromphone
Voicemail / Mailbox
A Voicemail or Mailbox is a digital answering machine. If this service is activated
at your mobile phone provider’s, you are notified immediately when ever a mes
sage is present in our Voicemail or Mailbox. You are given the call number for
your voicemail or mailbox inquiries together with the SIM card from your mobile
service provider.
Saving the Voicemail/Mailbox call number
ÆMenu Messages SMSsettings
Voicemailserver [Select voicemail memory] Edit
ÆNumber Entering the Voicemail/Mailbox number OK
Playing messages on the Voicemail/Mailbox
When you have stored the Voicemail number:
Æ2 sec. ÊConnect completed to Voicemail.
Or:
ÆMenu Messages SMSsettings
Voicemailserver [Select voicemail memory] Callvoicemail
Additional functions
Call list
Outgoing, received and missed calls are stored in a call list.
You can open the list Allcalls in the standby mode with the key.
Detailed view of call list entries
ÆMenu CallCentre Allcalls / Missedcalls /
Dialledcalls / Receivedcalls [Select entry] View
Deleting an entry from the call list
ÆMenu CallCentre Allcalls / Missedcalls /
Dialledcalls / Receivedcalls [Select entry] Clear
Deleting the call lists
ÆMenu CallCentre Allcalls / Missedcalls /
Dialledcalls / Receivedcalls Options Deleteall Yes
[Confirm prompt]
Showing all calls made
ÆMenu CallCentre Calltimers Lastcall /
Dialledcalls / Receivedcalls
Reseting call timer
ÆMenu CallCentre Calltimers Resetall
Yes [Confirm prompt]
Displays / sounds during telephone conversation
Switching off call time display during telephone conversation
ÆMenu Settings Callsettings Advancedsettings
Calltimedisplay On / Off
Setting signal tone during telephone conversation
During a telephone conversation you can use this feature to remind yourself of
the time elapsed with a one-time or periodic signal tone.
ÆMenu Settings Callsettings Advancedsettings
Off / Single / Periodic [Enter time] OK
Rejecting calls with text message
This feature allows you to send a text message to callers, whose call you rejec
ted.
ÆMenu Settings Callsettings Advancedsettings
RejectbySMS On / Off
Radio
The radio works only when a headset is connected.
You can switch the radio on in the menu or with the slide switch on the side of
your mobile phone.
Switching radio on/off
Æ
Find and save stations automatically
Æ[Switch on radio] Options Presetautosearch
Setting frequency manually
Æ[Switch on radio] /
Recording radio
Æ[Switch on radio] Options Record ÊRecording is started
Stopping a recording
After stopping a recording, you can save it.
ÆStop
Interrupting / continuing recording
ÆPause / Cont.
Playing recording
Æ[Switch on radio] Options Filelist [Select recording]
Play
Setting automatic switch on/off
This feature allows you to set fixed times for your mobile phone to switch on and
off. For example, you can switch your phone off at night to save energy.
You can enter up to four times at which your mobile phone is to switch on or off.
ÆMenu Settings Phonesettings
Schedulepoweron/off
Æ/ 1. [Activate / deactivate automatic switch on/off]
Æ/ 2. [Use / to set whether the phone is to be switched
on or off]
Æ/ 3. [Enter time phone is to switch on or off]
ÆOK

5
Bluetooth
With Bluetooth you can exchange data with other devices or connect you mobile
phone with other devices, such headsets or hands-free systems.
Activating/deactivating Bluetooth
ÆMenu Extra Bluetooth Power On / Off
ÊDisplayed in standby mode.
Completing Bluetooth connection to another device
Bluetooth must be activated.
ÆMenu Extra Bluetooth Mydevice
ÊA search is made for new devices. If a device is found, simply follow the in
structions on the display. If necessary, observe the instruction manual for the
device.
Switching Bluetooth visibility on/off
ÆMenu Extra Bluetooth Visibility On /
Off
Changing Bluetooth device name
ÆMenu Extra Bluetooth Changedevicename
Æ[Change device name] Options Done
Sending data via Bluetooth (example sending contact data
ÆMenu Phonebook [Select entry] Sendcontact
ViaBluetooth [Select device from list]
Announcing numbers
Announcing caller’s phone numbers
When this feature is switched on, the phone numbers of incoming calls are an
nounced before the ring tone sounds. This is possible only when the caller has
not anonymised (suppressed) his/her phone number.
ÆMenu Settings Voicesetting /
Incomingnumbervoice On / Off
Announcing digits when dialling
If this function is activated, the digits entered for a call are announced.
ÆMenu Settings Voicesetting /
Keynumbervoice On / Off
Calendar
This feature allows you to enter dates you want to remember in your calendar.
You can navigate in the calendar view up and down with / and to the left
and right with / .
Entering new dates
ÆMenu Extra Calendar [Select date]
Addevent
Deleting the date
ÆMenu Extra Calendar Options Deleteevent
All / Specificperiod
Calculator
ÆMenu Extra Calculator
Calculation example
Æ[Enter number]
Æ/ [Select arithmetic operation]
Æ[Enter number] Options
ÊResult is displayed.
Alarm function
You can set up to 5 alarm times. The icon indicates that an alarm time is act
ive.
Setting alarm time
ÆMenu Extra Alarm Add
Æ/ 1. [Switch on alarm with / ]
Æ/ 2. [Enter time]
Æ/ 3. [Set repeat with / ]
Æ/ 4. [Set alarm tone with / and select ring tone]
Æ/ 5. [Set sleep time with / ]
Æ/ 6. [Set type of warning with / ]
ÆDone Yes [Confirm prompt]
Delete alarm time
ÆMenu Extra Alarm [Select text message]
Clear / Deleteall
Notes
The Notes menu allows you to note things you want to be reminded of later.
Basic settings
Setting the language
ÆMenu Settings Phonesettings
ÆLanguage [Select text message] OK
Setting the time and date
ÆMenu Settings Phonesettings
ÆTimeanddate Settime/date
Æ/ HH:MM [Enter time]
Æ/ DD/MM/YYYY [Enter date] OK
Setting the display format for time and date
ÆMenu Settings Phonesettings
ÆTimeanddate Setformat
Æ/ 1. [Set time format with / ]
Æ/ 2. [Set date format with / ]
Æ/ 3. [Set symbol for dividing date with / ]
Getting time and date automatically
This feature is not supported by all mobile phone providers. If you cannot
obtain the time automatically, you can set the date and time manually.
ÆMenu Settings Phonesettings
ÆTimeanddate Autoupdateofdateandtime On /
Off
Entry methods
Entry methods available
This feature allows you to set the entry methods available for entering texts.
ÆMenu Settings Phonesettings
PreferredInputmethod InputMethodsConfigure
Æ[Show entry methods (On) or hide (Off)]
Setting default entry mode
This feature allows you to set the entry method available as a default.
ÆMenu Settings Phonesettings
PreferredInputmethod InputMethodsConfigure
Pref.inputmethods
Æ[Select entry method]
Personalising
Setting the ringing tone and other tones
The various tone settings for your mobile phone are grouped in 4 so-called “Pro
files“. Each profile has a different presetting.
Adapting profiles
All profiles except the Silent profile can be personalised. The
Headset is activated automatically, when a headset is connect to your
mobile phone.
ÆMenu Settings Userprofiles [Select profile]
Customize [Adapt profile]
Activating a profile
ÆMenu Settings Userprofiles [Select profile]
Activate

6
Displaying settings
Setting background image
ÆMenu Settings Displaysetting
ÆWallpaper System / Userdefined
Æ[Select image] OK
Setting screen illumination
ÆMenu Settings Displaysetting
ÆLCDbacklight
Æ[Set brightness and illumination time with / ] OK
Showing/hiding time and date
ÆMenu Settings Displaysetting
Æ/ Showdateandtime On / Off
Setting character size
ÆMenu Settings Displaysetting
ÆFontSize Normal / Small
Switching the key back-lighting on/off
ÆMenu Settings Displaysetting
Æ/ Keypadlight On / Off
Restoring the factory settings
The phone code is required to restore the default settings. The default
setting for the phone code is 0000.
ÆMenu Settings Restorefactorysettings
Æ[Enter phone code] OK OK [Confirm prompt]
Call settings
Call transfer
You can transfer incoming calls to another phone number. Before doing this, you
must define whether you want to divert all calls or only certain calls, e.g. those
which receive a busy line signal.
Setting up call transfer
ÆMenu Settings Callsettings SIMsettings
Calldivert
ÆDivertallvoicecalls / Divertifunreachable /
Divertifnoanswer / Divertifbusy / Divertalldatacalls
Enable Tonewnumber / Tovoicemail
Æ[Enter phone number] OK
Deactivating call forwarding
Deactivating call forwarding for specific call
ÆMenu Settings Callsettings SIMsettings
Calldivert
ÆDivertallvoicecalls / Divertifunreachable /
Divertifnoanswer / Divertifbusy / Divertalldatacalls
Deactivate
Deactivating universal call forwarding
ÆMenu Settings Callsettings SIMsettings
Calldivert Cancelalldiverts
Barring calls
This function inhibits outgoing and incoming transmissions according to specific
conditions defined. E.g. you can reject incoming calls when you are abroad.
This service must be supported by your mobile service provider and you
also require the network code of your mobile service provider. Additional
fees may be incurred.
ÆMenu Settings Callsettings SIMsettings
Callbarring [Select type of call barring]
Æ[Enter network code] OK Yes [Confirm prompt]
Deactivating call barring
ÆMenu Settings Callsettings SIMsettings
Callbarring Cancelall
Æ[Enter network code] OK Yes [Confirm prompt]
Changing password for call barring
ÆMenu Settings Callsettings SIMsettings
Callbarring Changebarringpassword
Æ[Enter old network code]
Æ[Enter new network code]
Æ[Confirm new network code]
Activating/Deactivating call waiting
This feature notifies you during a telephone conversation, that another caller is
trying to reach you.
ÆMenu Settings Callsettings SIMsettings
Callwaiting Activate / Deactivate
Transfer / suppress own phone number
You can set whether your phone number is to be transferred or suppressed when
you make a call, or if this setting is to change depending on the mobile telecom
munications network.
ÆMenu Settings Callsettings SIMsettings
CallerID Setbynetwork / HideID / SendID
Switching back and forth between calls
If you have activated this feature at your mobile phone provider’s, you can switch
back and forth between calls.
ÆMenu Settings Callsettings SIMsettings
Lineswitching Line1 / Line2
SMS settings
Test message profiles
You can create 2 profiles for sending text messages. Each profile comprises vari
ous settings.
Adapting text message profiles
ÆMenu Messages SMSsettings Profilesettings
[Select profile] Edit
Æ1. [Enter profile name] Options Done
Æ/ 2. [Enter SMSC number]
Æ/ 3. [Set validity time with / ]
Æ/ 4. [Set message type with / ]
Activating/deactivating text message profile
ÆMenu Messages SMSsettings Profilesettings
[Select profile] Activate
Request status report
ÆMenu Messages SMSsettings
Commonsettings Deliveryreport On / Off
Setting reply path
ÆMenu Messages SMSsettings
Commonsettings Replypath On / Off
Displaying the SMS memory status
ÆMenu Messages SMSsettings Storagestatus
Setting standard text message memory
ÆMenu Messages SMSsettings
Preferredstorage SIM / Phone
Display number of receivers / text messages sent
ÆMenu Messages SMSsettings
Messagecounter
Resetting text message counter
ÆMenu Messages SMSsettings
Messagecounter Sent / Received Reset
Security settings
The PIN is supplied together with the SIM card by your mobile service
provider.

7
Switching the PIN password on/off
ÆMenu Settings Securitysettings SIMlock
Æ[Enter PIN1] OK
Switching phone code lock on/off
If you have activated the phone code lock on your mobile phone, it is necessary
to enter the password in addition to the PIN, when switching on your mobile
phone.
The default setting for the phone code is 0000.
ÆMenu Settings Securitysettings Phonelock
Æ[Enter phone code] OK
Changing PIN / PIN2 / phone code
ÆMenu Settings Securitysettings
Changepassword PIN / PIN2 / Phonepassword
Æ[Enter old PIN1/PIN2/phone code] OK
Æ[Enter new PIN1/PIN2/phone code] OK
Æ[Confirm new PIN1/PIN2/phone code] OK
SOS (emergency call) settings
You can enter up to 5 emergency call numbers to be dialed one after the other
when an emergency call is activated, until one of the numbers called answers
the emergency call. If the emergency call is not answered within approx.
3 minutes, a new emergency call to the local rescue service is started.
It is also possible to compile an SOS text message which is sent together with
the SOS calls.
Enter / change emergency call numbers
ÆMenu Settings SOSsetting
SOSnumberssetup
Æ[Select memory location] Edit
ÆSearch [Select phone book entry] OK
You can also enter a phone number directly and confirm your entry with
OK.
Delete one / all emergency phone number(s)
ÆMenu Settings SOSsetting
SOSnumberssetup
Æ[Select memory location] Clear / Deleteall OK [Confirm
prompt]
Preparing the emergency text message
ÆMenu Settings SOSsetting SOSsmscontent
Æ[Select message]
Æ[Enter emergency text message] Options Done
Switching the SOS function on/off
ÆMenu Settings SOSsetting
SOSnumberssetup
Æ/ Status On / Off
Enter / change public emergency call numbers
The default emergency phone number is set to 112. Be careful not to
trigger a public emergency call unintentionally!
ÆMenu Settings SOSsetting
Publicemergencynumber SOSnumberssetup
Æ[Enter phone number]OK
Changing public emergency call number
ÆMenu Settings SOSsetting
Publicemergencynumber SOSsmscontent
Æ[Enter emergency text message] OK
Triggering an SOS call
Æ3 sec.
ÊAn announcement is made, that a call has been activated.
ÊIf you have prepared an emergency text message, it is sent.
ÊAn acoustic signal sounds.
ÊThe phone numbers entered are dialled one after another.
ÊWhen the emergency call is answered, the siren is muted and the call
switched to speakerphone.
If none of the emergency phone numbers answers the emergency call, the
phone number saved as the public emergency phone number is dialled after ap
prox. 3 minutes.
Aborting SOS call
Æ
If the emergency call is aborted, the public emergency phone number is
still dialled after approx. 3 minutes.
Ending the SOS call
Æ3 sec. ÊAn announcement is made that the emergency call has been
terminated.
Service hotline
In the case of technical problems, contact our Service hotline.
Switzerland: Tel. 0900 00 1675 (national charges, Swisscom at time of going to
print: CHF 2.60/min).
In the case of claims under the terms of guarantee, please contact your sales
outlet.
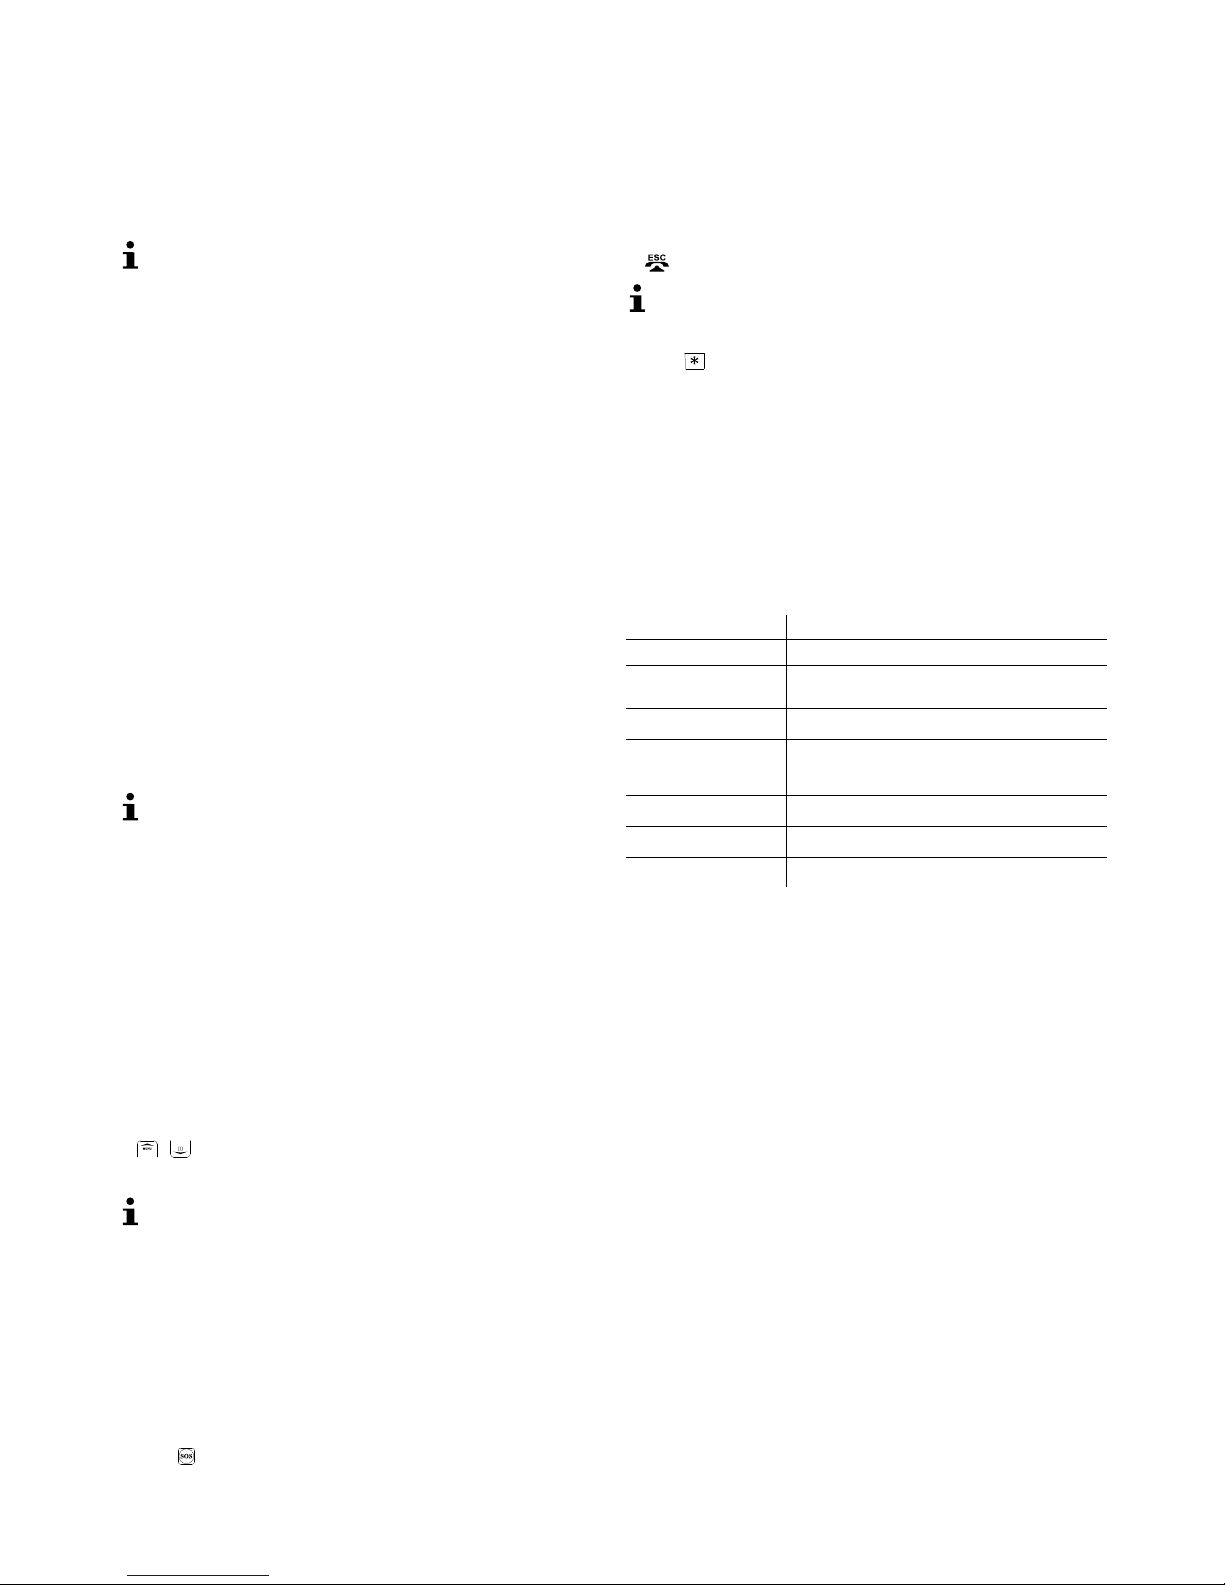
Technical properties
Technical data
Feature Value
Standard - GSM 900, 1800 MHz Dualband
Dimensions
(W x H x D)
- 52 x 108,3 x 17,3 mm
Weight - 106 g (including battery)
Power supply - Input: 100-230 V, 50-60 Hz, 0.2 A
- Output: Mini USB 5 V, 700 mA
Battery - 3.7 V, 1000mAh
Standby time - up to 200 hours
Max. talk time - up to 180 minutes
All Rights Reserved!
Power adapter plug
Your mobile phone is equipped with an energy-efficient power adapter plug
UT-003E-698 (input 100-240 VAC, output 5 VDC, 500 mA). The zero load is ap
prox. 0.18 W. The average efficiency is approx. 68.2 %. The power consump
tion while charging the mobile phone is approx. 1 W.
SAR information
Information on radio frequency emissions and specific absorption rates (SAR =
Specific Absorption Rate).
All the applicable safety standards related to radio frequency emissions were im
plemented during the development of this mobile phone. The limit values are
based on scientific directives and contain a safety margin in order to guarantee
the safety of all persons regardless of age and state of health.
The specified values established according to the directives on radio frequency
emissions are based on a measurement unit referred to as SAR. SAR values are
established using standard methods in which the phone is operated in all pos
sible frequency bands with the highest power output.
Although the SAR values of various phone models can differ, all the models were
developed to maintain the relevant directives on radio frequency emissions.
The following information applies to residents of countries which, as with the
European Union, have adopted the SAR limit value recommended by the IC
NIRP (International Commission on Non-Ionizing Radiation Protection) which
lies at 2 W/kg (averaged from 10 gram tissue:
The highest SAR value measured, averaged over 10 g tissue, was 0.237 W/kg
for this mobile phone measured at the ear.

8
Maintenance
ÆClean the surface of the housing with a soft, fluff-free cloth.
ÆDo not use any cleaning agents or solvents.
Disposal
In order to dispose of your device, take it to a collection point provided
by your local public waste authorities (e.g. recycling centre). According
to laws on the disposal of electronic and electrical devices, owners are
obliged to dispose of old electronic and electrical devices in a separate waste
container. The adjacent symbol indicates that the device must not be disposed
of in normal domestic waste!
You are legally obliged to dispose of power packs and batteries at the
point-of-sale or in the corresponding containers provided at collection
points by the public waste authorities. Disposal is free of charge. The
symbols indicate that the batteries must not be disposed of in normal do
mestic waste and that they must be brought to collection points provided
by local public waste authorities.
Packaging materials must be disposed of according to local regulations.
Guarantee
SWITEL equipment is produced and tested according to the latest production
methods. The implementation of carefully chosen materials and highly de
veloped technologies ensure trouble-free functioning and a long service life.The
terms of guarantee do not apply when a device malfunction was caused by the
mobile telecommunications network operator/provider. The terms of guarantee
do not apply to the batteries or power packs used in the products. The period of
guarantee is 24 months from the date of purchase.
All deficiencies related to material or manufacturing errors within the period of
guarantee will be redressed free of charge. Rights to claims under the terms of
guarantee are annulled following tampering by the purchaser or third parties.
Damage caused as the result of improper handling or operation, normal wear
and tear, incorrect positioning or storage, improper connection or installation or
Acts of God and other external influences are excluded from the terms of guaran
tee. In the case of complaints, we reserve the right to repair defective parts, re
place them or replace the entire device. Replaced parts or devices become our
property. Rights to compensation in the case of damage are excluded where
there is no evidence of intent or gross negligence by the manufacturer.
If your device shows signs of defect during the period of guarantee, please return
it to the sales outlet in which you purchased the SWITEL device together with
the purchase receipt. All claims under the terms of guarantee in accordance with
this agreement can only be asserted at the sales outlet. No claims under the
terms of guarantee can be asserted after a period of two years from the date of
purchase and hand-over of the product.
Declaration of Conformity
This device fulfils the requirements stipulated in the EU directive
1999/5/EC concerning radio equipment and telecommunications termin
al equipment and the mutual recognition of their conformity. Conformity
with the above mentioned directive is confirmed by the CE mark on the device.
To view the complete Declaration of Conformity, please refer to the free down
load available on our web site at www.switel.com.
Table of contents
Other switel Cell Phone manuals

switel
switel S 4000 D ARMOR User manual

switel
switel M 180 User manual

switel
switel M215 User manual

switel
switel S 45 D ALPHA User manual

switel
switel M 170 BRAVO User manual

switel
switel M 270 MAPA User manual

switel
switel M 190 User manual

switel
switel M 16D User manual

switel
switel M100 User manual

switel
switel Zurich M210 User manual

switel
switel M15D User manual

switel
switel S 4502 D SPARK User manual

switel
switel M222 User manual

switel
switel M228 User manual

switel
switel S 47 D JAZZ User manual

switel
switel m220 classico User manual

switel
switel M110 User manual

switel
switel S 4018 D MAMBO User manual

switel
switel Handy ME10 User manual

switel
switel S 55 D SPEED User manual