manuals.online logo
Brands
  1. Home
  2. •
  3. Brands
  4. •
  5. Symmons
  6. •
  7. Plumbing Product
  8. •
  9. Symmons Origins S-23 Series Quick guide

Symmons Origins S-23 Series Quick guide

Installation
Caution: Be sure to turn off hot and cold water supplies before
installing or servicing faucet.
Step 1 If installing model with hose and spray, install hose
guide into hole in sink (normally the far right hole on four hole
sink). From underneath sink place washer then nut over hose
guide and secure to sink. Insert hose through hose guide and up
through middle hole from le in sink. Place gasket on base of
escutcheon. From above sink attach hose securely to nipple on
base of faucet.
Step 2 Align faucet to sink by matching underside arrow
and letter “F” on escutcheon with front of sink. Without
straightening copper supplies insert through center hole of sink.
Secure faucet to sink by tightening the anchor bar (KN-23),
spacer (KN-26) and nut (L-36) on the mounting bolts from
underside. (If sink surface is uneven use putty or sealant to
make proper seal under base.)
Step 3 Carefully straighten copper supplies to avoid kinking
tubing. Connect hot supply to le tube and cold supply to right
tube using appropriate connectors.
Step 4 It is very important to thoroughly ush the supply
lines to prevent foreign matter, i.e. copper chips, sand, stones,
etc. from damaging the sealing surfaces of cartridge. Remove
aerator and turn valve handle on to full cold position, open cold
supply. Without closing, turn handle to full hot and open hot
supply. Let water run in hot only and cold only positions long
enough to ush supply lines thoroughly. If equipped with a hose
and spray, direct spray head into sink and activate spray. Shut
o faucet and replace aerator. Check for leaks.
Step 5 e handle limit stop can be set to limit handle turn
to the hot position. e limit mechanism is factory set to allow
full handle travel. To adjust the limit stop, turn handle to the
full hot position and li handle to open faucet approximately
half way to obtain a smooth ow for correct initial temperature
measurement.
Step 6 If when faucet is on and in full hot position and water
is too hot, shut water o, remove plug button (KN-157), loosen
set screw (L-22) and remove handle (KN-3RB or KN-3BRB),
li limit stop using a small at head screw driver and rotate
clockwise to lower temperature. If water is not hot enough,
rotate counter clockwise (See Figure 1 on reverse side). Aer
correct temperature is achieved, reattach handle, reversing
procedure above.
Cartridge Replacement (KN-4)
Step 1 Remove plug button (KN-157), loosen set screw (L-22)
and remove handle (KN-3RB or KN-3BRB).
Step 2 Engage tabs in cartridge wrench (LN-34) with slots in
compression ring (KN-2) and use screwdriver in wrench holes or
pliers on wrench and turn counter clockwise until compression
ring engages with cap (KN-1). Continue turning counter
clockwise so that cap/ring assembly is removed from the body
(KN-11).
Step 3 Remove cartridge and o-ring seal (KN-4).
Step 4 Install new cartridge while taking care to maintain
position of the o-ring seal at the base of the cartridge. Match
posts in base of cartridge with alignment holes in adapter plate
during assembly.
Step 5 Reassemble faucet in reverse fashion. Thread cap onto
body firmly by hand. Do not use a wrench which may damage
the finish. Tighten compression ring (KN-2) finger tight using
the wrench (LN-34) then 1/4 to 1/2 turn further. Set hot water
limit stop in accordance with installation step 6 above.
Diverter replacement (KN-169)
1. Follow cartridge replacement steps 1 through 5 above.
2. Remove retaining ring (K-44) with 3/8" hex key wrench.
3. Remove diverter and o-ring (K-46).
4. Grease diverter o-ring and install into body.
5. Press diverter into o-ring and body.
6. Replace retaining ring.
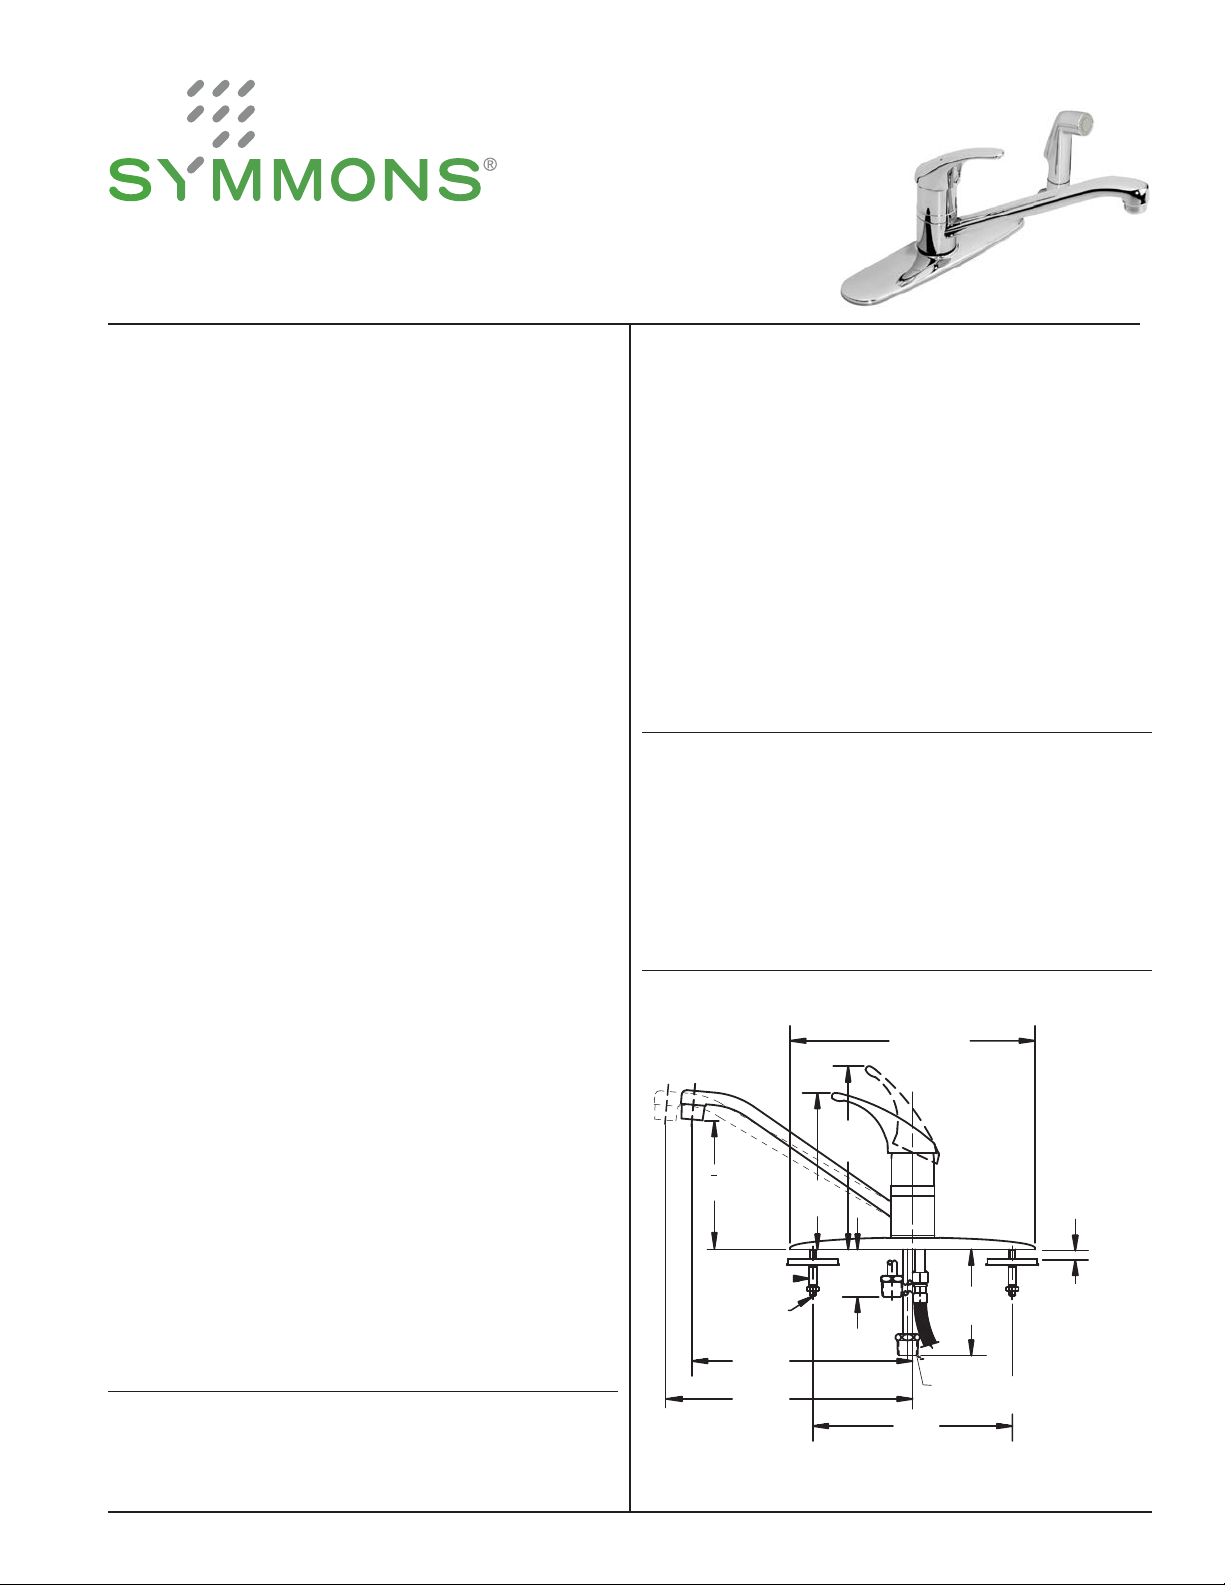
Kitchen Faucet S-23 Series
Installation and Service Instructions
Origins®
10-1/8"
257mm
7-1/2"
191mm
8"
203mm
7-1/4"
184mm
6"
152mm
6-1/4"
159mm
1/2"- 13mm
with spacer
1-1/4"- 32mm
without spacer
spacer
optional 1/2-14
NPT tting
5 1/4
133mm
8-3/4"
222mm
10-7/8"
276mm
1/4-20" UNC
Dimensions Origins Kitchen Faucet, S-23
Note:
Dimensions subject to change without notice.
optional IPS
connections shown
KN-3RB
LN-34
Figure 1
KN-1
KN-2
KN-4
KN-20
KN-11 ASSY
KN-11A ASSY
KN-19A
KN-30
LN-15
LN-216
LN-100
L-22
KN-157
KN-3BRB
LN-135
KN-23
KN-26
L-36
KN-30A
K-41/42* Hand spray and holder
K-43 Diverter valve
K-44 Retainer ring
K-46 O-ring
KN-1* Valve cap
KN-2 Compression ring
KN-3RB* Solid Handle
KN-3BRB* Loop Handle
KN-4 Cartridge
KN-11 ASSY Supply body assembly
with diverter
KN-11A ASSY Supply body assembly
without diverter
KN-19A Spacer
KN-20 O-ring (2)
KN-23 Anchor bar (2)
KN-26 Mounting spacer (2)
KN-30* Escutcheon
KN-30A* Escutcheon with hand spray hole
KN-157 Plug button
KN-169 Diverter assembly
L-22 Set screw
L-36 Mounting nut (2)
LN-216* Aerator (Faucet with hand spray)
LN-34 Cartridge wrench
LN-135 6” lever handle with
red/blue indicators
* Note: When ordering parts for products with an
optional decorative nish, append appropriate three
letter nish sufx code to part numbers marked with
an asterisk (*).
KN-20
Diverter assembly
KN-169
6 inch lever handle
Loop handle
Lever handle
Repair
use only
3/8"
Removal tool part number, LL-60K
Aerator
(ow regulator)
2.2 gpm (8.3L/min) LN-15
1.5 gpm (5.7L/min) FLR-110-1.5
1.0 gpm (3.8L/min) FLR-110-1.0
.5 gpm (1.9L/min) ----
Part Number*
Standard
Aerator
Vandal Resistant
with removal tool
LN-101
FLR-110-1.5-VP
RL-288-VP-1.0
LN-100
Diverter
K-44
K-46
K-41/42
Parts Assembly Origins Kitchen Faucet, S-23 Series
Symmons Industries, Inc. ■31 Brooks Drive ■Braintree, MA 02184
Phone: (800) 796-6667 ■Fax: (800) 961-9621
Website: symmons.com ■Email: [email protected]
Copyright © 2018 Symmons Industries, Inc. ■ZV-330 REV I ■060518
WARNING: This product can expose you to chemicals including lead, which is known to the state of California to cause
cancer, birth defects, or other reproductive harm. For more information, go to www.P65Warnings.ca.gov.
Installation
Caution: Be sure to turn off hot and cold water supplies before
installing or servicing faucet.
Step 1 If installing model with hose and spray, install hose
guide into hole in sink (normally the far right hole on four hole
sink). From underneath sink place washer then nut over hose
guide and secure to sink. Insert hose through hose guide and up
through middle hole from le in sink. Place gasket on base of
escutcheon. From above sink attach hose securely to nipple on
base of faucet.
Step 2 Align faucet to sink by matching underside arrow
and letter “F” on escutcheon with front of sink. Insert through
center hole of sink. Secure faucet to sink by tightening the
anchor bar (KN-23), spacer (KN-26) and nut (L-36) on the
mounting bolts from underside. (If sink surface is uneven use
putty or sealant to make proper seal under base.)
Step 3 Connect ex hoses (LN-247) to supply stops (le hose
to hot, right hose to cold). Hot supply hose is marked with tag.
Step 4 It is very important to thoroughly ush the supply
lines to prevent foreign matter, i.e. copper chips, sand, stones,
etc. from damaging the sealing surfaces of cartridge. Remove
aerator and turn valve handle on to full cold position, open cold
supply. Without closing, turn handle to full hot and open hot
supply. Let water run in hot only and cold only positions long
enough to ush supply lines thoroughly. If equipped with a hose
and spray, direct spray head into sink and activate spray. Shut
o faucet and replace aerator. Check for leaks.
Step 5 e handle limit stop can be set to limit handle turn
to the hot position. e limit mechanism is factory set to allow
full handle travel. To adjust the limit stop, turn handle to the
full hot position and li handle to open faucet approximately
half way to obtain a smooth ow for correct initial temperature
measurement.
Step 6 If when faucet is on and in full hot position and water
is too hot, shut water o, remove plug button (KN-157), loosen
set screw (L-22) and remove handle (KN-3RB or KN-3BRB),
li limit stop using a small at head screw driver and rotate
clockwise to lower temperature. If water is not hot enough,
rotate counter clockwise (See Figure 1 on reverse side). Aer
correct temperature is achieved, reattach handle, reversing
procedure above.
Cartridge Replacement (KN-4)
Step 1 Remove plug button (KN-157), loosen set screw (L-22)
and remove handle (KN-3RB or KN-3BRB).
Step 2 Engage tabs in cartridge wrench (LN-34) with slots
in compression ring (KN-2) and use screwdriver in wrench
holes or pliers on wrench and turn counter clockwise until
compression ring engages with cap (KN-1). Continue turning
counter clockwise so that cap/ring assembly is removed from the
body (KN-11).
Step 3 Remove cartridge and o-ring seal (KN-4).
Step 4 Install new cartridge while taking care to maintain
position of the o-ring seal at the base of the cartridge. Match
posts in base of cartridge with alignment holes in adapter plate
during assembly.
Step 5 Reassemble faucet in reverse fashion. Thread cap onto
body firmly by hand. Do not use a wrench which may damage
the finish. Tighten compression ring (KN-2) finger tight using
the wrench (LN-34) then 1/4 to 1/2 turn further. Set hot water
limit stop in accordance with installation step 6 above.
Diverter replacement (KN-169)
1. Follow cartridge replacement steps 1 through 5 above.
2. Remove retaining ring (K-44) with 3/8" hex key wrench.
3. Remove diverter and o-ring (K-46).
4. Grease diverter o-ring and install into body.
5. Press diverter into o-ring and body.
6. Replace retaining ring.
Kitchen Faucet S-23-BH Series
Installation and Service Instructions
Origins®
Dimensions Origins Kitchen Faucet, S-23-BH
Note: Dimensions subject to change without notice.
10 "
257mm
1
8
20"
508mm
8"
203mm
7 "
184mm
1
4
6 "
159mm
1
4
"- 13mm
1
2
with spacer
1 "- 32mm
1
4
without spacer
"-20 UNC
spacer
1
4
5 "
133mm
1
4
8 "
222mm
3
4
10 "
276mm
7
8
"-COMP
3
8
KN-3RB
LN-34
Figure 1
KN-1
KN-2
KN-4
KN-20
KN-11 ASSY
KN-11A ASSY
LN-15
LN-216
LN-100
L-22
KN-157
KN-3BRB
LN-135
3/8"
Diverter
K-44
K-46
KN-19A
KN-30
KN-23
KN-26
L-36
K-41/42* Hand spray and holder
K-43 Diverter valve
K-44 Retainer ring
K-46 O-ring
KN-1* Valve cap
KN-2 Compression ring
KN-3RB* Solid Handle
KN-3BRB* Loop Handle
KN-4 Cartridge
KN-11 ASSY Supply body assembly
with diverter
KN-11A ASSY Supply body assembly
without diverter
KN-19A Spacer
KN-20 O-ring (2)
KN-23 Anchor bar (2)
KN-26 Mounting spacer (2)
KN-30* Escutcheon
KN-30A* Escutcheon with hand spray hole
KN-157 Plug button
KN-169 Diverter assembly
L-22 Set screw
L-36 Mounting nut (2)
LN-216* Aerator (Faucet with hand spray)
LN-34 Cartridge wrench
LN-135 6” lever handle with
red/blue indicators
LN-247 Flex hoses (3/8 inch compression)
KN-20 Diverter assembly
KN-169
6 inch lever handle
Loop handle
Lever handle
Repair
use only
* Note: When ordering parts for products with an
optional decorative nish, append appropriate three
letter nish sufx code to part numbers marked with
an asterisk (
*
).
Removal tool part number, LL-60K
Aerator
(ow regulator)
2.2 gpm (8.3L/min) LN-15
1.5 gpm (5.7L/min) FLR-110-1.5
1.0 gpm (3.8L/min) FLR-110-1.0
.5 gpm (1.9L/min) ----
Part Number*
Standard
Aerator
Vandal Resistant
with removal tool
LN-101
FLR-110-1.5-VP
RL-288-VP-1.0
LN-100
LN-247
KN-30A
K-41/42
Parts Assembly Origins Kitchen Faucet, S-23-BH Series
Symmons Industries, Inc. ■31 Brooks Drive ■Braintree, MA 02184
Phone: (800) 796-6667 ■Fax: (800) 961-9621
Website: symmons.com ■Email: [email protected]
Copyright © 2018 Symmons Industries, Inc. ■ZV-330 REV I ■060518

This manual suits for next models

1

Other Symmons Plumbing Product manuals

Symmons Symmetrix S-20-IPS Quick guide

Symmons

Symmons Symmetrix S-20-IPS Quick guide

Symmons Naru Trim Series Installation instructions

Symmons

Symmons Naru Trim Series Installation instructions

Symmons Winslet Series Manual

Symmons

Symmons Winslet Series Manual

Symmons Origins 9600-PLR Manual

Symmons

Symmons Origins 9600-PLR Manual

Symmons Dia SK3510PD Manual

Symmons

Symmons Dia SK3510PD Manual

Symmons S-71 Series User manual

Symmons

Symmons S-71 Series User manual

Symmons Origins Trim Series Installation instructions

Symmons

Symmons Origins Trim Series Installation instructions

Symmons Duro 362SH Manual

Symmons

Symmons Duro 362SH Manual

Symmons Origins SK248 Series Manual

Symmons

Symmons Origins SK248 Series Manual

Symmons Dia S-3504-H321-V-CYL-B-TRM Manual

Symmons

Symmons Dia S-3504-H321-V-CYL-B-TRM Manual

Symmons Carrington Shower System User manual

Symmons

Symmons Carrington Shower System User manual

Symmons Origins S9612PP Manual

Symmons

Symmons Origins S9612PP Manual

Symmons 2DIV-BODY Manual

Symmons

Symmons 2DIV-BODY Manual

Symmons Carrington SLW-4412 Quick guide

Symmons

Symmons Carrington SLW-4412 Quick guide

Symmons Symmetrix S-250 Series Quick guide

Symmons

Symmons Symmetrix S-250 Series Quick guide

Symmons SLC72121.2 Manual

Symmons

Symmons SLC72121.2 Manual

Symmons Carrington Trim Series Installation instructions

Symmons

Symmons Carrington Trim Series Installation instructions

Symmons Dia SLS-3512 Series Reference guide

Symmons

Symmons Dia SLS-3512 Series Reference guide

Symmons Dia SLW3512PP User manual

Symmons

Symmons Dia SLW3512PP User manual

Symmons H321-V User manual

Symmons

Symmons H321-V User manual

Symmons 0142-02-L/HD-SS-TRM User manual

Symmons

Symmons 0142-02-L/HD-SS-TRM User manual

Symmons Ballina Trim Series Manual

Symmons

Symmons Ballina Trim Series Manual

Symmons Duro SLS3622PP Manual

Symmons

Symmons Duro SLS3622PP Manual

Symmons DS Creations SPR-3510-PD User manual

Symmons

Symmons DS Creations SPR-3510-PD User manual

Popular Plumbing Product manuals by other brands

Galvin Specialised Ezy-Wash TF83HJS Product installation guideline

Galvin Specialised

Galvin Specialised Ezy-Wash TF83HJS Product installation guideline

Grohe 19 793 manual

Grohe

Grohe 19 793 manual

D'Vontz Copper Sink installation guide

D'Vontz

D'Vontz Copper Sink installation guide

alfi AB3600-PC installation instructions

alfi

alfi AB3600-PC installation instructions

Homa HCON 15 instruction manual

Homa

Homa HCON 15 instruction manual

MCBATH ACRYMOLD ARGOS instructions

MCBATH

MCBATH ACRYMOLD ARGOS instructions

Laufen TWINPLUS HF905451100000 quick start guide

Laufen

Laufen TWINPLUS HF905451100000 quick start guide

Akw iTherm 30306 instructions

Akw

Akw iTherm 30306 instructions

Sanela SLR 04 Mounting instructions

Sanela

Sanela SLR 04 Mounting instructions

Quadro Sense Assembling instructions

Quadro

Quadro Sense Assembling instructions

Hans Grohe AXOR Uno 45119 Series Assembly instructions

Hans Grohe

Hans Grohe AXOR Uno 45119 Series Assembly instructions

KWC Suprimo 10.271.103.700 Specification sheet

KWC

KWC Suprimo 10.271.103.700 Specification sheet

Signature Hardware KEY WEST 948303 installation manual

Signature Hardware

Signature Hardware KEY WEST 948303 installation manual

Kohler Family Care 2.0 K-701646T-FM-SHP installation instructions

Kohler

Kohler Family Care 2.0 K-701646T-FM-SHP installation instructions

Hans Grohe Showerpipe Croma 100 Reno 27139000 Instructions for use/assembly instructions

Hans Grohe

Hans Grohe Showerpipe Croma 100 Reno 27139000 Instructions for use/assembly instructions

American Standard GREEN TEA 7010.801 installation instructions

American Standard

American Standard GREEN TEA 7010.801 installation instructions

Toto Vessel Lavatory LT645 Installation and owner's manual

Toto

Toto Vessel Lavatory LT645 Installation and owner's manual

DURAVIT N1 4383 Mounting instructions

DURAVIT

DURAVIT N1 4383 Mounting instructions

manuals.online logo
manuals.online logoBrands
  • About & Mission
  • Contact us
  • Privacy Policy
  • Terms and Conditions

Copyright 2025 Manuals.Online. All Rights Reserved.