Taylor 9306N User manual

9306N
Non-Contact Infrared Thermometer & Thermocouple
Probe Thermometer
1
Rubber
Gasket
(Battery
compartment
screw
location)
INSTRUCTION MANUAL

2
Thank you for purchasing a Taylor® Non-Contact Infrared
Thermometer and a Thermocouple Probe Thermometer. Your
Taylor® instrument is an example of superior design and
craftsmanship. Please read this instruction manual carefully before
use. Keep these instructions handy for future reference.
This thermometer has 2 uses – Non-Contact Infrared Thermometer
and a Thermocouple Probe Thermometer. You can select only one
use at a time, but can change the function at will.
Please remember to keep away from children!
Do not use for safety related applications.
NON-CONTACT INFRARED THERMOMETER FUNCTIONS
Distance:Spot Ratio = 8:1 (ie., 8” away, the spot will be 1”, etc)
Emissivity = 0.1 – 1, steps of 0.01
Wave Length = 8µm - 14µm
Simply aim the thermometer at the target to be measured with the
infrared lens (located on the underside of the thermometer) and
press the ‘SCAN’ (red) key to display the surface temperature.
The white light targeting feature will automatically turn on while
the Scan button is pressed.
The distance to target ratio is 8:1; therefore the thermometer
should be positioned as close to the target as possible.
As long as the Scan key is pressed, the newest temperature will
update and the thermometer will continue to measure. When the
Scan key is released, “Hold” will appear on the display and the last
measurement will remain visible for 15 seconds before the unit
turns off.

3
MODE KEY
Functions of the Mode (yellow) key are:
Min/Max, °C/°F Selection, Emissivity Selection
Min/Max
• Min/Max mode is used to get the lowest or highest
temperature when taking multiple measurements on an area
at one time.
• The thermometer will display the minimum or maximum
measurement ONLY while the Scan key is pressed
continuously. The reading will clear when the Mode key is
pressed again and Min or Max will flash on the display
• Max Mode: Press Scan, then Mode, then Scan (Max will
display on the screen). Keep holding Scan while taking the
measurements. The highest or MAX temperature will display.
Press the Mode key to clear.
• Min Mode: Press Scan, then Mode twice, then Scan (Min will
display on the screen). Keep holding Scan while taking the
measurements. The lowest or MIN temperature will display.
Press the Mode key to clear.
Emissivity
Emissivity is the measure of the amount of “black” in a
material. The duller and blacker the object, the closer to an
emissivity of 1. The more reflective the material, the lower the
emissivity. Changing this setting will alter the accuracy of your
measurements.
This thermometer is set with a default emissivity of 0.95. The
range is 0.10 – 1.0
To change the Emissivity, press the Scan key, then the Mode
key 5 times, then Scan for each 0.01 adjustment. To set, press
Mode again.
NOTE: Non-contact infrared thermometers are not
recommended for use in measuring the temperature of shiny or
highly polished materials due to the reflective properties/low
emissivity.

4
LOCK MODE
The lock mode is useful for continuous monitoring of
temperatures. To use the lock mode, press the Scan key, then
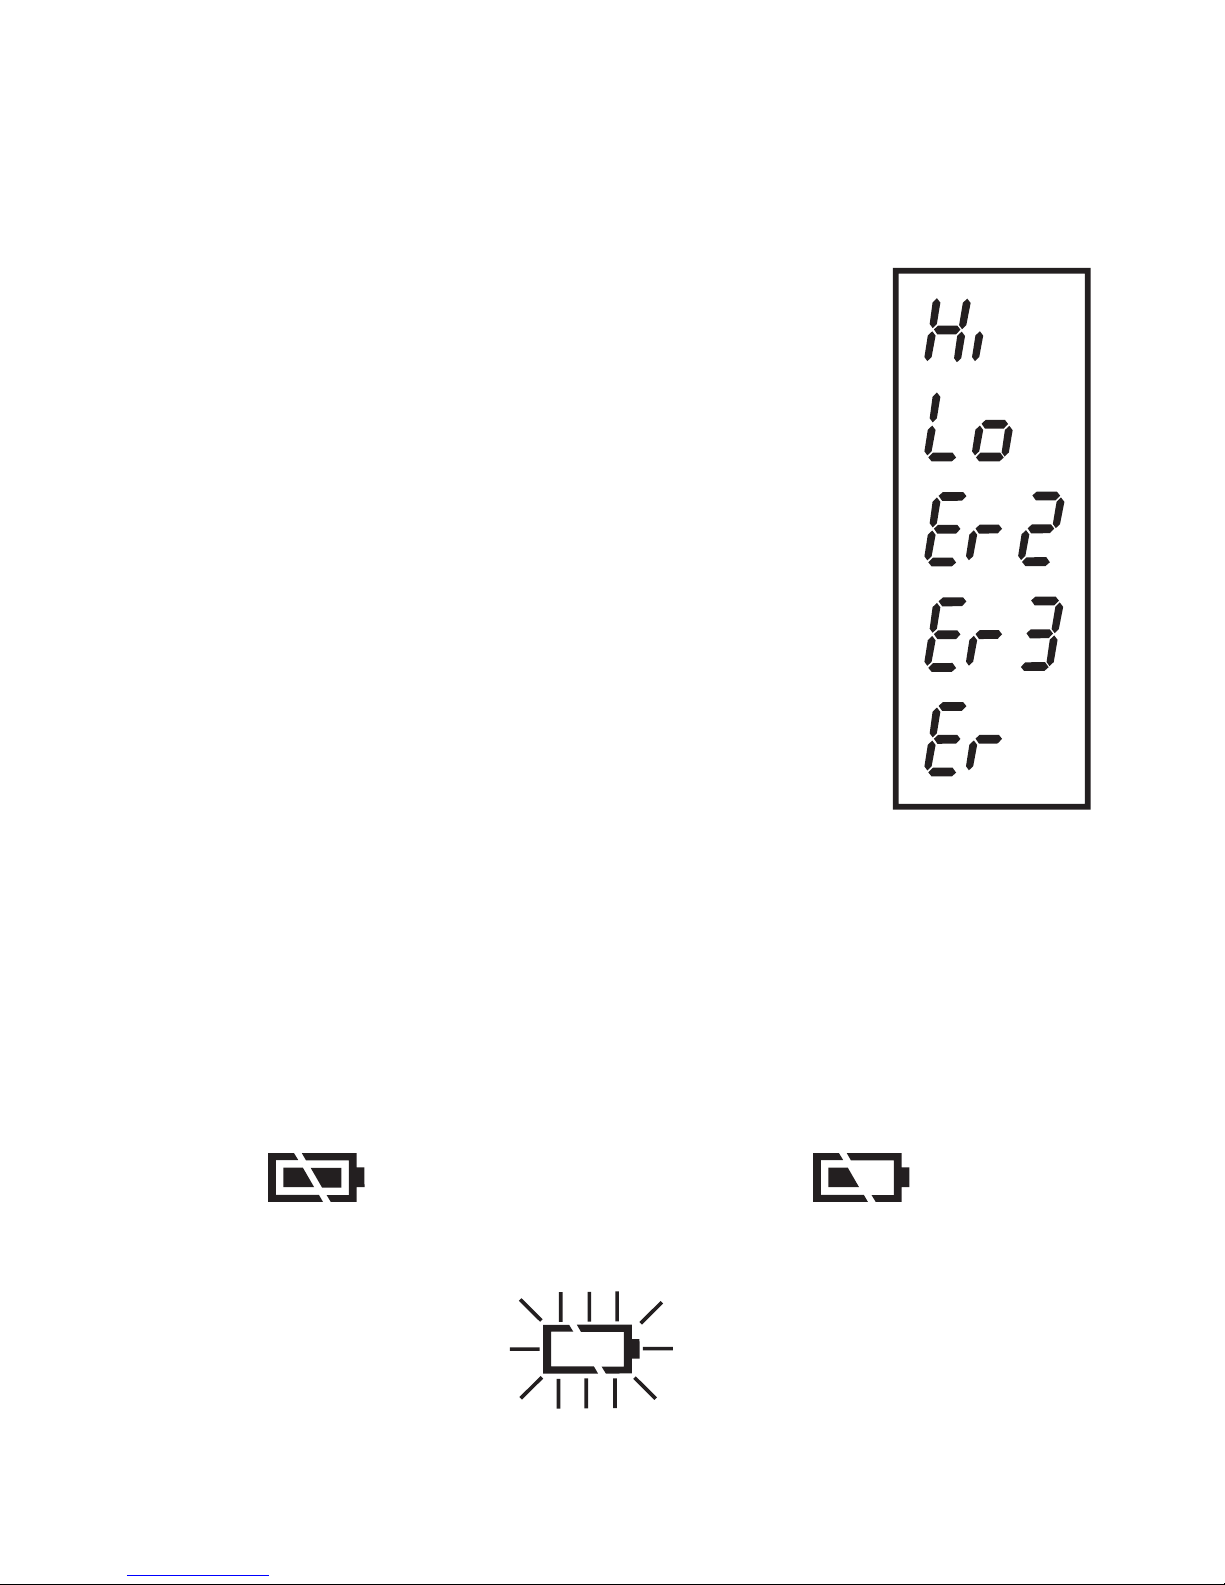
Mode key 3 times, then Scan key again. “Lock” will display
on the screen and the thermometer will continuously display
the temperatures for up to 60 minutes or until the Scan key is
pressed and held. When the Scan key is held and released,
“Hold” will display and the last measurement will remain visible
for 15 seconds and the screen will go blank.
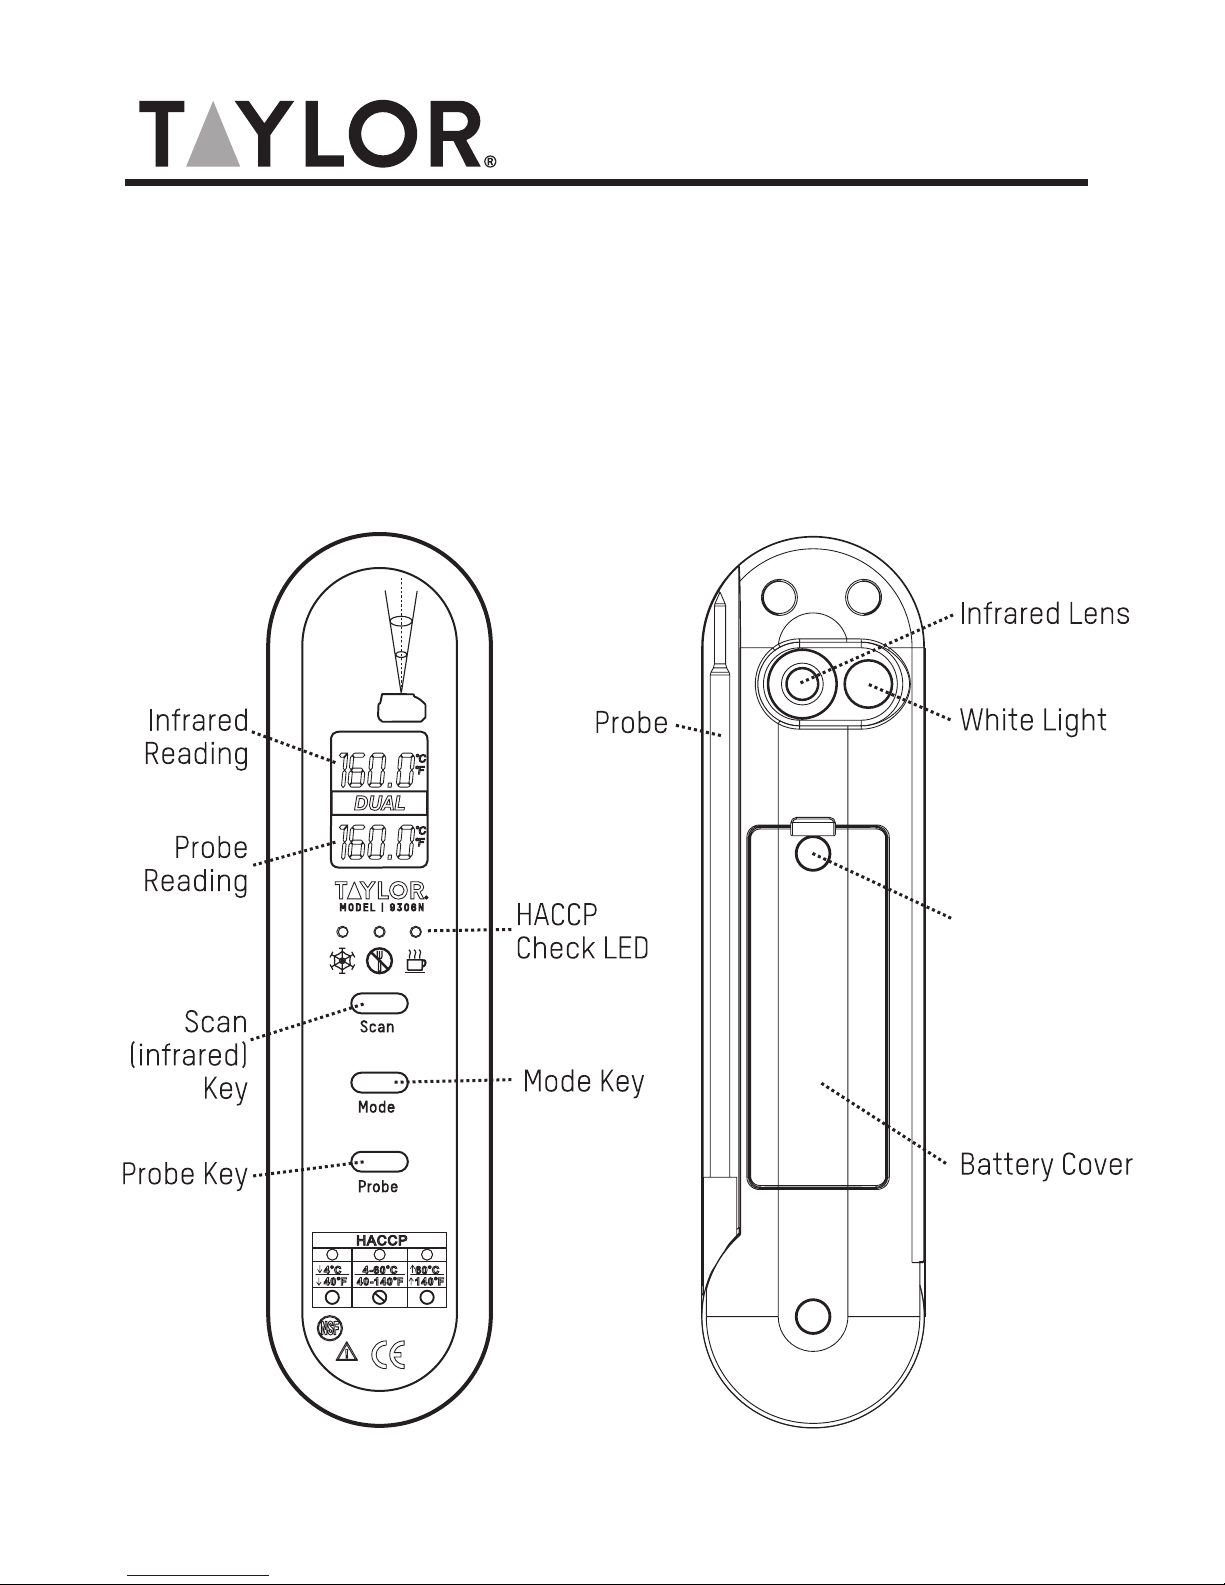
THERMOCOUPLE PROBE FUNCTION
The thermocouple probe is used to measure internal food
temperature quickly and accurately.
To use, open the probe from the housing and insert the probe
into the food to be measured, then press and release the
‘PROBE’ (green) key to display the temperature. The unit will
continuously display temperatures for up to 4 minutes. After
that, the unit will automatically shut off to preserve battery
life. Pressing the Probe key again will hold the last temperature
and “Hold” will show on the display and the F (or C) will stop
flashing. If there are no further measurements after “Hold”
appears, the unit will automatically shut off after 15 seconds.
NOTE: If Scan is pressed while the Probe function is in use,
the Probe temperature will automatically “Hold” so the Scan
function can be used. If the Probe key is pressed while using
the Infrared function, then the Scan function will “Hold”. If
there is no Scan or Probe activity for 15 seconds, the unit will
automatically shut off.
°F/°C selection
To change the ‘ºC’ or ‘ºF’ mode, press the SCAN (infrared) then
the MODE key four times. This will switch between ºF and ºC
selections.

5
HACCP CHECK
HACCP stands for “Hazard Analysis & Critical Control Points” and
is a management system used for food safety in professional
food service environments.
The HACCP Check feature is incorporated in this thermometer to
easily indicate critical temperature zones. The icons and LED
indicators located above the display indicate if a food product
stays in the safe or unsafe HACCP “Danger Zone” temperature.
A Green LED (left) appears with the “ “ icon to indicate a safe
cool or frozen condition below 40°F (4°C) or appears with the
“ “ icon (right) to indicate safe holding temperatures above
140°F (60°C).
When the temperature is between 40°F and 140°F (4°C and
60°C), the Red LED (middle) with the “ “ icon will appear and
indicate that the temperature has fallen within the HACCP
“Danger Zone”.

6
LCD ERROR MESSAGES
This thermometer incorporates visual messages
as follows:
• “Hi” or “Lo” is displayed when the temperature
being measured is outside of the range of the
instrument – “Hi” when higher than 626°F (330°C)
and “Lo” when lower than -67°F (-55°C).
• “Er2” is displayed when the temperature is
exposed to rapid changes in the ambient
temperature.
• “Er3” is displayed when the ambient temperature
is below 32°F (0°C) or above 122°F (50°C). The
thermometer should be allowed plenty of time
to stabilize to the working/room temperature if
exposed to extreme temperature changes.
For all other error messages, it is necessary to reset the
thermometer. To reset, turn the thermometer off, remove the
batteries, and wait for a minimum of one minute. Then, re-
insert the batteries and turn on. If the error message remains,
please contact Customer Service for further assistance.
BATTERY POWER ICON
‘Battery OK’: measurements
are possible
‘Battery Low’: batteries needs to be replaced,
measurements are possible
‘Battery Exhausted’:
measurements are not possible

7
INSERT/CHANGE BATTERIES
First Time Use:
1. Open battery compartment on the underside of the unit;
remove the bag with the screw and the cap – reserve.
2. Insert the batteries with the correct polarity as noted on the
inside of the case.
3. Replace cover; insert screw into the hole of the cover to
secure the battery compartment. Insert cap to protect from
water.
CAUTION: Since the thermometer is splash proof, please
make sure the battery cover and rubber cap are on tight
REPLACING THE BATTERIES:
1. Pick out the rubber cap carefully using a small pointed tool,
such as a screwdriver. Remove the screw from under the
cap.
2. Remove battery cover.
3. Replace with 2 AAA 1.5v batteries.
4. Replace battery compartment cover.
5. Replace the screw and the cap.
When the Low Battery icon indicates that the battery is low
or the readings grow dim or irregular, the batteries should be
replaced immediately. Please note: It is important to turn the
instrument off before replacing the batteries, otherwise the
thermometer may malfunction.

EMC / RFI
Readings may be affected if the unit is operated within a radio
frequency electromagnetic field strength of approximately 3
volts per meter, but the performance of the instrument will not be
permanently affected.
8
NOTE: Please recycle or dispose of batteries per local
regulations.
WARNING: Batteries may pose a choking hazard. As with all
small items, do not let children handle batteries. If swallowed,
seek medical attention immediately.
PRECAUTION: Do not dispose of batteries in fire. Batteries may
explode or leak. Remove the battery if the unit will not be used
for a long period of time.
Do not combine old and new batteries. Do not mix Alkaline,
carbon-zinc (standard) or Nickel-Cadmium (rechargeable)
batteries.

SPECIFICATIONS:
Measuring Range
Operating Range
Accuracy
Resolution
Weight (with battery)
Battery Life
Auto Shut-Off
0.5°F (0.2°C)
0.22 oz
Typically 40 hours, minimum 30 hours continuous use
Thermocouple –
After 4 minutes if no change in temperature
Infrared – After 15 seconds if no change in temperature
THERMOCOUPLE PROBE
(K type, Grounded)
(COT Mode)
-67°F to 482°F
(-55°C to 250°C)
32 to122°F
(0 to 50°C)
-67°F to -14°F: +/- 4°F
-14°F to 149°F: +/- 2°F
149°F to 482°F: +/-1.5%
of reading
-55°C to -10°C: +/- 2°C
-10°C to 65°C: +/- 1°C
65°C to 250°C: +/-1.5% of
reading
-67°F to 626°F
(-55°C to 330°C)
32 to122°F
(0 to 50°C)
Below 23°F: +/-2°F
23°F to 149°F: +/-1°F
Above 149°F: +/-1% of
reading
Below -10°C: +/-1°C
-10°C to 65°C: +/-0.5°C
Above 65°C: +/-1% of
reading
9
INFRARED SCAN FUNCTION

TWO (2) YEARS LIMITED WARRANTY
Taylor® warrants this product to be free from defects in material or
workmanship (excluding batteries) for two (2) years for the original
purchaser from date of retail purchase. It does not cover damages
or wear resulting from accident, misuse, abuse or unauthorized
adjustment and/or repair. If service is required, do not return to
retailer. Should this product require service (or replacement at
our option), please pack the item carefully and return it prepaid,
along with store receipt showing the date of purchase and a note
explaining reason for return to:
Taylor Precision Products
2220 Entrada Del Sol, Suite A
Las Cruces, New Mexico 88001 USA
Customer Service Phone: 1-800-225-4834
Customer Service Fax: 1-575-526-4347
www.taylorusa.com
There are no expressed warranties except as listed above. This
warranty gives you specific legal rights, and you may have other rights
which vary from state to state.
For additional product information, or warranty information outside
the USA, please contact us through www.taylorusa.com
©2017 Taylor Precision Products and its affiliated companies, all
rights reserved. Taylor® is a registered trademark of Taylor Precision
Products and its affiliated companies. All rights reserved.
Made to our exact specifications in China.
9306 6.17 WC
10

11
Butée de
caoutchouc
(Emplacement
de la vis du
compartiment
des piles)
Relevé
d’infrarouge
Lentille
infrarouge
Relevé de
sonde
Touche
de Scan
(infrarouge)
Touche de
sonde
DEL de
vérification
d’ARMPC
Touche de
mode
Sonde
Couvercle de
piles
Lumière
blanche
9306N
Thermomètre infrarouge sans contact et thermomètre
à sonde à thermocouple
MANUEL D’INSTRUCTIONS

12
Merci d’avoir fait l’achat d’un thermomètre infrarouge sans contact
et d’un thermomètre à sonde à thermocouple Taylor®. Votre produit
Taylor® est un exemple de design et de travail supérieur. Veuillez lire
attentivement votre manuel d’instructions avant d’utiliser l’appareil.
Conservez ces instructions à portée de la main à titre de référence.
Ce thermomètre possède deux fonctions : thermomètre infrarouge
sans contact et thermomètre à sonde à thermocouple. Vous ne pouvez
utiliser qu’une seule fonction à la fois, mais vous pouvez passer de
l’une à l’autre à tout moment.
Rappelez-vous de garder l’appareil loin des enfants!
Ne pas l’utiliser pour des applications reliées à la sécurité.
LES FONCTIONS DE THERMOMÈTRE SANS CONTACT INFRAROUGE
Rapport distance/surface du point = 8:1 (c’est-à-dire qu’à 8 po [7,5 cm]
de distance, le point sera de 1 po [2,5 cm]; etc.).
L’émissivité = 0.1~1 Step 0.01
Longueur d’onde = 8um-14um
Pointez simplement le thermomètre vers la cible à mesurer avec la lentille
infrarouge (qui se trouve au bas de le thermomètre) et enfoncez la touche
de Scan (rouge) pour afficher la température en surface.
La fonction de cible à lumière blanche s’allume automatiquement lorsque la
touche « Scan » (balayage) est enfoncé.
Le ratio de distance à la cible est de 8:1. Pour obtenir les résultats les plus
exacts, placez la lentille du capteur aussi près que possible de la cible.
La température la plus récente sera mise à jour et le thermomètre
continuera à la mesurer aussi longtemps que la touche «Scan» (balayage)
sera enfoncée. Lorsque la touche de Scan est dégagée, l’icône « Hold »
(maintien) apparaît à l’écran et la dernière mesure restera visible pendant
15 secondes avant que l’écran ne se vide.

13
LA TOUCHE MODE
Les fonctions de la touche mode (jaune) sont:
Minimum/maximum, Sélection de °C/°F, Sélection de l’émissivité
Minimum/maximum
• Le mode Min/Max sert à obtenir la température la plus basse ou la plus
haute lors de la prise de mesures multiples sur une surface à un moment
donné.
• Le thermomètre affiche la température minimum ou maximum UNIQUEMENT
si la touche « Scan » reste enfoncée en permanence. Le résultat s’efface
quand la touche « Mode » est à nouveau enfoncée; Min ou Max clignotent
alors sur l’écran.
• Mode Max : Appuyez sur « Scan », puis sur « Mode », puis sur «Scan »
(Max s’affiche sur l’écran). Maintenez la touche «Scan» enfoncée tout en
prenant les mesures. La température la plus élevée, ou température MAX
s’affiche. Appuyez sur la touche «Mode» pour l’effacer.
• Mode Min : Appuyez sur « Scan », puis deux fois sur « Mode » , puis
sur « Scan » (Min s’affiche sur l’écran). Maintenez la touche « Scan »
enfoncée tout en prenant les mesures. La température la plus basse, ou
température MIN, s’affiches. Appuyez sur la touche « Mode » pour l’effacer.
L’émissivité
L’émissivité est la mesure de la quantité de « noir » dans un matériau. Plus
l’objet est terne et noir, plus l’émissivité sera proche de 1. Plus un matériau
réfléchit la lumière, plus son émissivité sera basse. Tout changement de ce
réglage perturberait la précision de vos mesures.
Ce thermomètre a été réglé avec une émissivité par défaut de 0,95.
La plage d’émissivité va de 0,10 à 1,0
Pour modifier l’émissivité, appuyez sur la touche « Scan », puis 5 fois sur la
touche « Mode », puis de nouveau sur « Scan » pour chaque intervalle de
0,01. Pour enregistrer votre réglage, appuyez de nouveau sur « Mode ».
REMARQUE : L’utilisation des thermomètres infrarouges sans contact n’est
pas recommandée pour mesurer la température de matériaux brillants
ou fortement polis en raison de leurs propriétés de réflexion et d’une
émissivité basse.

14
LE MODE DE VERROUILLAGE
Le mode de verrouillage est particulièrement utile pour le suivi
continu des températures. Pour utiliser le mode verrouillage,
appuyez la touche de balayage « Scan » puis la touche « Mode »
trois fois puis la touche « Scan ». «Lock» (verrouillage) apparaîtront
à l’écran et le thermomètre affiche continuellement la température
jusqu’à 60 minutes ou jusqu’à ce qu’on enfonce et gardez la touche
de «Scan». Lorsque la touche de balayage « Scan » (infrarouge) est
dégagée, l’icône « Hold » (maintien) apparaît à l’écran et la dernière
mesure restera visible pendant 15 secondes avant que l’écran ne se
vide.
FONCTION DE SONDE DE THERMOCOUPLE
La sonde à thermocouple sert à mesurer rapidement et avec précision
la température interne des aliments.
Pour l’utiliser, sortez la sonde de son boîtier et insérez-la dans
l’aliment à mesurer, puis enfoncez et relâchez la touche « PROBE »
(verte) pour afficher la température. L’appareil affiche en permanence
les températures pendant un maximum de 4 minutes. Puis l’appareil
s’éteint automatiquement pour préserver la durée de vie des piles.
En appuyant de nouveau sur la touche « Probe », l’appareil retient la
dernière température et « Hold » (maintien) s’affiche sur l’écran tandis
que le F (ou C) cesse de clignoter. Si aucune autre mesure n’est prise
après l’affichage de « Hold », l’appareil s’éteint automatiquement
au bout de 15 secondes.
REMARQUE : Si on appuie sur « Scan » pendant l’utilisation de la
fonction « Probe », la température de la sonde est automatiquement
mise en attente « Hold » pour permettre l’utilisation de la fonction «
Scan ». Le fait d’actionner la touche « Probe » pendant l’utilisation
de la fonction infrarouge entraîne la mise en attente de la fonction «
Scan » (« Hold »). En cas d’absence d’activité « Scan » ou « Probe »
pendant 15 secondes, l’appareil s’éteint automatiquement.
Sélection du °F/°C
Pour modifier le mode de mesure de «ºC » à «ºF» ou inversement,
appuyez sur la touche « SCAN » (infrarouge) puis quatre fois sur la
touche MODE. Ceci permet de passer des degrés Fahrenheit «ºF» aux
degrés Celsius « ºC» ou inversement.

15
VÉRIFICATION D’ARMPC « HACCP CHECK »
L’acronyme HACCP signifie « Hazard Analysis & Critical Control
Points » (analyse des risques et points de contrôles critiques); il
s’agit d’un système de gestion utilisé pour la sécurité alimentaire
dans le milieu professionnel des services alimentaires.
La fonction « HACCP Check » incorporée à ce thermomètre lui
permet d’indiquer facilement les zones de températures critiques.
Les icônes et les indicateurs à DEL situés au-dessus de l’écran
indiquent si l’aliment reste à une température sécuritaire ou s’il
s’agit d’une « zone de danger » HACCP.
Une DEL verte apparaît avec l’icône « » pour indiquer une
condition sans danger, froide ou congelée, sous 40ºF (4ºC) ou
avec l’icône « » pour indiquer une température de maintien sans
danger supérieure à 140ºF (60ºC).
Lorsque la température est entre 40ºF et 140ºF (4ºC et 60ºC), la
DEL rouge (milieu) avec une icône « » apparaît et indique que la
température est tombée sous la « zone de danger » d’ARMPC de 40
à 140ºF (4ºC à 60ºC).

16
MESSAGES D’ERREUR À ACL
Le thermomètre incorpore des messages
diagnostiques visuels comme suit :
• « Hi » (élevé) ou « Lo » (bas) apparaît à l’écran
lorsque la température mesurée est à l’extérieur de
la plage de l’instrument - soit « Hi » lorsqu’elle est
supérieure à + 626ºF (330ºC) et « Lo » lorsqu’elle est
inférieure à -67ºF (-55ºC).
•« Er2 » apparaît à l’écran lorsque le thermomètre
est exposé à des changements rapides de la
température ambiante.
• « Er3 » apparaît lorsque la température ambiante est
inférieur à 32ºF (0ºC) ou supérieur à 122ºF (50ºC).
Si le thermomètre est exposé à des variations
majeures de température, lui laisser assez de temps
pour qu’il se stabilise à la température ambiante de
la pièce de travail.
Pour tous les autres messages d’erreur, il est nécessaire
de réinitialiser le thermomètre. Pour le réinitialiser, éteignez
l’appareil, retirez la pile et attendez au moins une minute avant
de réinsérer la pile et de remettre l’appareil en marche. Si le
message d’erreur ne disparaît pas, contactez le Service à la
clientèle pour obtenir de l’aide.
L’ICÔNE DU COURANT DES PILES
« Piles OK » : Les mesures sont
possibles.
« Piles faibles » : doivent être remplacées;
les mesures sont possibles.
« Piles épuisées » : Les mesures ne sont
pas possibles.

17
INSÉREZ/CHANGER LAS PILES
Utiliser l’appareil pour la première fois:
1. Ouvrez le compartiment des piles situé sous l’appareil; retirer
le sac comportant la vis et le cache; mettre de côté.
2. Insérez les piles en respectant le sens des polarités
indiquées à l’intérieur du boîtier.
3. Remettre le couvercle en place, insérer la vis dans le trou du
couvercle pour verrouiller le compartiment des piles. Insérer
le cache pour protéger de l’eau.
ATTENTION : Dans la mesure où le thermomètre est à
l’épreuve des éclaboussures, assurez-vous que le
couvercle du compartiment des batteries et le cache en
caoutchouc sont serrés correctement.
REMPLACEMENT DES PILES:
1. Soulever avec précaution le cache en caoutchouc avec un
petit outil pointu tel qu’un tournevis. Retirer la vis située
sous le cache.
2. Retirez le couvercle des piles.
3. Remplacez avec 2 piles AAA de 1,5 V.
4. Replacez les couvercles de piles.
5. Remettre en place la vis et le cache.
Lorsque l’icône « Low Battery » (Pile faible) indique la faiblesse
de la pile, ou les relevés seront plus faibles ou Irréguliers, il faut
les remplacer immédiatement. Veuillez noter : il est important
d’éteindre l’appareil avant de remplacer les piles, sinon le
thermomètre pourrait mal fonctionner.

EMC / RFI
Les relevés peuvent être affectés si l’appareil fonctionne près d’un
champ électromagnétique de radio-fréquence d’une force d’environ
3 volts par mètre, mais la performance de l’appareil ne sera pas
touchée de manière permanente.
18
NOTA: Por favor, recicle o deseche las baterías con las regulaciones
locales.
ADVERTENCIA: Las baterías pueden representar un peligro de asfixia.
Como con todos los artículos pequeños, no deje que los niños
manipulen las baterías. Si se ingiere, busque atención médica
inmediata.
PRECAUCIÓN: No tire las baterías al fuego. Las baterías pueden
explotar o tener pérdidas. Retire la batería si la unidad no se utilizará
por un largo tiempo.
Ne mélangez pas vieilles et nouvelles piles. Ne mélangez pas les
piles alcalines, standard (carbonezinc) ou les nickel-cadmium
(rechargeables).

SPÉCIFICATIONS:
Plage de mesure
Plage d’utilisation
Exactitude
Résolution
Poids (avec pile)
Durée de vie de pile
Arrêt automtique
0.5°F (0.2°C)
0.22 oz
typiquement 40 heures, au moins 30 heures d’utilisation
continue
Thermocouple - Éteint après 4 minutes sans changement
de température
Infrarouge - Éteint après 15 secondes sans changement
de temperature
Fonction de balayage
infrarouge (mode IRT)
-67°F à 482°F
(-55°C à 250°C)
32 to122°F
(0 to 50°C)
-67°F à -14°F: +/- 4°F
-14°F à 149°F: +/- 2°F
+149°F à 482°F: +/-1.5%
dureleve’
-55°C à -10°C: +/- 2°C
-10°C à 65°C: +/- 1°C
65°C à 250°C: +/-1.5%
dureleve’
-67°F à 626°F
(-55°C à 330°C)
32 to122°F
(0 to 50°C)
Below 23°F: +/-2°F
23°F à 149°F: +/-1°F
Above 149°F: +/-1%
dureleve’
Below -10°C: +/-1°C
-10°C à 65°C: +/-0.5°C
Above 65°C: +/-1% of
dureleve’
19
Sonde de thermocouple
(type K, mise à la terre)
(mode COT)

GARANTIE LIMITÉE DE DEUX ANS
Taylor® garantit que ce produit est libre de tout défaut de matériaux
ou de main d’oeuvre pour une période de deux (2) ans pour
l’acheteur original à partir de la date d’achat original (à l’exclusion
de les piles). Elle ne couvre pas les dommages ou l’usure suite
à un accident, une mauvaise utilisation, tout abus, ou réglage
interdit et/ou réparation interdite. Si ce produit doit être réparé (ou
remplacement à notre discrétion), veuillez l’emballer avec soin et le
retourner à frais prépayés avec la facture du magasin indiquant la
date d’achat et une note expliquant la raison du retour à l’adresse
suivante: Taylor Precision Products
2220 Entrada Del Sol, Suite A
Las Cruces, New Mexico 88001 USA
Téléphone de Service à la Clientèle: 1-800-225-4834
Télécopie de Service à la Clientèle: 1-575-526-4347
www.taylorusa.com
Il n’y a aucune garantie expresse sauf celle indiquée précédemment.
Cette garantie vous donne des droits précis, mais vous pouvez aussi
avoir d’autres droits qui varient d’une juridiction à l’autre.
Pour de l’information supplémentaire sur le produit ou sur la garantie
à l’extérieur des É.-U. veuillez nous contacter par www.taylorusa.com.
©2017 Taylor Precision Products et ses sociétés affiliées, tous
droits réservés. Taylor® et Leading the Way in Accuracy® sont des
marques de commerce déposées de Taylor Precision Products et ses
sociétés affiliées. Tous droits réservés.
Fabriqué en Chine selon nos spécifications exactes.
20
Table of contents
Languages:
Other Taylor Thermometer manuals

Taylor
Taylor Weekend Warrior 805 Owner's manual

Taylor
Taylor 9940N User manual

Taylor
Taylor 1446 User manual

Taylor
Taylor 9523 User manual

Taylor
Taylor WeatherGuide User manual

Taylor
Taylor 5286498 User manual

Taylor
Taylor 9877FDA User manual

Taylor
Taylor 147921 User manual

Taylor
Taylor 1442 User manual

Taylor
Taylor 1700 User manual

Taylor
Taylor 519 User manual

Taylor
Taylor OMG 808 User manual

Taylor
Taylor Five Star 1479 User manual

Taylor
Taylor 2750 User manual

Taylor
Taylor 5109 User manual

Taylor
Taylor 518 User manual

Taylor
Taylor 5925N User manual

Taylor
Taylor WeatherGuide 1521 User manual

Taylor
Taylor TruTemp Manual

Taylor
Taylor 505 User manual