TCL Alcatel FLASH2 PLUS Technical manual

L2 Repair Document TCLCommunication Ltd.
Rev.
FL02 Level 2 Repair Document
Page
1.0 1/59
All rights reserved. Transfer, copy, use or communication of this file is prohibited without authorization.
FLASH2 PLUS
FL02
Note: this manual is non-contractual and TCL Communication Ltd. can modify it without prior
notice on the characteristics of described equipments.

L2 Repair Document TCLCommunication Ltd.
Rev.
FL02 Level 2 Repair Document
Page
1.0 2/59
All rights reserved. Transfer, copy, use or communication of this file is prohibited without authorization.
1.0 2016/3/12 Draft creation Wilson li
Rev. Date Modification description Prepared By Checked By Approved By

L2 Repair Document TCLCommunication Ltd.
Rev.
FL02 Level 2 Repair Document
Page
1.0 3/59
All rights reserved. Transfer, copy, use or communication of this file is prohibited without authorization.
Content
1Level 2 repair process ..............................................................................................4
2Warranty Check and Visual Inspection ...................................................................5
2.1 Warranty confirmation of L1.....................................................................................5
2.2 Visual mechanical check..........................................................................................6
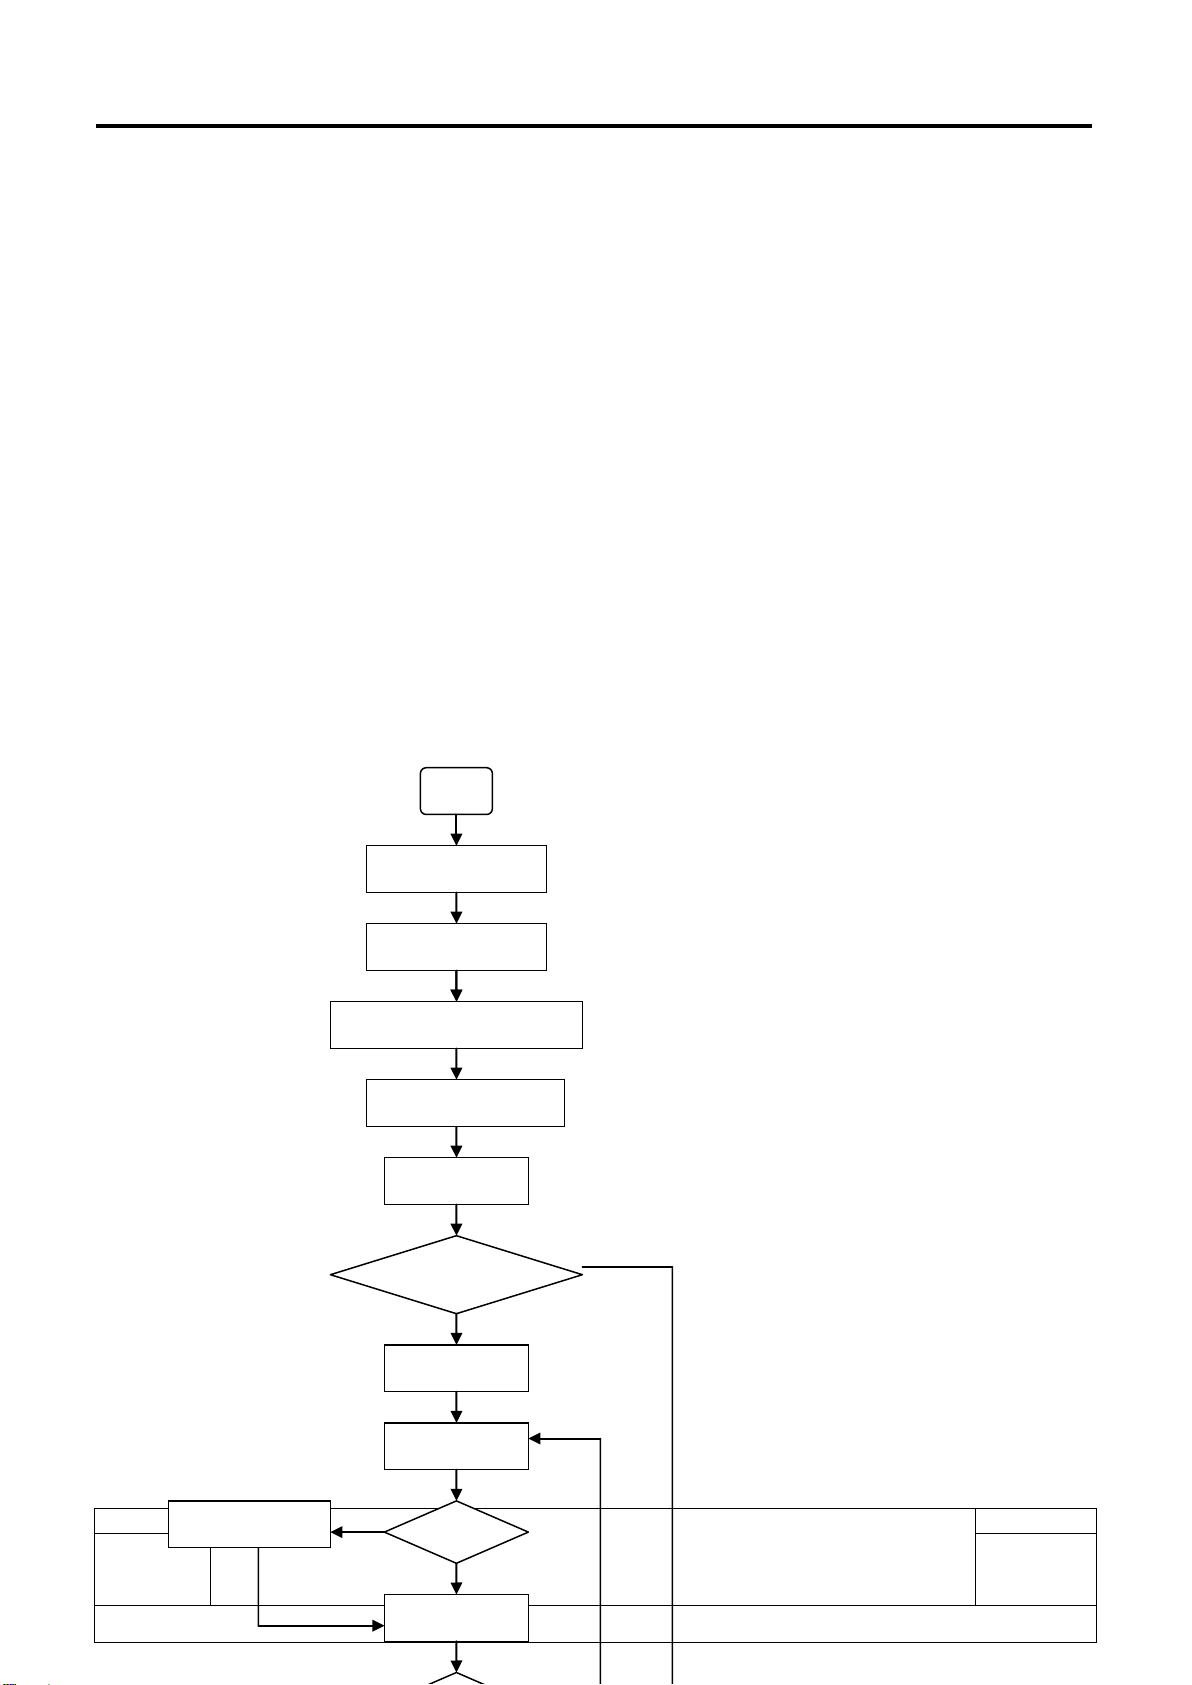
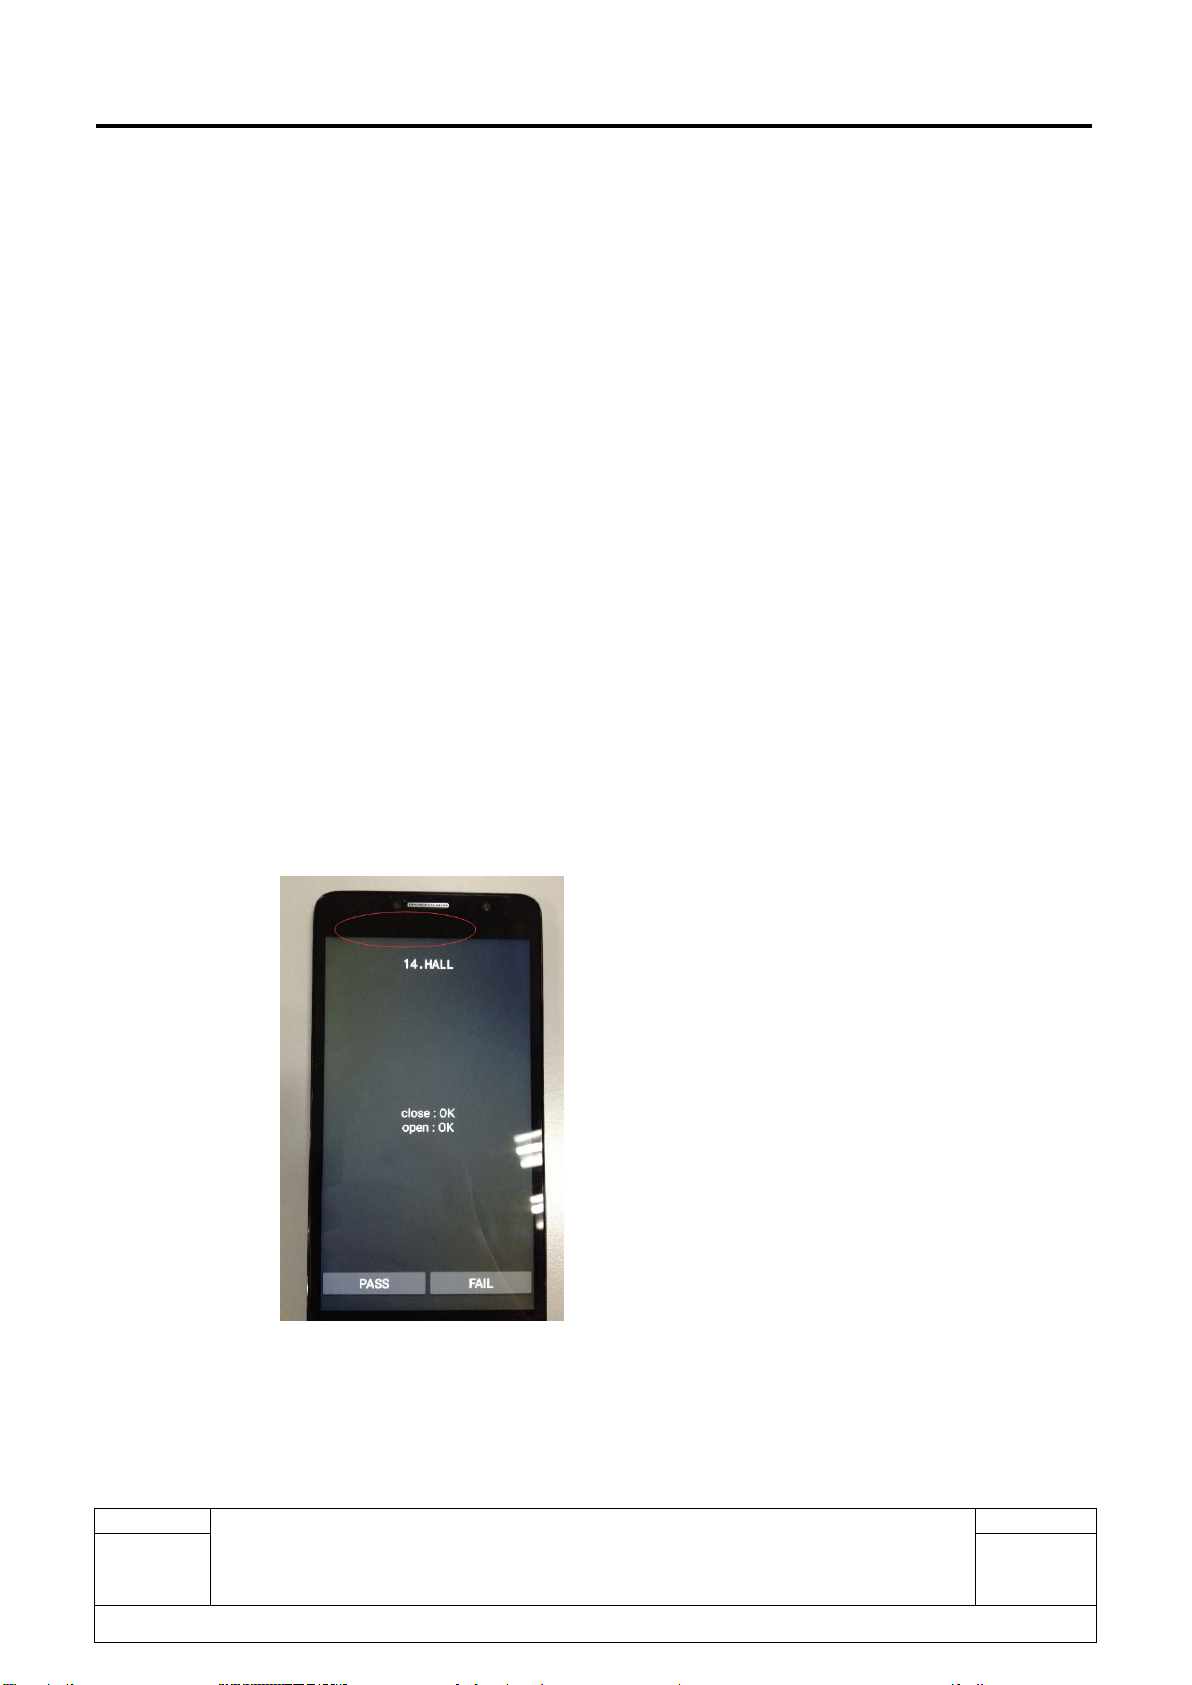
2.3 Pretest........................................................................................................................7
3Battery......................................................................................................................16
3.1 Battery information.................................................................................................16
3.2 Battery test ..............................................................................................................18
3.4 Note of Battery ........................................................................................................20
4. Software download .................................................................................................20
4.1 Equipments requested when download:.............................................................20
4.2 Install driver..............................................................................................................20
4.3 SW download process.............................................................................................21
5 Disassembly and assembly FL02 ..............................................................................26
5.1 ESD Safety................................................................................................................26
5.2 Disassembly tool......................................................................................................27
5.3 Disassembly process...............................................................................................27
Disassembly Notice:......................................................................................................34
5.4 Reassembly Process ..............................................................................................35
5.5 Disassembly process evaluation...........................................................................36
6Disassembly Complete...........................................................................................37
7Level 2 repair...........................................................................................................40
7.1 power on issue .........................................................................................................41
7.2 Charge issue.............................................................................................................42
7.3 Display issue ............................................................................................................43
7.4 Vibrator issue ..........................................................................................................44
7.5 Touch panel issue...................................................................................................45
7.6 SIM recognize issue................................................................................................46
7.7 TF card recognized issue.......................................................................................47
7.8 Main camera issue ..................................................................................................48
7.9 Sub camera issue....................................................................................................49
7.10MIC issue .................................................................................................................50
7.11Speaker issue..........................................................................................................51

L2 Repair Document TCLCommunication Ltd.
Rev.
FL02 Level 2 Repair Document
Page
1.0 4/59
All rights reserved. Transfer, copy, use or communication of this file is prohibited without authorization.
8PCBA exchange.......................................................................................................51
9Other component exchange...................................................................................52
Function Test..................................................................................................................53
1 Level 2 repair process
Reassembly
OK
OK
Start
Visual Inspection
Warranty Check
Pretest & Failure confirm
SW Upgrade
Disassembly
L2 Repair
Retest
Function test
PCBA Replace
NG
NG
NG
Back up user data

L2 Repair Document TCLCommunication Ltd.
Rev.
FL02 Level 2 Repair Document
Page
1.0 5/59
All rights reserved. Transfer, copy, use or communication of this file is prohibited without authorization.
2 Warranty Check and Visual Inspection
2.1 Warranty confirmation of L1
IMEI sticker check:
1) Power on the handset, enter *#06#
2) If the IMEI sticker in the back casing is not lost:
We should make sure that the IMEI number MUST be the same with the one on the IMEI sticker; if
not, it’s out of warranty policy.
Humidity sensitive label
If humidity sensitive label is not good, the cell phone will be considered as out of guarantee.
1). Liquid was detected by humidity sensitive label.

L2 Repair Document TCLCommunication Ltd.
Rev.
FL02 Level 2 Repair Document
Page
1.0 6/59
All rights reserved. Transfer, copy, use or communication of this file is prohibited without authorization.
2). Position of humidity sensitive sticker.
2.2 Visual mechanical check
Mechanical warranties check items:
1) Corrosion
Corrosion on the USB connector, SIM connector, and other metal surfaces。
2) Hole (diameter > 1mm)
Holes on any surface, including the front casing, furnished frame, battery cover, touch Lens,
keypad…
3) Bump
Bumps (diameter > 1mm) on any surface, including front casing, decorate frame, battery
cover, touch Lens, keypad, etc.

L2 Repair Document TCLCommunication Ltd.
Rev.
FL02 Level 2 Repair Document
Page
1.0 7/59
All rights reserved. Transfer, copy, use or communication of this file is prohibited without authorization.
4) Scratch
Scratches (length > 3mm) on any surface, including the front casing, decorate frame, battery
cover, touch Lens, keypad, etc.
5) Distortion
Bend, twisted or crushed on the h/s, cover/casing or connectors, etc.
6) Broken
Touch broken, casing/cover broken, etc.
7) Dropped
Keypad tear off, touch lens, connectors dropped, etc.
8) Gap
External physical damage relating to abnormal use, like front case and frame opened
9) Others
Damage caused by disassembly ,wrong part assembly, loss of components
Use in abnormal environment like high temperature causing plastic melts
2.3 Pretest
1) Check that the SIM card is set correctly.
2) Power on the cell phone.
3) If the cell phone asks to input NCK code, which means it is SIM locked, and can only be worked with
dedicated SIM card. Use the correct SIM card.

L2 Repair Document TCLCommunication Ltd.
Rev.
FL02 Level 2 Repair Document
Page
1.0 8/59
All rights reserved. Transfer, copy, use or communication of this file is prohibited without authorization.
4) Enter the phone code if necessary.
5) If power on, test step by step with the auto test code:
Press *#2886# in dial screen and then you will see the interface displaying the SW version. Select
“Auto” to start the auto test, or select “MANU” to do the MMI test manually.
If one of the tests failed during “Auto” test mode, it will show “Failed: XXX”, press “Next” to go on test
and press “END” to power off.
Traceability
I. You can get some information such as IMEI, CU-REF, PTH, Date Code, etc.
II. Press “Pass” to continue.
Touch Panel1
I. “Please draw on the yellow area” according to instructions;
II. Press “Pass” to continue.
Touch Panel2
I. “Please draw on the yellow area” according to instructions;
II. Press “Pass” to continue.
LCD MIRE
I. You will see the LCD display three colors: RED, GREEN and BLUE if it
functions well;
II. Press “Pass” to continue;

L2 Repair Document TCLCommunication Ltd.
Rev.
FL02 Level 2 Repair Document
Page
1.0 9/59
All rights reserved. Transfer, copy, use or communication of this file is prohibited without authorization.
LCD BLACK
I. You will see the LCD displays black if it functions well;
II. Press “Pass” to continue;
LCD GRAY
I. You will see the LCD displays grey if it functions well;
II. Press “Pass” to continue;
LCD GRAYLEVEL
I. You will see the LCD displays grey level if it functions well;
II. Press “Pass” to continue;
LCD WHITE
I. You will see the LCD displays white if it functions well;
II. Press “Pass” to continue;
KEYPAD
I. Press the key displayed on the screen. The key on the screen will turn grey
when you press it if it functions well;
II. Press “Pass” to continue.
LCD BACKLIGHT
I. The screen backlight will be flashing if it functions well;
II. Press “Pass” to continue.

L2 Repair Document TCLCommunication Ltd.
Rev.
FL02 Level 2 Repair Document
Page
1.0 10/59
All rights reserved. Transfer, copy, use or communication of this file is prohibited without authorization.
KEYBOARD BACKLIGHT
I. The keyboard backlight will be flashing if it functions well;
II. Press “Pass” to continue.
MAIN CAMERA
Press “Pass” to continue if the front camera functions well.
FRONT CAMERA
Press “Pass” to continue if the main camera functions well.
HALL
I. It will response accordingly when close the flip cover; Or close a magnet to the
red circle area in the picture below, then it will response;
II. Press “Pass” to continue;
MAIN FLASH

L2 Repair Document TCLCommunication Ltd.
Rev.
FL02 Level 2 Repair Document
Page
1.0 11/59
All rights reserved. Transfer, copy, use or communication of this file is prohibited without authorization.
I. Main Camera LED will turn on if it functions well;
II. Press “Pass” to continue.
FRONT FLASH
I. Front Camera LED will turn on if it functions well;
II. Press “Pass” to continue;
CHARGER LED
I. The charge LED will turn on if it functions well;
II. Press “Pass” to continue.
SPEAK BOX
I. It will display “Speak Box Test PASS” if it functions well;
II. Press “PASS” to continue;
RECEIVER
I. You will hear a voice prompt which introduces some emergency call numbers
from the top receiver if it functions well;
II. Press “PASS” to continue;
SPEAKER
I. You will hear a voice prompt which introduces some emergency call numbers
from the top speaker if it functions well;
II. Press “PASS” to continue;

L2 Repair Document TCLCommunication Ltd.
Rev.
FL02 Level 2 Repair Document
Page
1.0 12/59
All rights reserved. Transfer, copy, use or communication of this file is prohibited without authorization.
MIC
I. Make a noise near the MAIN MIC, you will hear it from the top receiver if it
functions well;
II. Press “PASS” to continue;
III.Make a noise near the SUB MIC, you will hear it from the bottom receiver if it
functions well;
IV.Press “PASS” to continue.
Vibrator
I. You can feel the phone’s vibrating if it functions well;
II. Press “Pass” to continue.
Headset
I. Insert headset according to the instruction and you will hear a voice prompt
which introduces some emergency call numbers through the headset left if it
functions well;
II. Press “Pass” to continue;
III.You will hear a voice prompt which introduces some emergency call numbers
through the headset right if it functions well;
IV.Press “Pass” to continue;
V. Make a noise near the headset mic, you will hear it from headset if it functions
well;

L2 Repair Document TCLCommunication Ltd.
Rev.
FL02 Level 2 Repair Document
Page
1.0 13/59
All rights reserved. Transfer, copy, use or communication of this file is prohibited without authorization.
VI.Press “Pass” to continue;
VII. You could hear the FMRadio from the headset if it functions well;
VIII. Press “Pass” to continue;
IX.Remove headset according to the instruction and press “Pass” to continue;
X. Press “Pass” to continue.
USB
I. Insert USB cable according to instruction and it will say “USB cable checked”,
“USB: OK”;
II. Press “Pass” to continue.
CHARGER
I. Insert USB cable according to instruction and it will say “Charger: OK”, “Current:
xxx” if it functions well;
II. Press “Pass” to continue.
G-Sensor
I. Put the handset towards up according to instruction;
II. Press “Pass” to continue;
III.Put the handset “FACE DOWN”, “DOWN”, “LEFT”, “RIGHT” and “FACE UP”
according to instruction, and then the instruction will disappear if it functions
well;
IV.Press “Pass” to continue.

L2 Repair Document TCLCommunication Ltd.
Rev.
FL02 Level 2 Repair Document
Page
1.0 14/59
All rights reserved. Transfer, copy, use or communication of this file is prohibited without authorization.
Light Sensor
I. It will show the value of ambient light and the value will change according to the
phone’s environment (Bright test: use the electric torch in another phone to
shine the phone; Dark test: use something to shadow the phone), then it will
say “dark: OK”, “bright: OK” if it functions well;
II. Press “Pass” to continue.
Proximity Sensor
I. Please shawdow the senor according to instruction and it will say “near: OK”,
“far: OK” if it functions well;
II. Press “Pass” to continue.
SIM CARD
I. Insert SIM card and the phone will detect it if it functions well;
II. Press “Pass” to continue.
Memory Card
I. Insert SD card and the phone will detect it if it functions well;
II. Press “Pass” to continue.
Battery TEMP
I. It will display the value of battery temperature, current, battery voltage, capacity
rate and battery present if it functions well;
II. Press “Pass” to continue.

L2 Repair Document TCLCommunication Ltd.
Rev.
FL02 Level 2 Repair Document
Page
1.0 15/59
All rights reserved. Transfer, copy, use or communication of this file is prohibited without authorization.
Bluetooth
I. Bluetooth will search automatically and it will display device address if it
functions well;
II. Press “Pass” to continue.
WIFI
I. It will search for WIFI hotspot and it will display searched result on the screen if it functions
well;
II. Press “Pass” to continue.
GPS
I. It will run GPS and search for satellite, and then it will display info such as
“PRN”, “SNR”, etc. on the screen if it functions well;
II. Press “Pass” to continue.
Call
I. It will turn to the call interface and hear a pcs of record from receiver if it
functions well;
II. Press “Pass” to continue
FACTORY RESET
It will do the factory reset automatically if you press the item.

L2 Repair Document TCLCommunication Ltd.
Rev.
FL02 Level 2 Repair Document
Page
1.0 16/59
All rights reserved. Transfer, copy, use or communication of this file is prohibited without authorization.
3 Battery
3.1Battery information
1) Battery picture

L2 Repair Document TCLCommunication Ltd.
Rev.
FL02 Level 2 Repair Document
Page
1.0 17/59
All rights reserved. Transfer, copy, use or communication of this file is prohibited without authorization.
Note: When replace battery, the Furnished battery steel should be replaced together.
So the Furnished battery steel should be ordered along with battery.
2) Battery feature
3) Battery life
The bellowing table shows the nominal battery life respectively in standby and talking mode. These
typical values are expressed in normal temperature with battery initially full charged and under good
Model Element Capacity
Battery Li Lithium 2960mAh

L2 Repair Document TCLCommunication Ltd.
Rev.
FL02 Level 2 Repair Document
Page
1.0 18/59
All rights reserved. Transfer, copy, use or communication of this file is prohibited without authorization.
ratio coverage. Battery range depends on the network characteristics, the ambient temperature and
particularly on movement.
Shine plus
Power pack
FL02
Standby time (hours) Talking time
Power pack Lithium 2G around 500hours/ 3G
around 480hours 2G around 15hours/ 3G around
12hours
* Pmin: minimum transmission power
** DTX: no transmission during period of silence
4) Battery charge time
For a normally discharged battery which has not been stored for long time, the charge time
listed as below table.
Battery type
Typical Charge time
Soft pack 100 minuets
Note:
If the battery is new, charge it before use. Battery icon will appear after charging a short
time.
If the battery is deeply discharged, battery icon will appear after charging several minutes
and accompany with a slight sound.
3.2Battery test
1) Below table describes the various events related to a standard charger connected to a cell phone.

L2 Repair Document TCLCommunication Ltd.
Rev.
FL02 Level 2 Repair Document
Page
1.0 19/59
All rights reserved. Transfer, copy, use or communication of this file is prohibited without authorization.
FL02
Cell phone status before
charger connected ON OFF
During charging
Display lights up and following battery icon displayed:
Sequential icon flashing:
After charging
(charger connected)
Following fixed battery icon display :
Table - Battery charge status on handset
2) If the display does not light on or battery icon does not flash when the charger or the cell phone’s
charge function is defective with mechanical or electronics.
In this case:
a) Replace the charger to charge.
Confirm it works correctly or not.

L2 Repair Document TCLCommunication Ltd.
Rev.
FL02 Level 2 Repair Document
Page
1.0 20/59
All rights reserved. Transfer, copy, use or communication of this file is prohibited without authorization.
If it cannot work correctly after change charger.
b) Check the Charge connector on the cell phone.
If it is damaged, replace the cell phone.
3.4Note of Battery
Potential for fire or burning. Do not puncture, crush, or heat the battery. Strictly avoid using sharp tool to
pry up battery.
Fire extinguisher is needed for emergency.
4. Software download
It is authorized to download software for the handset which needs to be updated. This
downloading tool is called “Sugar MTK_SP”. Thus internet access is necessary. TS
Website: https://css.tclmobile.cn/.
4.1 Equipments requested when download:
⑴A handset with full power;
⑵PC with windows system;
⑶A USB cable.
4.2 Install driver
At the final step of SUGAR setup procedure, it will remind you to install driver.
This manual suits for next models
1
Table of contents
Other TCL Cell Phone manuals