TCL Alcatel PIXI3-7 KD Technical manual

L2 Repair Document TCLCommunication Ltd.
Rev.
8058/8059/8053 Level 2 Repair Document
Page
1.0
1/39
All rights reserved. Transfer, copy, use or communication of this file is prohibited without authorization.
PIXI3-7 KD
8058/8059/8053
Note: this manual is non-contractual and TCL Communication Ltd. can modify it without prior
notice on the characteristics of described equipments.

L2 Repair Document TCLCommunication Ltd.
Rev.
8058/8059/8053 Level 2 Repair Document
Page
1.0
2/39
All rights reserved. Transfer, copy, use or communication of this file is prohibited without authorization.
2016-4-27
Add model 8053
Mani Lee
1.0
2015-6-16
Draft creation
Mani Lee
Rev.
Date
Modification description
Prepared By
Checked By
Approved By

L2 Repair Document TCLCommunication Ltd.
Rev.
8058/8059/8053 Level 2 Repair Document
Page
1.0
3/39
All rights reserved. Transfer, copy, use or communication of this file is prohibited without authorization.
Content
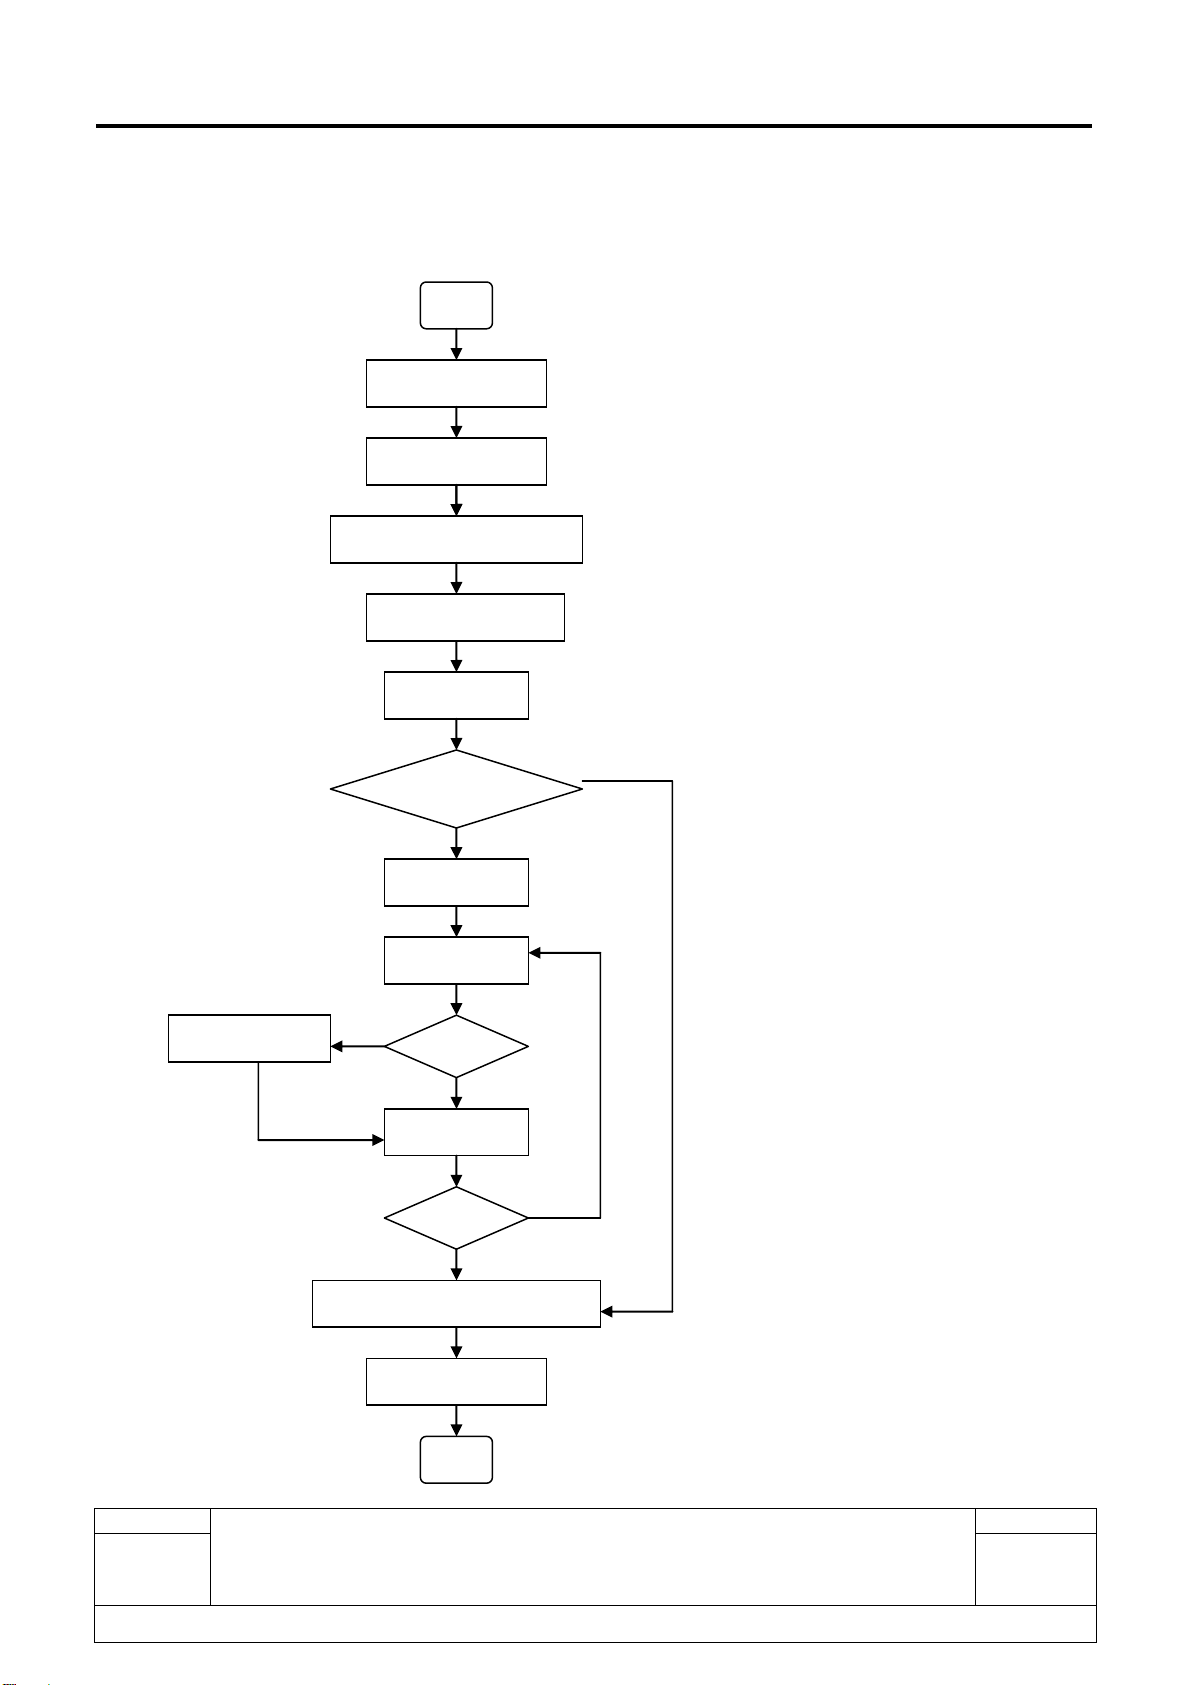
1Level 2 repair process ..............................................................................................4
2Warranty Check and Visual Inspection ...................................................................5
2.1 Warranty confirmation of L1.....................................................................................5
2.2 Visual mechanical check..........................................................................................5
2.3 Pretest........................................................................................................................6
3Battery......................................................................................................................10
3.1 Battery information ..................................................................................................10
3.2 Battery test................................................................................................................11
3.3 Battery specifications.............................................................................................12
4Software download .................................................................................................13
4.1 Equipments requested when download:............................................................13
4.2 SW download process.............................................................................................13
5 Disassembly and assembly ONE TOUCH 8058 .......................................................21
5.1 ESD Safety................................................................................................................21
5.2 Disassembly tool......................................................................................................21
5.3 Disassembly process...............................................................................................22
5.4 Reassembly Process ..............................................................................................29
5.5 Disassembly process evaluation...........................................................................29
6 Disassembly Complete..............................................................................................30
7 Level 2 repair..............................................................................................................31
8PCBA exchange.......................................................................................................32
9Other component exchange...................................................................................33
Function Test..................................................................................................................34

L2 Repair Document TCLCommunication Ltd.
Rev.
8058/8059/8053 Level 2 Repair Document
Page
1.0
4/39
All rights reserved. Transfer, copy, use or communication of this file is prohibited without authorization.
1 Level 2 repair process
Reassembly
Record in BIG
End
OK
Retest
OK
OK
Start
Visual Inspection
Warranty Check
Pretest & Failure confirm
SW Upgrade
Disassembly
L2 Repair
Retest
Function test
PCBA Replace
NG
NG
NG
Restore User Information
Back up user data

L2 Repair Document TCLCommunication Ltd.
Rev.
8058/8059/8053 Level 2 Repair Document
Page
1.0
5/39
All rights reserved. Transfer, copy, use or communication of this file is prohibited without authorization.
2 Warranty Check and Visual Inspection
2.1 Warranty confirmation of L1
S/N sticker check:
1) Power on the Tablet, accessing menu-> “Settings” -> “About Tablet” -> “Status”
2) If the S/N sticker in the back casing is not lost:
We should make sure that the S/N number MUST be the same with the one on the S/N sticker; if not,
it‟s out of warranty policy.
Humidity sensitive label
If humidity sensitive label is not good, the Tablet will be considered as out of guarantee.
1). Liquid was detected by humidity sensitive label.
2). Position of humidity sensitive sticker.
2.2 Visual mechanical check
Mechanical warranties check items:
1) Corrosion
Corrosion on the USB connector, SIM connector, and other metal surfaces。

L2 Repair Document TCLCommunication Ltd.
Rev.
8058/8059/8053 Level 2 Repair Document
Page
1.0
6/39
All rights reserved. Transfer, copy, use or communication of this file is prohibited without authorization.
2) Hole (diameter > 1mm)
Holes on any surface, including the front casing, furnished frame, battery cover, touch Lens,
keypad…
3) Bump
Bumps (diameter > 1mm) on any surface, including front casing, decorate frame, battery
cover, touch Lens, keypad, etc.
4) Scratch
Scratches (length > 3mm) on any surface, including the front casing, decorate frame, battery
cover, touch Lens, keypad, etc.
5) Distortion
Bend, twisted or crushed on the h/s, cover/casing or connectors, etc.
6) Broken
Touch broken, casing/cover broken, etc.
7) Dropped
Tear off keypad , touch lens, connectors dropped, etc.
8) Gap
External physical damage relating to abnormal use, like front case and frame opened
9) Others
Damage caused by disassembly ,wrong part assembly, loss of components
Use in abnormal environment like high temperature causing plastic melts
2.3 Pretest
1) Insert the battery.
2) Power on the Tablet.
3) If the Tablet cannot power on, visually check the condition of the battery connector. Replace it if
necessary.
4) Enter the Tablet code if necessary.
5) Enter auto test in power off mode:
6) Press 0*0-0+= in Calculator screen and then you will see the interface displaying the SW
version. Select “Auto” to start the auto test, or select “MANU” to do the MMI test manually.

L2 Repair Document TCLCommunication Ltd.
Rev.
8058/8059/8053 Level 2 Repair Document
Page
1.0
7/39
All rights reserved. Transfer, copy, use or communication of this file is prohibited without authorization.
If one of the test failed during “Auto” test mode, it will ask you “Restart?”, press “YES” to restart the
auto test from the first one and “NO” to exit the auto test, while “NEXT” to continue the auto test.
TRACABILITY
I. 1). “Auto” test mode: You can get some information such as PT, PFT, BW, MMI
and FT.
2). “MANU” mode: You can get information such as IMEI, CU-REF, PTH
(PTM), Data Code, BT address, etc.
II. Press “Pass” to continue.
TOUCH PANNEL
I. “Please draw on the yellow area”and it will show “TEST OK!”;
II. Press “Pass” to continue;
RAW DATA
Press”Pass”if the raw data function is well.
LCD
I. You will see the LCD display three colors: RED, GREEN and BLUE if it
functions well;
II. Press ”Pass”to continue.
III.You will see the LCD displays grey level if it functions well;
IV. Press “Pass” to continue;
V.You will see the LCD displays black if it functions well;
VI. Press “Pass” to continue;
VII. You will see the LCD displays white if it functions well;
VIII. Press “Pass”to continue.
IX. You will see the LCD displays grey if it functions well;
X.Press “Pass” to continue;
KEYBOARD

L2 Repair Document TCLCommunication Ltd.
Rev.
8058/8059/8053 Level 2 Repair Document
Page
1.0
8/39
All rights reserved. Transfer, copy, use or communication of this file is prohibited without authorization.
I. Press the key displayed on the screen. The key on the screen will darken when
you press it if it functions well;
II. Press “Pass” to continue.
LCD BACKLIGHAT
I. The screen backlight will be flashing ,meanwhile it will ask”Is screen Backlight
flashing?”
II. Press “Pass” to continue.
MAIN CAMERA
I. You will see the LCD displays the picture that back camera catch if it functions
well;
II. Press “Pass” to continue;
FRONT CAMERA
I. You will see the LCD displays the picture that front camera catch if it functions
well;
II. Press “Pass” to continue.
AUDIO
I. You will hear a some of voice record if it functions well;
II. Press ”Pass”to continue;
MIC
I. You can press”Start “and speak loudly to record the sound
II. Press “Stop and play”to hear what you said before
III.Press “Pass”if it functions well.
Accessories
I. You will hear one record in left discrete; Press ”Pass”to continue.
II. You will hear one record in right discrete; Press ”pass”to continue;
IV.Press””Start “and speak loudly to record the sound

L2 Repair Document TCLCommunication Ltd.
Rev.
8058/8059/8053 Level 2 Repair Document
Page
1.0
9/39
All rights reserved. Transfer, copy, use or communication of this file is prohibited without authorization.
V. Press “Stop and play”to hear what you said before
VI.Press “Pass”if it functions well.
VII. Remove the headset if it functions well.
FM
I. You will hear the sound from on channel when you insert earphone if it
functions well;
II. Remove the earphone then press “Pass” to continue;
USB/ CHARGER
I. Insert USB cable according to instruction, then it will say “USB:OK
Charger :OK” ;
II. Remove USB cable according to instruction
III.Press “Pass” to continue;
G-SENSOR
Put the Tablet “towards up”, “face down”, “left”and “right”, towards “down”
according to instruction;
MEMORY CARD
I. Insert memory card according to instruction and the Tablet will detect it if it
functions well;
BATTERY TEMPERATURE
I. It will display “Temp range: 20~50”, “current is xxx” and the value of “Battery
content”/ “Battery Voltage” if it functions well;
II. Press ”Pass”to continue;
BLUETOOTH
I. Bluetooth will search automatically and it will display device address if it
functions well;
II. Press ”Pass”to continue;
WIFI

L2 Repair Document TCLCommunication Ltd.
Rev.
8058/8059/8053 Level 2 Repair Document
Page
1.0
10/39
All rights reserved. Transfer, copy, use or communication of this file is prohibited without authorization.
I. It will search for WIFI hotspot and display searched result on the screen if it functions well;
II. Press ”Pass”to continue;
HDMI
I. Follow the guidance “Please connect the TV with HDMI cable”
II. Press “Pass” if it functions well.
BATTERY CTRL
I. It will display” The battery level should be 30~80%.” “Battery level is xxx%.,OK”
if it functions well.
II. Press ”Exit”to continue.
EXIT
You will display the Calculator screen [0*0-0+=] again, and the test is done.
3 Battery
3.1 Battery information
1) Battery picture

L2 Repair Document TCLCommunication Ltd.
Rev.
8058/8059/8053 Level 2 Repair Document
Page
1.0
11/39
All rights reserved. Transfer, copy, use or communication of this file is prohibited without authorization.
2) Battery feature
3) Note
I. Standard change
0.5CmA=1420Ma
Full charge condition: Constant current 0.5CmA.Constant voltage 4.2V to 0.01CmA
for 3.0 hours in all at 25±2℃
II. Long time storage
If stored for a long time(exceed three months),the cell should be stored in drying
and cooling place. The cell‟s storage voltage should be 3.7-3.9v.
III. Battery parts need welding when repairing.
3.2 Battery test
1) Below table describes the various events related to a standard charger connected to a
Tablet.
PIXI3-7 KD 8058/8059
Tablet status before
charger connected
ON
OFF
During charging
Display lights up and following battery icon displayed:
Sequential icon flashing:
Model
Element
Capacity
Battery
Lithium
2820mAh

L2 Repair Document TCLCommunication Ltd.
Rev.
8058/8059/8053 Level 2 Repair Document
Page
1.0
12/39
All rights reserved. Transfer, copy, use or communication of this file is prohibited without authorization.
After charging
(charger connected)
Following fixed battery icon display :
Table - Battery charge status on handset
2) If the display does not light on or battery icon does not flash when the charger or the
Tablet‟s charge function is defective with mechanical or electronics.
In this case:
a) Replace the charger to charge.
■Confirm it works correctly or not.
b) Check the Charge connector on the Tablet.
If it is damaged, repair the Tablet.
3.3Battery specifications
1) Specification
Item
Specification
Remarks
Typical capacity
2820mAh
Discharge:0.2CmA
cut-off voltage:3.0V
Minimum capacity
2840mAh(Cell)
2820(Battery)
Nominal voltage
3.7V
Charge Voltage
4.2V

L2 Repair Document TCLCommunication Ltd.
Rev.
8058/8059/8053 Level 2 Repair Document
Page
1.0
13/39
All rights reserved. Transfer, copy, use or communication of this file is prohibited without authorization.
Cell discharge cut-off voltage
3.0V
Operating temperature
0~+55℃
Charging
-20~+60℃
Discharging
Storage temperature
-20~+60℃
Less than 1 month
-20~+45℃
Less than 6 months
2) Battery configuration
Items
criteria
remarks
Semi-manufactured
cell
PR-3079101
TCL
PCM
PIX07-V3
TCL
Connector/Wire
UL3302 24AWG/26AWG
/
4 Software download
Model 8058/8059 requires for SD card upgrade, and model 8053 requires for SUGAR
upgrade.
4.1 Equipments requested when download:
⑴A Tablet with full power;
⑵PC with windows system;
⑶A USB cable.
4.2 SW download process
SD card upgrade for model 8058/8059
I. Insert the SD card to the tablet
II. Copy the FOTA software package to the SD card

L2 Repair Document TCLCommunication Ltd.
Rev.
8058/8059/8053 Level 2 Repair Document
Page
1.0
14/39
All rights reserved. Transfer, copy, use or communication of this file is prohibited without authorization.
III. Power off the tablet
Press the power and volume up in the meantime for about 3S, the tablet will go into the
robot interface.
IV.Press power key about 2s, and then press volume up 3s in the meantime, go
into to recovery mode.
Press volume up or down to choose: apply update from SD card”
V. Press “updateBCP TO BC0?8058?.zip”to update

L2 Repair Document TCLCommunication Ltd.
Rev.
8058/8059/8053 Level 2 Repair Document
Page
1.0
15/39
All rights reserved. Transfer, copy, use or communication of this file is prohibited without authorization.
VI.SW Upgrade process finished

L2 Repair Document TCLCommunication Ltd.
Rev.
8058/8059/8053 Level 2 Repair Document
Page
1.0
16/39
All rights reserved. Transfer, copy, use or communication of this file is prohibited without authorization.
Upgrade tool for 8053
Note:The upgrade process of 8053 are consists of two parts: Sugar upgrade and
preloaded Kurio process.
Need to preloaded Kurio after Sugar upgrade.
Step 1 :Sugar upgrade
Open “Sugar MTK_SP V3.4.5”(you can get the latest version from TS
websithttps://css.tclmobile.cn/). “Sugar MTK_SP”login window looks like follow picture;
Input „User name‟and „Password‟, and then press “OK”to log on.
1. Click the „Get version‟ button, it will display the SW version , IMEI, Cu ref etc of the
handset,

L2 Repair Document TCLCommunication Ltd.
Rev.
8058/8059/8053 Level 2 Repair Document
Page
1.0
17/39
All rights reserved. Transfer, copy, use or communication of this file is prohibited without authorization.
1) Select the product models –“8053”;
1) Press “Get Version”button, power off the handset and connect it with PC by USB cable.

L2 Repair Document TCLCommunication Ltd.
Rev.
8058/8059/8053 Level 2 Repair Document
Page
1.0
18/39
All rights reserved. Transfer, copy, use or communication of this file is prohibited without authorization.
2 Click the “Upgrade”button. Online upgrade process starting:

L2 Repair Document TCLCommunication Ltd.
Rev.
8058/8059/8053 Level 2 Repair Document
Page
1.0
19/39
All rights reserved. Transfer, copy, use or communication of this file is prohibited without authorization.
3 Upgrade finished:

L2 Repair Document TCLCommunication Ltd.
Rev.
8058/8059/8053 Level 2 Repair Document
Page
1.0
20/39
All rights reserved. Transfer, copy, use or communication of this file is prohibited without authorization.
Step 2 : Preloaded Kurio process
1. Format your SD card.
2.unzip the APK package and copy the below four folder to the SD card.
Note: Please use the SD card storage which higher than 8GB to avoid the unzip file is
too large to add.
3. Power on the device.
Insert the SD card to the tablet and it will installing pre-loaded apps automatically.
This manual suits for next models
3
Table of contents
Other TCL Cell Phone manuals