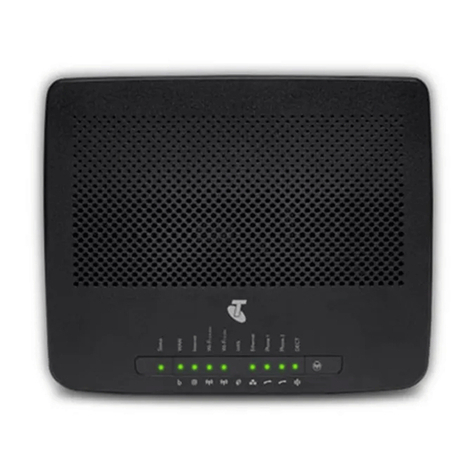
Telstra TG797n V3 Assembly instructions

GETTING TO
KNOW YOUR
ADSL BUSINESS
NETWORK GATEWAY

LET’S GET THIS SHOW
ON THE ROAD
This guide is designed to help you get started and
get the most out of your Telstra Business Broadband
service. Please make sure you keep it in a safe place,
as you may need to refer to it again at a later date -
we suggest you save a copy to your computer.
As a Telstra Business Broadband customer you’ll
be able to access a range of web and mail services,
including state-of-the-art security options,
account management tools and flexible plans.
2

WHAT’S
INSIDE
03 Getting started
07 Getting connected
09 Installing ADSL filter/splitter
12 Using business mail
16 Problem solving
29 What it all means
2

LET’S GET
STARTED
YOUR PACKAGE CONTAINS THE FOLLOWING:
• Business Network Gateway - TG797n V3
• Power adapter
• Yellow Ethernet cable
• Grey telephone cord
• Filter/splitter
• Self Install CD
• Telstra Business Broadband welcome letter
• Wireless security card
MAKE A NOTE OF YOUR TELSTRA DETAILS:
Email Address
(This is your Business Mail address)
Wi-Fi SSID
(This is the name of your wireless network)
Wi-Fi WPA
(This is the unique wireless security key set during install)
Username for Broadband Access
(This is the username for configuring your router to access to the internet)
Password for Broadband Access
(This is the password for configuring your router to access the internet)
3 4

YOUR ADSL BUSINESS
NETWORK GATEWAY
TG797N V3:
1
3
5
2
4
6
7
8
USB Port
DSL Port
(for Grey telephone cord)
Main power/reset
Ethernet Ports
(for Yellow Ethernet cables)
3 4

INDICATOR LIGHT DESCRIPTION
1Ethernet
Green LED Solid Green - Ethernet connection
detected, no activity.
Flashing Green - Ethernet connectivity
detected and network traffic is ongoing.
Off No Ethernet connection detected.
2Wireless
Green LED
Solid Green - A wireless device is paired,
no activity.
Flashing Green - A wireless device is
paired and network traffic is ongoing.
Off No device is paired.
3Voice
Green LED Solid Green - VoIP service is registered
and no traffic running.
Flashing Green - VoIP service is registered
and traffic is running.
Off No serviced is registered.
4WAN
Green LED Solid Green - DSL line is synchronised
and working.
Slow Flashing Green - Trying to detect a
DSL carrier signal.
Fast Flashing Green - DSL carrier
detected and trying to synchronise.
5 65 6

5Internet
Green LED
Red LED
Solid Green - Internet connected,
no activity.
Flashing Green - Internet connected
and activity is ongoing.
Off No Internet is connected.
Solid Red - Internet connection failed.
6DECT
Green LED
Orange LED
Solid Green - DECT is paired and ready
for use.
Off DECT is not paired.
Flashing Orange - DECT is in pairing mode
and is registering.
7WPS
Green LED
Red LED
Solid Green - WPS setup successful.
Off Idle mode.
Fast Flashing Red - WPS error detected.
Intermittent Flashing Red -
WPS session overlap.
8Status/Eco Power
Green LED
Red LED
Blue LED
No LED
Solid Green - Power on, all required
services are up and running.
Flashing Red - Device is booting up.
Solid Red - One of the required services
has failed.
Solid Blue - Device is in Eco mode (Wi-Fi
disabled) and is operating normally.
Power off.
5 65 6

TIPS FOR SETTING UP YOUR WIFI OPTIONAL
• You will need to have your wireless security card with you when you
complete the set-up process.
• The wireless card contains default settings for your SSID and Wi-Fi WPA
(wireless security key).
• If you wish to change the SSID and Wi-Fi WPA (wireless security key) details
to something that is easier for you to remember, you can select to do this
as part of the Self Install CD. Make sure you write these new details at the
beginning of this guide for safe keeping.
Please note: if you factory re-set your device at any stage, the Wi Fi SSID and Wi Fi
WPA (wireless security key) will return to the original default settings supplied on your
wireless security card.
Your username and password for broadband access will also be factory re-set meaning
you will need to re-enter these details to connect to the internet.
GETTING
CONNECTED
Once the self install CD has been inserted into your
computer, follow the prompts to complete installation.
You will be guided through the following steps:
1. Setting up your new router
2. Router Conguration
3. Connecting the router to the internet
4. Setting up your Wi-Fi (optional)
5. Installing a Mobile Broadband USB modem (Optional)
Important: If you are using a telephone on the same line as your Telstra Business
Broadband service, you will need to install a filter/splitter.
This also applies to any other devices, such as a fax, answering machine, dial-up
modem, alarm system and FOXTEL digital tuner. Turn to page 9 for instructions.
7 8

TIPS FOR INSTALLING A MOBILE BROADBAND
USB MODEM OPTIONAL
As part of the Self Install CD you will have the option of connecting a
Mobile Broadband USB Modem to your ADSL Business Network Gateway.
• If your device is not connected to the internet via ADSL, the USB device
will enable you to stay connected to the internet via the Next G®network.
Note: Mobile broadband usage charges will apply.
• Before installing your mobile broadband device you will need to ensure that
it is compatible. The Self Install CD will conrm which options are available
to you. You will also need to have your SIM PIN (provided with the USB device)
ready when installing the device.
7 8

INSTALLING ADSL
FILTERSPLITTER
FOR A STANDARD PHONE SOCKET
1. Connect lter/splitter to phone
• Disconnect the phone cable from the wall socket and connect it
into the socket labelled ‘Local Phone’ on the lter/splitter.
2. Connect lter/splitter to wall socket
• Connect the short cable from the socket labelled ‘Wall Socket’
on the lter/splitter to the wall socket.
Step 1
Step 2
3. Ensure phone line is connected
• After you have installed the lter/splitter, we recommend that you test the phone to
make sure it works the same way as it did before the installation.
• To test your phone connection check if you have a dial tone and that there is no
interference on your phone line.
• If you don’t have a dial tone or there is interference on the line, please review and
repeat the steps above. If your router will be sharing the same socket as the phone,
you can plug it into the socket on the lter/splitter marked ‘ADSL Modem’ when the
Install CD asks you to. Otherwise, just leave this socket empty.
9 10

FOR A WALLMOUNTED PHONE AND SOCKET
You will need a special lter/splitter if any wall-mounted phones
share the same phone number as your ADSL service.
1. Remove phone from wall
• Apply rm upwards pressure on the telephone until it is released
from the mounting screws on the wall plate.
• Then remove the short cable from the wall plate, leaving it attached
to the phone.
9 10

2. Connect lter/splitter to wall socket
• Plug the short cable (labelled ‘Line’) on the back of the lter/splitter into
the socket on the wall plate.
• Next, align the mounting screws on the lter/splitter with the mounting
screws on the wall plate. Then slide the lter/splitter downward until it
stops sliding and is secured rmly.
3. Connect phone to lter/splitter
• Plug the short cable on the phone into the socket on the front of the
lter/splitter that is labelled ‘Local Phone’.
• Next, align the mounting holes on the phone with the mounting screws
on the lter/splitter. Then slide the phone downward until it stops sliding
and is secured rmly.
• Finally, to connect the router to the lter/splitter, plug it into the socket
labelled ‘ADSL Router’
• The wall phone lter/splitter also includes an additional socket for other
phone devices.
11 12

BUSINESS MAIL POP
• Business Mail POP is a ‘store and forward’ mail service,
where messages sent to your email address(es) are received
and stored on your behalf in individually addressed mailboxes
(customer_name@companyname.com.au).
• With Business Mail POP your mail is stored on servers within Telstra’s partner
Data Centre. The messages are then forwarded (downloaded) to your email
client software upon request – via an authenticated session based on a
username and password – using the industry standard mail protocol.
BUSINESS MAIL POP FEATURES
• Your service includes ten free Business Mail POP mailboxes. Once your
Business Mail service is set up (refer to page 14 to set up Business Mail), it can
be accessed through the same computer all the time (subject to outages and
routine maintenance) or at any computer with internet access by using the
Webmail function.
• Each POP mailbox comes with basic virus and SPAM ltering. This will reject
known unsolicited bulk email SPAM, messages that may contain viruses or
other potentially malicious content “malware”, and certain attachments such
as .exe, .bat, .pif and .cmd les.
This will prevent potentially harmful content not yet handled by
virus ltering updates from reaching your inbox or computer.
There are no changes required to the computer or email programs to utilise
these lters, as they operate upon the creation of the POP mailbox in Mission
Control - Telstra’s online portal for business mailbox management.
USING
BUSINESS MAIL
Important: These filters do not provide complete protection and may reject some email
which is legitimate. If you are seeking a higher level of protection and the added benefit of
features such as calendar, meeting planner and other email options, contact Telstra on
13 2000 or refer to our T-suite®product offerings at http://www.telstra.com.au/T-suite
11 12

• POP mailboxes also come with web access via ‘desk control’ so that
you can remotely access your email.
• Go to https://deskcontrol.pm.telstra.com for this option
• The Business Mail POP service is designed to only handle the receipt,
storage and downloading of email messages. To send email, a SMTP
facility is required which Telstra provides. This is available by setting
your email client to smtp.telstrabusiness.com or an alternate address
we may specify.
Important: Telstra may vary the size and volume of emails that may be sent using the
Telstra Business SMTP Mail Server to reduce the impact of SPAM.
13 14

HOW TO SET UP BUSINESS MAIL SERVICE
The Install CD will guide you through the set up for your
local email client.
1. Creating your Business Mail POP mailboxes in Mission Control
• You will need to have your Business Mail welcome letter with you
in order to set up your email mailboxes. This letter will be sent to
the email address or fax you nominated on your Telstra Business
Broadband order. It is important that you specied an active email
account that would not have been affected in the transition from your
old email to your new email address.
If you have not received this letter, please contact Telstra Business
Technical Support on 13 2999 to have a new letter issued.
• When you have your Business Mail welcome letter, go to the website
https://missioncontrol.pm.telstra.com and follow the instructions in
your Business Mail welcome letter.
13 14

2. Accessing your Business Mail POP Mailboxes
To access your newly created mailboxes, you have two options:
• Webmail
To access your mailbox using Webmail visit deskcontrol.pm.telstra.com and
enter the mailbox name and password created as part of the mailbox set up.
• Mail Client
1. Go to https://missioncontrol.pm.telstra.com
2. Go to the Help Me tab
3. Click on Help Documents
4. Click on Business Mail
5. Open the Business Mail Quick Reference Guide
(or Administrator Guide for in depth instructions)
6. Follow the instructions provided
Important: if you are not an experienced computer user, you may need some
assistance from your IT Specialist when setting up your email client. Otherwise,
contact your account representative to discuss our Business Support Services.
15 16

HAVING TROUBLE GETTING CONNECTED?
• Turn everything off, count to ve, and then turn it on again. The
technical term for this is ‘cycling the equipment’. Please remember,
where possible, to follow the correct procedure for turning off your
computer, router or other equipment, according to the instructions.
• Check that your equipment is set up correctly. Carefully check that
every plug and wire is in the right place, the right way round, and is
switched on.
FILTERING IS NECESSARY
• If you have ADSL installed, you need lters to attach to the outlets
that don’t provide the signal to your ADSL router. As all voice
conversations take place below 4 KHz, the lters are built to block
everything above 4 KHz, preventing the data signals from interfering
with standard phone calls.
• Any of the following devices that share the same telephone line
as your Telstra Business Broadband service need to have a lter/
splitter connected.
You’ll need a lter/splitter for every:
• Telephone
• Cordless phone base unit
• Answering machine
• Fax machine
• Internal or external dial-up modem
• FOXTEL Digital uplink line
PROBLEM
SOLVING
15 16

• Each lter/splitter should be connected between the wall outlet and the
device in question. The only thing that doesn’t need a lter is your router,
unless it’s sharing an outlet with a phone or other device.
• You’ll also need to make sure there are no extension leads on any of the
devices connected to the ADSL phone line. Extension cords often cause
more interference than a broadband ADSL connection can manage.
• If you have two telephone lines (that is, two different telephone
numbers), only devices on the same line as the router will need ltering.
Anything connected to the other line can stay unltered.
NETWORKING TROUBLE
• If your computer is part of an existing network (eg LAN), this Install CD may
change some of your computer’s network settings (eg DHCP, DNS, Proxy
settings etc).
• Please ensure that any computers that you want to connect to your
Telstra Business Broadband service via this Install CD are not part of
an existing network.
• Computer networks require an IP address to be allocated to your computer’s
network card. When connecting to Telstra Business Broadband using
the Install CD, you must allow the router to allocate you an IP address
automatically – this is known as a dynamic IP address (or DHCP).
• If you are not sure how your business network is set up, and you are not sure if
changing these settings will affect your existing network, we recommend that
you engage your IT Specialist or a Telstra IT specialist before running this CD
and installing Telstra Business Broadband.
• Telstra Business offers a range of specialist IT assistance through its Business
Support service. You can apply for Business Support by contacting your Telstra
Account Representative or calling 1800 655 744.
Please Note: If you have more than four outlets on the line or any ‘hardwired’ devices,
like a back-to-base alarm or wall phone that doesn’t come off the wall, you will need to
have a central splitter fitted as part of an onsite installation.
17 18

THIRDPARTY WIRELESS MANAGEMENT SOFTWARE
• You will need to close or disable any third-party wireless management
software. If you leave it enabled you may not be able to successfully install
your Telstra Business Broadband Service with a wireless connection.
• If you require assistance, please call Telstra Business Technical Support
on 13 2999.
HAVING ISSUES WITH YOUR ROUTER?
If you’re having trouble with your router, try to establish what the issue
may be:
• Check the power supply from the socket to the router is plugged in properly
and switched on at the wall.
• Check the phone service to see if you get a dial tone, and if you can make and
receive calls. If not, you may have a problem with your phone line.
For assistance contact Telstra Business Technical Support on 13 2999.
This should give you a good idea of whether the problem is in the router or
elsewhere. A few examples of issues are provided below and on the
following pages.
If the light on the router is not solid green when using your
Ethernet connection:
• The Ethernet light on your router will be solid green when connected and will
flash when communicating with your computer.
• If the Ethernet light on the router is not solid green or ashing, please check
that the Ethernet cable is plugged in correctly.
• If the light still does not show a solid green or ashing light, for assistance
call Telstra Business Technical Support on 13 2999.
17 18

The Internet Light on the router will not come on:
The Light on your router will be solid green when your ADSL line is connected
and synchronised. If it isn’t solid green, then there could be an issue with the
ltering of your telephone devices, or a problem with the telephone line at
your exchange.
Please check:
1. That every telephone device sharing the line with your ADSL router has a
lter on it. Affected devices can include any telephones, dial-up computer
modems (including internal modems), fax machines, answering machines,
back-to-base alarm systems and FOXTEL Digital installations.
2. That you have not connected the router into a ltered socket.
3. Whether there are any telephone extension leads connecting any device on
the telephone line, including your ADSL router (extension leads can cause
problems on the line).
4. Whether there is work being done on your line at the exchange. Please wait
30 minutes and check again.
If the light still does not come on solid green, call Telstra Business Technical
Support on 13 2999 and advise that you may have a ‘Sync Fault’.
19 20
Other manuals for TG797n V3
1
Table of contents
Other Telstra Gateway manuals

Telstra
Telstra Gateway Max User manual

Telstra
Telstra bigpond velocity User manual

Telstra
Telstra ULTIMATE Gateway User manual

Telstra
Telstra nbn FTTC User manual

Telstra
Telstra T-GATEWAY User manual

Telstra
Telstra T-GATEWAY User manual

Telstra
Telstra DEVG2020 User manual

Telstra
Telstra Elite User manual
Telstra
Telstra TG797n V3 User manual
Telstra
Telstra Elite User manual