manuals.online logo
Brands
  1. Home
  2. •
  3. Brands
  4. •
  5. Tennsco
  6. •
  7. Indoor Furnishing
  8. •
  9. Tennsco STK-151872-1 Instruction Manual

Tennsco STK-151872-1 Instruction Manual

RETAIN INSTRUCTIONS FOR FUTURE REFERENCE!
ASSEMBLY INSTRUCTIONS & PARTS MANUAL #1050702
Tennsco Corp., Dickson, TN 37056-1888  (615) 446-8000
UNASSEMBLED SINGLE TIER LOCKERS
SINGLE WIDE UNIT
LIMITED WARRANTY
Tennsco warrants goods purchased hereunder to be free of defects in materials and workmanship for a period of one (1) year from the date of shipment, hereunder.
This warranty shall not apply in the event goods are damaged as a result of misuse, abuse, neglect, accident, improper application, modification or repair by
persons not authorized by Seller, where goods are damaged during shipment, or where the date stamps on the goods have been defaced, modified or removed.
NLESS CONSIDERED NENFORCEABLE OR NLAWF L NDER APPLICABLE LAW:
a. ALL IMPLIED WARRANTIES, INCL DING B T NOT LIMITED TO WARRANTIES OR MERCHANTABILITY AND FITNESS FOR A PARTIC LAR
P RPOSE ARE HEREBY EXCL DED:
b. B YERS REMEDY, IF ANY, FOR ANY DEFECTIVE GOODS SHALL BE LIMITED TO A REF ND BY SELLER OR REPLACEMENT OF THE GOODS
AT SELLERS OPTION, AND SHALL IN NO EVENT INCL DE DAMAGES OF ANY KIND, WHETHER INCIDENTAL, CONSEQ ENTIAL OR
OTHERWISE.
NO GOODS ACCEPTED FOR RET RN WITHO T PRIOR APPROVAL. Seller shall have the right to inspect any goods claimed to be defective at Buyers place
of business or require Buyer to return the goods to Seller for inspection on Sellers premises. Transportation charges covering returned goods will be borne
by Seller only if such goods are proven to be defective, are covered by this warranty and are returned within the warranty period stated above.
TENNSCO Corp., P.O. BOX 1888, DICKSON, TN 37056-1888
(615) 446-8000 or (866) 446-8686 (toll free)
Website: www.tennsco.com E-mail: [email protected]
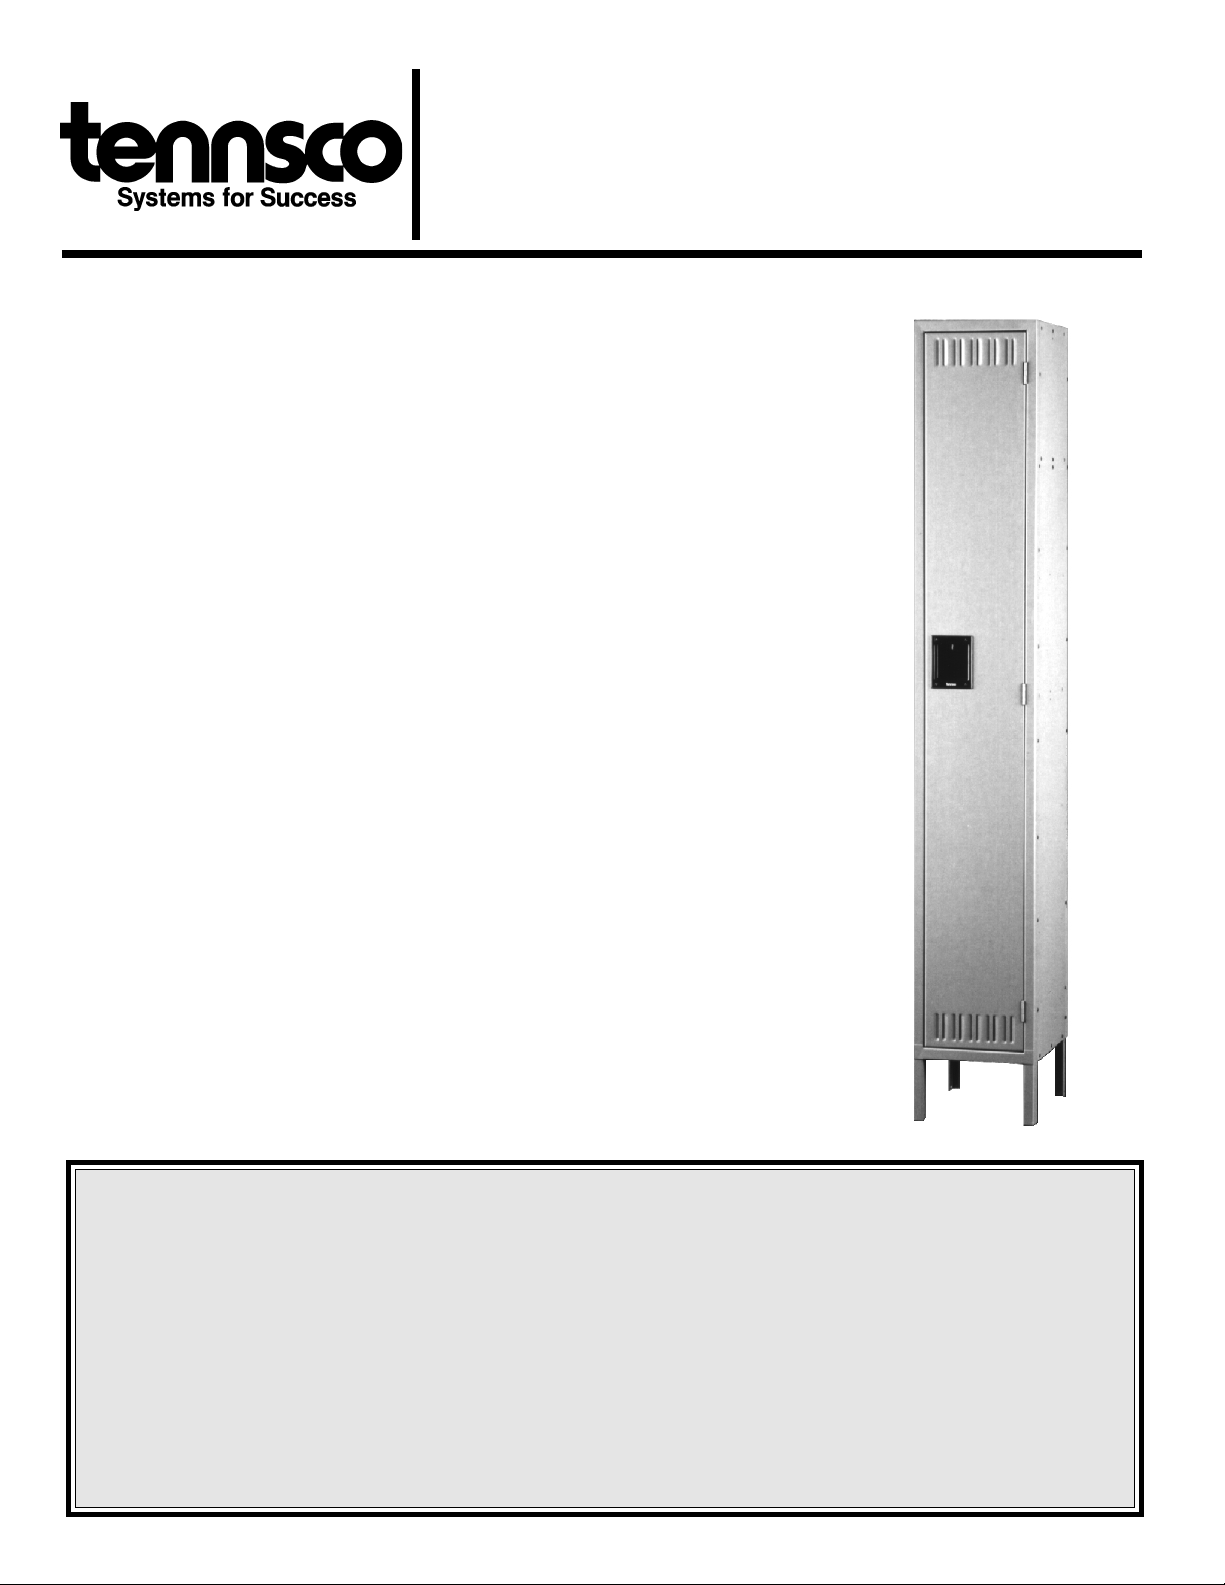
Tennsco single tier lockers are designed for se by single
individ als for the sec rity of clothing and personal property. One-
or three- wide nits are available in 60" or 72" heights, with or
witho t legs. Optional opening sizes are 12", 15", 18", or 24" wide
by 12", 15", 18", 21", and 24" deep. Heavy ga ge steel
constr ction with baked on enamel finish ass res years of tro ble
free service, even nder the most demanding sit ations. All nits
have a top shelf and three coat hooks in each compartment; nits
18" deep and deeper provide a coat rod. Doors are eq ipped with
painted locking channels which are completely c shioned for silent
operation, as well as recessed handles that allow the se of
standard size padlocks, b ilt-in key locks and combination locks
(all optional) for a fl sh, clean appearance.
Basic Construction:
All models are constr cted of 16 ga ge steel frames and doors
with a 24 ga ge door stiffener and 24 ga ge body components.
Locking channels are 20 ga ge with baked on enamel finish and
q iet-action spring loaded latches. Recessed handles are black
painted steel. Doors are lo vered for ventilation.
GENERAL SAFETY INFORMATION
Some parts may have sharp edges. CARE m st be taken when
handling vario s pieces to avoid inj ry. For safety, wear a pair of work
gloves when assembling or performing any maintenance on lockers.
1. All reference numbers refer to the illustrations in
Figure 1, the door lock detail, and the chart on
the back cover. This is to help you identify the
various parts as they
are mentioned.
3. Bolt left side
(Ref. o. 2) to the
back so that side flange
fits around back.
ASSEMBLY OF SINGLE TIER LOCKERS -- SINGLE WIDE UNIT
Assemble lockers individ ally or in gro ps of three. Do not tighten bolts ntil nit is
completely assembled. Tools req ired: 11/32" n t driver (11/32" socket may be s bstit ted).
4. Bolt shelf
(Ref. o. 4) to back
and side. Attach coat
hooks (Ref. o. 5) as shown.
(For lockers 18" and deeper, bolt
shelf in place, then attach side coat
hook through third and fourth holes
below shelf). Attach top and bottom to
side and back, as shown above.
5. Bolt right side (Ref. o. 7) to the
back so that side flange fits
around back. Also attach
to top, bottom and shelf.
Attach remaining
coat hook.
6. If the locker has legs, insert the
leg into the corner between
the bottom and the side.
Bolt the leg to the
side using two
#8-32 x 1/2
bolts
and
#8-32
nuts.
7. Place door
and frame
assembly (Ref. os.
8 & 9) over the locker
body and secure with bolts
and nuts. Make certain that body
sides are inside frames.
Bottom
Top
Left side
Do not bolt
through rear
leg holes yet.
Bottom
Shelf
Top
Top
Bottom
Right side
Door & Frame assembly
Shelf
Top slots
Back
2. Place back
(Ref. o. 1) on a
protected flat surface so that
the flanges face upward. If
available, place the unit on a pair of
"saw horses" for easier
installation.
Back
Care must be taken to assure that lockers
are set plumb and true before anchoring.
FIGURE 1
1
23
4
5
6
7
10
9
6
11
12
13
14
1
19
17
16
15
20
14
21
DOOR-LOCK DETAIL
8. If joining units side by
side, temporarily install
only one bolt and nut in
the frame at the end of
unit.
9. Stand units upright
and place in desired
location. Remove
temporary bolts in
frames and bolt
adjacent units
together through
frames.
NOTE: If the bolts
are not removed
before the frames
are joined side by
side, the frames will
have a 1/8" gap
between them.
10. Place non-slotted end of coat rod (Ref. o. 10)
over projecting tab at top of left coat hook.
Slide the slotted end of the coat rod over the
projecting tab in the right coat hook and turn 90
degrees to secure it.
11. Anchor units to wall or floor. The units are not
intended to stand free and may topple if not
secured. (Units standing back to back should
be bolted together.)
12. If units are not pre-numbered, optional number
plates (Ref. o. 11) may be attached with two
#6 x 5/16 drive screws or push plugs (Ref. o.
12).
REPLACEMENT PARTS
We make every effort to ensure that all units ship complete and arrive undama ed. However, should your
unit contain missin or dama ed parts, replacements may be obtained directly from us. To obtain proper
replacement parts, follow the instructions below, or fill out the form at www.tennsco.com/partsorder.html.
l
l
l
l
TO OBTAIN PROPER REPLACEMENT PARTS, PLEASE PROVIDE THE FOLLOWING INFORMATION:
Model Number Purchase Date
Description of part(s) needed and part Your company name
number(s) as shown in Parts List (above) Contact person's name
Color (i e Medium Grey, etc ) Who the product was purchased from
Was item missing, or was it damaged?
Tennsco Corp., P.O. Box 888, Dickson, TN 37056- 888 E-mail address: [email protected]
Customer Service: (866) 446-8686 Fax: (866) 445-7260
If requesting parts by telephone, ask for customer service and have as much of the above information ready as possible.
PART NO.
DESCRIPTION QUANTITY
1 Back kLSTB-wwhh 1
2 Left side kLSSL-ddhh 1
3 Rear leg LRL-1 2
4 Shelf kESL-wwdd 1
5 Coat hook LCH-1 3
6 Top/Bottom kLTB-wwdd 2
7 Right side kLSSR-wwhh-x 1
8 Door frame assembly kLSFA-wwhh-x 1
9 Locker Door kLSTD-wwhh 1
10 Coat rod (in units 18" or deeper only) kLCR-ww 1
11 Number plate LNP-3 1
12 Push plug LPP-1 2
13 Latch and spring LL-3 3
14 Bumper LB-1 2
15 Dart clip LDC-1 2
16 Locking channel LLCA-1 1
17 Lock receiver LPR-2 1
18 Reinforcement tab LRT-1 1
19 Recessed handle ( painted steel ) LRH-2 1
or Recessed handle ( plastic ) LRH-1 1
or Recessed handle (stainless steel ) LCH-1 1
20 Logo plate LPN-2 1
21 Tennsco nut driver TOOL-2 1
REF. NO.
k Part No. is composed of prefix shown plus combination of opening width, depth and height. Door frame assemblies
require a further suffix (x) of either 1 or A. 1 indicates frame with legs; A indicates frame without legs.
For example: A door frame assembly for locker STK-151872 with legs would be Part No. LSFA-1572-1. The door
assembly alone without the frame would be Part No. LSTD-1572 for the same locker.
l
l
l
l
1
23
4
5
6
7
10
6
9
11
12
17
16
15
20
14
21
1
19
13 14

This manual suits for next models

1

Other Tennsco Indoor Furnishing manuals

Tennsco DWR-6618 Instruction Manual

Tennsco

Tennsco DWR-6618 Instruction Manual

Tennsco 1872 Instruction Manual

Tennsco

Tennsco 1872 Instruction Manual

Tennsco 1470RH Instruction Manual

Tennsco

Tennsco 1470RH Instruction Manual

Tennsco Sliding Door Jumbo Storage Cabinet JSD2478SU Instruction Manual

Tennsco

Tennsco Sliding Door Jumbo Storage Cabinet JSD2478SU Instruction Manual

Tennsco RGL-1236S User manual

Tennsco

Tennsco RGL-1236S User manual

Tennsco 1470 Instruction Manual

Tennsco

Tennsco 1470 Instruction Manual

Tennsco J1878A-N Instruction Manual

Tennsco

Tennsco J1878A-N Instruction Manual

Tennsco EB-12 Instruction Manual

Tennsco

Tennsco EB-12 Instruction Manual

Tennsco Standard Combination Cabinet 7220 Instruction Manual

Tennsco

Tennsco Standard Combination Cabinet 7220 Instruction Manual

Tennsco CC-30 Instruction Manual

Tennsco

Tennsco CC-30 Instruction Manual

Tennsco WELDED 3-PERSON LOCKER Instruction Manual

Tennsco

Tennsco WELDED 3-PERSON LOCKER Instruction Manual

Tennsco B-8400 User manual

Tennsco

Tennsco B-8400 User manual

Tennsco 3070 Instruction Manual

Tennsco

Tennsco 3070 Instruction Manual

Tennsco Stackable Workbench Drawer Unit Instruction Manual

Tennsco

Tennsco Stackable Workbench Drawer Unit Instruction Manual

Tennsco J2478A-N Instruction Manual

Tennsco

Tennsco J2478A-N Instruction Manual

Tennsco Z-Line Steel Shelf Unit Instruction Manual

Tennsco

Tennsco Z-Line Steel Shelf Unit Instruction Manual

Tennsco 2476 Series Instruction Manual

Tennsco

Tennsco 2476 Series Instruction Manual

Tennsco Imperial Shelving 3630 Instruction Manual

Tennsco

Tennsco Imperial Shelving 3630 Instruction Manual

Tennsco BK6-121812-1 Instruction Manual

Tennsco

Tennsco BK6-121812-1 Instruction Manual

Tennsco ESP-1236 Instruction Manual

Tennsco

Tennsco ESP-1236 Instruction Manual

Tennsco 1276 Series Instruction Manual

Tennsco

Tennsco 1276 Series Instruction Manual

Tennsco 1870RH Instruction Manual

Tennsco

Tennsco 1870RH Instruction Manual

Tennsco Z-Line User manual

Tennsco

Tennsco Z-Line User manual

Tennsco 1870 Instruction Manual

Tennsco

Tennsco 1870 Instruction Manual

Popular Indoor Furnishing manuals by other brands

Premium Poly Patios Garden Classic GCLT0044D Assembly Directions

Premium Poly Patios

Premium Poly Patios Garden Classic GCLT0044D Assembly Directions

Uplift Desk CHR455 instructions

Uplift Desk

Uplift Desk CHR455 instructions

Progressive DRIFT PRO user manual

Progressive

Progressive DRIFT PRO user manual

Kinfine HOMEPOP K6699 Assembly instructions

Kinfine

Kinfine HOMEPOP K6699 Assembly instructions

Monoprice 30904 installation guide

Monoprice

Monoprice 30904 installation guide

Core Products Augusta AG902 Assembly instructions

Core Products

Core Products Augusta AG902 Assembly instructions

Rauch M1920 Assembly instructions

Rauch

Rauch M1920 Assembly instructions

Furinno FNCP-33037 Assembly instruction

Furinno

Furinno FNCP-33037 Assembly instruction

Lifely PAM-CT-WNT Pam Coffee Table Assembly instructions

Lifely

Lifely PAM-CT-WNT Pam Coffee Table Assembly instructions

Songmics VASAGLE KDT076 manual

Songmics

Songmics VASAGLE KDT076 manual

Dormiente MUCHO Assembly instruction

Dormiente

Dormiente MUCHO Assembly instruction

Whittier Wood McKenzie Alder 1614a Assembly instructions

Whittier Wood

Whittier Wood McKenzie Alder 1614a Assembly instructions

Whalen WMCPRO-9 Instruction booklet

Whalen

Whalen WMCPRO-9 Instruction booklet

USP DURAMAX Jackson 68050 manual

USP

USP DURAMAX Jackson 68050 manual

Conair Reflections manual

Conair

Conair Reflections manual

Songmics VASAGLE OFC71 manual

Songmics

Songmics VASAGLE OFC71 manual

Seville Classics AirLift S3 OFF65803 manual

Seville Classics

Seville Classics AirLift S3 OFF65803 manual

Zintra BEAMS PARALLEL RAFTER Assembly instructions

Zintra

Zintra BEAMS PARALLEL RAFTER Assembly instructions

manuals.online logo
manuals.online logoBrands
  • About & Mission
  • Contact us
  • Privacy Policy
  • Terms and Conditions

Copyright 2025 Manuals.Online. All Rights Reserved.