TESA TESA-hite 400 User manual

TESA-hite 400 / 700
Instruction manual
TESA-hite 400 / 700

TESA-hite 400 / 700
2

TESA-hite 400 / 700
LIST OF CONTENTS PAGE
1 Main features 4
2 Installation 5
2.1 Unpacking and setting up 5
2.2 Starting the instrument 6
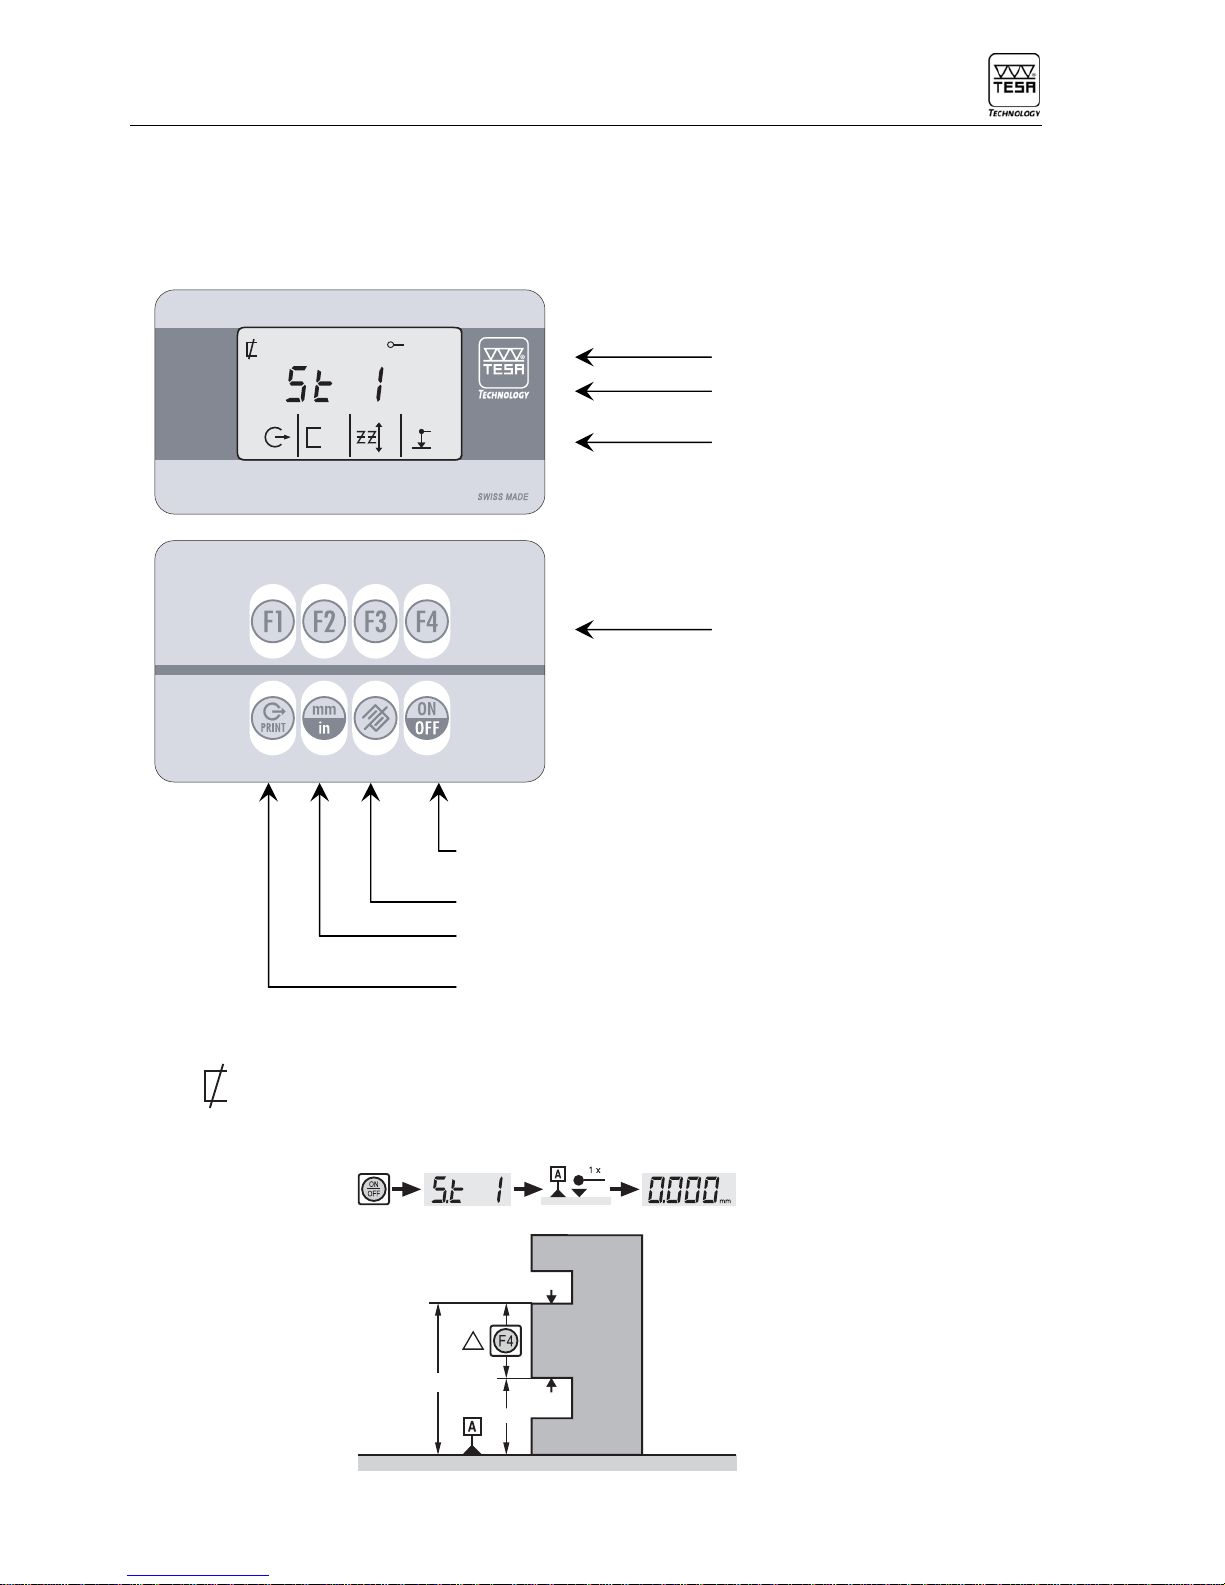
2.3 Short instructions for use 7
3 Description of the components 10
3.1 Instrument base 10
3.2 Air-cushion base 10
3.3 Vertical column, measuring head and movement of the head 10
3.4 Power supply 11
3.5 Measuring system 11
3.6 Automatic measuring value correction 11
4 Measuring 12
4.1 Basic principles 12
4.2 Display and function keys 12
4.2.1 Definition of display symbols 13
4.3 Program functions 14
4.4 Probing procedure at the contact point 16
4.5 Establishing the probe constant for length measurements
with inversion of the probing direction 17
4.6 Measuring features with flat surfaces 18
4.7 Measuring features with cylindrical surfaces 18
4.8 MODE 1, Measuring lengths in one direction, without probe constant 19
4.9 MODE 2, Measuring lengths in two directions, with probe constant 20
4.10 Procedure for detecting the culmination point 21
4.11 MODE 3, continuous display 27
4.12 PRESET function 29
4.13 Measuring parallelism deviations 33
4.14 Measuring perpendicularity deviations 36
4.15 Use of the fine adjustment 39
5 Instrument configuration 39
6 Error messages 44
7 Maintenance 44
7.1 Cleaning 44
7.2 Charging the battery 45
8 Delivery programme 45
8.1 Optional accessories 46
9 Technical data 49
9.1 Description of the RS 232 interface 50
9.1.1 Monodirectional data transmission 50
9.1.2 Bidirectional data transmission 50
10 Warranty 50
11 Declaration of conformity 51
3

TESA-hite 400 / 700
1 MAIN FEATURES
Cap cover 1
Housing 2
Fig. 1
Probe fixing arm 4
Probe 5
Guiding and
support faces 6
3-point cast-iron base 7
Switch for electric
pump 11
Knurled screw for the fine
adjustment 9
Handwheel for
displacement 8
Knurled screw for locking the
measuring-head
drive 10
Mounting pin 3
Control panel 12
4

TESA-hite 400 / 700
1 MAIN FEATURES
The TESA-Hite 400 / 700 is a mains-independent height gauge, which is suitable for measuring
lengths in the form of external, internal, step, height, depth and distance dimensions. A cast-iron base
with 3 integrated finish-ground supporting lugs ensures the stability of the TESA-Hite 400 700. By
activating the integrated electric pump, an air cushion can be created to facilitate the movement of the
instrument. A rigid column is located under the protective cover, equipped with a guide system that is
absolutely straight and perpendicular to the base. On this slides the measuring head and the
movement of the head is measured by an opto-electronic measuring system (TESA patent). The
measured readings are obtained in a very simple and reliable manner. Firstly the probe is brought into
contact with the point to be measured then immobilised to permit it to stabilise; then, by performing a
further slight rotation of the drive system, the measured reading is automatically recorded by a
dynamic process, with the measuring force at all times remaining constant. An acoustic signal
confirms that the reading has be recorded and it is immediately displayed and, if required, transmitted
via the RS 232 output. Cylindrical surfaces (bores and shafts) can also be measured simply and
reliably by automatically probing to find the culminating point. Although the TESA-Hite 400 / 700 is
manufactured to the highest precision, automatic microprocessor assisted correction makes it even
more accurate: Correction values memorised in the instrument compensate for systematic errors
when measuring lengths.
2 INSTALLATION
2.1 Unpacking and setting up
The TESA-Hite 400/700 is delivered ex factory, packed to protect it from impact and corrosion. Please
use the original packing materials for any subsequent transport.
IMPORTANT:
Your instrument is supplied with a 6V rechargeable battery already inserted. For recharging the
battery, see section 7.2.
Before fitting the standard accessories, release the measuring carriage by unscrewing the light grey
knurled screw (10) Fig. 1 on the hand wheel.
Securely fit the probe 5 to the probe-fixing arm 4 itself fitted to the mounting pin 3. Ensure that the
two knurled screws on the probe-fixing arm are well tightened.
After, unlock the measuring head by moving the slide downward until the insert touché the granite
plate; exert a force on the handwheel, like if you would do a probing down; this will unlock the
transport carriage from the measuring carriage.
However, we recommend you firstly read this instruction manual.
5
TESA-hite 400 / 700
2.2 Starting the instrument
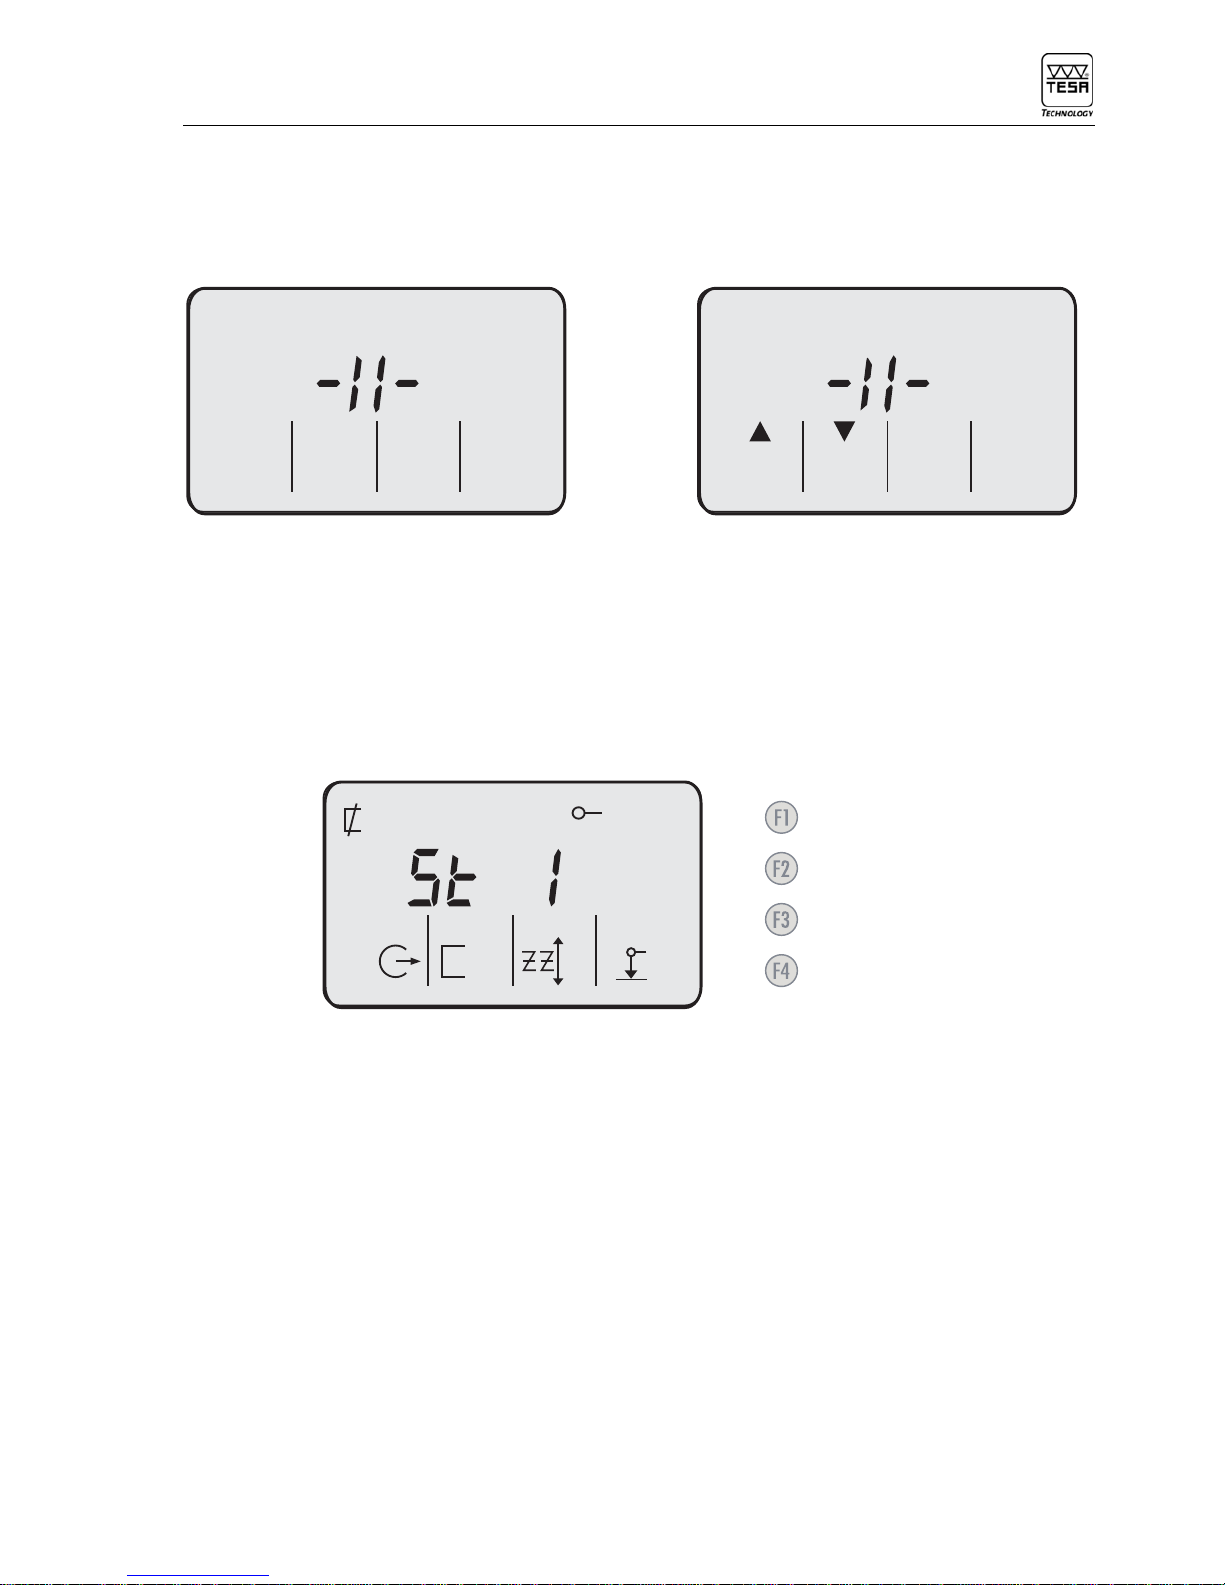
After the instrument is turned on (ON/OFF), a double bar appears on the screen (Fig.2.1)
mm mm
Fig.2.1 Fig.2.2
To enter in the measuring mode, move slowly the measuring head at a certain distance until the
2 triangles appear (Fig.2.2); then the movement can be done faster until the reference mark has
been crossed.
After having crossed the reference, the TESA-Hite 400 / 700 is in the measuring mode and the
following display appears:
Switch-onautoPrintmode
Establish the probe constant
Enter in ZZ mode
Introduction of a PRESET
mm
For more detailed information on the probing procedure for taking readings, please consult the
chapter 4.
Remark:
By turned on, if first the F1, then the F1 and ON/OFF keys are simultaneously activated; after
deactivate the ON/OFF and then the F1 keys; the instrument will go in the configurations menu. For
further information about it, please consult the chapter 5.
6

TESA-hite 400 / 700
2.3 Short instructions for use
Display and keys
Active functions
b
h1
h2 a
Maindisplay
Functions available
through keys
F1toF4
Function keys
F1toF4
mm
Switching ON / OFF
Cancel last function or last probing
Change unit
Transmit a reading to a peripheral
MODE 1 Measuring length in one direction, without calibration
7

TESA-hite 400 / 700
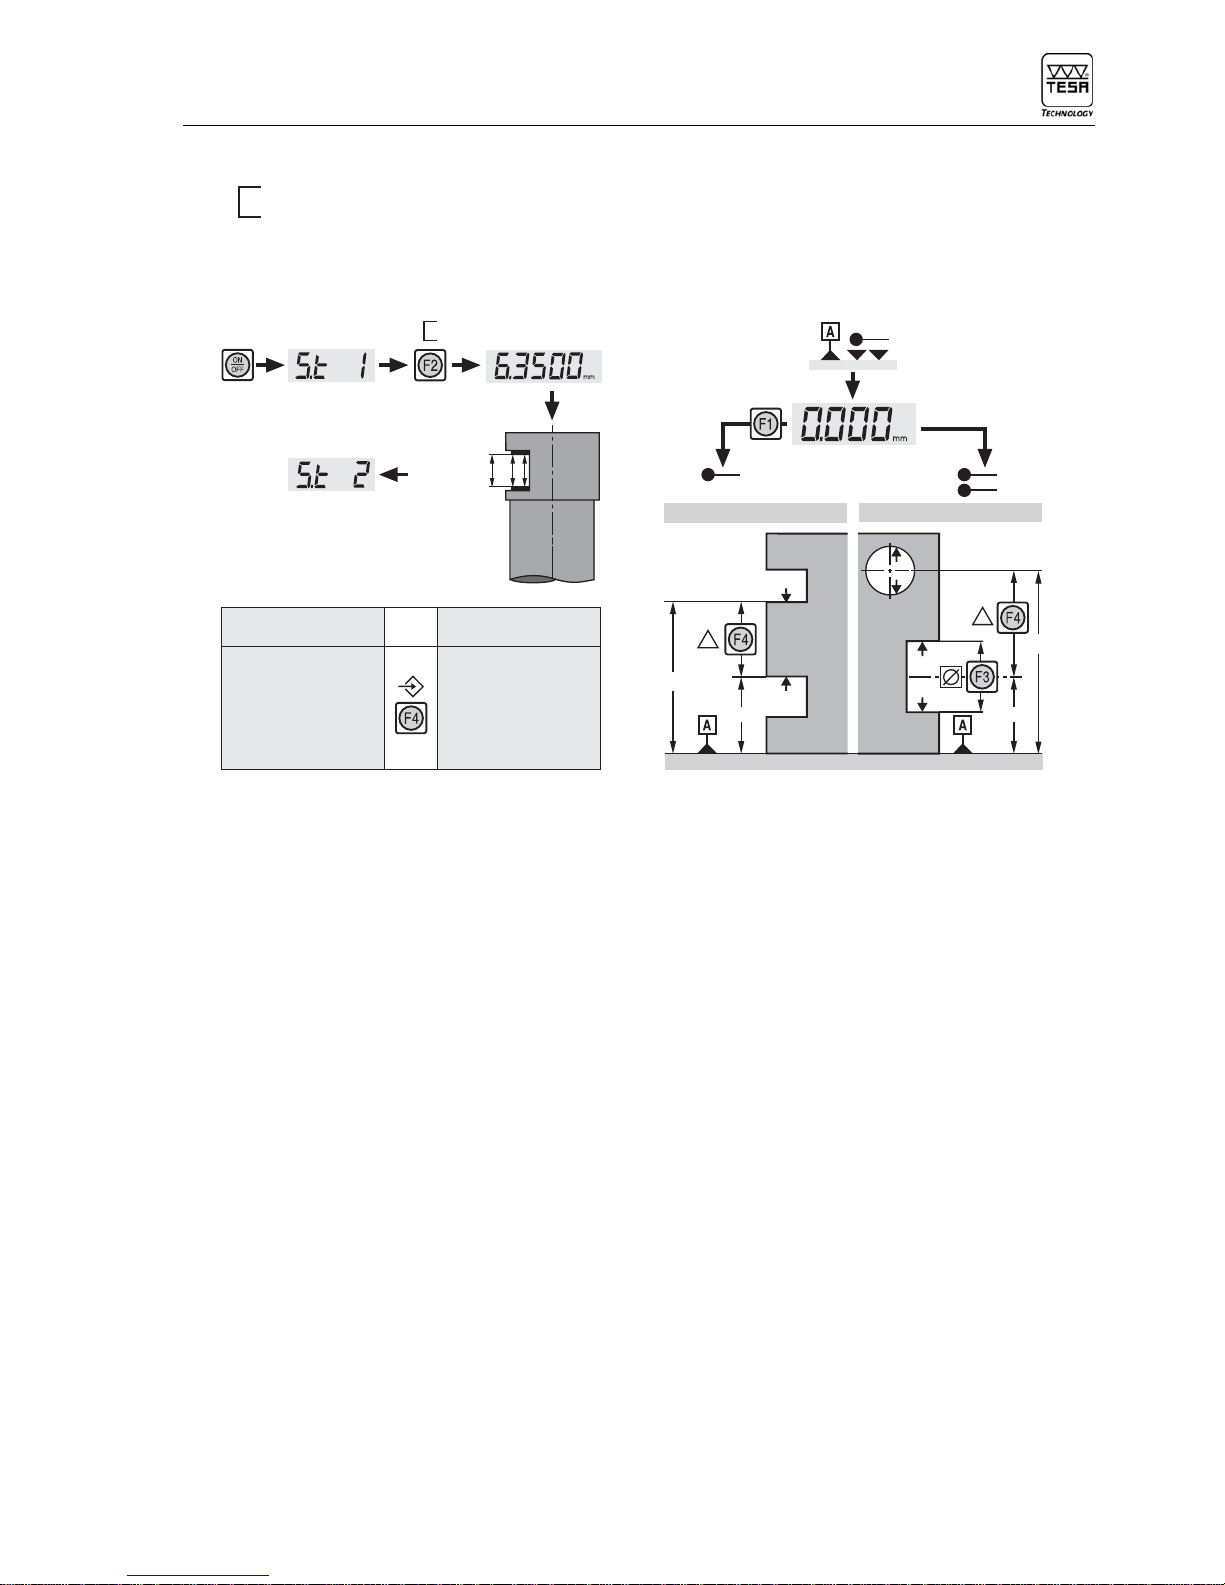
MODE 2 Measuring length in two directions, with calibration
h2
2 x
b
a
h1
d
c
b
h1
h2 a
6.3500 mm
.25000 in
2
1
4
3
With single probing With double probing
With reading Display
Scatter resolution
5 ÷ 10 µm 0.01 mm
.0002 ÷ .0004 in .0005 in
10 ÷ 50 µm 0.1 mm
.0004 ÷ .002 in .005 in
50µm 1 mm
.002 in .05 in
Procedure for detecting the culmination point
Probe normally without releasing the probe; wait about 1 second in the probing zone.
The system will automatically switch to culmination-point detection mode. Move either the part
or the TESA-Hite 400/ 700 by means of its air cushion so that measuring probe passes through the
culmination point. The TESA-Hite 400 / 700 has a system for automatically detecting the shape of the
surface being probed (concave or convex). Hence it is not necessary to indicate to the
TESA-Hite 400 / 700 whether it is probing a bore or a shaft as this will be detected automatically
according to the upward or downward probing of the maximum or minimum culmination point. Once
the symbol ▲or ▼appears on the display, the system will have automatically detected the
maximum or minimum point of the bore or shaft to be measured. The measuring head can now be
withdrawn.
8

TESA-hite 400 / 700
MODE 3 Continuous display
« PRESET » function (mode 1, 2 and 3)
mm
Choice:
Choice:
Shift one position to the left
Confirm preselected reading
Cancel preselected reading
Mode 1: 1x
Mode 2: 2x
Indirect reference point
—
+
9

TESA-hite 400 / 700
3 DESCRIPTION OF THE COMPONENTS
3.1 Instrument base
The base is chemically nickel-plated in order to make it very resistant to corrosion. Its lower face,
which has been machined to ensure that it is rigorously flat, incorporates three finely-machined
support lugs that guarantee the stability of the TESA-Hite 400 700. These lugs form a large surface so
that any grooves or other similar irregularities in the surface plate can be comfortably cleared.
The lugs 6 (Fig. 1) are designed especially for supporting the TESA-Hite 400 / 700 against a parallel
rule or for guiding it along such a rule, for example.
3.2 Air-cushion base
The air-cushion base, which is generated by the
pneumatic system linked to the electric pump
integrated into the instrument, permits the height
gauge to be moved safely and easily. Once
activated, manually with the button 11 (Fig. 1), the
pump creates an air-cushion only a few µm thick
between the height gauge base and the surface
plate so that TESA-Hite 400 / 700 can be displaced
effortless and quite wear-free. The thickness of the
air cushion can be set according to the surface
quality of the granite plate. This is done by turning
screw (Fig. 3), which acts on the valve located into
the pneumatic system. Experience has shown that
the air cushion should not be thicker than
necessary. Once enabled, it has to support the
weight of the height gauge while contacting the
surface plate lightly.
Fig.3
3.3 Vertical column, measuring head and movement of the head
The rigid vertical column is perpendicular to the base, to which it is permanently fixed. A measuring
head slides on the guide and the movement of the head is recorded by an opto-electronic measuring
system (TESA patent). The measuring head can be moved in infinitesimal increments by the fine-
adjustment system, for example when using fine probes or measuring small bores. The knurled
screw 9 (Fig. 1) is used to lock the measuring-head movement that is thus left free for scanning.
However, if necessary, the head itself can also be locked by using the built-in system. To do it, block
the handwheel by using the screw 8 (Fig. 1) and move the probe upwards to the stop.
10

TESA-hite 400 / 700
3.4 Power supply
The TESA-Hite 400 / 700 is powered by a 6V rechargeable battery (N° 00760157). This is recharged
using the mains adapter N° 04761054 and the cable EU N° 04761055 or US N° 04761056
(see chapter 7.2 – Charging the battery).
3.5 Measuring system
The TESA-Hite 400 / 700 incorporates an opto-electronic measuring system which digitally records
the measured dimension, called the mesurande (TESA patent). A glass scale marked off in
incremental divisions serves as a material measure. According to the reflection principle, the glass
scale is scanned contactlessly by a sensor with photo-sensitive elements. After analogue/digital
conversion, the measurement signal is transmitted for processing. From point A, the reading system
can be moved downwards to the respective trigger points. Once one of these points has been
reached, the reading of the value is triggered, that is to say that the position of the measuring head in
relation to the incremental divisions is read off by the sensor. The distance C, symmetrical in relation
to the position of each trigger point in the travel of the measuring system is kept for seeking the
culminating point when probing cylindrical surfaces. (Read section 4.7 also).
<6 N
<6 N
~ 7 mm
1.5 N
C~ 2 mm
C~ 2 mm
~ 3 mm
0
~ 3 mm
~ 7 mm
A
1.5 N
D
D
B
B
AStarting position
BTravel to upper or lower trigger point for taking reading
CPartial measuring span for finding the culmination point
DTravel in one direction from the neutral position to the spring-loaded end stop
3.6 Automatic measuring value correction
It is agreed that a perfectly accurate measuring instrument is impossible to produce. Therefore, the
value indicated by any instrument comprises a deviation from the true value; this deviation is
composed of the bias errors and the random errors. Random errors cannot be predicted since they
are the result of influences that cannot be controlled, e.g. the value dispersion. Bias errors, on the
other hand, as for example the deviations of the scale divisions on the material measure or the form
and positional errors of the measuring head guides can be corrected once they have been measured.
To correct length measurements, after the TESA-Hite 400 / 700 has been completely assembled; the
actual errors are determined step-by-step by means of a system of stepped gauge blocks.
11

TESA-hite 400 / 700
The correction values thus calculated will subsequently be memorised in the electronic module of the
instrument. Thus, every measurement read off by the TESA-Hite 400 / 700 will be automatically
corrected before being displayed.
4 MEASURING
4.1 Basic principles
To measure with the TESA-Hite 400 / 700 necessarily means that the way the measured values are
determined depends to a large extent on the kind of measurement tasks the user has to carry out.
Special attention should be paid to the main following points:
• Determining the reading by one or two probe contacts
• Measuring with or without change of probe direction
• Measuring with or without seeking the culmination point.
4.2 Display and function keys
mm
in
Active functions
Maindisplay
Functions available
through keys F1 to F4
Function keys F1 to F4
Transfer a reading to Cancel last function
a peripheral or probing
Change unit Switching ON / OFF
12

TESA-hite 400 / 700
4.2.1 Definition of display symbols
1 Length measurements in one direction, without probe constant
(Measuring mode 1)
2 Length measurements in two directions, with probe constant
(Measuring mode 2)
3 Continuous display (Measuring mode 3)
4 Display of the difference between the last two probe contacts (Measuring mode 2)
5 Display of the difference between the last two displayed readings
(Measuring modes 1 and 2)
6 Measurements with 2 probe contacts per length measurement (Measuring mode 2)
7 Measurements with 1 probe contact per length measurement (Measuring mode 2)
8 Establishing a new reference (Measuring modes 1, 2 and 3)
9 «PRESET» function (presetting of numerical values) (Measuring modes 1, 2 and 3)
10 Automatic data transfer to a peripheral
11 Confirmation and further registering of data in the instrument memory
12 Increment digit,
in measuring mode this indicates the detection of the maximum culmination point
13 Increment digit,
in measuring mode this indicates the detection of the minimum culmination point
14 Shifting a digit to the left
15 Start the measurement of the parallelism deviation
13

TESA-hite 400 / 700
4.3 Program functions
MEASUREMENT TASKS
Length
dimensions Form
dimensions
Step dimensions
Height dimensions
Depth dimensions
External dimensions:
- Rib width
- Shaft diameter
(culmination)
Internal dimensions:
- Groove width
- Bore diameter
(culmination)
Centre distances:
- Ribs, shafts,
grooves, bores
Determining
distances during
a continuous
measurement
process
Parallelism
deviations
Perpendicularity
deviations
Run-out
deviations
Measurements
without change of
probe direction
Measurements
with change of
probe direction
Without taking the
probe constant
With taking the
probe constant
« Continuous »
display with the
program functions
excluded
Measuring the
MAX – MIN
deviation
Measuring mode 1 Measuring mode 2 Measuring mode 3
Measuring
with a digital
instrument
connected to
the RS port,
using the
interface
N° 04760070
or with a
TESATAST
14

TESA-hite 400 / 700
15
Measuring mode 1 Measuring mode 2 Measuring mode 3
Length measurements in
one direction without probe
constant
Length measurements in
two directions with probe
constant
Continuous display
Turn instrument On
St1
Take the
reference point
Determine the
probe constant
Set display to
zero or
« PRESET »
Mode 3
St2
Take the
reference point
Measure Measure Measure

TESA-hite 400 / 700
4.4 Probing procedure at the contact point
In order to ensure the reliability of the measured values, the following condition must be fulfilled:
the probe 5 should be firmly attached to the probe fixing arm 4 which in turn is fixed to the
mounting pin 3. Make sure that both knurled screws on the fixing arm are tightened.
3
4
5
Probe contact procedure for the reading the measured values
• Use the handwheel 8 (Fig. 1) to rapidly move the measuring head.
• Use the knurled ring to bring the probe into contact with the measuring point on the work piece,
but not right up to the switch point.
• Pause for a second or so.
• Approach the measuring head by continuing to turn the knurled ring slowly until an acoustic signal
confirms the taking of the reading.
• Withdraw the probe from the surface of the work piece.
For optimum results when taking the readings, the measuring point should always be probed with the
same careful regular movement. When the speed with which the measuring head approaches the
work piece is reduced to an absolute minimum at the end of its travel, the probe will make precise and
bounce-free contact. The readings thus obtained will be reliable and highly repeatable.
16

TESA-hite 400 / 700
4.5 Establishing the probe constant for length measurements with inversion of the
probing direction
When bores, shafts, grooves, etc. are measured with a change of probe direction, a gauge-head
constant must be taken into account. In order that the user may effect all these measurements
without having to resort to tire some calculations, the gauge-head constant is determined on a
suitable master gauge whose actual dimension is known. Setting piece No. 00760219 is provided
with the instrument. By combining the three gauge blocks of which it consists, it has a total internal
or external dimension of 6,350 mm / .25000 in.
Remark
• Use only the setting piece supplied with the
TESA-Hite 400 / 700 bearing with the N° 00760219
and the same production number as the instrument.
• The final TESA-Hite 400 / 700 verification and the
certificate supplied both refer to this reference
gauge.
The gauge-head constant, which is a permanent correction factor, is calculated by the built-in
program once the measurements on the master-gauge have been completed; it is then recorded and
automatically taken into account for all subsequent measurements.
By applying a gauge-head constant, the following features – which can affect the measurements –
will be considered or compensated:
• Diameter of the probe ball or disc used.
• Elastic distortion of the probe and its support under the action of the measuring force.
• Hysteresis errors of the measuring system.
The gauge-head constant must be redetermined after any change in the measuring conditions.
Main causes of change:
• Turning the instrument off.
• Changing the probe.
• Changing the probe position.
The «Determination a gauge-head constant» function requires at least two probe contacts at each
measuring point. The difference between the two readings at each measuring point should not exceed
1 µm. Should the instrument indicate a greater difference, it will be displayed and the operator must
either accept that difference or repeat the gauge-head constant determination operation.
17

TESA-hite 400 / 700
4.6 Measuring features with flat surfaces
The probes used for contacting flat surfaces are those producing point contact. Such probes are
either ball, barrel or disk shaped (see standard and optional accessories).
In measuring mode 1, the measurements are taken exclusively by probing. All measurements must be
taken in the same direction.
In measuring mode 2, the measurements can involve one or two contacts and can be recorded with
or without inverting the probe direction.
4.7 Measuring features with cylindrical surfaces
Probes appropriate for contacting cylindrical surfaces are identical to those used for flat surfaces.
If the diameter of bores or shafts has to be determine in addition to their height, the two contacts
have to be made at the diametrically opposed culmination points.
To determine the culminating point, proceed as follows:
• Use the handwheel 8 to rapidly move the measuring head and the probe
• Use the knurled ring to bring the probe into contact – slightly off centre –
with the bore or shaft to be measured, but not right up to the switch point.
• Pause for a second or so.
• Move the measuring head forward by continuing to turn the knurled ring slowly
until an acoustic signal confirms the taking of the reading.
• After about 1 second, the probing force will be displayed graphically
on the control-panel display.
• Keep the probing force within the limits and manually move the part or
the TESA-Hite 400 / 700 so that the probe passes through the culmination point.
Once the symbol or appears on the display, the system will have automatically
detected the maximum or minimum point of the bore or shaft to be measured.
• The measuring head can now be withdrawn.
• Repeat the operation in the other direction to determine the diameter.
18

TESA-hite 400 / 700
4.8 MODE 1 Measuring lengths in one direction, without probe constant
Measuring without inversion of gauge-head direction (Mode St 1)
h2
h3
h1
Measuring
points
Important
To ensure optimum instrument measuring accuracy, the standard probe-fixing arm
(N° 00760143) must be aligned on the working surface with the air cushion deactivated.
The accessory N° 00760225 can be used to do this alignment.
b
h1
h2 a
Automatic Print
Available after switch-on
Two possibilities for cancelling the automatic point:
A) B) au
19

TESA-hite 400 / 700
4.9 MODE 2 Measuring lengths in two directions, with probe constant
Measuring with inversion of gauge-head direction (Mode St 2)
FLAT SURFACES CYLINDRICAL SURFACES
h1
b1
h3
h2
b2
Ø 2
Ø 1
h3
h2
h1
External
dimensions
Internal
dimensions
6.3500 mm
.25000 in
2
1
4
3
Important
To ensure optimum instrument measuring accuracy, the standard probe-fixing arm
(N° 00760143) must be aligned on the working surface with the air cushion deactivated.
The accessory N° 00760225 can be used to do this alignment.
Automatic Print
Available after switch-on Changing the
Dimension of
the setting piece
If the reading dispersion is too
great, the display indicates: Deviation not accepted, Accept with resolution adapted
recalibrate as follows:
5 ÷ 10µm 0.01 mm
.0002 ÷ .0005 in .0005 in
10 ÷ 50µm 0.1 mm
.0005 ÷ .002 in .005 in
> 50µm 1 mm
> .002 in .05 in
20
This manual suits for next models
1
Table of contents
Other TESA Measuring Instrument manuals

TESA
TESA CLINOBEVEL 2 User manual

TESA
TESA Micro-Hite 10 Setup guide

TESA
TESA MICRO-HITE User manual

TESA
TESA CLINOBEVEL 3 User manual

TESA
TESA TESA-hite Magna 400 User manual

TESA
TESA HEXAGON DIALTRONIC EASY User manual

TESA
TESA TESATRONIC TT20 User manual

TESA
TESA Micro-Hite Plus M User manual

TESA
TESA TWIN-SURF User manual

TESA
TESA MH3D User manual