TFA SPRING User manual

56
SPRING
– Estación meteorológica inalámbrica
Alcance: máximo de 60 m (campo libre)
Frecuencia de la transmisión: 433 MHz
Potencia máxima de
radiofrecuencia transmitida: < 10mW
Tiempo de transmisión: 50 segundos
Alimentación de tensión: Pilas 2 x 1,5 V AA (no incluidas)
Utilice pilas alcalinas
Dimensiones del cuerpo: 40 x 21 x 130 mm
Peso: 47 g (solo dispositivo)
Estas instrucciones o extractos de las mismas no pueden ser publicados sin la autorización de la TFA Dostmann. Los datos
técnicos de este producto corresponden al estado en el momento de la impresión y pueden ser modificados sin previo
aviso. Los actuales datos técnicos e informaciones sobre su producto los puede encontrar bajo el número de artículo en
nuestra página web.
Declaración UE de conformidad
Por la presente, TFA Dostmann declara que el tipo de equipo radioeléctrico 35.1129.01 es conforme con la Directiva
2014/53/UE. El texto completo de la declaración UE de conformidad está disponible en la dirección Internet siguiente:
www.tfa-dostmann.de/service/downloads/ce
www.tfa-dostmann.de
E-Mail: [email protected]
TFA Dostmann GmbH & Co.KG, Zum Ottersberg 12, D-97877 Wertheim, Alemania
Número del registro mercantil: Reg. Gericht Mannheim HRA 570186 12/20
Bedienungsanleitung
Instruction manual
Mode d'emploi
Istruzioni per l'uso
Gebruiksaanwijzing
Instrucciones de uso
Kat. Nr. 35.1129
Instruction manuals
www.tfa-dostmann.de/en/service/downloads/instruction-manuals
TFA_No. 35.1129_Anleit_12_20 22.12.2020 11:13 Uhr Seite 1

Fig. 1
Fig. 2 Fig. 4
Fig. 3
2 3
A 3
A 4 A 6 A 5 A 10
A 1 A 2
A 11
C 4
A 12A 8
B 3
C 3C 5 C 2
C 1
B 4 B 5 B 6 B 7
A 7 A 9 B 1 B 2
D 4
D 1
D 3
D 2
TFA_No. 35.1129_Anleit_12_20 22.12.2020 11:13 Uhr Seite 2

SPRING – Funk-Wetterstation
4 5
• Batterien enthalten gesundheitsschädliche Säuren und können bei Verschlucken lebensgefährlich sein.
Wurde eine Batterie verschluckt, kann dies innerhalb von 2 Stunden zu schweren inneren Verätzungen
und zum Tode führen. Wenn Sie vermuten, eine Batterie könnte verschluckt oder anderweitig in den Kör-
per gelangt sein, nehmen Sie sofort medizinische Hilfe in Anspruch.
• Batterien nicht ins Feuer werfen, kurzschließen, auseinandernehmen oder aufladen. Explosionsgefahr!
• Um ein Auslaufen der Batterien zu vermeiden, sollten schwache Batterien möglichst schnell ausge-
tauscht werden. Verwenden Sie nie gleichzeitig alte und neue Batterien oder Batterien unterschiedlichen
Typs.
• Beim Hantieren mit ausgelaufenen Batterien chemikalienbeständige Schutzhandschuhe und Schutzbrille
tragen!
Wichtige Hinweise zur Produktsicherheit!
• Setzen Sie das Gerät keinen extremen Temperaturen, Vibrationen und Erschütterungen aus.
• Vor Feuchtigkeit schützen.
• Der Außensender ist spritzwassergeschützt, aber nicht wasserdicht. Suchen Sie einen niederschlagsge-
schützten Platz für den Außensender aus.
5. Bestandteile
Basisstation (Empfänger)
A: Display-Anzeige (Fig. 1):
Linkes Fenster
A 1: Außentemperatur und –luftfeuchtigkeit
A 2: Tendenzanzeigen
A 3: Temperatur-Alarm-Symbol
A 4: Außensendersymbol
Mittleres Fenster
A 5: Wettersymbole
A 6: Tendenzanzeige
A 7: Uhrzeit, Wochentag und Datum
A 8: Funkuhrsymbol
A 9: Alarm-/Snooze-/DST-Symbol
Rechtes Fenster
A 10: Innentemperatur und –luftfeuchtigkeit
A 11: Tendenzanzeigen
A 12: Temperatur-Alarm-Symbol
B: Tasten (Fig. 1+2):
Vorne
B 1: ALERTS Taste
B 2: ALARM Taste
Oben
B 3: ▼Taste
B 4: TIME SET Taste
B 5: SNOOZE/LIGHT (HI – LOW - OFF) Taste
B 6: HEAT/DEW Taste
B 7: ▲Taste
C: Gehäuse (Fig. 3):
C 1: Wandaufhängungen
C 2: Batteriefach
C 3: Ständer (ausklappbar)
C 4: Netzteilanschluss
C 5: Kabelführung
SPRING – Funk-Wetterstation
Vielen Dank, dass Sie sich für dieses Gerät aus dem Hause TFA entschieden haben.
1. Bevor Sie mit dem Gerät arbeiten
•Lesen Sie sich bitte die Bedienungsanleitung genau durch. So werden Sie mit Ihrem neuen Gerät ver-
traut, lernen alle Funktionen und Bestandteile kennen, erfahren wichtige Details für die Inbetriebnahme
und den Umgang mit dem Gerät und erhalten Tipps für den Störungsfall.
•Durch die Beachtung der Bedienungsanleitung vermeiden Sie auch Beschädigungen des Gerätes und
die Gefährdung Ihrer gesetzlichen Mängelrechte durch Fehlgebrauch.
•Für Schäden, die aus Nichtbeachtung dieser Bedienungsanleitung verursacht werden, übernehmen
wir keine Haftung. Ebenso haften wir nicht für inkorrekte Messwerte und Folgen, die sich aus solchen
ergeben können.
•Beachten Sie besonders die Sicherheitshinweise!
•Bewahren Sie diese Bedienungsanleitung gut auf!
2. Lieferumfang
• Funk-Wetterstation (Basisstation)
• Netzteil
• Außensender (Kat.-Nr.: 30.3206.02)
• Bedienungsanleitung
3. Einsatzbereich und alle Vorteile Ihres neuen Gerätes
• Außentemperatur und Luftfeuchtigkeit über kabellosen Außensender (433 MHz) mit Reichweite bis 60 m
(Freifeld)
• Innentemperatur und Luftfeuchtigkeit
• Tendenzanzeigen, Höchst- und Tiefstwerte, Temperaturalarm
• Animierte Wettervorhersage mit Symbolen und Luftdrucktendenz
• Taupunkt
• Funkuhr mit Datum und Wochentag (7 Sprachen)
• Alarm mit Snooze-Funktion
• Farbdisplay mit zwei Helligkeitsstufen (im Dauerbetrieb mit Netzadapter)
4. Zu Ihrer Sicherheit
• Das Produkt ist ausschließlich für den oben beschriebenen Einsatzbereich geeignet. Verwenden Sie das
Produkt nicht anders, als in dieser Anleitung dargestellt wird.
• Das eigenmächtige Reparieren, Umbauen oder Verändern des Gerätes ist nicht gestattet.
Vorsicht!
Lebensgefahr durch Stromschlag!
• Schließen Sie das Basisgerät nur an eine vorschriftsmäßig installierte Steckdose mit einer Netzspannung
von 230V an! Die Steckdose muss nahe der Einrichtung angebracht und leicht zugänglich sein.
• Das Basisgerät und das Netzteil dürfen nicht mit Wasser oder Feuchtigkeit in Kontakt kommen. Nur für
den Betrieb in trockenen Innenräumen geeignet.
• Benutzen Sie das Gerät nicht, wenn Gehäuse oder Netzteil beschädigt sind.
• Bewahren Sie das Gerät außerhalb der Reichweite von Personen (auch Kindern) auf, die mögliche Gefah-
ren im Umgang mit elektrischen Geräten nicht richtig einschätzen können.
• Ziehen Sie sofort den Stecker aus der Steckdose, wenn eine Störung auftritt oder das Gerät für längere
Zeit nicht benutzt wird.
• Verwenden Sie ausschließlich das mitgelieferte Netzteil.
• Verbinden Sie erst das Kabel mit dem Basisgerät und stecken Sie dann den Netzstecker in die Steckdose.
• Ziehen Sie den Netzstecker nicht am Kabel aus der Steckdose.
• Verlegen Sie das Netzkabel so, dass es nicht mit scharfkantigen oder heißen Gegenständen in Berührung
kommt.
Vorsicht!
Verletzungsgefahr:
• Bewahren Sie die Batterien und die Geräte außerhalb der Reichweite von Kindern auf.
TFA_No. 35.1129_Anleit_12_20 22.12.2020 11:13 Uhr Seite 3

SPRING – Funk-Wetterstation
6 7
• Falls die Funkuhr kein DCF-Signal empfangen kann (z.B. wegen Störungen, Übertragungsdistanz, etc.),
kann die Zeit auch manuell eingestellt werden.
• Die Uhr arbeitet dann wie eine normale Quarz-Uhr (siehe Manuelle Einstellungen).
6.3 Empfang der Funkzeit
Die Zeitübertragung erfolgt von einer Cäsium Atom-Funkuhr, die von der Physikalisch Technischen Bundes-
anstalt in Braunschweig betrieben wird. Die Abweichung beträgt weniger als 1 Sekunde in einer Million Jah-
ren. Die Zeit ist kodiert und wird von Mainflingen in der Nähe von Frankfurt am Main durch ein DCF-77
(77.5 kHz) Frequenzsignal übertragen mit einer Reichweite von ca. 1.500 km. Ihre Funkuhr empfängt das
Signal, wandelt es um und zeigt immer die exakte Zeit an. Auch die Umstellung von Sommer- und Winter-
zeit erfolgt automatisch. Während der Sommerzeit erscheint DST im Display. Der Empfang hängt haupt-
sächlich von der geographischen Lage ab. Im Normalfall sollten innerhalb des Radius von 1.500 km ausge-
hend von Frankfurt bei der Übertragung keine Probleme auftauchen.
Bitte beachten Sie folgende Hinweise:
• Es wird empfohlen, einen Abstand von mindestens 1,5 – 2 Metern zu eventuell störenden Geräten wie
Computerbildschirmen und Fernsehgeräten einzuhalten.
• In Stahlbetonbauten (Kellern, Aufbauten) ist das empfangene Signal natürlicherweise schwächer. In
Extremfällen wird empfohlen, das Gerät in Fensternähe zu platzieren und/oder durch Drehen das Funksi-
gnal besser zu empfangen.
• Nachts sind die atmosphärischen Störungen meist geringer und ein Empfang ist in den meisten Fällen
möglich. Ein einziger Empfang pro Tag genügt, um die Genauigkeit zu gewährleisten und Abweichungen
unter 1 Sekunde zu halten.
6.4 Einlegen der Batterien in die Basisstation
• Die Batterien fungieren im Falle eines Stromausfalls als Backup-Batterien.
• Für eine dauerhafte Hintergrundbeleuchtung und um die Leistungsdauer der Batterien zu verlängern,
benutzen Sie bitte das mitgelieferte Netzteil.
• Öffnen Sie das Batteriefach auf der Rückseite der Basisstation.
• Legen Sie drei neue Batterien 1,5 V AAA in das Batteriefach. Achten Sie auf die richtige Polarität beim
Einlegen der Batterien.
• Schließen Sie das Batteriefach wieder.
6.5 Hintergrundbeleuchtung
•Achtung: Die Hintergrundbeleuchtung im Dauerbetrieb funktioniert nur mit Netzstecker.
• Voreinstellung für die Hintergrundbeleuchtung ist HI.
• Drücken Sie die SNOOZE/LIGHT (HI – LOW - OFF) einmal (LOW), um die Hintergrundbeleuchtung zu dim-
men.
• Drücken Sie die SNOOZE/LIGHT (HI – LOW - OFF) noch einmal (OFF), um die Hintergrundbeleuchtung aus-
zuschalten.
• Die Hintergrundbeleuchtung ist deaktiviert.
• Zum kurzzeitigen Aktivieren der Hintergrundbeleuchtung drücken Sie eine beliebige Taste.
7. Bedienung
• Während der Bedienung werden alle erfolgreichen Eingaben mit einem kurzen Piepton quittiert.
• Das Gerät verlässt automatisch den Einstellmodus, wenn für längere Zeit keine Taste gedrückt wird.
• Halten Sie die ▲oder ▼Taste im Einstellmodus gedrückt, gelangen Sie in den Schnelllauf.
7.1 Manuelle Einstellungen
• Halten Sie die TIME SET Taste im Normalmodus für drei Sekunden gedrückt, um in den Einstellmodus zu
gelangen:
• Die Zeitzone (0 = Voreinstellung) blinkt im Display.
• Mit der ▲oder ▼Taste können Sie die Zeitzonenkorrektur (+12/-12) vornehmen.
• Die Zeitzonenkorrektur wird benötigt, wenn das DCF Signal empfangen werden kann, die Zeitzone sich
aber von der DCF Zeit unterscheidet (z.B. +1=eine Stunde später).
SPRING – Funk-Wetterstation
D: Außensender (Fig. 4):
Gehäuse
Vorne:
D 1: LED-Kontrolllicht
D 2: Batteriefach
D 3: TX Taste im Batteriefach
Hinten:
D 4: Wandaufhängung
6. Inbetriebnahme
• Legen Sie die Basisstation und den Außensender in einem Abstand von ca. 1,5 Metern voneinander auf
einen Tisch. Vermeiden Sie die Nähe zu möglichen Störquellen (elektronische Geräte und Funkanlagen).
• Ziehen Sie die Schutzfolie vom Display der Basisstation.
• Schließen Sie die Basisstation mit dem beigefügtem Netzadapter an. Stecken Sie den Anschlussstecker
in den Anschluss der Basisstation und schließen Sie das Gerät mit dem Netzstecker am Stromnetz an.
Wichtig! Stellen Sie sicher, dass Ihre Netzspannung nicht mehr als 230 V beträgt! Andere Netzspannun-
gen können zur Beschädigung des Gerätes führen.
• Ein kurzer Signalton ertönt und alle Segmente werden kurz angezeigt.
6.1 Einlegen der Batterien in den Außensender/ Empfang der Außenwerte
• Schieben Sie den Batteriefachdeckel des Außensenders nach unten.
• Legen Sie zwei neue Batterien 1,5 V AA in das Batteriefach des Außensenders. Achten Sie auf die richtige
Polarität beim Einlegen der Batterien.
• Nach dem Einlegen der Batterien werden die Messdaten des Außensenders an die Basisstation übertra-
gen.
• Sobald die Basisstation die Außenwerte empfangen hat, werden die Werte dauerhaft angezeigt.
• Werden die Außenwerte nicht innerhalb drei Minuten empfangen, erscheint „- -” auf dem Display. Prüfen
Sie die Batterien und starten Sie einen weiteren Versuch. Beseitigen Sie eventuelle Störquellen.
• Sie können die Außensendersuche zu einem späteren Zeitpunkt auch manuell starten (z.B. bei Verlust des
Außensenders oder Batteriewechsel).
• Halten Sie die HEAT/DEW Taste auf der Basisstation für drei Sekunden gedrückt.
• Auf dem Display erscheint „---”.
• Drücken Sie die TX Taste im Batteriefach des Außensenders.
• Ein Signalton ertönt und die Basisstation empfängt die Werte vom Außensender.
• Nach erfolgreicher Inbetriebnahme des Außensenders schließen Sie den Batteriedeckel wieder sorgfältig.
6.2 Empfang des Funkuhrsignals
• Nach dem Empfang der Außenwerte versucht die Uhr nun, das Funkuhrsignal zu empfangen und das
DCF-Funkempfangszeichen blinkt.
• Wenn der Zeitcode nach 3-10 Minuten empfangen wurde, werden die funkgesteuerte Zeit und das DCF-
Funkempfangszeichen ständig im Display angezeigt.
• Der DCF-Funkempfang findet täglich um 1:00, 2:00 und 3.00 Uhr morgens statt. Ist auch der Funkemp-
fang um 3:00 Uhr nicht erfolgreich, so finden bis 5:00 Uhr früh weitere Funkempfangsversuche statt.
• Sie können den DCF-Funkempfang auch manuell aktivieren.
• Drücken Sie die TIME SET Taste.
• Das DCF-Funkempfangssymbol blinkt.
• Es gibt drei verschiedene Empfangssymbole:
blinkt - Empfang aktiv
bleibt stehen - Empfang erfolgreich
kein Symbol – kein Empfang
• Standardgemäß ist der DCF-Empfang aktiviert und nach erfolgreichem Empfang des DCF-Funkempfangs
ist keine manuelle Einstellung erforderlich.
TFA_No. 35.1129_Anleit_12_20 22.12.2020 11:13 Uhr Seite 4

SPRING – Funk-Wetterstation
8 9
• Die höchste Temperatur und Luftfeuchtigkeit für innen und außen seit der letzten Rückstellung werden
angezeigt.
• Drücken Sie die ▼Taste im Normalmodus
• MIN erscheint auf dem Display.
• Die niedrigste Temperatur und Luftfeuchtigkeit für innen und außen seit der letzten Rückstellung werden
angezeigt.
• Um wieder die Anzeige mit den aktuellen Werten zu erhalten, drücken Sie die ▲oder ▼Taste noch ein-
mal.
• Das Gerät verlässt auch automatisch den MAX/MIN-Modus, wenn keine Tasten gedrückt werden.
• Halten Sie die ▲Taste für 3 Sekunden gedrückt, während auf dem Display die höchsten Werte angezeigt
werden, um die Werte zu löschen.
• Halten Sie die ▼Taste für drei Sekunden gedrückt, während auf dem Display die niedrigsten Werte ange-
zeigt werden, um die Werte zu löschen.
• Die Höchst- und Tiefstwerte werden automatisch um Mitternacht zurückgesetzt.
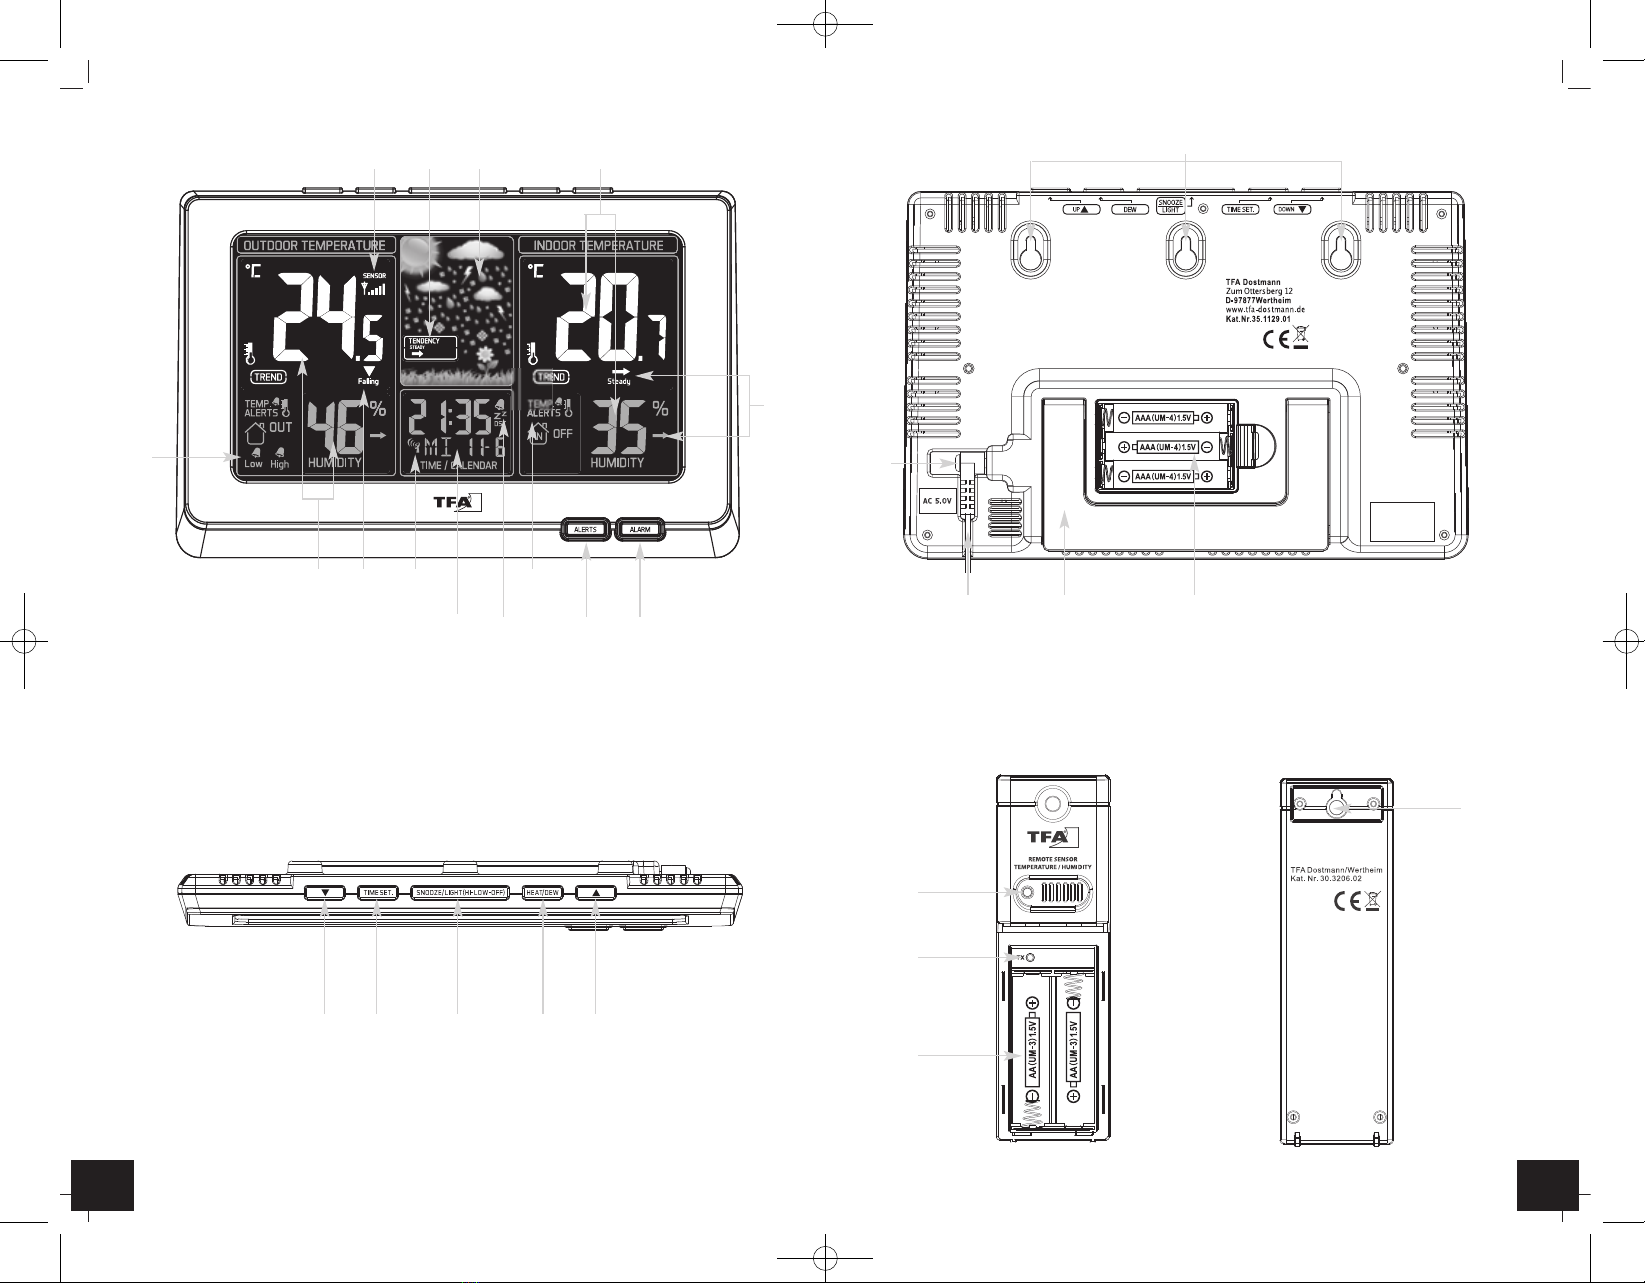
7.3.2 Trendpfeile
• Die Trendpfeile zeigen Ihnen, ob die Werte für die Temperatur und Luftfeuchtigkeit aktuell steigen, fallen
oder gleich bleiben.
7.4 Wettervorhersage-Symbole
• Die Wetterstation unterscheidet 6 unterschiedliche Wettersymbole (Sonnig, teilweise bewölkt, bedeckt,
regnerisch, stürmisch und Schneefall).
• Die Vorhersage über die Symbolanzeige bezieht sich auf einen Zeitraum von 12 Stunden und gibt ledig-
lich einen Wettertrend an. Ist es zum Beispiel im Moment wolkig und es wird Regen angezeigt, deutet
dies nicht auf eine Fehlfunktion des Gerätes hin, sondern gibt an, dass der Luftdruck gesunken und eine
Wetterverschlechterung zu erwarten ist, wobei es sich aber nicht unbedingt um Regen handeln muss.
• Das Sonnensymbol wird auch bei Nacht angezeigt, wenn es sich um eine sternenklare Nacht handelt.
Wichtiger Hinweis!
• Bitte beachten Sie, dass die Symbolvorhersage sich im Laufe des Betriebs präzisiert. Die Symbolvorher-
sage ist bereits ab der Inbetriebnahme aktiv, allerdings steigt die Zuverlässigkeit der Prognosen mit der
Menge an gesammelten Daten. Der Sensor muss sich zunächst auf das Referenzniveau am Standort ein-
stellen.
• Die bestmögliche Zuverlässigkeit der Symbolvorhersage ist in der Regel nach ca. 30 Tagen gegeben.
7.5 Einstellung des Außen- und Innentemperaturalarms
• Drücken Sie die ALERTS Taste im Normalmodus.
• HIGH und 60°C (Voreinstellung) oder die zuletzt eingestellte Außentemperatur-Obergrenze wird auf dem
Display angezeigt.
• Halten Sie die ALERTS Taste gedrückt.
• Die Temperaturanzeige blinkt.
• Stellen Sie mit der ▲oder ▼Taste die gewünschte Obergrenze ein.
• Bestätigen Sie mit der ALERTS Taste.
• LOW und -40°C (Voreinstellung) oder die zuletzt eingestellte Außentemperatur-Untergrenze wird auf dem
Display angezeigt.
• Die Temperaturanzeige blinkt.
• Stellen Sie mit der ▲oder ▼Taste die gewünschte Untergrenze ein.
• Bestätigen Sie mit der ALERTS Taste.
• Stellen Sie die Ober- und Untergrenze für die Innentemperatur auf die gleiche Weise ein.
(Messbereich 0 °C… +50 °C)
7.5.1 Aktivieren und Deaktivieren des Außen- und Innentemperaturalarms
• Um die einzelnen Alarm-Funktionen zu aktivieren oder zu deaktivieren, drücken Sie die ALERTS Taste im
Normalmodus.
• HIGH und die zuletzt eingestellte Außentemperatur-Obergrenze wird auf dem Display angezeigt.
• Drücken Sie die ▲Taste, um die Alarmfunktion zu aktivieren.
• Drücken Sie die ▼Taste, um die Alarmfunktion zu deaktivieren.
SPRING – Funk-Wetterstation
• Drücken Sie die TIME SET Taste noch einmal und Sie können nun nacheinander die Spracheinstellung für
die Wochentage, das 24 – oder 12 - Stunden Anzeigeformat, die Stunden, die Minuten, das Jahr, den
Monat, den Tag und die Temperatureinheit (°C oder °F) ansteuern und mit der ▲oder ▼Taste einstellen.
• Bestätigen Sie die Eingabe mit der TIME SET Taste.
• Bei erfolgreichem Empfang des DCF-Funkempfangssignals wird die manuell eingestellte Uhrzeit über-
schrieben.
7.1.1 Einstellung der Sprachauswahl für den Wochentag
• Im Einstellungsmodus können Sie die Sprache für den Wochentag auswählen.
• Drücken Sie die ▲oder ▼Taste.
• Im Display erscheint: Deutsch - GE (Voreinstellung), Französisch - FR, Italienisch - IT, Niederländisch -
NE, Spanisch - ES, Dänisch - DA und Englisch - EN
• Bestätigen Sie die Eingabe mit der TIME SET Taste.
7.1.2 Einstellung des 24- oder 12- Stunden-Formats
• Im Einstellungsmodus können Sie zwischen dem 24 Stunden oder 12 Stunden-Format auswählen.
• Drücken Sie die ▲oder ▼Taste.
• Im 12-h-Format erscheint AM (vormittags) und PM (nachmittags) auf dem Display.
• Bestätigen Sie die Eingabe mit der TIME SET Taste.
7.1.3 Einstellung der Temperatureinheit
• Im Einstellungsmodus können Sie zwischen °C (Celsius) oder °F (Fahrenheit) als Temperatureinheit aus-
wählen.
• Drücken Sie die ▲oder ▼Taste.
• Bestätigen Sie die Eingabe mit der TIME SET Taste.
7.2 Weckalarm
• Drücken Sie die ALARM Taste.
• AL und 0:00 Uhr (Voreinstellung) oder die zuletzt eingestellte Alarmzeit erscheint auf dem Display.
• Halten Sie die ALARM Taste für 3 Sekunden gedrückt.
• Das Alarmsymbol erscheint und die Stundenanzeige fängt an zu blinken.
• Sie können mit der ▲oder ▼Taste die Stunden einstellen.
• Drücken Sie die ALARM Taste noch einmal und Sie können nun die Minuten mit der ▲oder ▼Taste ein-
stellen.
• Drücken Sie die ALARM Taste, um in den Normalmodus zurückzukehren.
• Die Alarmfunktion ist aktiviert.
• Im Display erscheint das Alarmsymbol neben der aktuellen Uhrzeit.
• Drücken Sie die ALARM Taste im Normalmodus, um die Alarmfunktion zu aktivieren oder deaktivieren.
• Im Display erscheint die eingestellte Alarmzeit und AL.
• Drücken Sie nochmals die ALARM Taste. Das Alarmsymbol erscheint oder verschwindet.
• Wenn die eingestellte Weckzeit erreicht ist, beginnt der Wecker zu klingeln.
• Das Alarmsymbol blinkt auf dem Display.
• Drücken Sie auf eine beliebige Taste und der Alarm wird beendet.
• Wird der Alarm nicht unterbrochen, schaltet sich der ansteigende Alarmton automatisch nach zwei Minu-
ten aus und aktiviert sich erneut zur gleichen Weckzeit wieder.
• Das Alarmsymbol bleibt im Display stehen.
• Wenn der Wecker klingelt, drücken Sie die SNOOZE/LIGHT (HI – LOW - OFF) Taste, um die Snooze-Funkti-
on zu aktivieren.
• Ist die Snooze-Funktion aktiviert, blinkt Zz auf dem Display.
• Der Alarm wird für die Dauer von 10 Minuten unterbrochen.
• Zum Deaktivieren der Snooze-Funktion drücken Sie die ALARM Taste.
• Das Symbol Zz verschwindet.
7.3 Temperatur und Luftfeuchtigkeit
7.3.1 Höchst- und Tiefstwerte
• Drücken Sie die ▲Taste im Normalmodus.
• MAX erscheint auf dem Display.
TFA_No. 35.1129_Anleit_12_20 22.12.2020 11:13 Uhr Seite 5

SPRING – Funk-Wetterstation
10 11
Batteriebetrieb:
➜Batterien polrichtig einlegen
➜Hintergrundbeleuchtung kurzzeitig aktivieren mit beliebiger Taste
➜Batterien wechseln
Kein Außensender- ➜Kein Außensender installiert
empfang Anzeige „---“ ➜Batterien des Außensenders prüfen (keine Akkus verwenden!)
➜Neuinbetriebnahme von Außensender und Basisstation gemäß
Betriebsanleitung
➜Manuelle Außensendersuche gemäß Betriebsanleitung starten
➜Anderen Aufstellort für Außensender und/oder Basisstation wählen
➜Abstand zwischen Außensender und Basisstation verringern
➜Beseitigen der Störquellen
Unkorrekte Anzeige ➜Batterien wechseln
11. Entsorgung
Dieses Produkt wurde unter Verwendung hochwertiger Materialien und Bestandteile hergestellt, die recycelt
und wiederverwendet werden können.
Batterien und Akkus dürfen keinesfalls in den Hausmüll!
Als Verbraucher sind Sie gesetzlich verpflichtet, gebrauchte Batterien und Akkus zur umwelt-
gerechten Entsorgung beim Handel oder entsprechenden Sammelstellen gemäß nationalen
oder lokalen Bestimmungen abzugeben.
Die Bezeichnungen für enthaltene Schwermetalle sind:
Cd=Cadmium, Hg=Quecksilber, Pb=Blei
Dieses Gerät ist entsprechend der EU-Richtlinie über die Entsorgung von Elektro- und Elektro-
nik-Altgeräten (WEEE) gekennzeichnet.
Dieses Produkt darf nicht mit dem Hausmüll entsorgt werden. Der Nutzer ist verpflichtet, das
Altgerät zur umweltgerechten Entsorgung bei einer ausgewiesenen Annahmestelle für die Ent-
sorgung von Elektro- und Elektronikgeräten abzugeben.
12. Technische Daten
Basisstation:
Messbereich Innen
Temperatur: 0 °C…+50 °C (+32…+122 °F)
Luftfeuchtigkeit: 1...99 %
Genauigkeit Luftfeuchtigkeit ±5% (30%...80% rH)
Spannungsversorgung: Batterien 3 x 1,5 V AAA (nicht inklusive)
Verwenden Sie Alkaline Batterien
Netzteil (inklusive):
Input: 230-240V, AC 50Hz, 50mA
Output: 5,0V, AC 0,15A, 0,75W
Ø Effizienz im Betrieb: >53.5%
Leistungsaufnahme bei Nulllast: <0,21 W
Gehäusemaße: 210 x 26 (60) x 140 mm
Gewicht: 348 g (nur das Gerät)
SPRING – Funk-Wetterstation
• Das Alarmsymbol erscheint/verschwindet über HIGH im Display.
• Drücken Sie die ALERTS Taste, um weitere Alarmfunktionen anzusteuern und in den Normalmodus
zurückzukehren.
7.5.2 Alarmfall
• Im Alarmfall blinkt das entsprechende Symbol und ein Alarmton ertönt.
• Beenden Sie den Alarmton mit einer beliebigen Taste.
7.6 Taupunkt-Anzeige
• Drücken Sie die HEAT/DEW Taste, um sich die aktuelle Taupunkt-Temperatur anzeigen zu lassen.
• Auf dem Display erscheinen DEW-POINT und die Temperatur.
• Das Display wechselt automatisch wieder zurück zur aktuellen Anzeige von Temperatur und Luftfeuchtig-
keit.
•Der Zusammenhang von Temperatur und relativer Luftfeuchte wird durch den Taupunkt ausgedrückt:
Wird Luft kontinuierlich abgekühlt, steigt bei gleich bleibender absoluter Luftfeuchtigkeit die relative
Luftfeuchtigkeit bis auf 100% an. Kühlt die Luft weiter ab, so wird der überschüssige Wasserdampf in
Tröpfchenform ausgeschieden.
8. Aufstellen und Befestigen der Basisstation und des Senders
• Mit dem ausklappbaren Ständer auf der Rückseite kann die Basisstation auf einer glatten Oberfläche auf-
gestellt werden.
• Mit den Aufhängeösen an der Rückseite kann die Basisstation an der Wand im Wohnraum befestigt wer-
den. Vermeiden Sie die Nähe zu anderen elektrischen Geräten (Fernseher, Computer, Funktelefone) und
massiven Metallgegenständen.
• Der Außensender kann auf einer geraden, glatten Oberfläche aufgestellt werden oder mit der Aufhängeö-
se an der Wand befestigt werden. Suchen Sie sich einen schattigen, niederschlagsgeschützten Platz für
den Außensender aus. (Direkte Sonneneinstrahlung verfälscht die Messwerte und ständige Nässe bela-
stet die elektronischen Bauteile unnötig).
• Prüfen Sie, ob eine Übertragung der Messwerte vom Außensender am gewünschten Aufstellort zur
Basisstation stattfindet (Reichweite Freifeld ca. 60 Meter), bei massiven Wänden, insbesondere mit
Metallteilen kann sich die Sendereichweite erheblich reduzieren.
• Suchen Sie sich gegebenenfalls einen neuen Aufstellort für Außensender und/oder Basisstation.
9. Pflege und Wartung
• Reinigen Sie die Geräte mit einem weichen, leicht feuchten Tuch. Keine Scheuer- oder Lösungsmittel ver-
wenden!
• Entfernen Sie die Batterien und ziehen Sie den Stecker, wenn Sie die Geräte längere Zeit nicht verwenden.
• Bewahren Sie Ihre Geräte an einem trockenen Platz auf.
9.1 Batteriewechsel
• Sobald das Batteriesymbol im Displayfenster der Außenwerte auf der Basisstation erscheint, wechseln
Sie bitte die Batterien im Außensender.
• Sobald das Batteriesymbol im Displayfenster der Innenwerte erscheint, wechseln Sie bitte die Batterien
in der Basisstation.
•Achtung:
Bei einem Batteriewechsel muss der Kontakt zwischen Außensender und Basisstation wiederhergestellt
werden – also immer beide Geräte neu in Betrieb nehmen oder manuelle Sendersuche starten.
10. Fehlerbeseitigung
Problem Lösung
Keine Anzeige Netzbetrieb:
auf der Basisstation ➜ Basisstation mit Netzteil anschließen
➜Hintergrundbeleuchtung dauerhaft aktivieren
➜Netzteil überprüfen
TFA_No. 35.1129_Anleit_12_20 22.12.2020 11:13 Uhr Seite 6

SPRING
– Wireless weather station
12 13
Thank you for choosing this instrument from TFA.
1. Before you start using it
•Please make sure to read the instruction manual carefully.
This information will help you to familiarise yourself with your new device, to learn all of its functions
and parts, to find out important details about its first use and how to operate it, and to get advice in the
event of faults.
•Following and respecting the instructions in your manual will prevent damage to your instrument and
loss of your statutory rights arising from defects due to incorrect use.
•We shall not be liable for any damage occurring as a result of non-following of these instructions.
Likewise, we take no responsibility for any incorrect readings and for any consequences which may
result from them.
•Please take particular note of the safety advice!
•Please keep this instruction manual for future reference.
2. Delivery contents
• Wireless weather station (base station)
• Power supply
• Outdoor transmitter (Cat.-No.: 30.3206.02)
• Instruction manual
3. Field of operation and all the benefits of your new instrument at a glance
• Outdoor temperature and humidity over wireless outdoor transmitter (433 MHz), range of up to 60 m
(free field)
• Indoor temperature and humidity
• Tendency indicators, maximum and minimum values, temperature alarm
• Animated weather forecast with symbols and tendency of atmospheric pressure
• Dew point
• Radio-controlled clock with date and weekday (7 languages)
• Alarm with snooze function
• Colour display with two brightness levels ( continuous operation by power adapter only)
4. For your safety
• This product is exclusively intended for the field of application described above. It should only be used as
described within these instructions.
• Unauthorized repairs, modifications or changes to the product are prohibited.
Caution!
Risk of electrocution!
• Plug the base station only into a socket installed in regulation manner and with a mains voltage of 230V!
The mains socket must be installed near the equipment and it must be easily accessible.
• The base station and the mains adapter must not come into contact with water or moisture. Only suitable
for operation in dry interiors.
• Do not use the unit if the housing or the mains adapter are damaged.
• Keep the unit out of reach of persons (including children) who cannot fully appreciate the potential risks
of handling electrical equipment.
• Pull the plug out of the socket immediately if any fault occurs or if the unit is not used for a long period
of time.
• Only use the supplied mains adapter.
• First connect the lead to the instrument and then insert the mains plug into the socket.
• Do not pull the plug out of the socket by its lead.
• Route the mains lead so that it does not come into contact with sharp-edged or hot objects.
SPRING – Funk-Wetterstation
Außensender:
Messbereich Außen
Temperatur: -40 °C...+60°C (-40…+140 °F)
Luftfeuchtigkeit: 1...99 %
Genauigkeit Luftfeuchtigkeit ±5% (30%...80% rH)
Reichweite: ca. 60 m (Freifeld)
Übertragungsfrequenz: 433 MHz
Maximale Sendeleistung: < 10mW
Übertragungszeitraum: 50 Sekunden
Spannungsversorgung: Batterien 2 x 1,5 V AA (nicht inklusive)
Verwenden Sie Alkaline Batterien
Gehäusemaße: 40 x 21 x 130 mm
Gewicht: 47 g (nur das Gerät)
Diese Anleitung oder Auszüge daraus dürfen nur mit Zustimmung von TFA Dostmann veröffentlicht werden. Die techni-
schen Daten entsprechen dem Stand bei Drucklegung und können ohne vorherige Benachrichtigung geändert werden.
Die neuesten technischen Daten und Informationen zu Ihrem Produkt finden Sie auf unserer Homepage unter Eingabe der
Artikel-Nummer in das Suchfeld.
EU-KONFORMITÄTSERKLÄRUNG
Hiermit erklärt TFA Dostmann, dass der Funkanlagentyp 35.1129.01 der Richtlinie 2014/53/EU entspricht. Der vollständige
Text der EU-Konformitätserklärung ist unter der folgenden Internetadresse verfügbar:
www.tfa-dostmann.de/service/downloads/ce
www.tfa-dostmann.de
E-Mail: [email protected]
TFA Dostmann GmbH & Co.KG, Zum Ottersberg 12, D-97877 Wertheim, Deutschland
Handelsregister-Nummer: Reg. Gericht Mannheim HRA 570186 12/20
TFA_No. 35.1129_Anleit_12_20 22.12.2020 11:13 Uhr Seite 7

SPRING
– Wireless weather station
14 15
D: Outdoor transmitter (Fig. 4):
Housing
Front:
D 1: LED control lamp
D 2: Battery compartment
D 3: TX button inside of the battery compartment
Backside:
D 4: Wall mount hole
6. Getting started
• Place the base station and the transmitter on a desk with a distance of approximately 1.5 meter. Avoid
getting close to possible interference sources (electronic devices and radio installations).
• Remove the protective foil from the display of the base station.
• Connect the base station to the attached power adapter. Insert the adapter into the jack at the base sta-
tion and connect the power adapter to a wall socket. Important! Make sure that your household voltage
is 230V! Otherwise your device may be damaged.
• The device will alert you with a beep and all LCD segments will be displayed for a short moment.
6.1 Inserting of the batteries in the outdoor transmitter / Reception of the outdoor values
• Slide down the battery compartment lid of the outdoor transmitter.
• Insert two new batteries 1,5 V AA. Make sure the polarities are correct.
• After the batteries are inserted, the outdoor values will be transmitted to the base station.
• As soon as the base station receives the outdoor values, the values are permanently shown.
• If the reception of the outdoor values fails, “- -” appears on the display. Check the batteries and try it
again. Check if there is any source of interference.
• You can also start the outdoor transmitter search manually later on (for example when the outdoor trans-
mitter is lost or the batteries are changed).
• Hold the HEAT/DEW button on the base station for three seconds.
• “---” appears on the display.
• Press the TX button in the battery compartment of the outdoor transmitter.
• The device will alert you with a beep and the base station receives the values from the outdoor transmit-
ter.
• After successful installation close the battery compartment of the outdoor transmitter carefully.
6.2 Reception of the DCF reception signal
• After the reception of outdoor values, the clock is now trying to receive the reception signal and the DCF
reception symbol will be flashing.
• When the time code is received successfully after 3-10 minutes, the radio-controlled time and the DCF
symbol are displayed steadily in the LCD.
• The DCF reception always takes place at 1:00, 2:00 and 2:00 o'clock in the morning. If the reception is
not successfully received at 3:00 clock, it shall be held further attempts until 5:00 clock.
• You can also activate the DCF reception manually.
• Press the TIME SET button.
• The DCF reception symbol will be flashing.
• There are three different reception symbols:
flashing – reception is active
stays – reception is good
No symbol – no reception
• By default, the DCF reception is activated and after successful reception of the DCF signal no manual
adjustment is necessary.
• In case the clock cannot detect the DCF-signal (for example due to disturbances, transmitting distance,
etc.), the time can be set manually.
• The clock will then work as a normal quartz clock. (see: Manual settings).
SPRING
– Wireless weather station
Caution!
Risk of injury:
• Keep these instruments and the batteries out of the reach of children.
• Batteries contain harmful acids and may be hazardous if swallowed. If a battery is swallowed, this can
lead to serious internal burns and death within two hours. If you suspect a battery could have been swal-
lowed or otherwise caught in the body, seek medical help immediately.
• Batteries must not be thrown into a fire, short-circuited, taken apart or recharged. Risk of explosion!
• Low batteries should be changed as soon as possible to prevent damage caused by leaking. Never use a
combination of old and new batteries together, nor batteries of different types.
• Wear chemical-resistant protective gloves and safety glasses when handling leaking batteries.
Important information on product safety!
• Do not place your product near extreme temperatures, vibrations or shocks.
• Protect it from moisture.
• The outdoor transmitter is protected against splash water, but is not watertight. Choose a shady and dry
position for the transmitter.
5. Elements
Wireless weather station (base station)
A: Display (Fig. 1):
Left display
A 1: Outdoor temperature and humidity
A 2: Tendency indicators
A 3: Symbol for temperature alarm
A 4: Symbol for the outdoor transmitter
Middle display
A 5: Weather symbols
A 6: Tendency indicator
A 7: Time, weekday and date
A 8: DCF-reception symbol
A 9: Alarm / snooze / DST symbol
Right display
A 10: Indoor temperature and humidity
A 11: Tendency indicators
A 12: Symbol for temperature alarm
B: Buttons (Fig. 1+2):
Front
B 1: ALERTS button
B 2: ALARM button
Top
B 3: ▼button
B 4: TIME SET button
B 5: SNOOZE/LIGHT (HI – LOW - OFF) button
B 6: HEAT/DEW button
B 7: ▲button
C: Housing (Fig. 3):
C 1: Wall mount holes
C 2: Battery compartment
C 3: Stand (fold out)
C 4: Connection mains adapter
C 5: Cable slot
TFA_No. 35.1129_Anleit_12_20 22.12.2020 11:13 Uhr Seite 8

SPRING
– Wireless weather station
16 17
7.1.2 Setting of the 24- or 12 hour system
• In the setting mode you can change 24 - or 12 hour system.
• Press the ▲or ▼button.
• In 12 HR system AM (before noon) or PM (after noon) appears on the display.
• Confirm the setting with the TIME SET button.
7.1.3 Setting of the temperature unit
• In the setting mode you can change between °C (Celsius) or °F (Fahrenheit) as temperature unit.
• Press the ▲or ▼button.
• Confirm the setting with the TIME SET button.
7.2 Alarm function
• Press the ALARM button.
• AL and 0:00 (default) or the last adjusted alarm time appear on the display.
• Press and hold ALARM button for 3 seconds.
• The alarm symbol appears and the hour digit will be flashing.
• Press the ▲or ▼button to adjust the hours.
• Press the ALARM button again and you can adjust the minutes with the ▲or ▼button.
• Press the ALARM button to return to normal mode.
• The alarm function is activated.
• The alarm symbol appears on the display besides the current time.
• Press the ALARM button in normal mode, to activate or deactivate the alarm function.
• The adjusted alarm time and AL appear on the display.
• Press the ALARM button again. The alarm symbol appears or disappears on the display.
• When the adjusted alarm time is reached, the alarm will ring.
• The alarm symbol will be flashing on the display.
• Press any button and the alarm will stop.
• If the alarm is not stopped manually, the increasing alarm will automatically turn off after two minutes
and will be reactivated at the same time.
• The alarm symbol stays in the display.
• When the alarm rings, press the SNOOZE/LIGHT (HI – LOW - OFF) button and the snooze function will be
activated.
• Once the snooze function is activated, Zz will be flashing on the display.
• The alarm will be interrupted for 10 minutes.
• To deactivate the snooze function, press the ALARM button.
• The symbol Zz disappears.
7.3 Temperature and humidity
7.3.1 Maximum and minimum values
• Press the ▲button in normal mode.
• MAX appears on the display.
• The highest temperature and humidity for indoor and outdoor are displayed since the last reset.
• Press the ▼button in normal mode.
• MIN appears on the display.
• The lowest temperature and humidity for indoor and outdoor are displayed since the last reset.
• To return to the current value display, press the ▲or ▼button once more.
• The instrument will automatically quit the MAX/MIN mode if no button is pressed.
• Press and hold the ▲button for 3 seconds while the maximum values are displayed to clear the record-
ed maximum readings and the actual values appear.
• Press and hold the ▼button for three seconds while the minimum values are displayed to clear the
recorded minimum readings and the actual values appear.
• The MAX-MIN values are automatically reset at midnight.
7.3.2 Trend pointers
• The trend arrows indicate whether the values for temperature and humidity are currently increasing,
steady or decreasing.
SPRING
– Wireless weather station
6.3 Radio-controlled time reception
The time base for the radio-controlled time is a caesium atomic clock operated by the Physikalisch Technis-
che Bundesanstalt Braunschweig. It has a time deviation of less than one second in one million years. The
time is coded and transmitted from Mainflingen near Frankfurt via frequency signal DCF-77 (77.5 kHz) and
has a transmitting range of approximately 1,500 km. Changeover from summer time or winter time is auto-
matic. In Daylight Saving Time DST is shown on the LCD. The quality of the reception depends mainly on
the geographic location. Normally there should be no reception problems within a 1,500 km radius around
Frankfurt.
Please take note of the following:
• The recommended distance to any interfering sources like computer monitors or TV sets is at least 1.5 -
2 meters.
• Inside ferro-concrete rooms (basements, superstructures), the received signal is naturally weakened. In
extreme cases, please place the unit close to a window to improve the reception.
• During nighttime, the atmospheric interference is usually less severe and reception is possible in most
cases. A single daily reception is adequate to keep the accuracy deviation under 1 second.
6.4 Inserting of the batteries into the base station
• The batteries will operate as a backup power source in case of power failure.
• For a permanent backlight and to conserve battery power, use the included supplied power adapter.
• Open the battery compartment at the back of the base station.
• Insert three new batteries 1,5 V AAA. Make sure the polarities are correct.
• Close the battery compartment again.
6.5 Backlight
•Attention: Backlight in continuous operation only works with the power adapter.
• Default for the backlight is HI.
• Press the SNOOZE/LIGHT (HI – LOW - OFF) button once (LOW) to dim the backlight.
• Press the SNOOZE/LIGHT (HI – LOW - OFF) button once more (OFF) to turn off the backlight.
• The backlight is deactivated.
• To temporarily activate the backlight temporarily, press any button.
7. Operation
• During the operation, all successful settings will be confirmed by a brief beep tone.
• The instrument will automatically quit the setting mode if no button is pressed for a long period of time.
• Press and hold ▲or ▼button in the setting mode for fast running.
7.1 Manual settings
• Press and hold TIME SET button in normal mode for three seconds, to enter the setting mode.
• The time zone (0 = default) will be flashing on the display.
• Press the ▲or ▼button to adjust the time zone (+12/-12).
• The time zone correction is needed for countries where the DCF signal can be received but the time zone
is different from the DCF time (e.g. +1=one hour later).
• Press the TIME SET button again and make the settings in the following sequence: day-of-the-week lan-
guage, the 24- or 12 hour time system, the hours, the minutes, the year, the month, the day and the dis-
play for the temperature unit (°C or °F). Press the ▲or ▼button to adjust it.
• Confirm the setting with the TIME SET button.
• By a successful reception of the DCF signal the manually set time will be overwritten.
7.1.1 Setting of the day-of-week language
• In the setting mode choose the day-of-the-week language.
• Press the ▲or ▼button.
• In the display appears: German - GE (default), French - FR, Italian - IT, Dutch - NE, Spanish - SP, Danish -
DA and English - EN.
• Confirm the setting with the TIME SET button.
TFA_No. 35.1129_Anleit_12_20 22.12.2020 11:13 Uhr Seite 9

SPRING
– Wireless weather station
18 19
• Check the transmission of the signal from the outdoor transmitter to the base station (transmission
range of up to 60 m free field). Within ferro-concrete rooms (basements, superstructures), the received
signal is naturally weakened.
• If necessary choose another position for the outdoor transmitter and/or base station.
9. Care and maintenance
• Clean the instruments with a soft damp cloth. Do not use solvents or scouring agents.
• Remove the batteries and pull out the plug of the socket, if you do not use the products for a long period
of time.
• Keep the instruments in a dry place.
9.1 Battery replacement
• Change the batteries of the outdoor transmitter when the battery symbol appears on the display of the
outdoor values.
• Change the batteries of the base station when the battery symbol appears on the display of the indoor
values.
•Please note: When the batteries are changed, the contact between outdoor transmitter and base station
must be restored – so always insert new batteries into both units or start a manual outdoor transmitter
search.
10. Troubleshooting
Problems Solution
No indication Operation with mains plug:
on the weather station ➜ Connect the base station to mains adapter
➜Backlight is activated permanently
➜Control the power adapter
Operation with batteries:
➜Ensure that the batteries polarity are correct
➜Press any button to activate the backlight briefly
➜Change the batteries
No reception of ➜No outdoor transmitter is installed
the outdoor transmitter ➜Check batteries of external transmitter
Display “---“ (do not use rechargeable batteries!)
➜Restart the outdoor transmitter and the base station according to
the manual
➜Start the outdoor transmitter search manually according to the
manual
➜Choose another place for the outdoor transmitter and/or the base
station
➜Reduce the distance between the outdoor transmitter and the base
station
➜Check if there is any source of interference
Incorrect indication ➜Change the batteries
11. Waste disposal
This product has been manufactured using high-grade materials and components which can be recycled
and reused.
Never dispose of empty batteries and rechargeable batteries in household waste. As a con-
sumer, you are legally required to take them to your retail store or to an appropriate collection
site depending on national or local regulations in order to protect the environment.
The symbols for the heavy metals contained are: Cd=cadmium, Hg=mercury, Pb=lead
SPRING
– Wireless weather station
7.4 Weather forecast symbols
• There are 6 different weather symbols (sunny, slightly cloudy, cloudy, rainy, stormy and snowfall).
• The weather forecast relates to a range of 12 hours and indicates only a general weather trend. For
example, if the current weather is cloudy and the rain symbol is displayed, it does not mean the product
is faulty because it is not raining. It simply means that the air pressure has dropped and the weather is
expected to get worse but not necessarily rainy.
• The sun symbol also appears at night if there is a starry night.
Important note!
• Please note that the forecast symbol will become more defined in the course of operation. The forecast
symbol is active right from the start, however, the reliability of the forecasts increases with the amount
of data collected. To begin with, the sensor must adapt initially to the reference level at the site. The fore-
cast symbol will become at its most reliable after about 30 days.
7.5 Setting of the outdoor temperature and indoor temperature alarm
• Press the ALERTS button in normal mode.
• HIGH and 60 °C (default) or the last adjusted upper temperature limit appear on the display.
• Press and hold the ALERTS button.
• The temperature display will be flashing .
• Press the ▲or ▼button to set the desired upper limit.
• Confirm with the ALERTS button.
• LOW and -40°C (default) or the last adjusted lower temperature limit appear on the display.
• The temperature display will be flashing.
• Press the ▲or ▼button to set the desired lower limit.
• Confirm with the ALERTS button.
• Set the upper and lower limit for the indoor temperature in the same way.
(Measuring range: 0°C…+50°C / +32°F…+122°F)
7.5.1 Activate and deactivate the outdoor and indoor temperature alarm
• To activate or deactivate the respective alarm functions, press the ALERTS button in normal mode.
• HIGH and the last adjusted upper temperature limit is indicated.
• Press the ▲button to activate the alarm function.
• Press the ▼button to deactivate the alarm function.
• The alarm symbol appears/disappears on the display above HIGH.
• Press the ALERTS button again to go to the next alarm function and to return to normal mode.
7.5.2 Case of alarm
• In the case of an alarm the corresponding symbol will be flashing and an alarm sound is activated.
• You can stop the alarm by pressing any button.
7.6 Display of the dew point
• Press the HEAT/DEW button, to show the current dewpoint temperature.
• On the display appears DEW-POINT and the temperature.
• The display automatically switches back to the current display of temperature and humidity.
•This interdependency of temperature and relative humidity is expressed by means of the dew-point:
If the air is cooled continuously at constant absolute humidity, then the relative humidity will steadily
increase up to a maximum of 100%. If the air is cooled further, then the excess water vapour is sepa-
rated out in the form of water droplets.
8. Positioning and fixing of the base station and the outdoor transmitter
• With the foldable leg at the back of the base station, the base station can be placed onto any flat surface.
• With the hanging holes at the back of the base station, the base station can be wall mounted at the
respective location. Avoid the vicinity of any interfering field like computer monitors or TV sets and solid
metal objects.
• The outdoor transmitter can be placed onto any flat surface or wall mounted at the respective location by
the hanging hole at the back of the unit. Choose a shady and dry position for the transmitter. (Direct sun-
shine falsifies the measurement and continuous humidity strains the electronic components needlessly).
TFA_No. 35.1129_Anleit_12_20 22.12.2020 11:13 Uhr Seite 10

SPRING
– Station météo radio-pilotée
20 21
Nous vous remercions d'avoir choisi l'appareil de la Société TFA.
1. Avant d'utiliser l'appareil
•Veuillez lire attentivement le mode d'emploi. Vous vous familiariserez ainsi avec votre nouvel appareil,
vous découvrirez toutes les fonctions et tous les éléments qui le composent, vous noterez les détails
importants relatifs à sa mise en service et vous lirez quelques conseils en cas de disfonctionnement.
•En respectant ce mode d'emploi, vous éviterez d'endommager votre appareil et de perdre vos droits
résultant d'un défaut pour cause d'utilisation non-conforme.
•Nous n'assumons aucune responsabilité pour des dommages qui auraient été causés par le non-res-
pect du présent mode d'emploi. De même, nous n’assumons aucune responsabilité pour des relevés
incorrects et les conséquences qu’ils pourraient engendrer.
•Suivez bien toutes les consignes de sécurité !
•Conservez soigneusement le mode d'emploi !
2. Contenu de la livraison
• Station météo (Station de base)
• Adaptateur secteur
• Émetteur extérieur (Ref. : 30.3206.02)
• Mode d'emploi
3. Aperçu du domaine d'utilisation et tous les avantages de votre nouvel appareil :
• Température et humidité extérieure sans fil (433 MHz), rayon d’action jusqu'à un max. de
60 mètres (champ libre)
• Température et humidité intérieure
• Indication de la tendance, valeurs maximales et minimales, alarme de température
• Prévisions météo animées avec symboles et tendance de la pression atmosphérique
• Température de point de rosée
• Horloge radio-pilotée avec date et jour de la semaine (en 7 langues)
• Alarme avec fonction snooze
• Écran couleur avec deux niveaux de luminosité (en utilisation continue avec adaptateur secteur)
4. Pour votre sécurité
• L'appareil est destiné uniquement à l'utilisation décrite ci-dessus. Ne l'utilisez jamais à d'autres fins que
celles décrites dans le présent mode d'emploi.
• Vous ne devez en aucun cas réparer, démonter ou modifier l'appareil par vous-même.
Attention !
Danger de choc électrique !
• Branchez seulement l'appareil à une prise de courant réglementaire ayant une tension de secteur de
230V ! La prise de courant doit être installée à côté de l'équipement et doit être facilement accessible.
• La station de base et l'adaptateur secteur ne doivent pas entrer en contact avec de l'eau ou de l'humidité.
L'appareil doit être utilisé uniquement en intérieur dans un environnement sec.
• N'utilisez pas l'appareil si le boitier ou l'adaptateur secteur sont endommagés.
• Conservez le produit hors de la portée de personnes (enfants compris) inaptes à évaluer les risques pos-
sibles liés au maniement d'appareils électriques.
• Retirez immédiatement la fiche de la prise en cas de défaut ou si l'appareil n'est pas utilisé pendant une
longue période.
• Utilisez uniquement l'adaptateur secteur fourni.
• Commencez par brancher le câble à l'unité de base, branchez ensuite le cordon d'alimentation dans la
prise.
• Pour débrancher, tirez sur la fiche et non sur le cordon de la prise.
• Placez le cordon d'alimentation de sorte qu'il n'entre pas en contact avec des objets tranchants ou
chauds.
SPRING
– Wireless weather station
This instrument is labelled in accordance with the EU Waste Electrical and Electronic Equip-
ment Directive (WEEE).
Please do not dispose of this instrument in household waste. The user is obligated to take
end-of-life devices to a designated collection point for the disposal of electrical and electronic
equipment, in order to ensure environmentally-compatible disposal.
12. Specifications
Base station:
Measuring range indoor
Temperature: 0 °C…+50 °C (+32…+122 °F)
Humidity: 1...99 %
Accuracy humidity ±5% (30%...80% rH)
Power consumption: Batteries 3 x 1,5 V AAA (not included)
Use alkaline batteries
Power supply (included):
Input: 230-240V, AC 50Hz, 50mA
Output: 5,0V, AC 0,15A, 0,75W
Average active efficiency: >53.5%
No-load power consumption: <0,21 W
Dimensions: 210 x 26 (60) x 140 mm
Weight: 348 g (instrument only)
Outdoor transmitter:
Measuring range outdoor
Temperature: -40 °C...+60°C (-40…+140 °F)
Humidity: 1...99 %
Accuracy humidity: ±5% (30%...80% rH)
Range: max. 60 m (free field)
Transmission frequency: 433 MHz
Maximum radio-frequency power: < 10mW
Transmission time: 50 seconds
Power consumption: Batteries 2 x 1,5 V AA (not included)
Use alkaline batteries
Dimensions: 40 x 21 x 130 mm
Weight: 47 g (instrument only)
No part of this manual may be reproduced without written consent of TFA Dostmann. The technical data are
correct at the time of going to print and may change without prior notice. The latest technical data and information about
this product can be found in our homepage by simply entering the product number in the search box.
EU declaration of conformity
Hereby, TFA Dostmann declares that the radio equipment type 35.1129.01 is in compliance with Directive 2014/53/EU. The
full text of the EU declaration of conformity is available at the following Internet address:
www.tfa-dostmann.de/service/downloads/ce
www.tfa-dostmann.de
E-Mail: [email protected]
TFA Dostmann GmbH & Co.KG, Zum Ottersberg 12, D-97877 Wertheim, Germany
Commercial registration number: Reg. Gericht Mannheim HRA 570186 12/20
TFA_No. 35.1129_Anleit_12_20 22.12.2020 11:14 Uhr Seite 11

SPRING
– Station météo radio-pilotée
22 23
C 4 : Connexion de l'alimentation
C 5 : Guide pour le câble
D : Émetteur extérieur (Fig. 4) :
Boîtier
Avant :
D 1 : Lampe LED
D 2 : Compartiment à piles
D 3 : Touche TX dans le compartiment à piles
Arrière :
D 4 : Œillet de suspension
6. Mise en service
• Déposez les appareils sur une table à une distance d'environ 1,5 mètre l'un de l'autre. Évitez la proximité
de sources de parasitage (appareils électroniques ou appareils radio).
• Enlevez le film de protection de l'affichage de la station.
• Raccorder la station de base avec l’adaptateur secteur fourni. Mettez le connecteur dans la prise du
réveil et branchez-le au secteur avec l'adaptateur. Important ! Une tension de réseau de plus de 230 V
pourrait endommager votre appareil. Une autre tension de réseau pourrait également endommager votre
appareil.
• Un signal sonore se fait entendre et tous les segments LCD s'allument.
6.1 Installer les piles dans l'émetteur extérieur / Réception des valeurs extérieures
• Poussez le couvercle du compartiment à piles vers le bas.
• Insérez deux piles neuves 1,5 V AA dans le compartiment à piles de l'émetteur extérieur. Contrôlez la
bonne polarité des piles avant des insérer.
• Après l'insertion des piles, les paramètres de mesure seront transférés de l'émetteur à la station de base.
• Dès que la station de base a reçu les valeurs extérieures, les valeurs sont affichées en permanence.
• Si les valeurs extérieures ne sont pas reçues, «- -» apparaît sur l'écran. Contrôlez les piles et effectuez
une nouvelle tentative. Éliminez les éventuelles sources de parasitage.
• Vous pouvez activer manuellement la réception ultérieurement (par exemple en cas de perte de l'émet-
teur ou de remplacement des piles).
• Maintenez appuyée la touche HEAT/DEW appuyée de la station de base pendant deux secondes.
• «---» apparaît sur l'écran.
• Appuyez sur la touche TX dans le compartiment de la pile de l'émetteur extérieur.
• Un signal sonore se fait entendre et la station de base reçoit les valeurs de l’émetteur extérieur.
• Après la mise en service de l'émetteur, replacez soigneusement le couvercle de la pile.
6.2 Réception du signal DCF
• Après la réception des valeurs extérieures, l'horloge tente maintenant de recevoir le signal radio et le
symbole de réception DCF clignote.
• En cas de réception correcte (3-10 minutes), l’heure radio s’affiche et le symbole reste affiché en conti-
nu.
• La réception du signal DCF a lieu à 1, 2 et 3 heures du matin. Au cas où la réception à 3 heures du matin
n'aurait pas de succès, un nouvel essai de réception sera effectué à 5 heures ou bien toutes les heures
jusqu'à ce qu'il réussisse.
• Si aucune réception n'est possible, vous pouvez activer manuellement la réception de l’heure radio.
• Appuyez sur la touche TIME SET.
• Le symbole de réception DCF clignote.
• Il y a 3 symboles de réception différents :
Le symbole clignote – réception active.
Le symbole ne clignote pas – réception bonne
Pas de symbole – pas de réception
SPRING
– Station météo radio-pilotée
Attention !
Danger de blessure :
• Gardez les appareils et les piles hors de la portée des enfants.
• Les piles contiennent des acides nocifs pour la santé et peuvent être mortelles dans le cas d’une inges-
tion. Si une pile a été avalée, elle peut entraîner des brûlures internes graves ainsi que la mort dans l’es-
pace de 2 heures. Si vous craignez qu’une pile ait pu être avalée ou ingérée d’une autre manière, quelle
qu’elle soit, contactez immédiatement un médecin d’urgence.
• Ne jetez jamais de piles dans le feu, ne les court-circuitez pas, ne les démontez pas et ne les rechargez
pas. Risque d'explosion !
• Une pile faible doit être remplacée le plus rapidement possible afin d'éviter toute fuite. N'utilisez jamais
simultanément de piles anciennes avec des piles neuves ou des piles de types différents.
• Pour manipuler des piles qui ont coulé, utilisez des gants de protection chimique spécialement adaptés
et portez des lunettes de protection !
Conseils importants de sécurité du produit !
• Évitez d’exposer l’appareil à des températures extrêmes, à des vibrations ou à des chocs.
• Protégez-le contre l'humidité.
• L’émetteur extérieur est résistant aux éclaboussures d'eau mais il n'est pas étanche. Choisissez un
emplacement à l'ombre et protégé de la pluie pour votre émetteur.
5. Composants
Station de base (récepteur)
A : Affichage (Fig. 1) :
Écran de gauche
A 1 : Température et humidité extérieure
A 2 : Indicateurs de tendance
A 3 : Symbole de l'alarme de température
A 4 : Symbole pour l'émetteur extérieur
Écran central
A 5 : Prévisions météo par symboles
A 6 : Indicateur de la tendance
A 7 : Horloge, jour du calendrier et date
A 8 : Symbole de réception DCF
A 9 : Symbole alarme, snooze et DST
Écran de droite
A 10 : Indication de la température et de l'humidité
A 11 : Indicateurs de tendance
A 12 : Symbole de l'alarme de température
B : Touches (Fig. 1+2) :
Avant
B 1 : Touche ALERTS
B 2 : Touche ALARM
Vue de dessus
B 3 : Touche ▼
B 4 : Touche TIME SET
B 5 : Touche SNOOZE/LIGHT (HI – LOW - OFF)
B 6 : Touche HEAT/DEW
B 7 : Touche ▲
C : Boîtier (Fig. 3) :
C 1 : Suspensions murale
C 2 : Compartiment à piles
C 3 : Support (dépliable)
TFA_No. 35.1129_Anleit_12_20 22.12.2020 11:14 Uhr Seite 12

SPRING
– Station météo radio-pilotée
24 25
• Vous avez la possibilité d'utiliser une autre correction de fuseau horaire si votre horloge radio-pilotée
peut recevoir le signal DCF, cependant, l'heure de votre fuseau horaire sera différente de l’heure DCF (par
exemple : +1 = une heure plus tard).
• En appuyant sur la touche TIME SET, vous pouvez alors ajuster le langage pour les jours de la semaine,
l'affichage de 12 heures et de 24 heures, les heures, les minutes, l'année, le mois, le jour et la tempéra-
ture (°C ou °F). Vous pouvez régler ces valeurs à l'aide des touches ▲ou ▼.
• Validez au moyen de la touche TIME SET.
• Lorsque la réception du signal DCF est réussie, l'heure ajustée manuellement sera remplacée.
7.1.1 Réglage du langage pour les jours de la semaine
• En mode de réglage, vous pouvez régler le langage pour les jours de la semaine.
• Appuyez sur la touche ▲ou ▼.
• Allemand - GE (par défaut), Français - FR, Italien - IT, Néerlandais - NE, Espagnol - SP, Danois - DA et
Anglais - EN apparaissent sur l'écran.
• Validez au moyen de la touche TIME SET.
7.1.2 Réglage de l’affichage de 12 heures et de 24 heures
• En mode de réglage, vous pouvez régler l'affichage de 12 heures et de 24 heures.
• Appuyez sur la touche ▲ou ▼.
• En format 12 heures, AM (avant 12 h) ou PM (après 12 h) est affiché sur l'écran.
• Validez au moyen de la touche TIME SET.
7.1.3 Réglage de l'unité de température
• En mode de réglage, vous pouvez régler la température en °C (Celsius) ou en °F (Fahrenheit).
• Appuyez sur la touche ▲ou ▼.
• Validez au moyen de la touche TIME SET.
7.2 Fonction d'alarme
• Appuyez sur la touche ALARM.
• AL et 0:00 (par défaut) ou l'heure d'alarme réglée précédemment apparaissent sur l'affichage.
• Maintenez la touche ALARM appuyée pendant trois secondes.
• L'indication de l'heure apparaît et le symbole d'alarme clignote.
• Vous pouvez ajuster l'heure avec la touche ▲ou ▼.
• Appuyez encore une fois sur la touche ALARM et vous pouvez ajuster les minutes avec la touche ▲ou ▼.
• Appuyez sur la touche ALARM afin de retourner au mode normal.
• La fonction d'alarme est activée.
• Le symbole alarme apparaît à côté de l'affichage de l'heure actuelle.
• Appuyez sur la touche ALARM en mode normal pour activer ou désactiver la fonction d'alarme.
• L'heure d'alarme et AL apparaissent sur l’écran.
• Appuyez encore une fois sur la touche ALARM. Le symbole d'alarme apparaît ou disparaît de l'écran.
• Lorsque l'heure d'alarme fixée est atteinte, le réveil commence à sonner.
• Le symbole alarme clignote à l'affichage.
• Appuyez sur une touche de votre choix pour que l’alarme soit désactivée.
• Si l'alarme n'est pas coupée, elle s'arrêtera automatiquement après deux minutes et sera de nouveau
active pour l'heure de réveil suivant.
• Le symbole d'alarme reste à l'écran.
• Lorsque le réveil sonne, appuyez sur la touche SNOOZE/LIGHT (HI – LOW - OFF) pour activer la fonction
snooze.
• Le signal Zz clignote à l'affichage lors de l'utilisation de la fonction snooze.
• L’alarme s'interrompt pendant 10 minutes.
• Appuyez sur la touche ALARM pour désactiver la fonction snooze.
• Le symbole Zz disparaît de l’écran.
7.3 Température et humidité
7.3.1 Valeurs maximales et minimales
• Appuyez sur la touche ▲en mode normal.
• MAX apparaît sur l'écran.
SPRING
– Station météo radio-pilotée
• Par défaut, la réception DCF est activée et après une réception réussie du signal DCF aucun réglage
manuel n’est nécessaire.
• Si votre horloge radio-pilotée ne peut pas recevoir le signal DCF (par exemple en raison de la présence
de perturbations, d’une distance de transmission excessive etc.), vous pouvez procéder à un paramétra-
ge manuel.
• L’horloge fonctionne comme une horloge à quartz normale (voir Réglages manuels).
6.3. Réception de l'heure radio
La transmission de l’heure radio-pilotée s’effectue via une horloge atomique au césium, exploitée par la
Physikalisch Technische Bundesanstalt de Braunschweig (Institut Fédéral Physico-Technique de Braun-
schweig). L’écart de précision de cette horloge est d' 1 seconde pour un million d’années. L’heure est diffu-
sée à partir de Mainflingen, près de Francfort sur le Main, grâce à un signal DCF-77 (77,5 kHz), d'une une
portée d’environ 1500 km. Le passage de l'heure d'hiver à l'heure d'été et vice-et-versa s'effectue égale-
ment en mode automatique. Pendant l’heure d’été, DST apparaît à l'écran. La réception est essentiellement
en fonction de votre position géographique. En règle générale, dans un rayon de 1500 km autour de Franc-
fort, aucun problème de transmission ne devrait apparaître.
Nous vous prions de respecter les consignes suivantes :
• Nous vous recommandons de respecter une distance de 1,5 - 2 m entre l'appareil et d’éventuelles sour-
ces de signaux parasites, comme les écrans d'ordinateurs et les postes de télévision.
• Dans les bâtiments en béton armé (caves, greniers aménagés), le signal reçu est affaibli. Dans les cas
extrêmes, nous vous conseillons de placer l’appareil près d’une fenêtre de manière à améliorer la récep-
tion du signal radio.
• La nuit, les perturbations s’affaiblissent en règle générale et la réception est possible dans la plupart des
cas. Un seul signal par jour suffit pour garantir la précision de l’affichage de l’heure et pour maintenir
d’éventuels écarts en dessous d' 1 seconde.
6.4 Installer les piles dans la station de base
• Les piles servent de source de soutien en cas de panne d'électricité.
• Pour prolonger un éclairage de fond permanent et pour économiser les piles, utilisez l'adaptateur secteur
compris.
• Ouvrez le compartiment à piles au revers de la station de base.
• Insérez trois piles neuves 1,5 V AAA dans le compartiment des piles. Contrôlez la bonne polarité des
piles avant de les insérer.
• Refermez le compartiment à piles.
6.5 Éclairage de fond
•Attention : L'éclairage de fond permanent fonctionne seulement par l’adaptateur.
• Le défaut pour l'éclairage de fond est HI.
• Appuyez sur la touche SNOOZE/LIGHT (HI – LOW - OFF) encore une fois (LOW) pour assombrir l'éclairage
de fond.
• Appuyez sur la touche SNOOZE/LIGHT (HI – LOW - OFF) encore une fois (OFF) pour désactiver l'éclairage
de fond.
• L'éclairage de fond est désactivé.
• Pour activer l'éclairage de fond passagèrement, appuyez sur une touche de votre choix.
7. Utilisation
• Pendant le paramétrage, toutes les entrées sont confirmées par une courte tonalité.
• Le mode de paramétrage sera automatiquement terminé si aucune touche n'est utilisée.
• Maintenez la touche ▲ou ▼appuyée au mode de réglage pour accéder au défilement rapide.
7.1 Réglages manuels
• Maintenez la touche TIME SET appuyée pendant trois secondes en mode normal pour accéder au mode
de réglage.
• Le fuseau horaire (0 = par défaut) clignote à l’écran.
• Vous pouvez alors changer le fuseau horaire (+12/-12) avec la touche ▲ou ▼.
TFA_No. 35.1129_Anleit_12_20 22.12.2020 11:14 Uhr Seite 13

SPRING
– Station météo radio-pilotée
26 27
7.5.2 Cas d'une alarme
• Dans le cas d'une alarme, la valeur appropriée clignote et un signal sonore se fait entendre.
• Appuyez sur une touche de votre choix pour déclencher l'alarme.
7.6 Affichage du point de rosée
• Appuyez sur la touche HEAT/DEW vous pouvez alors voir le point de rosée actuel.
• DEW-POINT et la température apparaissent sur l'écran.
• L'affichage revient automatiquement à l'affichage actuel de la température et de l'humidité.
•Cette action simultanée de la température et de l'humidité relative est exprimée par le point de
rosée : Si l'air se refroidit de manière continue l'humidité absolue constante de même que l'humidité
relative augmente jusqu'à un maximum de 100%. Si l'air continue à se refroidir, la vapeur d'eau en
excès sera éliminée sous forme de gouttelettes.
8. Position ou accrochage au mur de la station de base et de l’émetteur
• À l'aide du pied au dos de votre appareil, la station de base peut être mise en place sur une surface plate.
• Avec les œillets à l'arrière, la station de base peut être montée sur le mur dans le salon. Évitez une mise
en place à proximité d'autres appareils électriques (téléviseur, ordinateur, téléphone sans fil) ou d'objets
métalliques.
• L'émetteur peut être mis en place sur un meuble ou encore être accroché au mur à l'aide de l'œillet de
suspension. Choisissez un emplacement à l'ombre et protégé de la pluie pour votre émetteur (évitez l'en-
soleillement direct, il peut fausser la mesure et une humidité continue endommage les composants élec-
troniques inutilement).
• Vérifiez que les valeurs de mesure entre l'émetteur et la station de base (portée avec champ libre jusqu'à
60 mètres) sont bien transmises de l'endroit choisi. En cas de murs massifs, en particulier comportant
des parties métalliques, la portée d'émission peut se trouver réduite considérablement.
• Si nécessaire cherchez de nouveaux emplacements pour l'émetteur et/ou la station de base.
9. Entretien et maintenance
• Pour le nettoyage des appareils, utilisez un chiffon doux et humide. N’utilisez pas de solvants ou
d´agents abrasifs !
• Enlevez les piles et retirez la fiche de prise murale, si vous n'utilisez pas vos appareils pendant une durée
prolongée.
• Conservez votre appareil dans un endroit sec.
9.1 Remplacement des piles
• Si le symbole de la pile apparaît sur l'écran des valeurs extérieures, changez les piles de l'émetteur.
• Si le symbole de la pile apparaît sur l'écran les valeurs intérieures, changez les piles de la station de base.
•Attention :
Il faut rétablir le contact entre l'émetteur et la station de base après le remplacement des piles - Il faut
donc toujours remplacer les piles dans les deux appareils ou bien lancer la recherche manuellement.
10. Dépannage
Problème Solution
Aucun affichage sur la Fonctionnement avec une fiche secteur :
station de base ➜ Raccordement de la station de base avec l'adaptateur secteur
➜Activez l’éclairage de fond en permanence
➜Vérifiez l'adaptateur secteur
Fonctionnement avec piles :
➜Contrôlez la bonne polarité des piles
➜Appuyez sur une touche pour activer brièvement l’éclairage de
fond
➜Changez les piles
SPRING
– Station météo radio-pilotée
• La température et l'humidité maximale pour l’intérieur et l’extérieur depuis la dernière réactualisation
apparaissent.
• Appuyez sur la touche ▼ en mode normal.
• MIN apparaît sur l'écran.
• La température et l'humidité minimale pour l’intérieur et l’extérieur depuis la dernière réactualisation
apparaissent.
• Appuyez encore une fois sur la touche ▲ou ▼et les valeurs actuelles apparaissent sur l'écran.
• L'appareil quittera automatiquement le mode MAX/MIN si aucune touche n'est utilisée pendant un cer-
tain temps.
• Maintenez la touche ▲appuyée pendant 3 secondes, les valeurs maximales seront effacées et remplacée
par les valeurs actuelles.
• Maintenez la touche ▼appuyée pendant 3 secondes, les valeurs minimales seront effacées et remplacée
par les valeurs actuelles.
• Les valeurs MAX-MIN sont automatiquement remises à zéro à minuit.
7.3.2 Flèches de tendance
• Les flèches de tendance indiquent si la température et l'humidité actuelles montent, descendent ou res-
tent stables.
7.4 Prévisions météo avec symboles
• La station météo a 6 différents symboles météo (ensoleillé, partiellement nuageux, nuageux, pluvieux,
orageux et neige).
• Les prévisions de l'affichage par symboles couvrent une période de temps de 12 heures et proposent
uniquement une tendance météorologique. Par exemple, si le ciel est nuageux et le symbole de pluie
s'affiche, cela ne signifie pas que l'appareil est en panne, cela signifie simplement que la pression atmos-
phérique a baissé et qu'il faut s'attendre à une dégradation du temps, mais cela ne signifie pas forcément
qu'il va pleuvoir.
• Le symbole du soleil est affiché également la nuit, s'agit d'une nuit étoilée.
Important !
• Veuillez noter que le symbole de prévisions deviendra plus précis au cours de l’opération. The symbole
de prévisions est actif dès le début, cependant, la fiabilité des prévisions augmente avec la quantité des
données recueillies. Initialement, le capteur doit être réglé à un niveau de référence sur le site. Le symbo-
le de prévisions devient d’une fiabilité optimale environ après une période de 30 jours.
7.5 Réglage de l'alarme de température extérieure et intérieure
• Appuyez sur la touche ALERTS en mode normal.
• HIGH et 60 °C (par défaut) ou la limite supérieure de température extérieure apparaissent sur l'affichage.
• Maintenez la touche ALERTS appuyée.
• L´affichage de la température clignote.
• Réglez la limite supérieure désirée avec la touche ▲ou ▼.
• Validez au moyen de la touche ALERTS.
• LOW et -40°C (par défault) ou la limite inférieure de température intérieure apparaissent sur le display.
• L´affichage de la température clignote.
• Réglez la limite inférieure désirée avec la touche ▲ou ▼.
• Validez au moyen de la touche ALERTS.
• Réglez la limite supérieure et inférieure pour la température intérieure de la même manière. (Plage de
mesure : 0°C…+50°C)
7.5.1 Activer et désactiver l'alarme de température
• Appuyez sur la touche ALERTS pour activer ou désactiver les fonctions d'alarme individuelles.
• HIGH et la limite supérieure de température extérieure apparaissent sur l'affichage.
• Appuyez sur la touche ▲pour activer la fonction d'alarme.
• Appuyez sur la touche ▼pour désactiver la fonction d'alarme.
• Le symbole d'alarme apparaît/disparait sur l'affichage au-dessus du symbole HIGH.
• Appuyez à nouveau sur la touche ALERTS pour régler les autres alarmes et afin de retourner au mode
normal.
TFA_No. 35.1129_Anleit_12_20 22.12.2020 11:14 Uhr Seite 14

SPRING
– Station météo radio-pilotée
28 29
Humidité : 1...99 %
Précision humidité : ±5% (30%...80% rH)
Rayon d’action : env. 60 mètres (champ libre)
Fréquence de transmission : 433 MHz
Puissance de radiofréquence
maximale transmise : < 10mW
Le temps de transmission : 50 secondes
Alimentation : Piles 2 x 1,5 V AA (non incluses)
Utilisez de piles alcalines
Mesure de boîtier : 40 x 21 x 130 mm
Poids : 47 g (appareil seulement)
La reproduction, même partielle du présent mode d'emploi est strictement interdite sans l'accord explicite de TFA Dost-
mann. Les spécifications techniques de ce produit ont été actualisées au moment de l'impression et peuvent être modi-
fiées, sans avis préalable.
Les dernières données techniques et des informations concernant votre produit peuvent être trouvées en entrant le numéro
de l'article sur notre site.
Déclaration UE de conformité
Le soussigné, TFA Dostmann, déclare que l'équipement radioélectrique du type 35.1129.01 est conforme à la directive
2014/53/UE. Le texte complet de la déclaration UE de conformité est disponible à l'adresse Internet suivante :
www.tfa-dostmann.de/service/downloads/ce
www.tfa-dostmann.de
TFA Dostmann GmbH & Co.KG, Zum Ottersberg 12, D-97877 Wertheim, Allemagne
Numéro d’enregistrement au registre du commerce : Reg. Gericht Mannheim HRA 570186 12/20
SPRING
– Station météo radio-pilotée
Pas de réception de ➜Aucun émetteur installé
l'émetteur extérieur ➜Vérifiez les piles de l'émetteur extérieur (n'utilisez pas d'accus)
Affichage «---» ➜Remettez l'émetteur et la station de base en service, conformément
aux instructions
➜Recherche de l'émetteur manuellement conformément aux instruc-
tions
➜Sélectionnez une autre position pour l'émetteur et / ou de la station
de base
➜Diminuez la distance entre l'émetteur extérieur et la station de base
➜Éliminez les éventuelles sources de parasitage
Indication incorrecte ➜Changez les piles
11. Traitement des déchets
Ce produit a été fabriqué avec des matériaux de construction de haute qualité qui peuvent être recyclés et
réutilisés.
Les piles et accus usagés ne peuvent en aucun cas être jetés dans les ordures ménagères !
En tant qu'utilisateur, vous avez l'obligation légale de rapporter les piles et accus usagés à
votre revendeur ou de les déposez dans une déchetterie proche de votre domicile conformé-
ment à la réglementation nationale et locale.
Les métaux lourds sont désignés comme suit :
Cd = cadmium, Hg = mercure, Pb = plomb
Cet appareil est conforme aux normes de l'UE relatives au traitement des déchets électriques
et électroniques (WEEE).
L'appareil usagé ne doit pas être jeté dans les ordures ménagères. L’utilisateur s’engage, pour
le respect de l’environnement, à déposer l’appareil usagé dans un centre de traitement agréé
pour les déchets électriques et électroniques.
12. Caractéristiques techniques
Station de base :
Plage de mesure intérieure
Température : 0 °C…+50 °C (+32…+122 °F)
Humidité : 1...99 %
Précision humidité : ±5% (30%...80% rH)
Alimentation : Piles 3 x 1,5 V AAA (non incluses)
Utilisez des piles alcalines
Source d’alimentation (incluse)
Entrée : 230-240V, AC 50Hz, 50mA
Sortie : 5,0V, AC 0,15A, 0,75W
Rendement moyen en mode actif : >53.5%
Consommation électrique hors charge : <0,21 W
Mesure de boîtier : 210 x 26 (60) x 140 mm
Poids : 348 g (appareil seulement)
Émetteur extérieur :
Plage de mesure extérieure
Température : -40 °C...+60°C (-40…+140 °F)
TFA_No. 35.1129_Anleit_12_20 22.12.2020 11:14 Uhr Seite 15

SPRING
– Stazione meteo radiocontrollata
30 31
Avvertenza!
Pericolo di lesioni:
• Tenete il dispositivo e le batterie lontano dalla portata dei bambini.
• Le batterie contengono acidi nocivi per la salute. Se ingerite, le batterie possono essere mortali. Se una
batteria venisse ingerita, potrebbe causare gravi ustioni e portare alla morte nel giro di due ore. Se si
sospetta che una batteria sia stata ingerita o inserita nel corpo in altra maniera, consultare immediata-
mente un medico.
• Non gettare le batterie nel fuoco, non polarizzarle in maniera scorretta, non smontarle e non cercare di
ricaricarle. Pericolo di esplosione!
• Sostituite quanto prima le batterie quasi scariche, in modo da evitare che si scarichino completamente.
Non utilizzate mai contemporaneamente batterie usate e batterie nuove né batterie di tipi diversi.
• Quando si maneggiano batterie esaurite indossare sempre guanti resistenti alle sostanze chimiche e
occhiali di protezione.
Avvertenze sulla sicurezza del prodotto!
• Non esporre l'apparecchio a temperature estreme, vibrazioni e urti.
• Proteggere dall’umidità.
• Il trasmettitore è resistente agli spruzzi d’acqua, ma non impermeabile. Cercare un luogo ombreggiato e
al riparo dalla pioggia per il trasmettitore.
5. Componenti
Stazione base (ricevitore)
A: Display (Fig. 1):
Display di sinistra
A 1: Temperatura ed umidità esterna
A 2: Indicatori di tendenza
A 3: Simbolo dell'allarme di temperatura
A 4: Simbolo del trasmettitore
Display centrale
A 5: Simboli meteorologici
A 6: Indicatore di tendenza
A 7: Ora, giorno della settimana e data
A 8: Ricezione del segnale DCF
A 9: Simbolo della sveglia, snooze e DST
Display di destra
A 10: Temperatura ed umidità interna
A 11: Indicatori di tendenza
A 12: Simbolo dell'allarme di temperatura
B: Tasti (Fig. 1+2):
Parte anteriore
B 1: Tasto ALERTS
B 2: Tasto ALARM
Parte superiore
B 3: Tasto ▼
B 4: Tasto TIME SET
B 5: Tasto SNOOZE/LIGHT (HI – LOW - OFF)
B 6: Tasto HEAT/DEW
B 7: Tasto ▲
C: Struttura esterna (Fig. 3):
C 1: Fori per sospensione alla parete
C 2: Vano batteria
C 3: Supporto (pieghevole)
SPRING
– Stazione meteo radiocontrollata
Vi ringraziamo per aver scelto l'apparecchio della TFA.
1. Prima di utilizzare l'apparecchio
•Leggete attentamente le istruzioni per l'uso. Avrete così modo di familiarizzare con il vostro nuovo
apparecchio, di scoprirne tutte le funzioni e le componenti, di apprendere importanti dettagli sulla sua
messa in funzione, di acquisire dimestichezza nel suo utilizzo e di usufruire di alcuni validi consigli da
seguire in caso di guasti.
•Seguendo le istruzioni per l'uso, eviterete anche di danneggiare il dispositivo e di pregiudicare, a
causa di un utilizzo scorretto, i diritti del consumatore che vi spettano per legge.
•Decliniamo ogni responsabilità per i danni derivanti dal mancato rispetto delle presenti istruzioni
per l'uso. Allo stesso modo, non siamo responsabili per eventuali misurazioni errate e per le conse-
guenze che ne possono derivare.
•Prestate particolare attenzione alle misure di sicurezza!
•Conservate con cura queste istruzioni per l'uso!
2. La consegna include
• Stazione meteorologica (stazione base)
• Alimentatore
• Trasmettitore esterno (No. Cat. 30.3206.02)
• Istruzioni per l'uso
3. Tutte le applicazioni e tutti i vantaggi del vostro nuovo apparecchio
• Trasmissione senza fili (433 MHz) della temperatura e dell'umidità esterna con raggio d'azione di max.
60 metri (campo libero)
• Indicazione della temperatura e dell'umidità interna
• Indicazioni della tendenza, valori massimi e minimi, allarme temperatura
• Previsioni del tempo animati con simboli e tendenza della pressione atmosferica
• Indicazione del punto di rugiada
• Orologio radiocontrollato con data e giorno (7 lingue)
• Allarme con funzione snooze
• Display a colori con due livelli di luminosità (in funzionamento continuo con alimentatore)
4. Per la vostra sicurezza
• Il prodotto è adatto esclusivamente agli utilizzi di cui sopra. Non utilizzate il prodotto in maniera diversa
da quanto descritto in queste istruzioni.
• Non sono consentite riparazioni, alterazioni o modifiche non autorizzate del dispositivo.
Attenzione!
Pericolo di morte per scossa elettrica!
• Collegare la stazione base esclusivamente a una presa di corrente a norma che fornisca corrente a una
tensione di 230V! La presa dell’alimentazione dovrebbe essere situata vicino al dispositivo e dovrebbe
essere facilmente accessibile.
• La stazione base e l’alimentatore non devono venire a contatto con acqua o umidità. Il dispositivo è adat-
to esclusivamente all’utilizzo interno in ambienti asciutti.
• Non utilizzate il dispositivo qualora la struttura esterna o l’alimentatore risultino danneggiati.
• Conservate il dispositivo fuori dalla portata di persone (per esempio i bambini) che potrebbero non rico-
noscere adeguatamente il rischio derivante dall’uso di apparecchi elettrici.
• Estraete immediatamente la spina dalla presa di corrente qualora rileviate un guasto o nel caso in cui non
utilizziate il dispositivo per un periodo prolungato.
• Utilizzate esclusivamente l'adattatore in dotazione.
• Collegare prima il cavo alla stazione base e successivamente inserire la spina nella presa di corrente.
• Quando estraete la spina dalla presa di corrente, non tiratela per il cavo.
• Proteggete il cavo di alimentazione in modo che oggetti appuntiti o caldi non vi entrino in contatto.
TFA_No. 35.1129_Anleit_12_20 22.12.2020 11:14 Uhr Seite 16

SPRING
– Stazione meteo radiocontrollata
32 33
• La ricezione DCF è attiva per impostazione predefinita. Dopo l'avvenuta ricezione del segnale DCF non è
necessaria alcuna regolazione manuale.
• Nel caso in cui l’orologio non riesca a ricevere il segnale DCF (a causa di guasti, della distanza di trasmis-
sione, ecc.), l'ora può essere impostata manualmente.
• L'orologio funziona come un normale orologio al quarzo (vedi: Impostazione manuale).
6.3 Informazioni sull'ora radiocontrollata DCF
L'ora viene trasmessa da un orologio atomico al cesio gestito dal Physikalisch Technische Bundesanstalt di
Braunschweig. La deviazione è inferiore a 1 secondo in un milione di anni. L'ora è codificata e trasmessa da
Mainflingen, vicino Francoforte, con un segnale a frequenza DCF - 77 (77,5 kHz) entro un raggio di 1.500
km. Anche il passaggio tra ora solare e ora legale è automatico. Durante il periodo estivo DST appare sul
display. La qualità della ricezione dipende molto dalla posizione geografica. In circostanze normali e in
assenza di problemi di ricezione, dovrebbe avvenire entro il raggio di 1.500 km da Francoforte.
Rispettate le norme elencate qui di seguito:
• La distanza raccomandata da qualsiasi fonte di interferenza come monitor di computer o televisori deve
essere di almeno 1.5 - 2m.
• All'interno di strutture in cemento armato (seminterrati, sovrastrutture) la ricezione del segnale è natu-
ralmente più debole. In casi estremi si consiglia di sistemare l'unità vicino ad una finestra per ottenere
una migliore ricezione del segnale.
• Durante le ore notturne, le interferenze dovute ad agenti atmosferici sono normalmente meno influenti, e
la ricezione è possibile nella maggior parte dei casi. Una singola ricezione giornaliera è sufficiente a
garantire la precisione e a mantenere la deviazione al di sotto di un secondo.
6.4 Inserimento delle batterie nella stazione base
• Le batterie funzionano come batterie di backup in caso di interruzione di corrente.
• Per una retroilluminazione permanente e per risparmiare le batterie, utilizzare il alimentatore incluso.
• Aprire il vano batteria sul retro della stazione base.
• Inserire tre batterie nuove tipo AAA da 1,5 V. Accertarsi di aver rispettato la corretta polarità.
• Richiudere il vano batteria.
6.5 Retroilluminazione
•Attenzione: La retroilluminazione del display funziona solo tramite alimentatore.
• L'impostazione predefinita per la retroilluminazione è HI.
• Premere il tasto SNOOZE/LIGHT (HI – LOW - OFF) una volta (LOW) per abbassare la retroilluminazione.
• Premere il tasto SNOOZE/LIGHT (HI – LOW - OFF) nuovamente (OFF) per spegnere la retroilluminazione.
• La retroilluminazione è disattivata.
• Per attivare temporaneamente la retroilluminazione, premere un tasto qualunque.
7. Uso
• Tutti gli inserimenti corretti vengono confermati con un bip.
• L'apparecchio esce automaticamente dalla modalità impostazione se non si preme alcun tasto per un
periodo prolungato.
• In modalità impostazione, tenere premuto il tasto ▲o ▼per procedere velocemente.
7.1 Impostazione manuale
• Tenere premuto per 3 secondi il tasto TIME SET nella modalità normale per attivare la modalità di impo-
stazione.
• Il fuso orario (0 predefinito) inizia a lampeggiare sul display.
• Impostare il fuso orario (+12/-12) con il tasto ▲o ▼.
• La correzione del fuso orario è attiva dove è possibile ricevere il segnale DCF ma il fuso orario differisce
da quello tedesco (ad esempio, +1 = un'ora dopo).
• Premendo nuovamente il tasto TIME SET è possibile modificare uno dopo l'altro le impostazioni per la
lingua nella quale verrà indicato il giorno della settimana, 12 o 24 ore, le ore, i minuti, l'anno, il mese, il
giorno e la visualizzazione della temperatura (°C o °F) e installare con il tasto ▲o ▼.
• Confermare con il tasto TIME SET.
• In caso di corretta ricezione, l'ora impostata in modalità manuale viene sostituita.
SPRING
– Stazione meteo radiocontrollata
C 4: Connettore di alimentazione
C 5: Passacavi
D: Trasmettitore esterno (Fig. 4):
Struttura esterna
Parte anteriore:
D 1: Luce LCD
D 2: Vano batteria
D 3: Tasto TX nel vano batteria
Parte posteriore:
D 4: Montaggio a parete
6. Messa in funzione
• Posizionare gli apparecchi su un tavolo ad una distanza di circa 1,5 metri l'uno dall'altro. Tenerli lontano
da eventuali fonti di interferenza (dispositivi elettronici e impianti radio).
• Rimuovere il foglio protettivo dal display della stazione base.
• Collegare la stazione base tramite l'alimentatore fornito in dotazione. Inserire l'adattatore nella presa e
collegarlo ad una presa a terra. Avvertenza importante! Controllare che il voltaggio della vostra abitazio-
ne non sia maggiore di 230V, perché il dispositivo potrebbe essere danneggiato. Tensioni diverse posso-
no danneggiare lo strumento.
• Verrà emesso un breve segnale acustico e tutti i segmenti dell'LCD appariranno contemporaneamente.
6.1 Inserimento delle batterie del trasmettitore / Ricezione dei valori esterni
• Fare scorrere il coperchio del vano batteria verso il basso.
• Inserire due batterie nuove AA da 1,5 V nel vano batterie del trasmettitore. Accertarsi di aver rispettato la
corretta polarità.
• Dopo la messa in funzione il trasmettitore esterno inizia automaticamente a trasmettere i valori esterni.
• Appena la stazione base ricevere i valori esterni, questi vengono visualizzati in modo permanente.
• Se i valori esterni non vengono ricevuti, dopo circa 2 minuti sul display viene visualizzato “- -”. Controlla-
re le batterie e riprovare di nuovo. Eliminare eventuali fonti di interferenza.
• È successivamente possibile avviare anche manualmente la ricerca del segnale del trasmettitore (ad
esempio in caso di perdita del segnale o di sostituzione delle batterie).
• Tenere premuto il tasto HEAT/DEW della stazione base per 3 secondi.
• Sul display appare “---”.
• Premere il tasto TX nel vano batteria del trasmettitore.
• Un breve segnale acustico verrà emesso e la stazione base inizia a ricevere i valori esterni.
• Dopo la corretta messa in funzione del trasmettitore esterno, chiudere il coperchio della batteria.
6.2 La ricezione del segnale radio DCF
• Dopo la ricezione di valori esterni, l'orologio inizia a ricevere il segnale radio; il simbolo della ricezione
del segnale DCF inizia a lampeggiare.
• Se il codice dell'ora è stato ricevuto entro 3-10 minuti, viene visualizzata l'ora radiocontrollata e appare il
simbolo della ricezione del segnale DCF.
• La ricezione del segnale DCF avverrà alle ore 1.00, 2.00 e 3.00 del mattino. Se la ricezione non è avvenu-
ta con successo alle 3.00, verranno eseguiti tentativi ad ogni ora fino alle 5.00.
• È possibile avviare l'inizializzazione manuale.
• Premere il tasto TIME SET.
• Il simbolo della ricezione del segnale DCF inizia a lampeggiare.
• Ci sono 3 differenti simboli di ricezioni:
lampeggiante – Ricezione attiva
Simbolo acceso – Ricezione buona
Nessun simbolo – Nessuna ricezione
TFA_No. 35.1129_Anleit_12_20 22.12.2020 11:14 Uhr Seite 17

SPRING
– Stazione meteo radiocontrollata
34 35
• Per tornare alla visualizzazione dei valori attuali, premere ancora una volta il tasto ▲o ▼.
• L'apparecchio esce automaticamente dalla modalità MAX/MIN se non si preme alcun tasto.
• Tenere premuto il tasto ▲per 3 secondi durante la visualizzazione dei valori massimi per cancellarli.
• Tenere premuto il tasto ▼per 3 secondi durante la visualizzazione dei valori minimi per cancellarli.
• I valori massimi e minimi verranno memorizzati e a mezzanotte vengono resettati automaticamente.
7.3.2 Frecce della tendenza
• La freccia della tendenza mostra se la temperatura e l'umidità sono in aumento, in discesa o stazionarie.
7.4 Previsioni del tempo
• La stazione meteo visualizza 6 simboli meteo diversi (soleggiato, parzialmente nuvoloso, coperto, piovo-
so, tempestoso e neve).
• La previsione tramite l'indicazione del simbolo si riferisce ad un periodo di tempo di 12 ore e indica solo
una tendenza atmosferica. Se ad esempio in questo momento è nuvoloso e viene segnalata pioggia, non
si tratta di un funzionamento difettoso dell'apparecchio, bensì di una indicazione che la pressione del-
l'aria è scesa e c'è da aspettarsi un peggioramento del tempo, anche se non necessariamente la pioggia.
• Il simbolo del sole viene visualizzato durante la notte se vi è una notte stellata.
Nota importante!
• Si prega di notare che il simbolo della previsione diviene più preciso nel corso dell'operazione. Il simbolo
della previsione è attiva sin dall'inizio, ma l'affidabilità delle previsioni aumenta con la quantità dei dati
raccolti. Il sensore deve inizialmente essere impostato sul livello di riferimento del luogo.
• La migliore affidabilità possibile del simbolo della previsione è raggiunta di solito dopo 30 giorni.
7.5 Impostazione dell'allarme temperatura esterna e interna
• Premere il tasto ALERTS in modalità normale.
• HIGH e 60°C (predefinito) o il limite superiore della temperatura esterna impostato vengono visualizzato
sul display.
• Tenere premuto il tasto ALERTS.
• La visualizzazione della temperatura inizia a lampeggiare.
• Impostare con il tasto ▲o ▼il limite massimo desiderato.
• Confermare con il tasto ALERTS.
• LOW e -40°C (predefinito) o il limite inferiore di temperatura esterna impostato vengono visualizzato sul
display.
• La visualizzazione della temperatura inizia a lampeggiare.
• Impostare con il tasto ▲o ▼il limite inferiore desiderato.
• Confermare con il tasto ALERTS.
• Impostare il limite superiore e inferiore della temperatura interna procedendo nello stesso modo.
(Campo di misura: 0°C…+50°C)
7.5.1 Attivazione e disattivazione dell'allarme temperatura esterno e interno
• Premere il tasto ALERTS nella modalità normale per attivare/disattivare i singoli allarmi.
• HIGH e il limite superiore di temperatura esterna impostato vengono visualizzati sul display.
• Premere il tasto ▲per attivare la funzione dell'allarme.
• Premere il tasto ▼per disattivare la funzione dell'allarme.
• Sul display appare/scompare il simbolo dell'allarme sopra HIGH.
• Premere il tasto ALERTS per continuare a regolare i singoli allarmi e per tornare alla visualizzazione in
modalità normale.
7.5.2 Eventualità di allarme
• In caso di allarme il simbolo corrispondente inizia a lampeggiare e viene emesso un segnale acustico.
• Spegnere il segnale acustico con un tasto qualsiasi.
7.6 Indicazione punto di rugiada
• Premendo il tasto HEAT/DEW è possibile visualizzare il punto di rugiada attuale.
• Sul display vengono visualizzati DEW-POINT e la temperatura.
SPRING
– Stazione meteo radiocontrollata
7.1.1 Impostazione della lingua nella quale verrà indicato il giorno della settimana
• In modalità impostazione è possibile scegliere la lingua nella quale verrà indicato il giorno della settima-
na.
• Premere il tasto ▲o ▼.
• Impostazione della lingua: Tedesco (GE) (predefinita), Francese (FR), Italiano (IT), Olandese (NE), Spa-
gnolo (SP), Danese (DA) e Inglese (EN).
• Confermare con il tasto TIME SET.
7.1.2 Impostazione del display 24 o 12 ore
• In modalità impostazione è possibile scegliere fra la visualizzazione del display 24 o 12 ore.
• Premere il tasto ▲o ▼.
• Nel formato 12 ore compare AM (prima di mezzogiorno) e PM (dopo mezzogiorno) sul display.
• Confermare con il tasto TIME SET.
7.1.3 Impostazione della visualizzazione della temperatura
• In modalità impostazione è possibile scegliere fra la visualizzazione della temperatura in °C (gradi Cel-
sius) o °F (gradi Fahrenheit).
• Premere il tasto ▲o ▼.
• Confermare con il tasto TIME SET.
7.2 Funzione sveglia
• Premere il tasto ALARM.
• AL e 0:00 (predefinito) o l'ultima ora impostata della sveglia vengono visualizzati sul display.
• Tenere premuto per 3 secondi il tasto ALARM.
• L’indicazione dell’ora inizia a lampeggiare e appare il simbolo della sveglia.
• È possibile impostare l'ora con il tasto ▲o ▼.
• Premere nuovamente il tasto ALARM ed impostare i minuti con il tasto ▲o ▼.
• Per tornare alla visualizzazione in modalità normale premere ancora una volta il tasto ALARM.
• La funzione sveglia è attivata.
• Il simbolo della sveglia appare sul display accanto all'ora attuale.
• Premere il tasto ALARM in modalità normale per disattivare o attivare la funzione sveglia.
• Sul display viene visualizzata l'ora dell'allarme attuale e AL.
• Premere nuovamente il tasto ALARM. Il simbolo della sveglia scompare o appare.
• Quando l'orario di allarme inserito viene raggiunto, la sveglia comincia a suonare.
• Il simbolo della sveglia inizia a lampeggiare.
• Per arrestare l’allarme, premere un tasto qualunque.
• Se non viene interrotto, il segnale si disattiva automaticamente dopo 2 minuti e si riattiva nuovamente
alla stessa ora.
• Il simbolo resta fisso sul display.
• Quando suona la sveglia innestare la funzione snooze con il tasto SNOOZE/LIGHT (HI – LOW - OFF).
• Quando la funzione snooze è attivata, Zz inizia a lampeggiare.
• Il suono della sveglia verrà interrotto per 10 minuti.
• Premere il tasto ALARM per disattivare la funzione snooze.
• Il simbolo Zz scompare.
7.3 Temperatura e umidità
7.3.1 Valori massimi e minimi
• Premere il tasto ▲nella modalità normale.
• Sul display appare MAX.
• Vengono visualizzate la temperatura massima e l'umidità massima dell'aria, interne ed esterne, raggiunte
dopo l'ultimo azzeramento.
• Premere il tasto ▼nella modalità normale.
• Sul display appare MIN.
• Vengono visualizzate la temperatura minima e l'umidità minima dell'aria, interne ed esterne, raggiunte
dopo l'ultimo azzeramento.
TFA_No. 35.1129_Anleit_12_20 22.12.2020 11:14 Uhr Seite 18

SPRING
– Stazione meteo radiocontrollata
36 37
➜Cercate nuove posizioni per il trasmettitore e/o il stazione base
➜Diminuite la distanza tra il trasmettitore e il stazione base
➜Eliminare fonti di interferenza
Indicazione non corretta ➜Cambiare le batterie
11. Smaltimento
Questo prodotto è stato realizzato utilizzando materiali e componenti di alta qualità che possono essere rici-
clati e riutilizzati.
È assolutamente vietato gettate le batterie tra i rifiuti domestici. In qualità di consumatori,
siete tenuti per legge a consegnare le batterie usate al negoziante o ad altri enti preposti al
riciclaggio in conformità alle vigenti disposizioni nazionali o locali, ai fini di uno smaltimento
ecologico.
Le sigle dei metalli pesanti contenuti sono: Cd=cadmio, Hg=mercurio, Pb=piombo
Questo apparecchio è etichettato in conformità alla Direttiva UE sullo smaltimento delle appa-
recchiature elettriche ed elettroniche (WEEE).
Questo prodotto non deve essere smaltito insieme ai rifiuti domestici. Il consumatore è tenuto
a consegnare il vecchio apparecchio presso un punto di raccolta per lo smaltimento di appa-
recchiature elettriche ed elettroniche ai fini di uno smaltimento ecologico.
12. Dati tecnici
Stazione di base:
Campo di misura interna
Temperatura: 0 °C…+50 °C (+32…+122 °F)
Umidità: 1...99 %
Precisione umidità: ±5% (30%...80% rH)
Alimentazione: Batterie 3 x AAA da 1,5 V (non fornite)
Utilizzare batterie alcaline
Alimentatore (fornite):
Ingresso: 230-240V, AC 50Hz, 50mA
Uscita: 5,0V, AC 0,15A, 0,75W
Rendimento medio in modo attivo: >53.5%
Potenza assorbita nella condizione a vuoto: <0,21 W
Dimensioni esterne: 210 x 26 (60) x 140 mm
Peso: 348 g (solo apparecchio)
Trasmettitore esterno:
Campo di misura esterno
Temperatura: -40 °C...+60°C (-40…+140 °F)
Umidità: 1...99 %
Precisione umidità: ±5% (30%...80% rH)
Raggio d'azione: ca. 60 metri al massimo
Frequenza di trasmissione: 433 MHz
Massima potenza a
radiofrequenza trasmessa: < 10mW
SPRING
– Stazione meteo radiocontrollata
• Il display torna automaticamente alla visualizzazione corrente di temperatura e umidità.
•Questa correlazione fra temperatura e umidità relativa viene espressa dal punto di rugiada: Se l’aria
viene raffreddata in modo continuo, al permanere costante dell’umidità assoluta, l’umidità relativa
aumenta fino al 100%. Se l’aria si raffredda ulteriormente, il vapore acqueo in eccesso viene espul-
so sotto forma di gocce.
8. Posizionamento della stazione base e fissaggio del trasmettitore
• Con il supporto pieghevole situato nella parte posteriore è possibile disporre la stazione base su superfi-
ci piane.
• Con le alette di fissaggio sul retro, la stazione base può essere fissati alla parete della stanza. Evitare l’in-
stallazione in prossimità di altri apparecchi elettrici (televisori, computer, cellulari) e oggetti metallici
pesanti.
• Il trasmettitore può essere posizionato su una superficie liscia e diritta o attaccato al gancio di solleva-
mento sulla parete. Cercare un luogo ombreggiato e al riparo dalla pioggia per il trasmettitore. (La luce
diretta del sole falsifica la misurazione e l'umidità costante sforza inutilmente le componenti elettroni-
che).
• Verificare se il trasferimento dei valori di misura alla stazione base da parte del trasmettitore ha luogo
correttamente (raggio d’azione in campo libero circa 60 metri. In caso di pareti spesse, in particolare con
parti metalliche, il raggio d’azione del trasmettitore potrà ridursi notevolmente).
• Se necessario, cercate nuove posizioni per il trasmettitore e/o il ricevitore.
9. Cura e manutenzione
• Per pulire l'apparecchio utilizzare solo un panno morbido leggermente inumidito. Non usare solventi o
abrasivi.
• Rimuovere le batterie ed estraete la spina dalla presa se non si utilizzano i dispositivi per un periodo pro-
lungato.
• Collocare i dispositivi in un luogo asciutto.
9.1 Sostituzione delle batterie
• Cambiare le batterie del trasmettitore se il simbolo della batteria appare sul display dei valori esterni della
stazione base.
• Cambiare le batterie della stazione base se il simbolo della batteria appare sul display dei valori interni.
•Attenzione:
dopo aver sostituito le batterie è necessario ristabilire il contatto tra il trasmettitore e il ricevitore, pertan-
to cambiate sempre le batterie contemporaneamente ad entrambi i dispositivi oppure avviate manual-
mente la ricerca del trasmettitore.
10. Guasti
Problema Risoluzione del problema
Nessuna indicazione Funzionamento con spina di alimentazione:
sul dispositivo ➜ Collegare la stazione base tramite l'alimentazione
➜Attivare permanentemente la retroilluminazione
➜Verificare l'alimentatore
Funzionamento con batterie:
➜Inserire le batterie rispettando le corrette polarità
➜Premere un tasto qualisiasi per attivare brevemente la retroillumi-
nazione
➜Cambiare le batterie
Nessuna ricezione ➜Nessun trasmettitore installata
del trasmettitore ➜Controllare le batterie del trasmettitore (non utilizzare le batterie
Indicazione “---“ ricaricabile!)
➜Riavviate il trasmettitore e la stazione base secondo le istruzioni
➜Avviare il trasmettitore manuale secondo le istruzioni
TFA_No. 35.1129_Anleit_12_20 22.12.2020 11:14 Uhr Seite 19

SPRING
– Draadloze weerstation
38 39
Hartelijk dank dat u voor dit apparaat van de firma TFA hebt gekozen.
1. Voor u met het apparaat gaat werken
•Leest u a.u.b. de gebruiksaanwijzing aandachtig door. Zo raakt u vertrouwd met uw nieuw apparaat en
leert u alle functies en onderdelen kennen, komt u belangrijke details te weten met het oog op het in
bedrijf stellen van het apparaat en de omgang ermee en krijgt u tips voor het geval van een storing.
•Door rekening te houden met wat er in de handleiding staat, vermijdt u ook beschadigingen van het
apparaat en riskeert u niet dat uw wettelijke rechten door verkeerd gebruik niet meer gelden.
•Voor schade die wordt veroorzaakt doordat u geen rekening houdt met de handleiding aanvaarden
wij geen aansprakelijkheid. Ook zijn wij niet verantwoordelijk voor verkeerde metingen en de moge-
lijke gevolgen die daaruit voortvloeien.
•Neem in elk geval acht op de veiligheidsinstructies !
•Bewaar deze gebruiksaanwijzing a.u.b. goed!
2. Levering
• Draadloze weerstation (basisapparaat)
• Stroomadapter
• Buitenzender (kat.-nr. 30.3206.02)
• Gebruiksaanwijzing
3. Hoe u uw nieuw apparaat kunt gebruiken en alle voordelen ervan in één oogopslag:
• Buitentemperatuur en buitenluchtvochtigheid door een draadloze buitenzender (433 MHz), zendbereik
van maximaal 60 meter (vrijveld)
• Binnentemperatuur en luchtvochtigheid
• Tendens, maximum- en minimumwaarden, temperatuuralarm
• Geanimeerde weersverwachting met symbolen en luchtdruktendens
• Dauwpunt
• Zendergestuurde klok met datum en weekdagen ( 7 talen)
• Alarm met snooze-functie
• Kleurendisplay met twee lichtsterktes (in een permanente bedrijvigheid met netaansluiting)
4. Voor uw veiligheid
• Het product is uitsluitend geschikt voor de hierboven beschreven doeleinden. Gebruik het product niet
anders dan in deze handleiding is aangegeven.
• Het eigenmachtig repareren, verbouwen of veranderen van het apparaat is niet toegestaan.
Voorzichtig!
Levensgevaar door elektrocutie!
• Sluit het basisapparaat uitsluitend aan op een volgens de voorschriften geïnstalleerd stop-
contact met een netspanning van 230V! Het stopcontact moet zich dicht bij de apparatuur bevinden en
gemakkelijk toegankelijk zijn.
• Basisapparaat en netvoeding mogen niet met water of vocht in aanraking komen. Ze zijn alleen geschikt
voor het gebruik in droge ruimtes.
• Gebruik het apparaat niet wanneer de behuizing of de netvoeding beschadigd is.
• Bewaar het apparaat buiten de reikwijdte van personen (ook kinderen) die de mogelijke gevaren van elek-
trische apparaten zouden kunnen onderschatten.
• Trek onmiddellijk de oplader uit het stopcontact als er een storing optreedt of wanneer het apparaat
gedurende langere tijd niet zal worden gebruikt.
• Gebruik uitsluitend de bijbehorende netvoeding.
• Sluit eerst de kabel op het basisapparaat aan, steek daarna de stekker in het stopcontact.
• Trek de stekker niet aan de kabel uit het stopcontact.
• Leg het snoer zo neer dat het niet met scherpe of hete voorwerpen in aanraking komt.
Voorzichtig!
Kans op letsel:
• Bewaar de apparaten en de batterijen buiten de reikwijdte van kinderen.
SPRING
– Stazione meteo radiocontrollata
Tempo di trasmissione: 50 secondi
Alimentazione: Batterie 2 x 1,5 V AA (non fornite)
Utilizzare batterie alcaline
Dimensioni esterne: 40 x 21 x 130 mm
Peso: 47 g (solo apparecchio)
È vietata la pubblicazione delle presenti istruzioni o di parti di esse senza una precedente autorizzazione della TFA
Dostmann. I dati tecnici corrispondono allo stato del prodotto al momento della stampa e possono cambiare senza preav-
viso. È possibile trovare dati tecnici e informazioni aggiornate sul prodotto inserendo il numero di articolo sul nostro sito.
Dichiarazione di conformità UE
Il fabbricante, TFA Dostmann, dichiara che il tipo di apparecchiatura radio 35.1129.01 è conforme alla direttiva 2014/53/UE.
Il testo completo della dichiarazione di conformità UE è disponibile al seguente indirizzo Internet:
www.tfa-dostmann.de/service/downloads/ce
www.tfa-dostmann.de
E-Mail: [email protected]
TFA Dostmann GmbH & Co.KG, Zum Ottersberg 12, D-97877 Wertheim, Germania
Numero di iscrizione nel registro delle imprese: Reg. Gericht Mannheim HRA 570186 12/20
TFA_No. 35.1129_Anleit_12_20 22.12.2020 11:14 Uhr Seite 20
This manual suits for next models
2
Table of contents
Languages:
Other TFA Weather Station manuals

TFA
TFA 47.3004 User manual

TFA
TFA 30.3057.01 User manual

TFA
TFA 35.1078.10.IT User manual

TFA
TFA 35.1136 User manual

TFA
TFA WEATHERHUB User manual

TFA
TFA AXIS 35.1079 User manual

TFA
TFA AIRCO2NTROL OBSERVER User manual

TFA
TFA slim-touch User manual

TFA
TFA 30.3016.54.IT User manual

TFA
TFA Weather Station User manual
Popular Weather Station manuals by other brands

CAPTELEC
CAPTELEC S0620 manual

Velleman
Velleman WS3080 user manual

Calypso
Calypso WEATHERDOT user manual

Spectrum Technologies
Spectrum Technologies WatchDog 2000 Series Technical bulletin

Siemens
Siemens 5WG1 257-3AB22 Operating and mounting instructions

La Crosse Technology
La Crosse Technology WIRELESS 868 MHz instruction manual