TIPTEL INNOVAPHONE 200 User manual


Page 2 tiptel innovaphone IP 200
Release 5, 1st edition, March 2003
PDF version available for download at:
http://www.innovaphone.com
Brand names are used with no guarantee that they may be freely employed.
Almost all hardware and software designations in this manual are registered
trademarks and should be treated as such.
All rights reserved. No sections of this manual may be reproduced in any way
(print, photocopy, microfilm or by any other means) or processed, duplicated or
distributed using electronic systems without explicit approval.
Texts and illustrations have been compiled and software created with the
utmost care, however errors cannot be completely ruled out. This documenta-
tion is therefore delivered under exclusion of any liability or warranty of suitabil-
ity for specific purposes. innovaphone reserves the right to improve or modify
this documentation without prior notice.
Copyright © 2001-2003 innovaphone®AG
Böblinger Str. 76 71065 Sindelfingen, Germany
Tel +49 (70 31) 7 30 09-0 Fax +49 (70 31) 7 30 09-99
http://www.innovaphone.com

tiptel innovaphone IP 200 Page 3
1 About this manual
This manual describes how to operate your tiptel innovaphone 200 VoIP
telephone. The comprehensive manual titled "innovaphone Operating Manual -
VoIP Terminals" which is used for the configuration and connection of the IP
200 can be found in the download area at www.innovaphone.com.
The safety instructions specified in Appendix A must be observed.
2 Top view of the IP 200
Figure 1 Top view of the IP 200 comfort telephone
12 34
5
6
7891011

Page 4 tiptel innovaphone IP 200
Pos. Symbol Description and key function
1Handsetsupport
2Display
3LED
4 Menu selection and Function keys
The six Function keys next to the display are used to select
menus, to execute functions assigned to them or to directly
dial a subscriber displayed there.
5 Menu The Menu key is used to open the main menu or save
changes.
6 Loudspeaker
7Keypad
The Stop key is used to cancel a function and return to the
next higher menu.
The Shift key is used in combination with a subsequent key
to enter capital letters.
The Backspace key is used to delete characters to the left
of the cursor while making an entry.
The Alt key can be used in combination with a subsequent
key to enter the special character above the key as well as
additional special characters.
Space key is for entering spaces
The Enter key is used to complete an entry or select the
current line of a list.
8Functionblock
The Clearing key is used to end a call.
The Mute key is used to switch off/on the microphone.
The Refer-back key is used to enable the functions "Hold"
and "Switch". In idle mode, the Refer-back key is used to
call up the list of missed calls.

tiptel innovaphone IP 200 Page 5
2.1 Display
Figure 2 Display of the IP 200 comfort telephone
Pos. Symbol Description and key function
The Redial key is used to call up the list of 100 last dialled
phone numbers.
The Loudspeaker key is used to switch on/off the hands-
free system.
9
n... v
Dial keypad
Digit keys for entering phone numbers
Star and hash have special functions for touch-tone
dialling.
10 Microphone
11
Arrow keys for menu navigation
1234

Page 6 tiptel innovaphone IP 200
Pos. Symbol Designation
1 Name (H.323 ID or nickname of the innovaphone PBX con-
figuration)
2 Status line; gives information on the current status of the
telephone using the following symbols:
Date
Time
No connection to the gatekeeper
Connection established to the gatekeeper
Loudspeaker on
Hands-free system activated
Microphone switched off (symbol flashing)
Head set activated
Call diversion activated
Handset activated
Telephone lock activated
3 Own phone number (E.164)
4 Function keys for dialling a function directly

tiptel innovaphone IP 200 Page 7
2.2 Operating instructions
2.2.1 Setting the volume
You can adjust the volume while establishing a connection as well as during the
call. This only applies to the loudness of the device currently active (handset,
hands-free system or head set), which is retained after the call. The "Vol"
display shows the value set (see Fig. 3).
Figure 3 Adjusting the volume
2.2.2 User guidance
The menu system helps you operate your IP 200. Starting at the main menu,
you are directed to your desired function via submenus.
Figure 4 Main menu
1. The volume can be changed in
steps by pressing the Arrow keys
or .
Volume one step quieter
Volume one step louder

Page 8 tiptel innovaphone IP 200
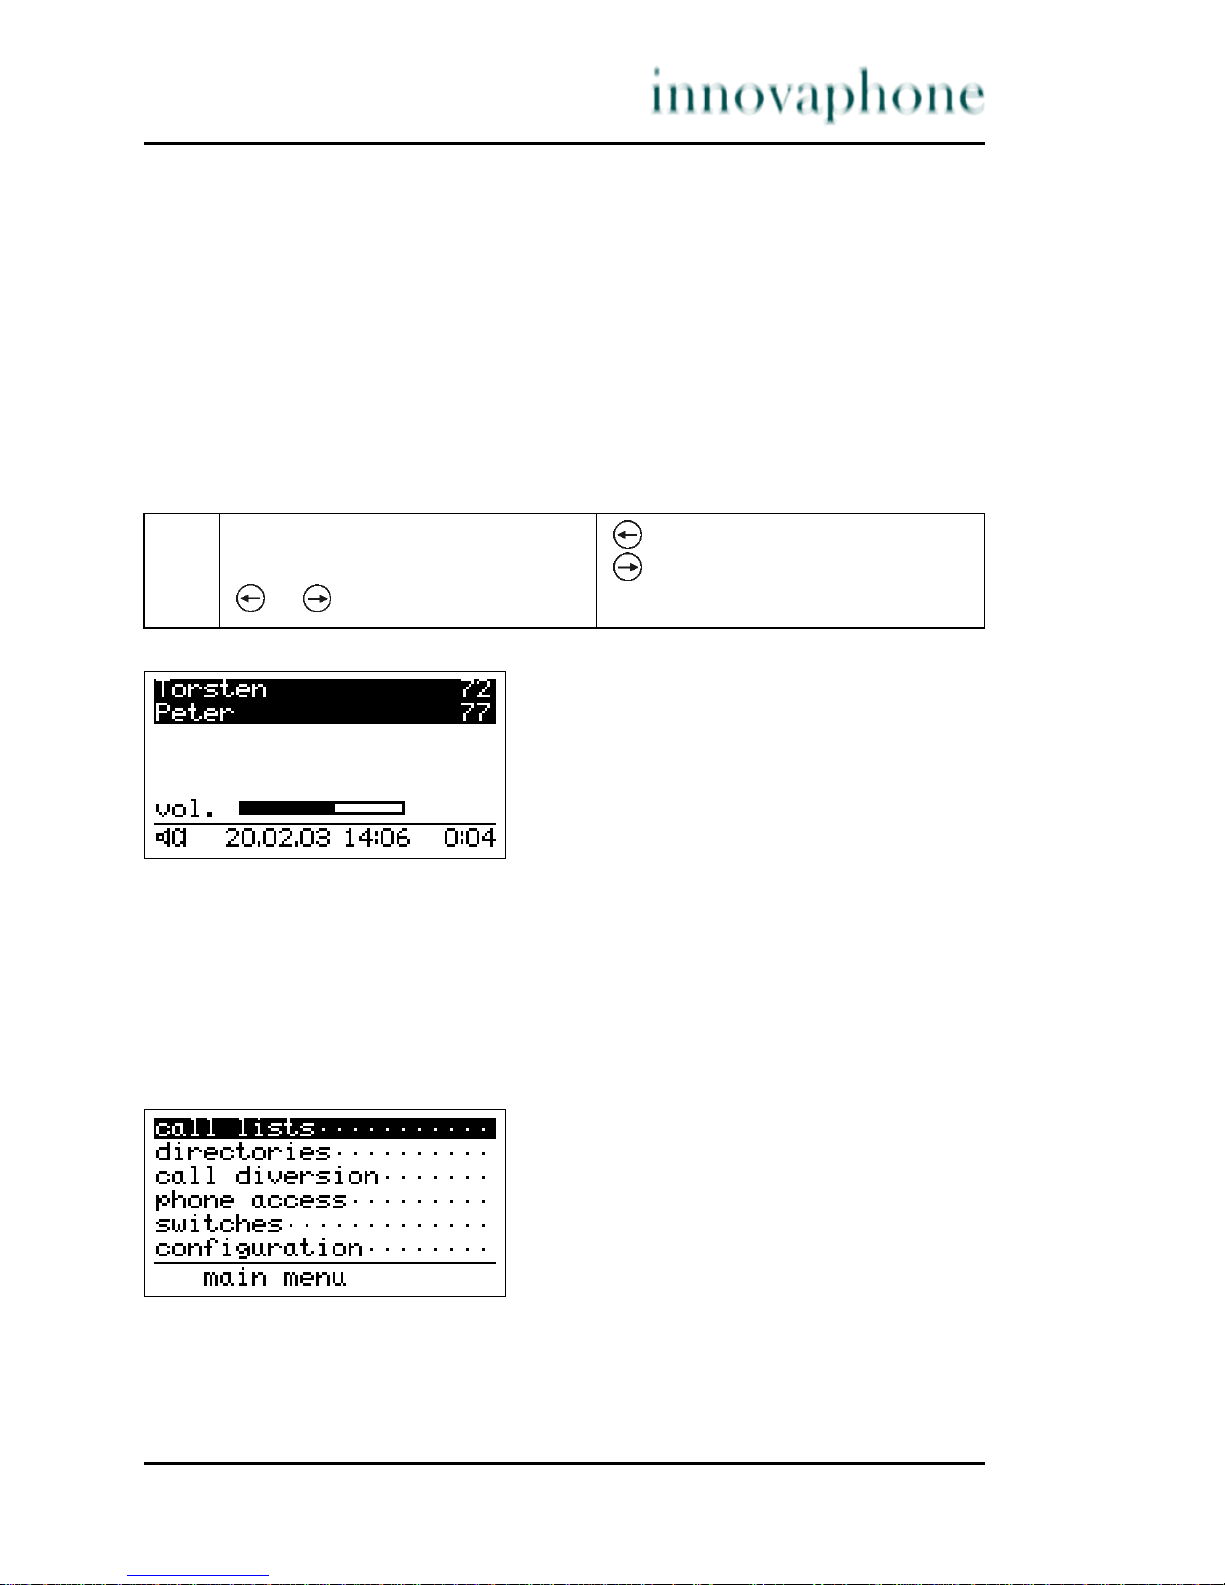
Call lists .....................Menu for displaying call lists for incoming, outgoing
and combined calls. A filter is able to be set for the dis-
play of combined calls, as well as in the menu for dis-
playing the active return calls.
Directories ................ Menu for entering a directory or looking through a
telephone directory.
Call diversion ............Menu for setting and displaying call diversions. This
menu item only appears if the gatekeeper supports the
call diversion in accordance with the H.450 standard.
Phone access ............Menu for blocking the terminal, changing the PIN or
for changing the user and logging joint users on and
off.
Switches .................... Setting functions such as call waiting, line identifica-
tion presentation, head set and direct dialling
Configuration ............Secondary menus for configuration
In general, the following applies:
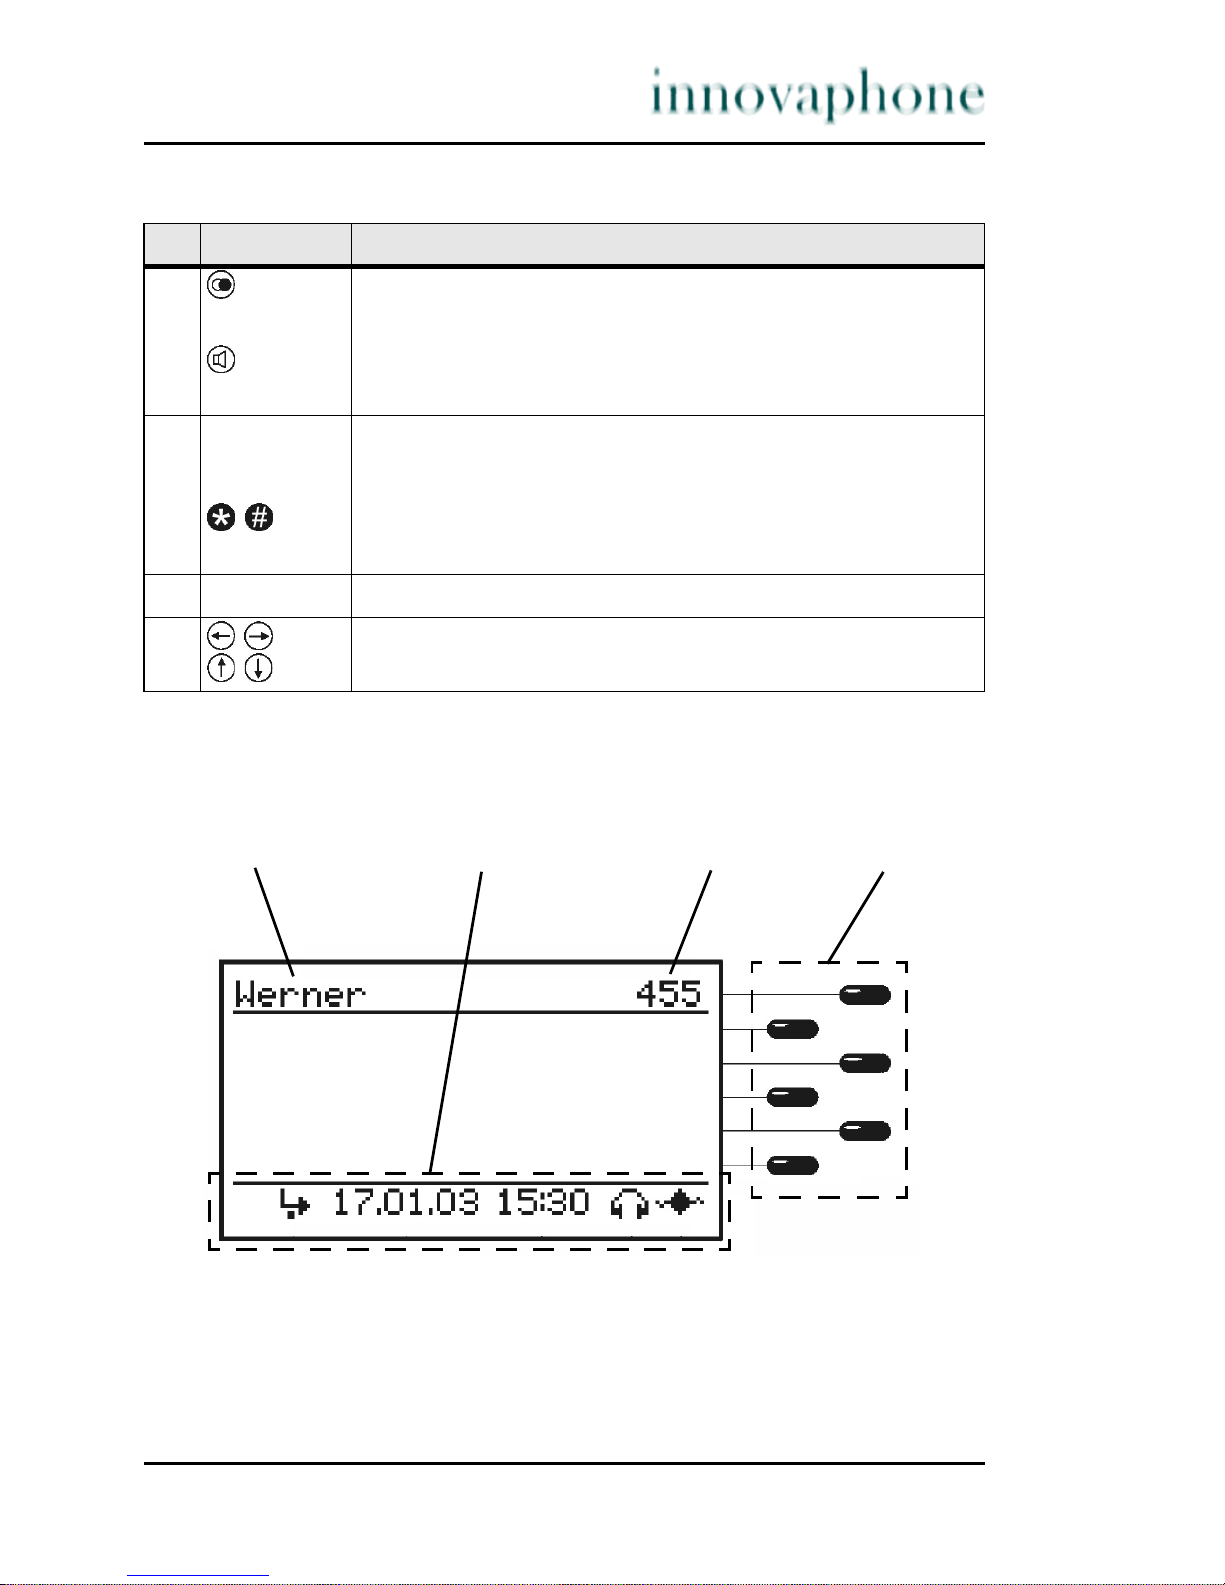
•The initial condition is that the handset is hung up and the display shows
the date and time.
•The Menu key is used to switch from the initial condition to the main
menu. It is used to switch from any submenu to the next higher-level menu,
at the same time confirming any changes made in the submenu.
•The modified values are saved upon returning to the main menu, but first
an enquiry is made about whether the modifications are to be saved.
•The Function keys next to the display are used to switch to the corres-
ponding submenu of the respective line (i.e. one menu level lower) or to
activate the corresponding function of the line.
•The Arrow keys and are used to switch between the menu selection
lines or function lines and the edit fields of a menu, i.e. to determine the
current line of the menu.
•If the current line is a menu selection line or function line, it is displayed
inversely. If it is an edit field, a flashing cursor indicates the input position.

tiptel innovaphone IP 200 Page 9
•The Arrow key is used to switch to the corresponding submenu of the
current line (i.e. one menu level lower) or to activate the corresponding
function of the line.
•The Stop key and the Arrow key switch one menu level higher each
time they are pressed. Any changes made in the submenu are discarded.
To adopt any changes, the submenu has to be exited by pressing the
Menu key.
•The Clearing key is used to discard all entries and return to the initial
condition.
•The Enter key is used to complete entries in an edit field.
•The bottom line of the display shows the current menu level (<<...).
The number of arrows "<" corresponds to the level in the menu.
Moving within lists
Your IP telephone offers you a number of lists in which you can move using the
Arrow keys. The respective current entry is displayed inversely.
Figure 5 Example of an entry to a directory
You can move up and down within the list using the Arrow keys and .
In a submenu, the Arrow key moves you to the current entry. The entry can
be edited in this menu.
The Menu key moves you to the current entry in a context menu. Additional
information on the entry is displayed in this menu. Furthermore, it allows dial-
ling with line identification presentation either switched on or off.
The current entry is dialled immediately by lifting the handset or pressing the
Enter key , i.e. the destination specified by the entry is dialled (hand-free
mode).

Page 10 tiptel innovaphone IP 200
An entry can also be dialled using the Function keys . This precise function
however depends on the type of list.
Editing entries
Various forms contain edit fields in which you can make entries. A flashing verti-
cal line appears in edit fields as a cursor.
Figure 6 Editing entries
Newly entered characters are added to the left of the cursor. Any characters
present to the right of the cursor are shifted to the right. The Backspace key
(above the Enter key ) deletes the character to the left of the cursor.
The key combination and deletes the character to the right of the cursor.
Entering special characters
You can enter any Western European characters in accordance with ISO 8859-1
on the keypad. Characters without their own key can be reached by first press-
ing or. , and then the corresponding letter key (see Table 1).
Different characters can be selected by pressing the letter key consecutively in
quick succession. The following special characters are available and can be
entered by pressing the corresponding key combination of the respective char-
acter:
! ” # $ % & ´ ( ) * + , - . / : ; < = > ? @ [ ] \ ^ _ ‘ { | } ~ £ § ¿÷

tiptel innovaphone IP 200 Page 11
Table 1 Special characters
Key + key + +
key
Key + key + +
key
Q @ [ ] \ ... ´ ( ) * ... F & ´ ( ) ... ~ £ § ¿...
W§
¿÷ ... £ § ¿... G ( ) * + ... { | } ~ ...
E è é ê ë È É Ê Ë H ) * + , ... } ~ £ § ...
R $ % & ... % & ´ ... J - . / : ; ... [ ] \ ^ ...
T ð ¥ ð ¥ K + , - . / ... ] \ ^ _ ...
Z / : ; < ... ? @ [ ] ... L _‘ { | } ... ^ _ ‘ { ...
U ü ù ú û Ü Ù Ú Û Y Ý ý ÿ Ý ý ÿ
I ì í î ï i Ì Í Î Ï X . / : ; ... ; < = > ...
O ö ø ò ó ô õ Ö Ø Ò Ó Ô Õ C ç ¢ Ç
P = > ? ... | } ~ £ ... V , - . / : ... + , - . / ...
A ä å æ à á â ã Ä Å Æ À Á Â Ã B Þþ
Sß ß Nñ Ñ
DÐ Ð Mµ µ

Page 12 tiptel innovaphone IP 200
2.3 Phoning
2.3.1 Answering a call
You receive a call and your telephone rings. The name and the phone number
of the caller are displayed. The name and phone number of the person for
whom the call is intended are also displayed. This is particularly useful if you
wish to identify the actual caller when a call is diverted to your telephone.
Figure 7 Answering a call
If you would like to answer the call:
If you would like to reject the call:
2.3.2 Terminating a call
You would like to terminate an existing connection.
1. Pick up the handset or press the
Loudspeaker key .
You are connected with the caller
and can make a call.
1. Press the Clearing key . The telephone returns to idle
mode.
1. Replace the handset. Press the
Loudspeaker key if you are in
hands-free mode.
The connection is terminated.

tiptel innovaphone IP 200 Page 13
2.3.3 Direct manual dialling
In this case, the IP telephone dials the number while it is being entered. If a
connection has already been established, all digits entered are transmitted as
DTMF signals. You can remote control terminals this way.
Figure 8 Direct dialling
2.3.4 Prepared dialling
In this case, the number to be called is first prepared and then dialled.
1. Pick up the handset or switch on
hands-free conversation using
the Loudspeaker key .
In handset mode the symbol
appears, in hands-free mode the
symbol.
2. Enter the phone number using
the keys.
The dial code appears and is dialled
by the telephone (see Fig. 8).
3. After the call:
Replace the handset or switch
off the hands-free system using
the Loudspeaker key .
The telephone returns to its initial
condition.
1. Use the keys to enter the phone
number
The dial code appears on the
display.
2. Pick up the handset or switch on
hands-free conversation using
the Loudspeaker key .
The telephone dials.

Page 14 tiptel innovaphone IP 200
The Menu key can be used to switch to a menu in which you can switch call
number suppression on or off before dialling.
2.3.5 Dialling from the directory
The directory is opened automatically once the first letter of a desired entry is
entered. The entries matching the respective incomplete entry are displayed.
The desired entry can be selected using the Arrow keys or .
Figure 9 Directory menu
This subscriber is dialled by picking up the handset, pressing the Loudspeaker
key or by pressing the Enter key . The current entry can also be dialled
by pressing the Function key next to the entry. The previous entry is dialled
by pressing the Function key next to the sixth line.
Figure 10 Dialling from the directory
1. Enter the first letters of the
entry.
The entries beginning with the
entered letters appear on the
display.
2. Press the Arrow key or . Select the desired entry
(see Fig. 10).

tiptel innovaphone IP 200 Page 15
In a context menu, the Menu key moves you to the current entry. You can
initiate dialling from this menu (with phone number suppression if desired).
2.3.6 Different types of phone numbers
In addition to dialling normal phone numbers your IP telephone can also be
used using H.323 names and IP addresses.
Phone numbers consisting of characters other than the digits 0 to 9 and the
characters * and # are interpreted as H.323 names. Phone numbers beginning
with the character @ are always regarded as H.323 name. The @ is removed
before dialling however.
In some cases you can also directly dial an IP address. To do this, enter @ fol-
lowed by the IP address using the Star key as decimal point . An extension
number can be added, where appropriate, separated by a hash #.
Figure 11 Dialling an IP address
3. Start dialling:
Pick up the handset and press
the Enter key or the Loud-
speaker key .
The telephone starts to dial the
phone number.

Page 16 tiptel innovaphone IP 200
2.3.7 Redialling
The 100 phone numbers last dialled are saved automatically together with their
time and date and can be dialled again. In the initial condition, press the Redial
key to call up the function. The list of the phone numbers dialled last are dis-
played. The handset symbol on the display indicates that a call has taken
place.
Figure 12 List of the phone numbers dialled last
Dialling from the redial list
In a context menu, the Menu key moves you to the current entry. You can
initiate dialling from this menu (with phone number suppression if desired).
If, during a connection, a call has been diverted to a different number, the des-
tination of the diversion is displayed in addition to the number initially dialled.
You can also initiate dialling this number (with phone number suppression
where appropriate).
1. Press the Redial key . The contents of the redial list
appear on the display (see Fig 12).
2. Press the Arrow key or . Select the desired entry.
3. Start dialling:
Pick up the handset and press
the Enter key or the Loud-
speaker key .
The telephone starts to dial the
phone number.

tiptel innovaphone IP 200 Page 17
Corrected dialling from the redial list
It is possible for to first correct the phone number to be repeated.
Editing the redial list
Figure 13 Editing the redial list
1. Press the Redial key . The contents of the redial list
appear on the display (see Fig 12).
2. Press the Arrow key or . Select the desired entry.
3. Press the bottom Function key
next to the entry.
The cursor is within the field for
the phone number. You can now
correct the phone number.
4. Pick up the handset, press the
Enter key or Loudspeaker
key or press the bottom
Function key next to the
entry again.
The telephone starts to dial the
phone number.
1. Press the Redial key . The contents of the redial list
appear on the display (see Fig 12).
2. Press the Arrow key or . Select the desired entry.
3. Press the top Function key
or the Arrow key .
A menu appears in the display.
In addition, the call duration
display appears for the calls
already made (see Fig 13).

Page 18 tiptel innovaphone IP 200
Adding a number to the directory
It is possible for you to copy a phone number from the redial list into your direc-
tory.
Deleting an entry
Deleting a list
2.3.8 Open listening
You can switch on the loudspeaker while making a call using the handset,
making it possible for the call to be heard in the room.
Figure 14 Open listening
1. Press the Function key next
to Save no in directory as
illustrated by Fig. 13.
The input field of your directory
appears. The phone number has
already been entered. You can
now add the name and complete
the entry.
1. Press the Function key next
to Delete entry as illustrated
by Fig. 13.
The current entry is deleted.
The display returns to its previous
state (see Fig. 12).
1. Press the Function key next
to Delete list as illustrated by
Fig 13.
All older entries and the entry
being currently processed are
deleted. The display switches to
its previous state (see Fig. 12).

tiptel innovaphone IP 200 Page 19
2.3.9 Hands-free conversation
The hands-free system makes it possible to make a call while the handset is
hung up.
Figure 15 Hands-free conversation
a) You receive a call:
1. Press the Loudspeaker key
during a call.
The loudspeaker symbol
appears (see Fig. 14) and the
loudspeaker is switched on.
Adjust the desired volume using
the Arrow keys or .
2. Press the Loudspeaker key
again.
The loudspeaker symbol dis-
appears. The loudspeaker is
switched off.
1. Press the Loudspeaker key . The hands-free system is
switched on. The symbols " "
appear (see Fig. 15). The hands-
free system is switched on. Set
the desired volume using the
Arrow keys or .
2. Press the Loudspeaker key
again after the call.
The hands-free system is
switched off.

Page 20 tiptel innovaphone IP 200
b) You want to make a hands-free call:
Switching from the handset to the hands-free system and vice versa
You are making a call using the handset and would like to switch to the hands-
free system:
You are making a call using the hands-free system and would like to switch to
the handset:
1. Press the Loudspeaker key . The loudspeaker is switched on.
The symbols " " appear.
2. Enter the phone number. The telephone dials.
3. Press the Loudspeaker key
again after the call.
The hands-free system is
switched off.
1. Press the Loudspeaker key
and hold it down.
The loudspeaker symbol " "
appears.
2. Replace the handset.
3. Let go of the Loudspeaker
key .
The microphone symbol appears
" " next to the loudspeaker sym-
bol " ". The hands-free system is
switched on. Set the desired vol-
ume using the Arrow key or
.
1. Replace the handset. The symbols " " disappear. The
hands-free system is switched off.
Other manuals for INNOVAPHONE 200
1
Table of contents
Other TIPTEL Telephone manuals

TIPTEL
TIPTEL 114 User manual

TIPTEL
TIPTEL IP 386 User manual

TIPTEL
TIPTEL 83 system User manual

TIPTEL
TIPTEL 3022 office User manual

TIPTEL
TIPTEL 195 User manual

TIPTEL
TIPTEL 1030 User manual

TIPTEL
TIPTEL 1010 User manual

TIPTEL
TIPTEL 6240 User manual

TIPTEL
TIPTEL 822XT User manual

TIPTEL
TIPTEL 6120 User manual

TIPTEL
TIPTEL 114 User manual

TIPTEL
TIPTEL 218 User manual

TIPTEL
TIPTEL Ergophone 12 User manual

TIPTEL
TIPTEL 1020 User manual

TIPTEL
TIPTEL 410 User manual

TIPTEL
TIPTEL 85 System S0 User manual

TIPTEL
TIPTEL 160 User manual

TIPTEL
TIPTEL 3110 User manual

TIPTEL
TIPTEL 274 User manual

TIPTEL
TIPTEL 124 User manual