Toa IP-300XI User manual
INSTRUCTION MANUAL
NETWORK MODULE
IP-300XI
Thank you for choosing the TOA network module.
Please carefully follow the instructions in this manual to ensure long, trouble-free use of your equipment.
1.
GENERAL DESCRIPTION
IP-300XI is a network audio signal conversion module. It can transform analog audio signals to digital audio
signals or transform digital audio signals to analog audio signals for long-distance transmission via local area
networks or wide area networks, featuring low signal transmission loss, good anti-jamming capability and simple
wiring. It can be used in combination with other TOA products, including A-9000M2 series, M-9000M2 series,
A-900MK2 series, M-900MK2 series, AX-0120 series, AX-0240 series, FS-9205DA, DA-502H CE-GB, DA-502H
5TW, VX-2000 series and BG-2000 series.
2.
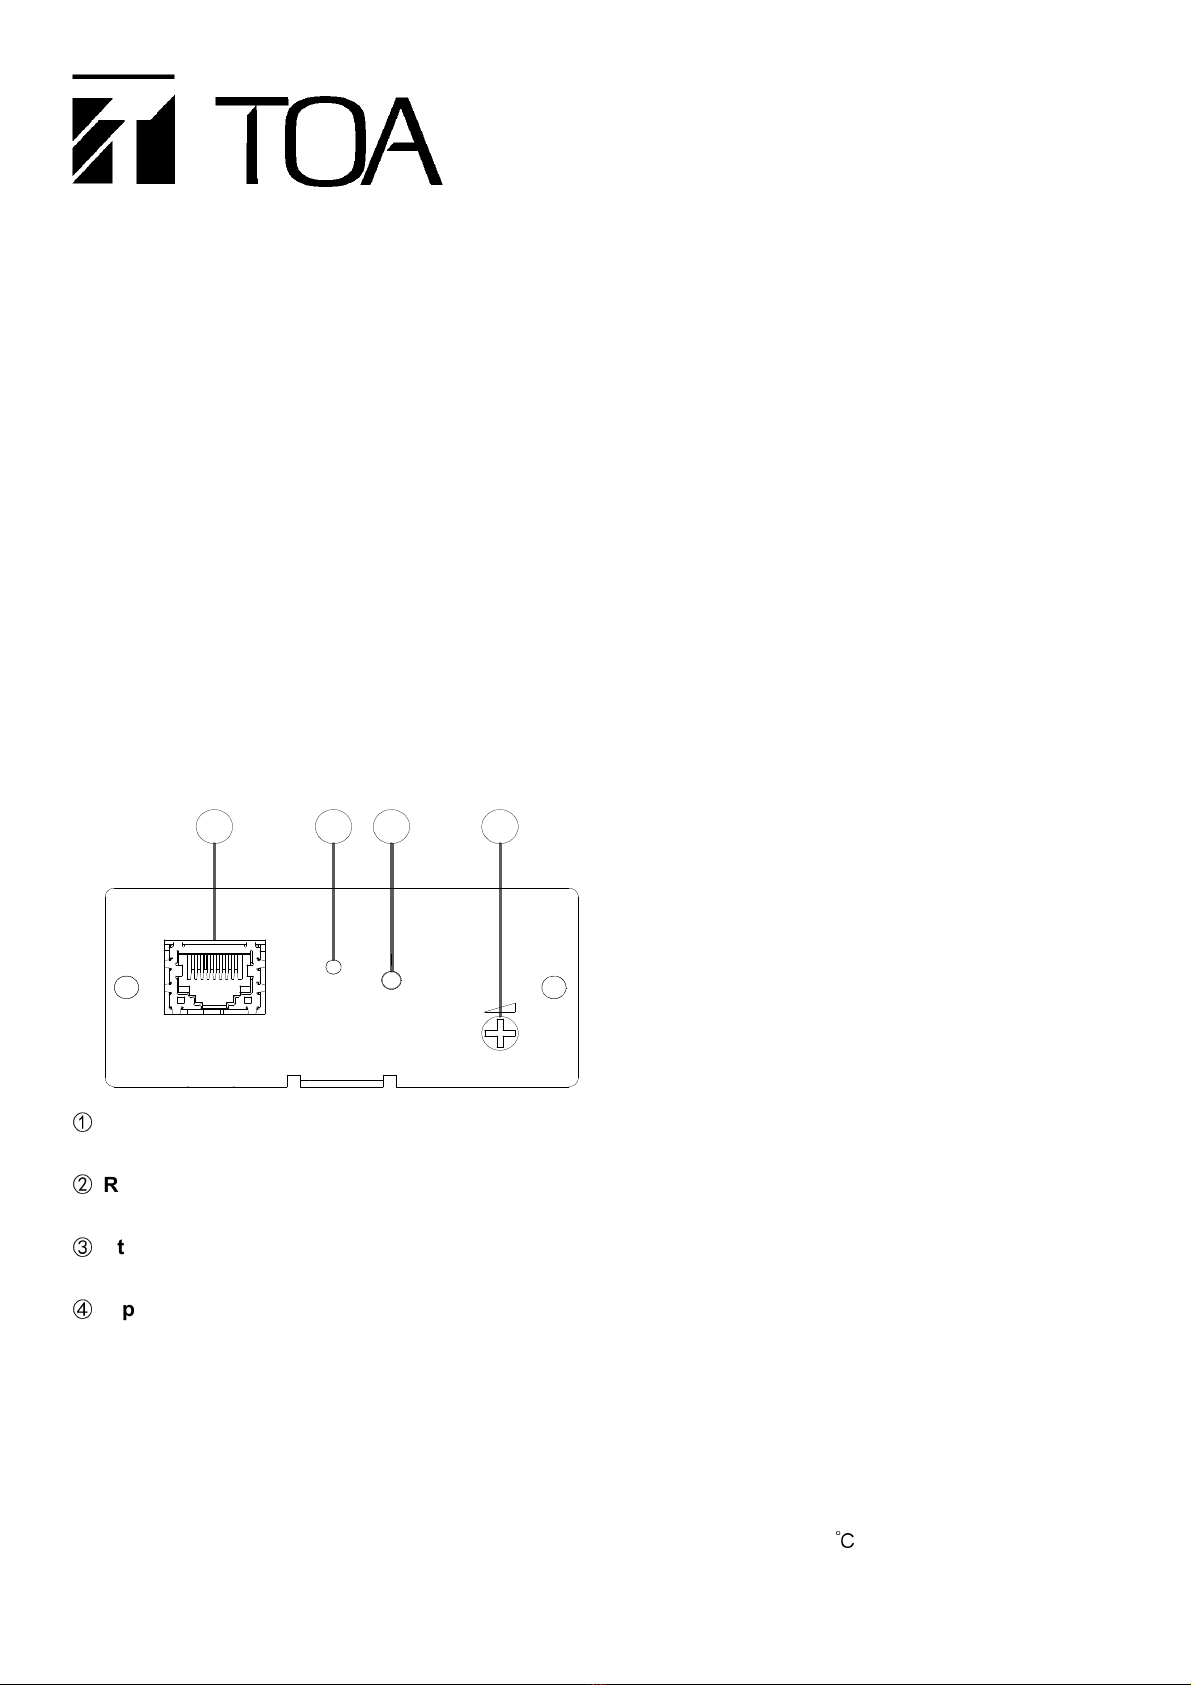
NOMENCLATURE AND FUNCTIONS
1 2 3 4
LAN
STATUS
RESET
VOLUME
IP-300XI
①
Networ connection port [LAN]
It can be connected with 100 BASE-T network cables.
②
Reset switch [RESET]
Press this button to reset the module.
③
Status indicator [STATUS]
The green indicator will flicker regularly when the module is normal.
④
Input volume control [VOLUME]
Adjusts gain of the input .
3. NOTICES
When IP-300XI is installed in a power amplifier, such installation shall be done with the power amplifier
disconnected from its power source.
The module shall be used in an environment with the temperature of 0~+40
℃
and relative humidity of no
more than 90% (no dew formation).

4. SETTINGS
When this module is used in combination with different TOA products, it shall be set correspondingly.
Note: no change to the settings is required when it is used in combination with AX-0120 series or AX-0240 series.
4.1 As shown in the following figure, the jumpers of the input and output substrates (inside) shall be set.
PAG OUT HOT OUT
MON IN MIX IN
CN205
CN206
1 2
1 2 3
CN209 CN208
Send Receive Send Receive
MUTE 1 MUTE 2
1 2 3 1 2 3
CN210
FG GND
3 2 1
Function
Location
Setting
AX-0120 series
AX-0240 series
FS-9205DA
DA-502H CE-GB
DA-502H 5TW
VX-2000 series
BG-2000 series
A-9000M2 series
M-9000M2 series
A-900MK2 series
M-900MK2 series
Audio input
switch
CN205 CN205 1-2pin short circuit CN205 2-3pin short circuit
Audio output
switch
CN206 CN206 1-2pin open circuit CN206 1-2pin short circuit
MUTE1
Function switch
CN209
This function is unavailable
Send: This module sends mute
control signal to control (mute)
other input.
Receive: to receive mute control
signal from other modules for
mute control of this module.
MUTE2
Function switch
CN208
Reduce noise
CN210
1-2-3 Pin open
circuit
GND-side tangent
(1-2pin short circuit)
FG-side tangent
(2-3pin short circuit)
GND-side tangent
(1-2pin short circuit)
Factory settings:
CN205: 1-2pin short circuit; CN206: 1-2pin open circuit; CN208/CN209:Send; CN210:1-2-3 Pin open circuit
4.2 Upon setting of CN205 or CN206, as shown in the following figure, it is required to remove the loc ing
screws on the networ port substrate and then the substrate before the setting.
Substrate locking screw
M3x6 3pcs
Network port substrate
Input,output substrate

5.MODULE INSTALLATION
5.1.
The module can be installed in an AX-0120 power amplifier as shown in the following figure.
Note:
The same method applies to installation in AX-0120 series, AX-0240 series, FS-9205DA, DA-502H CE-GB, and
DA-502H 5TW series power amplifiers.
Baffle connecting point
Cable tie
12
3
2
Step 1: Wear protective gloves, use diagonal pliers to shear the module installation baffle on the rear plate of the power
amplifier,be careful when taking the baffle to avoid hand injury.
Step 2: Shear the cable tie fastened on the cable with the diagonal pliers, and connect the cable to CN203 and CN207
of the module.
Step 3: Put the module in the power amplifier, and use the M3x8 screws supplied along with the module to fix the
module onto the power amplifier.
5.2. The module can be installed in a BG-2000 power amplifier as shown in the following figure.
Note:
The same method applies to installation in A-9000M2 series, M-9000M2 series, A-900MK2 series, M-900MK2
series, VX-2000 series, and BG-2000 series.
Step 1: Remove the blank panel with
module slots on the rear plate
of the power amplifier.
Step 2: Put the module in the power
amplifier, and use the M3x8
screws supplied along with
the module to fix the module
onto the power amplifier.
6.APPLICABLE NUMBER OF MODULES TO DIFFERENT PRODUCTS
TOA Product Models
Applicable maximum number of the module to be installed
A-9000M2 Series
M-9000M2 Series
A-900MK2 Series
M-900MK2 Series
FS-9205DA
DA-502H CE-GB
DA-502H 5TW
AX-0120 Series
AX-0240 Series
VX-2000 Series
BG-2000 Series
2
1
2
4

7.SPECIFICATIONS
DC power DC 24V supplied by the power amplifier body
Current consumption
70mA or low
Network Network I/F: 100BASE-T x 1
Network protocols: TCP, UDP, ARP, RTP, CMP, TTP, IGMP, FTP
Connecting terminal: RJ45 terminal
Sound sampling frequency: 48kHz
Quantized digits: 16 digits
Switch Reset switch in the front
Display STATUS indicator in the front
Volume control Audio input volume adjustment knob in the front
Material Panel: stoving varnish-coated steel plate, black (munsell N1.0 similar color)
Weight 90g
Accessories Screws M3×8 ×2
8.
DIMENSIONAL DIAGRAM
Side view
Front view
35.0
78.0
91.5
77.0
68.0
LAN
STATUSRESET
VOLUME
IP-300XI
Traceability Information for Europe
Manufacturer
TOA Corporation
7-2-1, Minatojima-Nakamachi,Chuo-ku,Hyogo,Japan
Authorized representative:
TOA Electronics Europe GmBH
Suederstrasse 282,20537 Hamburg, Germany
133020035400
TOA Corporation
Other Toa Control Unit manuals


Popular Control Unit manuals by other brands

Festo
Festo Compact Performance CP-FB6-E Brief description

Elo TouchSystems
Elo TouchSystems DMS-SA19P-EXTME Quick installation guide

JS Automation
JS Automation MPC3034A user manual

JAUDT
JAUDT SW GII 6406 Series Translation of the original operating instructions

Spektrum
Spektrum Air Module System manual

BOC Edwards
BOC Edwards Q Series instruction manual

KHADAS
KHADAS BT Magic quick start

Etherma
Etherma eNEXHO-IL Assembly and operating instructions

PMFoundations
PMFoundations Attenuverter Assembly guide

GEA
GEA VARIVENT Operating instruction

Walther Systemtechnik
Walther Systemtechnik VMS-05 Assembly instructions

Altronix
Altronix LINQ8PD Installation and programming manual


