Toro 2024 Quick start guide

FormNo.3413-630RevB
2024DirectionalDrill
ModelNo.23800—SerialNo.313000501andUp
ModelNo.23800A—SerialNo.315000001andUp
ModelNo.23800C—SerialNo.315000001andUp
ModelNo.23800TE—SerialNo.315000001andUp
ModelNo.23800W—SerialNo.315000001andUp
SoftwareGuide
Readthisinformationcarefullytolearnhowtooperate
andmaintainyourproductproperlyandtoavoid
injuryandproductdamage.Youareresponsiblefor
operatingtheproductproperlyandsafely.Readyour
Operator’sManualformoreinformation.
Monitor
HomeScreenOptions
MainInformationScreen
Thisistherstscreenthatappearsaftertheinitial
splashscreen.T onavigatebetweenscreens,usethe
leftandrightarrows.
g207713
Figure1
1.Drillspeed(rpm)4.Enginespeed(rpm)
2.Rotarytorque5.Drilling-uidowrate
3.Thrustforce6.Drilling-uidpressure
g207712
Figure2
1.Pipefunctions5.Enginetemperaturegauge
2.Fuelgauge6.Enginedroop
3.Limitsettingoptions7.Horn
4.Selectpiperow8.Thrustforce,drillspeed
(rpm),orrotarytorque
adjustment
Pushbutton1toswitchbetweenthepipefunctions:
pullpipe,pushpipe,neutral.
Pushbutton5toswitchbetweenthrustforce,drill
speed(rpm),androtarytorque.
Usebuttons6and7tosetlimitsforthedrillspeed
(rpm),rotarytorque,andthrustforce.
©2019—TheToro®Company
8111LyndaleAvenueSouth
Bloomington,MN55420
Registeratwww.T oro.com.OriginalInstructions(EN)
PrintedintheUSA
AllRightsReserved*3413-630*B

g210057
Figure3
1.Pullpipe4.Thrustforce
2.Pushpipe5.Drillspeed(rpm)
3.Rotarytorque
SmartTouch™HomeScreen
SmartTouchmodeallowstheoperatortoloadand
unloadpipesfromtherodboxwithlessjoystick
operationtoreduceoperatorfatigue.
UsetheCarriageSettingsScreen(page12)toturn
SmartTouchmodeonandoff.
Note:ThePush/PullIconwillhaveagreen
backgroundwhenSmartT ouchmodeisonanda
ribbonwillappearatthebottomofthescreenshowing
asequenceofthesteps.
Important:NeverswitchbetweenPush/Pull
modesduringthechosenoperation.Useneutral
(manual)modetoswitchbetweenPush/Pull;refer
toCarriageSettingsScreen(page12)toturn
SmartTouchmodeoff.
PullingPipeinSmartTouchMode
StarttheSmartT ouchmodewiththecamassemblyin
thehomeposition(row3ofthepipebox).
Important:Ensurethatyouholdthelowersection
ofthecamrockerswitch,ontheleftjoystick,
completelydownuntiltheactioniscompletein
eachstep(Figure4).
g210060
Figure4
Holdtheuppersectionofthecamrockerswitch,
ontheleftjoystick,completelydownuntilall
actionsarecompletetogotothepreviousstepin
thesequence(Figure5).
g210061
Figure5
1.Pushbutton1toselectthepullpipeoption
(Figure6).
2
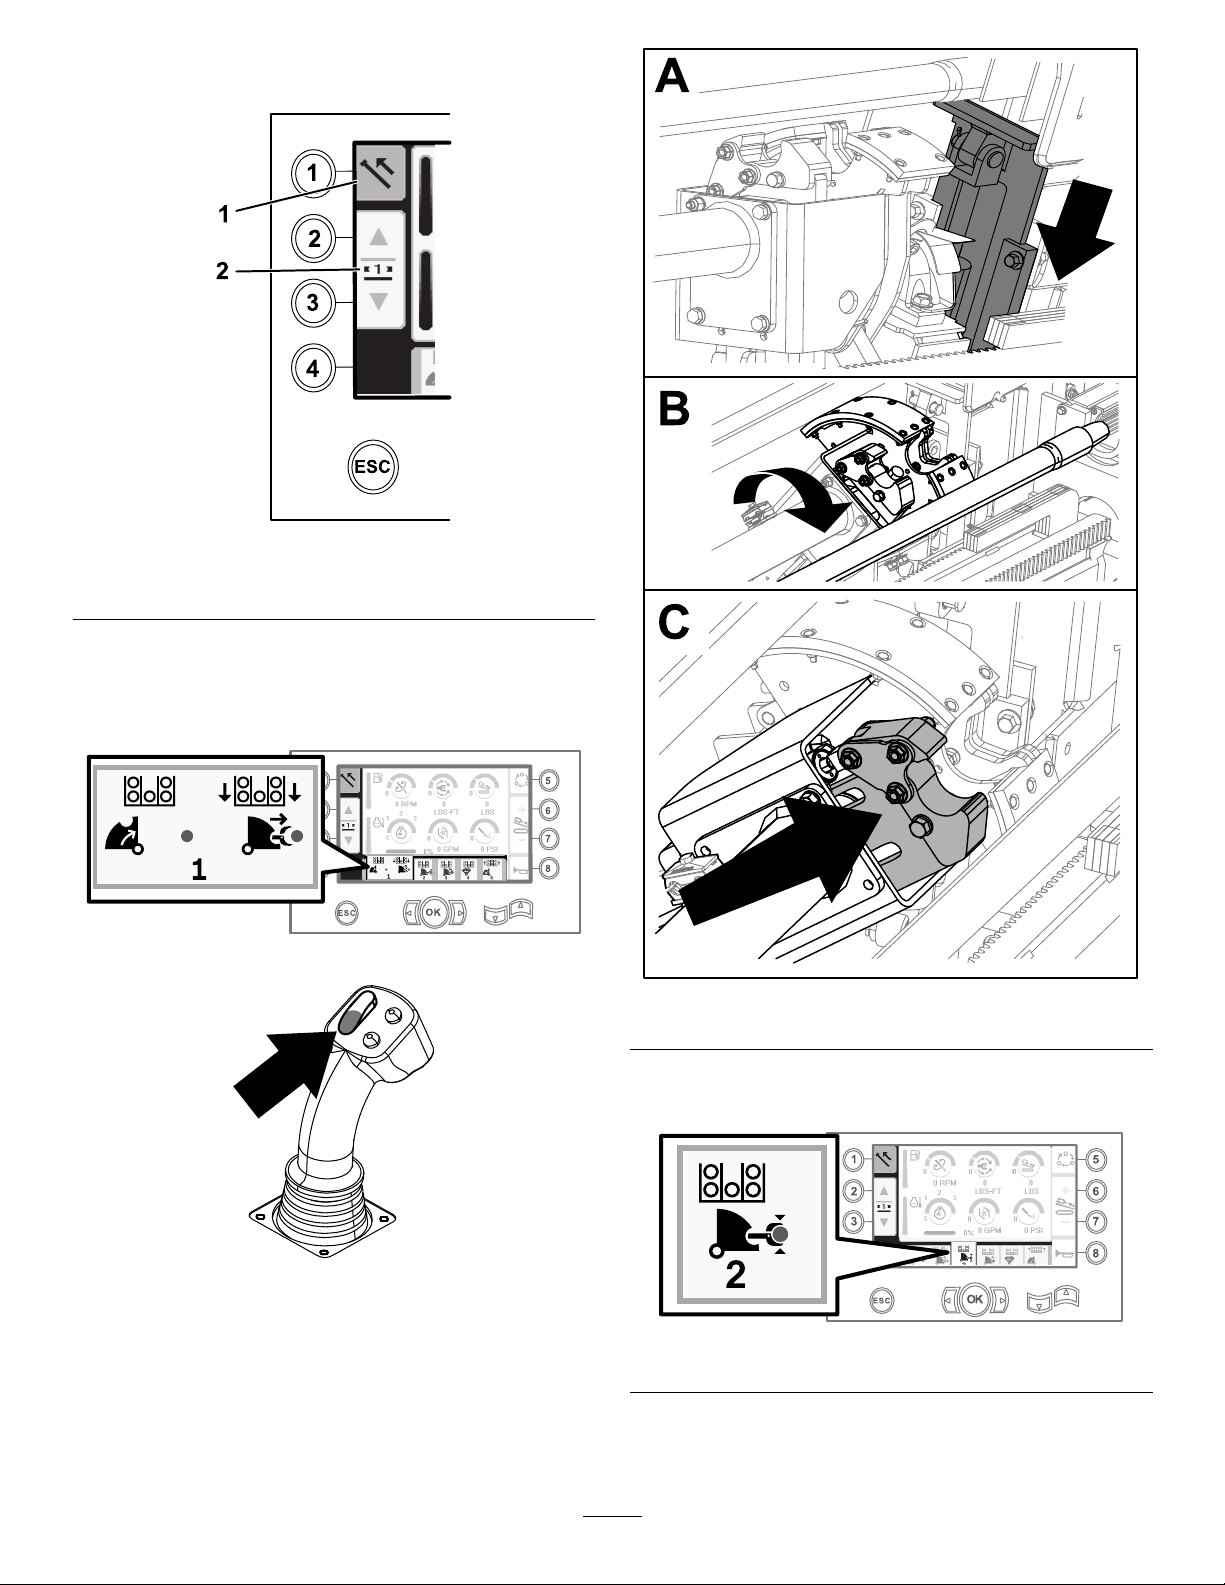
2.Pushbuttons2and3toselecttherowwhere
youwanttoplacethepipe(Figure6).
g210062
Figure6
1.Pullpipe2.Selectpiperow
3.Holdthelowersectionoftherockerswitch
(Figure8)untiltheelevatorlowers,thecam
assemblyrotatestowardtheoperatorstation,
andthearmsfullyextend(Figure9).
g210518
Figure7
g210462
Figure8
g210517
Figure9
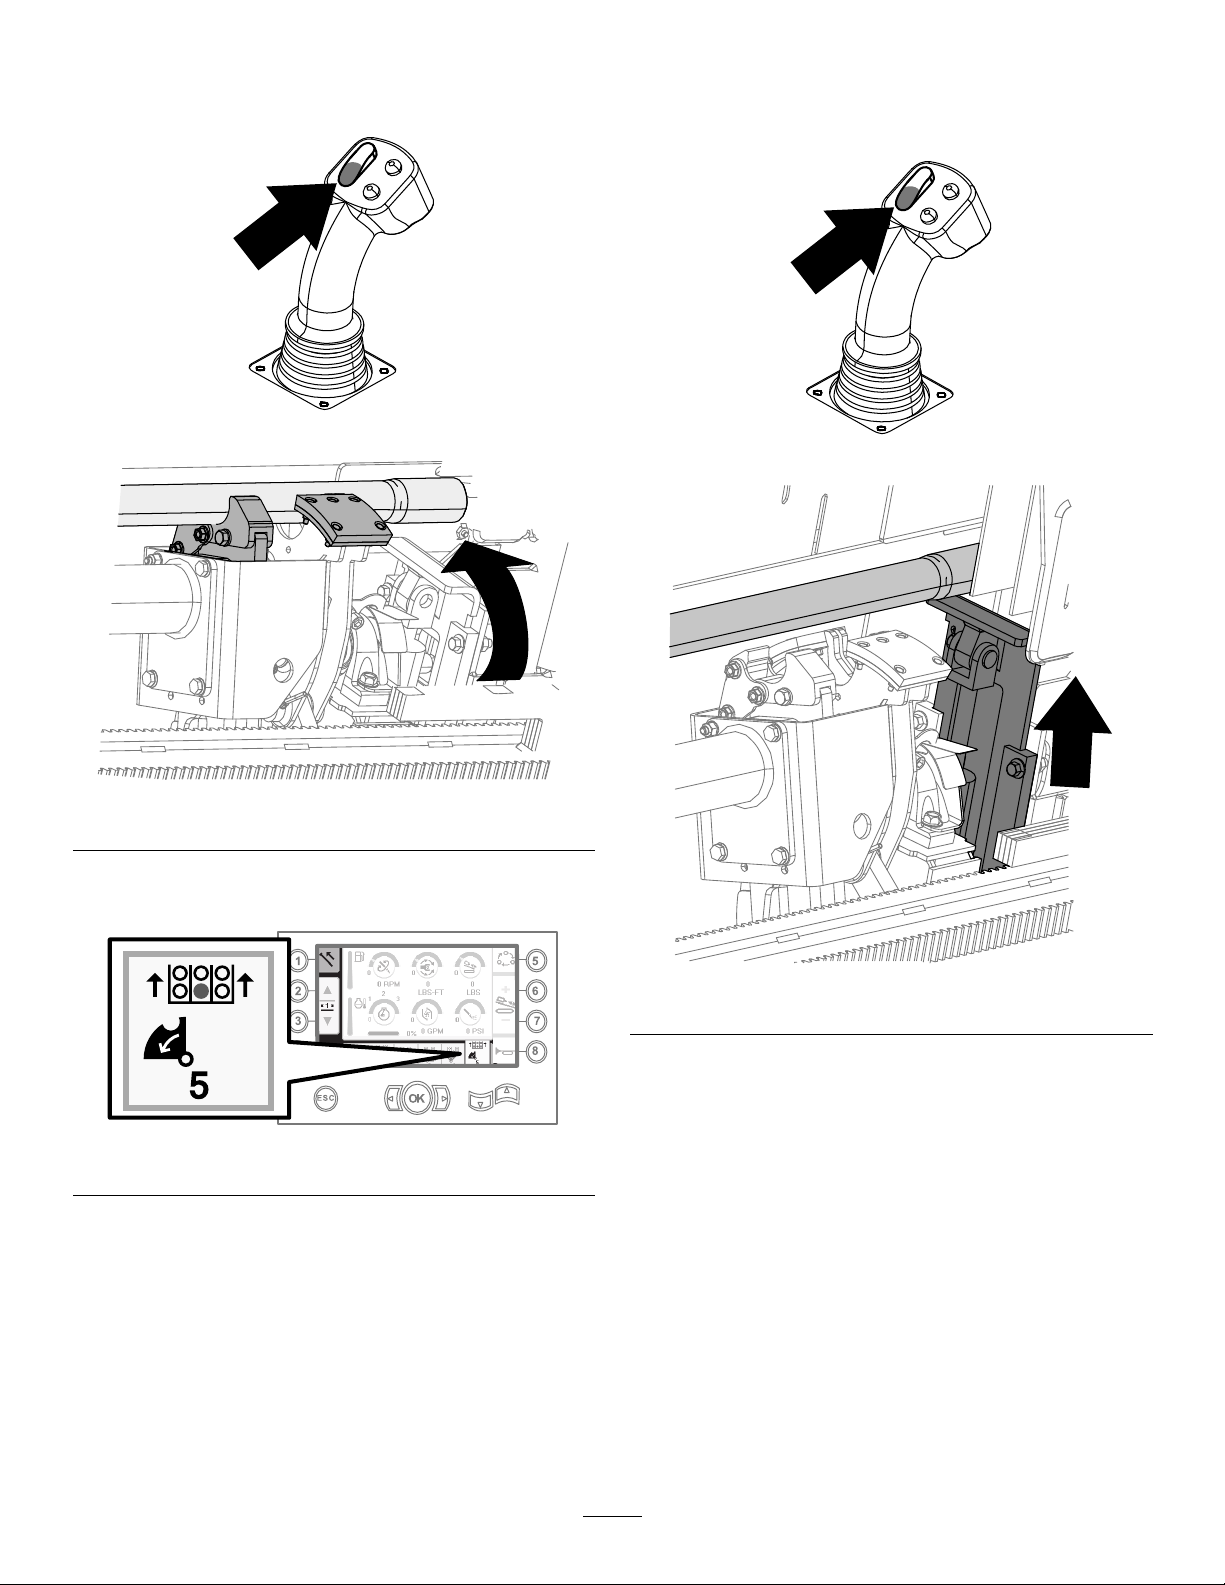
4.Releasetherockerswitchtoproceedtothenext
stepinthesequence(Figure10).
g210520
Figure10
5.Breakthepipeconnection;refertoRemoving
DrillPipesintheOperator’sManual.
3

6.Holdtheupperbuttononthejoysticktogripthe
pipe(Figure11andFigure12)andreleasethe
button.
g210533
Figure11
g210519
Figure12
7.Holdthelowersectionoftherockerswitch
(Figure14)untilthearmsfullyretract(Figure
15).
g210522
Figure13
g210462
Figure14
g210521
Figure15
8.Releasetherockerswitchtoproceedtothenext
stepinthesequence(Figure16).
g210524
Figure16
4
9.Holdthelowersectionoftherockerswitch
(Figure17)untilthecamassemblyrotatestothe
selectedrowunderthepipebox(Figure18).
g210462
Figure17
g210523
Figure18
10.Releasetherockerswitchtoproceedtothenext
stepinthesequence(Figure19).
g210526
Figure19
11.Holdthelowersectionoftherockerswitch
(Figure20)untiltheelevatorputsthepipeback
inthepipeboxandthecamrotatestothehome
position(Figure21).
g210462
Figure20
g210525
Figure21
12.Releasetherockerswitchtostartthepull-pipe
processagain.
5
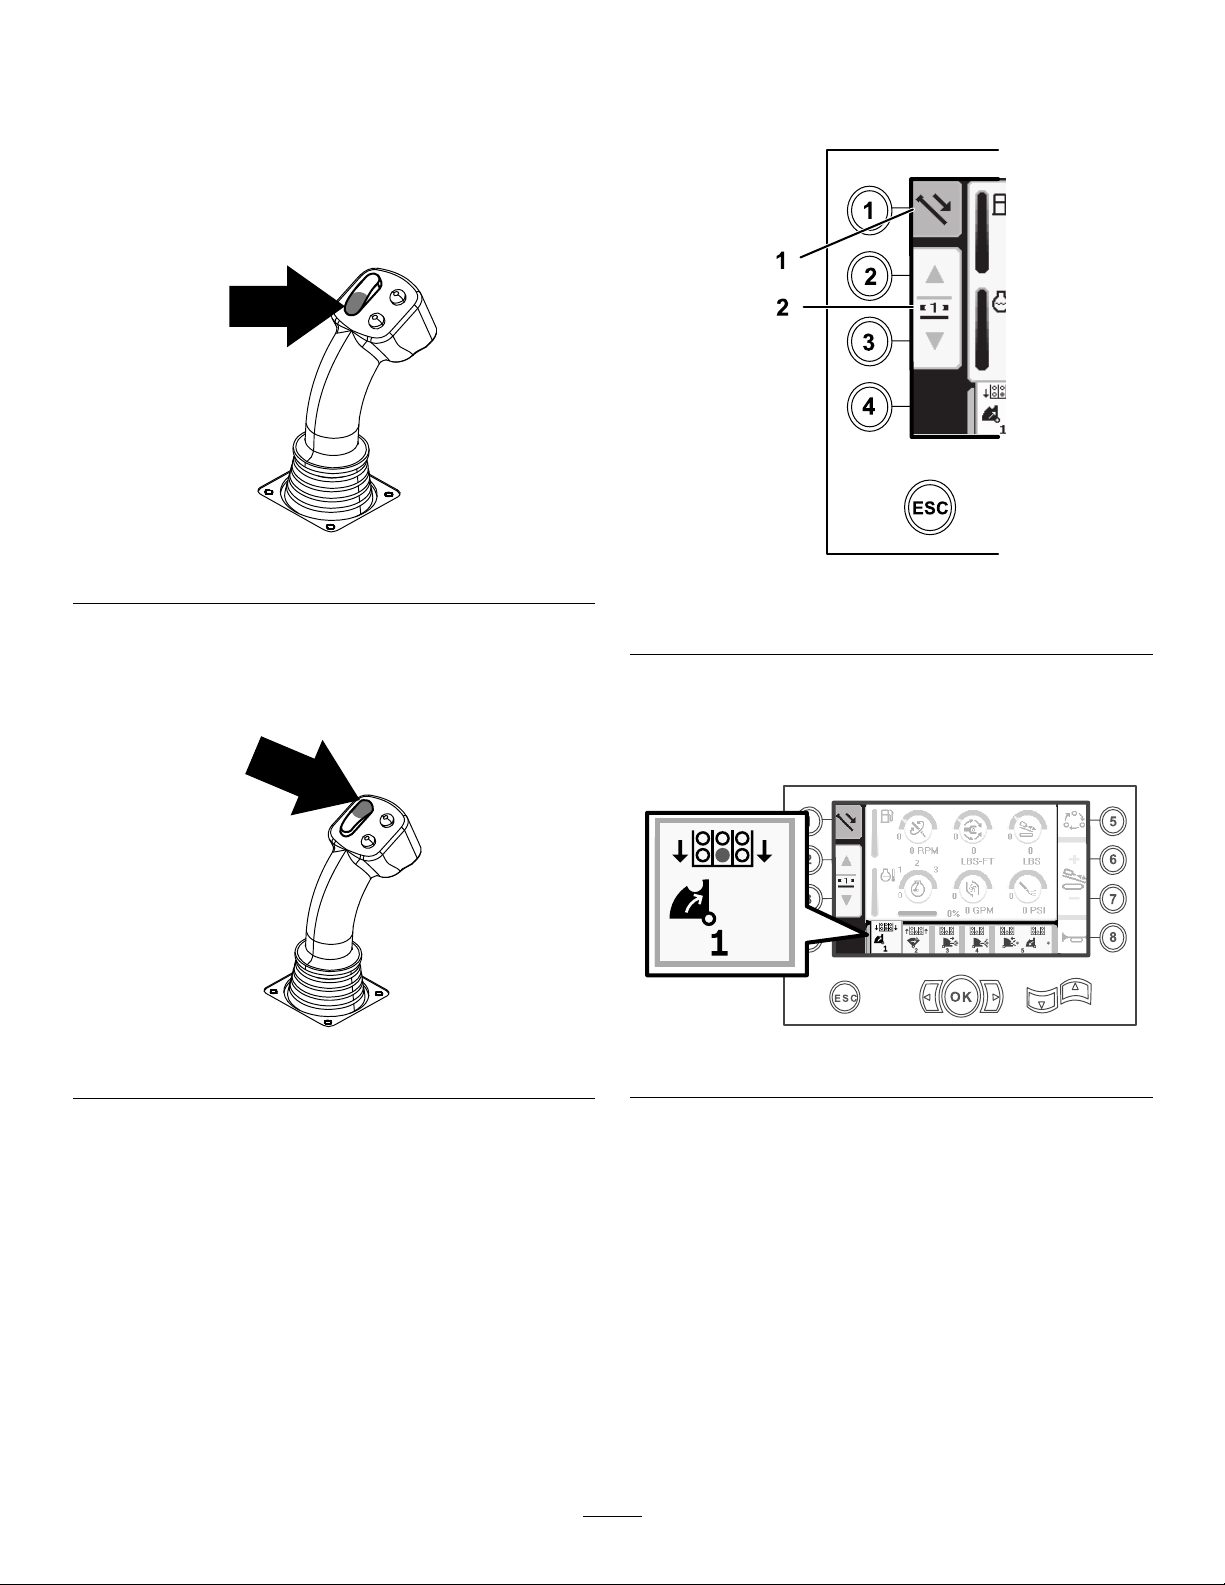
PushingPipeinSmartTouchMode
StarttheSmartT ouchmodewiththecamassemblyin
thehomeposition(row3ofthepipebox).
Important:Ensurethatyouholdthelowersection
ofthecamrockerswitch,ontheleftjoystick,
completelydownuntiltheactioniscompletein
eachstep(Figure22).
g210060
Figure22
Holdtheuppersectionofthecamrockerswitch,
ontheleftjoystick,completelydownuntilall
actionsarecompletetogotothepreviousstepin
thesequence(Figure23).
g210061
Figure23
1.Pushbutton1toselectpushpipe(Figure24).
2.Pushbuttons2and3toselecttherowwhere
youwanttogetthepipe(Figure24).
g210063
Figure24
1.Pushpipe2.Selectpiperow
3.Holdthelowersectionoftherockerswitch
(Figure26)untilthecamassemblyrotatesto
theselectedrowandthepipelowersintothe
opening(Figure27).
g210464
Figure25
6

g210462
Figure26
g210463
Figure27
4.Releasetherockerswitchtoproceedtothenext
stepinthesequence(Figure28).
g210466
Figure28
5.Holdthelowersectionoftherockerswitch
(Figure29)untilthecamassemblyfullyrotates
forwardtotherackandtheelevatorsliftthe
remainingpipeintothepipebox(Figure30).
g210462
Figure29
g210465
Figure30
6.Releasetherockerswitchtoproceedtothenext
stepinthesequence(Figure31).
g210467
Figure31
7

7.Holdthelowersectionoftherockerswitch
(Figure32)untilthearmsextend(Figure33).
g210462
Figure32
g210528
Figure33
8.Releasetherockerswitchtoproceedtothenext
stepinthesequence(Figure34).
g210530
Figure34
9.Makethepipeconnection;refertoAddingDrill
PipesintheOperator’sManual.
10.Holdthelowerbuttononthejoystick(Figure
35)toreleasethepipe(Figure36)andrelease
thebutton.
g210527
Figure35
g210529
Figure36
8

11.Holdthelowersectionoftherockerswitch
(Figure38)untilthearmsretractandthecam
assemblyreturnstothehomeposition(row3)
(Figure39).
g210532
Figure37
g210462
Figure38
g210531
Figure39
12.Releasetherockerswitchtostartthepush-pipe
processagain.Thecamassemblywillgoto
therowpickedinstep2ofPullingPipein
SmartTouchMode(page2).
HoursScreenOptions
MachineHoursScreen
Toaccessthisscreenpushbutton1ontheHours
screen.
Thisscreenshowstheoperatinghoursofthe
machine.Machine1cannotbechanged.Machine
2canbereset.
Button5showsthetotalenginehours.
Button6showsenginehoursthatcanberesetby
pushingbutton8.
g207716
Figure40
9

DrillingFluid(Mud)UseScreen
Toaccessthisscreenpushbutton2ontheHours
screen.
Thisscreenshowsthedrillinguid(mud)useofthe
machine.T otaldrillinguid(mud)cannotbechanged.
Dailydrillinguid(mud)canbereset.
g204519
Figure41
1.Resetbutton
LubricationandMaintenanceScreens
Toaccessthisscreen,pushbutton3ontheHours
screen.
Thesescreensprovidetheuserwiththedaily
maintenanceschedulesandthe50-hour,250-hour,
500-hour,and1,000-hourincrements.
Toresetthemaintenanceinterval,navigatetothe
MaintenanceandParametersOptionsScreen(page
13).
Pushbuttons5through8forthecorresponding
serviceintervalandthenpushtheOKbutton3times.
Pushthefollowingbuttonstoattainthesubsequent
maintenanceschedule:
•Button3—10-hour/Dailymaintenanceschedule
(Figure42)
•Button5—50-hourmaintenanceschedule(Figure
43)
•Button6—250-hourmaintenanceschedule(Figure
44)
•Button7—500-hourmaintenanceschedule(Figure
45)
•Button8—1,000-hourmaintenanceschedule
(Figure46)
g034777
Figure42
10
Other manuals for 2024
2
This manual suits for next models
5
Other Toro Construction Equipment manuals

Toro
Toro MB-1600 User manual

Toro
Toro 22409 User manual

Toro
Toro 22410 User manual

Toro
Toro MMX-658H-S User manual

Toro
Toro VR-2650 User manual

Toro
Toro 22984HD User manual

Toro
Toro TRX-16 User manual

Toro
Toro MMX-1158H-S User manual

Toro
Toro TX 525 Installation and operating manual

Toro
Toro MMXD-958H-S User manual


Popular Construction Equipment manuals by other brands


Wacker Neuson
Wacker Neuson DT05 Operator's manual

HYVA
HYVA AMCO VEBA 81 Series WARNING, OPERATING AND MAINTENANCE MANUAL

Atlas Copco
Atlas Copco Dynapac V5100TV manual

Manitowoc
Manitowoc National Crane 1400A Operator's manual

SGS
SGS EC1500 owner's manual

Saferoad
Saferoad VR Arcus Primus 90 Series Installation instruction