Toro MMXD-958H-S User manual

FormNo.3394-892RevA
MMXD-958H-SMortarMixer
ModelNo.68023—SerialNo.315000001andUp
G020472
Registeratwww.Toro.com.
OriginalInstructions(EN)*3394-892*A

WARNING
CALIFORNIA
Proposition65Warning
Thisproductcontainsachemicalorchemicals
knowntotheStateofCaliforniatocausecancer,
birthdefects,orreproductiveharm.
Theengineexhaustfromthisproduct
containschemicalsknowntotheStateof
Californiatocausecancer,birthdefects,
orotherreproductiveharm.
Useofthisproductmaycauseexposureto
chemicalsknowntotheStateofCalifornia
tocausecancer,birthdefects,orother
reproductiveharm.
ThissparkignitionsystemcomplieswithCanadianICES-002.
Becauseinsomeareastherearelocal,state,orfederal
regulationsrequiringthatasparkarresterbeusedonthe
engineofthismachine,asparkarresterisavailableas
anoption.Ifyourequireasparkarrester,contactyour
AuthorizedToroServiceDealer.
GenuineTorosparkarrestersareapprovedbytheUSDA
ForestryService.
Important:ItisaviolationofCaliforniaPublic
ResourceCodeSection4442touseoroperatetheengine
onanyforest-covered,brush-covered,orgrass-covered
landwithoutasparkarrestermufermaintainedin
workingorder,ortheengineconstricted,equipped,and
maintainedforthepreventionofre.Otherstatesor
federalareasmayhavesimilarlaws.
Theenclosed
Engine Owner's Man ual
issuppliedfor
informationregardingtheUSEnvironmentalProtection
Agency(EPA)andtheCaliforniaEmissionControl
Regulationofemissionsystems,maintenance,and
warranty.Replacementsmaybeorderedthroughthe
enginemanufacturer.
Introduction
Thismachineisdesignedtomixmortar,plaster,reproong
material,grout,andothersmall-grainedcementproducts.A
vehicleequippedwithanappropriatepintlehitchorballhitch
cantowthemachine..
Readthisinformationcarefullytolearnhowtooperateand
maintainyourproductproperlyandtoavoidinjuryand
productdamage.Youareresponsibleforoperatingthe
productproperlyandsafely.
YoumaycontactTorodirectlyatwww .Toro.comforproduct
andaccessoryinformation,helpndingadealer,ortoregister
yourproduct.
Wheneveryouneedservice,genuineToroparts,oradditional
information,contactanAuthorizedServiceDealerorToro
CustomerServiceandhavethemodelandserialnumbersof
yourproductready.Writethenumbersinthespaceprovided.
1G020473
Figure1
1.Modelandserialnumberlocation
ModelNo.
SerialNo.
Thismanualidentiespotentialhazardsandhassafety
messagesidentiedbythesafetyalertsymbol(Figure2),
whichsignalsahazardthatmaycauseseriousinjuryordeath
ifyoudonotfollowtherecommendedprecautions.
Figure2
1.Safetyalertsymbol
Thismanualuses2wordstohighlightinformation.
Importantcallsattentiontospecialmechanicalinformation
andNoteemphasizesgeneralinformationworthyofspecial
attention.
TheDOTtireinformationislocatedonthesideofeachtire.
Thisinformationgivesloadandspeedratings.Replacement
tiresshouldhavethesameorbetterratings.
©2015—TheToro®Company
8111LyndaleAvenueSouth
Bloomington,MN554202
Contactusatwww.Toro.com.
PrintedintheUSA
AllRightsReserved

Note:RefertoSpecications(page11)andensurethatall
replacementtiresmeetorexceedtheratingsforthismachine.
Contents
Safety...........................................................................3
SafeOperatingPractices...........................................3
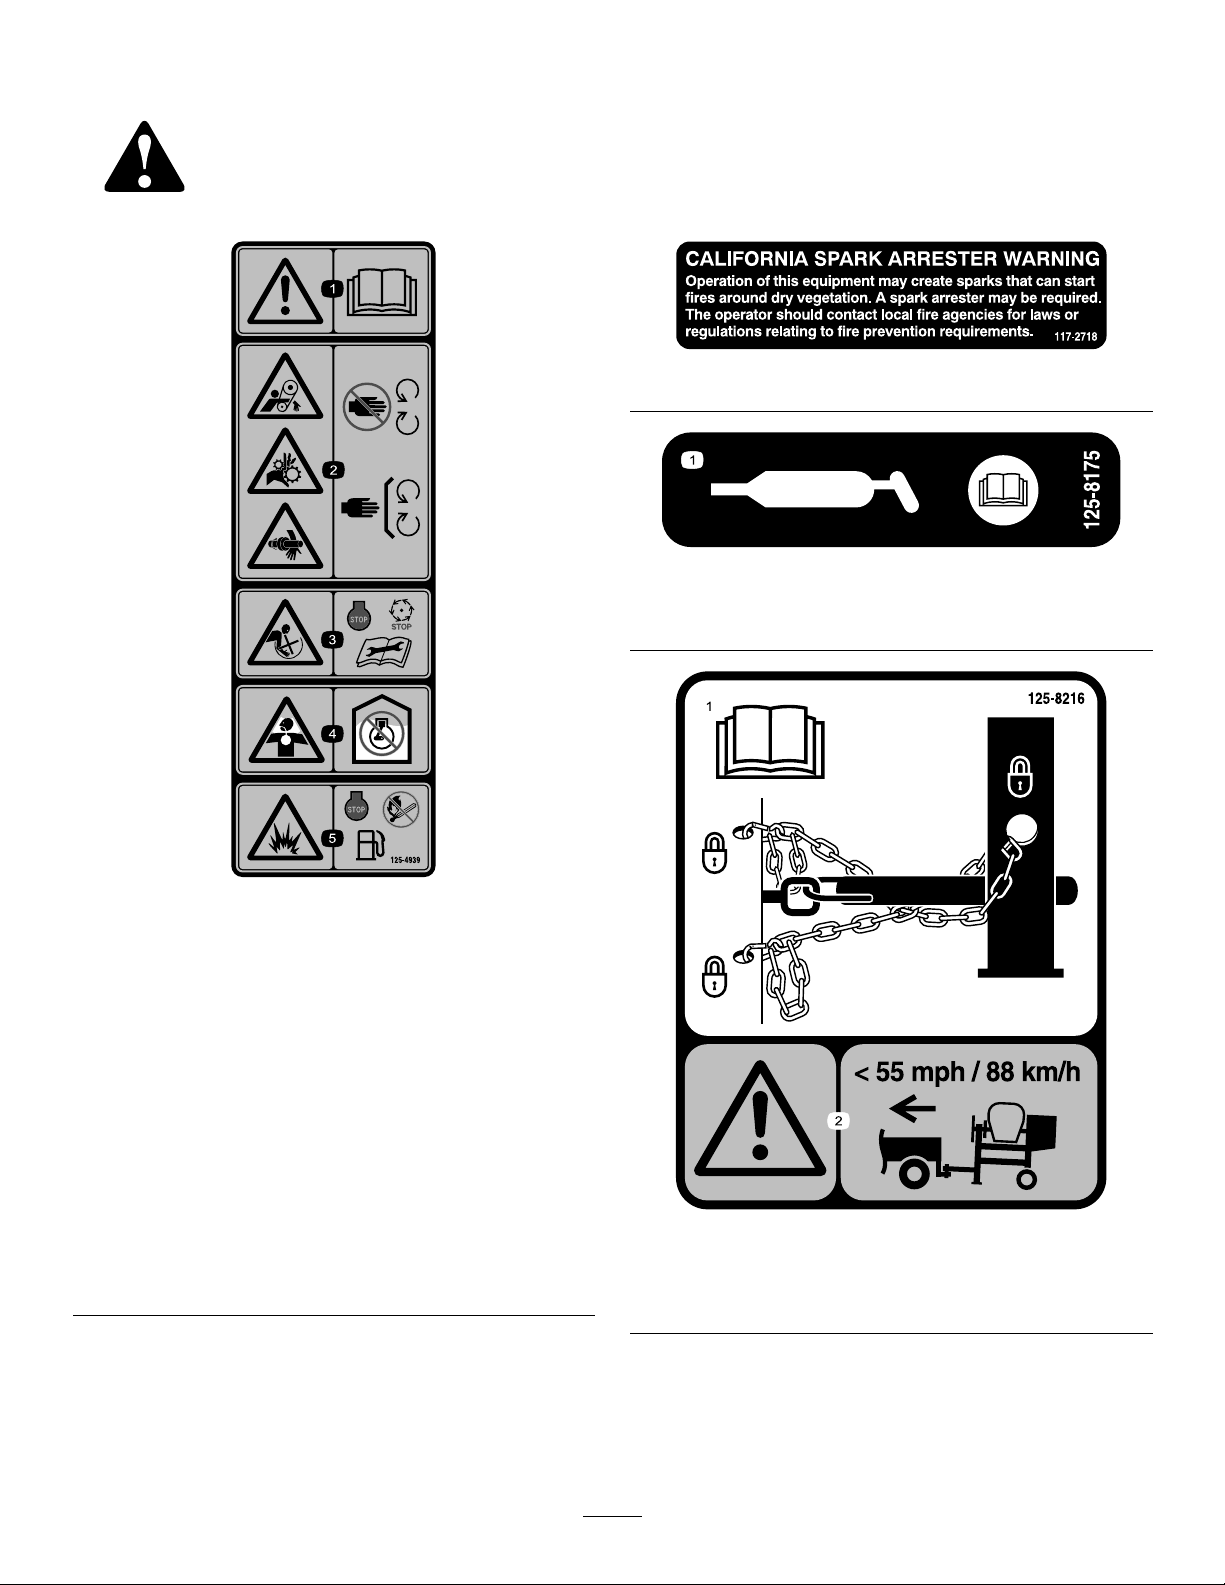
SafetyandInstructionalDecals.................................6
Setup............................................................................7
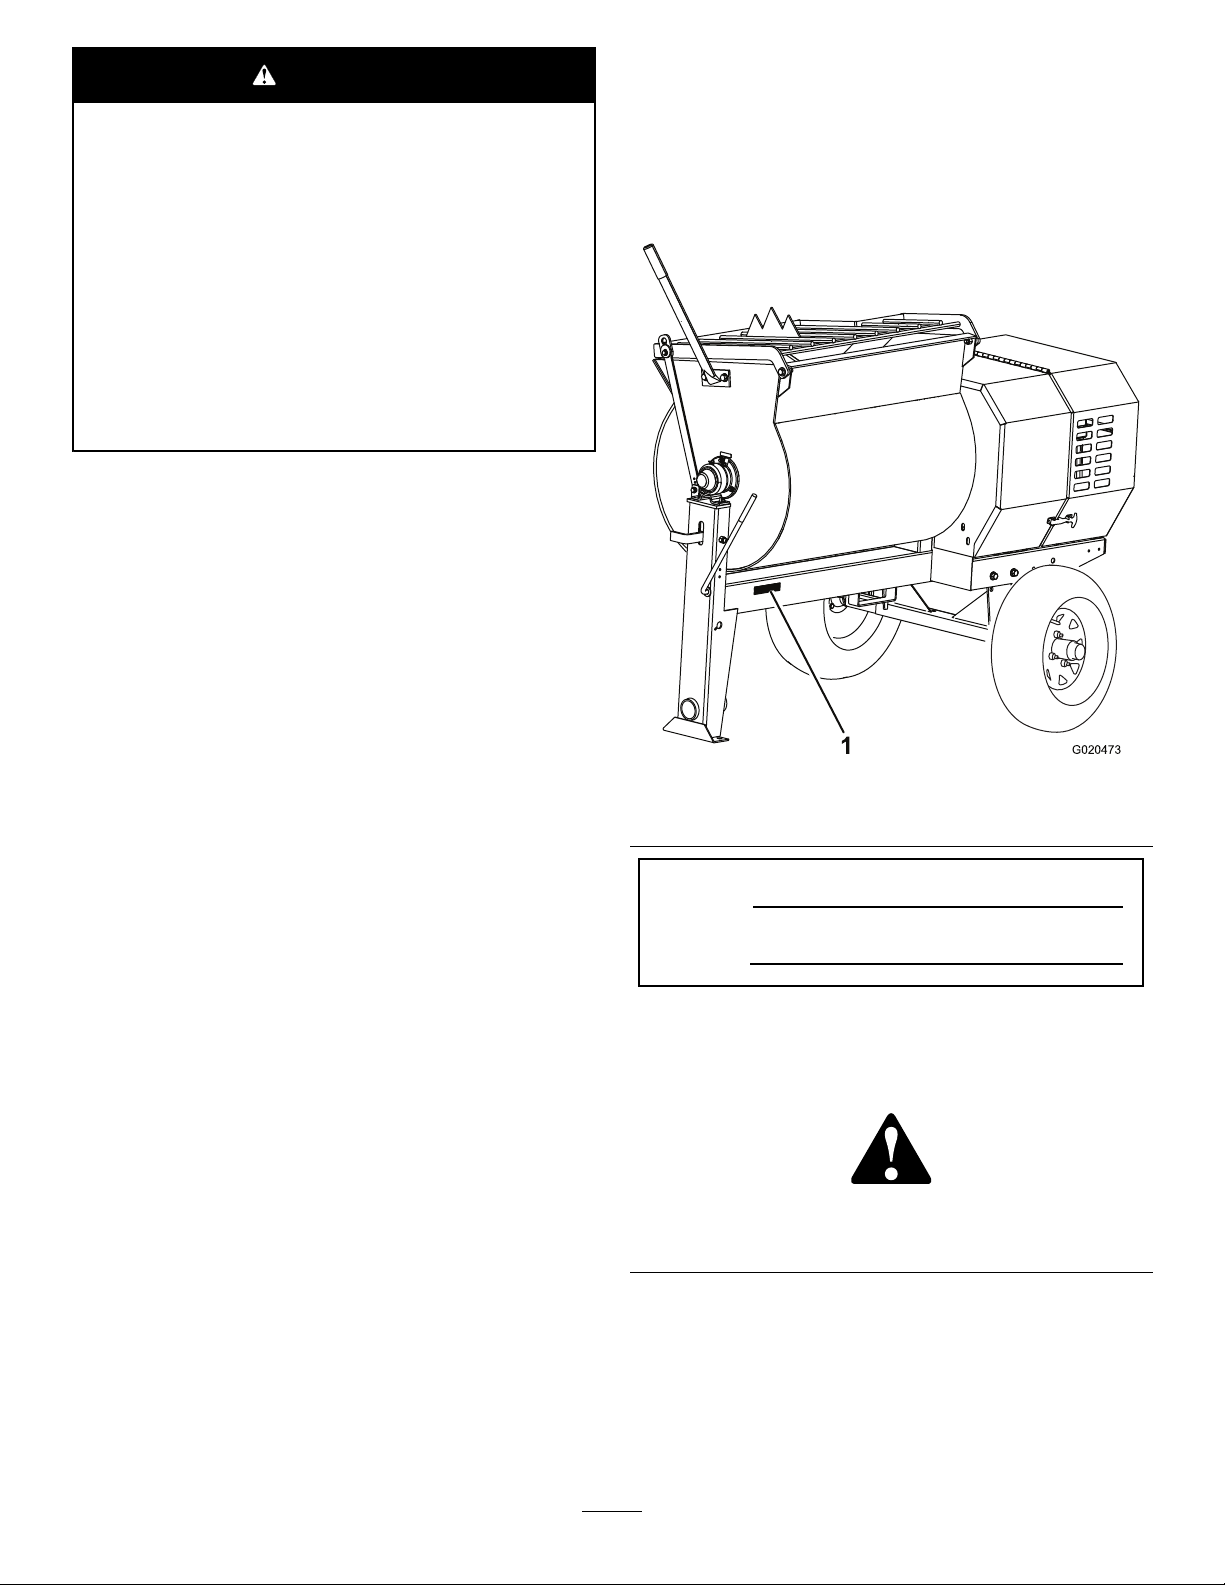
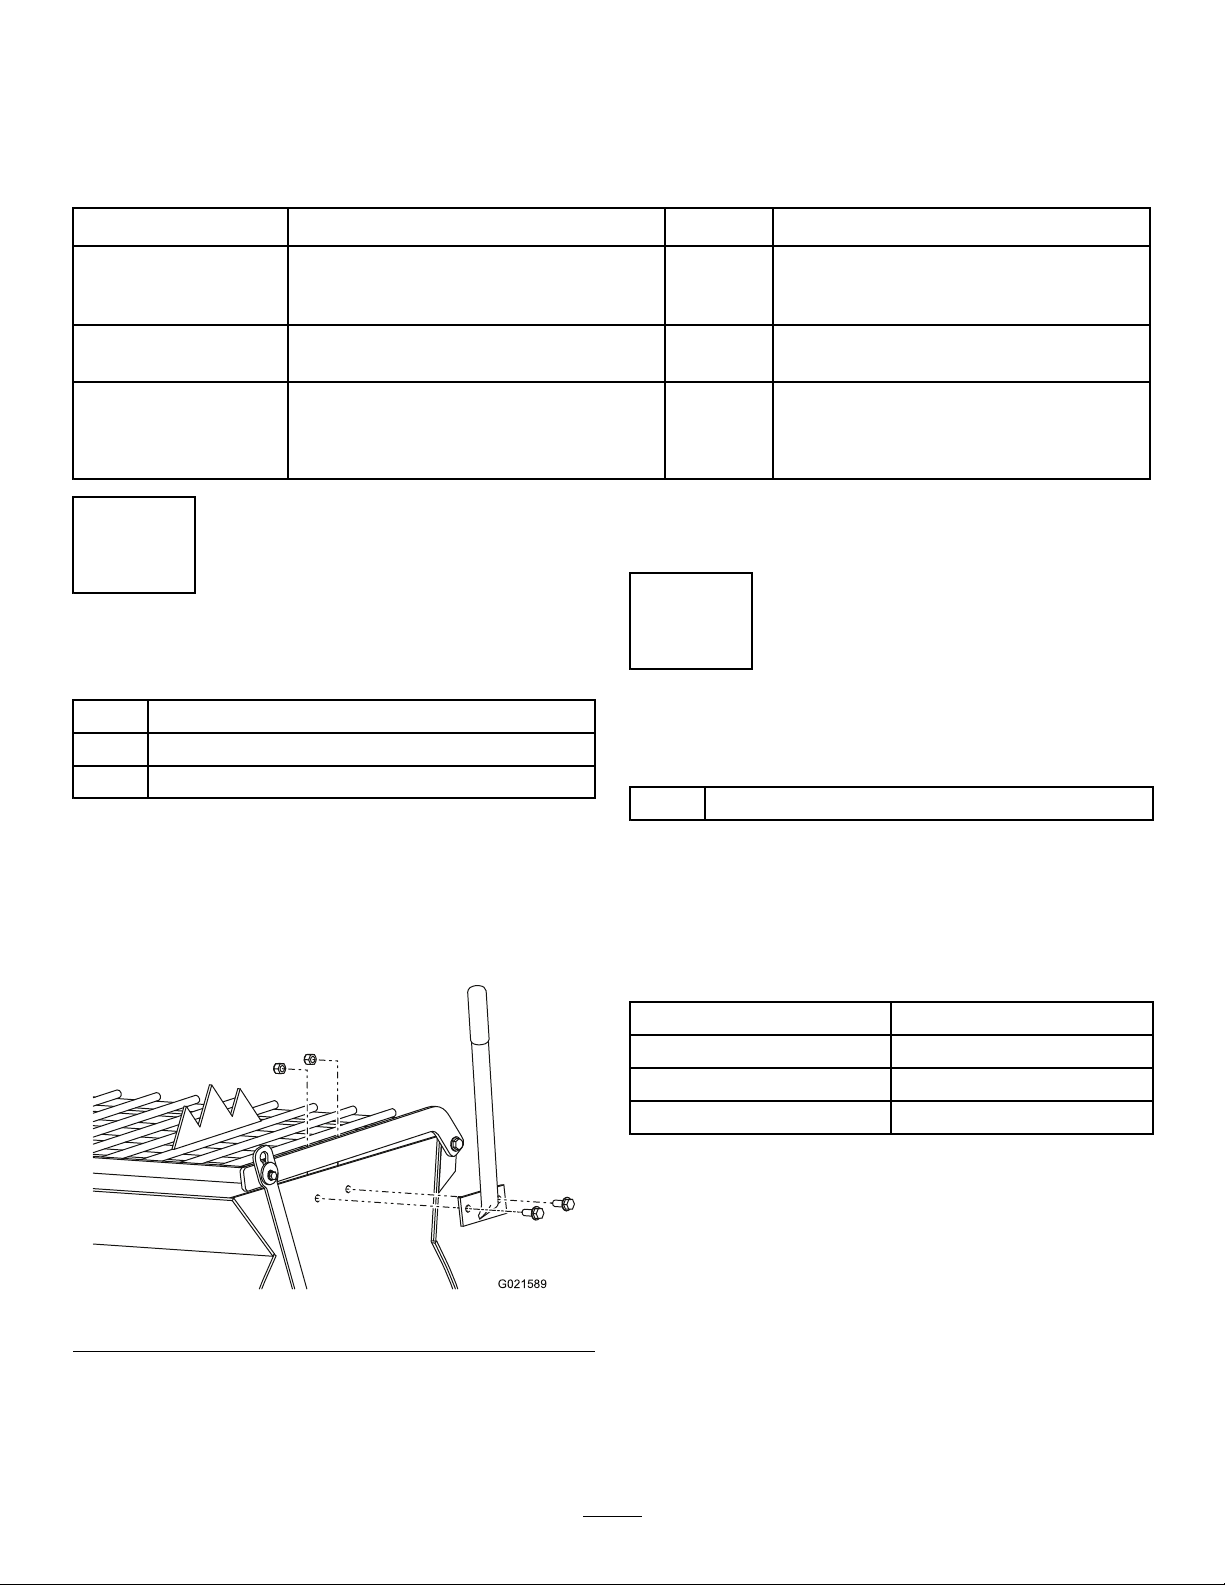
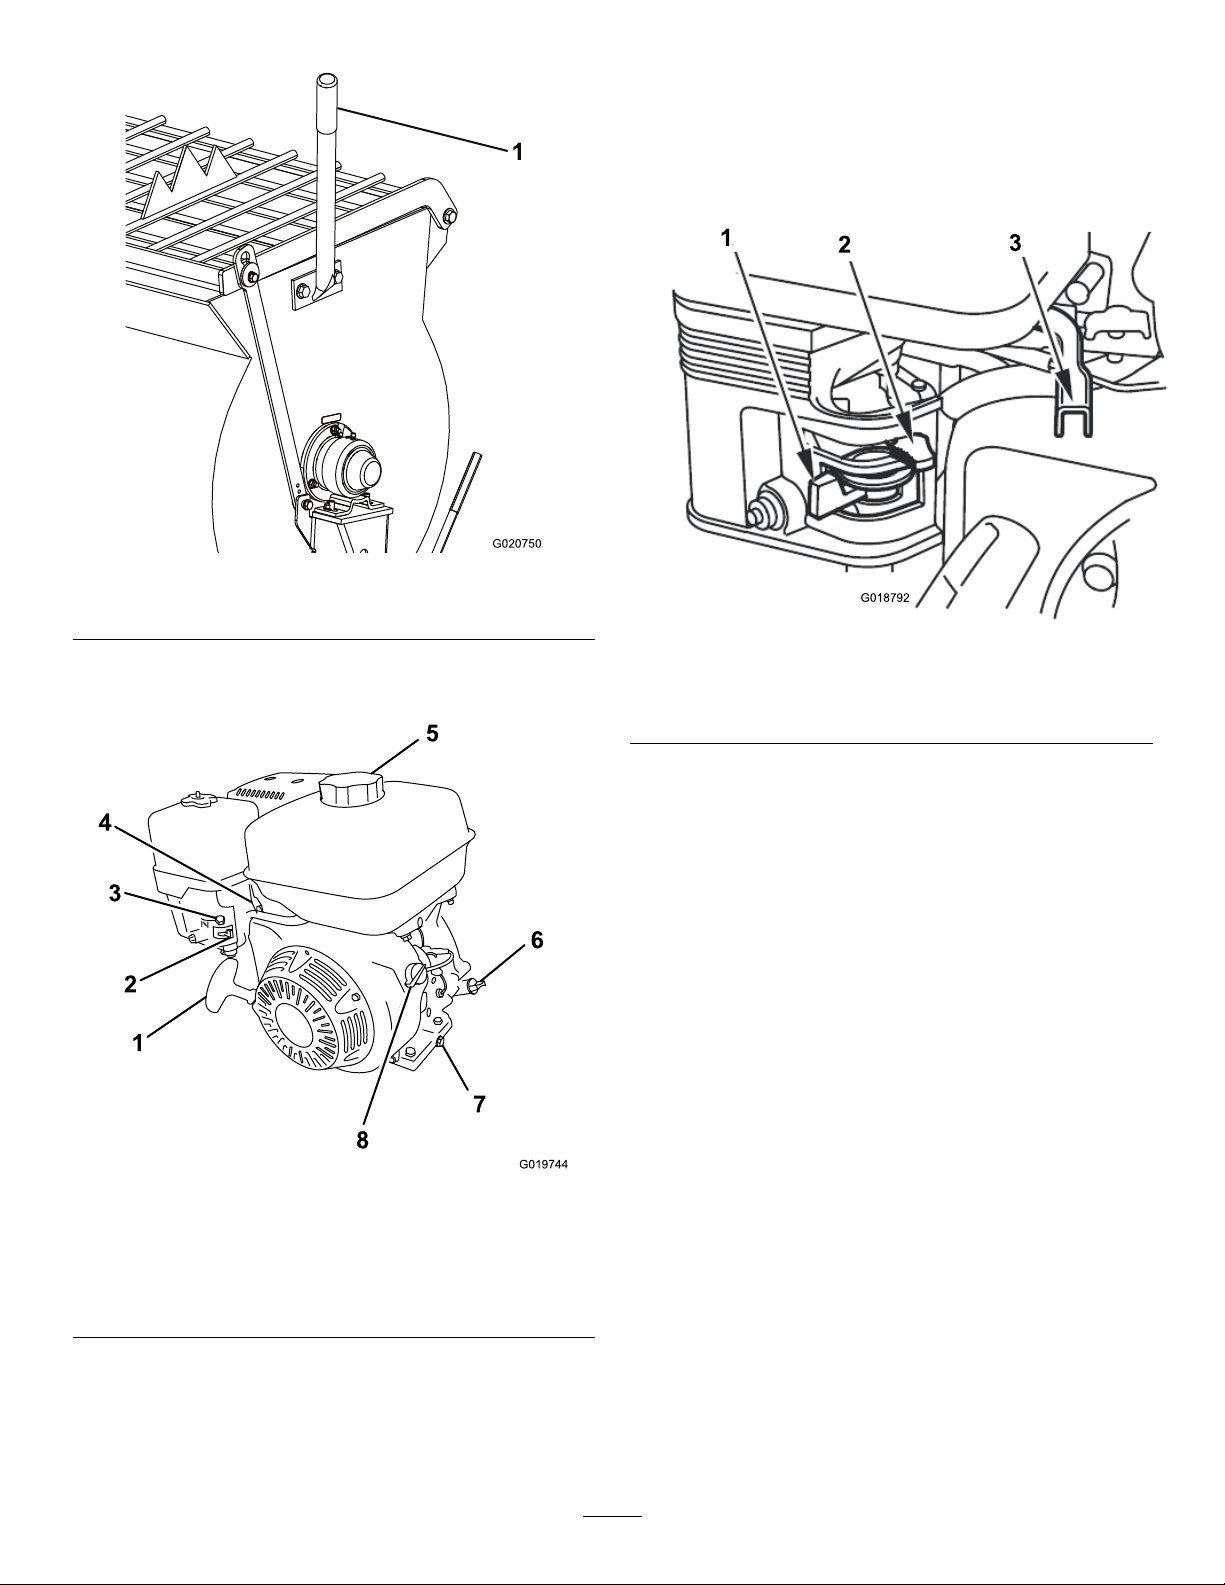
1InstallingtheDumpHandle...................................7
2InstallingtheTowPole..........................................7
3InstallingtheSafetyChain......................................8
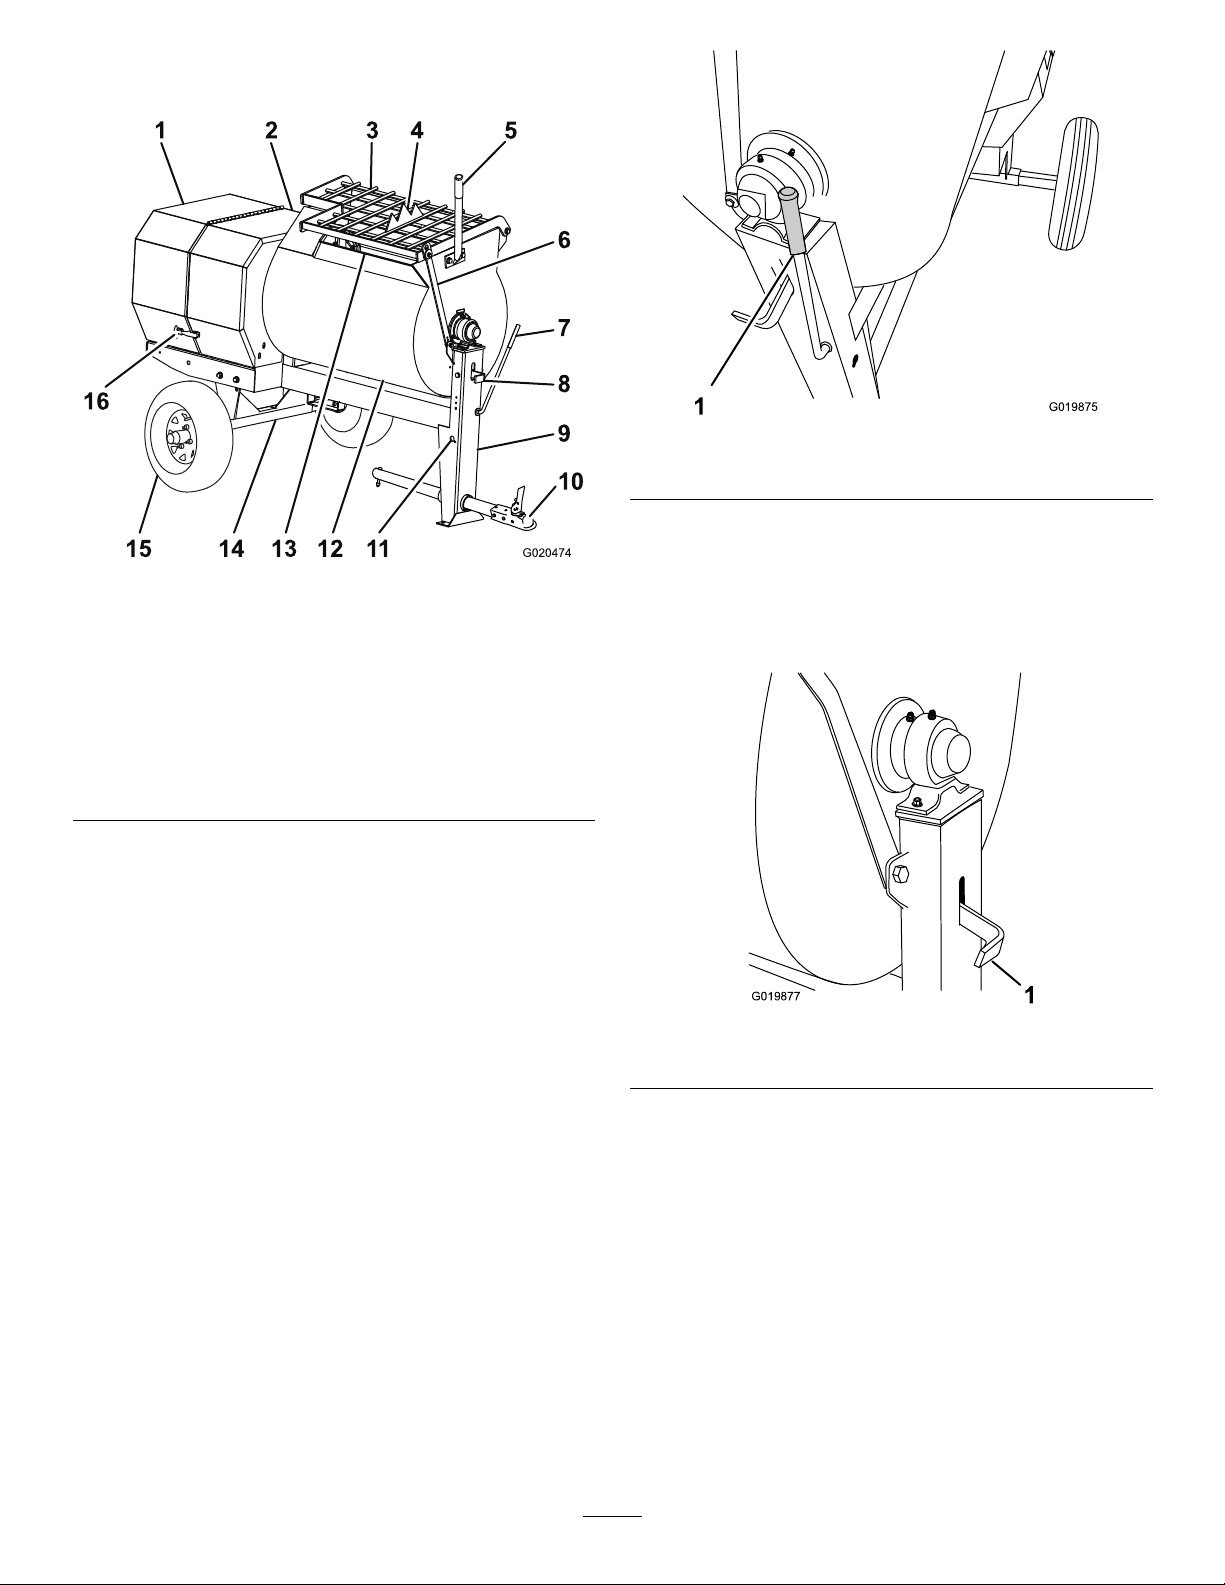
ProductOverview..........................................................9
Controls................................................................9
Specications........................................................11
Operation....................................................................11
PreparingtoTowtheMachine..................................11
ExtendingtheAxle.................................................15
TowingtheMachine...............................................15
PreparingtoUsetheMachine...................................16
OpeningandClosingtheCowl.................................16
AddingFuel...........................................................17
CheckingtheEngineOilLevel.................................18
StartingandStoppingtheEngine..............................19
ControllingthePaddles...........................................20
MixingtheMaterial.................................................20
UsingtheDrum.....................................................21
AdjustingthePaddleBlades.....................................22
Maintenance.................................................................23
RecommendedMaintenanceSchedule(s)......................23
PremaintenanceProcedures........................................24
PreparingtheMachineforMaintenance.....................24
DisconnectingtheSpark-plugWire...........................24
RemovingandInstallingtheDividerPlate..................24
Lubrication...............................................................25
LubricatingtheBearingsandSeals............................25
EngineMaintenance..................................................26
ServicingtheAirCleaner.........................................26
ChangingtheEngineOil.........................................27
ServicingtheSparkPlug..........................................28
ServicingtheSparkArrester.....................................29
RemovingandInstallingtheEngine..........................30
FuelSystemMaintenance...........................................31
ServicingtheFuelSystem........................................31
BeltMaintenance......................................................32
ServicingtheBelts..................................................32
ReplacingtheBelts.................................................33
AligningthePulleys................................................35
Cleaning...................................................................36
CleaningtheMachine..............................................36
Storage........................................................................36
StoringtheMachine................................................36
Troubleshooting...........................................................38
Safety
Improperlyusingormaintainingthemachinecanresult
ininjury.Toreducethepotentialforinjury,complywith
thesesafetyinstructionsandalwayspayattentiontothe
safetyalertsymbol,whichmeans:
Caution
,
W ar ning
,
or
Danger
—personalsafetyinstruction.Failureto
complywiththeinstructionmayresultinpersonalinjury
ordeath.
SafeOperatingPractices
Thisproductiscapableofamputatinghands.Alwaysfollow
allsafetyinstructionstoavoidseriousinjuryordeath.
WARNING
Machiningorhandlingstone,masonry,concrete,
metal,andothermaterialscangeneratedust,mists,
andfumescontainingchemicals,suchassilica,
knowntocauseseriousorfatalinjuryorillness,
suchasrespiratorydisease,silicosis,cancer,birth
defects,orotherreproductiveharm.
•Controldust,mist,andfumesatthesource
wherepossible.Watershouldbeusedfordust
suppressionwhenfeasible.
•Usegoodworkpracticesandfollowthe
recommendationsofthemanufactureror
suppliers,OSHA,andotheroccupationaland
tradeassociations.
•Alwaysfollowrespiratoryprecautions.
•Whenthehazardsfrominhalationcannotbe
eliminated,theoperatorandanybystanders
shouldweararespiratorapprovedbyOSHAfor
thematerialbeinghandled.
WARNING
Engineexhaustcontainscarbonmonoxide,an
odorless,deadlypoisonthatcankillyou.
Donotruntheengineindoorsorinanenclosed
area.
Training
•ReadtheOperator'sManualandothertrainingmaterial.If
theoperator(s)ormechanic(s)cannotreadorunderstand
theinformation,itistheowner'sresponsibilitytoexplain
thismaterialtothem.
•Becomefamiliarwiththesafeoperationoftheequipment,
operatorcontrols,andsafetysigns.
•Alloperatorsandmechanicsshouldbetrained.The
ownerisresponsiblefortrainingtheusers.
3

•Neverletchildrenoruntrainedpeopleoperateorservice
theequipment.Localregulationsmayrestricttheageof
theoperator.
•Theowner/usercanpreventandisresponsiblefor
accidentsorinjuriestopeopleordamagetoproperty.
Towing
Checkwithyourlocalcountyorstatetowingsafetyregulations
beforetowingthemachine.
•Inordertoreducethepossibilityofanaccidentwhile
transportingthemachineonpublicroads,makesurethat
thetowingvehicleismechanicallysoundandingood
operatingcondition.
•Shutdowntheenginebeforetransportingthemachine.
•Whentowingwithaballhitch,ensurethattheballhitch
youareusingisthepropersizeforthehitchcoupleron
themachine.
•Whentowingwithapintlehitch,ensurethattheeyeof
thetowpoleisthecorrectdimensionforthepintlehook.
•Inspectthehitchandcouplingforwear.Nevertowthe
machinewithdamagedordefectivehitches,couplings,
chains,orothercomponents.
•Checkthetireairpressureonthetowingvehicleandthe
machine.
•Checkthetiretreadandsidewallfordamageandwear.
•Properlyattachthesafetychainstothetowingvehicle.
•Ensurethatthedirectionalandbrakelightsareworking
properly(ifthemachineisequippedwiththelightkit).
•Ensurethatthedirectional,backup,andbrakelightsof
thetowvehicleareworkingproperly(ifthemachineis
equippedwiththelightkit).
•Beforetowing,checktomakecertainyourmachineis
correctlyandsecurelyattachedtothetowingvehicle.
•Ensurethatthesafetychainsareproperlysecuredtothe
vehicle,andleaveenoughslackforturning.
•Donotcarryanymaterialinthemachinewhentowing.
•Avoidsuddenstopsandstarts.Thiscancauseskidding,
orjackkning.Smooth,gradualstartsandstopswill
improvetowing.
•Avoidsharpturnstopreventrolling.Towonlywitha
vehiclethathasahitchdesignedfortowing.Donot
attachtowedequipmentexceptatthehitchpoint.
•Donottowthemachinefasterthan88km/h(55mph).
•Usecautionwhenbackingup;useaspotteroutsidethe
vehicletoguideyou.
•Donotallowanyonetositorrideonthemachine.
•Disconnectthemachinefromthetowvehiclebefore
usingit.
•Placechockblocksunderneaththetirestopreventthem
fromrollingwhilethemachineisparked.
Preparation
Becomefamiliarwiththesafeoperationoftheequipment,
operatorcontrols,andsafetysigns.
•Useonlyaccessoriesandattachmentsapprovedbythe
manufacturer.
•Wearpersonalprotectiveequipmentandappropriate
clothing,includingthefollowing:
–Hardhat
–Respiratorordustmask
–Faceshield
–Safetyglasses
–Hearingprotection
–Safetyshoes
–Longpants
–Shirtwithlongsleevesthataretightatthewrists
–Tight-ttinggloveswithoutdrawstringsorloosecuffs
•Securelonghair,looseclothing,orjewelrythatmayget
tangledinmovingparts.
•Operatingtheequipmentsafelyrequiresthefullattention
oftheoperator.Donotwearradioormusicheadphones
whileoperatingthemachine.
•Useextracarewhenhandlingfuels.Theyareammable
andthevaporsareexplosive.Usethefollowingpractices
whenhandlingfuel:
–Useonlyanapprovedfuelcontainer.
–Neverremovethefuelcaporaddfuelwiththeengine
running.
–Allowtheenginetocoolbeforerefueling.
–Donotsmoke.
–Neverrefuelordrainthemachineindoors.
–Replacethefuelcapandtightenitsecurely.
–Keepthecontainernozzleincontactwiththetank
duringlling.
–Neverllacontainerwhileitisinsideavehicle,trunk,
pick-upbed,oranysurfaceotherthantheground.
–Neverstorethemachineorfuelcontainerinside
wherethereisanopename,suchasnearawater
heaterorfurnace.
–Iffuelisspilled,wipeitofftheengineandequipment.
•Ensurethatthemachineisonalevelsurfacebefore
operatingthemachine.
•Chockthetiresofthemachinetopreventunintended
movement.
•Beforeeveryuse,dothefollowing:
–Inspectthecoupler,ball,andhitch.
–Ensurethatalllightsarefunctioningproperly(ifthe
machineisequippedwithalightkit).
–Ensurethatthetiresareproperlyinatedas
recommended.
4

–Ensurethatthelugnutsaretightandtorqued
properly.
–Ensurethatthemachineisproperlysecured.
Operation
•Neverrunanengineinanenclosedorpoorlyventilated
area.
•Onlyoperatethemachineingoodlightingconditions.
•Beforestartingthemachine,makesurethatthereareno
personsorobstaclesnearorunderthemachine.
•Shutofftheenginebeforeleavingthemachineforany
reason.
Neverleavearunningmachineunattended.Alwaysstop
theengineandverifythatallmovingpartshavestopped.
•Chockthetiresofthemachineorkeepitattachedtothe
towingvehiclewhenitisnotinuse,topreventitfrom
rolling.
•Avoidprolongedbreathingofexhaustfumes.Engine
exhaustfumescancausesicknessordeath.
•Keephandsawayfromanymovingparts.Keepfeetaway
fromthetiresandthefrontpost.
•Donotoperatethemachineundertheinuenceof
alcoholordrugs.
•Ensurethattheareaisclearofotherpeopleorpetsbefore
operatingthemachine.Stopthemachineifanyoneenters
thearea.
•Neverplaceyourhandsoranysolidobjectintothedrum
whenthemachineisinoperation.
•Donottouchpartswhichmaybehotfromoperation.
Allowthemtocoolbeforeattemptingtomaintain,adjust,
orservicethemachine.
•Nevermovethemachinewhiletheengineisrunning.
•Keepthecowlclosedandlatchedduringoperation.
•Ensurethatalltheguardsandshieldsaresecurelyinplace
beforeoperatingthemachine.
•Ifthemixingpaddlesstrikeaforeignobjectorifthe
machineshouldstartmakinganunusualnoiseor
vibration,stoptheengineandemptythedrum.Waitfor
allmovingpartstocometoacompletestopandcool.
Vibrationisgenerallyawarningoftrouble.Inspectfor
cloggingordamage.Cleanandrepairand/orreplace
damagedparts.
•Donotchangetheenginegovernorsettingoroverspeed
theengine.
•Lightningcancausesevereinjuryordeath.Ifyousee
lightningorhearthunderinthearea,donotoperatethe
machine;seekshelter.
MaintenanceandStorage
•Beforeperformingmaintenance,dothefollowing:
–Parkthemachineonlevelground.
–Stoptheengine.Waitforallmovementtostopbefore
adjusting,cleaning,orrepairing.
–Lettheenginecoolbeforeperformingmaintenance
orstoring.
–Disengageallpowerandoperationcontrols.
•Neverlubricate,service,repair,oradjustthemachine
whileitisrunning.
•Keepequipmentmaterialsclearfromthemuferand
enginetohelppreventres.Cleanupanyoilorfuel
spillage.
•Neverallowuntrainedpersonneltoservicethemachine.
•Keephands,feet,andclothingawayfrommovingparts.
Ifpossible,donotmakeadjustmentswiththeengine
running.
•Keepallpartsingoodworkingconditionandallhardware
tightened.Replaceallwornordamageddecals.
•Removeanybuildupofgrease,oil,ordebrisfromthe
machine.
•Stopandinspectthemachineifaforeignobjectentersthe
drumorcausesanotherobstruction.Makeanynecessary
repairsbeforestartingthemachine.
•Donottamperwithsafetydevices.
•Chockthetireswhenstoringthemachine.
•Keepallnuts,bolts,screws,andhoseclampssecurely
tightened.Keepequipmentingoodcondition.
•UseonlygenuineTororeplacementpartstoensurethat
theoriginalstandardsaremaintained.
5

SafetyandInstructionalDecals
Safetydecalsandinstructionsareeasilyvisibletotheoperatorandarelocatednearanyareaofpotential
danger.Replaceanydecalthatisdamagedorlost.
125–4939
1.Warning—readthe
Operator’sManual.
4.Toxicgasinhalation
hazard—Don’trunthe
engineinanenclosed
space.
2.Handandarm
entanglementatthe
beltdrive;crushinghazard
ofhand;entanglement
hazardofhandatthe
shaft—keephandsaway
frommovingparts;keep
allguardsandshieldsin
place.
5.Explosionhazard—stop
theengineandkeep
awayfromameswhen
refueling.
3.Entanglementhazardat
paddles—stoptheengine
andwaitforallmoving
partstostopbefore
performingmaintenance.
117–2718
125–8175
1.ReadtheOperator’sManualforinformationongreasing
themachine.
125–8216
1.ReadtheOperator’s
Manualforinformationon
howtotowthemachine.
2.Warning—limittowing
speedtolessthan55mph
/88km/h.
6

Setup
LooseParts
Usethechartbelowtoverifythatallpartshavebeenshipped.
ProcedureDescriptionQty.Use
Dumphandle1
Bolt2
1Nut2
Installthedumphandle.
2Towpolekit(soldseparately)1Installthetowpole.
Safetychain(soldwiththeoptionaltow
polekit)1
3Connectinglink(soldwiththeoptional
towpolekit)2
Installthesafetychain.
1
InstallingtheDumpHandle
Partsneededforthisprocedure:
1Dumphandle
2Bolt
2Nut
InstallingtheDumpHandletotheDrum
1.Cutthecabletiestoremovethedumphandlefrom
theundersideofthegrate.
2.Positionthedumphandlesothattheboltholesalign
withtheboltholesinthedrum(Figure3).
G021589
Figure3
3.Insertthe2boltsthroughtheboltholesinthedump
handleandthedrum(Figure3).
4.Installanutontoeachbolt,andtightenthembyhand
topreventcross-threading.
5.Tightenthenutswithawrenchwhileusinganother
wrenchtokeeptheboltsfromspinning.
2
InstallingtheTowPole
Partsneededforthisprocedure:
1Towpolekit(soldseparately)
InstallingtheTowPoletotheMachine
Note:Thetowpoleispurchasedseparatelyandincludesthe
nutandboltneededforinstallation.
Themachinehasthefollowingtowpoleoptions:
HitchTypeLength
50mm(2inch)ball—stamped127cm(50inches)
50mm(2inch)ball—forged127cm(50inches)
Pintle127cm(50inches)
1.Removetheboltandnutfromthetowpole(Figure4).
7

5
12
4
6
3
G019804
Figure4
1.Towpole4.Bolthole
2.Frontpost5.Frametting
3.Bolt6.Nut
2.Slidethetowpoleforwardandaligntheholeinthe
polewiththeholeintheframetting(Figure4).
3.Inserttheboltthroughtheholesinthettingandthe
pole(Figure4).
4.Threadthenutontotheboltandtightenthemuntil
theyaretightagainsttheframetting(Figure4).
Note:Iftheself-lockingnyloninsertinthelocknut
wearswithuse,replacethenutwithanewGrade5or
Grade8locknut.
3
InstallingtheSafetyChain
Partsneededforthisprocedure:
1Safetychain(soldwiththeoptionaltowpolekit)
2Connectinglink(soldwiththeoptionaltowpolekit)
InstallingtheSafetyChain
Note:Thesafetychainispartoftheoptionaltowpolekit.
1.Formahookontheendofabendablepieceofrod
orstiffwire(notincluded),andinsertitthroughboth
keyholesinthefrontpostofthemachine(Figure5A).
A
B
C
D
g019883
2
3
4
3
1
Figure5
1.Keyhole3.Safetychain
2.Rodorwire(notincluded)4.Connectinglink
2.Attachthesafetychaintothelengthofrodorwire
(Figure5A).
3.Pulltherod,orwire,andthesafetychainthroughboth
keyholes(Figure5B).
Note:Ensurethatapproximatelyequallengthsof
safetychainextendfromeithersideofthefrontpost.
InstallingtheConnectingLinks
Note:Theconnectinglinksarepartoftheoptionaltowpole
kit.
1.Aligntheconnectinglinktothelastlinkinoneendof
thesafetychain(Figure5D).
2.Inserttheconnectinglinkthroughthechainlinkuntil
theconnectinglinksnapsclosed.
3.Repeatsteps1and2toinstalltheotherconnectinglink
intheotherendofthesafetychain.
8

ProductOverview
12345
6
7
8
9
10
1112131415
16
G020474
Figure6
1.Rearcowl7.Clutchlever13.Chute
2.Frontcowl8.Drumlatch14.Axle
3.Grate9.Frontpost15.Wheel
assembly
4.Bagsplitter10.Towpole16.Cowllatch
5.Dumphandle11.Safety-chain
keyhole
6.Gratelifterarm12.Drum
Controls
Becomefamiliarwithallthecontrolsbeforeyoustartthe
engineandoperatethemachine.
ClutchLever
Theclutchlever(Figure7)engagesanddisengagesengine
powertothepaddles.
G019875
1
Figure7
1.Clutchlever
DrumLatch
Thedrumlatch(Figure8)securesthedrumtothe
mixposition(upright)formixingoperationsandwhen
transportingthemachine.
1
G019877
Figure8
1.Drumlatch
DumpHandle
Thedumphandle(Figure9)allowstheoperatortorotate
thedrumbetweenthedumppositionandthemix(upright)
position.
9

G020750
1
Figure9
1.Dumphandle
EngineControls
1
2
3
4
5
6
7
8
G019744
Figure10
1.Recoil-starthandle5.Fuelcap
2.Fuelvalve6.Oilcap/dipstick
3.Chokelever7.Oil-drainplug
4.Throttlelever8.On/Offswitch
FuelValve
Thefuelvalve(Figure11)islocatedunderneaththechoke
lever.MovetheleverforthefuelvalvetotheOnposition
beforeattemptingtostarttheengine.Whenyouhavenished
mixing,stoptheengineandmovethefuelvalvelevertothe
Offposition.
1
23
G018792
Figure11
1.Fuelvalve3.Throttlelever
2.Chokelever
ChokeLever
Thechokelever(Figure11)isrequiredwhenstartinga
coldengine.Beforepullingontherecoil-starthandle,move
thechokelevertotheclosedposition.Oncetheengineis
running,movethechokelevertotheopenposition.Do
notusethechokeiftheengineisalreadywarmeduporthe
airtemperatureishigh.
ThrottleLever
Thethrottlelever(Figure11)controlsthespeed(rpm)ofthe
engine.Itislocatednexttothechokelever.Itsetstheengine
speedandthereforecanincreaseanddecreasetherotation
speedofthemixingpaddles.Forbestperformance,setthis
controltothefastpositionwhenmixingmaterial.
EngineOn/OffSwitch
TheOn/Offswitch(Figure12)allowstheoperatorofthe
machinetostartandstoptheengine.Thisswitchislocated
onthefrontoftheengine.RotatetheOn/Offswitchtothe
Onpositiontostartandruntheengine.RotatetheOn/Off
switchtotheOffpositiontostoptheengine.
10

OFF
ON
1
OFF
ON
G021 103
2
Figure12
1.Offposition2.Onposition
Recoil-startHandle
Tostarttheengine,pulltherecoil-starthandle(Figure10)
quickly.Ensurethattheenginecontrolsdescribedaboveare
allsetcorrectlyfortheenginetostart.
Oil-levelSwitch
Theoil-levelswitchislocatedinsidetheengine,anditwill
notallowtheenginetorunintheeventtheoillevelisbelow
thesafeoperatinglimit.
Specications
Note:Specicationsanddesignaresubjecttochange
withoutnotice.
BatchMixCapacity0.25cubicm(9cuft)
Length
(withtowpole)
255cm(101inches)
Width122cm(48inches)
Height173cm(68inches)
Weight389kg(860lb)
Axle
(extendable)
91to119cm(36to47inches)
Operation
Important:Beforeoperating,checkthefuelandoil
levels,andremovedebrisfromthemachine.Ensurethat
theareaisclearofpeople.
PreparingtoTowtheMachine
Important:Ensurethatyourtowvehiclehastowing
capacityfortheweightofthemachine.
Important:UseaClass2orlargerreceiver.
Note:Ensurethatyourtowvehiclehastheappropriatehitch
totowthemachine;optionsincludea50mm(2inch)ball
hitchorapintlehitch.
Note:Ifthemachineisequippedwithatrailer-lightkit,
ensurethattheelectricalconnectorofthetowvehicleis
compatiblewiththeelectricalconnectorofthemachine.The
machineusesastandard4-atplug.Ifyourtowvehiclehasa
differenttypeofplug,obtainanadapterfromanautomotive
partsstore.
1.Ensuretheengineisstopped,thefuelvalveisoff,and
thedrumisempty.
2.Ifthedrumhasaccumulatedanywater,dumpthe
drum;refertoDumpingtheDrum(page21),steps1,
3,4,and5.
3.Usingthedumplever,positionthedrumsothatitisin
themixposition(upright)andlocked.
4.Closetheenginecowlandsecurethecowllatches
(Figure13).
G022324
Figure13
5.Extendtheaxle;refertoExtendingtheAxle(page15).
11

CheckingtheTiresandWheels
ServiceInterval:Beforeeachuseordaily—Inspectthetires
andwheels.
Aftereachuse—Torquethelugnutsto108to122
N-m(80to90ft-lb)aftertowing.
WARNING
Failuretomaintaincorrecttirepressuremayresult
intirefailureandlossofcontrol,resultingin
propertydamageandseriousinjuryordeath.
•Checkthetirepressurefrequentlytoensure
properination.Ifthetiresarenotinatedto
thecorrectpressure,theywillwearprematurely.
•Inspectthetireconditionbeforetowingand
afteranyoperatingaccident.
TheDOTtireinformationislocatedontheside
ofeachtire.Thisinformationgivesloadandspeed
ratings.Replacementtiresshouldhavethesame
orbetterratings.Formoreinformationgoto
http://www.nhtsa.gov/Vehicle+Safety/Tires.
Note:RefertoSpecications(page11)andensurethatall
replacementtiresmeetorexceedtheratingsforthismachine.
1.Visuallyinspectthetiresfordamageandwear(Figure
14andFigure15)
G020836
Figure14
1.Exampleoftirewearcausedbyunderination
Figure15
1.Exampleoftirewearcausedbyoverination
2.Ensurethatthetiresareinatedtothecorrectair
pressure.Thefollowingratingindicatestheappropriate
airpressureforthetiresasinstalledatthefactory.
AirPressure:Max241kPa(35psi)
Important:Alwayschecktheinformation
ontheactualtiresforthecorrectairpressure
requirement.
Important:Themostcommoncauseoftire
troubleisunderination.Maintainfullair
pressure.
3.Ensurethatthewheellugnutsaretorquedto108to
122N-m(80to90ft-lb).Checkthetorqueofthe
wheellugnutsinitiallyandaftertowing.
Note:Torquethelugnutsinthesequenceshownin
Figure16.
1
2
3
4
G021 107
Figure16
12

HitchingaMachinewithaStampedBall
Coupler(optionalkit)
1.Applychassisgreasetothesocketofthecouplerand
theareaoftheclampthatcontactstheball.Oilthe
pivotpointsandslidingsurfacesofthecouplerwith
SAE30motoroil.
2.Openthecouplerlatch(Figure17).
A
B
C
G020359
2
1
Figure17
1.Bail2.Safetypin
3.Positionthecouplerontopofthehitchball(Figure17).
4.Closethecouplerlatch(Figure17).
5.Openthebailonthesafetypinandinsertthepin
throughtheholeinthelatch(Figure17).
6.Rotatethefreeendofthebailovertheendofthesafety
pinthatisprotrudingthroughthelatch(Figure17).
7.Ifthemachineisequippedwithatrailer-lightkit,
connectthewireplugofthetowvehicletothewire
plugofthemachine.
HitchingaMachinewithaForgedBall
Coupler(optionalkit)
1.Applyremovablethread-lockingcompoundtothe
threadsofthecouplerbolttopreventthecoupler
handlefromcomingloose(Figure18).
Important:Applythread-lockingcompoundas
neededinthefuture.
A
B
C
D
G019807
5
1
2
3
4
Figure18
1.Couplerhandle4.Bolt
2.Coupler5.Hitchball
3.Clamp
2.Applychassisgreasetothesocketofthecouplerand
theareaoftheclampthatcontactstheball.
3.Pushthecouplerboltupthroughthecouplerclamp
andthecouplertop,andconnectthecouplerhandleto
thebolt(Figure18).
4.Positionthecouplersothesocketisontopofthehitch
ballandtheclampisundertheball.
5.Turnthecouplerhandleclockwisetothreaditontothe
boltuntilitissecure(Figure18).
Note:Useawrenchtokeeptheboltfromspinning.
6.Ifthemachineisequippedwithatrailer-lightkit,
connectthewireplugofthetowvehicletothewire
plugofthemachine.
13

HitchingaMachinewithaPintleHitch
TowPole(optionalkit)
1.Removethepinfromthepintlehitchandopenit
(Figure19).
G019809
Figure19
2.Positiontheringonthetowpoleontothehookofthe
pintlehitch(Figure19).
3.Closethetopofthepintlehitchandsecureitwiththe
pin(Figure19).
4.Ifthemachineisequippedwithatrailer-lightkit,
connectthewireplugofthetowvehicletothewire
plugofthemachine.
ConnectingtheSafetyChainstothe
TowVehicle
Connectthesafetychaintothemachineandthetowvehicle
asfollows:
1.Pullthesafetychainthroughtheslotsinthekeyholes
locatedinthefrontpostofthemachine,sothatthere
isjustenoughslackoneachsideforturningaround
cornerswhentowingthemachineFigure20).
Note:Stowtheexcesschaininsidethebottomofthe
frontpostbypushingitintothekeyholesandlatching
theappropriatelinksintothekeyholeslots.
2.Crossbothlengthsofchainunderthetowpole.
Note:Crossingthechainsdecreasesthechancesof
thefrontofthemachinedroppingtothegroundifthe
hitchdoesnotholdtheconnection.
1
2
3G021 177
Figure20
1.Connectinglinks3.Chaincrossedundertow
pole
2.Keyholesinfrontpost
3.Connecteachlengthofchaintothesafetychain
mountingpointonthetowvehiclewiththeconnecting
links(Figure21).
G021 178
1
2
3
Figure21
1.Connectinglink3.Chainlink
2.Safetychainmounting
pointontowvehicle
14

ExtendingtheAxle
WARNING
Themachineisnotstablewhentowingitwiththe
axleinthenarrowposition.
Towthemachinewiththeaxleinthewideposition.
Important:Adjusttheaxletothenarrowpositiononly
tomovethemachinethroughanarrowaccesspoint,
suchasthegateofafenceorthedoorwayofabuilding.
PreparingtoChangetheAxleWidth
1.Movethemachinetoaleveljob-sitesurface.
2.Disconnectthemachinefromthetowvehicle.
3.Chockthetires.
4.Ensurethatthedrumisemptyandinthemixposition
(upright).
5.Ensurethatthedrumlatchisengagedandthatthe
drumdoesnotrotatetowardthedumpposition.
AdjustingtheAxleWidth
WARNING
Mechanicalorhydraulicjacksmayfailtosupport
themachineandcauseseriousinjury.
Usejackstandswhensupportingthemachine.
1.Alignajackwithanadequateliftheightandweight
capacityundertheaxle;refertoSpecications(page
11).
2.Liftthemachineuntilthetiresareofftheground.
3.Useajackstandateachsupportpointontherear
frameextension(Figure22).
G020476
1
Figure22
1.Supportpoint(2)
4.Removetheboltsandnutsthatsecuretheinneraxleto
theouteraxle(Figure23).
12343
565G020020
Figure23
1.Wideposition(towing)4.Nut(narrowposition)
2.Narrowposition5.Bolt(wideposition)
3.Nut(wideposition)6.Bolt(narrowposition)
5.Aligntheinneraxletothedesiredpositionasfollows:
•Slideeachsideoftheaxleinwardtothenarrow
position(Figure23).
•Slideeachsideoftheaxleoutwardtothewide
(tow)position(Figure23).
6.Aligntheholesoftheinneraxlewiththeholesofthe
outeraxle.
7.Inserttheboltsthroughtheaxleholes(Figure23).
8.Threadthenutsontothebolts,andtorquethenuts
to87N-m(64ft-lb).
TowingtheMachine
WARNING
Towingthemachineathighspeedincreasesthe
riskofahitchmalfunctionandtirefailure.Higher
speedsalsoincreasethemomentumofthemachine
andbrakingdistance.Ifthemachinebecomes
detachedfromthetowvehicleathighspeed,it
couldcausedamagetoproperty,orinjuryordeath
tobystanders.
Donotexceed88km/h(55mph)whentowingthe
machine.Forpoorroadconditionsorinclement
weather,reducespeedaccordingly.
15

WARNING
Towingthemachinewithmaterialinthedrum
increasestheriskofahitchmalfunctionandtire
failure.Inaddition,materialcouldbounceoutof
thedrumandhitothervehiclesand/orpeople.
Materialinthedrumincreasestheweight,which
affectsmomentumandbrakingdistance.
Donottowthemachinewithmaterialinthedrum.
•ReviewandunderstandSafeOperatingPractices(page3).
•Testthebrakesofthetowvehiclebeforetowing.
•Avoidsuddenstartsandstopswhiletowingthemachine.
PreparingtoUsetheMachine
•Reviewallofthesafetydecalsonthemachine.
•Useahard-hat,hearingprotection,ashirtwithlong
sleevesthataretightatthewrists,tight-ttinggloves
withoutdrawstringsorloosecuffs,eyeprotection,and
adustmaskorrespirator.Ameshvisoralonedoes
notprovidesufcienteyeprotection;supplementwith
protectiveglasses.
•Ensurethatyouarefamiliarwiththesafetyregulations
andshutdownproceduresdescribedintheOperator’s
ManualandtheEngineOwner’sManual.
•Ensurethatallguardsareinplaceandingoodcondition.
•Ensurethatthepaddlesareinplaceandingood
condition.
•Checkthefuelandoillevelsoftheengine.
•Checkallthegreasettingstoensurethatthemachine
isproperlylubricated.
•Whenpreparingtomixmaterial:
1.Movethemachinetoaleveljob-sitesurface.
2.Removethemachinefromthetowvehicle.
3.Chockthefrontandbackofthetirestoprevent
themachinefrommoving.
4.Ensurethatthedrumisinthemixposition
(upright).
5.Ensurethatthedrumlatchisengagedandthatthe
drumdoesnotrotatetowardthedumpposition.
OpeningandClosingtheCowl
OpeningtheCowl
1.Atthesideofthemachinewherethefrontcowland
rearcowlmeet,graspthelatchandpullitofffromthe
latchanchorontherearcowl(Figure24).
AB
C D
1
G022323
1 2
Figure24
1.Latch2.Latchanchor
2.Repeatstep1ontheoppositesideofthemachine.
3.Rotatetherearcowlupandforwarduntilitisfully
positionedontopofthefrontcowl(Figure24).
ClosingtheCowl
1.Rotatetherearcowlrearwardanddownuntilthe
receiveratthebottomcenterofthecowlisushonthe
frameofthemachine(Figure24).
2.Atthesideofthemachine,graspthelatchandpullit
ontothelatchanchorontherearcowl.
3.Repeatstep2attheoppositesideofthemachine
(Figure24).
16

AddingFuel
•Forbestresults,useonlyclean,fresh(lessthan30days
old),unleadedgasolinewithanoctaneratingof87or
higher((R+M)/2ratingmethod).
•ETHANOL:Gasolinewithupto10%ethanol(gasohol)
or15%MTBE(methyltertiarybutylether)byvolume
isacceptable.EthanolandMTBEarenotthesame.
Gasolinewith15%ethanol(E15)byvolumeisnot
approvedforuse.Neverusegasolinethatcontainsmore
than10%ethanolbyvolume,suchasE15(contains15%
ethanol),E20(contains20%ethanol),orE85(contains
upto85%ethanol).Usingunapprovedgasolinemay
causeperformanceproblemsand/orenginedamage
whichmaynotbecoveredunderwarranty.
•Donotusegasolinecontainingmethanol.
•Donotstorefueleitherinthefueltankorfuelcontainers
overthewinterunlessafuelstabilizerisused.
•Donotaddoiltogasoline.
DANGER
Incertainconditions,fuelisextremelyammable
andhighlyexplosive.Areorexplosionfromfuel
canburnyouandothersandcandamageproperty.
•Fillthefueltankoutdoors,inanopenarea,when
theengineiscold.Wipeupanyfuelthatspills.
•Neverllthefueltankinsideanenclosedtrailer.
•Donotllthefueltankcompletelyfull.Add
fueltothefueltankuntilthelevelisnohigher
thanthescreenonthelterinthefueltank.
Thisemptyspaceinthetankallowsthefuelto
expand.
•Neversmokewhenhandlingfuel,andstayaway
fromanopenameorwherefuelfumesmaybe
ignitedbyaspark.
•Storefuelinanapprovedcontainerandkeepit
outofthereachofchildren.Neverbuymore
thana30-daysupplyoffuel.
•Donotoperatewithouttheentireexhaust
systeminplaceandinproperworkingcondition.
DANGER
Incertainconditionsduringfueling,static
electricitycanbereleasedcausingasparkwhich
canignitethefuelvapors.Areorexplosionfrom
fuelcanburnyouandothersandcandamage
property.
•Alwaysplacefuelcontainersonthegroundaway
fromyourvehiclebeforelling.
•Donotllfuelcontainersinsideavehicleoron
atruckortrailerbedbecauseinteriorcarpets
orplastictruckbedlinersmayinsulatethe
containerandslowthelossofanystaticcharge.
•Whenpractical,removefuel-poweredequipment
fromthetruckortrailerandfueltheequipment
withthewheelsontheground.
•Ifthisisnotpossible,thenrefuelsuchequipment
onatruckortrailerfromaportablecontainer,
ratherthanfromafueldispensernozzle.
•Ifafueldispensernozzlemustbeused,keepthe
nozzleincontactwiththerimofthefueltank
orcontaineropeningatalltimesuntilfuelingis
complete.
WARNING
Fuelisharmfulorfatalifswallowed.Long-term
exposuretovaporscancauseseriousinjuryand
illness.
•Avoidprolongedbreathingofvapors.
•Keepyourfaceawayfromthenozzleandthe
fueltankorconditioneropening.
•Keepfuelawayfromyoureyesandskin.
Important:Donotmixoilwithgasoline.
RecommendedFuel
UnleadedGasoline
U.S.Pumpoctanerating87orhigher
Except
U.S.
Researchoctanerating92orhigher
Pumpoctanerating87orhigher
UsingFuelStabilizer/Conditioner
Useafuelstabilizer/conditionerinthemachinetokeepthe
fuelfreshduringstorageof90daysorless.Ifyouarestoring
themachineforlonger,drainthefueltank;refertoStoring
theMachine(page36).
Important:Donotusefueladditivescontaining
methanolorethanol.
Addthecorrectamountoffuelstabilizer/conditionertothe
fuel,andfollowthedirectionsofthemanufacturer.
17

Note:Fuelstabilizer/conditionerismosteffectivewhen
mixedwithfreshfuel.Tominimizethechanceofvarnish
depositsinthefuelsystem,usefuelstabilizeratalltimes.
FillingtheFuelTank
Thefueltankcapacityis5.3L(1.4USgallons).
1.Parkthemachineonalevelsurface,stoptheengine,
andallowtheenginetocool.
2.Cleanaroundthefuelcapandremoveit(Figure25).
1
G019799
Figure25
1.Fuelcap
3.Addunleadedgasolinetothefueltank,untilthelevel
isatthebottomofthemaximumfuellevel,asshown
inFigure26.
Important:Thisspaceinthetankallowsgasoline
toexpand.Donotllthefueltankcompletelyfull.
G020679
1
Figure26
1.Maximumfuellevel
4.Installthefuelcapsecurely(Figure25).
5.Wipeupanygasolinethatmayhavespilled.
CheckingtheEngineOilLevel
ServiceInterval:Beforeeachuseordaily
Important:Use4-cycleengineoilthatmeetsorexceeds
therequirementsforAPIservicecategory
SJ , SL, SM,
or higher
.
Crankcasecapacity:1.1L(1.2USqt)
Important:Iftheoillevelinthecrankcaseistoolow
ortoohighandyouruntheengine,youmaydamage
theengine.Thistypeofdamageisnotcoveredbythe
warranty.
Note:UseSAE10W-30forgeneraluse.Youcanuse
theotherviscositiesshowninthechartwhentheaverage
temperatureinyourareaiswithintheindicatedrange(Figure
27).
18

g013375
0 20 40 60 80 100 F
-20 -10 0 10 20 30 40 C o
o
30
5W - 30 / 10W - 30
Figure27
1.Placethemachineonaat,levelsurface,andstopthe
engine.
2.Allowtheenginetocool.
3.Cleanaroundthedipstick.
4.Removethedipstickandwipetheendclean(Figure28).
12
3
4
G019746
Figure28
1.Fillport3.Oil-levelupperlimit
2.Dipstick4.Oil-levellowerlimit
5.Slidethedipstickfullyintothellportwithout
threadingitintotheport(Figure28).
6.Removethedipstickandlookattheend.Iftheengine
oillevelislow,slowlypouronlyenoughoilintothell
porttoraisetheleveltotheFullmarkonthedipstick
(Figure28).
Note:ToroPremiumEngineOilisavailablefrom
yourAuthorizedToroDealer.
7.Replaceandsecurethedipstick(Figure28).
StartingandStoppingthe
Engine
StartingtheEngine
1.EnsurethattheclutchleverisintheOffposition;refer
toControllingthePaddles(page20).
2.Ontheengine,movethethrottleleverawayfromthe
Minposition,1/3ofthewaytowardtheMaxposition
(Figure29);refertoThrottleLever(page10).
G019815
1
2
3
Figure29
1.Chokelever3.Throttlelever
2.Fuelvalve
3.MovetheleverofthefuelvalvetotheOnposition—all
thewaytotheright(Figure29);refertoFuelValve
(page10).
4.Positionthechokeleverasfollows:
•Tostartacoldengine,movethechokelevertothe
Closedposition—allthewaytotheleft(Figure29);
refertoChokeLever(page10).
•Tostartawarmengine,movethechokeleverin
theOpenposition—allthewaytotheright.
5.RotatetheengineswitchtotheOnposition(Figure
29);refertoEngineOn/OffSwitch(page10).
6.Pulltherecoil-starthandlelightlyuntilyoufeel
resistance,thenpullthehandlebriskly.Returnthe
recoil-starthandlegently(Figure30).
19

G019747
Figure30
Note:IfthechokeleverissettotheClosedpositiontostart
theengine,graduallymovethechokeleverbacktowardthe
Openpositionastheenginewarmsup.Iftheenginestalls
orhesitates,movethechokeleverbacktowardtheClosed
positionuntiltheenginerunssmooth.Allowtheengineto
warmup,thenmovethechokelevertotheOpenposition;
refertoChokeLever(page10).
StoppingtheEngine
WARNING
Inanemergencysituation,stoptheengine
immediately.
Important:Duringnormaloperation,iftheengine
hasbeenworkinghardorishot,letitidleforaminute
beforestoppingtheengine.Thishelpstocoolthe
enginebeforestopping.
1.EnsurethatthechokeleverisintheOffposition
(Figure29);refertoChokeLever(page10).
2.MovethethrottlelevertotheMinposition(Figure29);
refertoThrottleLever(page10).
3.RotatetheengineswitchtotheOffposition;referto
EngineOn/OffSwitch(page10).
ControllingthePaddles
DANGER
Thismachineiscapableofamputatinghands.
•Stayintheoperator’spositionwhilethemachine
isrunning.
•Keepallbystandersasafedistancefromthe
machine.
•Stopthemachineimmediatelyifanypeopleor
animalsentertheworkarea.
•Neverplaceanypartofyourbodyintoaposition
thatcausesanunsafeoperatingcondition.
Usetheclutchlevertocontrolthepowertransmissiontothe
paddlesofthemachine.
UsingtheClutchLever
Movetheclutchleverclockwisetoengagetheclutch,and
counterclockwisetodisengagetheclutch(Figure31).
G019873
1
2
Figure31
1.Offposition2.Onposition
MixingtheMaterial
DANGER
Eyeandskincontactwithconcretematerialsand
breathingthedustinvolvedishazardoustoyour
health.
•Ensurethatthereisadequateairventilation.
•Wearadustmasktopreventinhalationofdust
whileusingthemachine;refertoSafeOperating
Practices(page3).
•Avoiddirectcontactofcementandconcrete
materialswithskinandeyes.
DANGER
Contactwiththemixingpaddlescouldcause
damageorinjury.
Neverputyourhandsinsidethedrumatanytime.
Important:Donotaddmorematerialthanthebatch
capacityofthemachine;refertoSpecications(page11).
Note:Followthemanufacturer’sinstructionsthatareprinted
onthepackagingoftheproductthatyouareusing.
20
Table of contents
Other Toro Construction Equipment manuals

Toro
Toro 68038 User manual

Toro
Toro 22410 User manual

Toro
Toro TXL 2000 User manual

Toro
Toro 68141 User manual

Toro
Toro 22984HD User manual

Toro
Toro MMX-650E-S User manual

Toro
Toro TX 427 Installation and operating manual

Toro
Toro MB-1600 User manual

Toro
Toro MM-858H-P User manual

Toro
Toro TX 700 User manual

Toro
Toro 60213 60216 User manual

Toro
Toro Pro Sneak 365 User manual

Toro
Toro Pro Sneak 360 User manual

Toro
Toro MMX-658H-S User manual

Toro
Toro Line Painter 1200 User manual

Toro
Toro 22322 User manual

Toro
Toro CM-658H-S User manual

Toro
Toro 23174 User manual

Toro
Toro 323 User manual

Toro
Toro MMX-655H-S User manual