Toro 39519 User manual

FormNo.3412-564RevB
30inStand-OnAerator
ModelNo.39519—SerialNo.400000000andUp
Registeratwww.Toro.com.
OriginalInstructions(EN)*3412-564*B

ThissparkignitionsystemcomplieswithCanadian
ICES-002
Important:Thisengineisnotequippedwith
asparkarrestermufer.Itisaviolationof
CaliforniaPublicResourceCodeSection4442to
useoroperatetheengineonanyforest-covered,
brush-covered,orgrass-coveredland.Other
statesorfederalareasmayhavesimilarlaws.
TheenclosedEngineOwner'sManualis
suppliedforinformationregardingtheUS
EnvironmentalProtectionAgency(EPA)and
theCaliforniaEmissionControlRegulationof
emissionsystems,maintenance,andwarranty.
Replacementsmaybeorderedthroughtheengine
manufacturer.
WARNING
CALIFORNIA
Proposition65Warning
Theengineexhaustfromthisproduct
containschemicalsknowntotheStateof
Californiatocausecancer,birthdefects,
orotherreproductiveharm.
Batteryposts,terminals,andrelated
accessoriescontainleadandlead
compounds,chemicalsknownto
theStateofCaliforniatocause
cancerandreproductiveharm.Wash
handsafterhandling.
Useofthisproductmaycauseexposure
tochemicalsknowntotheStateof
Californiatocausecancer,birthdefects,
orotherreproductiveharm.
Introduction
Thisaeratorisintendedtobeusedbytrained
operatorsinresidentialandcommercialapplications.
Itisprimarilydesignedforaeratingareasof
well-maintainedlawnsonresidentialgrounds,parks,
sportselds,andcommercialgrounds.Usingthis
productforpurposesotherthanitsintendedusecould
provedangeroustoyouandbystanders.
Readthisinformationcarefullytolearnhowtooperate
andmaintainyourproductproperlyandtoavoid
injuryandproductdamage.Youareresponsiblefor
operatingtheproductproperlyandsafely.
Visitwww.Toro.comforproductsafetyandoperation
trainingmaterials,accessoryinformation,helpnding
adealer,ortoregisteryourproduct.
Wheneveryouneedservice,genuineT oroparts,or
additionalinformation,contactanAuthorizedService
DealerorToroCustomerServiceandhavethemodel
andserialnumbersofyourproductready.Figure1
identiesthelocationofthemodelandserialnumbers
ontheproduct.Writethenumbersinthespace
provided.
g020219
Figure1
1.Locationofthemodelandserialnumbers
ModelNo.
SerialNo.
Thismanualidentiespotentialhazardsandhas
safetymessagesidentiedbythesafety-alertsymbol
(Figure2),whichsignalsahazardthatmaycause
seriousinjuryordeathifyoudonotfollowthe
recommendedprecautions.
g000502
Figure2
Safety-alertsymbol
Thismanualuses2wordstohighlightinformation.
Importantcallsattentiontospecialmechanical
informationandNoteemphasizesgeneralinformation
worthyofspecialattention.
©2020—TheToro®Company
8111LyndaleAvenueSouth
Bloomington,MN554202
Contactusatwww.Toro.com.
PrintedintheUSA
AllRightsReserved

Contents
Safety.......................................................................4
SafeOperatingPractices....................................4
AeratorSafety....................................................6
SlopeIndicator...................................................7
SafetyandInstructionalDecals..........................8
Setup......................................................................12
1CheckingTirePressure..................................12
2ServicingtheBattery......................................12
3CheckingFluidLevels....................................13
4RemovingtheCylinderStop...........................14
ProductOverview...................................................15
Controls...........................................................15
Specications..................................................18
Operation................................................................18
CheckingtheEngine-OilLevel..........................18
AddingFuel......................................................19
LubricatingtheChains......................................20
CheckingtheSafety-InterlockSystem..............22
CheckingforLooseHardware...........................22
OperatingtheMachine.....................................22
TransportingtheMachine.................................25
LoadingtheMachine........................................26
Maintenance...........................................................27
RecommendedMaintenanceSchedule(s)...........27
Pre-MaintenanceProcedures..............................28
PreparingfortheMachinefor
Maintenance.................................................28
AccessingtheConsoleCompartment...............28
Lubrication..........................................................29
LubricatingtheGreaseFittings.........................29
LubricatingtheCasters.....................................30
EngineMaintenance...........................................32
ServicingtheAirCleaner..................................32
ServicingtheEngineOil....................................33
CheckingtheSparkPlugs.................................35
ServicingtheSparkPlug...................................35
CheckingtheSparkArrester(if
equipped)......................................................36
FuelSystemMaintenance...................................36
ServicingtheFuelFilter....................................36
ElectricalSystemMaintenance...........................37
ServicingtheBattery.........................................37
ServicingtheFuses..........................................39
DriveSystemMaintenance..................................39
CheckingtheAirPressureintheTires...............39
CheckingtheWheelHubNuts..........................39
CheckingtheTorqueoftheWheelLug
Nuts..............................................................39
AdjustingtheCasterPivotBearings
Pre-Load.......................................................40
MaintainingtheChain.......................................40
CheckingtheTransmissionOutputShaftNut
Torque...........................................................41
BrakeMaintenance.............................................42
AdjustingtheParkingBrake..............................42
AdjustingtheBrakeSwitch...............................42
BeltMaintenance................................................43
CheckingtheConditionandT ensionofthe
Belts..............................................................43
AdjustingtheAuxiliaryPumpDrive
Belt................................................................43
ReplacingtheTransmission-DriveBelt.............43
ControlsSystemMaintenance.............................44
AdjustingtheTraction-ControlLinkage.............44
HydraulicSystemMaintenance...........................45
MaintainingtheAuxiliaryHydraulic
System..........................................................45
MaintainingtheTransmission...........................47
TineMaintenance.................................................50
CheckingtheTines...........................................50
AdjustingtheTine-DriveChain.........................50
Cleaning..............................................................51
CleaningtheEngineandtheExhaust
SystemArea.................................................51
RemovingtheEngineShroudsandCleaning
theCoolingFins............................................51
CleaningtheDebrisfromtheMachine...............51
WasteDisposal.................................................51
Storage...................................................................52
Troubleshooting......................................................53
Schematics.............................................................55
3

Safety
Improperuseormaintenancecanresultininjury.
Toreducethepotentialforinjury,complywith
thesesafetyinstructions,andpayattentiontothe
safety-alertsymbol,whichmeansCaution,Warning,
orDanger—personalsafetyinstruction.Failureto
complywiththeinstructionsmayresultinpersonal
injuryordeath.
WARNING
Removalormodicationoforiginal
equipment,partsand/oraccessoriesmay
alterthewarranty,controllability,andsafety
ofthemachine.Unauthorizedmodications
totheoriginalequipmentorfailuretouse
originalToropartscouldleadtoserious
injuryordeath.Unauthorizedchangestothe
machine,engine,fuelorventingsystem,may
violateapplicablesafetystandardssuchas:
ANSI,OSHAandNFPAand/orgovernment
regulationssuchasEPAandCARB.
Replaceallpartsincluding,butnotlimitedto,
tires,belts,andfuelsystemcomponentswith
originalToroparts.
Important:Thismachinewasmanufactured
accordingtotheappropriateregulatorystandards
ineffectatthetimeofmanufacture.Modifying
thismachineinanywaymaycauseittobe
outofcompliancewiththosestandardsand
withtheinstructionsinthisOperator’sManual.
Modicationstothismachineshouldonlybe
madebyeitherthemanufactureroranAuthorized
ToroDealer.
Thisproductiscapableofinjuringyourhandsand
feet.Followallsafetyinstructionstoavoidserious
injuryordeath.
Theowner/usercanpreventandisresponsiblefor
accidentsorinjuriesoccurringtopeople,ordamage
toproperty.
Anyuseofthismachineotherthanaeratingturfgrass
couldprovedangeroustotheuserandbystanders.
Important:Theadditionofattachmentsmade
byothermanufacturersthatdonotmeetANSI
certicationmaycausenoncomplianceofthis
machine.
SafeOperatingPractices
ThefollowinginstructionsarefromANSIstandard
B71.4-2012.
Training
•ReadtheOperator'sManualandothertraining
material.
Note:Iftheoperator(s)ormechanic(s)cannot
readthemanuallanguage,itistheowner's
responsibilitytoexplainthismaterialtothem.
•Becomefamiliarwiththesafeoperationofthe
equipment,operatorcontrols,andsafetysigns.
•Alloperatorsandmechanicsshouldbetrained.
Theownerisresponsiblefortrainingtheusers.
•Neverletchildrenoruntrainedpeopleoperateor
servicetheequipment.
Note:Localregulationsmayrestricttheageof
theoperator.
•Theowner/usercanpreventandisresponsible
foraccidentsorinjuriesoccurringtopeopleor
damagetoproperty.
Preparation
•Evaluatetheterraintodeterminewhataccessories
andattachmentsareneededtoproperlyand
safelyperformthejob.Onlyuseaccessoriesand
attachmentsapprovedbythemanufacturer.
•Wearappropriateclothing;includingsafety
glasses,longpants,substantialslip-resistant
footwear,gloves,andhearingprotection.
•Tiebacklonghair.Donotwearjewelry.
•Inspecttheareawheretheequipmentistobe
usedandensurethatallobjectsareremovedfrom
theareabeforeuse.
•Checkthattheoperator'spresencecontrols,safety
switches,andshieldsareattachedandfunctioning
properly.Donotoperatethemachineunlessthey
arefunctioningproperly.
Operation
•Lightningcancausesevereinjuryordeath.If
lightningisseen,orthunderisheardinthearea,
donotoperatethemachine;seekshelter.
•Donotrunanengineinanenclosedarea.
•Onlyoperateinwell-litareas,keepingawayfrom
holesandhiddenhazards.
•Ensurethatalldrivesareinneutralandthatthe
parkingbrakeisengagedbeforestartingengine.
Onlystarttheenginefromtheoperator’sposition.
•Makesurethatyouhavegoodfootingwhileusing
thismachine,especiallywhenbackingup.
4

Note:Reducedfootingcouldcauseslipping.
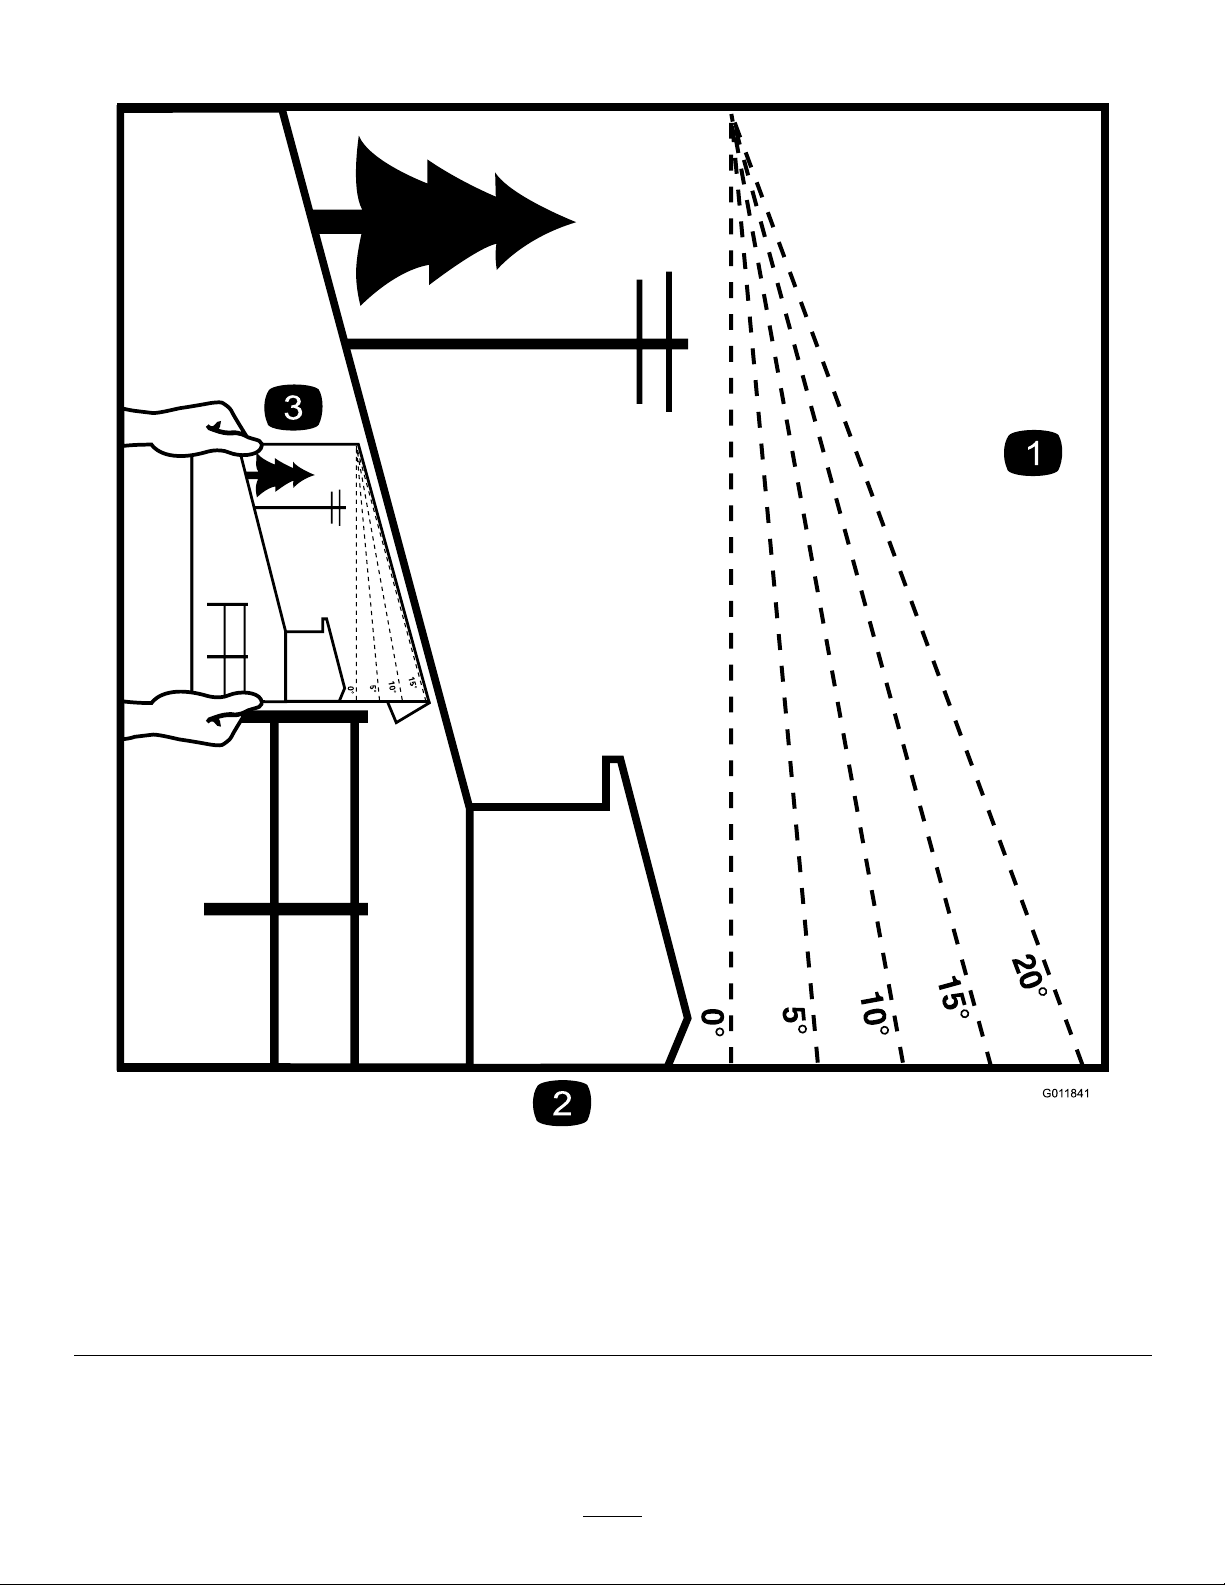
•Slowdownanduseextracareonhillsides.Be
suretotravelsidetosideonhillsides.Turf
conditionscanaffectthestabilityofthemachine.
Usecautionwhileoperatingneardrop-offs.
•Slowdownandusecautionwhenmakingturns
andwhenchangingdirectionsonslopes.
•Donotoperatethemachinewithouttheshields
orotherguardssecurelyinplace.Besureall
interlocksareattached,adjustedproperly,and
functioningproperly.
•Donotchangetheenginegovernorsettingor
overspeedtheengine.
•Beforeleavingtheoperator’sposition:
–Stoponlevelground.
–Disengagetheparkingbrake(ifprovided).
–Shutofftheengine.
•Stoponlevelground,disengagedrives,engage
theparkingbrake(ifprovided),shutofftheengine
beforeleavingtheoperator'spositionforany
reason.
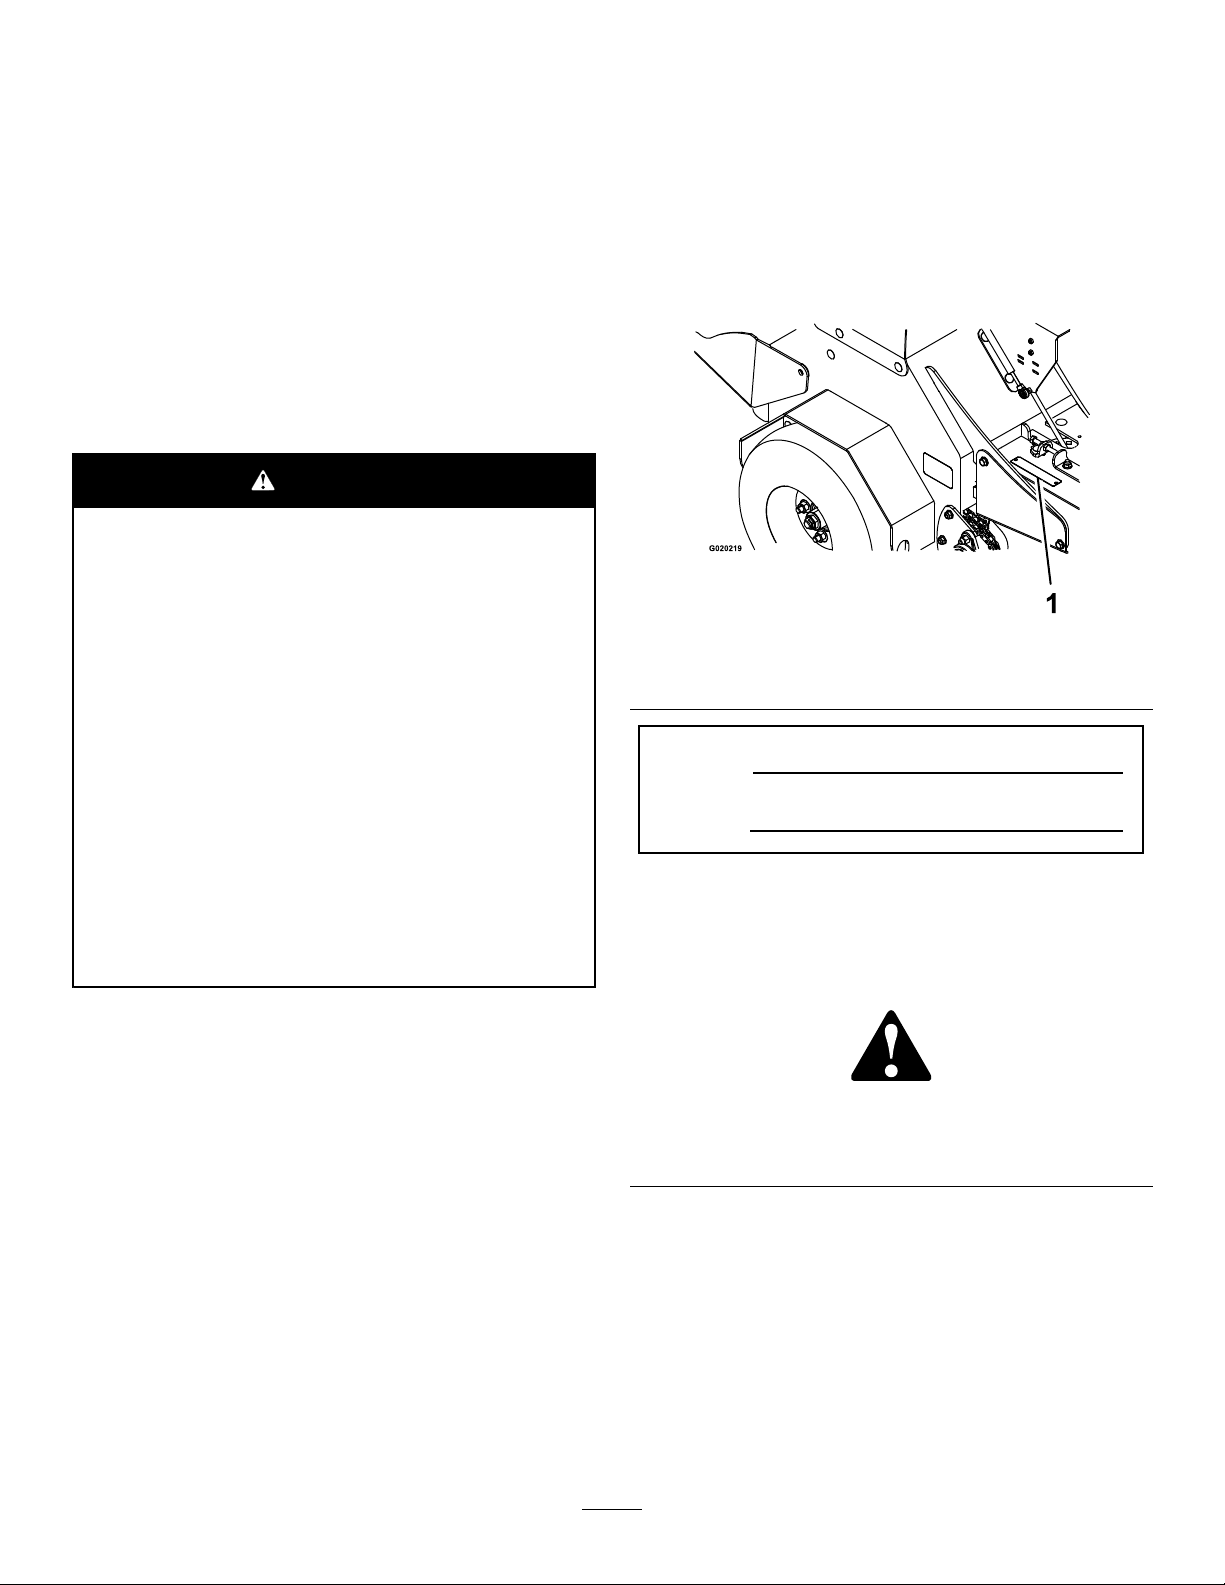
•Stopequipmentandinspectthetinesafterstriking
objectsorifanabnormalvibrationoccurs.Make
thenecessaryrepairsbeforeresumingoperations.
•Keepyourhandsandfeetawayfromthetine
assembly.
•Lookbehindanddownbeforebackingupto
ensureaclearpath.
•Keeppetsandbystandersawayfromanoperating
machine.
•Slowdownandusecautionwhenmakingturns
andcrossingroadsandsidewalks.Fullyraisethe
tinesifyouarenotaerating.
•Donotoperatethemachinewhileill,tired,or
undertheinuenceofalcoholordrugs.
•Usecarewhenapproachingblindcorners,shrubs,
trees,orotherobjectsthatmayobscurevision.
SafeHandlingofFuels
•Toavoidpersonalinjuryorpropertydamage,use
extremecareinhandlingfuel.Fuelisextremely
ammableandthevaporsareexplosive.
•Useonlyanapprovedfuelcontainer.
•Donotremovethefuelcaporaddfuelwiththe
enginerunning.
•Allowtheenginetocoolbeforefueling.
•Neverrefuelordrainthemachineindoorsanddo
notsmokewhilerefuelingordraining.
•Donotstorethemachineorfuelcontainerwhere
thereisanopename,spark,orpilotlightsuchas
onawaterheateroronotherappliances.
•Donotllcontainersinsideavehicle,onatruck,
oronatrailerbedwithaplasticliner.Alwaysplace
containersonthegroundawayfromyourvehicle
beforelling.
•Removeequipmentfromthetruckortrailerand
fuelitontheground.Ifthisisnotpossible,
thenaddfuelwithsuchequipmentasaportable
container,ratherthanfromafuel-dispensernozzle.
•Keepthenozzleincontactwiththerimofthefuel
tankorcontaineropeningatalltimesuntilfueling
iscomplete.Donotuseanozzlelockopendevice.
•Iffuelisspilledonclothing,changeyourclothing
immediately.
•Donotoverllfueltank.Replacefuelcapand
tightensecurely.
MaintenanceandStorage
•Donotallowuntrainedpersonneltoservice
machine.
•Donottouchequipmentorattachmentpartswhich
maybehotfromoperation.Allowallofthepartsof
themachinetocoolbeforeattemptingtomaintain,
adjust,orservicethemachine.
•Keepyourhandsandfeetawayfrommoving
parts.Ifpossible,donotmakeadjustmentswith
theenginerunning.
•Disengagethedrives,raisethetines,engagethe
parkingbrake,shutofftheengine,andremove
thekeyordisconnectthespark-plugwire.Waitfor
allmovementtostopbeforeadjusting,cleaning,
orrepairing.
•Disconnectthebatteryorremovethespark-plug
wirebeforemakinganyrepairs.Disconnectthe
negativeterminalrstandthepositiveterminal
last.Reconnectthepositiverstandnegativelast.
•Usecarewhencheckingthetines.Wrapthetine(s)
orweargloves,andusecautionwhenservicing
them.Onlyreplacetines;donotstraightenorweld
them.
•Cleangrass,dirt,anddebrisfromthetines,drives,
mufers,andenginetohelppreventres.
•Cleanupoilorfuelspills.
•Parkthemachineonlevel,hardground.Never
allowuntrainedpersonneltoservicemachine.
•Usejackstandstosupportcomponentswhen
required.
•Carefullyreleasepressurefromcomponentswith
storedenergy.
•Lettheenginecoolbeforestoring.
•Keepallpartsingoodworkingconditionandall
hardwaretightened.Replaceallwornordamaged
decals.
5

Hauling
•Usecarewhenloadingorunloadingthemachine
intoatraileroratruck.
•Usefull-widthrampsforloadingmachineintoa
traileroratruck.
•Tiethemachinedownsecurelyusingstraps,
chains,cable,orropes.Bothfrontandrearstraps
shouldbedirecteddownandoutwardfromthe
machine.
AeratorSafety
Thefollowinglistcontainssafetyinformationspecic
toToroproductsandothersafetyinformationyou
mustknow.
GeneralOperation
•Checkcarefullyforoverheadclearances(i.e.
branches,doorways,electricalwires,etc.)before
operatingunderanyobjects,anddonotcontact
them.
•Usecautionwhenyouareridingontheplatform
anddrivingthemachineovercurbs,rocks,roots,
orotherobstructions.
•Donotjerkthecontrols;useasteadymotion.
•Donotcarrypassengers.
•Donotcarryequipmentonthemachine.
SlopeOperation
Useextremecautionwhenaeratingand/orturning
onslopesaslossoftractionand/ortip-overcould
occur.Theoperatorisresponsibleforsafeoperation
onslopes.
•UseFigure3tohelpyoudeterminetheappropriate
slopeangleofareatoaerate
•Removeormarkobstaclessuchasrocks,tree
limbs,etc.fromtheaeratingarea.
•Watchforholes,rutsorbumps.
Note:T allgrasscanhideobstacles.
•Usecautionneardrop-offs,ditches,or
embankments.
Note:Themachinecouldsuddenlyturnoverifa
wheelgoesovertheedgeofaclifforditch,orif
anedgecavesin.
•Beawarethatoperatingonwetgrass,across
steepslopesordownhillmaycausethemachine
tolosetraction.Lossoftractiontothedrivewheels
mayresultinslidingandalossofbrakingand
steering.
•Donotaerateslopesgreaterthan15degrees.
•Avoidsuddenstartsandstopswhenaeratinguphill
becausethemachinemaytipbackward.
Note:Themachineismorestablegoinguphill
withthetinesraised.
•Keepallmovementonslopesslowandgradual.
•Donotmakesuddenchangesinspeedor
direction.
•Reducethetine-downpressuretopreventthe
drivetiresfromraisingoffthegroundandto
preventthefronttiresfromraisingofftheground
whileaeratinguphill.
•Followthemanufacturer’srecommendationsfor
wheelweightsorcounterweightstoimprove
stability.
•Useextracarewithattachments.
Note:Useofattachmentscanchangethestability
ofthemachine.
Service
•Toensureoptimumperformanceandcontinued
safetycerticationofthemachine,useonly
genuineTororeplacementpartsandaccessories.
Replacementpartsandaccessoriesmadeby
othermanufacturerscouldbedangerous,and
suchusecouldvoidtheproductwarranty.
•Neverremoveortamperwithsafetydevices.
Checktheirproperoperationregularly.Neverdo
anythingtointerferewiththeintendedfunctionofa
safetydeviceortoreducetheprotectionprovided
byasafetydevice.
•Checkbrakeoperationfrequently.Adjustand
serviceasrequired.
6

SlopeIndicator
g011841
Figure3
Thispagemaybecopiedforpersonaluse.
1.Themaximumslopeyoucansafelyoperatethemachineonis15degrees.Usetheslopecharttodeterminethedegreeofslope
ofhillsbeforeoperating.Donotoperatethismachineonaslopegreaterthan15degrees.Foldalongtheappropriateline
tomatchtherecommendedslope.
2.Alignthisedgewithaverticalsurface,atree,building,fencepole,etc.
3.Exampleofhowtocompareslopewithfoldededge.
7

SafetyandInstructionalDecals
Safetydecalsandinstructionsareeasilyvisibletotheoperatorandarelocatednearanyarea
ofpotentialdanger.Replaceanydecalthatisdamagedormissing.
decal93-6686
93-6686
1.Hydraulicuid2.ReadtheOperator's
Manual.
decal115-2047
115-2047
1.Warning—donottouchthehotsurface.
decal116-9391
116-9391
decal117-2718
117-2718
decal120-9570
120-9570
1.Warning—stayawayfrommovingparts,keepallguards
andshieldsinplace.
decal121-6150
121-6150
1.Cuttinghazardofhandandfoot–stayawayfrommoving
parts.
decal121-6161
121-6161
1.Entanglementhazard,belt—stayawayfrommovingparts;
keepallguardsinplace.
decal121-6162
121-6162
1.Cutting/dismembermenthazardofhandorfoot—lower
thetinestotheground;readtheOperator’sManualfor
disassemblyprocedure.
8

decal121-6163
121-6163
1.Presstolowerthetines.2.Releasetoraisethetines.
decal126-2054
126-2054
1.Wheellugnuttorque129N∙m(95ft-lb)(4x)
2.Wheelhubnuttorque319N∙m(235ft-lb)
3.ReadandunderstandtheOperator’sManualbefore
performinganymaintenance;checkthetorqueevery100
hours.
decal121-6164
121-6164
1.Fast6.Wheelsandtinesrotatewhenmoving
backward
11.Warning—keepbystandersaway.
2.Slow7.Continuousvariablesetting12.Warning—donotoperatethemachine
unlessyouaretrained.
3.Neutral8.Choke—on13.Thrownobjecthazard—pickupdebris
beforeoperatingthemachine.
4.Reverse9.Choke—off14.Warning—stayawayfrommoving
parts;keepallguardsinplace.
5.Wheelsandtinesrotatewhenmoving
forward
10.Warning—readtheOperator’sManual.15.Warning—shutofftheengine,engage
theparkingbreak,andremovethekey
beforeleavingthemachine.
9

decal126-4528
126-4528
1.Rotatecounterclockwisetodecreasepressure5.Parkingbrake-release
2.Rotateclockwisetoincreasepressure6.Parkingbrake-engage
3.On-tinegroundengagementfootswitch7.Cutting/dismembermenthazardofhandorfoot,tines–stay
awayfrommovingparts;keepallguardsinplace
4.Off-tinegroundengagementfootswitch
decal121-6166
121-6166
1.Tippinghazard—donotturnsharplywhiletravellingfast;slow
downandturngradually.
3.Warning;tippinghazard—donotusesplitramps;usefull
widthrampstoloadamachinefortransport;usealoading
rampatamaximumof15degrees.
2.Tippinghazard—donotoperatethemachineonslopes
greaterthan15degrees;donotoperatethemachinenear
drop-offs.
10

decal116-9392
116–9392
1.Readtheinstructionsbeforeservicingorperformingmaintenance;readtheOperator’sManualforinformationonlubricating
themachine.
11

Setup
MediaandAdditionalParts
DescriptionQty.Use
Operator'sManual1Readbeforeoperatingthemachine.
Key2Startthemachine.
1
CheckingTirePressure
NoPartsRequired
Procedure
1.Checkthetirepressureinthedrivetires.
Note:Properinationfordrivetiresis83to97
kPa(12to14psi).
2.Adjustthetirepressureifnecessary.
2
ServicingtheBattery
NoPartsRequired
Procedure
Note:Themachineisshippedwithalled,lead-acid
battery.
DANGER
Chargingorjumpstartingthebatterymay
produceexplosivegases.Batterygasescan
explodecausingseriousinjury.
•Keepsparks,ames,orcigarettesaway
frombattery.
•Ventilatewhenchargingorusingbatteryin
anenclosedspace.
•Makesurethattheventingpathofbattery
isalwaysopenoncethebatteryislled
withacid.
•Alwaysshieldeyesandfacefrombattery.
DANGER
Batteryelectrolytecontainssulfuricacid,
whichispoisonousandcancausesevere
burns.Swallowingelectrolytecanbefatalor
ifittouchesskincancausesevereburns.
•Wearsafetyglassestoshieldyoureyes
andrubberglovestoprotectyourskinand
clothingwhenhandlingelectrolyte.
•Donotswallowelectrolyte.
•Intheeventofanaccident,ushwithwater
andcalladoctorimmediately.
12

1.TurnthekeyintheignitionswitchtotheOFF
positionandremovethekey.
2.Measurethevoltageofthebatterywitha
voltmeter.
3.Usethetablebelowtolocatethechargestate
orthebattery,andifneeded,thebattery-charger
settingandchargingintervalrecommendedto
chargethebatteryto12.6Vorgreater.
Important:Makesurethatthenegative
batterycableisdisconnectedandthe
batterychargerusedforchargingthebattery
hasanoutputof16Vand7Aorlessto
avoiddamagingthebattery(seechartfor
recommendedchargersettings).
BatteryChargeTable
Voltage
Reading
Percent
Charge
Maximum
Charger
Settings
Charging
Interval
12.6or
greater
100%16volts/
7amps
NoCharging
Required
12.4–12.675–100%16volts/
7amps
30Minutes
12.2–12.450–75%16volts/
7amps
1Hour
12.0–12.225–50%14.4volts/
4amps
2Hours
11.7–12.00–25%14.4volts/
4amps
3Hours
11.7orless0%14.4volts/
2amps
6Hoursor
More
CAUTION
IftheignitionisintheONpositionthere
ispotentialforsparksandengagement
ofcomponents.Sparkscouldcause
anexplosionormovingpartscould
accidentallyengagecausingpersonal
injury.
BesureignitionswitchisintheOFF
positionbeforechargingthebattery.
4.Ifthepositivecableisalsodisconnected,
connectthepositive(red)cabletothepositive
batteryterminalandslipterminalcoveroverthe
positiveterminal.
5.Removethescrew,washer,andgroundcable
fromtheengine.Connectthenegativebattery
cableasshowninFigure4.
g018126
Figure4
1.Screw4.Negativebatterycable
2.Washer5.Engine
3.Groundwire
Note:Iftimedoesnotpermitchargingthe
batteryorifchargingequipmentisnotavailable,
connectthenegativebatterycablesandrun
thevehiclecontinuouslyfor20to30minutesto
chargethebattery.
3
CheckingFluidLevels
NoPartsRequired
Procedure
Checktheengine-oillevelbeforetheengineisrst
started;refertoCheckingtheEngine-OilLevel(page
18).
Checkthetransmission-oillevelbeforetheengineis
rststarted;refertoCheckingtheTransmission-Oil
Level(page47).
Checktheauxiliaryhydraulic-uidlevelbeforethe
engineisrststarted;refertoCheckingtheAuxiliary
Hydraulic-FluidLevel(page45).
13

4
RemovingtheCylinder
Stop
NoPartsRequired
Procedure
Note:Raisethetinesbeforeremovingthecylinder
stop.Runningtheenginechargesthehydraulic
systemandraisesthetines.
1.Addasmallamountoffueltothefueltank;refer
toAddingFuel(page19).
2.Openthefuel-shutoffvalvebyaligningthelever
forthefuel-shutoffvalvewiththefuelline;refer
toFuel-ShutoffValve(page17).
3.Movethemotion-controlleverstotheneutral
positionandengagetheparkingbrake;referto
Traction-ControlLevers(page15).
4.PlacethethrottlemidwaybetweentheSLOWand
FASTpositions;refertoThrottleLever(page16).
5.Pushforwardthechokelevertosetthechoketo
theONposition;refertoChokeLever(page16).
6.TurnthekeyswitchtotheSTARTposition;refer
toIgnitionSwitch(page16).
Note:Releasetheswitchassoonastheengine
starts.
Important:Donotcranktheengine
continuouslyformorethan10secondsat
atime.Iftheenginedoesnotstart,allowa
60-secondcooldownperiodbetweenstarting
attempts.Failuretofollowtheseguidelines
canburnoutthestartermotor.
7.Graduallymovetheleverforthechokeleverto
theOFFpositionastheenginewarmsup.
Note:Allowtheenginetorunanadditional30
seconds
8.TurnthekeyswitchtotheOFFpositiontoshut
offtheengine.
9.Removethekeyandpullthewiresoffthespark
plugs.
Note:Pushthewiresasidesotheydonot
accidentallycontactthesparkplugs.
10.Removeandretainthehairpin,clevispin,and
cylinderstopasshowninFigure5.
g020266
Figure5
1.Hairpin3.Cylinderstop
2.Clevispin4.Cylinder
11.Connectthespark-plugwires.
14

ProductOverview
g020220
Figure6
1.Platform4.Enginecontrols
2.Parking-brakeknob5.Fuelcap
3.Traction-controllevers
Controls
Traction-ControlLevers
Thetraction-controlleversarelocatedoneachsideof
thetopconsole,andcontroltheforwardandreverse
motionofthemachine.
Movetheleversforwardorbackwardtocontrolthe
drivewheelonthesamesideforwardorreverse
respectively.Thewheelspeedisproportionaltothe
amounttheleverismoved.
Important:Thetinesrotatewhenthe
traction-controlleversaremovedoutofthe
Neutralposition.
g025895
Figure7
1.Lefttraction-controllever5.Reverse
2.Righttraction-controllever6.Frontofthemachine
3.Frontreferencebar7.Neutral
4.Forward
Tine-PressureControl
Thetine-pressurecontrolislocatedontheleftsideof
thecontrolconsole(Figure8).
Usethetine-pressurecontroltoadjustthedownward
pressureonthetinesandcoredepth.Rotatethe
controlcounterclockwisetodecreasethepressure
andthelengthoftheaerationplug;rotateclockwise
toincreasepressureandincreasethelengthofthe
aerationplug.
15

g028268
Figure8
1.Tinedownpressuregauge7.Choke
2.Tinedownpressure
control
8.Rightmotion-controllever
3.On/Off-tineground
engagementfootswitch
9.Hourmeter
4.Leftmotion-controllever10.Parkbrake
5.Frontreferencebar11.Ignitionswitch
6.Throttle12.Tinegroundengagement
footswitch
ThrottleLever
Thethrottlelever(Figure8)islocatedonthecontrol
console(redlever).
Toincreaseenginespeed,movethethrottlelever
forward.T odecreaseenginespeed,movethethrottle
leverbackward.
Note:Movethethrottleleverforwardintothedetent
forfullthrottle.
ChokeLever
Thechokelever(Figure8)islocatedonthecontrol
console(blacklever).
Thechokeleverisusedtoaidinstartingacold
engine.T osetthechoketotheONposition,move
thechokeleverforward.Toreducethechoke,move
thechokeleverbackward.
Note:Pullthechokeleverbackintothedetenttoset
thechoketotheOFFposition.
Note:Donotrunawarmenginewiththechokein
theONposition.
Parking-BrakeHandle
Theparking-brakehandleislocatedonthecontrol
console,totherightoftheignitionswitch(Figure8).
Note:Thebrakehandlesetsaparkingbrakeineach
ofthetransmissions.
Tosetthebrake,pullthehandleoutandslideit
backward.Torelease,pushthehandleforwardinto
thedetent.
Whenparkingonasteepslope,thewheelsmustbe
chockedorblockedinadditiontothebrakebeingset.
Themachinemustbetieddownandbrakesetwhen
transporting.
HourMeter
Thehourmeterislocatedabovetheignitionswitch
(Figure8).
Thehourmeterdisplaysthetotalnumberofhours
thatyouhaverunthemachine.
IgnitionSwitch
Theignitionswitchislocatedontherightsideofthe
controlconsole(Figure8).
Theswitchhas3positions:OFF,ON,andSTART
(Figure9).
g008610
Figure9
1.Off3.Start
2.On
16

On/OffTineGroundEngagement
FootSwitch
Locatedabovethetinedownpressurecontrolonthe
controlconsole.
Toenablethetinesgroundengagement,pushdown
onthetopoftheswitch.T odisablethetinesground
engagement,pushdownontherearoftheswitch.
Tine-PressureGauge
Thetine-pressuregaugeislocatedinthemiddleof
thecontrolconsole(Figure8).
Thetine-pressuregaugetoindicatesthedownward
pressurethemachineexertsonthetineswhen
aerating.
Tines-ElevationSwitch
Keepyouhandsandfeetawayfromthetines.
Makesurethatthetinesareaisclearofany
obstructionsbeforeloweringit.
Thetine-elevationswitchislocatedontheoperator
platform(Figure8).
Tolowerthetinesintotheground,standonthe
tine-elevationswitch.Toraisethetines,removeyour
footfromtheswitch.
Fuel-ShutoffValve
Thefuel-shutoffvalveislocatedbehindtheengine
andunderthefueltank(Figure10).
Usethefuel-shutoffvalvetoshutoffthefuelwhen
themachinewillnotbeusedforafewdays,when
transportingthemachinetoandfromthejobsite,or
whenthemachineisparkedinsideabuilding.
Toopenforfuel-shutoffvalve,rotatethehandleofthe
fuel-shutoffvalveuntilitisalignedwiththefuelline.
Toclosethefuel-shutoffvalve,rotatethehandle90°
tothefuelline.
g025897
Figure10
1.Offposition2.Onposition
DriveWheelReleaseValves
Thedrivewheelreleasevalvesarelocatedontheleft
andrightsidesunderneaththefrontoftheunit.
Note:Duringnormaloperatingconditions,the
washerontheleverispositionedinsidetheslots.
Ifyouneedtopushthemachinebyhand,makesure
thatthevalvesareinthe“released”position(Figure
11).
g031272
Figure11
1.Leverpositiontopushthe
machine
3.Leverpositionfor
operatingthemachine
2.Washeroutsideofslot4.Washerinsideslot
Toreleasethedrivewheels,movethelevertothe
largeropeningoftheslot,pullitoutuntilthewasher
isoutsidetheframe,thenmovetheleverbacktothe
narrowportionoftheslot.Repeatthisoneachside
ofthemachine.
17

Disengagetheparkingbraketoallowyoutopushthe
machinebyhand.
Important:Donottowthemachine.
Toresetthedrivesystembacktotheoperating
position,movethelevertothelargeropeningofthe
slot,pushinwarduntilthewasherisinsidetheframe,
thenmovetheleverbacktothenarrowportionofthe
slot.Repeatthisoneachsideofthemachine.
Specications
Height132cm(52inches)
Length162cm(64inches)
Width121cm(48inches)
AerationWidth76cm(30inches)
Coringrange5to13cm(2to5inches)
Weight460kg(1,015lb)
Operation
Note:Determinetheleftandrightsidesofthe
machinefromthenormaloperatingposition.
CheckingtheEngine-Oil
Level
ServiceInterval:Beforeeachuseordaily
OilType:Detergentoil(APIserviceSJorhigher)
Oilviscosity:Refertothetablebelow.
g004216
Figure12
Important:Donotoperatetheenginewiththeoil
levelbelowtheLow(orAdd)markonthedipstick,
orovertheFullmark.
1.TurnthekeyintheignitionswitchtotheOFF
position,removethekey,andwaitforallmoving
partstostopbeforeleavingtheoperating
position
2.Allowtheenginetocool.
3.Checktheengine-oillevelasshowninFigure
13.
18

g025899
g025898
Figure13
4.Iftheoillevelislow,wipeofftheareaaround
theoilllcap,removecapandaddthespecied
oiluntiltheoillevelisattheFullmarkonthe
dipstick.
Note:Donotoverlltheenginewithoil.
AddingFuel
Fueltankcapacity:18.9L(5USGallons)
•Forbestresults,useonlyclean,fresh(lessthan
30daysold),unleadedgasolinewithanoctane
ratingof87orhigher((R+M)/2ratingmethod).
•ETHANOL:Gasolinewithupto10%ethanol
(gasohol)or15%MTBE(methyltertiarybutyl
ether)byvolumeisacceptable.Ethanoland
MTBEarenotthesame.Gasolinewith15%
ethanol(E15)byvolumeisnotapprovedforuse.
Neverusegasolinethatcontainsmorethan10%
ethanolbyvolume,suchasE15(contains15%
ethanol),E20(contains20%ethanol),orE85
(containsupto85%ethanol).Usingunapproved
gasolinemaycauseperformanceproblemsand/or
enginedamagewhichmaynotbecoveredunder
warranty.
•Donotusegasolinecontainingmethanol.
•Donotstorefueleitherinthefueltankorfuel
containersoverthewinterunlessafuelstabilizer
isused.
•Donotaddoiltogasoline
DANGER
Incertainconditions,fuelisextremely
ammableandhighlyexplosive.Areor
explosionfromfuelcanburnyouandothers
andcandamageproperty.
•Fillthefueltankoutdoors,inanopenarea,
andwhentheengineiscold.Wipeupany
fuelthatspills.
•Donotllthefueltankcompletelyfull.
Addfueltothefueltankuntilthelevelis6
to13mm(1/4to1/2inch)belowthebottom
ofthellerneck.Thisemptyspaceinthe
tankallowsthefueltoexpand.
•Neversmokewhenhandlingfuel,andstay
awayfromanopenameorwhereaspark
mayignitethefuelfumes.
•Storefuelinanapprovedfuelcontainer
andkeepitoutofthereachofchildren.
•Neverbuymorethana30-daysupplyof
fuel.
19

DANGER
Incertainconditionsduringfueling,static
electricitycanbereleasedcausingaspark
whichcanignitethefuelvapors.Areor
explosionfromfuelcanburnyouandothers
andcandamageproperty.
•Alwaysplacefuelcontainersontheground
awayfromyourvehiclebeforelling.
•Donotllfuelcontainersinsideavehicle
oronatruckortrailerbedbecauseinterior
carpetsorplastictruckbedlinersmay
insulatethecontainerandslowthelossof
anystaticcharge.
•Whenpractical,removefuel-powered
equipmentfromthetruckortrailerand
refueltheequipmentwithitswheelsonthe
ground.
•Ifthisisnotpossible,thenrefuelsuch
equipmentonatruckortrailerfroma
portablecontainer,ratherthanfroma
fuel-dispensernozzle.
•Ifafuel-dispensernozzlemustbeused,
keepthenozzleincontactwiththerimof
thefueltankorcontaineropeningatall
timesuntilfuelingiscomplete.
WARNING
Fuelisharmfulorfatalifswallowed.
Long-termexposuretovaporscancause
seriousinjuryandillness.
•Avoidprolongedbreathingofvapors.
•Keepfaceawayfromnozzleandfueltank
orconditionerbottleopening.
•Avoidcontactwithskin;washoffspillage
withsoapandwater.
UsingStabilizer/Conditioner
Useafuelstabilizer/conditionerinthemachineto
providethefollowingbenets:
•Keepsfuelfreshduringstorageof90daysorless.
Forlongerstorageitisrecommendedthatthefuel
tankbedrained.
•Cleanstheenginewhileitruns
•Eliminatesgum-likevarnishbuildupinthefuel
system,whichcauseshardstarting
Important:Donotusefueladditives
containingmethanolorethanol.
Addthecorrectamountoffuelstabilizer/conditioner
tothefuel.
Note:Afuelstabilizer/conditionerismost
effectivewhenmixedwithfreshfuel.T ominimize
thechanceofvarnishdepositsinthefuelsystem,
usefuelstabilizeratalltimes.
FuelingtheMachine
1.Cleanaroundthefuel-tankcap.
2.Removethecapfromthetank.
3.Fillthefueltankwithunleadedfueltowithin6to
13mm(1/4to1/2inch)fromthetopofthetank.
Donotllintothellerneck.
Important:Donotllthetankmorethan
6mm(1/4inch)fromthetopofthetank
becausethefuelmusthaveroomtoexpand.
4.Installthefuel-tankcapandwipeupanyspilled
fuel.
LubricatingtheChains
CheckingtheConditionofthe
Sprockets
ServiceInterval:Beforeeachuseordaily
1.TurnthekeyintheignitionswitchtotheOFF
position,engagetheparkingbrake,waitforall
movingpartstostop,andremovekey.
2.Inspectsprocketsforwearandreplaceas
required(Figure14).
20
Table of contents
Other Toro Lawn And Garden Equipment manuals

Toro
Toro 22602THD User manual

Toro
Toro 3550 User manual

Toro
Toro 25520 User manual

Toro
Toro ProCore 09753 User manual

Toro
Toro POWER MAX HD User manual

Toro
Toro 23208 User manual

Toro
Toro Bullseye RotaQuake 630 User manual

Toro
Toro ProCore 648 User manual

Toro
Toro Tree Forks 22438 User manual

Toro
Toro 117-9170 User manual