Toro 686 User manual

FormNo.3425-248RevA
Aerator686and687
ModelNo.44856—SerialNo.402900001andUp
ModelNo.44867—SerialNo.402900001andUp
Registeratwww.Toro.com.
OriginalInstructions(EN)*3425-248*A

ThisproductcomplieswithallrelevantEuropean
directiveswhenCEKit95-3350isinstalled;fordetails,
pleaseseetheseparateproductspecicDeclaration
ofConformity(DOC)sheet.
TheDOTtireinformationislocatedonthesideof
eachtire.Thisinformationgivesloadandspeed
ratings.Replacementtiresshouldhavethesameor
betterratings.RefertoSpecicationstoensurethat
thetiresmeetorexceedtheweightrequirementsof
yourmachine.
WARNING
CALIFORNIA
Proposition65Warning
Useofthisproductmaycauseexposure
tochemicalsknowntotheStateof
Californiatocausecancer,birthdefects,
orotherreproductiveharm.
Introduction
Thisaeratorisintendedtobeusedbytrained
operatorsinresidentialandcommercialapplications.
Itisprimarilydesignedforaeratingareasof
well-maintainedlawnsonresidentialgrounds,parks,
sportselds,andoncommercialgrounds.
Readthisinformationcarefullytolearnhowtooperate
andmaintainyourproductproperlyandtoavoid
injuryandproductdamage.Youareresponsiblefor
operatingtheproductproperlyandsafely.
Visitwww.Toro.comforproductsafetyandoperation
trainingmaterials,accessoryinformation,helpnding
adealer,ortoregisteryourproduct.
Wheneveryouneedservice,genuineToroparts,or
additionalinformation,contactanAuthorizedService
DealerorT oroCustomerServiceandhavethemodel
andserialnumbersofyourproductready.Figure1
identiesthelocationofthemodelandserialnumbers
ontheproduct.Writethenumbersinthespace
provided.
Important:Withyourmobiledevice,youcan
scantheQRcode(ifequipped)ontheserial
numberplatetoaccesswarranty,parts,andother
productinformation.
g265026
Figure1
1.Modelandserialnumberlocation
ModelNo.
SerialNo.
Thismanualidentiespotentialhazardsandhas
safetymessagesidentiedbythesafety-alertsymbol
(Figure2),whichsignalsahazardthatmaycause
seriousinjuryordeathifyoudonotfollowthe
recommendedprecautions.
g000502
Figure2
1.Safety-alertsymbol
Thismanualuses2wordstohighlightinformation.
Importantcallsattentiontospecialmechanical
informationandNoteemphasizesgeneralinformation
worthyofspecialattention.
©2018—TheToro®Company
8111LyndaleAvenueSouth
Bloomington,MN554202
Contactusatwww.Toro.com.
PrintedintheUSA
AllRightsReserved

Contents
Safety.......................................................................3
GeneralSafety...................................................3
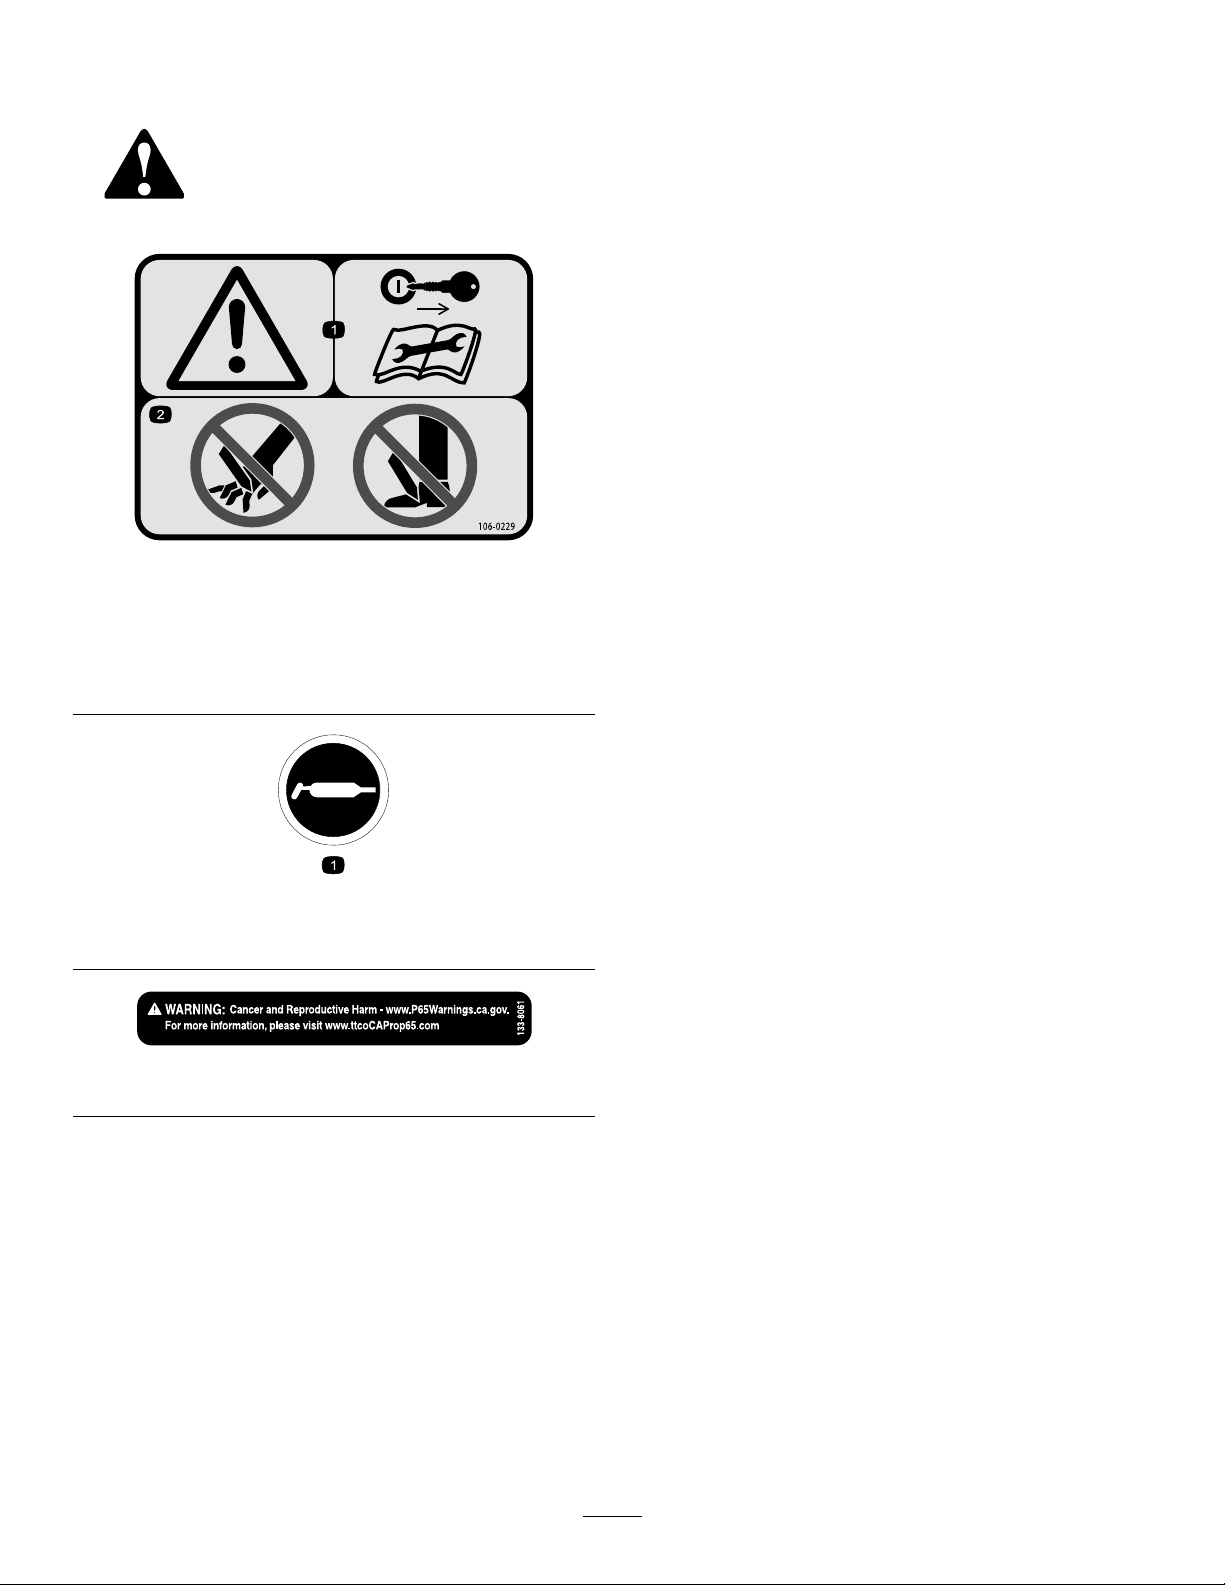
SafetyandInstructionalDecals..........................4
Setup........................................................................5
1InstallingtheWheels........................................6
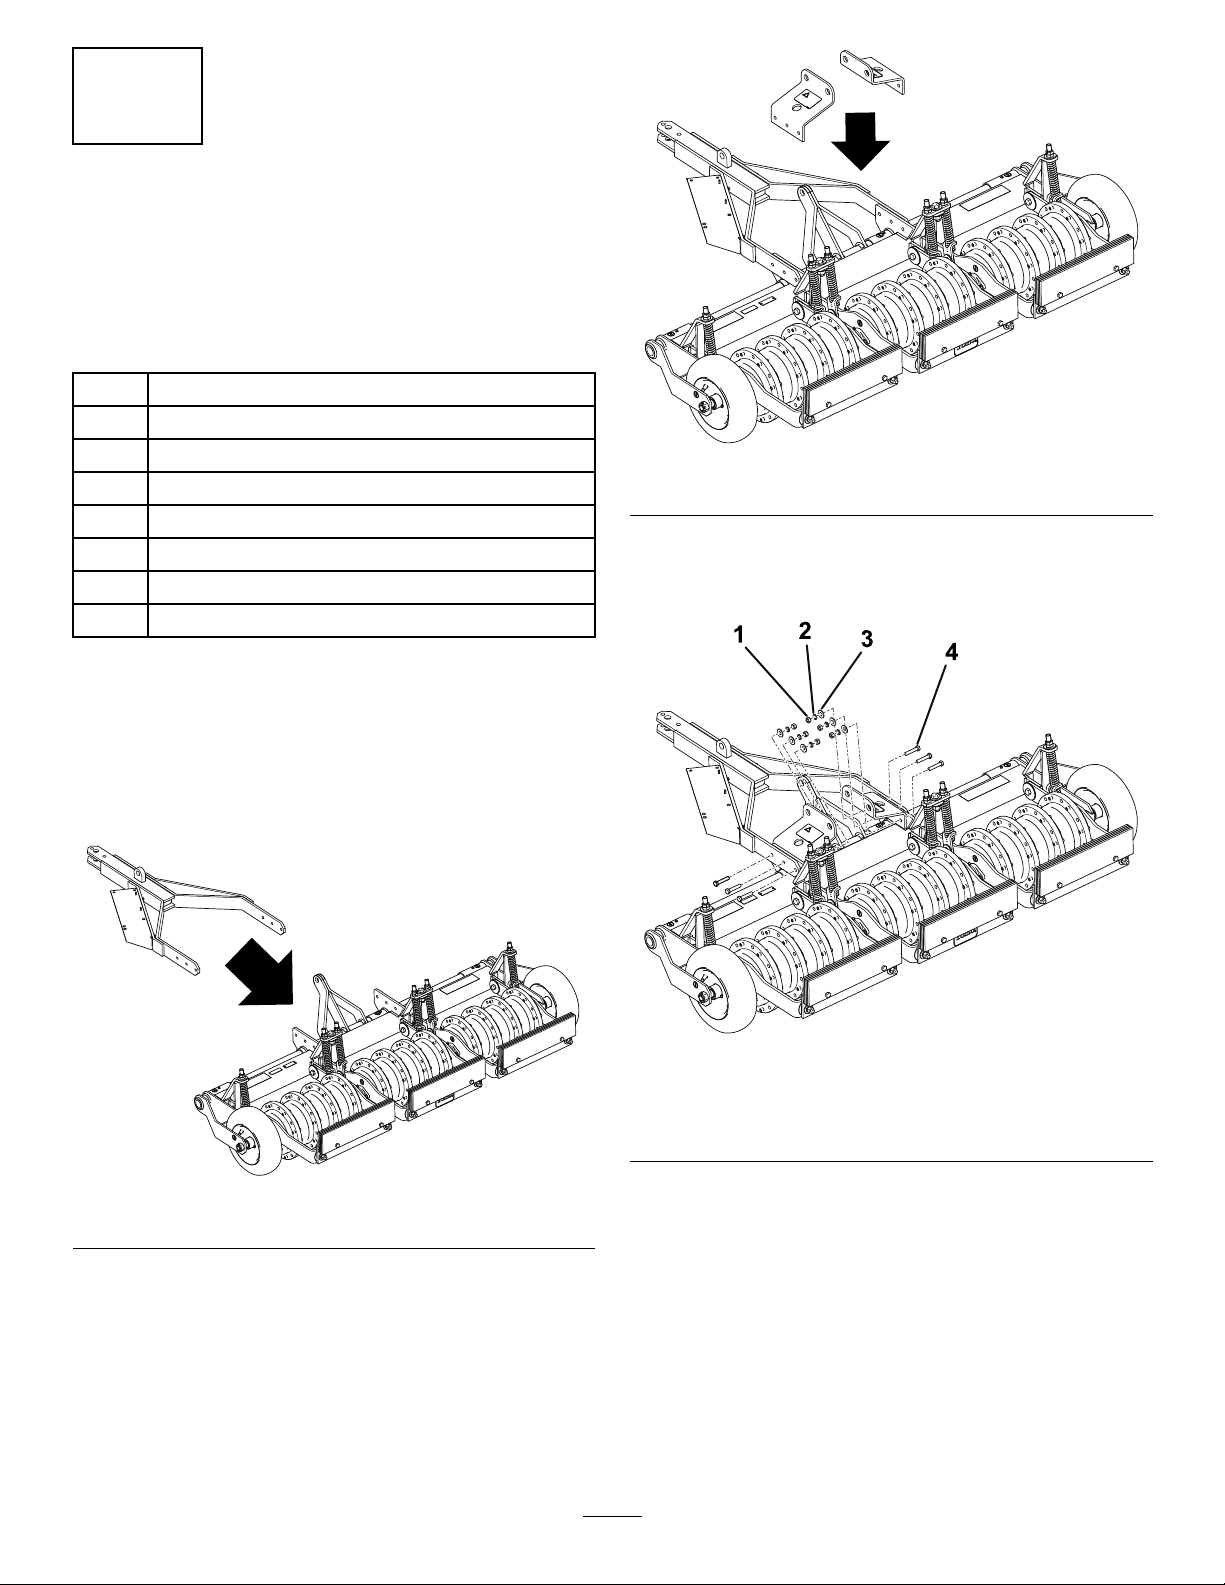
2InstallingtheWeights.......................................6
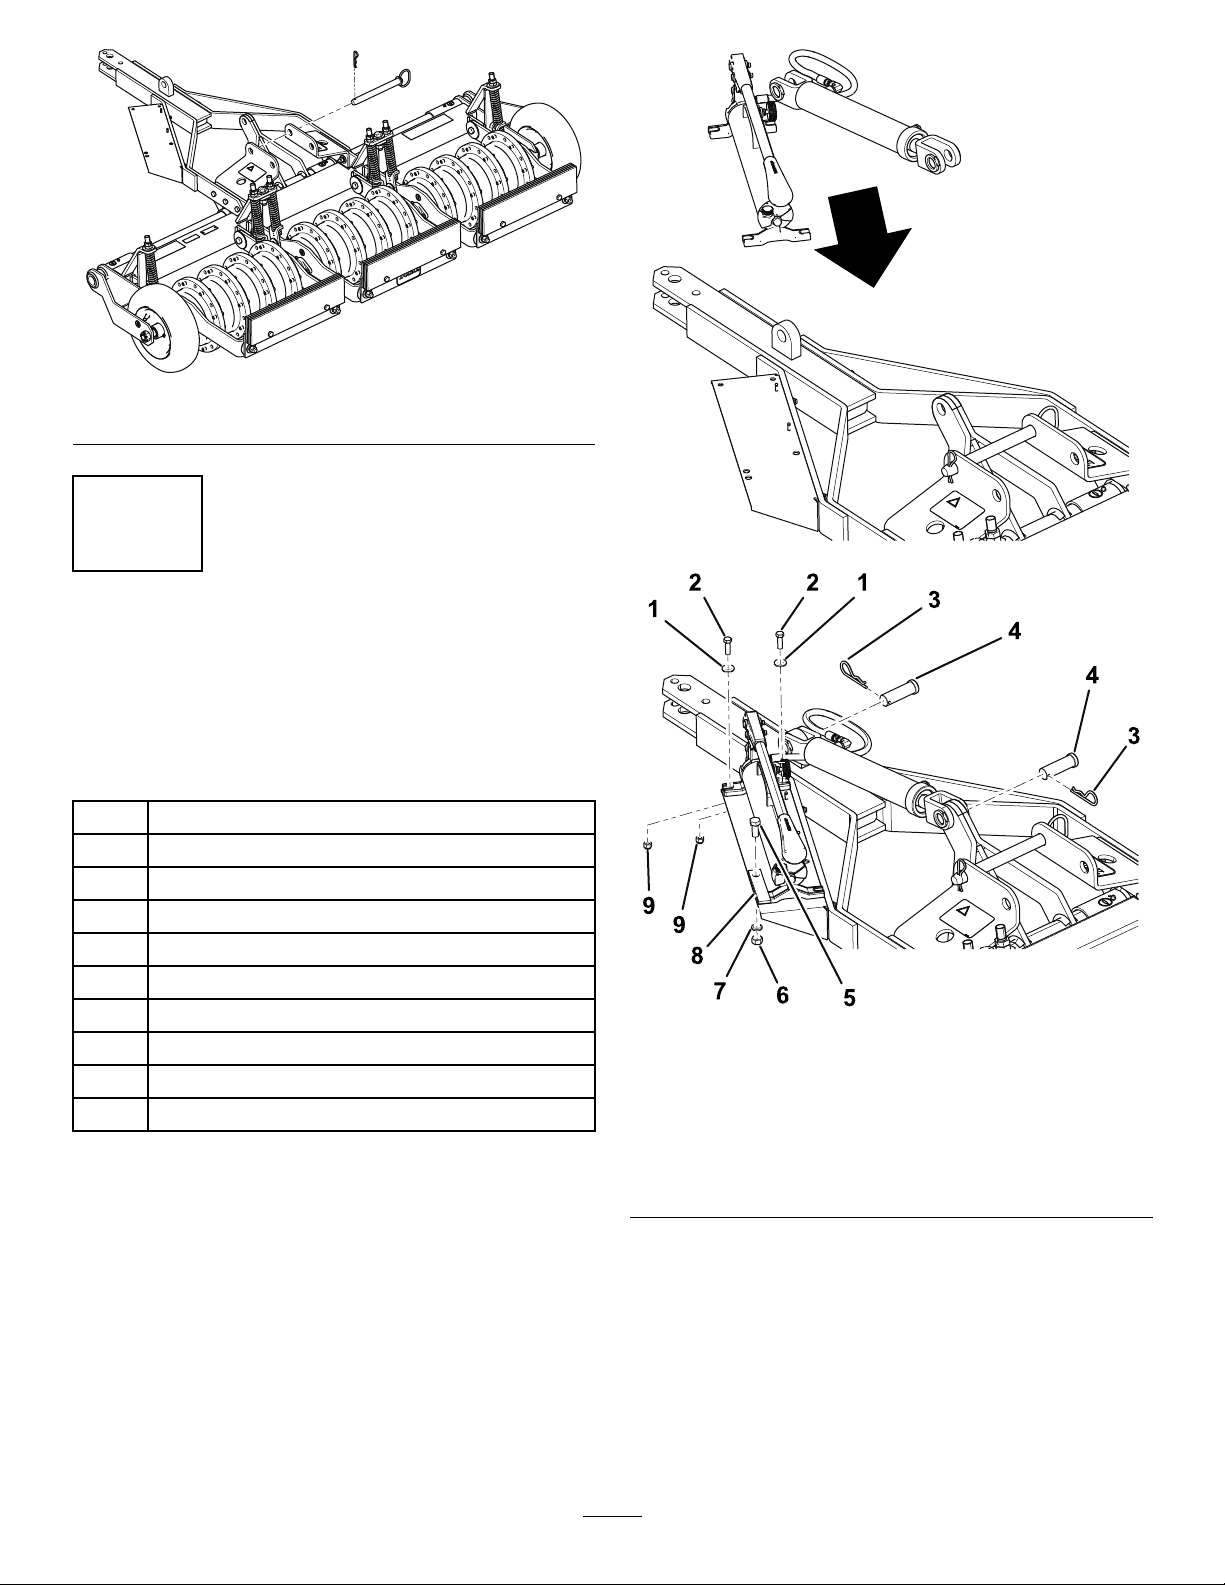
3MountingtheT ongueAssembly.......................6
4AttachingthePumpandCylinder
Assembly........................................................8
ProductOverview.....................................................9
Specications....................................................9
Attachments/Accessories...................................9
Operation................................................................10
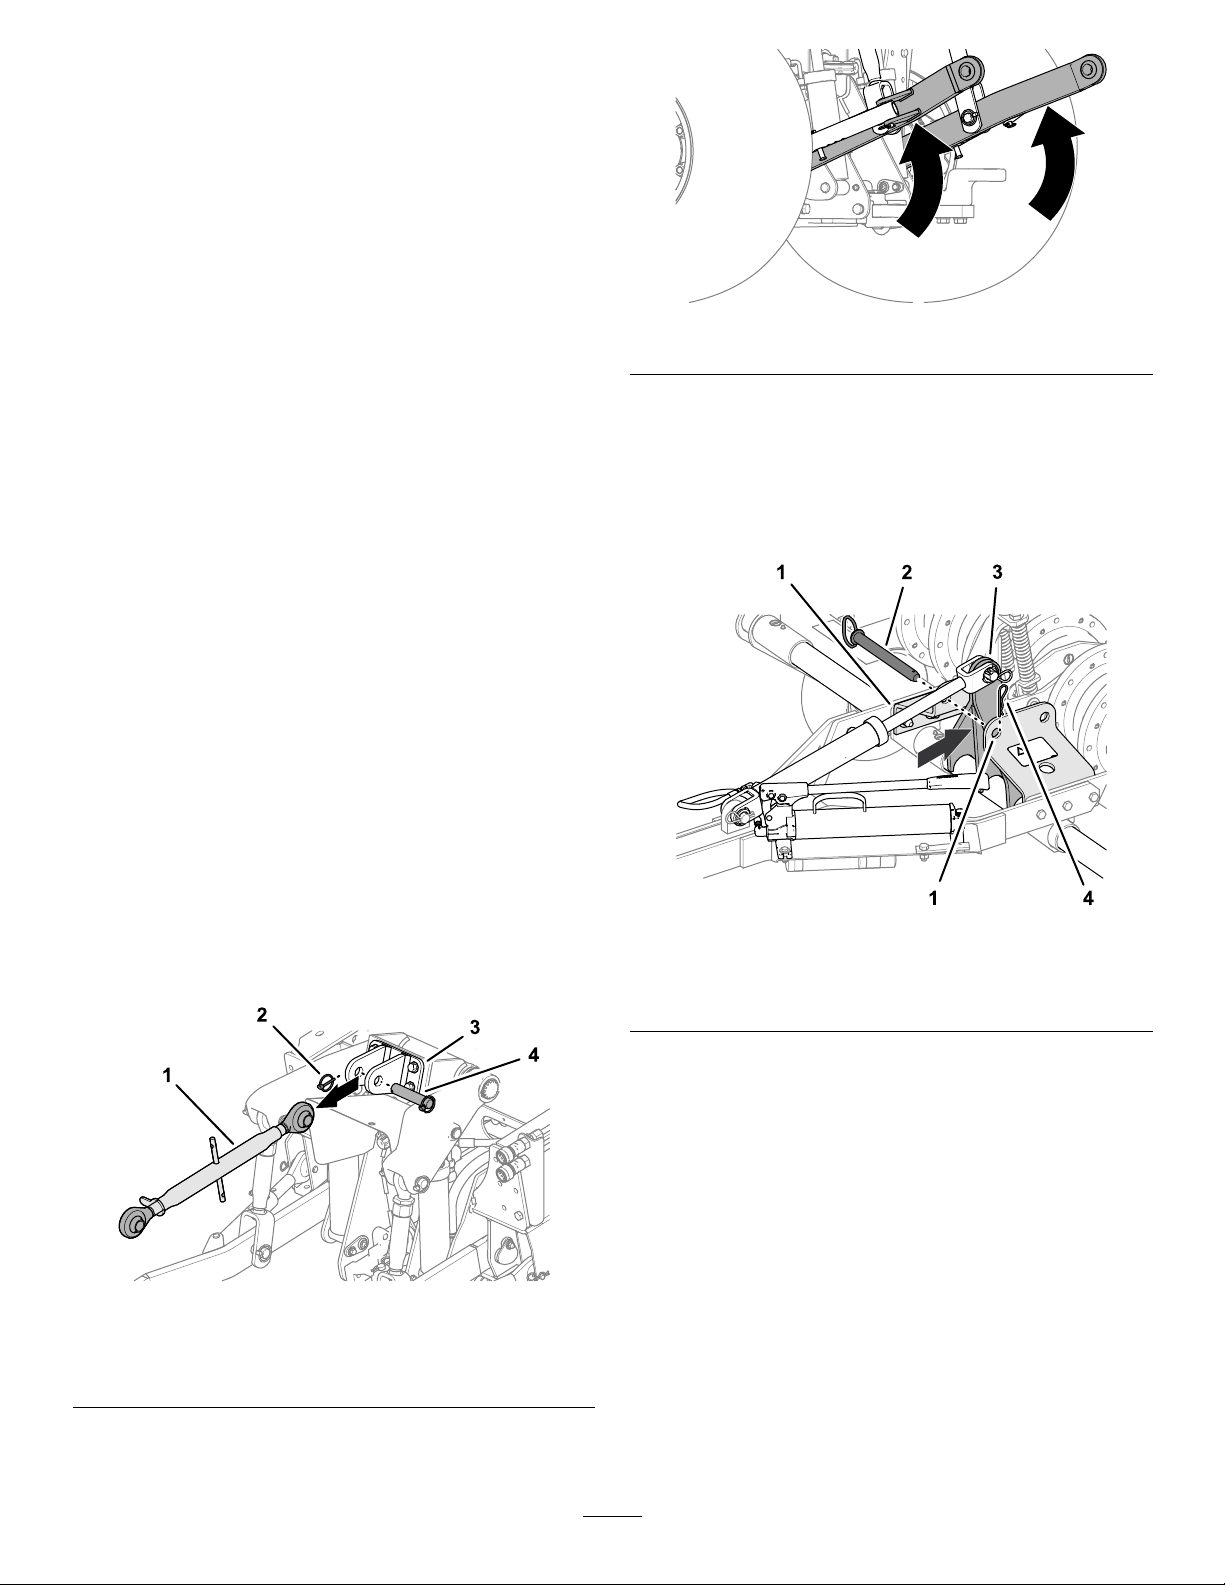
AssemblingtheAeratortotheTraction
Unit...............................................................10
InstallingtheTines............................................12
UsingtheAerator..............................................12
Maintenance...........................................................14
RecommendedMaintenanceSchedule(s)...........14
Lubrication..........................................................14
LubricatingtheBearings...................................14
ChassisMaintenance...........................................15
CheckingTireAirPressure...............................15
CheckingtheMainArmsBushings....................15
AdjustingtheSprings........................................16
CheckingtheTines...........................................16
Storage...................................................................17
Safety
GeneralSafety
•Readandunderstandthecontentsofthe
Operator’sManualforboththeaeratorandthe
tractionunit.
•Trainalloperatorsandservicepersonnelonthe
aerator.
•Raisethetines,slowdown,andusecautionwhen
crossingsurfacesotherthangrassandwhen
transportingthemachine.
•Donotoperatethemachinewhenill,tired,or
undertheinuenceofalcoholordrugs.
•Useextremecarewhenloadingorunloadingthe
aeratorintoatrailerortruck.
•Operatetheaeratoratalowerspeedwhenyou
areonaslope.
•Donotusetheaeratorneardrop-offs,ditches,
embankments,orbodiesofwater.Theaerator
couldsuddenlyrolloverifawheelgoesoffthe
edge.
•Stopthetractionunit,raisethetines(aerator
model44867),shutofftheengine,engagethe
parkingbrake,removethekey,andwaitforall
movementtostopbeforeadjusting,cleaning,or
repairingtheaerator.
•Alwaysweargloveswhenservicingthetines.
Replacedamagedtines.
•Donotputhandsorfeetnearmovingcomponents
ofthemachine.
Improperlyusingormaintainingthismachinecan
resultininjury.Toreducethepotentialforinjury,
complywiththesesafetyinstructionsandalways
payattentiontothesafety-alertsymbol,which
meansCaution,Warning,orDanger—personalsafety
instruction.Failuretocomplywiththeseinstructions
mayresultinpersonalinjuryordeath.
Youcanndadditionalsafetyinformationwhere
neededthroughoutthismanual.
3

SafetyandInstructionalDecals
Safetydecalsandinstructionsare
easilyvisibletotheoperatorandare
locatednearanyareaofpotential
danger.Replaceanydecalthatis
damagedormissing.
decal106-0229
106-0229
1.Warning—removethe
keyfromtheignition
andreadtheOperator's
Manualbeforeperforming
maintenance.
2.Cutting/severinghazard
ofhand;cutting/severing
hazardoffoot.
decal58-6520
58-6520
1.Grease
decal133-8061
133-8061
4

Setup
LooseParts
Usethechartbelowtoverifythatallpartshavebeenshipped.
ProcedureDescriptionQty.Use
Wheelassembly2
Spacer4
Axle2
Slottednut2
1
Cotterpin2
Installthewheels.
Weight12
Bolt(1/2x2-3/4inch)6
2Flangedlocknut(1/2inch)6
Installtheweights.
Tongueassembly1
Bracket2
Bolt(1/2x2-1/2inch)6
Nut(1/2inch)6
Washer(1/2inch)6
Lockwasher(1/2inch)6
Lockpin1
3
Hairpincotterpin(small)1
Mountthetongueassembly.
Pumpandcylinderassembly1
Screw(3/8x1-1/4inch)2
Washer(3/8inch)2
Locknut(3/8inch)2
Screw(1/2x1-1/4inch)1
Nut(1/2inch)1
Lockwasher(1/2inch)1
Vibrationstrap1
Cylinderpin2
4
Hairpincotterpin(large)2
Attachthepumpandcylinderassembly.
MediaandAdditionalParts
DescriptionQty.Use
Operator'sManual1Readbeforeoperatingthemachine.
Determinetheleftandrightsidesofthemachinefromthenormaloperatingposition.
5

1
InstallingtheWheels
Model44856
Partsneededforthisprocedure:
2Wheelassembly
4Spacer
2Axle
2Slottednut
2Cotterpin
Procedure
1.Positionthewheelassemblyand2spacers(1
oneachsideofthewheelhub)betweenthe
frameasshowninFigure3.
g029051
Figure3
1.Axle4.Wheelspacer
2.Cotterpin5.Wheelassembly
3.Slottednut
2.Inserttheaxlethroughtheframe,spacers,and
wheel(Figure3).
3.Threadtheslottednutontotheaxle(Figure3)
andtightenitwithahandwrenchto8to20N∙m
(75to180in-lb).
4.Rotatethewheeltoseatthebearingsand
removeendplay.
5.Loosenthecastlenutuntilitseparatesfromthe
frame,andthewheelhubhasendplay.
6.Tightentheslottednutto1.5to2N∙m(15to20
in-lb)whilerotatingthewheel.
Note:Ifthecotterpinholeintheaxleshaftis
misalignedwithaslotinthenut,loosenthenut
untiltheholeandslotaligns.
7.Installthecotterpin(Figure3).
8.Greasethewheelbearingsuntilthewheelhub
cavityiscompletelyfullandyouseeslight
leakageattheseals.
2
InstallingtheWeights
Partsneededforthisprocedure:
12Weight
6Bolt(1/2x2-3/4inch)
6Flangedlocknut(1/2inch)
Procedure
InstalltheweightsasshowninFigure4.
g214817
Figure4
1.Flangedlocknut(1/2inch)3.Bolt(1/2x2-3/4inch)
2.Weight
6

3
MountingtheTongue
Assembly
Model44856
Partsneededforthisprocedure:
1Tongueassembly
2Bracket
6Bolt(1/2x2-1/2inch)
6Nut(1/2inch)
6Washer(1/2inch)
6Lockwasher(1/2inch)
1Lockpin
1Hairpincotterpin(small)
Procedure
1.Removethebrackets,lockpin,andhardware
fromthetongueattachmentpointsoftheaerator.
2.Alignthetongueassemblywiththeaeratoras
showninFigure5.
g216322
Figure5
3.Alignthebracketsontheaeratorasshownin
Figure6.
g216319
Figure6
4.Securethetongueassemblyandthebrackets
withthehardwareasshowninFigure7and
torquethenutsto54to74N∙m(67-83ft-lb).
g216320
Figure7
1.Nut(1/2inch)3.Washer(1/2inch)
2.Lockwasher(1/2inch)4.Bolt(1/2x2-1/2inch)
5.Installthelockpinandsecureitwiththesmall
hairpincotterasshowninFigure8.
7

g216321
Figure8
4
AttachingthePumpand
CylinderAssembly
Model44856
Partsneededforthisprocedure:
1Pumpandcylinderassembly
2Screw(3/8x1-1/4inch)
2Washer(3/8inch)
2Locknut(3/8inch)
1Screw(1/2x1-1/4inch)
1Nut(1/2inch)
1Lockwasher(1/2inch)
1Vibrationstrap
2Cylinderpin
2Hairpincotterpin(large)
Procedure
Note:Donotkinkorpinchthehydraulichose.
Alignthepumpandcylinderassemblyandsecure
themasshowninFigure9.
g216317
g216318
Figure9
1.Washer(3/8inch)6.Nut(1/2inch)
2.Screw(3/8x1-1/4inch)7.Lockwasher(1/2inch)
3.Hairpincotter(large)8.Vibrationstrap
4.Cylinderpin9.Locknut(3/8inch)
5.Screw(1/2x1-1/4inch)
8

ProductOverview
Specications
FrameWeldedtubularsteel;divided
into3sections,eachsection
moveshorizontallyand
diagonallytofollowcontour,
springloaded
Aeratingwheels12castings,70lb,4per
section,withpermanentroll
pineveryotherhole
Shaft1-1/4inch,machinedto1inch
Tines96,8perwheel,securedwith
1bolt,rollpininwheelsecures
secondholeintine;1/2or3/4
inchopenorclosed,4inch
slicingbladesareavailable
BearingsSelfsealed,selfaligned
Transporttires(Model44856
only)
4.80x8—2ply
HitchDroppin(Model44856)
3point—Category1tractor
type(Model44867)
Liftmechanism(Model44856
only)
Handhydraulicpumptoa10
inchstrokecylinder.Hydraulic
uidrequiredisMobilDTE15
Morequivalent
Springs6toassistdownpressureon
tines
Aeratingswath2m(78inches)
Pattern15cm(6inches)oncenter
Operatingspeed1to16km/h(1to10mph),
dependingonconditions
2.2m(90inches)(Model
44856)
Overallwidth
2m(82inches)(Model44867)
674kg(1,485lb)(Model
44856)
Weight
569kg(1,255lb)(Model
44867)
Attachments/Accessories
AselectionofT oroapprovedattachmentsand
accessoriesisavailableforusewiththemachine
toenhanceandexpanditscapabilities.Contact
yourAuthorizedServiceDealerorauthorizedToro
distributororgotowww.T oro.comforalistofall
approvedattachmentsandaccessories.
Toensureoptimumperformanceandcontinuedsafety
certicationofthemachine,useonlygenuineT oro
replacementpartsandaccessories.Replacement
partsandaccessoriesmadebyothermanufacturers
couldbedangerous,andsuchusecouldvoidthe
productwarranty.
9

Operation
Note:Determinetheleftandrightsidesofthetraction
unitfromthenormaloperatingposition.
AssemblingtheAeratorto
theTractionUnit
PreparingtheTractionUnit
1.Parkthetractionunitonalevelsurface,shutoff
theengine,engagetheparkingbrake,remove
thekey,andwaitforallmovementtostopbefore
leavingthemachine.
2.Visuallyinspectthetractionunitforanyloose
hardwareoranyotherpossibleproblems.
Tightenloosehardwareandcorrectany
problemsbeforeoperating.
AttachingAerator
Model44856
Attachthehitchoftheaeratortothetongueofthe
tractionunitusingthehardwareofthetractionunit.
Important:Donotliftthetonguebyhand.Use
thetonguejackorpoweredlifttoalignthehitch
tothetractionunit.
1.Checkthetireairpressure;refertoChecking
TireAirPressure(page15).
2.Lowerthe3-pointhitch;refertotheoperator’s
manualforyourtractionunit.
3.Ifinstalled,removethelynchpin,clevispin,and
upper3-pointlinkfromtheupper-linkbracket
(Figure10).
g250419
Figure10
1.Upper3-pointlink3.Upper-linkbracket
2.Lynchpin4.Clevispin
4.Fullyraisethelowerlinksofthe3-pointhitch
(Figure11).
g264991
Figure11
5.Usethehydraulichandpump,movetheliftarm
(Figure12)justrearwardoftheforwardholesin
thelock-barbracket(transportposition).
Note:Theliftarmisinthetransportposition
whenthebarispositionedrearwardofthe
forwardlock-barbrackethole.
g265013
Figure12
1.Lock-barbracket3.Liftarm(transportposition)
2.Lock-barpin4.Hairpin
6.Insertthelock-barpinintotheforwardholesin
thelock-barbracketandsecurethelock-barpin
tothebracketwiththehairpin(Figure12).
7.Alignthetongueoftheaeratortothedrawbar
ofthetractionunitandusethehitchhardwareof
thevehicletosecuretheaerator(Figure13).
10

g265012
Figure13
1.Hitchhardware(traction
unit)
3.Tongue(aerator)
2.Drawbar(tractionunit)
AttachingAerator
Model44867
1.Lowerthelower-linkarmsofthetractionunit
(Figure14).
g265078
Figure14
2.Adjustthelower-linkarms(Figure15)outward
fully;refertotheoperator’smanualforthe
tractionunit.
g264148
Figure15
3.Ifremoved,installtheupper3-pointlink(Figure
16)tothetractionunit.
g265074
Figure16
1.Upper3-pointlink3.Upper-linkbracket
2.Lynchpin4.Clevispin
4.Positiontheaeratorsothatthelower-linkarms
ofthetractionunitlineupwiththelift-armpinsof
theaerator(Figure17).
g265123
Figure17
1.Lift-armpins(aerator)3.Lower-linkarm(traction
unit)
2.Lynchpin
5.Assemblethelower-linkarmstothelift-armpins
andsecurethearmswiththelynchpins(Figure
17).
6.Assembletheotherendoftheupper3-pointlink
totheliftarmsoftheaerator(Figure18)with
thebolt(3/4x4inches),nut(3/4inch),andjam
nut(3/4inch).
11

g265124
Figure18
1.Nut(3/4inch)4.Liftarms(aerator)
2.Jamnut(3/4inch)5.Bolt(3/4x4inches)
3.Upper3-pointlink
7.Adjustthelinksofthe3-pointhitchtolevelthe
aeratorlefttorightandfronttoback(Figure19);
refertotheoperator’smanualforyourtraction
unit.
g265125
Figure19
InstallingtheTines
Important:Installthetinesonlyafterattaching
theaeratortothetractionunit.
1.Startattheoutsidecastingandinstallthetines
asshowninFigure20.
g029052
Figure20
1.Hitch3.Rollpin
2.Tine4.Bolt
2.Installall8tinesonthecasting,usingarollpin
andbolts(1/2inchx1-3/4inches)andensuring
thattherollpinisinthefrontposition(Figure20).
Note:Ensurethattherollpinisinthefronthole
andtheboltisinthesecondhole.
UsingtheAerator
UsingModel44856
1.Closethevalveatthebaseofthehydraulic
hand-pump(Figure21)andstrokethepump
handleuntilthelockpinrotatesinthelock-bar
bracket.
g265130
Figure21
1.Valveknob(hydraulichand-pump)
2.Removethehairpinandmovethelockpinto
therearholes(stow/aeratingposition)inthe
12

lock-barbracket,andsecurethelockpintothe
bracketwiththehairpin(Figure22).
Note:Movingthelockpintostow/aerating
positionallowsyoutoraiseandlowertheaerator
whileworkingatthejobsite.
g265163
Figure22
1.Lockpin—stow/aerating
position(rearholeofthe
lock-barbracket)
3.Lockpin—transport
position(rearholeofthe
lock-barbracket)
2.Hairpin
3.Openthevalveatthebaseofthehydraulic
hand-pumptolowertheaeratortotheground.
4.Returntotheoperator’sseatandfollowthe
proceduresfortowinganimplement;refertothe
operator’smanualforthetractionunit.
5.Attheendofthedesiredaeratingregion,stop
thetractionunit,engagetheparkingbrake,
shutofftheengine,andremovethekeybefore
gettingoutoftheoperator’sseat.
6.Closethevalveofthehydraulichand-pump
(Figure21)andstrokethepumphandletoraise
theaeratortothetransportposition.
7.Removethehairpinandmovethelockpinto
theforwardholes(transportposition)inthe
lock-barbracket,andsecurethelockpintothe
bracketwiththehairpin(Figure22).
UsingModel44867
1.Startthetractionunitengineandrunitatalow
speed.
2.With3-pointorremote-hydraulicscontrolofthe
tractionunit,slowlylowertheaeratorwhilethe
tractionunitisslowlymovingforward(Figure
23).
g265323
Figure23
3.Asaeratingbegins,increasethespeedofthe
tractionunit.
4.Raisetheaeratorattheendofthepassbefore
turning(Figure24).
g265324
Figure24
13

Maintenance
CAUTION
Ifyouleavethekeyintheswitch,someonecouldaccidentlystarttheengineandseriously
injureyouorotherbystanders.
Removethekeyfromtheswitchbeforeyouperformanymaintenance.
RecommendedMaintenanceSchedule(s)
MaintenanceService
IntervalMaintenanceProcedure
Beforeeachuseordaily•Checkthetireairpressure.
•Checkthetinesforwear.
Every40hours•Greasethettings.
Every100hours•Checkthemainarmbushings.
Lubrication
LubricatingtheBearings
ServiceInterval:Every40hours
GreaseSpecication:No.2lithiumgrease
LubricatetheaeratorwiththespeciedgreaseasshowninFigure25orFigure26.
g265329
Figure25
Model44856
14

g265328
Figure26
Model44867
ChassisMaintenance
CheckingTireAirPressure
Model44856
ServiceInterval:Beforeeachuseordaily
1.Checkthetirepressure(Figure27).
Youshouldmeasure413kPa(60psi).
g265014
Figure27
2.Ifneeded,addorremoveairtoorairfromthe
tiresuntilyoumeasure413kPa(60psi).
CheckingtheMainArms
Bushings
ServiceInterval:Every100hours
The6mainarmspivotfreelyhorizontallyandvertically
toallowtheunittofollowthecontouroftheground.
Abronzebushingispressedinsidethepivotholes
betweenthemainarmsandframemountingbrackets
(Figure28).
15

g265377
g265376
Figure28
1.Mainarm6.Framemountingbracket
2.Bolt(5/8x2inches)7.Washer(5/8x1-3/4
inches)
3.Washer(5/8x3inches)8.Lockwasher
4.Washer(11/16x3inches)9.Nut(5/8inch)
5.Bronzebushing
1.Movetheaeratortothetransportposition;refer
toUsingtheAerator(page12).
2.Checkthatthe6mainarmspivotfreely(Figure
28).
3.Ifamainarmbinds,performthefollowingsteps:
A.Loosenthespringtension;refertoAdjusting
theSprings(page16).
B.Removethebolt,nut,washers,and
bushing,thatsecurethemainarmtothe
framemountingbracket(Figure28)and
checkthehardwareforwear.
Note:Replaceallwornordamaged
hardware.Thebronzebushingis3mm(1/8
inch)longerthanthecombinedmainarm
andmountingbracketplatethickness.
C.Assemblethemainarmtotheframe
mountingbracketwiththebolt,nut,
washers,andbushing(Figure28).
D.Tightenthebolt(5/8x2inch)andnut(5/8
inch)againstthebushings,notthearms,to
allowittopivotfreely.
E.Adjustthespringtension;refertoAdjusting
theSprings(page16).
AdjustingtheSprings
Thepurposeofthespringsistodistributetheweight
evenlyandreducetheshockloadonthepivotpoints.
Adjustthespringsevenlyacrosstolevelthemachine.
Usethenutsattopofthespringrodtoadjustthe
springtension(Figure29).
Important:Whenadjustingthespringtension,do
notcompletelycompressthecoilsare.Allowat
least1.6mm(1/16inch)ofspacebetweencoils.
g265341
Figure29
1.Springrodnuts3.1.6mm(1/16inch)
minimumspace\between
coils
2.Spring
CheckingtheTines
ServiceInterval:Beforeeachuseordaily
Toobtainmaximumaeratingperformance,always
checkthetinesforwearanddamagebeforeevery
use.Severelyworntinesareeasytobendorbreak
andleavethecoresintheground.SeeFigure30for
examplesoftinewear.
16

g029056
Figure30
1.New3.Wornand
unusable—replace
2.Badlywornbutusable
Alwayscleancoresoutofthetinesbeforestorage.
Coresleftintinesforextendedperiodscancause
pittingontheinsideofthetinewhichkeepthecore
fromejecting.
Storage
1.Raisethetines.
2.Stopthetractionunit,shutofftheengine,
engagetheparkingbrake,andremovethekey.
3.Removedirtanddebrisfromtheentireaerator.
Cleanthecoresoutofthetines.
Important:Youcanwashtheaeratorwith
milddetergentandwater.Donotpressure
washtheaerator.
4.Lubricatetheaerator;refertoLubrication(page
14).
5.Checktheconditionofthetines.Replaceany
brokenorworntines.
6.Checkandtightenallbolts,nuts,andscrews.
Repairorreplaceanypartthatisdamaged.
7.Paintallscratchedorbaremetalsurfaces.Paint
isavailablefromyourauthorizedServicedealer.
8.Storetheaeratorinaclean,drygarageor
storagearea.
9.Covertheaeratortoprotectitandkeepitclean.
17

EEA/UKPrivacyNotice
Toro’sUseofYourPersonalInformation
TheT oroCompany(“T oro”)respectsyourprivacy.Whenyoupurchaseourproducts,wemaycollectcertainpersonalinformationaboutyou,eitherdirectly
fromyouorthroughyourlocalTorocompanyordealer.T orousesthisinformationtofullcontractualobligations-suchastoregisteryourwarranty,
processyourwarrantyclaimortocontactyouintheeventofaproductrecall-andforlegitimatebusinesspurposes-suchastogaugecustomer
satisfaction,improveourproductsorprovideyouwithproductinformationwhichmaybeofinterest.Toromayshareyourinformationwithoursubsidiaries,
afliates,dealersorotherbusinesspartnersinconnectiontheseactivities.Wemayalsodisclosepersonalinformationwhenrequiredbylaworin
connectionwiththesale,purchaseormergerofabusiness.Wewillneversellyourpersonalinformationtoanyothercompanyformarketingpurposes.
RetentionofyourPersonalInformation
Torowillkeepyourpersonalinformationaslongasitisrelevantfortheabovepurposesandinaccordancewithlegalrequirements.Formoreinformation
aboutapplicableretentionperiodspleasecontact[email protected].
Toro’sCommitmenttoSecurity
YourpersonalinformationmaybeprocessedintheUSoranothercountrywhichmayhavelessstrictdataprotectionlawsthanyourcountryofresidence.
Wheneverwetransferyourinformationoutsideofyourcountryofresidence,wewilltakelegallyrequiredstepstoensurethatappropriatesafeguardsare
inplacetoprotectyourinformationandtomakesureitistreatedsecurely.
AccessandCorrection
Youmayhavetherighttocorrectorreviewyourpersonaldata,orobjecttoorrestricttheprocessingofyourdata.T odoso,pleasecontactusbyemail
at[email protected].IfyouhaveconcernsaboutthewayinwhichTorohashandledyourinformation,weencourageyoutoraisethisdirectlywithus.
PleasenotethatEuropeanresidentshavetherighttocomplaintoyourDataProtectionAuthority.
374-0282RevC

CaliforniaProposition65WarningInformation
Whatisthiswarning?
Youmayseeaproductforsalethathasawarninglabellikethefollowing:
WARNING:CancerandReproductiveHarm—www.p65Warnings.ca.gov.
WhatisProp65?
Prop65appliestoanycompanyoperatinginCalifornia,sellingproductsinCalifornia,ormanufacturingproductsthatmaybesoldinorbroughtinto
California.ItmandatesthattheGovernorofCaliforniamaintainandpublishalistofchemicalsknowntocausecancer,birthdefects,and/orother
reproductiveharm.Thelist,whichisupdatedannually,includeshundredsofchemicalsfoundinmanyeverydayitems.ThepurposeofProp65isto
informthepublicaboutexposuretothesechemicals.
Prop65doesnotbanthesaleofproductscontainingthesechemicalsbutinsteadrequireswarningsonanyproduct,productpackaging,orliteraturewith
theproduct.Moreover,aProp65warningdoesnotmeanthataproductisinviolationofanyproductsafetystandardsorrequirements.Infact,the
CaliforniagovernmenthasclariedthataProp65warning“isnotthesameasaregulatorydecisionthataproductis‘safe’or‘unsafe.’”Manyofthese
chemicalshavebeenusedineverydayproductsforyearswithoutdocumentedharm.Formoreinformation,gotohttps://oag.ca.gov/prop65/faqs-view-all.
AProp65warningmeansthatacompanyhaseither(1)evaluatedtheexposureandhasconcludedthatitexceedsthe“nosignicantrisklevel”;or(2)
haschosentoprovideawarningbasedonitsunderstandingaboutthepresenceofalistedchemicalwithoutattemptingtoevaluatetheexposure.
Doesthislawapplyeverywhere?
Prop65warningsarerequiredunderCalifornialawonly.ThesewarningsareseenthroughoutCaliforniainawiderangeofsettings,includingbutnot
limitedtorestaurants,grocerystores,hotels,schools,andhospitals,andonawidevarietyofproducts.Additionally,someonlineandmailorder
retailersprovideProp65warningsontheirwebsitesorincatalogs.
HowdotheCaliforniawarningscomparetofederallimits?
Prop65standardsareoftenmorestringentthanfederalandinternationalstandards.TherearevarioussubstancesthatrequireaProp65warning
atlevelsthatarefarlowerthanfederalactionlimits.Forexample,theProp65standardforwarningsforleadis0.5μg/day,whichiswellbelow
thefederalandinternationalstandards.
Whydon’tallsimilarproductscarrythewarning?
•ProductssoldinCaliforniarequireProp65labellingwhilesimilarproductssoldelsewheredonot.
•AcompanyinvolvedinaProp65lawsuitreachingasettlementmayberequiredtouseProp65warningsforitsproducts,butothercompanies
makingsimilarproductsmayhavenosuchrequirement.
•TheenforcementofProp65isinconsistent.
•CompaniesmayelectnottoprovidewarningsbecausetheyconcludethattheyarenotrequiredtodosounderProp65;alackofwarningsfora
productdoesnotmeanthattheproductisfreeoflistedchemicalsatsimilarlevels.
WhydoesToroincludethiswarning?
Torohaschosentoprovideconsumerswithasmuchinformationaspossiblesothattheycanmakeinformeddecisionsabouttheproductstheybuyand
use.T oroprovideswarningsincertaincasesbasedonitsknowledgeofthepresenceofoneormorelistedchemicalswithoutevaluatingthelevelof
exposure,asnotallthelistedchemicalsprovideexposurelimitrequirements.WhiletheexposurefromToroproductsmaybenegligibleorwellwithinthe
“nosignicantrisk”range,outofanabundanceofcaution,T orohaselectedtoprovidetheProp65warnings.Moreover,ifT orodoesnotprovidethese
warnings,itcouldbesuedbytheStateofCaliforniaorbyprivatepartiesseekingtoenforceProp65andsubjecttosubstantialpenalties.
RevA

TheToroWarranty
ATwo-YearLimitedWarranty
ConditionsandProductsCovered
TheT oroCompanyanditsafliate,T oroWarrantyCompany,pursuant
toanagreementbetweenthem,jointlywarrantyourT oroCommercial
product(“Product”)tobefreefromdefectsinmaterialsorworkmanship
fortwoyearsor1500operationalhours*,whicheveroccursrst.This
warrantyisapplicabletoallproductswiththeexceptionofAerators
(refertoseparatewarrantystatementsfortheseproducts).Wherea
warrantableconditionexists,wewillrepairtheProductatnocosttoyou
includingdiagnostics,labor,parts,andtransportation.Thiswarranty
beginsonthedatetheProductisdeliveredtotheoriginalretailpurchaser.
*Productequippedwithanhourmeter.
InstructionsforObtainingWarrantyService
YouareresponsiblefornotifyingtheCommercialProductsDistributoror
AuthorizedCommercialProductsDealerfromwhomyoupurchasedthe
Productassoonasyoubelieveawarrantableconditionexists.Ifyouneed
helplocatingaCommercialProductsDistributororAuthorizedDealer,or
ifyouhavequestionsregardingyourwarrantyrightsorresponsibilities,
youmaycontactusat:
ToroCommercialProductsServiceDepartment
ToroWarrantyCompany
8111LyndaleAvenueSouth
Bloomington,MN55420-1196
952–888–8801or800–952–2740
E-mail:[email protected]
OwnerResponsibilities
AstheProductowner,youareresponsibleforrequiredmaintenanceand
adjustmentsstatedinyourOperator'sManual.Failuretoperformrequired
maintenanceandadjustmentscanbegroundsfordisallowingawarranty
claim.
ItemsandConditionsNotCovered
Notallproductfailuresormalfunctionsthatoccurduringthewarranty
periodaredefectsinmaterialsorworkmanship.Thiswarrantydoesnot
coverthefollowing:
•Productfailureswhichresultfromtheuseofnon-T ororeplacement
parts,orfrominstallationanduseofadd-on,ormodiednon-T oro
brandedaccessoriesandproducts.Aseparatewarrantymaybe
providedbythemanufactureroftheseitems.
•Productfailureswhichresultfromfailuretoperformrecommended
maintenanceand/oradjustments.Failuretoproperlymaintainyour
ToroproductpertheRecommendedMaintenancelistedinthe
Operator’sManualcanresultinclaimsforwarrantybeingdenied.
•ProductfailureswhichresultfromoperatingtheProductinanabusive,
negligent,orrecklessmanner.
•Partssubjecttoconsumptionthroughuseunlessfoundtobedefective.
Examplesofpartswhichareconsumed,orusedup,duringnormal
Productoperationinclude,butarenotlimitedto,brakepadsand
linings,clutchlinings,blades,reels,rollersandbearings(sealedor
greasable),bedknives,sparkplugs,castorwheelsandbearings,tires,
lters,belts,andcertainsprayercomponentssuchasdiaphragms,
nozzles,andcheckvalves,etc.
•Failurescausedbyoutsideinuence.Conditionsconsideredtobe
outsideinuenceinclude,butarenotlimitedto,weather,storage
practices,contamination,useofunapprovedfuels,coolants,lubricants,
additives,fertilizers,water,orchemicals,etc.
•Failureorperformanceissuesduetotheuseoffuels(e.g.gasoline,
diesel,orbiodiesel)thatdonotconformtotheirrespectiveindustry
standards.
•Normalnoise,vibration,wearandtear,anddeterioration.
•Normal“wearandtear”includes,butisnotlimitedto,damagetoseats
duetowearorabrasion,wornpaintedsurfaces,scratcheddecalsor
windows,etc.
Parts
Partsscheduledforreplacementasrequiredmaintenancearewarranted
fortheperiodoftimeuptothescheduledreplacementtimeforthatpart.
Partsreplacedunderthiswarrantyarecoveredforthedurationofthe
originalproductwarrantyandbecomethepropertyofToro.Torowillmake
thenaldecisionwhethertorepairanyexistingpartorassemblyorreplace
it.Toromayuseremanufacturedpartsforwarrantyrepairs.
DeepCycleandLithium-IonBatteryWarranty:
DeepcycleandLithium-Ionbatterieshaveaspeciedtotalnumberof
kilowatt-hourstheycandeliverduringtheirlifetime.Operating,recharging,
andmaintenancetechniquescanextendorreducetotalbatterylife.Asthe
batteriesinthisproductareconsumed,theamountofusefulworkbetween
chargingintervalswillslowlydecreaseuntilthebatteryiscompletelyworn
out.Replacementofwornoutbatteries,duetonormalconsumption,
istheresponsibilityoftheproductowner.Batteryreplacementmaybe
requiredduringthenormalproductwarrantyperiodatowner’sexpense.
Note:(Lithium-Ionbatteryonly):ALithium-Ionbatteryhasapartonly
proratedwarrantybeginningyear3throughyear5basedonthetime
inserviceandkilowatthoursused.RefertotheOperator'sManualfor
additionalinformation.
MaintenanceisatOwner’sExpense
Enginetune-up,lubrication,cleaningandpolishing,replacementoflters,
coolant,andcompletingrecommendedmaintenancearesomeofthe
normalservicesT oroproductsrequirethatareattheowner’sexpense.
GeneralConditions
RepairbyanAuthorizedToroDistributororDealerisyoursoleremedy
underthiswarranty.
NeitherTheToroCompanynorToroWarrantyCompanyisliablefor
indirect,incidentalorconsequentialdamagesinconnectionwiththe
useoftheToroProductscoveredbythiswarranty,includingany
costorexpenseofprovidingsubstituteequipmentorserviceduring
reasonableperiodsofmalfunctionornon-usependingcompletion
ofrepairsunderthiswarranty.ExceptfortheEmissionswarranty
referencedbelow,ifapplicable,thereisnootherexpresswarranty.All
impliedwarrantiesofmerchantabilityandtnessforusearelimitedto
thedurationofthisexpresswarranty.
Somestatesdonotallowexclusionsofincidentalorconsequential
damages,orlimitationsonhowlonganimpliedwarrantylasts,sotheabove
exclusionsandlimitationsmaynotapplytoyou.Thiswarrantygivesyou
speciclegalrights,andyoumayalsohaveotherrightswhichvaryfrom
statetostate.
Noteregardingenginewarranty:
TheEmissionsControlSystemonyourProductmaybecoveredby
aseparatewarrantymeetingrequirementsestablishedbytheU.S.
EnvironmentalProtectionAgency(EPA)and/ortheCaliforniaAirResources
Board(CARB).Thehourlimitationssetforthabovedonotapplytothe
EmissionsControlSystemWarranty.RefertotheEngineEmissionControl
WarrantyStatementsuppliedwithyourproductorcontainedintheengine
manufacturer’sdocumentationfordetails
CountriesOtherthantheUnitedStatesorCanada
CustomerswhohavepurchasedT oroproductsexportedfromtheUnitedStatesorCanadashouldcontacttheirT oroDistributor(Dealer)toobtain
guaranteepoliciesforyourcountry,province,orstate.IfforanyreasonyouaredissatisedwithyourDistributor'sserviceorhavedifcultyobtaining
guaranteeinformation,contacttheT oroimporter.374-0253RevD
Other manuals for 686
1
This manual suits for next models
3
Table of contents
Other Toro Lawn And Garden Equipment manuals

Toro
Toro TRX-15 User manual

Toro
Toro Groundsmaster 120 User manual

Toro
Toro Reelmaster 3555 User manual

Toro
Toro 33518 User manual

Toro
Toro Greens Aerator User manual

Toro
Toro Bullseye QuickGroom 550 User manual

Toro
Toro 41602 User manual

Toro
Toro 22368 User manual

Toro
Toro 23210 User manual

Toro
Toro Greensmaster 3000 Series User manual