Toro 30818 User manual

FormNo.3390-683RevB
HighLiftCollection,ParkingStandKit,andCarrier
Frame
Groundsmaster®3604-WheelDriveMulti-PurposeMachine
ModelNo.30818
ModelNo.30866—SerialNo.315000001andUp
ModelNo.30869—SerialNo.315000001andUp
InstallationInstructions
Important:FormachineswithaKubotaengine,kit30801mustbeinstalledonthemachine.Formachineswitha
Yanmarengine,kit30898mustbeinstalledonthemachine.
WARNING
CALIFORNIA
Proposition65Warning
ThisproductcontainsachemicalorchemicalsknowntotheStateofCaliforniato
causecancer,birthdefects,orreproductiveharm.
ThisproductcomplieswithallrelevantEuropeandirectives.Fordetails,pleaseseetheDeclarationofIncorporation(DOI)at
thebackofthispublication.
Safety
SafetyandInstructionalDecals
Safetydecalsandinstructionsareeasilyvisibletotheoperatorandarelocatednearanyareaofpotentialdanger.
Replaceanydecalthatisdamagedorlost.
132-4868
1.Crushinghazard—securethecylinderlocks.
132-4867
1.Crushinghazard—keepawayfromactuatingparts.
©2016—TheToro®Company
8111LyndaleAvenueSouth
Bloomington,MN55420
Registeratwww.T oro.com.OriginalInstructions(EN)
PrintedintheUSA
AllRightsReserved*3390-683*B

132-4866
1.Crushinghazard—keepawayfromactuatingparts.
132-4865
1.Puncturehazardofhand;uidunderpressure—read
theOperator’sManualbeforeservicingorperforming
maintenance.
132-4864
1.Cuttinghazard—waituntilallcomponentshavestopped
movingbeforeservicingthemachine.
132-4863
1.Cuttinghazard—keepawayfrommovingparts.
132-4862
1.Attention—readtheOperator’sManualbeforeperforming
maintenance;donottransportthevehiclewithafullhopper.
2.Onlytransportthevehiclewhenthehopperisalmostempty.
3.Donotremovethecollectionsystemwhenthehopperisfull.
4.Emptythecontentsofthehopperbeforestoringthe
collectionsystem.
5.Disengagethevehicleonlywhenthehopperisempty.
132-4861
1.Warning—readtheOperator’sManual.
132-4860
1.Warning—removethekeyfromtheignitionandreadthe
Operator’sManualbeforeperformingmaintenance.
2

132-4859
1.Crushinghazard—securethecylinderlocks.
Installation
InstallingtheCarrierFrameKit
InstallingtheBumpers
1.Movethemachinetoalevelsurface,engagetheparking
brake,shutofftheengine,andremovethekeyfrom
theignition.
2.Loosenthejamnutontheadjustingboltontheendof
abumperandlowertheadjustingboltasfarasitcan
go(Figure1).
3.Installthebumpertothemachineframeusingalarge
bolt,washer,andnutfromthebumperassembly;do
nottightenthefasteners(Figure1).
Figure1
1.Largebolt(nutnotshown)3.Adjustmentboltandjam
nut
2.Washer4.Bumper
4.Adjustthebumpersothatitisparallelwiththeframe,
raisetheadjustmentboltuntilitcontactstheframe,
andsecureitwiththejamnut(Figure2).
3

Figure2
1.Adjustmentboltagainsttheframe
5.Tightentheboltandnutsecuringthebumpertothe
frame.
6.Repeatthisprocedurefortheotherbumperonthe
othersideofthemachine.
AssemblingtheCarrierFrame
1.Blockthecastor-wheelassemblyinanuprightposition
usingjackstandsunderthecarrier-framecrossbar
(Figure3).
Figure3
1.Carrier-framecrossbar3.Castor-wheelassembly
(wheelsnotshown)
2.Pivotpin4.Locknutandwasher
2.Lowerthecarrier-framecrossbarintothetopofthe
wheelassemblyandsecureitwithapivotpin,washer,
andlocknut(Figure3).
3.PumpNo.2lithiumgreaseintothettingsoneach
endofthepinuntilgreasestartstocomeoutofthe
bearings.
InstallingtheCarrierFrame
1.Raisetherollbaronthemachineandinstallapinto
secureitononly1sideoftherollbar.
2.Ontheothersideoftherollbar,installaboltandnut
suppliedinthekitintotheholesinsteadofthepin
(Figure4).
Figure4
1.Pivotboltandtabbed
washer
3.Tabbedpin
2.Nut4.Boltreplacingthe
removablerollbarpin
3.Ontheleftsideofthemachine,loosentheclampon
thevent-linehoseandslidethehosedownthemetal
tube(Figure8).Tightentheclamp.
Note:Thisallowsyoutoinstallthecarrierframe
withoutitcontactingthehose.
Figure5
1.Metaltube3.Hose
2.Clamp
4.Removethepivotbolt,tabbedwasher,andnutfrom
therollbar;installthetabbedwasherandpivotbolt
fromtheinsideofthebar,butdonotinstallthenut
yet(Figure4).
4

5.Movethecarrierframeuptotherollbarbracketand
secureitusingatabbedpinthroughtherearholein
thebracket(Figure4).
Note:Placethetabovertheendofthepivotbolt.
6.Securethepivotboltandtabbedpinusingthenutyou
removedpreviously(Figure4).
7.Removethepinfromtheothersideoftherollbarand
repeatthisproceduretosecuretheothersideofthe
carrierframetothemachine.
Figure6illustratesthecorrectlyinstalledcarrierframe.
g029470
Figure6
Installingthe
High-Lift-CollectionKit
InstallingtheHigh-Lift-Collection
Assembly
1.Secureandliftthehigh-lift-collectionassemblyusing
ahoist.Ensurethatthestrapsyouusetohoistitonly
contactthesteelframeunderthehopper.
Important:Donotliftthegrasscollectorbythe
plastichopperoryouwilldamageit.
2.Slowlylowerthehigh-lift-collectionassemblyontothe
frameandslideitforwarduntilthecoolerassemblyon
thefrontofthehopperisabout2.5cm(1inch)from
theplateonthecarrierframe(Figure7).
Figure7
1.Openinginthe
carrier-frameplate
3.Bolt(4required)
2.Cooler4.Shippingbrackets(2),
removeanddiscard
3.Removethefastenerssecuringtheshippingbracketsto
thetopofthecooleranddiscardthem(Figure7).
4.Slidethehigh-lift-collectionassemblyforwardsothat
thetabsonthefrontofthecoolerareushwiththe
plateonthecarrierframe(Figure7)andthetabsinthe
steelframeofthehigh-lift-collectionassemblysitinside
theholesonthecarrierframeasshowninFigure8.
g029471
Figure8
5

5.Securethetabsonthecoolerassemblytothe
carrier-frameplateusing4boltsandnuts,2aboveand
2belowtheassembly(Figure7).
6.Securethehigh-lift-collectionassemblytotherearof
thecarrierframeusing4bolts,2oneachsideofthe
assembly(Figure9).
Figure9
1.Bolts
ConnectingtheHydraulicHosesand
WireHarness
1.Routethehydraulichoseandwireharnessbundle
downtothettingsyouinstalledpreviouslywithKit
Model30801or30898(Figure10).
Note:FormachineswithaYanmarengine,routethe
bundleunderthecarrierframeandbetweentheguide
plateandbumper.
Figure10
MachineswithaKubotaengine
1.Hoseandwireharness
bundle
2.Cableties
Figure11
MachineswithaYanmarengine
1.Hoseandwireharness
bundle
3.Guideplate
2.Cableties
2.Connectthehosesandwireharnesstotheappropriate
ttingsandconnector,ensuringthatthehosesarenot
hangingontopofthecableorpullingonit.
3.Securethebundletothecarrierframewith4cableties
inthelocationsshowninFigure10.
4.Movethecollectionsystemupanddownthroughits
rangeofmotiontoensurethatthebundledoesnot
tightenorpullonanything.
InstallingtheGrassChute
Note:Thegrasschuteisshippedinsidethehopper.
1.Installtheturbinefancoveroverthefanusingknobs
andbolts(Figure12).
Note:Ensurethatyouorienttheportonthecover
atthe5o’clockposition.
Figure12
1.Turbinefancover2.Port
2.Removetherubberdischargechute,fasteners,and
springfromthemower;retainthemforfutureuse.
6

3.Installthedeckadapterovertheopeninginthemower,
securingitwiththepinassemblyandnutasshownin
Figure13.
Figure13
1.Deckadapter3.Grass-chutehose
2.Hoseclamp4.Pinassembly
4.Slidealargehoseclampovereachendofthe
grass-chutehose(Figure13).
5.Slide1endofthehoseovertheportontheendofthe
deckadapterandtightenthehoseclamptosecureit
(Figure13).
6.Slidetheotherendovertheportontheturbinefan
cover(Figure12)andtightenthehoseclamptosecure
it.
Operation
UsingtheParkingStand
1.Parkthemachineonlevel,rmground.
Note:Ifyouneedtoparkonsoftground,placea
blockofwoodundertheparkingstand.
2.Slidethebarontheparkingstandintotheholeonthe
frameandsecureitwithabolt(Figure14).
g029474
Figure14
3.Removethenutandpinassemblysecuringthedeck
adaptertothemowerandremovetheadapter(Figure
13);installtheoriginal,rubberdischargechute.
WARNING
Thecuttingunitcanthrowrocks,sticks,and
otherdebrisseverelyinjuringbystanders.
Neverrunthecuttingunitwithoutthe
dischargechuteorgrasscollector.
4.Liftthehoppertoremovetheweightfromthetabbed
pinsintherollbar.
5.Removethenutandtabbedpinsfromeachsideofthe
rollbar(Figure4).
6.Installthenutsontotheboltssecuringtherollbar.
OperatingtheHigh-Lift
Collection
1.Withthedoorclosedandhopperlowered,decrease
theenginespeed.
Note:Ensurethatthecuttingunitisoff.
2.EngagethePTOswitchtostartthefan.
Note:Ifthefandoesnotengage,makesurethatthe
hopperisallthewaydown.
7

Figure15
1.Doorswitch3.PTOswitch
2.Liftswitch
3.Slowlyincreaseenginespeedandstartthecuttingunit.
4.Afteryouhavenishedcollectinggrass,stopthe
cuttingunitthenturnoffthefan.
Important:Ensurethatthecuttingunitisoff
beforeturningoffthefan.
Note:Ifyouliftthehopperoropenthedoorwhile
thefanisoperating,itautomaticallyshutsdown.
5.Backthemachineuptothecollectionreceptacle.
Important:Onlyemptythehopperwiththe
machineparkedonrm,levelground.
6.Pushtheliftswitchtoraisethehopper(Figure15).
7.Pushthedoorswitchtoopenthedooronthehopper
(Figure15).
8.Closethedoorandreturnthehoppertotheoperating
position.
Note:Donotdrivethemachinewiththehopper
raisedorthehopperdooropen.
Maintenance
Installthecylinderlocksoverthehoppercylinderswhen
performingmaintenancewiththehopperraised(Figure16).
g029472
Figure16
WARNING
Thehoppermaylowerwhenintheraisedposition,
crushinganyoneunderit.
Installthecylinderlocksbeforeperforming
maintenancethatrequiresthehoppertobeinthe
raisedposition.
GreasingtheMachine
1.Lowerthehopperandshutofftheengineofthe
machine.
2.Locateandcleanthegreasettingswitharag.
Note:Therearearrowdecalstonotatethegrease
ttings.
3.Connectagreaseguntoeachttingandpumpgrease
intothettingsuntilgreasebeginstooozeoutofthe
bearings.
4.Wipeupanyexcessgrease.
AdjustingtheSequenceValve
Ifthehopperdoordoesnotcompletelyopenorifthehopper
doesnottilttodumportiltstooslowly,adjustthesequence
valveasfollows:
Note:Adjustingthisvalveincreasesthedump/tiltspeed.
1.Removethecapofthevalve(Figure17).
1
g029473
Figure17
1.Adjustmentvalve
2.Loosenthelocknutontheadjustingscrewofthevalve.
3.Adjustthepressure.
Note:Looseningtheboltincreasesthepressure.
4.Tightenthelocknut
5.Securethecapontothehydraulicvalve.
8

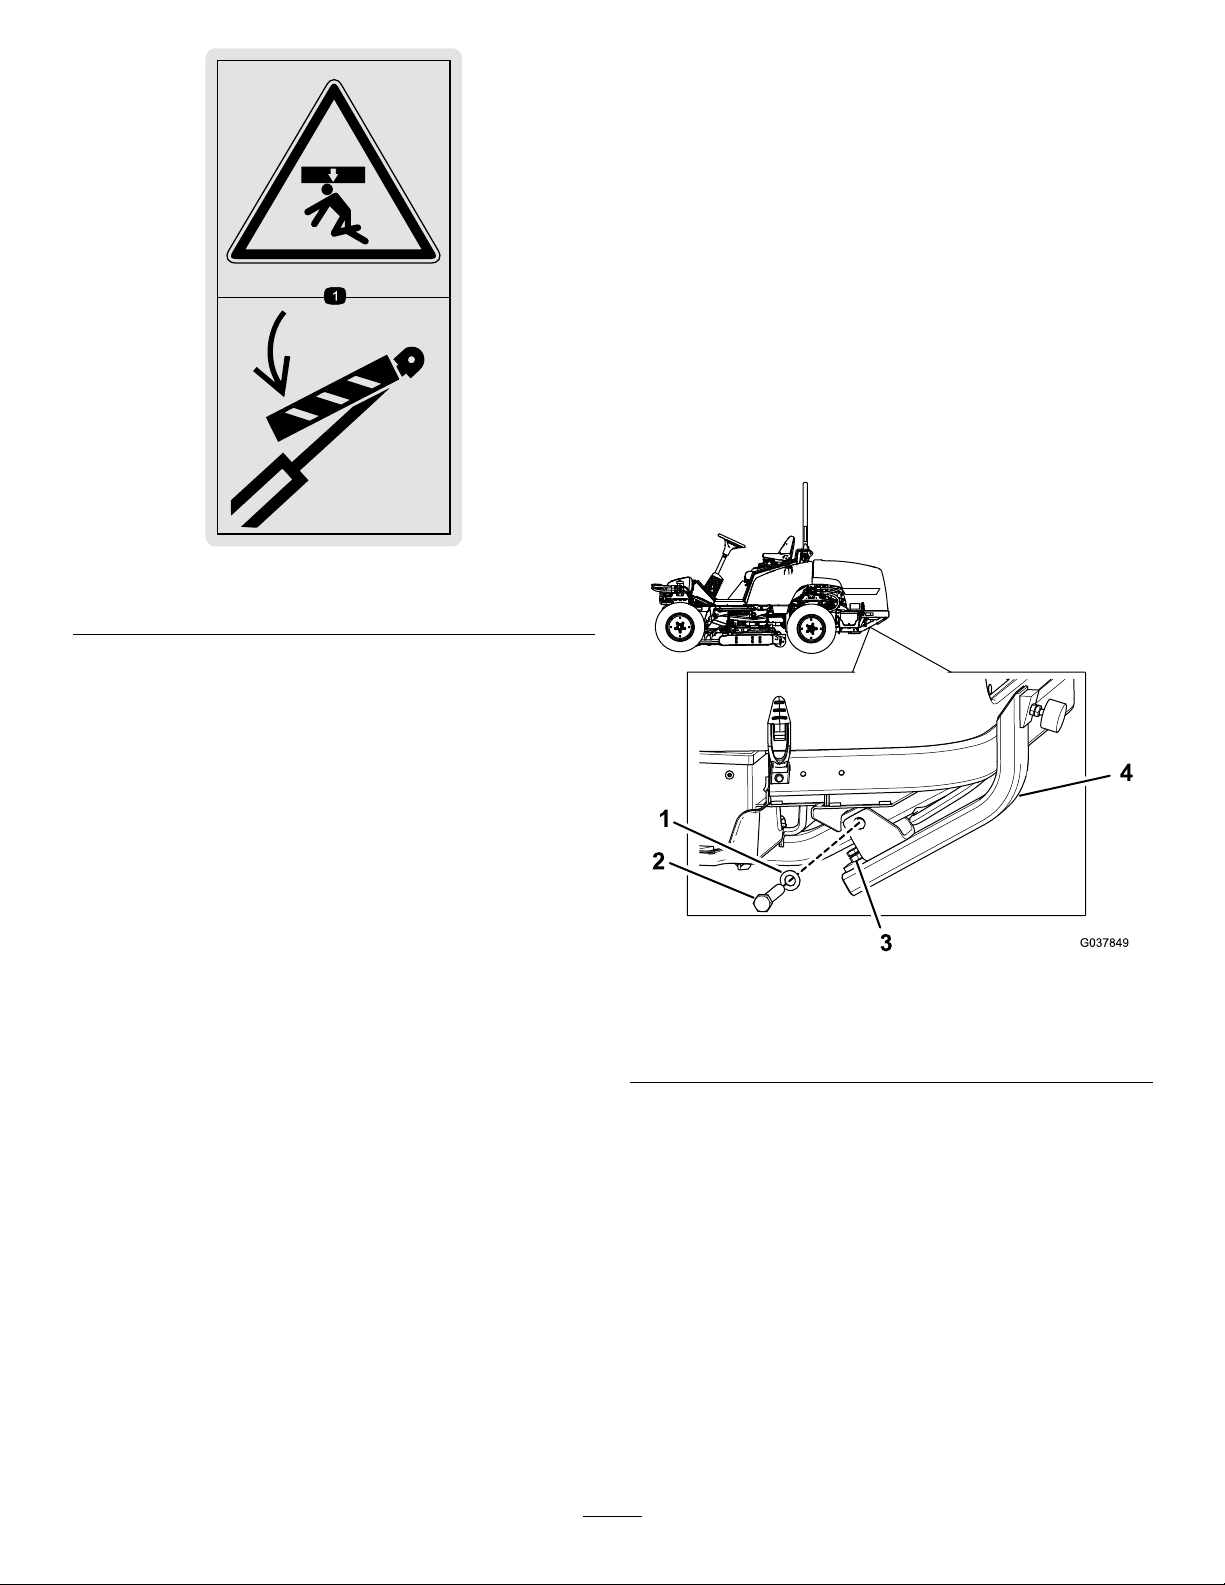
AdjustingtheClosingForce
1.Liftthehopperandopenthehopperdoor.
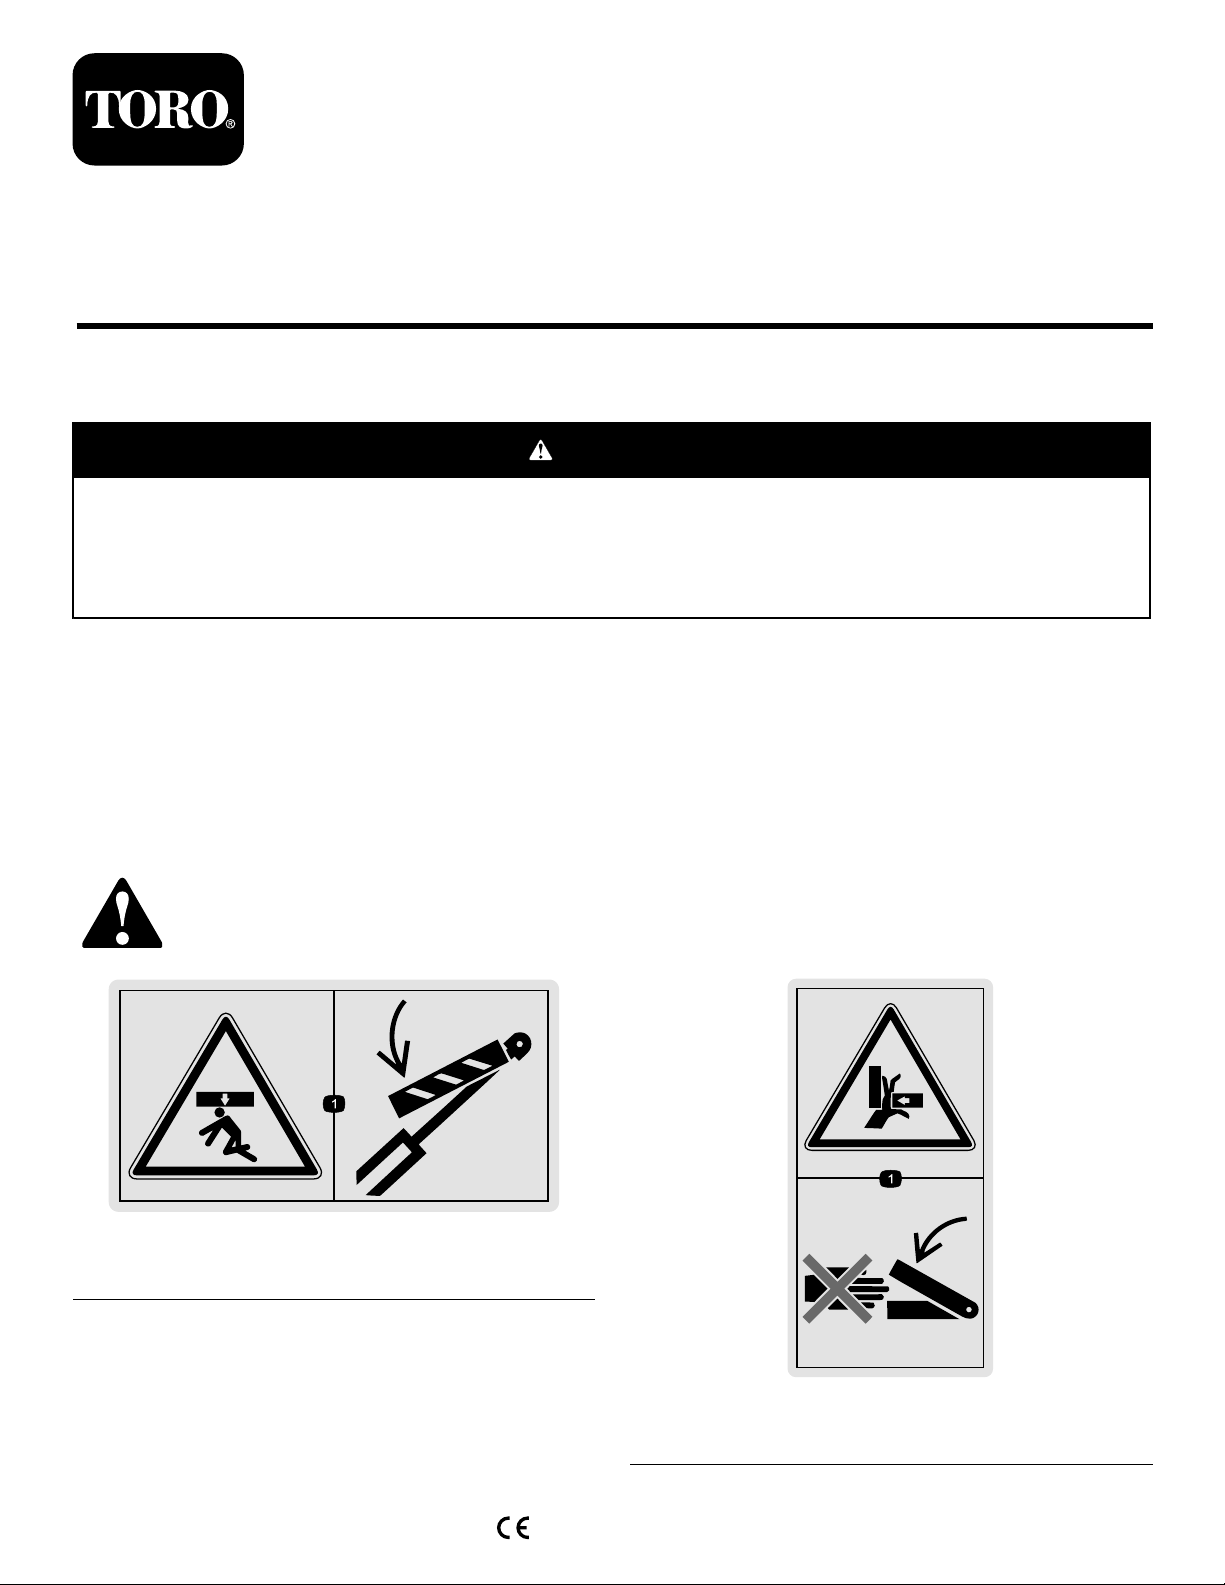
2.Puttheloweringsafeguardinplace(Figure16).
3.Removebothcylindersontherod-sideend.
4.Loosenthelocknutsonthecylinderrods.
5.Adjustthelengthasneeded.
6.Tightenthelocknuts.
7.Installthecylinders.
8.Closethehopperdoor.
AdjustingtheSealbetweenthe
Blow-InPortandtheHopper
Toadjusthowtightlythecollectionhopperrestsonthefan
outlet,youcanchangethefollowingsettings:
•Thelengthofthetoplink
•Thelengthofthehoppersupport(rubberbumper)
•Thepositionofthefanoutlet
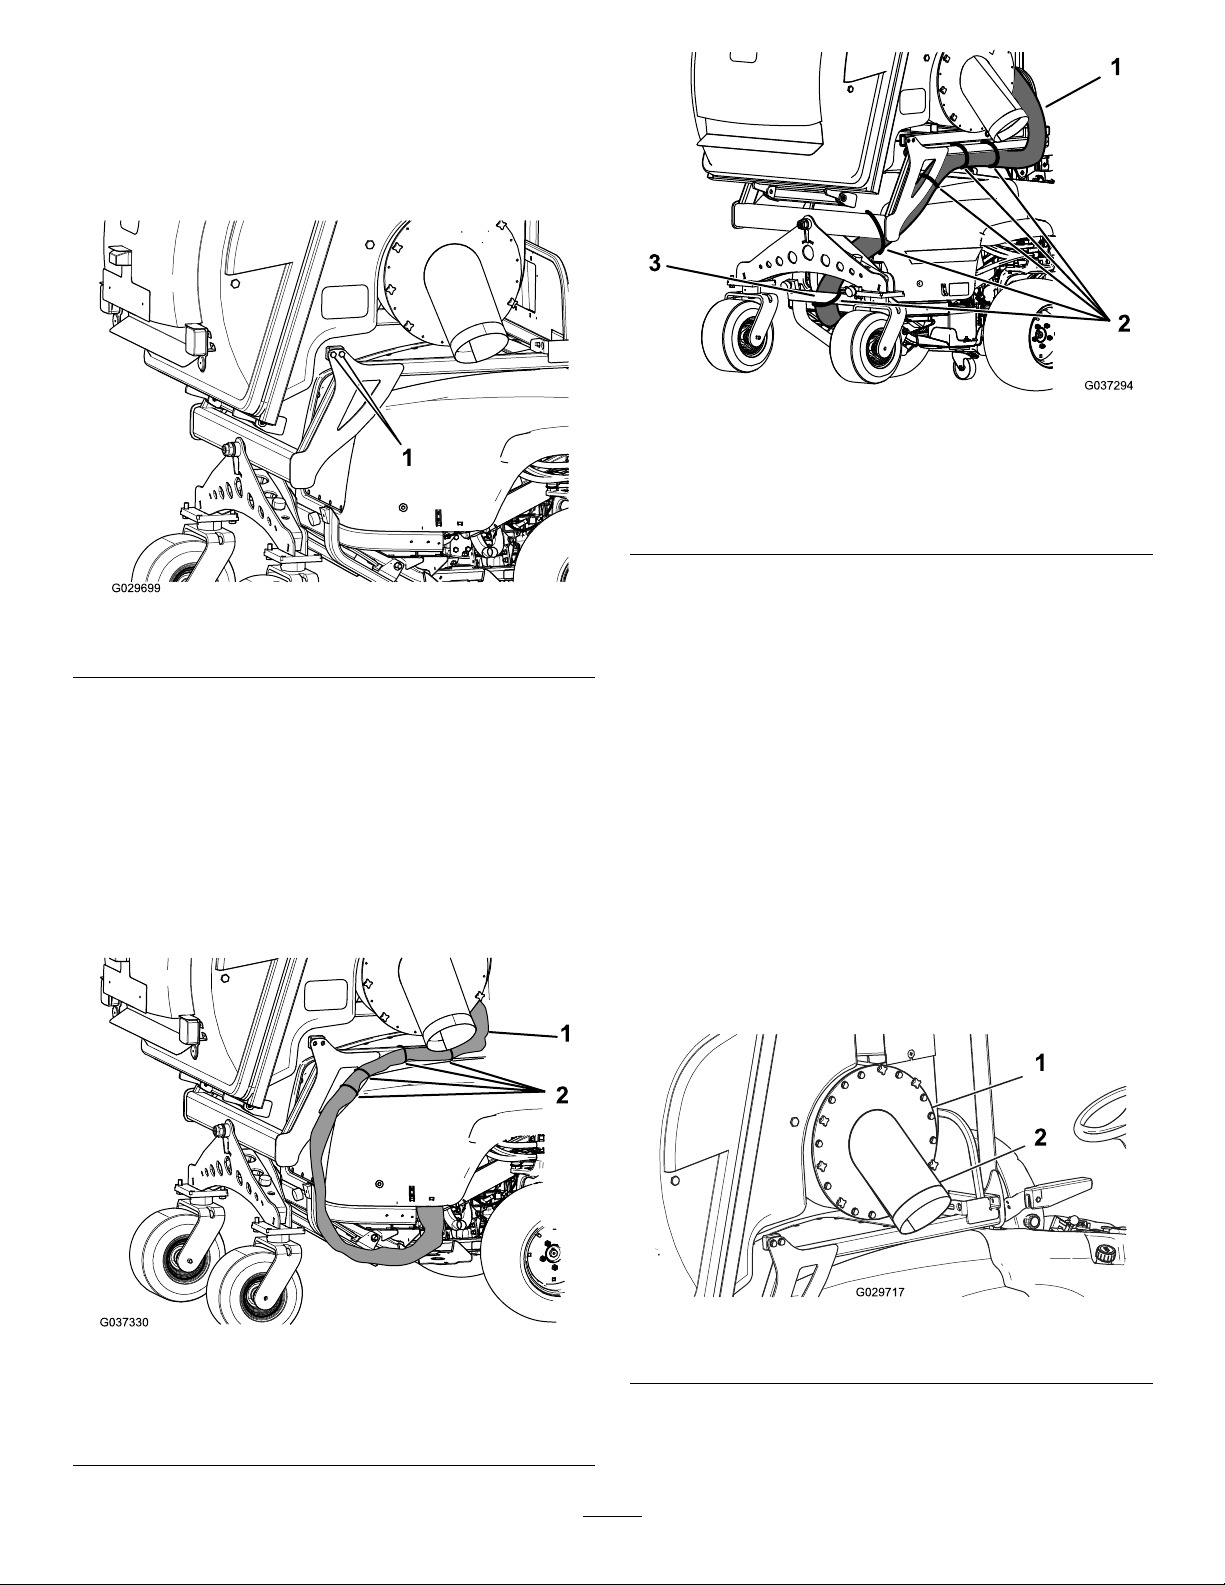
AdjustingtheLengthoftheTopLink
1.Lowerthehopperhalf-wayandsecureitwithsuitable
supports.
2.Tightentheboltofthetoplinkonthehopperside.
Ensurethatthehopperdoesnottipover.
3.Loosenthelocknutsontheupperlinkandadjustthe
lengthofthetoplink.Forexample,turnit1turn.
4.Tightenthecounternutandremounttheboltfrom
thetoplink.
5.Liftandlowerthehopperagaintocheckwhetherit
sealswhenitrestsonthefanoutlet.
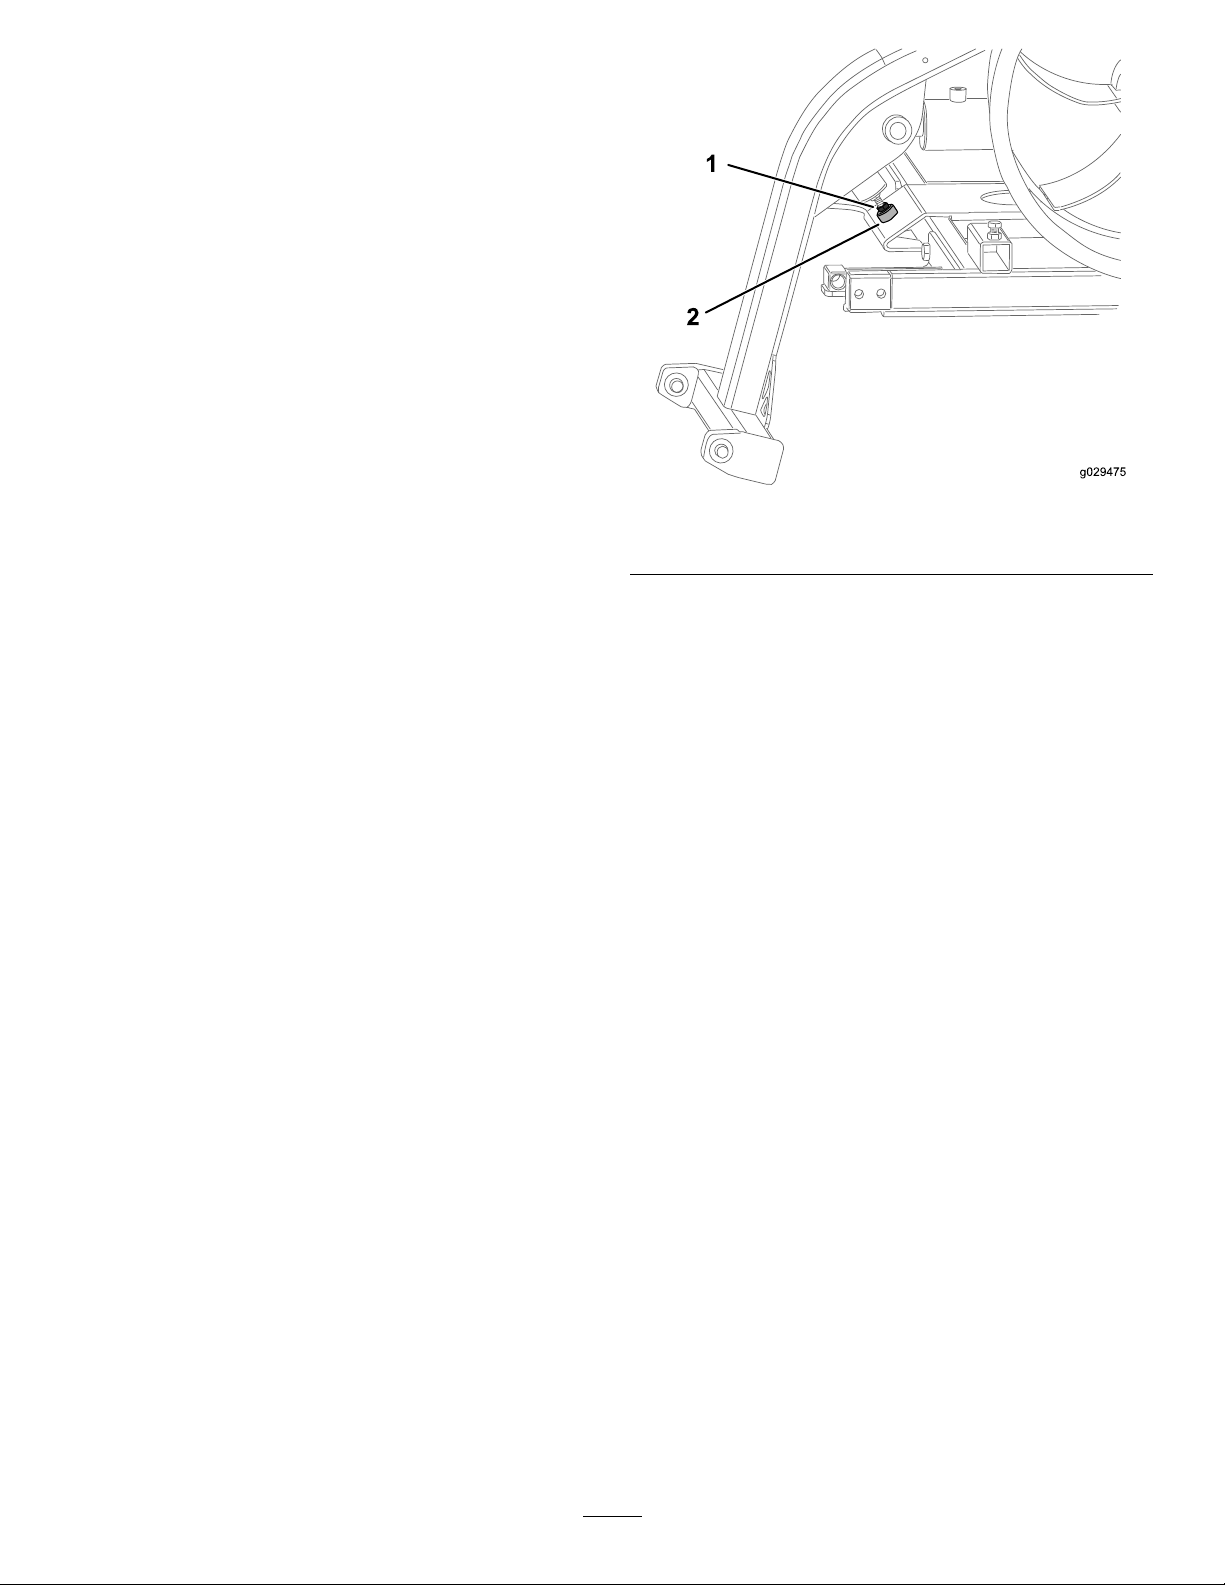
AdjustingtheLengthoftheHopper
Support
1.Raisethehopper.
2.Installthecylinderlocktosecurethehopperagainst
unintendedlowering(Figure16).
3.Removethelocknutontherubberbumper.
1
2
g029475
Figure18
1.Locknut2.Rubberbumper
4.Adjusttherubberbumpersothatthehopperseals
tightlyonthefanoutlet.
5.Fastenthelocknuts.
6.Removethecylinderlock.
7.Lowerthehopper.
8.Ensurethatthehoppersealstightlyonthefanoutlet;
repeatthisprocedureifitdoesnot.
AdjustingthePositionoftheFanOutlet
1.Raisethehopper.
2.Installthecylinderlocktosecurethehopperagainst
unintendedlowering(Figure16).
3.Removethe4nutsonthefanoutlet.
4.Aligntheupperclosingsurfacesothatitisparallel
tothecontainerhoppersurface.Thelateralairgap
betweentheblow-inportandsupportframeinthe
hoppershouldbeapproximatelythesamesizeleftand
right.
5.Installthe4nuts.
9

RemovingandInstallingthe
TurbineFan
RemovingtheFan
1.Removetheturbinefancover(Figure12).
2.Removethecentralfasteningboltofthefan(Figure
19).
Figure19
1.Turbinehousing3.Fan
2.Driveshaftwithkey
3.Useabolt(M16x80;notincluded)topresstheblade
offthedriveshaft.
Note:Keepthekeyinasafeplace.
4.BringthebladetoanAuthorizedServiceDealerto
haveitbalanced.
InstallingtheFan
1.Insertthekeyintothekeygrooveinthedriveshaft
(Figure19)anduseahexbolt(M12x100)topressthe
bladeintothedriveshaft.
2.Removethehexboltandinstallthecentralfastening
bolt(M12x45)andtorqueitto125N∙m(92ft-lb).
3.Installtheturbinefancover(Figure12).
10

Troubleshooting
ProblemPossibleCauseCorrectiveAction
Thesuctionportisblocked.1.Themachineisbeingdriventoofast
forthegivenconditions.
1.Operatethemachineataslowerpace.
Thesuctionhoseorpressurechannelis
clogged.
1.Grassordebrishasaccumulatedin
thehose.
1.Cleanoutthehose.
1.Theexhaustgrillorlterisdirty.1.Cleantheexhaustgrillandlter.
2.Theenginespeedofthemachineis
toolow.
2.Operatethemachineatahigher
enginespeed.
Thesuctioncapacityispoor.
3.Oneormorebeltsareloose.3.Checkthetensionofthebeltand
tightenitifnecessary.(Note:Thereis
adoublebeltonthehopperdrivingthe
fanandasinglebeltunderthehoodof
themachinedrivingthepump.)
Thereisastrongvibrationwhenthe
blowerisrunning.
1.Thefanbladesareoutofbalance.1.ContactyourT oroDistributor.
1.Thehopperisopen.1.Ensurethatthehopperisclosedallthe
way.
2.Thehydraulicsareoverheated.2.Allowthemachinetocooldownand
reslovetheheatingissue;refertoyour
ToroDistributor.
3.Thefanbeltislooseorbroken.3.ContactyourT oroDistributor.
Thefanturnsoffwhileoperatingthe
machine.
4.Thepumpbeltislooseorbroken.4.ContactyourT oroDistributor.
Thehydraulicquick-disconnectttingsare
difculttoremoveorconnect.
1.Somequick-disconnectttingsare
difculttoremoveorconnect.
1.Rotatethesleeveofthettinguntilthe
keylinesupwiththemarkingtoallow
thettingtorelease.
11

Notes:

Notes:

DeclarationofIncorporation
TheToroCompany,8111LyndaleAvenueSouth,Bloomington,MN,USAdeclaresthatthefollowingunit(s)
conform(s)tothedirectiveslisted,wheninstalledinaccordancewiththeaccompanyinginstructionsontocertain
ToromodelsasindicatedontherelevantDeclarationsofConformity.
ModelNo.SerialNo.ProductDescriptionInvoiceDescriptionGeneralDescriptionDirective
30866315000001andUpHigh-liftCollectionKitHIGH-LIFTCOLLECTION
-GM360GrassCollectorAttachment
2006/42/EC,EN
349,ENISO12100,
ISO5395
30818andUpParkingStandKitPARKINGSTAND
KIT-GM360HIGH-LIFTCOLLParkingStandAttachment2006/42/EC,,ISO
16154,FZO
30869315000001andUpCarrierFrameKitCARRIERFRAMEASM
-GM360CarrierFrameAttachment2006/42/EC,ISO
4254
RelevanttechnicaldocumentationhasbeencompiledasrequiredperPartBofAnnexVIIof2006/42/EC.
Wewillundertaketotransmit,inresponsetorequestsbynationalauthorities,relevantinformationonthispartly
completedmachinery.Themethodoftransmissionshallbeelectronictransmittal.
ThismachineryshallnotbeputintoserviceuntilincorporatedintoapprovedT oromodelsasindicatedonthe
associatedDeclarationofConformityandinaccordancewithallinstructions,wherebyitcanbedeclaredin
conformitywithallrelevantDirectives.
Certied:EUT echnicalContact:
MarcVermeiren
ToroEuropeNV
B-2260Oevel-Westerloo
Belgium
DavidKlisTel.003214562960
Sr.EngineeringManagerFax003214581911
8111LyndaleAve.South
Bloomington,MN55420,USA
April1,2015

InternationalDistributorList
Distributor:Country:PhoneNumber:Distributor:Country:Phone
Number:
AgrolancKftHungary3627539640MaquiverS.A.Colombia5712364079
BalamaPrimaEngineeringEquip.HongKong85221552163MaruyamaMfg.Co.Inc.Japan81332522285
B-RayCorporationKorea82325512076Mountelda.s.CzechRepublic420255704
220
CascoSalesCompanyPuertoRico7877888383Mountelda.s.Slovakia420255704
220
CeresS.A.CostaRica5062391138MunditolS.A.Argentina54114821
9999
CSSCTurfEquipment(pvt)Ltd.SriLanka94112746100NormaGardenRussia74954116120
CyrilJohnston&Co.NorthernIreland442890813121OslingerTurfEquipmentSAEcuador59342396970
CyrilJohnston&Co.RepublicofIreland442890813121OyHakoGroundandGarden
Ab
Finland35898700733
EquiverMexico525553995444ParklandProductsLtd.NewZealand6433493760
FemcoS.A.Guatemala5024423277PerfettoPoland48618208416
ForGarderOUEstonia3723846060PratoverdeSRL.Italy390499128
128
G.Y .K.CompanyLtd.Japan81726325861Prochaska&CieAustria4312785100
GeomechanikiofAthensGreece30109350054RTCohen2004Ltd.Israel97298617979
GolfinternationalTurizmTurkey902163365993RiversaSpain34952837500
GuandongGoldenStarChina862087651338LelyTurfcareDenmark4566109200
HakoGroundandGardenSweden4635100000SolvertS.A.S.France331308177
00
HakoGroundandGardenNorway4722907760SpyprosStavrinidesLimitedCyprus35722434131
HayterLimited(U.K.)UnitedKingdom441279723444SurgeSystemsIndiaLimitedIndia911292299901
HydroturfInt.CoDubaiUnitedArabEmirates97143479479T-MarktLogisticsLtd.Hungary3626525500
HydroturfEgyptLLCEgypt2025194308ToroAustraliaAustralia61395807355
IrrimacPortugal351212388260ToroEuropeNVBelgium3214562960
IrrigationProductsInt'lPvtLtd.India0091442449
4387
ValtechMorocco21253766
3636
JeanHeybroekb.v.Netherlands31306394611VictusEmakPoland48618238369
EuropeanPrivacyNotice
TheInformationToroCollects
ToroWarrantyCompany(Toro)respectsyourprivacy.Inordertoprocessyourwarrantyclaimandcontactyouintheeventofaproductrecall,weaskyou
tosharecertainpersonalinformationwithus,eitherdirectlyorthroughyourlocalTorocompanyordealer.
TheT orowarrantysystemishostedonserverslocatedwithintheUnitedStateswhereprivacylawmaynotprovidethesameprotectionasapplies
inyourcountry.
BYSHARINGYOURPERSONALINFORMATIONWITHUS,YOUARECONSENTINGTOTHEPROCESSINGOFYOURPERSONALINFORMATION
ASDESCRIBEDINTHISPRIVACYNOTICE.
TheWayToroUsesInformation
Toromayuseyourpersonalinformationtoprocesswarrantyclaims,tocontactyouintheeventofaproductrecallandforanyotherpurposewhichwetell
youabout.ToromayshareyourinformationwithToro'safliates,dealersorotherbusinesspartnersinconnectionwithanyoftheseactivities.Wewillnot
sellyourpersonalinformationtoanyothercompany.Wereservetherighttodisclosepersonalinformationinordertocomplywithapplicablelawsand
withrequestsbytheappropriateauthorities,tooperateoursystemsproperlyorforourownprotectionorthatofotherusers.
RetentionofyourPersonalInformation
Wewillkeepyourpersonalinformationaslongasweneeditforthepurposesforwhichitwasoriginallycollectedorforotherlegitimatepurposes
(suchasregulatorycompliance),orasrequiredbyapplicablelaw.
Toro'sCommitmenttoSecurityofYourPersonalInformation
Wetakereasonableprecautionsinordertoprotectthesecurityofyourpersonalinformation.Wealsotakestepstomaintaintheaccuracyandcurrent
statusofpersonalinformation.
AccessandCorrectionofyourPersonalInformation
Ifyouwouldliketorevieworcorrectyourpersonalinformation,pleasecontactusbyemailat[email protected].
AustralianConsumerLaw
AustraliancustomerswillnddetailsrelatingtotheAustralianConsumerLaweitherinsidetheboxoratyourlocalT oroDealer.
374-0269RevH

ToroGeneralCommercialProductWarranty
ATwo-YearLimitedWarranty
ConditionsandProductsCovered
TheT oroCompanyanditsafliate,ToroWarrantyCompany,pursuant
toanagreementbetweenthem,jointlywarrantyourToroCommercial
product(“Product”)tobefreefromdefectsinmaterialsorworkmanship
fortwoyearsor1500operationalhours*,whicheveroccursrst.This
warrantyisapplicabletoallproductswiththeexceptionofAerators
(refertoseparatewarrantystatementsfortheseproducts).Wherea
warrantableconditionexists,wewillrepairtheProductatnocosttoyou
includingdiagnostics,labor,parts,andtransportation.Thiswarranty
beginsonthedatetheProductisdeliveredtotheoriginalretailpurchaser.
*Productequippedwithanhourmeter.
InstructionsforObtainingWarrantyService
YouareresponsiblefornotifyingtheCommercialProductsDistributoror
AuthorizedCommercialProductsDealerfromwhomyoupurchasedthe
Productassoonasyoubelieveawarrantableconditionexists.Ifyouneed
helplocatingaCommercialProductsDistributororAuthorizedDealer,or
ifyouhavequestionsregardingyourwarrantyrightsorresponsibilities,
youmaycontactusat:
ToroCommercialProductsServiceDepartment
ToroWarrantyCompany
8111LyndaleAvenueSouth
Bloomington,MN55420-1196
952–888–8801or800–952–2740
E-mail:[email protected]
OwnerResponsibilities
AstheProductowner,youareresponsibleforrequiredmaintenanceand
adjustmentsstatedinyourOperator'sManual.Failuretoperformrequired
maintenanceandadjustmentscanbegroundsfordisallowingawarranty
claim.
ItemsandConditionsNotCovered
Notallproductfailuresormalfunctionsthatoccurduringthewarranty
periodaredefectsinmaterialsorworkmanship.Thiswarrantydoesnot
coverthefollowing:
•Productfailureswhichresultfromtheuseofnon-Tororeplacement
parts,orfrominstallationanduseofadd-on,ormodiednon-T oro
brandedaccessoriesandproducts.Aseparatewarrantymaybe
providedbythemanufactureroftheseitems.
•Productfailureswhichresultfromfailuretoperformrecommended
maintenanceand/oradjustments.Failuretoproperlymaintainyour
ToroproductpertheRecommendedMaintenancelistedinthe
Operator’sManualcanresultinclaimsforwarrantybeingdenied.
•ProductfailureswhichresultfromoperatingtheProductinanabusive,
negligent,orrecklessmanner.
•Partssubjecttoconsumptionthroughuseunlessfoundtobedefective.
Examplesofpartswhichareconsumed,orusedup,duringnormal
Productoperationinclude,butarenotlimitedto,brakepadsand
linings,clutchlinings,blades,reels,rollersandbearings(sealedor
greasable),bedknives,sparkplugs,castorwheelsandbearings,tires,
lters,belts,andcertainsprayercomponentssuchasdiaphragms,
nozzles,andcheckvalves,etc.
•Failurescausedbyoutsideinuence.Conditionsconsideredtobe
outsideinuenceinclude,butarenotlimitedto,weather,storage
practices,contamination,useofunapprovedfuels,coolants,lubricants,
additives,fertilizers,water,orchemicals,etc.
•Failureorperformanceissuesduetotheuseoffuels(e.g.gasoline,
diesel,orbiodiesel)thatdonotconformtotheirrespectiveindustry
standards.
•Normalnoise,vibration,wearandtear,anddeterioration.
•Normal“wearandtear”includes,butisnotlimitedto,damagetoseats
duetowearorabrasion,wornpaintedsurfaces,scratcheddecalsor
windows,etc.
Parts
Partsscheduledforreplacementasrequiredmaintenancearewarranted
fortheperiodoftimeuptothescheduledreplacementtimeforthatpart.
Partsreplacedunderthiswarrantyarecoveredforthedurationofthe
originalproductwarrantyandbecomethepropertyofToro.T orowillmake
thenaldecisionwhethertorepairanyexistingpartorassemblyorreplace
it.Toromayuseremanufacturedpartsforwarrantyrepairs.
DeepCycleandLithium-IonBatteryWarranty:
DeepcycleandLithium-Ionbatterieshaveaspeciedtotalnumberof
kilowatt-hourstheycandeliverduringtheirlifetime.Operating,recharging,
andmaintenancetechniquescanextendorreducetotalbatterylife.Asthe
batteriesinthisproductareconsumed,theamountofusefulworkbetween
chargingintervalswillslowlydecreaseuntilthebatteryiscompletelyworn
out.Replacementofwornoutbatteries,duetonormalconsumption,
istheresponsibilityoftheproductowner.Batteryreplacementmaybe
requiredduringthenormalproductwarrantyperiodatowner’sexpense.
Note:(Lithium-Ionbatteryonly):ALithium-Ionbatteryhasapartonly
proratedwarrantybeginningyear3throughyear5basedonthetime
inserviceandkilowatthoursused.RefertotheOperator'sManualfor
additionalinformation.
MaintenanceisatOwner’sExpense
Enginetune-up,lubrication,cleaningandpolishing,replacementoflters,
coolant,andcompletingrecommendedmaintenancearesomeofthe
normalservicesT oroproductsrequirethatareattheowner’sexpense.
GeneralConditions
RepairbyanAuthorizedToroDistributororDealerisyoursoleremedy
underthiswarranty.
NeitherTheToroCompanynorToroWarrantyCompanyisliablefor
indirect,incidentalorconsequentialdamagesinconnectionwiththe
useoftheToroProductscoveredbythiswarranty,includingany
costorexpenseofprovidingsubstituteequipmentorserviceduring
reasonableperiodsofmalfunctionornon-usependingcompletion
ofrepairsunderthiswarranty.ExceptfortheEmissionswarranty
referencedbelow,ifapplicable,thereisnootherexpresswarranty.All
impliedwarrantiesofmerchantabilityandtnessforusearelimitedto
thedurationofthisexpresswarranty.
Somestatesdonotallowexclusionsofincidentalorconsequential
damages,orlimitationsonhowlonganimpliedwarrantylasts,sotheabove
exclusionsandlimitationsmaynotapplytoyou.Thiswarrantygivesyou
speciclegalrights,andyoumayalsohaveotherrightswhichvaryfrom
statetostate.
Noteregardingenginewarranty:
TheEmissionsControlSystemonyourProductmaybecoveredby
aseparatewarrantymeetingrequirementsestablishedbytheU.S.
EnvironmentalProtectionAgency(EPA)and/ortheCaliforniaAirResources
Board(CARB).Thehourlimitationssetforthabovedonotapplytothe
EmissionsControlSystemWarranty.RefertotheEngineEmissionControl
WarrantyStatementsuppliedwithyourproductorcontainedintheengine
manufacturer’sdocumentationfordetails
CountriesOtherthantheUnitedStatesorCanada
CustomerswhohavepurchasedT oroproductsexportedfromtheUnitedStatesorCanadashouldcontacttheirT oroDistributor(Dealer)toobtain
guaranteepoliciesforyourcountry,province,orstate.IfforanyreasonyouaredissatisedwithyourDistributor'sserviceorhavedifcultyobtaining
guaranteeinformation,contacttheT oroimporter.374-0253RevC
This manual suits for next models
2
Table of contents
Other Toro Lawn Mower Accessories manuals

Toro
Toro 145-3495 User manual

Toro
Toro 117-3600 User manual

Toro
Toro 108-2639 User manual

Toro
Toro 144-0380 User manual

Toro
Toro 04259 User manual

Toro
Toro Wheel Horse 78361 User manual

Toro
Toro 04540 User manual

Toro
Toro REELMASTER 5010 Series User manual

Toro
Toro 03698 User manual

Toro
Toro 30124 User manual
Popular Lawn Mower Accessories manuals by other brands

Snapper
Snapper HYT18 Series Safety instructions & operator's manual

Husqvarna
Husqvarna 970-12 Operator's manual

Easymate
Easymate Garden1000X Installation and user manual

Exmark
Exmark Ultra Vac QDS Lazer Z HP Operator's manual

Simplicity
Simplicity 1690229 Operator's manual

Rover
Rover 108 - 109 owner's manual