TriBrer EPN90 User manual

USER'S GUIDE
PON OPTICAL POWER METER
EnglishEnglish


1
WARNING
You arecautioned that changes ormodifications not espressly approved in
this document could voidyout authority to operatethis equipment.
Toreduce the risk offire or electric shock,donot expose this apparatusto
rain or moisture.
Toavoid electrical shock, donot open the cabinet.Refer servicing to quali-
fied personnel only.
NOTE
As the laser isharmful to the eyes,do not attempt todisassemble the cabinet.
CLASS I LASER PRODUCT
Precautions for Use
Use batteries
At the same time,can not use differentstyle or different capacitancebatteries.
And only chargethe rechargeable batteries.
Avoiding condensation problems
As much as possible,avoid sudden temperature changes.Do not attempt
to use the driveimmediately after moving itfrom a coldto a warm location,
to raising the room temperature suddenly, as condensation mayform with
in the drive. Ifthe temperature changes suddenlywhile using the drive,
stop using it andtake out batteries forat least an hour.
Storage
When long time nouse, must take outthe batteries to avoiddestroying the
device.
2
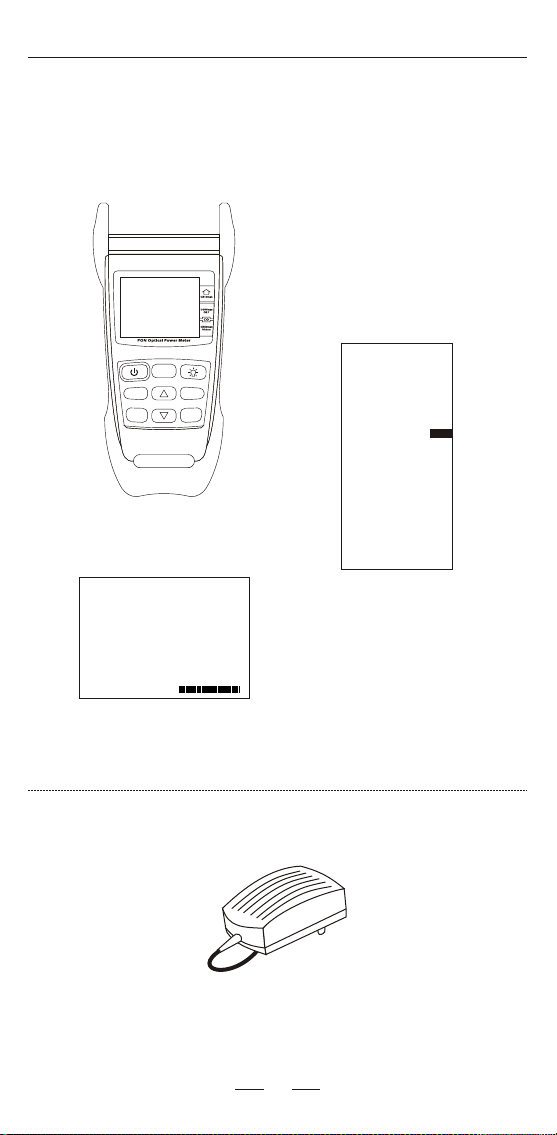
First check the accessories
Standard
Host
Manual
Calibration Certificate
Optional
AC/DC Adaptor
()If any accessory is short pleaserelate with the dealer ASAP
Threshold
REF/
dBm/dB
F/P
mode
ReCall
Save
Enter
>2S PERM
USER'S GUIDE
PON OPTICAL POWER METER
EnglishEnglish

Threshold
REF/
dBm/dB
F/P
mode
ReCall
Save
Enter
>2S PERM
3
Description
12
4
5
7
6
3
8
9
10
11
12
9V
1A
9V
1A
13
14
15
16
1- ONT (1310nm) inputconnector
2- OLT/Video(1490/1550nm) input connector
3- LCD
4- Power Key
5- F/P mode Key ( PASS, WRNG, FAIL)
6- VFL key
7- Unit Key ( dBm, dB)
8- Up Key
9- Threshold Key
10- Save Key
11- Down Key
12- REF Key / Enter Key
13- USB port
14- AC/DC port (Chargeable)
15- Battery charging LED
16- Connector of VFLor OPM

4
1.Press and pushdown 2.Open the lid
3.Place the batteries 4.Close the lidand push up
Set batteries
Warning:At the same time,can not use differentstyle and different capacitancebatteries.
5
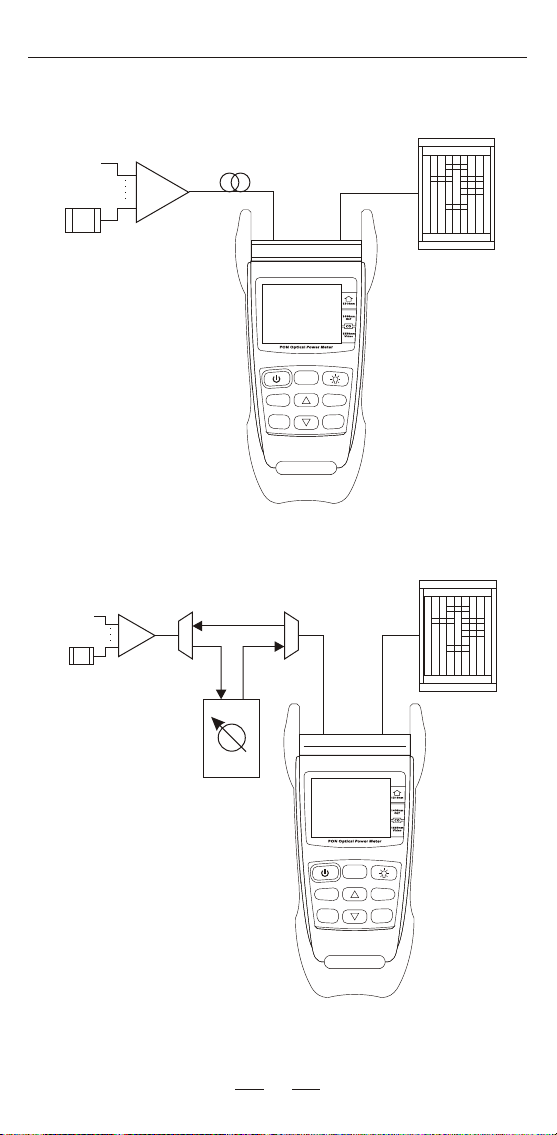
PON testing
Data Networks Analyser
IXIA/Smartbits
Fiber
Optical Splitter
ONT OLT
Threshold
REF/
dBm/dB
F/P
mode
ReCall
Save
Enter
>2S PERM
Threshold
REF/
dBm/dB
F/P
mode
ReCall
Save
Enter
>2S PERM
Data Networks Analyser
IXIA/Smartbits
Optical Splitter
Lamda
Demultiplexer
Lamda
Multiplexer
Variable Optical
Attenuator
ONT
OLT
1490nm
1310nm
Threshold
REF/
dBm/dB
F/P
mode
ReCall
Save
Enter
>2S PERM
>2S PERM
6
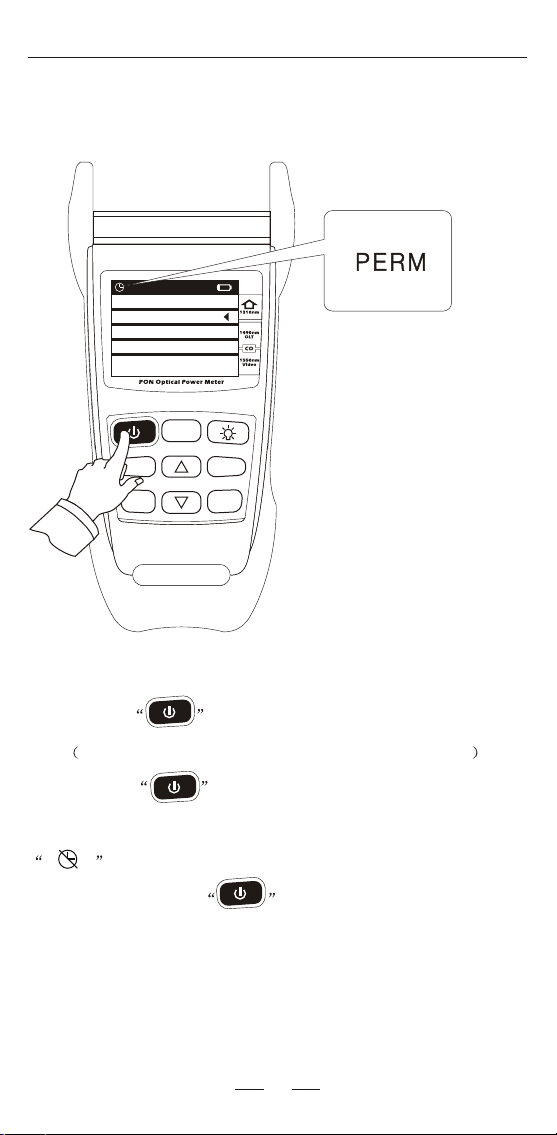
Power on/off, auto power off
Press the key to turn on the device with auto power
off. After 10 minutes nokey pressed, itwill auto poweroff.
Press the key for 2seconds when turn on the device,
the auto poweroff will becancelled, and theLCD will show
.
Also long pressthe key to shutdown the device.
Select Function
PON
OPM
VFL
>2S PERM
>2S PERM

7
PON Test mode
Threshold
REF/
dBm/dB
F/P
mode
ReCall
Save
Enter
>2S PERM
It can testthe signal of1310,1490,1550nm and showits power
at the sametime.
HI and LOW mean theresult is outof the testingrange.
Select Function
PON
OPM
VFL

8
PON- F/P Mode
Threshold
REF/
dBm/dB
F/P
mode
ReCall
Save
Enter
>2S PERM
PASS , WRNG , FAIL :
Alarm, depends on the threshold the user set.
key
Open or closethe alarm function ( PASS, WRNG, FAIL ).
:
On LCD
there are warning words beside theresults.
Tx:
The group NOof thresholds.
F/P
mode

9
PON- REF set
Threshold
REF/
REF/
dBm/dB
DBm/dB
F/P
mode
ReCall
Save
Enter
Enter
>2S PERM
key: It will showyou the referencevalue you stored
before, then turn the unit to dB. Keep pressing it for 2 seconds, you
can save current value as a new reference.
key: Change theunit ( dBm,dB).
Note: The valuemust be inthe testing rangewhen you pressthese
two keys.
-18.69
10
PON- Threshold set
Threshold
Unit : dBm
OLT:1490nm
ONT:1310nm VDO:1550nm
OVER FALT : OVER FALT :
OVER FALT :
03.0
LOW WRNG: LOW WRNG:
LOW WRNG:
-20.0
LOW FALT : LOW FALT :
LOW FALT :
-30.0
03.0
-20.0
-30.0
03.0
-20.0
-30.0
NUM: 5
Threshold
REF/
dBm/dB
F/P
mode
ReCall
Save
Enter
>2S PERM
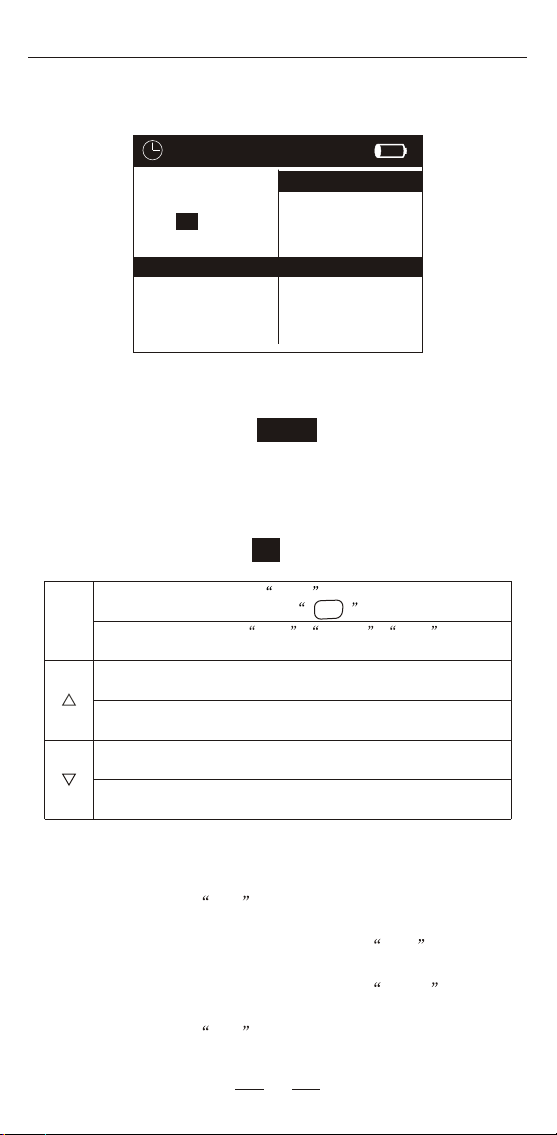
Press the key, user can shift theinterface. The upper
right picture showsthe threshold setinterface.
User can setthese 10 thresholds.Please see page11 for details.
Threshold
Threshold
Unit : dBm
OLT:1490nm
ONT:1310nm VDO:1550nm
OVER FALT : OVER FALT :
OVER FALT :
03.0
LOW WRNG: LOW WRNG:
LOW WRNG:
-20.0
LOW FALT : LOW FALT :
LOW FALT :
-30.0
03.0
-20.0
-30.0
03.0
-20.0
-30.0
NUM: 5
11
Wavelength
Max. Value
Min. Value
Warning Value
FIGURE 1
FIGURE 2
FIGURE 3
When the cursor is on NUM , you can change the
threshold number bypressing key. (seefigure 1)
Enter When the cursoris on FALT: , WRNG: , FALT: , you can
shift the cursor fromeach bit of the data. (seefigure 2)
Move the cursorup, please notethe cursor is not in one
bit of anydata.
Move the cursordown, please notethe cursor is not in one
bit of anydata.
Increase the bitby 1, whenthe cursor is in one bit of any
data. (see figure3)
Decrease the bitby 1, whenthe cursor is in one bit of any
data. (see figure3)
How to understandthe threshold:
1.Each wavelength hasits threshold.
2.If the current value > Max. Value, the alarm ofcorresponding
wavelength will be FAIL .
3.If the current value < Max. Value, but > Warning Value, the
alarm of corresponding wavelengthwill be PASS .
4.If the current value < Warning Value,but > Min.Value, the
alarm of corresponding wavelengthwill be WRNG .
5.If the current value < Min. Value, the alarm ofcorresponding
wavelength will be FAIL .
PON- Threshold set
ONT:1310nm------
OVER FALT : 03.0
LOW WRNG:-20.0
LOW FALT : -30.0
LOW FALT : -30.0
REF/
Enter
Threshold
Unit : dBm
OLT:1490nm
ONT:1310nm VDO:1550nm
OVER FALT : OVER FALT :
OVER FALT :
03.0
LOW WRNG: LOW WRNG:
LOW WRNG:
-20.0
LOW FALT : LOW FALT :
LOW FALT :
-30.0
03.0
-20.0
-30.0
03.0
-20.0
-30.0
NUM: 5

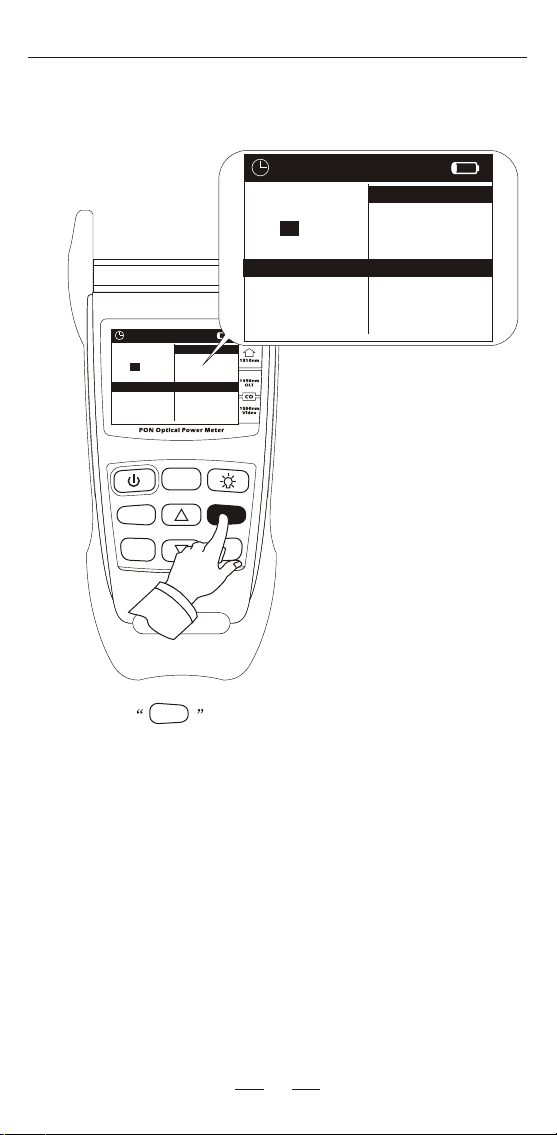
PON- Data Storage
Threshold
REF/
dBm/dB
F/P
mode
ReCall
Save
Enter
>2S PERM
12
When in PONtesting interface, user can press key to
the History interface. And press the key for 2seconds to
save the current value.
In the History interface, press and key to
change the history page.
Press key again backto the testinginterface.
ReCall
Save
ReCall
Save
ReCall
Save
0001
0002
0003
0004
0005
0006
0007
0008
0009
0010
1310nm
0.00
0.00
0.00
0.00
0.00
0.00
0.00
0.00
0.00
0.00
1490nm
0.00
0.00
0.00
0.00
0.00
0.00
0.00
0.00
0.00
0.00
1550nm
0.00
0.00
0.00
0.00
0.00
0.00
0.00
0.00
0.00
0.00
History
0001
0002
0003
0004
0005
0006
0007
0008
0009
0010
1310nm
0.00
0.00
0.00
0.00
0.00
0.00
0.00
0.00
0.00
0.00
1490nm
0.00
0.00
0.00
0.00
0.00
0.00
0.00
0.00
0.00
0.00
1550nm
0.00
0.00
0.00
0.00
0.00
0.00
0.00
0.00
0.00
0.00
History

13
OPM Mode
OPTIONAL
When turn on the device, press key to selectOPM
mode and press key to enterthe normal optical power
meter mode.
In normal power meter mode:
dBm/dB: change theunit, dBm, uWand dB.
Threshold: change thewavelength,
850/1300/1310/1490/1550/1625nm.
REF/Enter: press tocheck the REFvalue, press for2 seconds to
save the current value as a new REF value.
Threshold
REF/
dBm/dB
F/P
mode
ReCall
Save
Enter
>2S PERM
REF/
Enter
0.00
0.00
0.00
0.00
0.00
0.00
1300nm
1550nm
850 nm
1490nm
1310nm
1625nm
dBm
dBm
dBm
dBm
dBm
dBm
Reference
Select Function
PON
OPM
VFL
110.83 pw
dBm-26.62
1310nm

OPM-Data Storage
Threshold
REF/
dBm/dB
F/P
mode
ReCall
Save
ReCall
Save
ReCall
Save
ReCall
Save
Enter
>2S PERM
14
When in testinginterface, user can press key to the
History interface.. And press the key for 2seconds to save
the current value.
In the History interface, press and key to
change the history page.
Press key again backto the testinginterface.
01
02
03
04
05
06
07
08
09
10
1625nm
1625nm
1625nm
1625nm
1625nm
1625nm
1625nm
1625nm
1625nm
1625nm
0.00
0.00
0.00
0.00
0.00
0.00
0.00
0.00
0.00
0.00
11
12
13
14
15
16
17
18
19
20
1625nm
1625nm
1625nm
1625nm
1625nm
1625nm
1625nm
1625nm
1625nm
1625nm
0.00
0.00
0.00
0.00
0.00
0.00
0.00
0.00
0.00
0.00
Page1/5
History

15
Threshold
REF/
REF/
dBm/dB
F/P
mode
ReCall
Save
Enter
Enter
>2S PERM
VFL Mode
OPTIONAL
When turn on the device, press key to selectVFL mode
and press key to enter the visual fault locator mode.
In VFL mode:press key can change the light status
to be ON- Flashing -OFF.
Select Function
PON
OPM
VFL
VFL

16
Threshold
REF/
dBm/dB
F/P
mode
ReCall
Save
Enter
>2S PERM
Battery energy detect
Battery energy has fiveindicators:
Remain 80%---100%
Remain 60%---80%
Remain 40%---60%
Remain 20%---40%
Remain less than20%
If the energyis too low, the beep will be on and the device will
auto power off. When youplug in theAC adapter andrechargeable
batteries inside, thescreen will show the charging iconon upper
right corner.
Select Function
PON
OPM
VFL

17
Battery charge
First you mustuse the rechargeablebatteries. When the energy
is less than20%, you shouldcharge the batteries.Long time low
energy,the life ofthe batteries willbe short. When charging, the
battery indication on LCDwill flash. After charging fully, the
indication will stopflashing and showfull. Don't chargefor more
than 24 hours.If charging whileusing the device,the time willbe
longer.The rechargeable batteriesmust be indevice when youuse
the AC/DC adaptorfor charging. Anddo not chargethe
non-rechargeable batteries, orthe device willbe destroyed andalso
lose the guarantee.

18
Maintenance and calibration
Routine attention
1.Fiber-optical adapter should keep clean.
2.Please store thedevice in dry andventilated place.
3.The long periodno use ,please take outthe batteries.
Common malfunction
DescribedDescribed Malfunction causeMalfunction cause Handle wayHandle way
Display the messy
code Reset is incorrect Reset
Operation do not
have reaction Program is disorderly Reset
Can not turn on No battery Check battery setting
After turn on shutit
immediately
Check battery
capacities Change battery
Can not charge Use Non-rechargeable
batteries Change battery
Table of contents
Other TriBrer Measuring Instrument manuals

TriBrer
TriBrer AOF500 User manual

TriBrer
TriBrer AOP100T User manual

TriBrer
TriBrer EVA50-40 User manual

TriBrer
TriBrer Lemon 5 User manual

TriBrer
TriBrer AOP100 User manual

TriBrer
TriBrer OTDR AOR-50 User manual

TriBrer
TriBrer EPM30 User manual

TriBrer
TriBrer FOT-100 User manual

TriBrer
TriBrer AOP110 User manual

TriBrer
TriBrer AOU400 User manual


Popular Measuring Instrument manuals by other brands

FlowCon
FlowCon FAC6HP Installation and operation instruction

Konica Minolta
Konica Minolta CM-25cG instruction manual

Fluke
Fluke 5020AThermo-Hygrometer 5020A user manual

GOK
GOK GWG Assembly and operating manual

Gemu
Gemu 800 Installation, operating and maintenance instructions

Liquid Controls
Liquid Controls M Series Installation Manual & Setup Guide


