TRQ U-LED-1 User manual
CARACTERÍSTICAS/CHARACTERISTICS
230V - 50/60Hz
IP20
Marcado CE
CE marked
- Permanente - No permanente/Maintained - Non maintained.
- Test de vericación, puesta en reposo y reencendido a través de Telemando/Vericaton test, stand-by and re-start via Telemando
- LED verde de señalización/Green LED signaling.
- Protección n de descarga de la batería y sobreintensidades/End of battery discharge and overloading protection.
- Control por microcontrolador/Microcontroller control.
- Temperatura de funcionamiento: 0ºC ~ +50ºC/Operating temperature: 0ºC ~ +50ºC.
- Temperatura máxima de la caja (tc): 70ºC/Maximum temperature (tc): 70ºC.
- Autonomía: 1 y 3 horas (dependiendo del modelo)/Autonomy: 1 and 3 hours (depending on the model).
- No es eciente conectar luminarias de potencia mayor de 48W/It is not ecient to connect luminaires with a power greater than 48W
- Distancia máxima a la lámpara: 2 metros/Maximum distance to lamp: 2 meters.
- Instalación en falso techo o interior de la luminaria/Installation in false ceiling or inside the luminary.
- Funcionamiento con driver externo (conexión a la salida del driver)/Operation with external driver (connection to driver output).
- Tiempo de carga de batería: 24 horas/Battery charging: 24 hours.
LIGHTING TECHNOLOGIES TRQ, S.L.
KIT EMERGENCIA LED: U-LED-1/U-LED-3
LED CONVERSION KIT
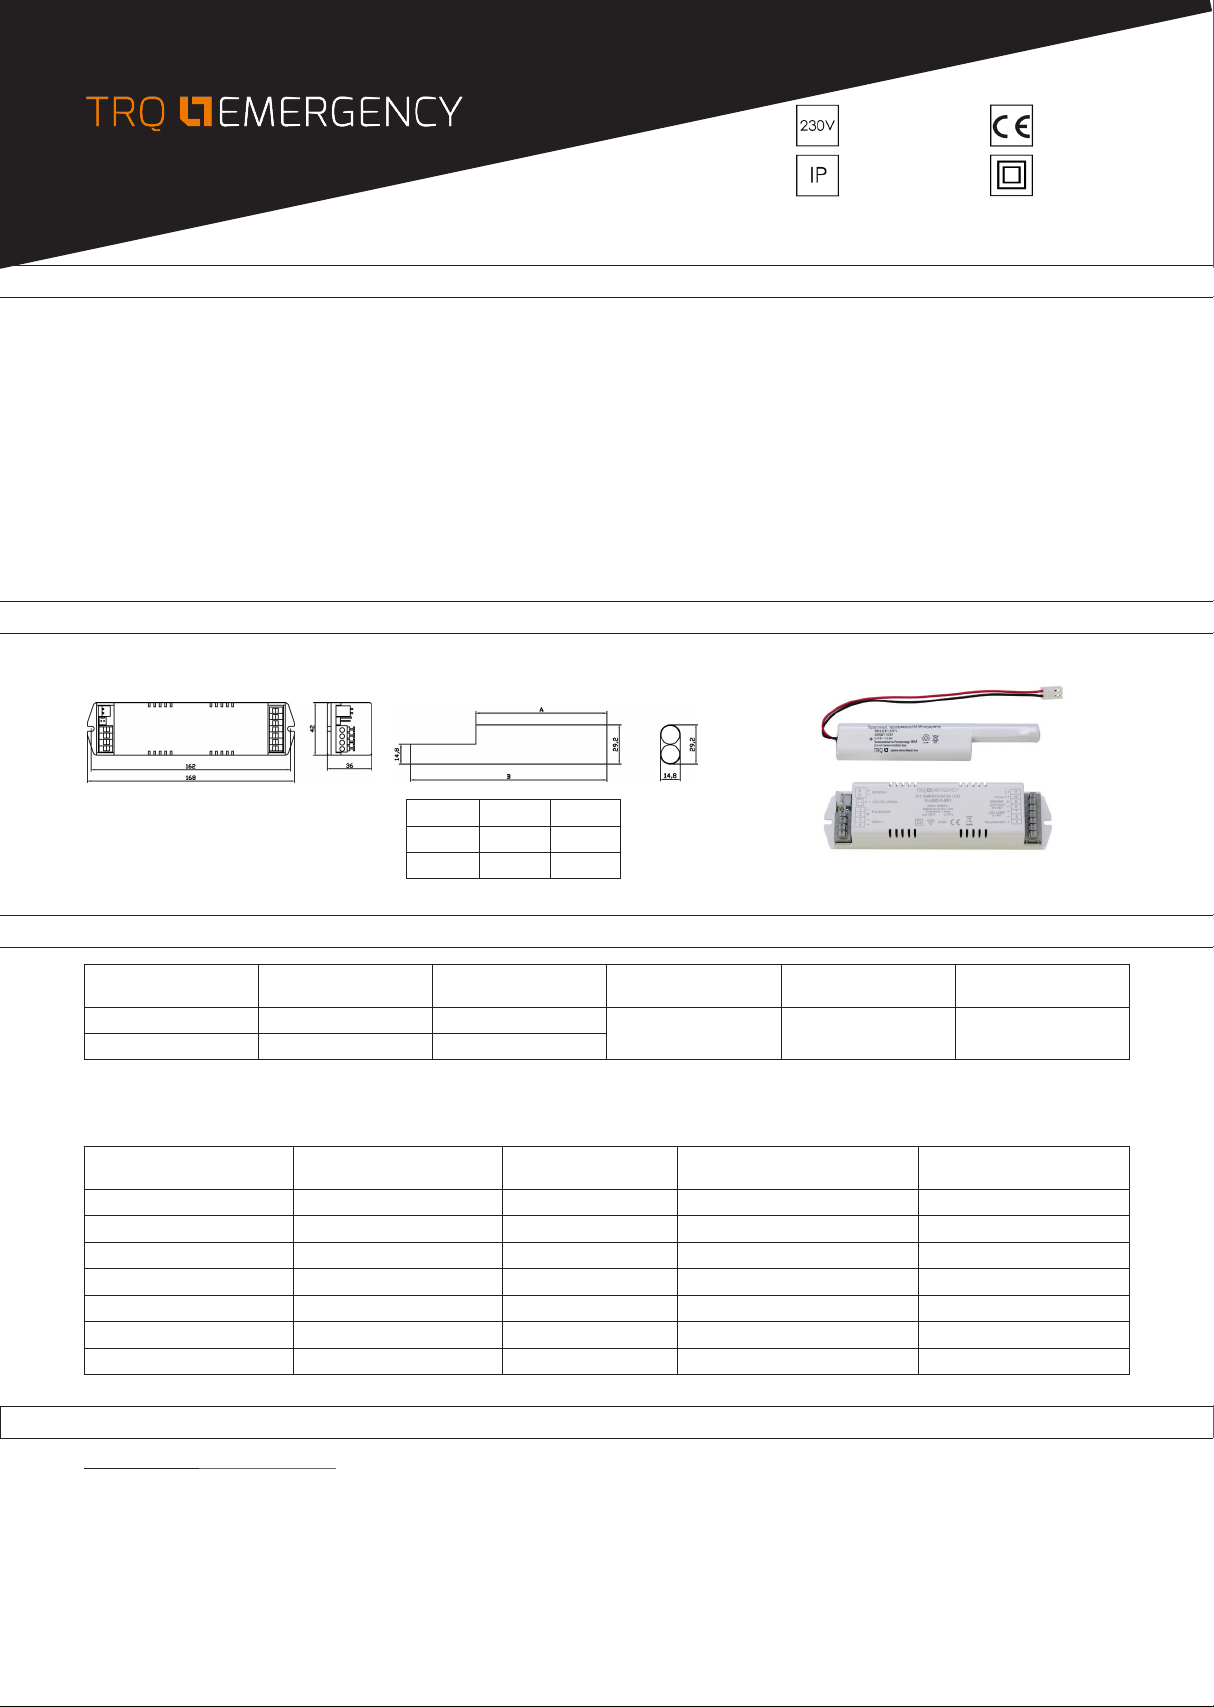
DIMENSIONES/DIMENSIONS
REFERENCIAS/REFERENCES
Modelos
Models
Batería Ni-MH
Battery Ni-MH
Autonomía
Autonomy
Tensión salida
Output voltage
Corriente salida
Output current
Potencia salida (W)
Output power (W)
U-LED-1 6V 1.5Ah 1h 8 - 33 VDC* 350mA max* 3,5W*
U-LED-3 6V 1.5-1.8Ah 3h
Tensión salida (V)
Output voltage (V)
Corriente salida (mA)
Output current (mA)
Potencia salida (W)
Output power (W)
Corriente descarga batería (mA)
Battery discharge current (mA)
Tensión batería
Battery voltage
9,65 VDC 349 mA 3,37W 738 mA 6 VDC
12,51 VDC 283 mA 3,54W 780 mA 6 VDC
20,82 VDC 170 mA 3,54W 805 mA 6 VDC
11,51 VDC 309 mA 3,56W 778 mA 6 VDC
16,48 VDC 214 mA 3,53W 776 mA 6 VDC
32,78 VDC 98 mA 3,21W 788 mA 6 VDC
12,27 VDC 192 mA 3,51W 795 mA 6 VDC
PARÁMETROS FUNCIONAMIENTO DIFERENTES LÁMPARAS LED
OPERATING PARAMETERS OF DIFFERENT LED LAMPS
Clase II
Class II
Baterías A B
U-LED-1 100 mm 150 mm
U-LED-3 133 mm 199 mm
FUNCIONAMIENTO/FUNCTIONING
RED PRESENTE/POWER PRESENCE:
El kit carga la batería y el LED se ilumina en verde indicando presencia de red. En modo de conexión permanente, el driver interconectado con el kit alimenta la
luminaria conectada a la salida de éste. En modo no permanente el kit no da salida y la luminaria permanece apagada/The device charges the battery and the LED
lights up in green colour indicating mains presence. In maintained mode, the driver of the luminary connected to the kit lights the lamp. In non-maintained mode the
luminaire is o.
*Ajustable automáticamente/Automatically adjustable
MANTENIMIENTO/MAINTENANCE
INSTALACIÓN/INSTALL ATION
PERMANENTE/MAINTAINEDNO PERMANENTE/NON MAINTAINED
- Ver diagrama de conexiones del apartado funcionamiento/See connection diagram in the functioning.
- Trabajar con la tensión de red de la instalación apagada/Switch o the power to make the installation.
- Conexionar la luminaria a los bornes del kit (LED lamp) siempre respetando la polaridad indicada/Connect the lamp to the connectors of the kit (LED lamp) make
sure the polarity.
- Conexionar la salida del driver externo de la luminaria en los bornes (Driver OUT) del kit respetando la polaridad indicada (modo permanente)/Connect the output of
the external driver of the luminary to the kit (Driver OUT), make sure the polarity (maintained mode).
- Conectar la entrada de línea (L1) del driver a través del kit según el diagrama de conexión (modo permanente)/Connect the power line (L1) to the external driver of
the luminaire through the kit as indicated in the connection diagram (maintained mode).
- Conectar la entrada de red del kit. Esta línea tiene que ser permanente para que la batería siempre esté en carga. Si se corta la alimentación, el equipo entrará en
estado de emergencia/Connect the power line of the kit. This line should be permanent, if disconnected the kit will enter in emergency mode.
- Conectar el cable del LED indicador de carga en el conector del kit con la polaridad adecuada. El LED de señalización debe instalarse en la luminaria o cerca de ella
de forma que sea visible desde fuera. Hay que hacer un oricio para colocar la mirilla soporte del LED/Connect the cable with LED indicated the battery charging
to the connector in kit. The LED of signaling must be installed in or near the luminaire so that it is visible from the outside to check that the battery is in charge. It is
necessary to make a hole to place de LED support window.
- Conectar la batería en el conector del kit vericando la polaridad indicada. Si se instala en el interior de la luminaria debe alejarse de los focos de calor/Connect the
battery to the connector of kit verifying the correct polarity. If it is installed inside the luminaire, it must be kept away from the heat sources.
- Conectar la alimentación de red a la instalación y vericar que el LED se ilumina en verde/Switch on the mains power and verify that the green LED is on.
- Las baterías se suministran descargadas/Batteries are supplied discharged.
FALLO DE RED/POWER FAILURE:
El kit entra en estado de emergencia. El LED se apaga. En modo de conexión permanente, el kit desconecta el driver de la luminaria y la alimenta a partir de la batería,
regulando una potencia de 3,5W. En modo no permanente, el kit alimenta a la luminaria, encendiéndose ésta y regulando una potencia de 3,5W/The kit enters in
emergency mode. The LED goes o. In maintained mode, the kit disconnects the driver and illuminates the lamp with battery power, regulating power to 3,5W. In non-
maintained mode, the kit feeds luminaire, this being turned on and also providing power of 3,5W.
LED verde parpadenando/Green LED blinking: signica que la conexión de la lámpara LED no es adecuada (lámpara LED 8V - 33V) o que la lámpara se
ha desconectado. Se restablece subsanando la anomalía y dando tensión de red y después quitándola (modo emergencia) o pulsar el pulsador (opcional)/
It means that LED lamp of the luminaire is disconnected or LED lamp is inadequate for the KIT (LED lamp 8V-33V). To solve this, switch power o connect
or replace the LED lamp, power on & press test button to check (optional).
TEST DE VERIFICACIÓN/VERIFICATION TEST:
Conectando un pulsador o a través de Telemando. Aún estando la red presente, el kit entra en estado de emergencia, alimentando la luminaria a partir de la batería.
Al soltar el botón de test, sale del estado de emergencia y vuelve al funcionamiento normal con red/By connecting a test button or via Telemando. Even with the mains
present, the kit enters an emergency state, feeding the luminaire from the battery. When the test button is released, it exits the emergency state and returns to normal
operation.
PUESTA EN REPOSO/STAND -BY:
En estado de emergencia si pulsamos el pulsador durante 3 segundos o a través del Telemando pulsando ‘ON’ 3 segundos, el kit apaga la luminaria. Si volvemos a
pulsar 3 segundos, se produce el reencendido/In emergency stage if you press the test button for 3 seconds or by pressing ‘ON’ on Telemando during 3 seconds, the
kit switches o the luminary. If we press again for 3 seconds, it returns on emergency mode again.
- Asegurar que la red y batería están desconectadas/Make sure the mains supply and battery is switched o.
- La batería debe ser reemplazada cuando su duración sea inferior a la autonomía asignada/Batteries should be changed once their duration gets inferior to the assigned.
- Los kits deben ser revisados por lo menos una vez al año por personal cualicado/The kits should be checked at least once a year by qualied technicians.
- Vericar siempre que la tensión de red de la instalación es del valor adecuado a la entrada del kit/Always verify the mains voltage is adequate to the input voltage of kit.
- Las baterías y equipos sustituidos deben ser reciclados de forma adecuada/Batteries and equipment should be re-cycled in adequate way.
TRQ se reserva el derecho de modicar las características de los productos sin previo aviso/TRQ reserves the right to modify the characteristics of the products without prior notice.
CONEXIÓN TELEMANDO/TELEMANDO CONNECTION
This manual suits for next models
1
Table of contents
Other TRQ Lighting Equipment manuals

TRQ
TRQ L-100 E LED AT User manual

TRQ
TRQ L-500 E LED AT User manual

TRQ
TRQ SOL Series User manual

TRQ
TRQ SIRAH LED Series User manual

TRQ
TRQ ALYA 25 EM PRO AT User manual

TRQ
TRQ EMERGENCY ORION EFS-100 LED AT User manual

TRQ
TRQ EYE-3W User manual

TRQ
TRQ PH V2 AT ECO LED Seres User manual

TRQ
TRQ MIZAR SP AT IP65 User manual

TRQ
TRQ K-501 User manual


