Vax Home Pro User manual

-- ---
Version 1.1
Vax Ltd., Kingswood Road, Hampton Lovett, Droitwic , Worcesters ire, WR9 OQH, UK
email: [email protected] - website: vax.co.uk
S6S Home ro steam cleaner UG 28.02.13_User guide 07/03/2013 11:41 Page 12

vax.co.uk S6S series
Vax Carel ne: (UK) 0844 412 8455
(ROI) 1-800 928 308
User Guide
Steam Cleaner
Home Pro
Get clean ng...
What’s your Vax model number? (Located on the flap of the packag ng)
What’s your ser al number? (Located on the base of the mach ne)
Note these down n case you need them n future. Please keep nstruct ons for further use.
– – – – –
e.g. S6 S
S6S Home ro steam cleaner UG 28.02.13_User guide 07/03/2013 11:41 Page 1

Mac ine Overview
2
Un t
4
123
7
6
5
8
10 11 12 13
15
16
23
19
20
21
22
17
14
Accessor es
9d
9c
9b
Tool storage
NOTE: Items 10-17 are stored
onboard at the rear of the un t.
1 Carry handle
2 Water tank l d
3 On/off button
4Steam ready (green LED)
5 Water heat ng (orange LED)
6 Var able steam d al
7 Hose nlet
8Tool storage (h dden)
9 Steam handle and hose
a) Extens on tube release
b) Safety latch (h dden)
c) Steam tr gger
d) Detergent tank cap
e) Detergent control d al (h dden)
10 Metal brush
11 Deta l nozzle
12 Small plast c brush
13 Large plast c brush
14 Scraper tool
15 Concentrat on nozzle
16 W ndow squeegee/upholstery tool
17 Velcro m crof bre pad (x1)
18 Tr angular floor head
19 Measur ng jug
20 Funnel
21 3pc extens on tubes
22 Upholstery tool cloth (x2)
23 Carpet gl der
24 Cool ng base
18
9a
24
9e
S6S Home ro steam cleaner UG 28.02.13_User guide 07/03/2013 11:41 Page 2

General Safety Information
vax.co.uk 3
FOR HOUSEHOLD USE ONLY.
When us ng the steam cleaner, bas c safety precaut ons should always be
observed, nclud ng the follow ng:
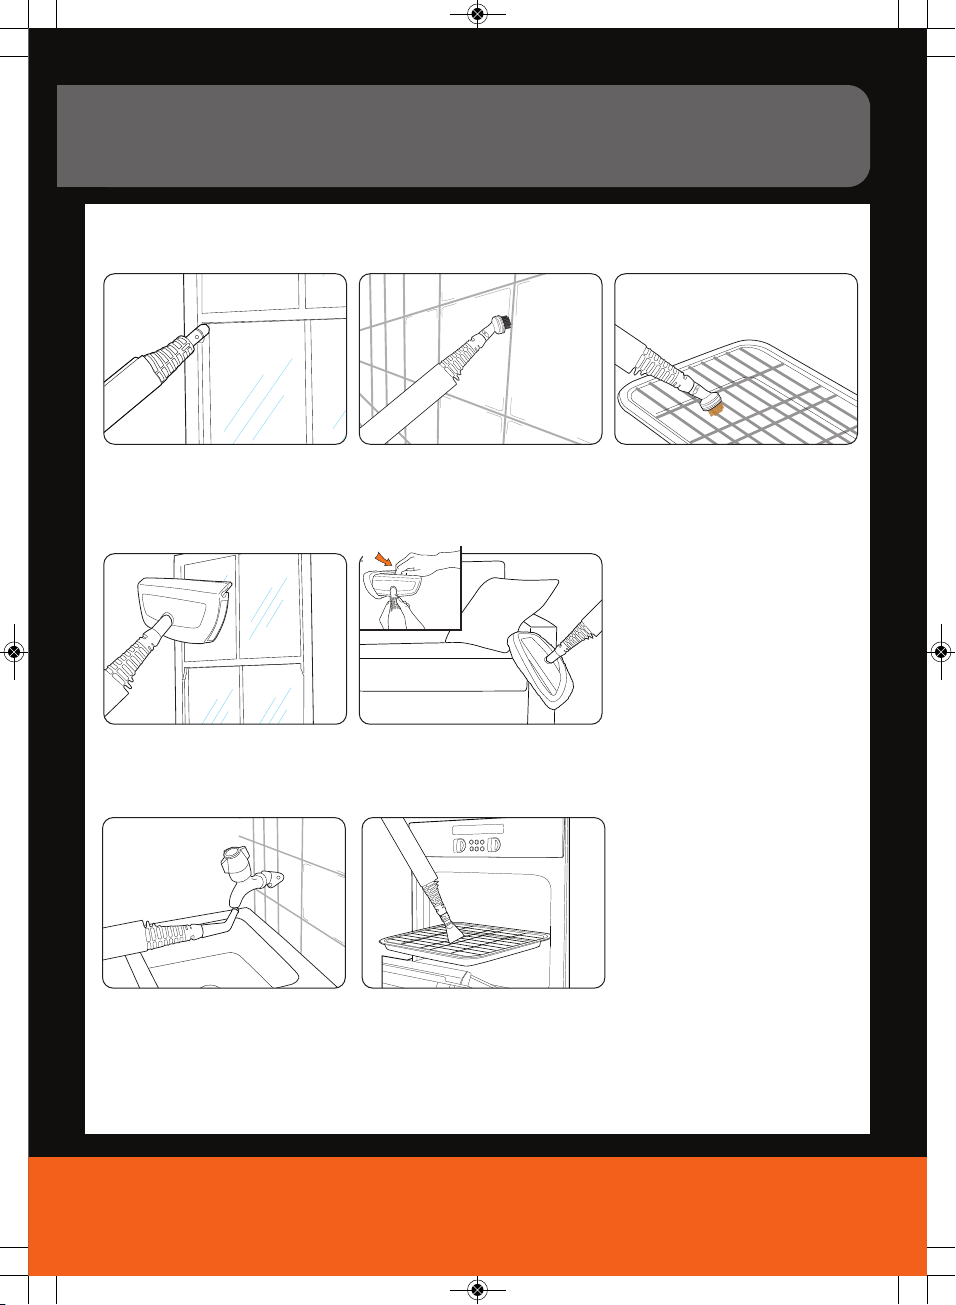
IMPORTANT: Please refer to floor manufacturer’s care recommendations
before use and test t e steam mop on a discrete area of flooring to
begin wit .
WARNING: T e steam cleaner unit and accessories get
very ot during operation.
DANGER OF SCALDING: Avoid contact wit t e steam.
1. Do not leave the steam cleaner unattended when plugged n.
Unplug t from socket when not n use.
2. To prevent electr c shock do not use outdoors.
3. Not to be used as a toy. Close superv s on s necessary when used
near ch ldren or the nf rm.
4. Th s appl ance can be used by ch ldren aged from 8 years and
above and persons w th reduced phys cal sensory or mental
capab l t es or lack of exper ence and knowledge f they have been
g ven superv s on or nstruct on concern ng use of the appl ance n
a safe way and understand the hazards nvolved. Ch ldren shall not
play w th the appl ance. Clean ng and user ma ntenance shall not be
made by ch ldren w thout superv s on.
5. Use only as descr bed n th s manual.
6. Do not use the steam cleaner f t has been dropped, damaged, left
outdoors or dropped nto water. Do not use the steam cleaner w th
a damaged cord or plug. If the supply cord s damaged, t must be
replaced by the manufacturer or a recommended Serv ce Agent to
avo d hazard and nval dat ng the guarantee.
7. Do not pull or carry by the cord, use the cord as a handle, allow the
cord to come nto contact w th hot or sharp surfaces or close a
door on the cord.
8. Do not unplug by pull ng on the cord.
9. Do not handle the plug or steam cleaner w th wet hands.
10. Do not put any objects nto open ngs or operate w th open ngs
blocked.
11. Do not use w thout the tank cap n place.
12. Turn off all controls before unplugg ng.
13. Keep the steam cleaner on the floor.
14. Do not use an extens on cord.
15. Do not attempt to remove blockages w th sharp objects as they may
cause damage.
16. Store ndoors, put away after use to prevent tr pp ng acc dents.
17. Us ng mproper voltage may result n damage to the steam cleaner
and poss ble njury to the user. The correct voltage s l sted on the
rat ng label.
18. A hazard may occur f the steam cleaner runs over the power
supply cord.
19. The steam cleaner must be kept level dur ng operat on.
20. Never mmerse the steam cleaner n water or other l qu ds.
21. Keep the steam cleaner away from ra n and mo sture. The steam
cleaner s not su table for outdoor use.
22. Do not operate the steam cleaner w thout water n the tank.
Always top up w th water n good t me.
23. Empty the water tank when the steamer s not n use.
24. Never f ll the water tank w th anyth ng other than water. Never put
add t ves (such as perfume, sta n remover or products conta n ng
alcohol) n the water as they may damage the steam cleaner or
make t dangerous to use.
25. Always remove the ma ns plug from the electr cal socket and
allow th s steam cleaner to cool down completely before topp ng
up w th water.
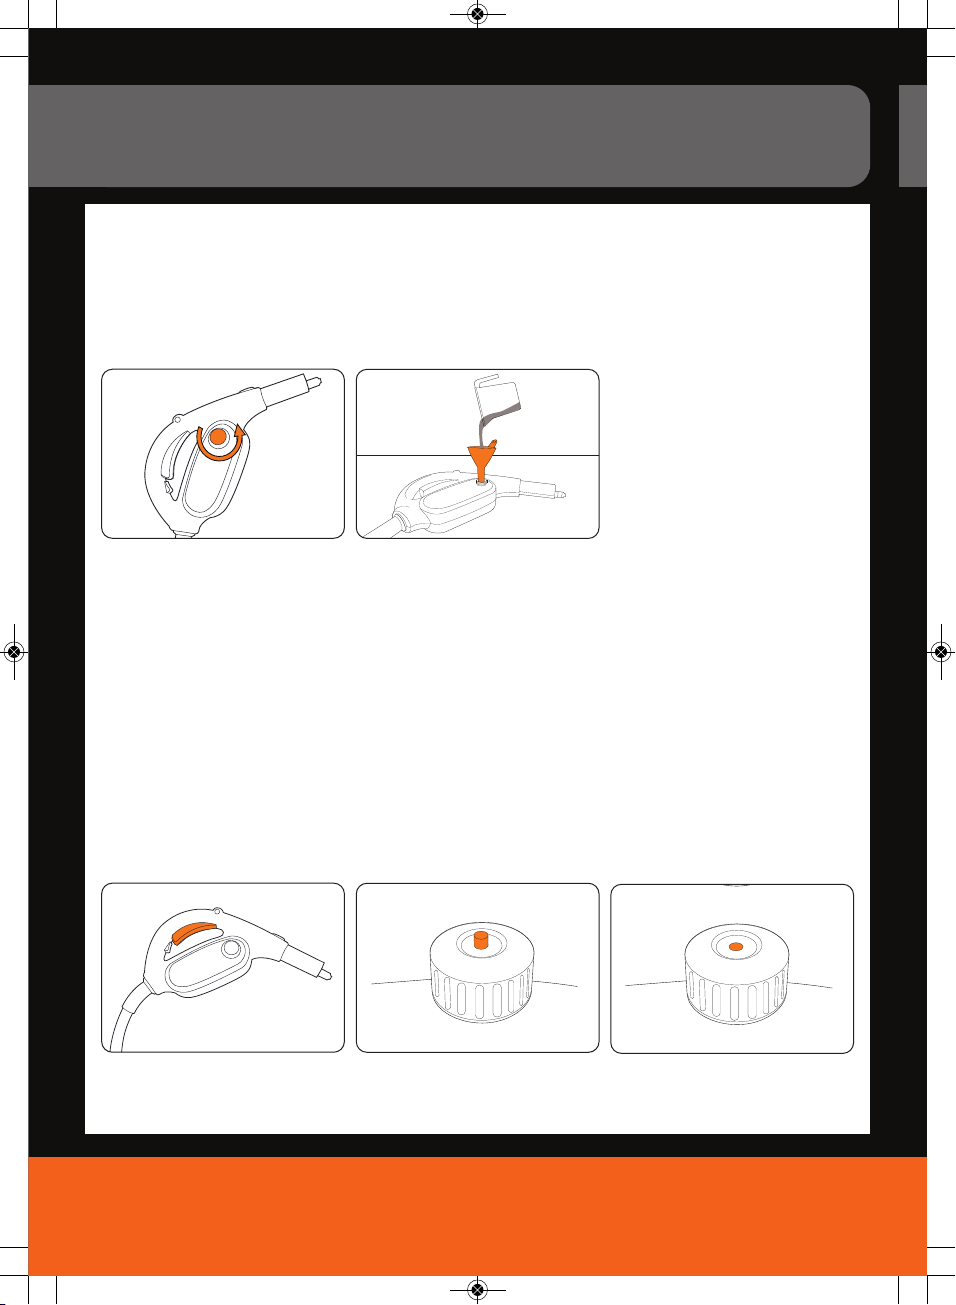
26. Do not overf ll the tank. Do not exceed the max mum prescr bed
f ll ng level. Please use the measur ng jug and funnel ncluded.
27. Ensure that the water tank cap has been screwed down fully
before use.
28. Only carry the steam cleaner by the carry handle.
29. Do not touch any hot areas on the steam cleaner. It s normal for
the steam cleaner to heat up dur ng operat on.
30. Do not use the steam cleaner to treat any tems of cloth ng that are
st ll be ng worn on the body.
31. The force and heat of the steam may have an adverse effect on
some mater als. Always check whether a surface s su table for
treatment w th the steam cleaner by carry ng out a test beforehand
on a concealed area.
32. Always nclude these operat ng nstruct ons f pass ng the steam
cleaner on to a th rd party.
33. Never a m the steam cleaner at people, an mals or plants (r sk of
scald ng)! Never touch the steam jet from a short d stance w th
your hands. Do not a m the steam cleaner at electr cal systems
or w res.
34. Please always sw tch the appl ance off and remove the ma ns plug
from the socket f leav ng the work area.
35. The steam cleaner s f tted w th a thermostat and a thermal cut-out
as protect on aga nst overheat ng.
36. Accessor es become hot dur ng use - allow them to cool down
before handl ng.
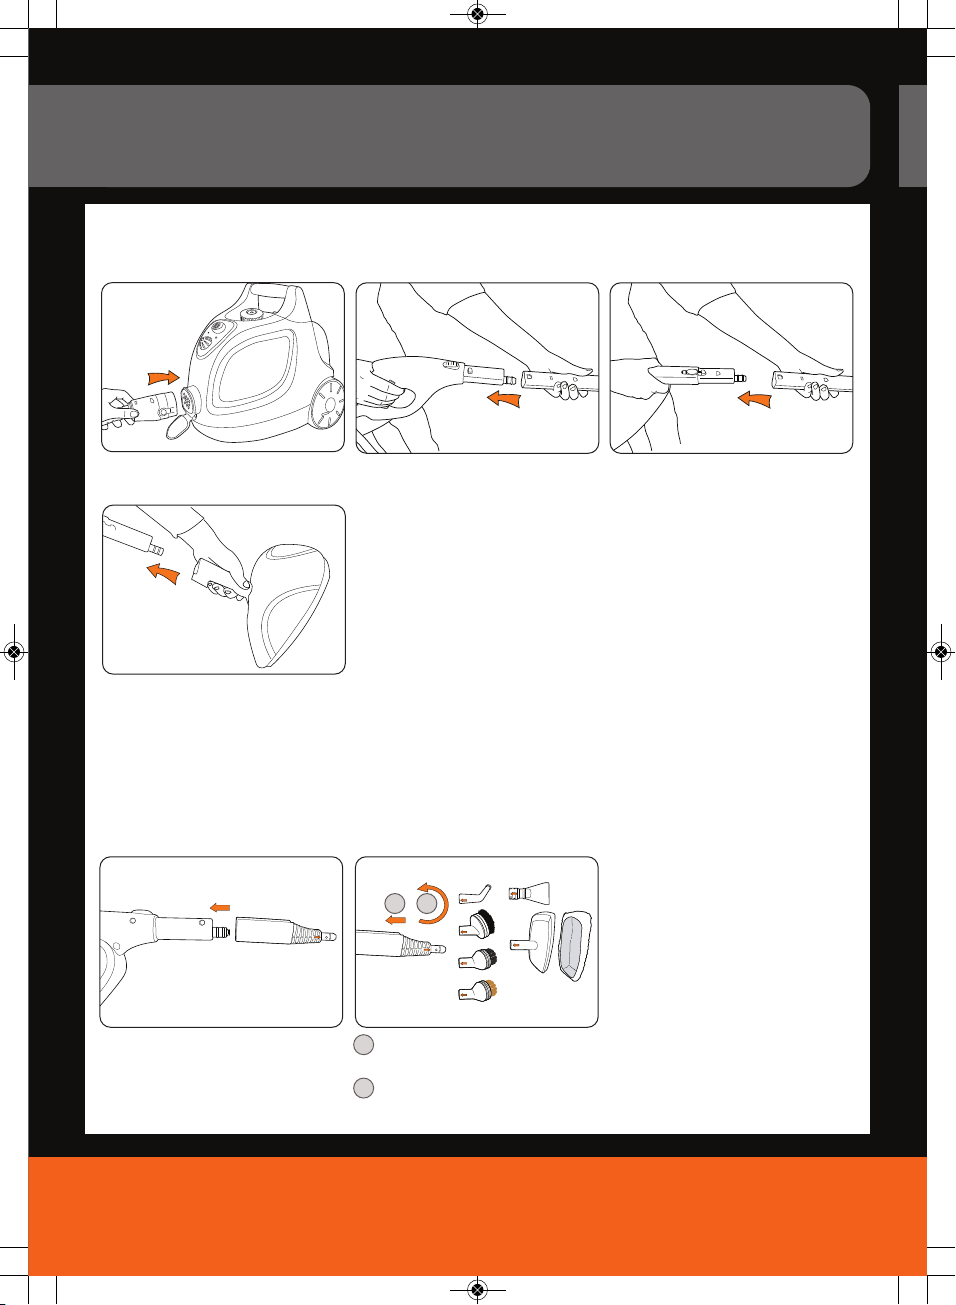
37. Please ensure all parts are correctly f tted before us ng the product.
38. Do not use your steam cleaner f damaged/faulty. Please call our
Vax Carel ne on 0844 412 8455.
39. Do not use un t on leather, wax pol shed furn ture or floors,
synthet c fabr cs, velvet or other del cate steam or water
sens t ve mater als.
40. Do not use on acryl c surfaces.
41. In wet rooms, e.g. bathrooms, connect the appl ance to sockets
w th a ser es connected RCD adaptor.
42. The dev ce should not be used to clean electr cal appl ances
such as ovens, m cro-waves, telev s ons,and electr cal heat ng
systems etc.
43. Be very careful wh le clean ng t led walls w th sockets
The l qu d or steam must not to be d rected towards equ pment conta n ng
electr cal components, such as the nter or of ovens.
T is steamer is for ouse old use only and NOT for commercial or
industrial use.
PLEASE KEEP INSTRUCTIONS FOR FURTHER USE.
S6S Home ro steam cleaner UG 28.02.13_User guide 07/03/2013 11:41 Page 3

---
Operation
4
Attach hose to un t.
Assembling your steam cleaner
Attac ing small tools
12
Push small tools onto concentrat on
nozzle al gn ng arrows.
Tw st clockw se to f t.
Concentrat on nozzle must be attached
before f tt ng the
small tools.
1
2
‘Cl ck’
Attach extens on tube to handle.
‘Cl ck’
Attach extens on tubes together.
To remove the tube/s press the wh te
release button.
Attach extens on tube to tr angular
floor head.
Attach concentrat on nozzle to handle or
extens on tube.
IMPORTANT: Do not attach/remove accessor es wh le steamer s n use.
(Hot water may dr p out of the accessory-r sk of scald ng)
S6S Home ro steam cleaner UG 28.02.13_User guide 07/03/2013 11:41 Page 4

Before you begin cleaning
Operation
vax.co.uk 5
Attac ing t e velcro microfibre cleaning pad
WARNING: To reduce the r sk of personal njury, unplug the steamer when f tt ng the clean ng pads.
IMPORTANT: Never use the steam cleaner w thout a clean ng pad attached to the floor head.
Place the tr angular floor head on top of
the velcro m crof bre pad mak ng sure the
mop head covers the ent re pad. The blue
face should be n contact w th the floor.
For use on sealed hard floors or refresh ng carpets.
IMPORTANT: Your detergent control d al w ll be set to ‘tough sta ns’ when you remove your steamer from the box. If you do not
want to use detergent on your hard floor ng/hard surfaces, th s must be rotated to the ‘steam/refreshes carpets only’ pos t on.
Always test on an nconsp cuous area of floor ng/surface f rst before us ng detergent.
IMPORTANT: Do not use hot or bo l ng water to f ll clean water tank. Do not over f ll the water tank.
IMPORTANT: Do not operate your steam cleaner w thout water n the clean water tank.
Filling clean water tank
To remove l d, rotate ant -clockw se. Us ng the measur ng jug and funnel, only
f ll up to 1.4L. Allow space to be left at
the top.
Ensure the l d s securely fastened by
rotat ng clockw se before use.
Do not overf ll.
S6S Home ro steam cleaner UG 28.02.13_User guide 07/03/2013 11:41 Page 5

--- ---
Filling detergent tank
Operation
6
IMPORTANT: Do not m x Vax detergent w th any other clean ng detergent.
Th s product can be used w th or w thout detergent.
Detergent tank s located n the hose/handle assembly.
Place the hose/handle assembly on a flat
surface. Unscrew the detergent tank cap
by turn ng ant -clockw se.
Pour 50ml of Vax detergent and 150ml of
water us ng the measur ng jug, nto the
detergent tank. Attach the detergent tank
cap and t ghten by tw st ng clockw se.*
50ml detergent plus 150ml water to 1 clean water tank.
Refilling water during operation
Press steam tr gger to release pressure. When tank s under pressure, the safety
pressure nd cator (red) w ll r se above
the surface of the l d.
When the tank s not under pressure,
the nd cator w ll be flush or below the
surface.
NOTE: Wa t 10 m nutes unt l the safety pressure nd cator has gone down, wh ch nd cates the steamer has cooled. If after th s t me
the nd cator has not fully dropped, release res dual steam pressure by press ng steam tr gger on handle and then gently push ng
the safety pressure nd cator. Slowly unscrew the tank l d ant -clockw se but do not remove. Allow steamer to cool an add t onal 5
m nutes. After you have ensured steamer has cooled and pressure has been released the water tank l d should turn freely to
remove. Remove any rema n ng water to avo d overf ll ng. Return to ‘f ll ng clean water tank’.
IMPORTANT: Turn off the steamer and unplug from electr cal socket before f ll ng up the clean water tank.
S6S Home ro steam cleaner UG 28.02.13_User guide 07/03/2013 11:41 Page 6

Steam cleaning ard floors
Operation
vax.co.uk 7
WARNING: Never leave the steam cleaner floor head n one spot on any surface for an extended per od of t me w th a damp or wet
pad attached as th s may damage the floor surface. Your steam cleaner should only be used on sealed floors nclud ng t les, l no,
wood floor ng and lam nate.
WARNING: To reduce the r sk of personal njury, unplug the steam cleaner when assembl ng the accessor es.
Do not operate the steam cleaner w thout water n the clean water tank.
Plug nto ma ns, turn on and press power
button on.
Release steam handle safety latch. To produce steam, squeeze the tr gger n
short bursts. To prevent overly wett ng
floors, do not hold down cont nuously.
After approx mately 12 m nutes
the Green LED w ll llum nate show ng
steamer s ready to use.
1 x 1.4L water tank =
40 m nute steam ng t me (approx)
Orange l ght = water heat ng
Green l ght = steamer ready to use
No green l ght = water heat ng to
max mum temperature.
(Note: you can st ll use your steamer at
th s t me).
If dur ng use the green l ght sw tches off,
th s means the steamer s heat ng up to
max mum temperature. The green l ght
w ll re-appear when t has heated back
up to max mum temperature.
Rotate var able steam d al to adjust pressure.
When clean ng sealed hard floors, move the
steamer slowly backwards and forwards
pay ng part cular attent on to h gh traff c
areas. Squeeze/release tr gger as requ red.
Orange LED w ll llum nate when water
s heat ng.
Ensure steam handle safety latch s on.
S6S Home ro steam cleaner UG 28.02.13_User guide 07/03/2013 11:41 Page 7

---
To clean wit steam detergent
Operation
8
Th s product can be used w th and w thout detergent. To use w th
detergent turn the detergent control d al to des red sett ng for the area
you want to clean. Squeeze/release tr gger to d spense detergent.
WARNING: Only use recommended Vax Steam Detergent.
The detergent can be used on sealed hard floor surfaces and some hard
surfaces only. For a full l st of surfaces detergent can be used on v s t
vax.co.uk.
Refres ing carpets
IMPORTANT: When us ng on carpets, always ensure the velcro m crof bre clean ng pad s properly attached to the floor head.
Place floor head (w th velcro m crof bre
pad attached) nto carpet gl der. Release steam handle safety latch. To produce steam, squeeze the tr gger n
short bursts. To prevent overly wett ng,
do not hold down cont nuously.
Move the steamer slowly backwards and
forwards pay ng part cular attent on to
h gh traff c areas.
REFRESH
CARPETS
DETERGENT
CONTROL
S6S Home ro steam cleaner UG 28.02.13_User guide 07/03/2013 11:41 Page 8

Operation
vax.co.uk 9
Using t e small tools
Concentration nozzle
Use to remove soap scum n baths and
shower enclosures and to clean heav ly
so led areas n k tchens.
Brus es
Ag tate stubborn grease and gr me.
Metal brus
For oven gr lls and racks.
Window squeegee tool
Great for leav ng your w ndows, t les and
m rrors gleam ng.
Up olstery tool
Attach the cloth to the squeegee tool for use
on upholstery and clothes. Do not use
detergent on fabr cs and upholstery.
IMPORTANT: Test for colour fastness n
a small h dden area of upholstery/fabr c
to check for colour removal before use.
IMPORTANT: Test a h dden area
before use. Do not use
on non-st ck surfaces.
Detail tool
For hard to reach areas e.g. around taps.
Scraper tool
Ideal for remov ng dr ed on res due
from n oven gr lls, work surfaces
and pans.
S6S Home ro steam cleaner UG 28.02.13_User guide 07/03/2013 11:41 Page 9

---
Maintenance (Keep your Vax as good as new)
10
Emptying t e clean water tank
Emptying t e detergent tank
Hold corner of pad down w th foot and
peel un t away.
IMPORTANT: Allow the un t to fully cool down before perform ng any ma ntenance or troubleshoot ng checks.
Removing t e velcro microfibre cleaning pad
IMPORTANT: Allow the un t to fully cool down before perform ng any ma ntenance or troubleshoot ng checks.
Empty un t of any rema n ng water.
To remove l d, rotate ant -clockw se. Ensure detergent tank s empt ed and r nsed out
w th tap water after each use.
S6S Home ro steam cleaner UG 28.02.13_User guide 07/03/2013 11:41 Page 10

vax.co.uk 11
Maintenance (Keep your Vax as good as new)
Cleaning t e pads
IMPORTANT: Never use bleach or fabr c softener when wash ng the clean ng pad.
Mach ne washable at warm temperature (40˚C max). Always use a m ld detergent.
Allow to fully dry before use (24 hours) or tumble dry on a low heat.
1
2
After steamer use/using cooling base/storage
Ensure steam handle safety latch s on.
Press steam tr gger to release steam. Empty un t of any rema n ng water.
IMPORTANT: To ma nta n your steam cleaner’s performance, turn the un t off at the plug and hold steam tr gger down to
release rema n ng steam pressure. Wa t for un t to completly cool down before carry ng out any ma ntenance work. Ensure
the water tank has been fully empt ed and detergent tank r nsed. The un t should be w ped down w th a dry cloth before
storage.
IMPORTANT: Steam cleaner must have cooled down before stor ng.
Hose can be hung up or loosely stored n
box. Hose must not be t ghtly wound
dur ng storage.
To avo d damage to your floors, unplug
the un t and place floor head on cool ng
base unt l product cools. Once cooled,
remove steamer pad and follow
‘cleaning t e pads’ sect on.
Ensure detergent tank s empt ed and
r nsed out w th tap water before stor ng
your un t.
S6S Home ro steam cleaner UG 28.02.13_User guide 07/03/2013 11:41 Page 11

---
12
FAQs
WARNING: to reduce t e risk of personal injury, unplug t e steamer and ensure unit as fully cooled down
before performing maintenance/troubles ooting c ecks.
Wat do I do if t e mac ine/an accessory as become
damaged or broken?
• V s t vax.co.uk for spares and parts.
• Please call our Carel ne to purchase new spares or order a
replacement.
W at to do if t e steam cleaner as no power?
• The un t may not be plugged nto an electr cal socket;
ensure the plug s pushed n securely.
• Check the ma ns power s sw tched on.
• The electr cal socket may not be work ng; check the fuse
or breaker and consult an electr c an.
• The power cord may be damaged; f t s t must be
replaced by the manufacturer, or a Vax author sed
serv ce agent.
W y is t e steam cleaner not producing steam?
• Ensure that the ma ns power s sw tched on and the power
button has been pressed on the un t.
• There may be no water n the tank; please refer to the
operat on sect on.
• Check that the safety latch has been unlocked on the
steam handle.
• Check that the un t has not been overf lled, as there must
be space n the tank for the water to heat. If overf lled the
un t w ll del ver l ttle steam or water droplets.
• The water may not yet be at temperature; the green steam
ready nd cator l ght w ll llum nate when the water s at
temperature and s ready to use.
• If the un t s produc ng a very small amount of steam,
check the var able steam power d al and adjust to max.
• If none of the po nts above are of ass stance, we’re here
to help. S mply call us on: 0844 412 8455
• When the un t has been sw tched off and fully cooled
remove the water tank l d. If l mescale bu ld up can be
seen ns de the tank the un t w ll need to be descaled.
Wat do I do if t e steam cleaner takes a long time to
eat up?
• When the un t has been sw tched off and fully cooled
remove the water tank l d. If l mescale bu ld up can be
seen ns de the tank the un t w ll need to be descaled.
• Otherw se, we’re here to help. S mply call us on:
0844 412 8455
we’re here if you need us
(UK) 0844 412 8455
(ROI) 1-800 928 308
vax.co.uk/support
vaxireland.ie
or call:
Instead of taking me back to the shop, simply visit;
This does not a ect your statutory rights.
S6S Home ro steam cleaner UG 28.02.13_User guide 07/03/2013 11:41 Page 12

Ot er Information
vax.co.uk 13
UK Service & Help
Any quer es or concerns about us ng your Vax, s mply v s t; vax.co.uk/support - vax reland. e or, call the Vax Carel ne. Calls are
charged at the UK local rate. Please make a note of the ser al number and model number of the steam cleaner before call ng.
Vax Carel ne:
(UK) 0844 412 8455
(ROI) 1-800 928 308
Monday-Fr day 8.30am to 6.30pm
Saturday 9.00am to 5.00pm
Consumables
To purchase spares and accessor es, please v s t vax.co.uk/support
The use of genu ne Vax spare parts helps to ma nta n opt m sed
performance and val dates your guarantee.
Velcro m crof bre clean ng pads (Type 1): 1-1-131448-00
Coral clean ng pad (Type 3): 1-1-131643-00
Vax steam detergent: 1-9-131627-00
Guarantee w ll only be val d w th the use of genu ne Vax spares and accessor es.
Tec nical Specification
Voltage: 220 – 240 v ~ 50Hz
Wattage: 1600W
Water tank capac ty: 1.6L (1.4L useable)
Detergent tank capac ty: 0.2L
Cord length: 8.0m
We ght: 4.7kg
Subject to techn cal change w thout not ce.
EEC Statement of Compliance
Manufacturer/EEC mporter: Vax L m ted, hereby on our own respons b l ty, declare that the S6S ser es s manufactured n
compl ance w th the follow ng D rect ves:
Safety: 2006/95/EC Low Voltage D rect ve
EMC: 2004/108/EC Electromagnet c Compat b l ty D rect ve
Waste electr cal products should not be d sposed of w th household waste. Please recycle where fac l t es ex st. Check w th
your Local Author ty or reta ler for recycl ng adv ce.
S6S Home ro steam cleaner UG 28.02.13_User guide 07/03/2013 11:41 Page 13

---
Notes
14
S6S Home ro steam cleaner UG 28.02.13_User guide 07/03/2013 11:41 Page 14

Notes
vax.co.uk 15
S6S Home ro steam cleaner UG 28.02.13_User guide 07/03/2013 11:41 Page 15
Other manuals for Home Pro
1
Table of contents
Other Vax Steam Cleaner manuals

Vax
Vax SteamFresh Multi S85-SF-M Installation instructions

Vax
Vax S84-W7-P Installation instructions

Vax
Vax Bare Floor Pro S2S series User manual

Vax
Vax V-084B Series User manual

Vax
Vax Mach2 VZL-6012 User manual

Vax
Vax Steam Fresh COMBI Installation instructions

Vax
Vax VS102 User manual

Vax
Vax S2 Series User manual

Vax
Vax Home Pro User manual

Vax
Vax V-084 User manual