Vax Total Home Pro S7-A Plus User manual

Vers on 1.0
Vax Ltd., K ngswood Road, Hampton Lovett, Dro tw ch, Worcestersh re, WR9 OQH, UK

vax.co.uk
Performance is everything.
S7-A+
Multi-function steam cleaner
User Guide
Total
Home Pro

2
Accessories
Vax Carel ne: (UK) 0844 412 8455
(ROI) 1-800 928 308
Unit
1 Handle
2 Upper cord clip
3 Power cord
4Lower cord clip
5 Clean water tank
6 LED indicator
a) Water eating/power on
(blue LED)
b) Steam ready
(blue LED) + (green LED)
7 Floor ead
8 Steam release trigger
9 Velcro microfibre cleaning pads x 2
(dependant on model)
10 Carpet glider
11 Cooling base
12 Pro Clean Pad
13 Window squeegee/Up olstery tool
14 Hose
15 Concentration nozzle
16 Accessories storage bag
17 Window clot
18 Grout brus
19 Scraper tool
20 Detailer tool
21 Small plastic brus
22 Large plastic brus
23 Metal brus
24 BBQ brus
25 S oulder strap
26 Accessories connector
1
2
4
3
5
6
7
8
910 11 12
13 14 15 16
25 26
17
18 19 20 21 22 23 24
Mach ne Overv ew

vax.co.uk 3
Th s steam mop s ntended for household use only and NOT
for commerc al or ndustr al use.
IMPORTANT: Please refer to floor manufacturer’s care recommendat ons
before use and test the steam mop on a d screte area of floor ng to
beg n w th.
W en using t e steam mop, basic safety precautions s ould always be
observed, including t e following:
WARNING: The st ck steam mop head gets very hot dur ng operat on.
WARNING: Danger of scald ng
1. Do not leave t e steam mop unattended w en plugged in.
Unplug t e product from t e socket w en not in use.
2. Only use t e steam mop indoors. Keep t e steam mop
away from rain and moisture.
3. Turn off t e on/off switc on t e steam mop controls before
disconnecting or connecting from t e mains supply.
4. Always unplug t e steam mop and allow it to cool before
connecting or disconnecting t e ose or accessories.
5. C ildren s ould be supervised to ensure t at t ey do not play
wit t e appliance.
6. T is appliance is not intended for use by c ildren under eig t
years of age and persons wit reduced p ysical, sensory or
mental capabilities or lack of experience and knowledge, unless
t ey ave been given supervision or instruction concerning use
of t e appliance in a safe way and understands t e
azards involved.
7. Cleaning and maintenance s all not be made by c ildren
wit out supervision.
8. T e appliance s ould only be used as described in t e quick start
guide or in t e full online user guide.
9. Only Vax recommended attac ments s ould be used wit
t is appliance.
10. Do not use t is steam mop if it as been dropped, damaged,
left outdoors or dropped into water. Do not use t is steam mop wit
a damaged cord or plug. If t e supply cord is damaged return t e
steam mop to a Vax aut orised Service Agent or a suitably qualified
person for examination, repair or adjustment.
11. Do not pull or carry t is appliance by t e cord. Do not use t e
cord as a andle, close a door on t e cord or pull t e cord around
s arp edges or corners. Do not run t e steam mop over t e cord.
Keep t e cord away from eated surfaces.
12. Do not unplug t e product by pulling on t e cord.
13. Do not andle t e plug or t e steam mop wit wet ands.
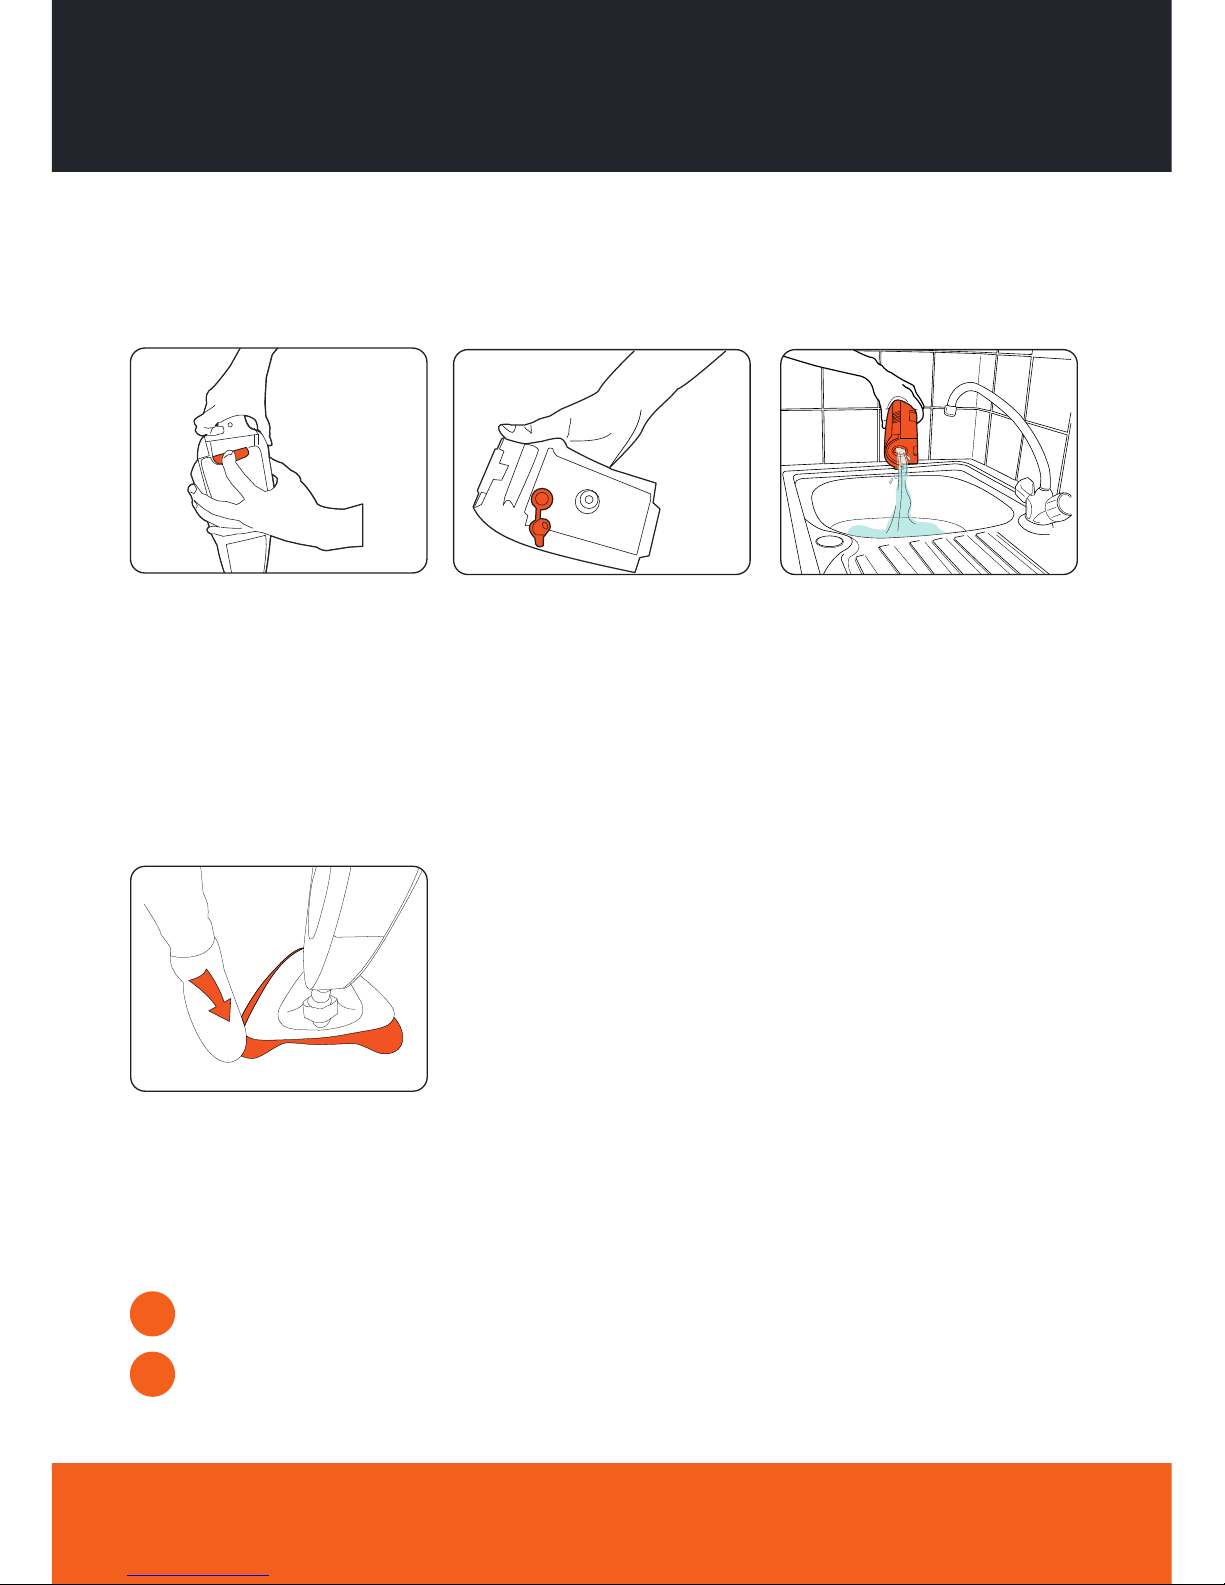
14. Do not use wit out t e tank cap in place. Ensure t at t e water
tank cap as been screwed down fully before use.
15. Do not touc any ot areas on t e steam mop. It is normal
for t e steam mop to eat up during operation.
16. Accessories will become ot during use – allow t em to cool
down before andling.
17. Do not use t e steam mop to treat any items of clot ing t at
are still being worn on t e body.
18. T e force and eat of t e steam may ave an adverse effect on
some materials. Always c eck w et er a surface is suitable for
treatment wit t e steam by carrying out a test before and on
a concealed area.
19. T e steam mop must be kept level during operation.
20.Never immerse t e steam mop in water or in ot er liquids.
21. Do not operate t e steam mop wit out water in t e tank.
Always top up wit water in good time.
22. Always remove t e mains plug from t e socket and allow t e
steam mop to cool down completely before topping up
wit water.
23. Never aim t e steam mop at people, animals or plants (t ere
is a risk of scalding). Never touc t e steam jet from a s ort
distance wit your ands. Do not aim t e steam mop at
electrical items or wires.
24. Keep air, loose clot ing, fingers and all parts of t e body away
from openings.
25. Never fill t e water tank wit anyt ing ot er t an water. Never
put additives (suc as perfume, stain remover or products
containing alco ol) in t e water as t ey may damage t e steam
cleaner or make it dangerous to use.
26. Only carry t e steam mop by t e carry andle.
27. Store t e steam mop in a cool, dry area.
28. Do not use an extension cord wit t is product.
29. Using improper voltage may result in damage to t e steam
cleaner and possible injury to t e user. T e correct voltage is
listed on t e rating label.
30. Do not use your steam mop if it is damaged or faulty. Please
make sure t at t e product is unplugged from t e mains and call
t e Vax Careline on 0844 412 8455.
31. Do not use t e unit on leat er, wax polis ed furniture or floors,
synt etic fabrics, velvet or ot er delicate steam or water
sensitive materials.
32. Do not use on acrylic surfaces.
33. In wet rooms, e.g. bat rooms, connect t e appliance to sockets
wit an RCD adaptor connected in series.
34. T e device s ould not be used to clean electrical appliances
suc as ovens, microwaves, televisions and electrical eating
systems etc.
35. Be very careful w en cleaning tiled walls wit sockets.
36. Keep t e unit on t e floor.
37. Empty t e water tank w en t e steam mop is not in use.
38. Do not overfill t e tank. Do not exceed t e maximum prescribed
filling level. Please use t e measuring jug and funnel included.
39. Always s ow t ese instructions to a t ird party if you are passing t e
steam mop on to t em.
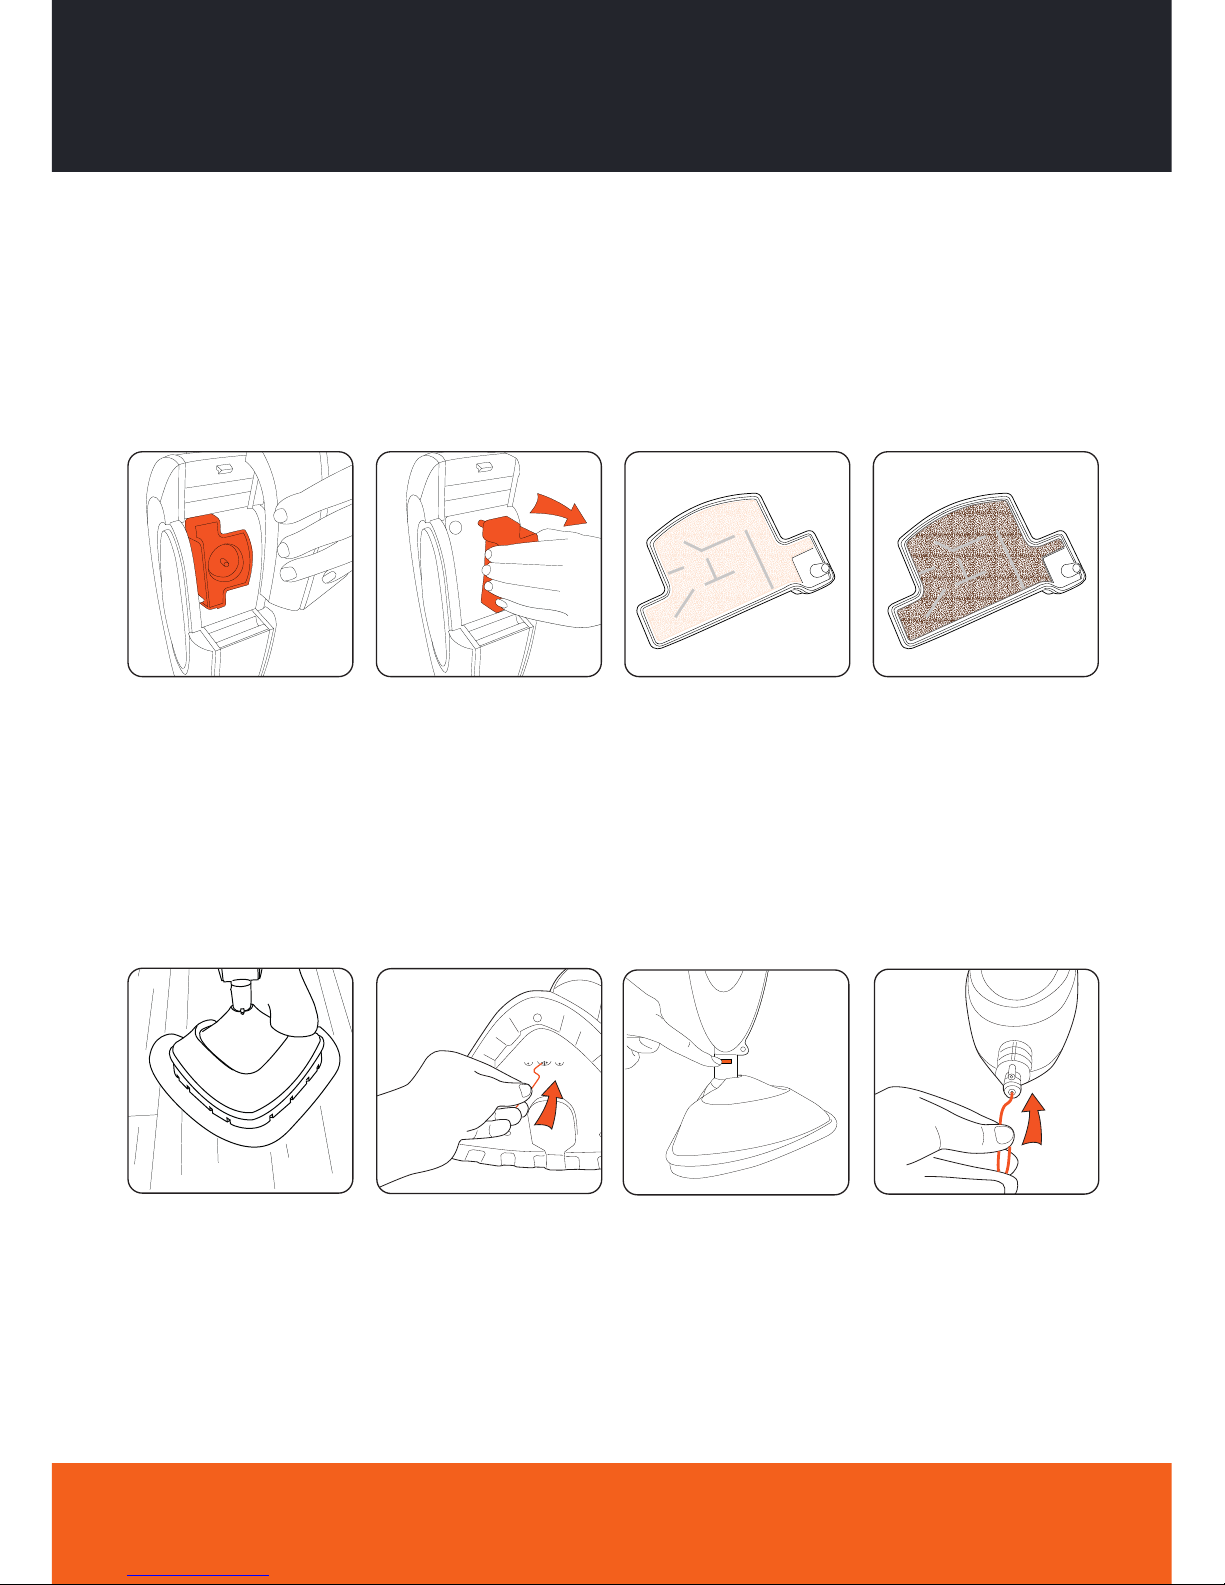
40. Please ensure all parts are correctly fitted before using t e product.
41. Do not attempt to remove blockages wit s arp objects as t ey may
cause damage.
42. Do not use wit out t e ard water filter in place.
43. Take extra care w en cleaning on t e stairs.
44. Keep cleaning area well lit.
45. Please refer to t e manufacturers care recommendations before use
and test t e steam mop on a discrete area of flooring to begin wit .
WARNING: Always switc off and unplug t e steam mop from t e
electrical outlet before assembling, opening or empting t e water tank,
or before connecting/disconnecting t e attac ments.
IMPORTANT: T e liquid or steam must not be directed towards equipment
containing electrical components, suc as t e interior of ovens.
IMPORTANT: T e steam mop is equipped wit a t ermostat and a t ermal
cut-out. If for any reason t e unit s ould over eat, t e t ermostat will
automatically turn t e unit off. S ould t is occur, unplug t e steam mop
from t e electrical outlet and turn off t e switc . Let t e unit cool, remove
and empty t e water tank. To re-start t e mac ine, plug it into an electrical
outlet and switc it back on.
PLEASE KEEP INSTRUCTIONS FOR FURTHER USE.
General Safety Informat on

Insert andle into main body. Line
up t e metal locking pin wit t e
ole and click into place.
Fit t e body of t e unit into t e
steam mop floor ead. Line up t e
w ite plastic locking pin wit t e
ole and click into place.
Attac t e velcro microfibre
cleaning pad to steam mop floor
ead. T e blue face of t e cleaning
pad s ould be in contact wit t e
floor.
Assembl ng your st ck steam mop
4Vax Carel ne: (UK) 0844 412 8455
(ROI) 1-800 928 308
WARNING: To reduce t e risk of personal injury, unplug t e steam mop w en assembling.
Operat on

Before you beg n clean ng
WARNING: To reduce t e risk of personal injury, unplug t e steam mop w en assembling t e accessories.
IMPORTANT: Never use t e stick steam mop wit out t e microfibre cleaning pad correctly attac ed
to t e floor ead.
Remove clean water tank by
pressing t e quick release button.
IMPORTANT: Do not use ot or boiling water to fill clean water tank. Do not overfill t e water tank.
Attach ng the clean ng pad
ab
NOTE: Always ensure t ere is water in t e clean water tank.
Hold corner of pad down wit foot
and peel unit away
Velcro m crof bre clean ng pad (dependant on model)
Remove t e water cap and pour
in 400ml of clean water. Replace
t e water cap.
Replace t e clean water tank,
clicking in place making sure t e
ard water filter is place.
vax.co.uk 5
Blue LED will illuminate w en t e unit is switc ed
on at t e plug, t e power button is pressed and t e
water is eating.
Blue LED +Green LED will illuminate wit in 1
minute indicating t at t e steam mop is ready to
use. T e Green LED will go off w en unit water is
re- eating.
a
b
Operat on

Operat on
Steam clean ng hard floors
Refresh ng carpets
IMPORTANT: W en using on carpets, always ensure t e microfibre cleaning pad is properly attac ed to t e
floor ead.
IMPORTANT: To reduce t e risk of personal injury, unplug t e steam mop w en assembling t e accessories.
Plug into mains, press on
button on t e main body.
A blue lig t s ows unit is
on and eating.
Wait until green lig t
appears (wit in 1 minute).
To recline t e unit place
foot on floor ead and
tilt andle.
To produce steam squeeze
t e trigger in s ort bursts.
To prevent overly wetting
floors, do not old
down continuously.
Move t e steam mop slowly
backwards and forwards
across t e floor paying
particular attention to ig
traffic areas.
Place unit into
carpet glider.
To recline t e unit place
foot on floor ead and
tilt andle.
To produce steam squeeze
t e trigger in s ort bursts.
To prevent overly wetting
carpet, do not old down
continuously.
Move t e steam mop slowly
backwards and forwards
across t e floor paying
particular attention to ig
traffic areas.
6Vax Carel ne: (UK) 0844 412 8455
(ROI) 1-800 928 308
WARNING: Never leave t e stick steam mop in one spot on any surface for an extended period of time wit a damp or
wet microfibre cleaning pad attac ed as t is may damage t e floor surface. Your stick steam mop s ould only be used
on tiles, lino, sealed wood flooring including sealed laminate.
WARNING: Do not operate/use stick steam mop wit out water in clean water tank.
IMPORTANT: For 1 x 400ml water tank = 12 minutes steaming time (approx).
WARNING: Please refer to t e manufacturers care recommendations before use and test t e steam mop on a
discrete area of flooring to begin wit .
IMPORTANT: Please refer to floor manufacturer’s care recommendations before use and test t e steam mop on
a discrete area of flooring to begin wit .

WARNING: To reduce t e risk of personal injury, unplug t e steam mop w en assembling t e accessories.
Operat on
Us ng the handheld steam mop
WARNING: Always ensure t ere is water in t e clean water tank.
Plug in unit, press on button. T e
BLUE LED will illuminate w en t e
unit is switc ed on at t e plug, t e
power button is pressed and t e
water is eating.
T e GREEN LED will illuminate
wit in 1 minute indicating t at t e
steam mop is ready to use.
Remove andle from main body by
pus ing metal locking pin and
pulling away andle.
Remove steam mop floor ead from
main body by pus ing w ite plastic
locking pin and pulling away.
vax.co.uk 7
W en using and eld steam mop
attac t e accessory connector 1 and
t en attac t e desired accessory 2.
To produced steam pus t e button
on top of t e main body
in s ort bursts.
Us ng the compact scrub brush
Place foot on outer floor ead and
gently pull away main body to
remove t e compact scrub brus .
Move steam mop back and forwards
across t e floor, getting into corners
and awkward places.

Empty the water tank
IMPORTANT: Allow t e unit to fully cool down before performing any maintenance or troubles ooting c ecks.
Remov ng the clean ng pad
IMPORTANT: Allow t e unit to fully cool down before performing any maintenance or troubles ooting c ecks.
Mac ine was able at warm temperature (max 40oc). Always use a mild detergent.
Allow to fully dry before use.
1
2
Empty any excess water over t e
sink, replace water cap and return
to t e unit.
Remove t e clean water tank by
pressing t e quick release button.
Remove t e water cap.
Clean ng the m crof bre clean ng pad
IMPORTANT: Never use bleac or fabric softener w en was ing t e microfibre cleaning pad.
Hold corner of pad down wit foot
and peel unit away.
Velcro m crof bre clean ng pad (dependant on model)
Ma ntenance (Keep your Vax as good as new)
8Vax Carel ne: (UK) 0844 412 8455
(ROI) 1-800 928 308

Steam ex aust vent. Remove microfibre pad
and inspect unit base for
blockages. If a blockage
can be seen use a small
t in object suc as a
paper-clip to try to
free blockage.
Ma ntenance (Keep your Vax as good as new)
vax.co.uk 9
Replac ng the hard water f lter
IMPORTANT: T e condition of t e filter affects t e performance of your mac ine.
C eck and c ange filter (depending on level of use). Do not operate unit wit out ard water filter in place.
Your mac ine is fitted wit a ard water filter. If you live in an area of ard water t e filter will discolour/darken
over time (2). Depending on water ardness and/or frequency of use t e filter s ould be c anged every 12
mont s, or once t e filter as completely darkened.
Hard water filter in unit. Hard water filter removed.
Clear ng blockages
IMPORTANT: Turn unit off. Allow unit to fully cool down before performing maintenance or
troubles ooting c ecks.
T ere is a small opening at t e bottom of t e trim t at goes around t e outside of t e back of t e unit.
T is opening is a steam ex aust vent s ould t e primary pat become blocked. If steam starts to escape from
t is vent you s ould:
If steam pat is still
blocked, remove steam
mop floor ead from main
body by pus ing w ite
plastic locking pin and
pulling away.
After floor ead is removed,
using a t in object suc as
a paper-clip (in t e area
s own), attempt to remove
t e blockage.

10 Vax Carel ne: (UK) 0844 412 8455
(ROI) 1-800 928 308
WARNING: To reduce the r sk of personal njury, unplug the st ck steam mop before perform ng
ma ntenance or trouble shoot ng checks.
Is there an accessory m ss ng?
• C eck t e Parts Overview page in t e guide to make sure
t e part is definitely included in your unit.
• If t e part is missing we’re ere to elp. Simply call us on:
0844 412 8455
The steam mop cleaner has no power?
• Unit may not be plugged into t e electrical outlet correctly,
ensure t e plug is pus ed in securely.
• T e electrical outlet may not be working properly, c eck
t e fuse or breaker, or consult an electrician.
• T e power cord may be damaged, if it is it must be
replaced by t e manufacturer or Vax aut orised agent
in order to avoid invalidating t e guarantee.
• W en in use if t e green lig t goes off t e unit may be
re- eating. T e lig t s ould only take 1 minute before
t is comes on again.
What do I do f an accessory/the un t has become damaged
or broken?
• Visit vax.co.uk for parts and spares.
• Please call our Carel ne to purc ase new spares or order
a replacement.
Why s the steam mop not produc ng steam?
• T ere may be no water in t e tank; please refer to t e
operation section.
• T e water tank may not be fitted correctly; please refer
to t e operation section.
• Hard water filter may be clogged and may need to be
replaced. See maintenance section.
• Steam pat may be blocked, refer to cleaning blockages
section.
Why won’t the m crof bre clean ng pad p ck up d rt?
• T e cleaning pad may already be saturated wit dirt and
needs was ing, please refer to t e maintenance section.
vax.co.uk/support
vaxireland.ie
or call:
(UK) 0844 412 8455
(ROI) 1-800 928 308
This does not aect your statutory rights
Instead of taking me back
to the shop, simply visit:
we’re here if you need us
FAQs

UK Serv ce & Help
Vax Careline:
(UK) 0844 412 8455
(ROI) 1-800 928 308
Monday-Friday 8.30am to 6.30pm
Saturday 9.00am to 5.00pm
Any queries or concerns about using your Vax, call t e Vax Careline. Calls are c arged at t e UK local rate.
Please make a note of t e serial number and model number of t e steam mop before calling. For t e nearest Service Agent,
please call t e Vax Careline or visit vax.co.uk
Consumables
To purc ase spares and accessories, please visit vax.co.uk
S7 series ard water filter kit (Type 1): 1-1-130624-01
Microfibre cleaning pads (Type 2): 1-1-130625-01
Velcro microfibre cleaning pads (Type 1): 1-1-131448-00
(dependant on model)
Coral cleaning pads (Type 3): 1-1-131643-00
S oulder strap 1-1-132373-00
Guarantee will only be valid wit t e use of genuine Vax spares and accessories.
Techn cal Spec f cat on
Voltage: 220 – 240 v ~ 50Hz
Wattage: 1600W
Water tank capacity: 0.4L
Cord lengt : 8.0m
Weig t: 2.7kg
Subject to tec nical c ange wit out notice.
EEC Statement of Compl ance
Manufacturer/EEC importer: Vax Limited, ereby on our own responsibility, declare t at t e S7-A+ is manufactured
in compliance wit t e following Directives:
Safety: 2006/95/EC Low Voltage Directive
EMC: 2004/108/EC Electromagnetic Compatibility Directive
Waste electrical products s ould not be disposed of wit ouse old waste. Please recycle w ere facilities exist.
C eck wit your Local Aut ority or retailer for recycling advice.
vax.co.uk 11
Other Informat on
Table of contents
Other Vax Steam Cleaner manuals

Vax
Vax V-084 User manual

Vax
Vax Mach2 VZL-6012 User manual

Vax
Vax V-085 Series User manual

Vax
Vax Steam Clean Multi S85-CM User manual

Vax
Vax Home Pro VX86 User manual

Vax
Vax Home Pro User manual

Vax
Vax S2 Series User manual

Vax
Vax VX36 Installation instructions

Vax
Vax Steam Grime Master VSTGM1200 User manual

Vax
Vax VMSM1500 User manual

Vax
Vax V-083 User manual

Vax
Vax SteamFresh Multi S85-SF-M Installation instructions

Vax
Vax S7 series User manual

Vax
Vax S2 Series User manual

Vax
Vax DualPower MAX User manual

Vax
Vax V-081 SERIES User manual

Vax
Vax V-081 SERIES User manual

Vax
Vax Steam Grime Master User manual

Vax
Vax S2 Series User manual

Vax
Vax S5-CM User manual