VEVOR DM21-U User manual

Technical Support and E-Warranty Certificate www.vevor.com/support
ELECTRONIC DRINK MIXER
USER’S MANUAL
Model:DM21-U/DM22-U/DM23-U
We continue to be committed to provide you tools with competitive price.
"Save Half", "Half Price" or any other similar expressions used by us only represents an
estimate of savings you might benefit from buying certain tools with us compared to the major
top brands and doses not necessarily mean to cover all categories of tools offered by us. You
are kindly reminded to verify carefully when you are placing an order with us if you are
actually saving half in comparison with the top major brands.


- 1 -
Have product questions? Need technical support? Please feel free to
contact us:
CustomerService@vevor.com
NEED HELP? CONTACT US!
This is the original instruction, please read all manual instructions
carefully before operating. VEVOR reserves a clear interpretation of our
user manual. The appearance of the product shall be subject to the
product you received. Please forgive us that we won't inform you again if
there are any technology or software updates on our product.
ELECTRONIC DRINK MIXER

- 2 -
For your safety of this product,
always read the instruction book carefully before using.
Alternating current
Connect an earth terminal to the ground
When using electrical appliances, basic safety precautions should be followed,
including the following.
1. READ ALL INSTRUCTIONS.
2. Unplug from outlet when not in use, before putting on or taking off parts,
and before cleaning.
3. Please check that the specified supply voltage in the product is consistent with
the supply voltage(AC only).
4. This appliance can be used by children aged from 8 years and above and
persons with reduced physical, sensory or mental capabilities or lack of
experience and knowledge if they have been given supervision or instruction
concerning use of the appliance in a safe way and understand the hazards
involved.
5. Children shall not play with the appliance. Cleaning and user maintenance shall
not be made by children without supervision.
6. To protect against electrical hazards, do not put the Drink Mixer in water or other
liquids
7. Avoid contact with moving parts.
8. Do not operate the Drink Mixer or any other electrical equipment with a
damaged cord or plug, or after the unit malfunctions or is dropped or damaged in
any manner. Return it to the nearest authorized service facility for examination,
repair, or adjustment.
9. Do not use outdoors. FOR HOUSEHOLD USE ONLY
10. Do not let the cord hang over the edge of the table or counter or touch hot
surfaces.
11. Put this instruction manual in a safe place. Do not discard.

- 3 -
12. If the supply cord is damaged, it must be replaced by the manufacturer, its
service agent or similarly qualified persons in order to avoid a hazard.
13. Electric Shock Danger! Non-professional personnel are forbidden to repair
the products, otherwise it may result in electrical shock. When failures happen, it
should be repaired by a qualified maintenance personnel.
14. WARNING! It is strictly prohibited to put the main body of the machine and the
power cord into any liquid. The machine must be fully cool before cleaning.
15. Do not place the product directly on the fire or near the source of fire,
otherwise the product will be damaged or even result in danger. Once part of the
product is on fire, do not directly use water to extinguish the fire. Use a wet cloth to
cover the fire site.
16. When the plug is plugged into the socket, it must be plugged to the end,
otherwise it will cause the components overheating and burning due to poor
contact.
17. Do not leave the product to work with no one watching. If the machine is
overheating, please stop working immediately and unplug the power.
SAVE THESE INSTRUCTIONS
PRODUCTS SPECIFICATIONS
PARTS AND FEATURE
Explanation of the Product's components:
Model
DM21-U
DM22-U
DM23-U
Voltage
AC 120V 60Hz
Rated Amp.
1.1A
2.0A
3.3A
Speed
3 speed setting +Pulse
Timer
8 setting 20/40/60sec; 2/4/6/8/10 min

- 4 -
1.Control Switch
2.Cup Actuator (ON/OFF)
3.Cup Support
4.Mixing Cup
5.Solid Disk Agitators
6.Moving-Wing Agitators
7.POWER ON/OFF (at Back)

- 5 -
OPERATING THE DRINK MIXER
The Drink Mixer has an automatic ON/OFF button (Cup Actuator (#2)) that starts
the motor when the mixing cup is placed in the proper position on the Cup Support
(#3). The Cup Support has two steps. To activate the automatic ON/OFF button,
the bottom of the mixing cup must be securely resting on the upper step of the Cup
Support, and the top rim of the mixing cup must go behind the front tab of the Cup
Actuator.
The motor will continue to operate while the mixing cup remains on the mixer,
activating the actuator. Removal of the mixing cup will shut off the motor.
Power ON/OFF button (#6): at the Back of Unit.
Control Switch (#1)
The 3-speed button on the front of the Drink Mixer regulates the operating speed.
Choose speed for LO, MED, or HI. For mixing heavy drinks, use HI speed only; for
light drinks with more liquid, use LO speed.
The drink mixer can be operated without engaging the ON/OFF cup actuator by
using the PULSE button. The PULSE button will operate at whatever speed the
3-speed button is set. The PULSE button will operate only while depressed.
Keep a firm grip on the cup while using PULSE.
For change agitators (#5/6), simply hold the spindle shaft with one
hand and turn the agitator in a clockwise direction. This will loosen
the screw, and you can unscrew to remove. Insert replacement
agitator and screw bottom screw back in. Use only a standard
metal mixing cup with the standard agitator.

- 6 -
KEY BUTTON
1. UP Button + (upward Arrow):
a.Used for scrolling up to set time. If holding down, time will advance by 10
seconds for every 1 second pressed. Every press will advance time 1 second
b.Used for turning timer On/Off. Press UP Button rapidly 3 times to turn timer OFF
and display "---" pressing UP Button or DOWN Button again will turn timer back on.
2. DOWN Button -- (downward Arrow):
a.Used for scrolling down to set time. If holding down, time will decrease by 10
seconds for every 1 second pressed. Every press will reduce time by 1 second.
b.Used for setting the countdown timer, holding the DOWN Button down for more
than 3 seconds puts the timer into the Set mode: S0:00.
3. Speed Button:
a.Every press will increase the speed from Lo to Hi. This is circular, so 3 presses
get you back to Lo.
4. Pulse/STOP Button:
a.Press and hold Pulse Button and the mixer runs at the set speed until button is
released.
b.Pressing the Pulse/STOP button will stop the motor while Cup Actuator engages
the motor. Re-pressing will restart the motor again.
Timer range: 0:01-9:59
TIMER SETTING
To activate the timer, press UP or Down button once. Timer will read
(R0:00). To deactivate timer, press UP button 3 times rapidly.
Manual COUNTDOWN Timer Setting
1. To activated Timer and in the ON position (R0:00).
2. Press and hold the DOWN button for 3 seconds to enter the SET mode (display
will blink during SET mode), S0:00.
3. Use UP and DOWN buttons to set the desired time.
4. Wait 5 seconds and time will be set.
5. To reset time, press and hold UP and DOWN buttons simultaneously for 3
seconds.
Auto SAVE Timer SETTING
1. To activated Timer and in the ON position (R0:00).

- 7 -
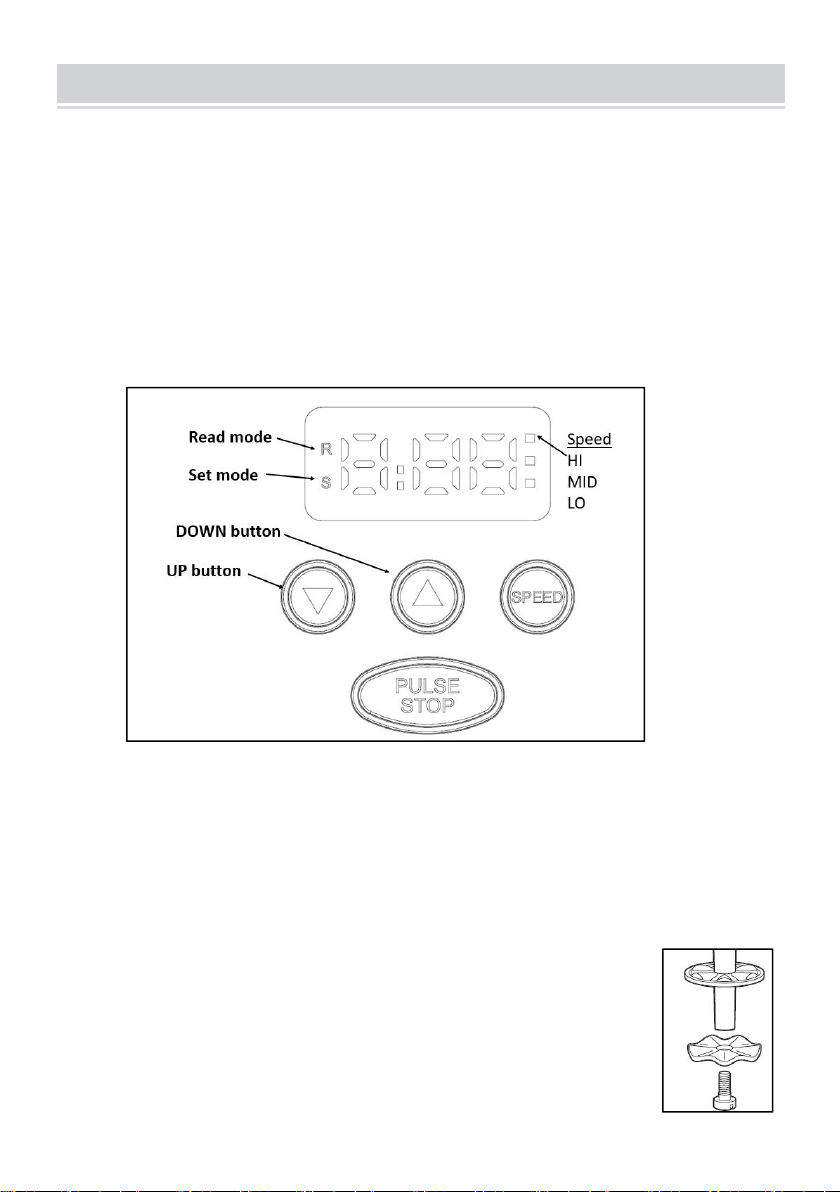
2. Place the cup and actuate Motor. Timer will begin to count up.
3. Remove the cup when your mix has reached its desired consistency.
4. Press and hold the UP button for 3 seconds to set the time OR replace the cup
within 10 seconds to continue the count.
NOTE: If cup is removed during countdown or count-up, the timer will pause and
blink for 10 seconds. Replace the cup within the 10 seconds to continue, or
timer will return to set time.
The timers will need to be set individually if more than one timer in unit.
Your Drink Mixer timer can be programmed manually or set while the unit is in
use.
CLEANING
● TURN UNIT OFF USING POWER SWITCH LOCATED ON BACK OF UNIT, OR
UNPLUG MIXER POWER CORD FROM ELECTRICAL OUTLET.
● DO NOT PUT IT IN THE DISHWASHER
● DO NOT IMMERSE APPLIANCE IN WATER OR OTHER LIQUID.
1. To clean the drink mixer, wipe with a damp cloth or spongy. Do not use abrasive
cleaners of any type.
2. To clean the mixing shaft, place 200ml warm, soapy water in Mixing Cup and
place it on the mixer's normal operating position. Run on LO speed for 30
seconds—empty Cup. When finished, turn the unit OFF.
3. Repeat Step 1 with warm water only to rinse mixer shaft.
4. With unit turned to OFF, unplug unit and wipe residual soap and water from the
mixing shaft with a damp cloth or sponge.
5. The Mixing Cup should be washed in warm, soapy water or in a dishwasher.
HELPFUL HINTS
1. Always turn unit off or unplug the Drink Mixer before disassembling or
assembling parts.
2. Keep all the instructions and service information in a safe and handy place.
3. If using ice, only use crushed ice in the Drink Mixer.
4. Clean the Drink Mixer thoroughly before initial use.
5. Keep mixing cups clean. Wash, rinse and sanitize thoroughly after use.

- 8 -
6. Be sure that all detachable parts are fastened tightly before operating the Drink
Mixer.
7. Operate the Drink Mixer only when it is fully assembled.
8. To avoid splashing drinks of thin consistency, operate on Speed LO.
Any other servicing should be performed by an authorized service representative.
TROUBLESHOOTING GUIDE
Problem
Solution
1
Ingredients are not being mixed
Properly
Try select a different speed.
2
Motor does not turn on when Cup
is set on Cup Support
● Cup is not tall enough to activate
motor switch.
● The unit features a thermal
overload protection circuit. Turn
unit OFF, wait 30min. Then turn on
again.
3
Excessive product splash-out
(Some splash-out is common)
● Ingredients too full
● Speed setting too high for
ingredients
● Agitator fastened tightly to the
spindle
● Agitator bent or worn.
Made In China

This manual suits for next models
2
Table of contents
Other VEVOR Kitchen Appliance manuals

VEVOR
VEVOR CZ-5 User manual

VEVOR
VEVOR DM11-U User manual

VEVOR
VEVOR CS-2-EU User manual

VEVOR
VEVOR SC-1 User manual

VEVOR
VEVOR EZL-EH-30S-E User manual

VEVOR
VEVOR SP354003S User manual

VEVOR
VEVOR MHTJJPZY01 User manual

VEVOR
VEVOR G-SKU1 User manual

VEVOR
VEVOR YD-302C-B-Z User manual

VEVOR
VEVOR JS-75-GD-01 User manual