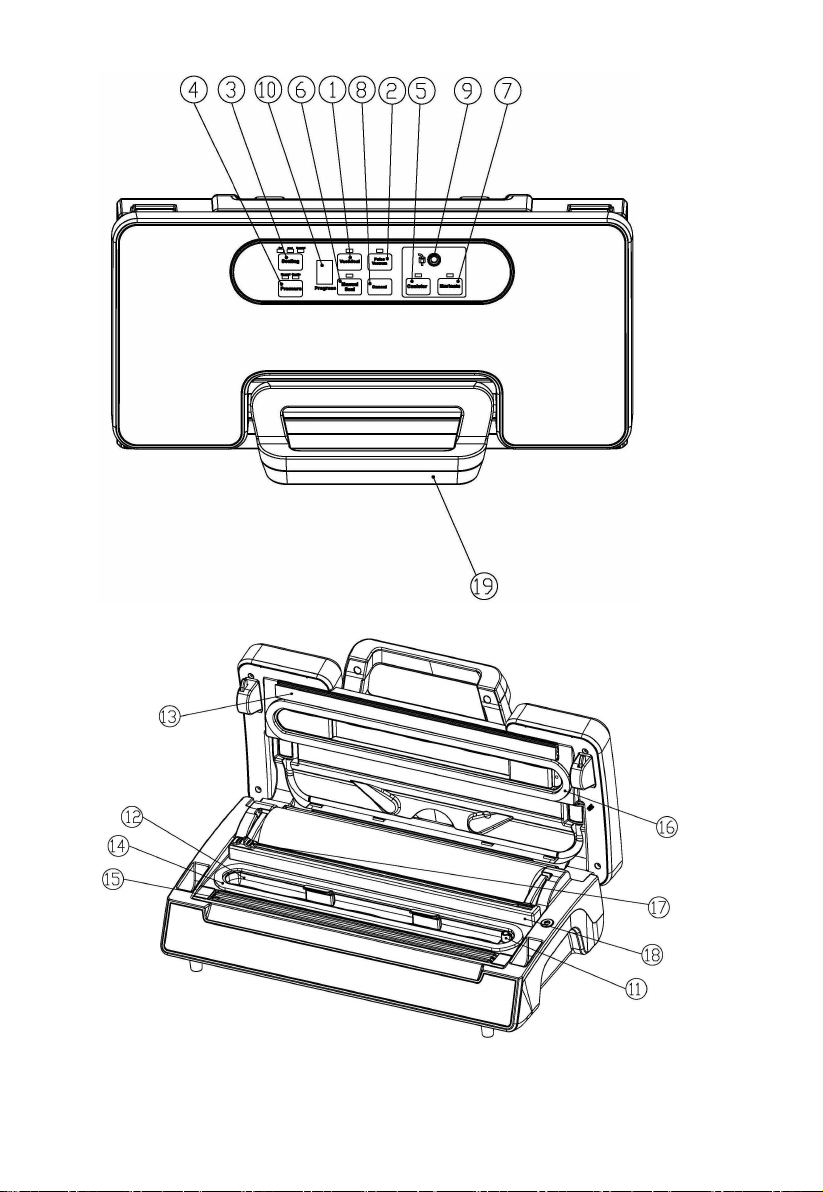
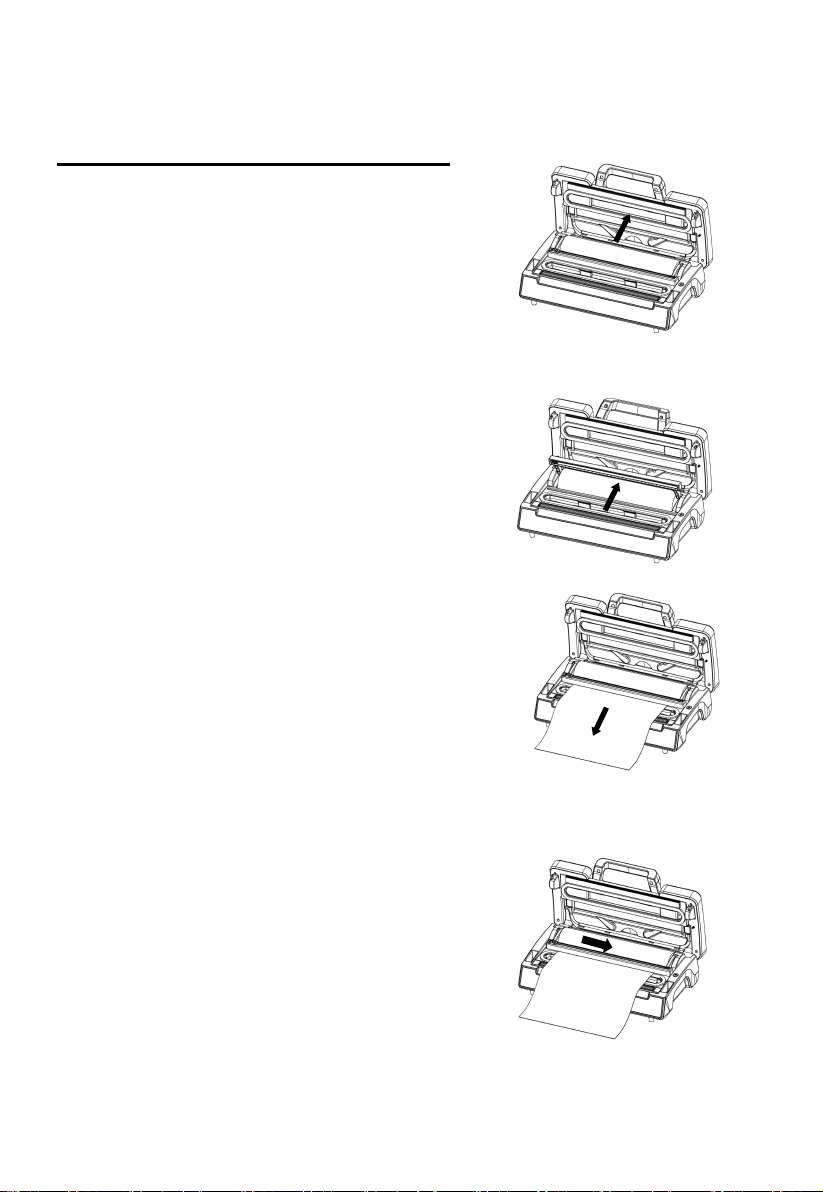
VEVOR VS5164 User manual

Technical Support and E-Warranty Certificate www.vevor.com/support
VS5164 VACUUM SEALER
INSTRUCTIONS
We continue to be committed to provide you tools with competitive price.
"Save Half", "Half Price" or any other similar expressions used by us only represents an
estimate of savings you might benefit from buying certain tools with us compared to the major
top brands and doses not necessarily mean to cover all categories of tools offered by us. You
are kindly reminded to verify carefully when you are placing an order with us if you are
actually saving half in comparison with the top major brands.


- 1 -
VS5164
Have product questions? Need technical support? Please feel free to
contact us:
CustomerService@vevor.com
NEED HELP? CONTACT US!
This is the original instruction, please read all manual instructions
carefully before operating. VEVOR reserves a clear interpretation of our
user manual. The appearance of the product shall be subject to the
product you received. Please forgive us that we won't inform you again if
there are any technology or software updates on our product.
VS5164 VACUUM
SEALER

- 2 -
IMPORTANT SAFEGUARDS
When using this electrical appliance, safety precautions
should always be observed, including the following:
READ ALL INSTRUCTIONS
1. Carefully read all of the instructions before using this appliance and save
for future reference.
2. Before plugging cord into wall outlet, or disconnecting, make sure that
the cover of the machine is in unlocked condition, and unplug from outlet
when not in use or before cleaning.
3. This appliance is not a toy, when used by or near children, close
attention is necessary, and store this appliance to a safe place, out of the
reach of children.
4. Do not use any bags or attachments not recommended or appointed,
and don’t use this appliance for other purpose except its intended use.
5. Stop using the machine immediately if the cord is damaged and have it
replaced by a professional.
6. Keep away from moving parts.
7. Do not contact the hot sealing element located on edge of the top
housing of this machine. It is hot and may get burn.
8. Do not try to repair this appliance by yourself.
9. Don't use the appliance if it has fallen or appeared to be damaged.
10. Avoid to do the following: pull or carry by the cord, use cord as a handle,
close a door on cord, or pull cord around sharp edges or corners. Do not
operate appliance over cord or cord / plug is wet.
11. Keep away from hot gas, heated oven, electric burner or any other hot
surfaces. Do not use this appliance on wet or hot surface or near a heat
source.
12. It’s better not to use an extension cord with this unit. However, if one is
used, it must have a rating equal to or exceeding the fating of this
appliance.
13. When disconnect, to avoid any injury, please unplug by grasp the plug,
not the cord.

- 3 -
14. Before plugging appliance in or operating, make sure your hands are dry
and safe to do the actions.
15. When it In “ON” or working position, always be on a stable surface, such
as table or counter.
16. It’s no need to use any lubricant, such as lubricating oils or water, on this
appliance.
17. Do not immerse any part of this appliance, power cord or plug in water or
any other liquid.
18. Do not use this appliance outdoors or on a wet surface, it’s
recommended for household, indoor use only.
19. This appliance can’t be used by children aged from 8 years and above
and persons with reduced physical, sensory or mental capabilities or lack
of experience and knowledge if they have been given supervision or
instruction concerning use of the appliance in a safe way and understand
the hazards involved.
20. Children should be supervised to ensure that they do not play with the
appliance.
21. If the supply cord is damaged, It must be replaced by the manufacturer,
its service agent or similarly qualified persons in order to avoid a hazard.
22. Cleaning and user maintenance shall not be made by children without
supervision.
CAUTION:
SAVE THESE INSTRUCTIONS
FOR HOUSEHOLD USE ONLY
AB:1MIN PER CYCLE

- 4 -
CONSTRUCTION AND FUNCTIONS
1.Vac&seal:
At stand-by condition, it starts the automatic operation of vacuuming the bag
and then automatically seals the bag when vacuum is complete;
2.Pulse vacuum :
Press this button, and the device starts vacuuming; undo, it will stop. This
process can be repeated. Then press “manual seal” when meet desired
pressure, turn to seal. Different pressure according to different type of foods
can be chosen.
3.Sealing time :
Three setting for choosing the best bag sealing time
Dry button : for dry bags and items without moisture, with a shorter heat
sealing time;
Moist button: for wet bags or foods with a little moisture, with an moist heat
sealing time.
Extended button: for wet bags or foods with very moisture, with an
extended heat sealing time.
Default setting is Normal setting for dry bags and shorter sealing time.
4.Pressure :
Two buttons for choice of different vacuum pressure:
Normal button: for regular items storage in normal vacuum pressure ;
Gentle button: for some soft & crushable items storage where less vacuum
pressure is desired.
Default setting is normal and high vacuum pressure.
5.Canister:
To start vacuuming for canisters, jar lids, wine stoppers or other
accessories through a hose.

- 5 -
6.Manual Seal :
This button provides two functions:
To seal the open end of a bag without vacuuming air suction, used to make a
bag from a bag roll;
When the automatic “Vacuum &seal” function is in operation, this button
stops the motor pump and immediately starts to seal the bag so that less
vacuum pressure inside the bag can be controlled by the operator to avoid
crushing for delicate items.
7.Marinate:
Press to marinate food in a marinator bowl.
8. Cancel:
At working (vacuuming or sealing operations) condition, it stops the
machine.
9.Hose port:
To insert the hose for canister and wine stopper before
“marinates” or “canister” operations.
10.Progress :
This is the numeric display apparatus and provides two functions
●show that the progress of vacuuming
●Shows that the device is on and the lid is closed. When the LED winkles,
please wait until it normally light, then you can start next operation.
11. Air intake:
Air intake connects with vacuum chamber and pump. Do not cover this
intake when placing bag for vacuum&Seal operations.

- 6 -

- 7 -
12.Vacuum chamber:
Position the open end of the bag inside the chamber, draws air out
of bag and catches any liquid overflow from the bag.
13. Sealing strip:
Place the bag to be sealed over this strip.,Clean and dry or replace
it when distorted or broken.
14. Lower gasket:
Keep air away by forming vacuum chamber with upper gasket in
the vacuum chamber. Clean and dry or replace it when it is
distorted or broken.
.
15. Sealing element:
Teflon-coated heating element which is hot and seals the bag.
16. Upper gasket:
Keep air away by forming vacuum chamber with lower gasket. Clean
and dry or replace it when distorted or broken.
17.Bag Cutter:
Press and slide in one direction or another to cut bags to a desired
size.
18.Cutter rack:
Support the cutter to slide along
19.Front handle:
Press down to lock the cover. And rock to open the cover.

- 8 -
OPERATING INSTRUCTIONS
I. Making a bag with bag roll
1. Open the top cover . Fig.1
2. Make sure the bag cutter is on one end of the cutter rack, Then put the
cutter rack to the back– Fig.2
3.Pull out the bag to the suitable
length you want– Fig.3
4.Put down the cutter rack and make sure it is on the right place of the bags,
then slide the cutter from one end to the other end to cut the bag– Fig.4
Fig.1
Fig.2
Fig.3
Fig.4

- 9 -
5. Put one end of the bag on top of the sealing
Element into the bag fixture– Fig.5
6. Close the top cover and press tightly till you
hear it click in place on both sides– Fig.6
7. Press “Maunal Seal” button to start sealing
the bags -Fig.7
8. Lift the handle to open the cover and take the bag
out of the machine. The bag is then done and is ready
for vacuum sealing -Fig.8
Fig.5
Fig.6
Fig.7
Fig.8

- 10 -
II. Vacuum packaging with a bag
1. Put the items inside the bag. Use only the special designed vacuum
bags supplied by us with vacuum channels.
2. Clean and straighten the open end of the bag, make sure no dust, wrinkle
or ripples.
3. Place the open end of the bag within the vacuum
chamber area. Make sure the air intake is not
covered by the bag. – Fig. 1
4. Put the top cover down and press front handle to lock
the top cover.- Fig.2
5.Check the LED status of “Pressure” and the “sealing” to confirm sealing
time depending on the moisture status of packed items (extended/moist/dry)
and desired vacuum pressure (Normal/Gentle) according to the type of food;
6.Then press Vac& Seal button, the unit start to vacuum and will seal the bag
automatically - Fig 3
NOTE: This product provides very high vacuum pressure during vacuum
packaging with a bag, in order to avoid crushing of the delicate item by the
high vacuum pressure, observe the status of the vacuum pressure inside the
bag and switch the “ MANUAL SEAL” button immediately when the desired
vacuum pressure is achieved. The pump will stop and change to heat-seal
the bag.
Fig.1
Fig.2
Fig.3

- 11 -
7.The vacuum packaging is done. Rock the handle to open the cover and
take out the packed bags – Fig. 4
NOTE:
For best sealing effect, it is better to let the appliance cool down for
1 minute before using it again. Wipe out any excess liquid or food
residue in the vacuum chamber after each bag packaged.
Do not seal one after another continuously to avoid overheat of the
sealing element. The machine will reject if this “seal” button is
activated within 15 seconds of the last activation.
Your appliance can work only on the specific bags provided by us.
Do not attempt to use other bags not intended for vacuum
packaging. .
Cut the bag straight across with scissors to open a sealed bag.
Ⅲ.Vacuum packaging with a bag using Pulse Vacuum
1. Press Pulse Vacuum button, the unit start to vacuum the bag , observe the
status of the vacuum pressure inside the bag . loose the Pulse Vacuum
button immediately when the desired vacuum pressure is achieved.-- Fig 1
Fig.4
Fig.1

- 12 -
2. Press the Manual Seal button when the Vacuuming have been completed,
the unit start to seal the bag automatically—Fig.2
Ⅳ. Vacuum package in a Canister & Vacuum Bowl
1.Wipe canister cover, canister base and ensure they are clean and dry.
2.Put the items into the canister and do not fill up too full so that the cover
can be in good contact with the canister bowl rim. Clean the cover rim of the
canister and bottom seal gasket of the canister cover;
3. Insert one end of the hose into the air intake
and another end of the hose into the center
hole of the canister cover– Fig. 1
4. Check the LED status of “Pressure”
and make sure if it is in “Normal” setting;
5. Press the canister button to start vacuuming– Fig. 2. To ensure there is no
air leaking between the cover and the canister, use your hand to push
down the cover at the beginning of the vacuuming work. The machine will
stop automatically when enough vacuum pressure is achieved.
6. Take out the hose tube from the canister or bowl immediately first after the
job is completed.
Note: When moist food are under vacuuming, moisture will be stored in
adaptor. Remember to clean up the adaptor if there is water before
Fig.1
Fig.2
Fig.2

- 13 -
vacumming.
Open Canister after vacuum packaging
In order to open the canister, you need to press the “Release “button on the
canister cover.
Note:
At the beginning of the vacuum packaging in a canister or a vacuum
bowl, slightly press down the cover or on the hose adaptor to ensure no
loose of the hose and to avoid air leaking through the gap between the
cover and the canister top rim for a few seconds.
To test vacuum, simply tug on the cover. It shall not move;
Different canisters are available in the market and also from Bigland. The
operation procedure will be a little different. Please refer to the individual
manual for the specific canister.
Ⅴ. Marinate meat with a marinate Bowl
1.Take out the hose accessory from inside cover, insert it to canister port on
unit and the center hole of canister cover– Fig. 1
2.Check the LED status of “Pressure” to
confirm the desired vacuum pressure
(Normal/Gentle) according to the type of food.
The default option is Normal mode.
3.Press Marinate button to start working– Fig. 2.
The indicator light glints during the course. It will release air automatically
after finished vacuum, this is for 1 working cycle, this machine will total
working for 5 cycles. It takes about 6 minutes to finish the process.
Fig.2
Fig.1

- 14 -
4.When the indicator light crush out, the marinate process is completed. Pull
off the hose accessory from canister port and canister cover.
Note:
At the beginning of the vacuum packaging in a canister, slightly press
down the canister cover or on the hose adaptor to ensure no loose of the
hose and to avoid air leaking through the gap between the cover and the
canister top rim for a few seconds.
To test vacuum, simply tug on the cover. It shall not move;
Do not press any button to interfere with the whole process
Ⅵ.Cord storage box
1.Put the power cord into the storage box when not use the machine which is
in the back of the machine. Do not wrap the cord around the appliance.
Hints for best vacuuming performance
1. Do not put too much stuff inside the bag: leave enough empty space in
the open end of the bag so that the bag can be placed in the vacuum
chamber area without creating wrinkles or ripples;
2. Do not wet the open end of the bag. Wet bags will cause difficulty to
heat-seal tightly. If the food has moisture, or the bag is wet, you can
choose the 'Moist' function which is designed for a longer sealing time
and seals better for wet bags.
3. Clean and straighten the open end of the bag before sealing. Make sure
nothing is left on the open area of the bag, no wrinkle or creased lines
should appear on the open panel, foreign objects or creased bag may
cause difficult to seal tightly.
4. Do not leave too much air inside the bag. Press the bag to allow extra

- 15 -
air to escape from the bag before vacuuming it. Too much air inside the
bag increases the vacuum pump loading and may cause the motor
insufficient power to draw away all the air inside the bag.
5. Do not vacuum packaging objects with sharp points like fish bones and
hard shells! Sharp points may penetrate and tear the bag! You may want
to use a container instead of a bag to store such stuff.
6. Suggest to vacuum seal one bag within 1 minute, to let the appliance
resume enough.
7. If it’s not reach the required vacuum for some unknowable reason, the
vacuum system will shut automatically after 60 seconds, in this
situation, please check if the bag is leak, or not placed properly or any
other reasons.
8. Make sure there is no crack or deformation, or small particles resting on
the foam gaskets around the vacuum chamber. When this happens,
take it out and wash and dry it thoroughly, or replace with a new one.
9. During bag vacuum packaging process, small amounts of liquids,
crumbs or food particles can be inadvertently pull into the vacuum
chamber, clogging the pump and damaging your appliance. To avoid
this, freeze moist and juicy foods first before sealing bags or place a
folded paper towel near the inside top of the bag. For powdery or
fine-grained foods, avoid overfilling bags. You may also place a coffee
filter inside before vacuum packaging.
10. Pre-freeze fruits and blanch vegetables before vacuum packaging for
best results.
11. Liquids need to be cooled before vacuum packing. Hot liquids will
bubble up and over the top of the jar when vacuum packed. Note: A jar
attachment is necessary for sealing jars.
12. Store perishable foods in the freezer or refrigerator. Vacuum packing
extend the shelf life of foods, but do not preserve them.
13. Fill a bag about 2/3 full with water, seal the end (don't vacuum). Freeze
the bag and use for ice in the cooler, or ice packs for sports injuries.
14. Many foods are sold pre-packed in commercial vacuum bags such as
cheese and deli meats. Now, you can maintain the taste and freshness
of these foods, by re-packaging with the vacuum sealer bags after the
commercially packed bags have been opened.

- 16 -
15. Panty items such as flour, rice, mixed for cakes and pancakes, all stay
fresher longer when vacuum packed. Nuts and condiments maintain
their flavor while rancidity is kept out.
16. For objects with sharp points and edges, such as bones or dried pasta,
pad the edges with paper towels to keep them from puncturing the bag.
17. There are many non-food uses for vacuum packing. Keep camping
supplies such as matches, first aid kits and clothing, clean and dry. Keep
flares for auto emergencies ready. Keep silver and collectibles
untarnished. 1. The main function of this appliance is to store a wide
kind of foods for freshness, longer, flavor and convenience. In general,
vacuum packaging keeps food fresh up to three times as long as other
traditional food storage methods. Once this appliance as an
indispensable part of your life, it will less food spoilage and save more
money.
a) Cook in advance to vacuum seal and store individual portions or
entire meals. This vacuum bag is not recommended for microwave
or boil-in-bag cooking, please use the general cooking method to
re-heat the vacuum-sealed foods.
b) Prepare foods in advance for picnics and camping trips or
barbecues.
c) Eliminate freezer burn.
d) Package foods, such as meat, fish, poultry, seafood and vegetables
to freeze or refrigerate.
e) Package dry foods, such as beans, nuts, and cereals to store
longer.
18. It’s ideal to prepackage ingredients as well as individual portions for the
health-conscious, such as weight-conscious or those on diets or
nutritional regimes with special requirements.
19. This system can also be used to store and protect other items: valuable
items, such as photos, important documents, stamp collections, book
collections, jewellery, cards, comics etc.; hardware items, such as
screws, nails, studs and bolts; medicines, band-aids and other first-aid
items, etc..

- 17 -
Note:
After finished the vacuum work, please always let the machine
cover open, don’t fasten the cover, it will deform the form gaskets
and affect the machine function.
FOOD STORAGE AND SAFETY INFORMATION
This Vacuum Sealer will change the way you purchase and store foods.
Once you are accustomed to vacuum packing, it will become an
indispensable part of your food preparation. When preparing and vacuum
packing foods using your vacuum sealer, there are certain procedures that
must be followed to ensure food quality and safety. Review this section
carefully for you protection:
1. Chemical reactions in the food to air, temperature, moisture, and enzyme
action, growth of microorganisms or contamination from insects will
cause food spoilage.
2. The main element to cause food to lose nutritive value, texture, flavor,
and overall quality is oxygen in the air. Most micro-organisms growth
relies on air, for it will carry moisture into and out of foods unless they are
protected with moisture-proof packing. Frozen foods being exposed to
freezer air will result in freezer burn.
3. The vacuum seal packing removes up to 90% of the air from the
package. It’s approximately 21% oxygen in the air, so 90% air removal
leaves a 2% to 3% residual oxygen level in vacuum-sealed foods. When
the oxygen level is at or below 5%, as you know, most microorganisms
are inhibited from growth
4. In general, there have three categories microorganisms: mold, yeast and
bacteria, they are present everywhere, but only under certain conditions
they can cause problems.
5. In a low oxygen environment or in the absence of moisture, mold can’t
grow; In moisture, Sugar and a moderate temperature circumstance,
yeast can grow with or without air. Refrigeration will slow the growth of
yeast and freezing stops it completely; Bacteria can grow with or without

- 18 -
air.
6. One of the extremely dangerous type of bacteria is clostridium botulinum,
and they can grow under the right conditions without air: in the
temperature range of 40˚F to 115˚F(4˚to 46˚). Conditions for growth are
foods lacking acid, low oxygen environment and temperatures greater
than 40˚F(4˚c) for extended time.
7. Frozen, dried, high in acid, salt or sugar foods can resistant to botulinum.
Non-acid foods which include meats, seafood, lye-cured olives, poultry,
fish, eggs and mushrooms; low-acid foods which are mostly vegetables;
medium-acid foods include overripe tomatoes, onions, chili peppers, figs
and cucumbers are easy be infected by botulinum;
8. It should be refrigerated for short term and frozen for long-term storage,
for the foods most susceptible to botulinum, and consume immediately
after heating.
9. Some dried foods, such as flour and cereals may contain insect larvae, if
do not vacuum-sealed, larvae may hatch during storage and
contaminate the foods. To prevent weevils and other insects from
hatching, store these foods in vacuum seal package is necessary.
10. Avoid spoilage: foods should be stored at low temperatures, for few of
the microorganisms could growth without air.
11. If Temperatures in the refrigerator greater than 40˚F (4˚C) (especially for
extended periods of time), it will support the growth of harmful
microorganisms, so we should keep the temperature at 40˚F (4˚C) or
below.
12. When the temperature for the freezer is 0˚F (-17˚C) or lower, it’s suitable
for store foods, although freezing does not kill microorganisms, it retards
their growth.
13. The vacuum-sealed storage temperature will affect dried foods: for their
shelf life is extended 3-4 times for every 18˚F (10˚C) drop in temperature.
14. When packaging large volumes of meat, fish, or any food
products, we advise the following:
1. Make sure to properly clean your hands, all utensils and surfaces to
be used for cutting and vacuum packing foods.
Table of contents
Languages:
Other VEVOR Kitchen Appliance manuals

VEVOR
VEVOR JYC-1100 User manual

VEVOR
VEVOR MHTJJPZY02 User manual

VEVOR
VEVOR DT-318 User manual

VEVOR
VEVOR JS-75-GD-01 User manual

VEVOR
VEVOR DM11-U User manual

VEVOR
VEVOR GB-GO16A-R User manual

VEVOR
VEVOR MHTJJPZY01 User manual

VEVOR
VEVOR DM21-U User manual

VEVOR
VEVOR C113 User manual

VEVOR
VEVOR QF-150 User manual