VIA Technologies AMOS-3003 User manual

1.03-07072016-153600
USER MANUAL
AMOS-3003
Compact Fanless Em edded System
for Automation and Transportation

Copyright
CopyrightCopyright
Copyright
Copyright © 2014-2016 VIA Technologies Incorporated. All rights reserved.
No part of this document may e reproduced, transmitted, transcri ed, stored in a retrieval system, or translated into any language,
in any form or y any means, electronic, mechanical, magnetic, optical, chemical, manual or otherwise without the prior written
permission of VIA Technologies, Incorporated.
Trademarks
TrademarksTrademarks
Trademarks
All trademarks are the property of their respective holders.
Disclaimer
DisclaimerDisclaimer
Disclaimer
No license is granted, implied or otherwise, under any patent or patent rights of VIA Technologies. VIA Technologies makes no
warranties, implied or otherwise, in regard to this document and to the products descri ed in this document. The information
provided in this document is elieved to e accurate and relia le as of the pu lication date of this document. However, VIA
Technologies assumes no responsi ility for the use or misuse of the information (including use or connection of extra
device/equipment/add-on card) in this document and for any patent infringements that may arise from the use of this document. The
information and product specifications within this document are su ject to change at any time, without notice and without o ligation
to notify any person of such change.
VIA Technologies, Inc. reserves the right the make changes to the products descri ed in this manual at any time without prior notice.
Regulatory Compliance
Regulatory ComplianceRegulatory Compliance
Regulatory Compliance
FCC
FCCFCC
FCC-
--
-A Radio Fre
A Radio FreA Radio Fre
A Radio Frequency Interference Statement
quency Interference Statementquency Interference Statement
quency Interference Statement
This equipment has een tested and found to comply with the limits for a class A digital device, pursuant to part 15 of the FCC rules.
These limits are designed to provide reasona le protection against harmful interference when the equipment is operated in a
commercial environment. This equipment generates, uses, and can radiate radio frequency energy and, if not installed and used in
accordance with the instruction manual, may cause harmful interference to radio communications. Operation of this equipment in a
residential area is likely to cause harmful interference, in which case the user will e required to correct the interference at his
personal expense.
Notice 1
Notice 1Notice 1
Notice 1
The changes or modifications not expressly approved y the party responsi le for compliance could void the user's authority to
operate the equipment.
Notice 2
Notice 2Notice 2
Notice 2
Shielded interface ca les and A.C. power cord, if any, must e used in order to comply with the emission limits.
Notice 3
Notice 3Notice 3
Notice 3
The product descri ed in this document is designed for general use, VIA Technologies assumes no responsi ility for the conflicts or
damages arising from incompati ility of the product. Check compati ility issue with your local sales representatives efore placing
an order.

Battery Recycling and Disposal
Only use the appropriate attery specified for this product.
Do not re-use, recharge, or reheat an old attery.
Do not attempt to force open the attery.
Do not discard used atteries with regular trash.
Discard used atteries according to local regulations.
Safety Precautions
Always read the safety instructions carefully.
Keep this User's Manual for future reference.
All cautions and warnings on the equipment should e noted.
Keep this equipment away from humidity.
Lay this equipment on a relia le flat surface efore setting it up.
Make sure the voltage of the power source and adjust properly 110/220V efore connecting the
equipment to the power inlet.
Place the power cord in such a way that people cannot step on it.
Always unplug the power cord efore inserting any add-on card or module.
If any of the following situations arises, get the equipment checked y authorized service personnel:
The power cord or plug is damaged.
Liquid has penetrated into the equipment.
The equipment has een exposed to moisture.
The equipment has not worked well or you cannot get it work according to User's Manual.
The equipment has dropped and damaged.
The equipment has o vious sign of reakage.
Do not leave this equipment in an environment unconditioned or in a storage temperature a ove
70°C (158°F). The equipment may e damaged.
Do not leave this equipment in direct sunlight.
Never pour any liquid into the opening. Liquid can cause damage or electrical shock.
Do not place anything over the power cord.
Do not cover the ventilation holes. The openings on the enclosure protect the equipment from
overheating

AMOS
AMOSAMOS
AMOS-
--
-3003
3003 3003
3003 User Manual
User ManualUser Manual
User Manual
iv
Box Contents
AMOS
AMOSAMOS
AMOS-
--
-3003
30033003
3003-
--
-1D12A1
1D12A11D12A1
1D12A1
1 x AMOS-3003 system (with default mounting rackets)
1 x Power ca le, 2-pole Phoenix plug to DC-in jack (P/N: 99G33-250043)
4 x M4*8mm screws with spring and flat washer for wall mounting (P/N: 99G44-010395)
6 x M2*5mm screws for miniPCIe cards and mSATA module (P/N: 99G44-010155)
4 x M3*5mm screws for SSD/HDD (P/N: 99G44-010645)
1 x Thermal pad for SSD/HDD (P/N: 99H43-140762)
1 x Thermal pad for mSATA module (P/N: 99H43-141016)
1 x Thermal grease in tu e syringe (P/N: 99H26-110124)
Ordering Information
Part Num er
Part Num erPart Num er
Part Num er
Description
DescriptionDescription
Description
AMOS
AMOSAMOS
AMOS-
--
-3003
30033003
3003-
--
-1D12A1
1D12A11D12A1
1D12A1
Fanless Em edded System with 1.2GHz VIA Nano
®
X2 E-Series
processor, Mini HDMI
®
, VGA, 2 x USB 3.0, 2 x USB 2.0, 2 x Giga it
Ethernet, 3 x COM, 1 x DIO, 3 x Audio jack, SATA SSD/HDD ay and
9V~30V DC-in
Optional Accessories
External AC
External ACExternal AC
External AC-
--
-to
toto
to-
--
-DC Adapter and Power Cord
DC Adapter and Power CordDC Adapter and Power Cord
DC Adapter and Power Cord
Part
PartPart
Part
Num er
Num erNum er
Num er
Description
DescriptionDescription
Description
99G63
99G6399G63
99G63-
--
-020316
020316020316
020316 AC-to-DC Adapter, 2-pole, DC 12V/5A, 60W
99G33
99G3399G33
99G33-
--
-02032C
02032C02032C
02032C
Power Cord, 180 cm, USA type
99G33
99G3399G33
99G33-
--
-02034C
02034C02034C
02034C
Power Cord with PSE mark, 180cm for Japan market
99G33
99G3399G33
99G33-
--
-02033C
02033C02033C
02033C
Power Cord, 180cm, Europe type
Wireless Modules
Wireless ModulesWireless Modules
Wireless Modules
Part
PartPart
Part
Num er
Num erNum er
Num er
Description
DescriptionDescription
Description
EMIO
EMIOEMIO
EMIO-
--
-1533
15331533
1533-
--
-00A2
00A200A2
00A2 VNT9271 IEEE 802.11 /g/n USB Wi-Fi module with assem ly kit
EMIO
EMIOEMIO
EMIO-
--
-2550
25502550
2550-
--
-00A1
00A100A1
00A1
3.75G HSPA/UMTS mo ile road and full size miniPCIe module with
GPS and SIM card slot

AMOS
AMOSAMOS
AMOS-
--
-3003
3003 3003
3003 User Manual
User ManualUser Manual
User Manual
v
Ta le of Contents
1.
1.1.
1.
Product Overview
Product OverviewProduct Overview
Product Overview
................................
................................................................
................................................................
................................................................
................................................................
................................................................
........................................................
................................................
........................
1
11
1
1.1. Key Features ...................................................................................................................................... 1
1.1.1.
Powered y VIA Nano
®
X2 E-Series Processor ................................................................................... 1
1.1.2.
Compact and Fanless Chassis Design ..................................................................................................... 1
1.1.3.
Networking Support ................................................................................................................................... 1
1.1.4.
Empowered Multimedia Capa ilities ..................................................................................................... 1
1.1.5.
Optimize Integration with Multiple I/O Access ................................................................................... 1
1.1.6.
Dual SIM (Stand- y) Card Slots .............................................................................................................. 1
1.1.7.
Storage Expansion ....................................................................................................................................... 1
1.1.8.
Wide Range of Power Sources ................................................................................................................ 1
1.1.9.
Wide Range of Operating Temperatures ............................................................................................... 2
1.1.10.
Shock Resistant ............................................................................................................................................ 2
1.1.11.
Multiple Mounting Solutions .................................................................................................................... 2
1.1.12.
Em edded OS ready .................................................................................................................................. 2
1.2. Product Specifications .................................................................................................................... 3
1.3. Panel Layout...................................................................................................................................... 7
1.4. Dimensions ........................................................................................................................................ 9
2.
2.2.
2.
External I/O Pin Descriptions and Functionality
External I/O Pin Descriptions and FunctionalityExternal I/O Pin Descriptions and Functionality
External I/O Pin Descriptions and Functionality
................................
................................................................
................................................................
................................................................
...................................
......
...
10
1010
10
2.1. DC-In Jack ........................................................................................................................................ 10
2.2. Power On/Off Button ................................................................................................................... 10
2.3. LED Indicator .................................................................................................................................. 10
2.4. Audio Jacks ..................................................................................................................................... 11
2.5. USB 2.0 Ports .................................................................................................................................. 11
2.6. Giga it Ethernet Port (LAN) ........................................................................................................ 12
2.7. USB 3.0 Port .................................................................................................................................... 13
2.8. Mini HDMI
®
Port ............................................................................................................................ 13
2.9. VGA Port ......................................................................................................................................... 14
2.10. COM Port ........................................................................................................................................ 14
2.11. DIO Port........................................................................................................................................... 15
3.
3.3.
3.
On oard I/O
On oard I/OOn oard I/O
On oard I/O
................................
................................................................
................................................................
................................................................
................................................................
................................................................
................................................................
................................................................
................................
16
1616
16
3.1. MiniPCIe Slot .................................................................................................................................. 16
3.2. SIM Card Slot ................................................................................................................................. 16
3.3. mSATA Slot .................................................................................................................................... 17
3.4. Wi-Fi USB Connector .................................................................................................................... 17
4.
4.4.
4.
Hardware Installation
Hardware InstallationHardware Installation
Hardware Installation
................................
................................................................
................................................................
................................................................
................................................................
................................................................
................................................
................................
................
18
1818
18
4.1. Removing chassis top cover ........................................................................................................ 18
4.2. Installing the mSATA flash drive module ................................................................................ 19
4.3. Installing the SIM card .................................................................................................................. 21
4.4. Installing the 3G/GPS/Wi-Fi module ......................................................................................... 22
4.5. Installing the Wi-Fi USB kit (optional) ...................................................................................... 25
4.6. Installing the 2.5” SATA SSD/HDD ............................................................................................ 28
4.7. Installing the DDR3 SODIMM memory ..................................................................................... 31
4.8. Removing the DDR3 SODIMM memory ................................................................................... 33
4.9. Installing the AMOS-3003 ........................................................................................................... 34
5.
5.5.
5.
BIOS Setup
BIOS SetupBIOS Setup
BIOS Setup
................................
................................................................
................................................................
................................................................
................................................................
................................................................
................................................................
................................................................
...................................
......
...
36
3636
36
5.1. Entering the BIOS Setup Utility .................................................................................................. 36
5.2. Control Keys ................................................................................................................................... 36
5.3. Getting Help ................................................................................................................................... 36

AMOS
AMOSAMOS
AMOS-
--
-3003
3003 3003
3003 User Manual
User ManualUser Manual
User Manual
vi
5.4. System Overview ........................................................................................................................... 37
5.4.1.
BIOS Information ...................................................................................................................................... 37
5.4.2.
Memory Information ................................................................................................................................ 37
5.4.3.
System Language ...................................................................................................................................... 37
5.4.4.
System Date ............................................................................................................................................... 37
5.4.5.
System Time .............................................................................................................................................. 37
5.5. Advanced Settings ......................................................................................................................... 38
5.5.1.
ACPI Settings ............................................................................................................................................. 39
5.5.1.1.
Ena le Hi ernation ....................................................................................................................... 39
5.5.1.2.
ACPI Sleep State ............................................................................................................................ 39
5.5.2.
S5 RTC Wake Settings ............................................................................................................................. 40
5.5.2.1.
Wake system with Fixed Time .................................................................................................... 40
5.5.2.2.
Wake system with Dynamic Time .............................................................................................. 40
5.5.3.
CPU Configuration ................................................................................................................................... 40
5.5.4.
SATA Configuration ................................................................................................................................. 41
5.5.4.1.
SATA Mode .................................................................................................................................... 41
5.5.5.
F81801 H/W Monitor............................................................................................................................... 41
5.5.6.
F81865 Super IO Configuration ............................................................................................................ 42
5.5.6.1.
Serial Port 1 Configuration .......................................................................................................... 42
5.5.6.2.
Serial Port 2 Configuration .......................................................................................................... 42
5.5.6.3.
Serial Port 3 Configuration .......................................................................................................... 43
5.5.6.4.
WLAN & USB Power Configuration ........................................................................................... 43
5.5.6.5.
PCIe Mini Card Configuration...................................................................................................... 43
5.5.6.6.
Others .............................................................................................................................................. 43
5.5.7.
F81865 H/W Monitor............................................................................................................................... 44
5.5.8.
Clock Generator Configuration ............................................................................................................. 44
5.5.8.1.
CPU Spread Spectrum .................................................................................................................. 44
5.5.8.2.
PCIe Spread Spectrum .................................................................................................................. 44
5.5.9.
OnBoard Configuration ........................................................................................................................... 45
5.5.9.1.
OnBoard LAN Ena le ................................................................................................................... 45
5.5.9.2.
S5 Wakeup On LAN...................................................................................................................... 45
5.6. Chipset Settings ............................................................................................................................. 46
5.6.1.
DRAM Configuration................................................................................................................................ 47
5.6.1.1.
DRAM Clock ................................................................................................................................... 47
5.6.1.2.
VGA Share Memory (Frame Buffer) ........................................................................................... 47
5.6.2.
Video Configuration ................................................................................................................................ 48
5.6.2.1.
Select Display Device 1 and 2 ................................................................................................... 48
5.6.3.
PMU_ACPI Configuration ....................................................................................................................... 49
5.6.3.1.
Other Control ................................................................................................................................. 49
5.6.4.
Others Configuration ............................................................................................................................... 51
5.6.4.1.
WATCHDOG Timer Ena le ........................................................................................................ 51
5.6.4.2.
WATCHDOG Timer RUN/STOP ................................................................................................. 51
5.6.4.3.
WATCHDOG Timer ACTION ..................................................................................................... 51
5.6.4.4.
WATCHDOG Timer COUNT ...................................................................................................... 51
5.6.4.5.
Key oard/Mouse Wakeup Control ............................................................................................ 51
5.7. Boot Settings................................................................................................................................... 52
5.7.1.
Boot Configuration ................................................................................................................................... 52
5.7.1.1.
Quiet Boot ....................................................................................................................................... 52
5.7.2.
Boot Option Priorities ............................................................................................................................. 52
5.7.2.1.
Boot Option #1/#2 ....................................................................................................................... 52
5.7.3.
Hard Drive BBS Priorities ........................................................................................................................ 52
5.8. Save & Exit ...................................................................................................................................... 53
5.8.1.
Save Changes and Exit ............................................................................................................................ 53
5.8.2.
Discard Changes and Exit ....................................................................................................................... 53
5.8.3.
Save Changes and Reset ......................................................................................................................... 53
5.8.4.
Discard Changes and Reset .................................................................................................................... 53
5.8.5.
Save Changes ............................................................................................................................................ 53

AMOS
AMOSAMOS
AMOS-
--
-3003
3003 3003
3003 User Manual
User ManualUser Manual
User Manual
vii
5.8.6.
Discard Changes ....................................................................................................................................... 53
5.8.7.
Restore Defaults ....................................................................................................................................... 53
6.
6.6.
6.
Software and Technical Supports
Software and Technical SupportsSoftware and Technical Supports
Software and Technical Supports
................................
................................................................
................................................................
................................................................
...........................................................
......................................................
...........................
54
5454
54
6.1. Microsoft and Linux Support ....................................................................................................... 54
6.1.1.
Driver Installation ..................................................................................................................................... 54
6.2. Technical Supports and Assistance ........................................................................................... 54

AMOS
AMOSAMOS
AMOS-
--
-3003
3003 3003
3003 User Manual
User ManualUser Manual
User Manual
viii
List of Figures
Figure 1: Back panel I/O layout .........................................................................................................................................7
Figure 2: Left panel I/O layout ..........................................................................................................................................7
Figure 3: Front panel layout ...............................................................................................................................................7
Figure 4: Bottom panel layout ...........................................................................................................................................8
Figure 5: Back side view dimension .................................................................................................................................9
Figure 6: Left side view dimension ...................................................................................................................................9
Figure 7: Top side view dimension ..................................................................................................................................9
Figure 8: DC-in jack diagram ........................................................................................................................................... 10
Figure 9: Power on/off utton diagram ........................................................................................................................ 10
Figure 10: LEDs indicator diagram ................................................................................................................................. 10
Figure 11: Audio jack receptacle diagram ................................................................................................................... 11
Figure 12: USB 2.0 ports diagram .................................................................................................................................. 11
Figure 13: Giga it Ethernet port diagram .................................................................................................................... 12
Figure 14: USB 3.0 ports diagram .................................................................................................................................. 13
Figure 15: Mini HDMI port diagram .............................................................................................................................. 13
Figure 16: VGA port diagram ......................................................................................................................................... 14
Figure 17: COM port diagram ........................................................................................................................................ 14
Figure 18: DIO port diagram........................................................................................................................................... 15
Figure 19: MiniPCIe slots diagram ................................................................................................................................. 16
Figure 20: SIM card slots diagram ................................................................................................................................. 16
Figure 21: mSATA slot diagram ..................................................................................................................................... 17
Figure 22: Wi-Fi USB connector diagram ..................................................................................................................... 17
Figure 23: Removing top cover plate ........................................................................................................................... 18
Figure 24: Installing the mSATA thermal pad ............................................................................................................ 19
Figure 25: Peeling off the mSATA thermal pad protective cover .......................................................................... 19
Figure 26: Inserting the mSATA flash drive module ................................................................................................. 20
Figure 27: Securing the mSATA flash drive module ................................................................................................. 20
Figure 28: Installing the SIM card .................................................................................................................................. 21
Figure 29: Installing the 3G/GPS/Wi-Fi module ......................................................................................................... 22
Figure 30: Securing the 3G/GPS/Wi-Fi module .......................................................................................................... 22
Figure 31: Removing the 3G/GPS/Wi-Fi antenna hole cover ................................................................................... 23
Figure 32: Inserting and securing the 3G/GPS/Wi-Fi antenna ca le ...................................................................... 23
Figure 33: Installing the 3G/GPS/Wi-Fi antenna ......................................................................................................... 24
Figure 34: Connecting Wi-Fi USB ca le ....................................................................................................................... 25
Figure 35: Connecting Wi-Fi antenna ca le ................................................................................................................ 25
Figure 36: Flipping the Wi-Fi USB module .................................................................................................................. 25
Figure 37: Installing the Wi-Fi USB module ................................................................................................................ 26
Figure 38: Connecting the other end of Wi-Fi USB ca le........................................................................................ 26
Figure 39: Inserting and securing Wi-Fi antenna ca le ............................................................................................. 27
Figure 40: Installing the Wi-Fi antenna ......................................................................................................................... 27
Figure 41: Removing the SSD/HDD mounting rackets ........................................................................................... 28
Figure 42: Installing the SSD/HDD mounting rackets ............................................................................................. 28
Figure 43: Installing the SATA SSD/HDD drive and ca les .................................................................................... 29
Figure 44: Installing the SSD/HDD thermal pad. ....................................................................................................... 29
Figure 45: Peeling off the protective plastic cover of SSD/HDD thermal pad ................................................... 30
Figure 46: Removing the memory access cover ......................................................................................................... 31
Figure 47: Installing the DDR3 SODIMM memory module ..................................................................................... 31
Figure 48: Securing the DDR3 SODIMM memory module ...................................................................................... 31
Figure 49: Reinstalling memory access cover ............................................................................................................. 32
Figure 50: Disengaging the SODIMM locking clips ................................................................................................... 33
Figure 51: Removing the memory module .................................................................................................................. 33
Figure 52: Aligning the AMOS-3003 to the mounting holes .................................................................................. 34
Figure 53: Securing the AMOS-3003 on the flat surface ......................................................................................... 35
Figure 54: Illustration of the Main menu screen ......................................................................................................... 37
Figure 55: Illustration of the Advanced Settings screen .......................................................................................... 38

AMOS
AMOSAMOS
AMOS-
--
-3003
3003 3003
3003 User Manual
User ManualUser Manual
User Manual
ix
Figure 56: Illustration of the ACPI Settings screen .................................................................................................... 39
Figure 57: Illustration of the S5 RTC Wake Settings screen .................................................................................... 40
Figure 58: Illustration of CPU Configuration screen .................................................................................................. 40
Figure 59: Illustration of SATA Configuration screen ............................................................................................... 41
Figure 60: Illustration of F81801 H/W Monitor .......................................................................................................... 41
Figure 61: Illustration of F81865 Super IO Configuration screen ........................................................................... 42
Figure 62: Illustration of F81865 H/W Monitor .......................................................................................................... 44
Figure 63: Illustration of Clock Generator Configuration screen ........................................................................... 44
Figure 64: Illustration of OnBoard Device Configuration screen ........................................................................... 45
Figure 65: Illustration of Chipset Settings screen ...................................................................................................... 46
Figure 66: Illustration of DRAM Configuration screen .............................................................................................. 47
Figure 67: Illustration of Video Configuration screen ............................................................................................... 48
Figure 68: Illustration of PMU_ACPI Configuration screen ...................................................................................... 49
Figure 69: Illustration of Other Control screen .......................................................................................................... 49
Figure 70: Illustration of Others Configuration screen ............................................................................................. 51
Figure 71: Illustration of Boot Settings screen ............................................................................................................ 52
Figure 72: Illustration of Save & Exit screen................................................................................................................ 53

AMOS
AMOSAMOS
AMOS-
--
-3003
3003 3003
3003 User Manual
User ManualUser Manual
User Manual
x
List of Ta les
Ta le 1: DC-in jack pinout .............................................................................................................................................. 10
Ta le 2: Audio jack receptacle description ................................................................................................................ 11
Ta le 3: USB 2.0 ports pinout ........................................................................................................................................ 11
Ta le 4: Giga it Ethernet ports pinout ........................................................................................................................ 12
Ta le 5: Giga it Ethernet port LED color definition ................................................................................................. 12
Ta le 6: USB 3.0 ports pinout ........................................................................................................................................ 13
Ta le 7: Mini HDMI port pinout .................................................................................................................................... 13
Ta le 8: VGA port pinout ............................................................................................................................................... 14
Ta le 9: COM ports pinout ............................................................................................................................................ 14
Ta le 10: DIO port pinout .............................................................................................................................................. 15

AMOS
AMOSAMOS
AMOS-
--
-3003
3003 3003
3003 User Manual
User ManualUser Manual
User Manual
1
1.
1.1.
1. Product Overview
Product OverviewProduct Overview
Product Overview
The AMOS-3003 is a fanless, compact and rugged em edded system designed specifically for transportation
and industrial automation applications such as data collection terminals for fleet and delivery management,
machine-to-machine controllers and etc. The AMOS-3003 system is capa le of handling a wide range of DC
power inputs from 9V ~ 30V, and it is powered y a VIA Nano
®
X2 E-Series 1.2GHz processor which is
super in multi-tasking performance and high power computing operation with lower power consumption.
The AMOS-3003 supports dual-sided multiple I/O connectors such as audio jacks, USB 2.0, USB 3.0, Giga it
Ethernet, VGA, mini HDMI, configura le COM ports, and DIO port. The AMOS-3003 also offers a 2.5” SATA
SSD/HDD drive ay, mSATA slot, DDR3 1333 SODIMM socket, and an optional Wi-Fi (WLAN) connectivity
which can e supported through on oard Wi-Fi USB connector. In addition, the AMOS-3003 supports two
on oard SIM card slots and two miniPCIe slots for 3G/GPS and Wi-Fi connectivity.
The AMOS-3003 system’s housing is made of a heavy-duty steel ody chassis and a ro ust aluminum alloy
top cover that provides high sta ility which can withstand shock and vi ration. Wall and ta le mounting
options are also availa le.
1.1. Key Features
1.1.1. Powered y VIA Nano
®
X2 E-Series Processor
The VIA Nano X2 E-Series processor is a 64- it superscalar x86 dual core processor ased on a 40
nanometer process technology. Packed into an ultra compact NanoBGA2 package (measuring 21mm x
21mm), it delivers an energy-efficient yet powerful performance, with cool and quiet operation, and super
in multi-tasking performance.
1.1.2. Compact and Fanless Chassis Design
Fanless operation in a compact heavy-duty steel and aluminum chassis that does dou le duty as a thermal
solution. It is designed to ensure maximum relia ility and sta ility that makes it suita le to install in extreme
environment.
1.1.3. Networking Support
Equipped with two RJ-45 ports that support high speed Giga it Ethernet and has wireless networking options
that give the system a freedom of 3G, GPS and Wi-Fi (WLAN) connectivity through miniPCIe slots and
on oard Wi-Fi USB connector.
1.1.4. Empowered Multimedia Capa ilities
Built-in 3D/2D performance graphics engine with MPEG-2, WMV9, VC1 and H.264 decoding accelerator.
1.1.5. Optimize Integration with Multiple I/O Access
Front, left and ack panel I/O access ena les the AMOS-3003 system to easily access to peripherals, support
various applications, easy integration, quick setup and easy maintenance.
1.1.6. Dual SIM (Stand- y) Card Slots
The AMOS-3003 has two uilt-in SIM card slots that can support two active 3G SIM card simultaneously from
two different/the same mo ile phone service providers for 3G communication.
1.1.7. Storage Expansion
The mSATA slot and hard disk drive ay ena les AMOS-3003 to have flexi le storage options of either
mSATA flash drive or 2.5” SATA SSD/HDD. The 2.5” SATA SSD/HDD ay has special cushioned design that
a sor s vi ration to ensure maximum relia ility under harsh conditions.
1.1.8. Wide Range of Power Sources
The AMOS-3003 supports a wide range of input power from 9V ~ 30V DC. The flexi ility of power input
ena les the system to e deploya le for various automation environments.

AMOS
AMOSAMOS
AMOS-
--
-3003
3003 3003
3003 User Manual
User ManualUser Manual
User Manual
2
1.1.9. Wide Range of Operating Temperatures
The AMOS-3003 carries a qualified thermal performance design which allows a wide range of operating
temperature from -10°C to 60°C, suita le for critical applications.
1.1.10. Shock Resistant
The AMOS-3003 is shock resistant to 50G for maximum relia ility.
1.1.11. Multiple Mounting Solutions
The AMOS-3003 supports multiple methods for mounting the chassis securely. It can e mounted to a ta le,
wall, and floor ed or side panel of the vehicle using the default mounting rackets.
1.1.12. Em edded OS ready
100% compati le with several operating systems including Microsoft Windows 7, Microsoft Windows
Em edded Standard 7 and Linux.

AMOS
AMOSAMOS
AMOS-
--
-3003
3003 3003
3003 User Manual
User ManualUser Manual
User Manual
3
1.2. Product Specifications
Processor
ProcessorProcessor
Processor
o1.2GHz VIA Nano
®
X2 E-Series CPU
•1066MHz Front Side Bus
•2MB L2 cache
Chipset
ChipsetChipset
Chipset
oVIA VX11 Media System Processor
BIOS
BIOSBIOS
BIOS
oAMI Aptio UEFI BIOS
o32M it Flash memory
System Power Ma
System Power MaSystem Power Ma
System Power Management
nagementnagement
nagement
oACPI 3.0 compliant, Wake-on LAN, key oard power-on, timer power-on, system power
management, AC power failure recovery, Watchdog timer control
System Memory
System MemorySystem Memory
System Memory
oTechnology
TechnologyTechnology
Technology
•One SODIMM socket supporting DDR3 1333 SDRAM
oMaximum Capacity
Maximum CapacityMaximum Capacity
Maximum Capacity
•Supports up to 8GB memory size
Storage
StorageStorage
Storage
oInterface
InterfaceInterface
Interface
•One on oard mSATA slot for mSATA module
•One SATA port on oard for 2.5” SATA SSD/HDD
•One SATA on oard power connector
Graphics
GraphicsGraphics
Graphics
oController
ControllerController
Controller
•Integrated VIA Chrome
™
640 DX11 2D/3D graphics with MPEG-2, WMV9, VC1, and
H.264 video decoding acceleration
oDisplay Memory
Display MemoryDisplay Memory
Display Memory
•Optimized Unified Memory Architecture (UMA), supports 256MB to 512MB frame
uffer using system memory
•UMA supporting CRT/HDMI
oCRT Interface
CRT InterfaceCRT Interface
CRT Interface
•Supports one VGA port
•10- it true-color RAMDAC up to 350MHz pixel rate with gamma correction
capa ility
•Supports CRT resolution up to 2560 x 1536
oHDMI
HDMIHDMI
HDMI
®
®®
®
Interface
InterfaceInterface
Interface
•Supports one mini HDMI
®
port
•Video pixel encoded in RGB 4:4:4/YC Cr 4:4:4/YC Cr 4:2:2 formats
•Pixel rate up to 340 MHz
•Supports 1x, 2x, 4x pixel-repetition, complies with CEA-861-D
oDual View
Dual ViewDual View
Dual View
•Dual independent display of:
oHDMI
®
+ VGA at different resolution, pixel depths, and refresh rate

AMOS
AMOSAMOS
AMOS-
--
-3003
3003 3003
3003 User Manual
User ManualUser Manual
User Manual
4
Audio
AudioAudio
Audio
oController
ControllerController
Controller
•VIA VT2021 High Definition Audio Codec
oInterface
InterfaceInterface
Interface
•Supports Line-out, Line-in and Mic-in audio jacks
USB
USBUSB
USB
oController
ControllerController
Controller
•Integrated USB controller uilt-in in VX11 chipset
oInterface
InterfaceInterface
Interface
•Supports two USB 3.0 ports
•Supports two USB 2.0 ports
•BIOS selecta le to set either stand y power (+5VSUS) or +5V for USB 2.0 port
•On oard connector reserved to support VIA EMIO-1533 Wi-Fi USB module
LAN
LANLAN
LAN
oController
ControllerController
Controller
•1st G E y VIA VT6130 PCIe Giga it Ethernet controller
•2nd G E y Realtek RTL8111G PCIe Giga it Ethernet controller
oInterface
InterfaceInterface
Interface
•Supports dual RJ-45 ports
•Supports Wake On LAN (WOL)
•Supports Pre oot Execution Environment (PXE)
Serial
SerialSerial
Serial
oControl
ControlControl
Controller
lerler
ler
•On oard Fintek Super I/O F81865 controller
oInterface
InterfaceInterface
Interface
•Three COM ports
oBIOS selecta le to support adjust functionality of RS-232/422/485 mode of
COM1, COM2 and COM3 port
o5V/12V power selection y BIOS setup for COM1 ~ COM3 port
Digital I/O (GPIO)
Digital I/O (GPIO)Digital I/O (GPIO)
Digital I/O (GPIO)
oInter
InterInter
Interface
faceface
face
•Supports one DIO port
•8- it DIO, +5V power source (4GPI + 4GPO)
MiniPCIe slot
MiniPCIe slotMiniPCIe slot
MiniPCIe slot
oController
ControllerController
Controller
•PCIe x1 Controller uilt-in VX11 chipset
•Integrated USB 2.0 Host Controller uilt-in VX11 chipset
oInterface
InterfaceInterface
Interface
•Two miniPCIe slots that support Wi-Fi/3G modules
•Supports three external antenna for Wi-Fi, 3G module and GPS module
SIM Card
SIM Card SIM Card
SIM Card s
ss
slot
lotlot
lot
oSupports two on oard SIM card slots
Watchdog Timer
Watchdog TimerWatchdog Timer
Watchdog Timer
oOutput
OutputOutput
Output
•System reset
oInterval
IntervalInterval
Interval
•Programma le 1~255 sec

AMOS
AMOSAMOS
AMOS-
--
-3003
3003 3003
3003 User Manual
User ManualUser Manual
User Manual
5
Back Panel
Back PanelBack Panel
Back Panel
I/O
I/OI/O
I/O
o1 x Mini HDMI
®
port
o1 x VGA port
o2 x Giga it Ethernet ports
o2 x USB 3.0 ports
o2 x USB 2.0 ports
o3 x 3.5
Ø
audio jacks (as Line-out, Line-in and Mic-in)
o1 x Power on/off utton
o1 x Green LED indicator for power status
o1 x Red LED indicator for SATA SSD/HDD activity
o1 x 2-pole Phoenix DC jack
Left
Left Left
Left Panel
PanelPanel
Panel
I/O
I/OI/O
I/O
o3 x COM ports for RS-232/422/485 (powered y selecta le 5V/12V)
o1 x DIO port for 8- it GPIO
Front
Front Front
Front Panel
PanelPanel
Panel
o4 x Antenna holes for the optional 3G, GPS and Wi-Fi (WLAN)
Power Supply
Power SupplyPower Supply
Power Supply
oInput Voltage
Input VoltageInput Voltage
Input Voltage
•9V ~ 30V DC (typical: 27W)
oInput Power Protection
Input Power ProtectionInput Power Protection
Input Power Protection
•Supports over voltage protection
•Supports over current protection
•Supports under voltage protection
Mechanical Characteristics
Mechanical CharacteristicsMechanical Characteristics
Mechanical Characteristics
oConstruction
ConstructionConstruction
Construction
•Aluminum mixed with heavy-duty steel with heat pipe em edded
•Aluminum top cover mixed with copper heat-pipe
oMounting
MountingMounting
Mounting
•Built-in wall mounta le racket on system chassis
oB
BB
Bottom
ottom ottom
ottom opening
opening opening
opening cover
covercover
cover
•Remova le door plate to access the DDR3 SODIMM
oDimensions (W x H x D)
Dimensions (W x H x D)Dimensions (W x H x D)
Dimensions (W x H x D)
•311.4mm x 50.6mm x 185mm (with wall mounta le rackets)
oWeight
WeightWeight
Weight
•3.5kg.(7.7l s)
Environmental Specification
Environmental SpecificationEnvironmental Specification
Environmental Specification
oOperating Temperature
Operating TemperatureOperating Temperature
Operating Temperature
•-10°C ~ 60°C (with mSATA and 2.5” SATA SSD)
•0°C ~ 45°C (with 2.5” SATA HDD)
oStorage Temperature
Storage TemperatureStorage Temperature
Storage Temperature
•-20°C ~ 70°C
oOperating
OperatingOperating
Operating
Humidity
HumidityHumidity
Humidity
•10% ~ 90% @ 45°C (non-condensing)
oVi ration Loadin
Vi ration LoadinVi ration Loadin
Vi ration Loading
gg
g
D
DD
During Operation
uring Operationuring Operation
uring Operation
(with mSATA or 2.5” SSD)
(with mSATA or 2.5” SSD)(with mSATA or 2.5” SSD)
(with mSATA or 2.5” SSD)
•3Grms, IEC 60068-2-64, random, 5 ~ 500Hz, 1hr/axis
oShock During Operation
Shock During OperationShock During Operation
Shock During Operation
(with mSATA or 2.5” SSD)
(with mSATA or 2.5” SSD)(with mSATA or 2.5” SSD)
(with mSATA or 2.5” SSD)
•50G, IEC 60068-2-27, half size, 11ms duration
oCompliance
ComplianceCompliance
Compliance
•CE, FCC

AMOS
AMOSAMOS
AMOS-
--
-3003
3003 3003
3003 User Manual
User ManualUser Manual
User Manual
6
Software Compati ility
Software Compati ilitySoftware Compati ility
Software Compati ility
oOperating System
Operating SystemOperating System
Operating System
•Microsoft Windows 7
•Microsoft Windows Em edded Standard 7
•Em edded Linux
Note:
Note:Note:
Note:
As the operating temperature provided in the specifications is a result of the test performed in VIA’s cham er, a
num er of varia les can influence this result. Please note that the working temperature may vary depending on the
actual situation and environment. It is highly suggested to execute a solid testing and take all the varia les into
consideration when uilding the system. Please ensure that the system runs well under the operating temperature in
terms of application.

AMOS
AMOSAMOS
AMOS-
--
-3003
3003 3003
3003 User Manual
User ManualUser Manual
User Manual
7
1.3. Panel Layout
Figure
Figure Figure
Figure 1
11
1:
: :
:
Back panel I/O layout
Back panel I/O layoutBack panel I/O layout
Back panel I/O layout
Figure
Figure Figure
Figure 2
22
2:
: :
:
Left
Left Left
Left panel I/O
panel I/Opanel I/O
panel I/O
layout
layoutlayout
layout
Figure
Figure Figure
Figure 3
33
3:
: :
:
Front
Front Front
Front panel
panelpanel
panel
layout
layoutlayout
layout

AMOS
AMOSAMOS
AMOS-
--
-3003
3003 3003
3003 User Manual
User ManualUser Manual
User Manual
8
Figure
Figure Figure
Figure 4
44
4:
: :
:
Bottom
Bottom Bottom
Bottom panel
panel panel
panel layout
layoutlayout
layout

AMOS
AMOSAMOS
AMOS-
--
-3003
3003 3003
3003 User Manual
User ManualUser Manual
User Manual
9
1.4. Dimensions
Figure
Figure Figure
Figure 5
55
5:
: :
:
Back side
Back sideBack side
Back side
view dimension
view dimensionview dimension
view dimension
Figure
Figure Figure
Figure 6
66
6:
: :
:
Left side view dimension
Left side view dimensionLeft side view dimension
Left side view dimension
Figure
Figure Figure
Figure 7
77
7:
: :
:
Top side view dimension
Top side view dimensionTop side view dimension
Top side view dimension

AMOS
AMOSAMOS
AMOS-
--
-3003
3003 3003
3003 User Manual
User ManualUser Manual
User Manual
10
2.
2.2.
2. External I/O Pin Descriptions and
External I/O Pin Descriptions and External I/O Pin Descriptions and
External I/O Pin Descriptions and
Functionality
FunctionalityFunctionality
Functionality
This chapter provides information a out the AMOS-3003’s external I/O ports, LED indicators and their
functionality.
2.1. DC-In Jack
The AMOS-3003 comes with a 2-pole Phoenix DC jack that carries 9V ~ 30V DC external power input.
Figure
Figure Figure
Figure 8
88
8:
: :
:
DC
DCDC
DC-
--
-in
inin
in
jack
jackjack
jack
diagram
diagramdiagram
diagram
Pin
PinPin
Pin
Signal
SignalSignal
Signal
1 GND
2 9V ~ 30V DC
Ta le
Ta le Ta le
Ta le 1
11
1:
: :
:
DC
DCDC
DC-
--
-in
inin
in
jack
jackjack
jack
pinout
pinoutpinout
pinout
2.2. Power On/Off Button
The AMOS-3003 comes with a power utton that supports Soft power On/Off (Instant Off or 4 second
delay), and Suspend.
Figure
Figure Figure
Figure 9
99
9:
: :
:
Power
Power Power
Power on/off
on/off on/off
on/off utton diagram
utton diagramutton diagram
utton diagram
2.3. LED Indicator
There are two LEDs on the ack panel of the AMOS-3003 that indicate the status of the system:
•Power LED is green and indicates the status of the system’s power.
•SSD/HDD LED is red and indicates hard drive storage activity.
Figure
Figure Figure
Figure 10
1010
10:
: :
:
LED
LEDLED
LEDs
ss
s
indicator diagram
indicator diagramindicator diagram
indicator diagram
Table of contents
Other VIA Technologies Industrial PC manuals

VIA Technologies
VIA Technologies AMOS-825 User manual

VIA Technologies
VIA Technologies AMOS-820 SKU User manual

VIA Technologies
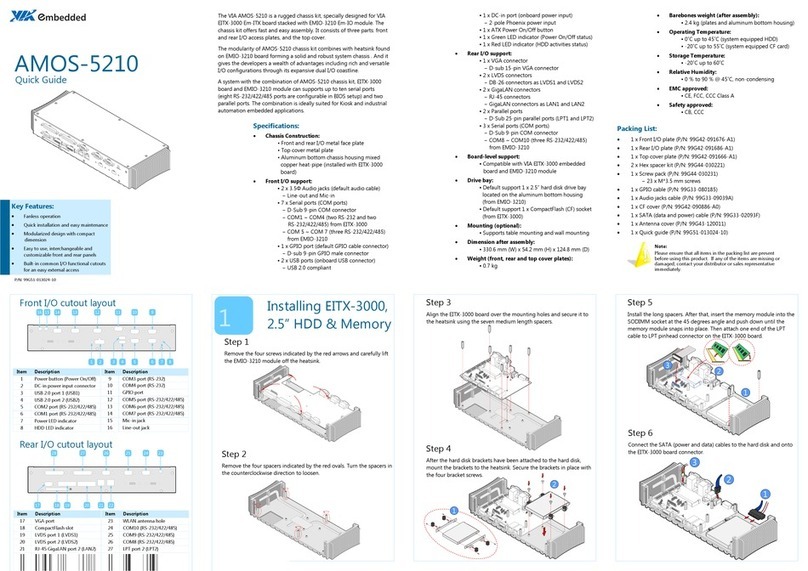
VIA Technologies AMOS-5210 User manual

VIA Technologies
VIA Technologies EPIA-P910 User manual

VIA Technologies
VIA Technologies AMOS-3005 User manual

VIA Technologies
VIA Technologies AMOS-820-QP SKU User manual

VIA Technologies
VIA Technologies AMOS-3006 User manual

VIA Technologies
VIA Technologies ART-3000 User manual

VIA Technologies
VIA Technologies AMOS-3007 User manual

VIA Technologies
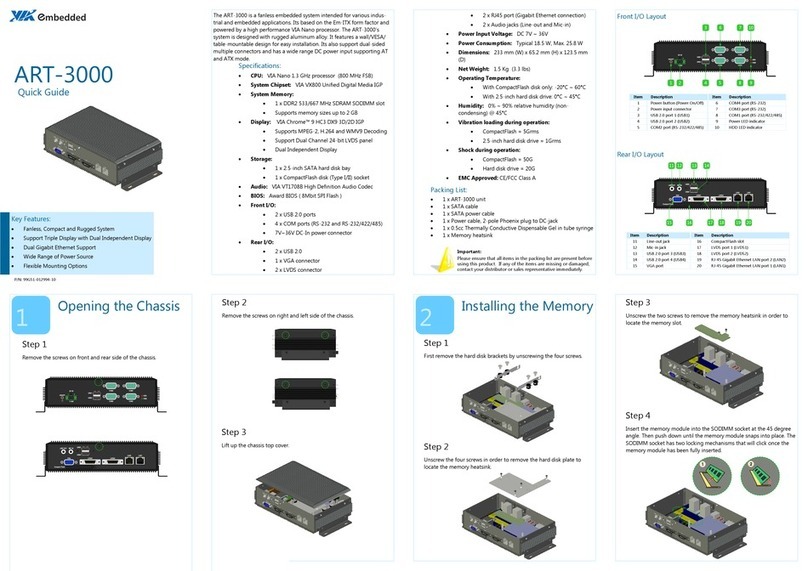
VIA Technologies ART-3000 User manual