manuals.online logo
Brands
  1. Home
  2. •
  3. Brands
  4. •
  5. Viavi
  6. •
  7. Test Equipment
  8. •
  9. Viavi T-BERD/MTS 8000 Parts list manual

Viavi T-BERD/MTS 8000 Parts list manual

8000 Platform - Quick Card “Fiber Characterization Script” – V1.3 - September 2011 – Ref.: E8000M02QCFC1 - Copyright 2011 JDSU. All rights reserved
1
1
2
3
Start the test sequence
When the script configuration is done, you can start the test sequence.
Press the soft key when ready.
Follow the step by step guidances to conduct the link characterization sequence.
-Press to Start a SM-OTDR test. (This will start a 1310/1550/1625 nm OTDR test).
-When asked to “CHECK PMD SOURCE”, contact far end of fiber under test and connect OBS-550/500 light source. Turn light
source on, ensure BB mode of operation, PMD mode and press Activate. Red light will come on indicating light source is active.
-Press to continue PMD test.
-Upon completion of PMD test, instruct tech at far end to press AP mode of operation on light source.
-Press to continue AP test.
-Upon completion of AP test, instruct tech at far end to press CD mode of operation on light source.
-Press to continue CD test.
After completion of CD test, Result screen appears.
If more fibers are to be tested press and fiber number automatically increments.
If no more fiber is to be tested press and a summary of the results is visible.
Press soft key to exit the link characterization script.
To see details of the tests, press Results hard key and application soft key at the bottom of the on-screen.
OBS-500/550 LightSource Operation for Fiber Characterization Testing
Press the Power button to turn on.
Using the MODE button to select BB(1).
When instructed by the technician performing the tests, using the button ensure PMD light
is green.
Under , press the button to activate the source.
When directed by the testing technician, using the button ensure AP light is green, then CD.
8000 Platform - Quick Card “Fiber Characterization Script” - V1.3 - September 2011 – Ref.: E8000M02QCFC1 - Copyright 2011 JDSU. All rights reserved
8000 PLATFORM QUICK CARD
FIBER CHARACTERIZATION SCRIPT
GETTING STARTED
OBS-550 has HD mode which is High dynamic mode. By selecting HD mode, the EDFA amplifier built into the light source is
engaged and the output power increases substantially. In addition, the spectral range of the light source goes from 1460-
1640 to 1530–1565 nm.
2
3
4
5
The following procedure describes how to configure a T-BERD/MTS 8000 platform with a MTAU 4-port module and how to start the
Automated Fiber Characterization Script. Please read the entire procedure BEFORE starting.
Inspect and clean connectors
Before connecting a fiber into a test module, inspect and clean the module bulkhead and the fiber jumper connectors.
!- Use video inspection scope to verify the connector quality.
- Use appropriate cleaning material (e.g. IBC™ cleaner, cotton swab, dust air sprays, etc...).
Connecting the test modules to the MTAU
Connect the OTDR module to the MTAU port A with a jumper.
1
2
Connect the OFI module (FOX port) to the MTAU port B with a jumper.
3
Connect the DISPAP module to the MTAU port C with a jumper.
4
Connect the BBS module to the MTAU port D with a jumper.
OTDR OFI
(
IL/ORL
)
8000 Base unit A
Fiber under Test
Jumper
A
MTAU 4
BBS2ADISPAP (CD/PMD/AP)
D
COM
C
B
A
The test modules (OTDR, DISPAP and OFI) have to be located in the slots closest to the mainframe. Keep the MTAU and BBS
modules at the back slots.
5
Repeat step 1 and 4 for the second unit.
Referencing the Test Functions
The Insertion Loss (IL), the Optical return Loss (ORL), the Chromatic Dispersion (CD) and the Attenuation Profile (AP)
measurements have to be referenced before starting testing.
1
Please refer to dedicated quick cards for the associated procedures
8000 Platform - Quick Card “Fiber Characterization Script” – V1.3 - September 2011 – Ref.: E8000M02QCFC1 - Copyright 2011 JDSU. All rights reserved
1
1
1
2
3
1
2
3
4
Check List
Check that OEO OTDR settings on each unit (for bidirectional solutions) are identical; or that SM OTDR settings on each unit
are identical. Note: You can press the Test Auto and Factory Defaults soft keys to get a set of default settings to work from.
Check that units are correctly set, typically Km.
Set the IL/ORL (FOX) wavelengths to be consistent with OTDR in case the OFI module is used.
Ensure that the Acquisition Band for CD and AP is appropriate to your Broadband Source. For handheld OBS 500/550 use
SCL; for BBS2A module use OESCL. When you switch acquisition band, you must check that a valid reference exists for that
band, the reference S/N should match the S/N of your source.
Check that Length is set to “Known Length” = Yes, for PMD, CD and AP testing. This will allow the Script to auto populate the
length field using the OTDR results.
Check that PMD, CD and AP Length units are consistent with OTDR settings.
Setup File Parameters
This paragraph provides a set of instructions for selecting typical File Storage options for Fiber Characterization test results.
Press the FILE Hard Key of the mainframe
Press softkey until the Setup radio button is selected. It is recommended you accomplish this on one of the OTDR tabs
(SM OTDR or OEO OTDR).
Select the following parameters starting from the top of the menu to the bottom.
a. Press the softkey
b. Select
c. For File type user preference, typically one OEO file or Single SOR files
After all the File parameters are selected, press , softkey
Select storage directory
Press the softkey once to select the “Explorer” page.
Using the navigation keys , on the left side of the screen, select the main or sub directory where you wish to store files,
typically the “Hard Disk”. After highlighting this Directory, press softkey to create a new subdirectory where you wish
your files to store.
It is not mandatory to create a subdirectory as the script automatically creates one at the start of the test sequence.
Use the pop-up keyboard to enter the directory name.
Move the pointer on the left to highlight the new directory so that files will store there.
Getting started with the “Link Characterization” Script
Press the hard key.
Drop down using the navigation keys or touch to select the “Link characterization” script.
Press the soft key to launch the script process.
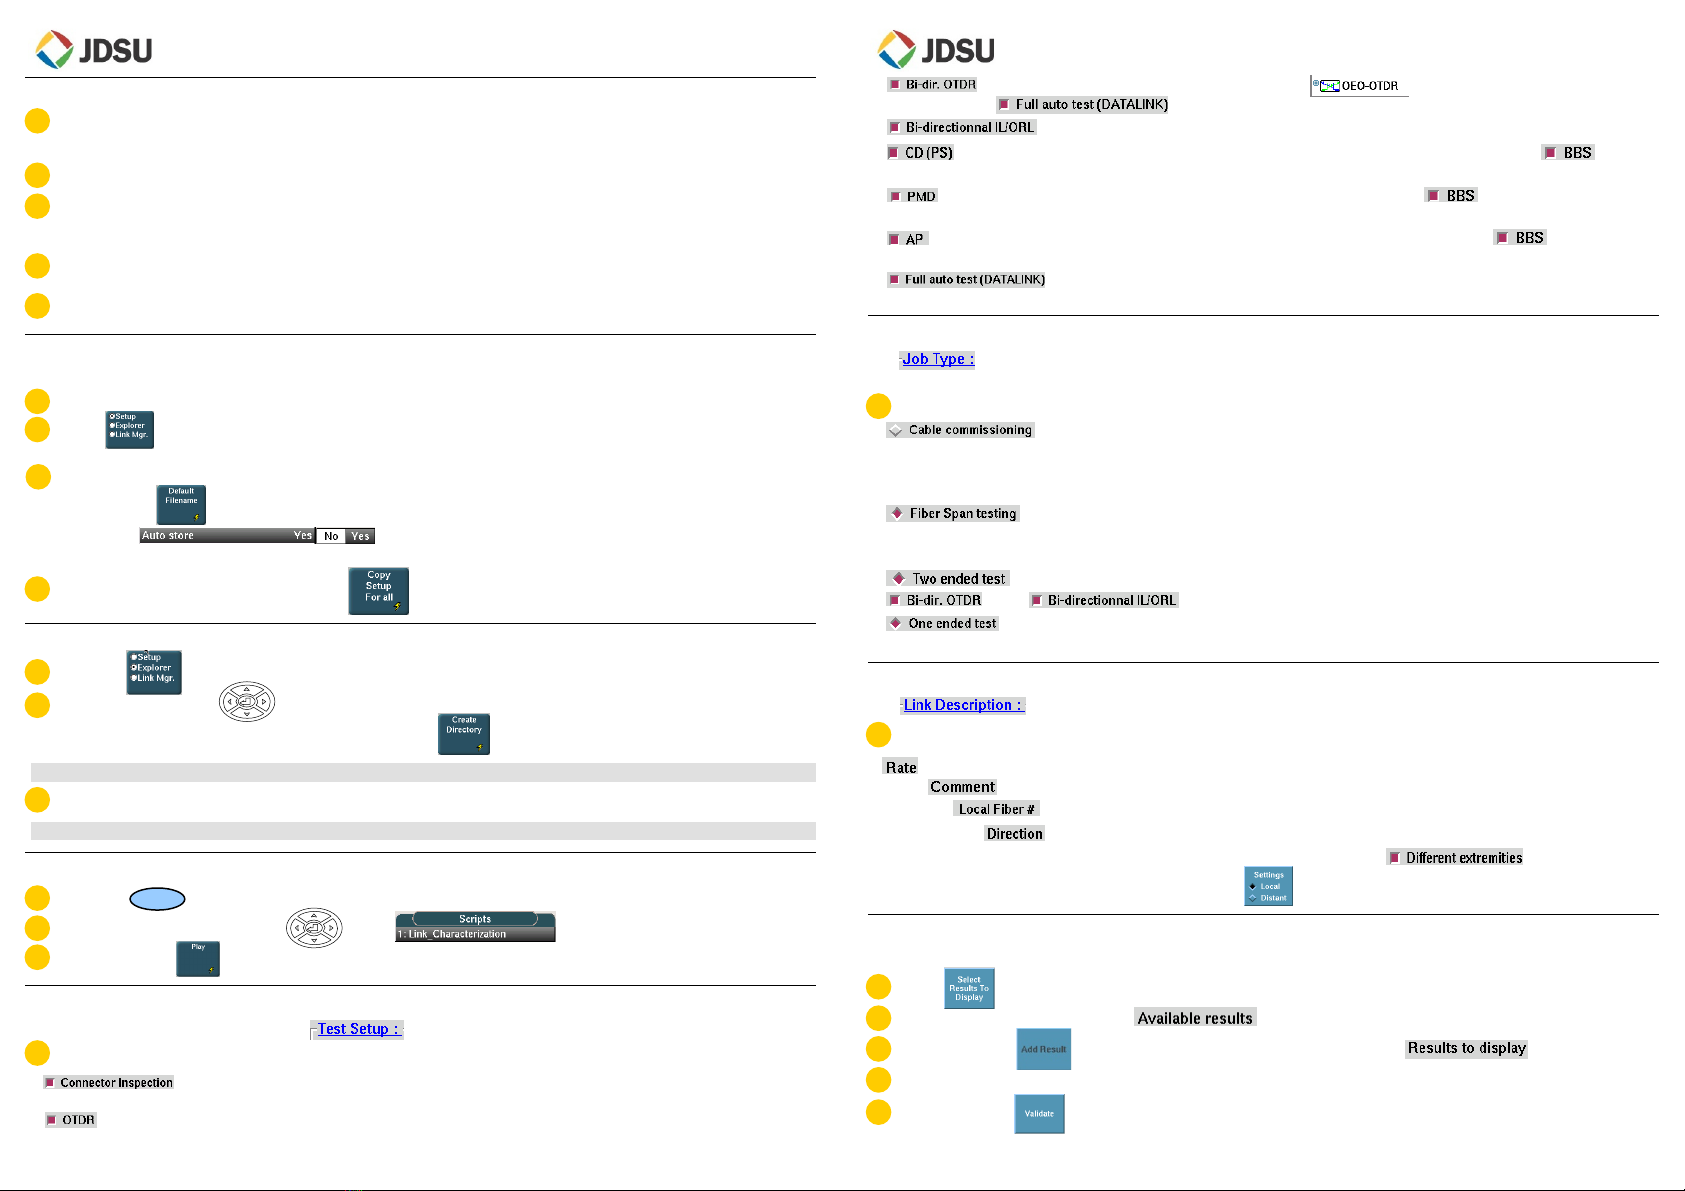
Define the Test Setup
The available test functions are listed in black in window.
Check marked the square button for each test function to be added in the test sequence. (Button becoming red).
-: Available if video inspection scope is connected to the mainframe. The script will open up the connector
image viewer.
-: The script will use the wavelengths defined in the OTDR test Setup and measurements will be performed using Automatic
configuration.
SCRIPT
3
1
2
2
3
4
5
-: Automated bi-directional OTDR measurement using the . It will require the use of the optical talk
set and will select automatically.
-: Automated bi-directional Loss test set, using the OFI module (Fox port).
-: Chromatic Dispersion measurement. It requires the use of the OBS handheld or the selection of the on the
other T-BERD 8000 script configuration menu.
-PMD measurement. It requires the use of the OBS handheld or the selection of the on the other T-BERD 800
script configuration menu.
-Attenuation Profile measurement. It requires the use of the OBS handheld or the selection of the on the other T-
BERD 8000 script configuration menu.
-It enables communication between 2 T-BERD 8000 running the script in order to perform bi-directional
OTDR measurement and automate the BBS mode selection.
Define the Job Type
The enables to define how the product is going to organize the results and what type of characterization test sequence is
performed.
Check marked the square button for each type (button becoming red).
1
-is used for testing an entire cable. The script will save all the test results and the summary report into one
directory, and for all the fibers. The directory will be created using the Cable ID as the name. This directory will be located under the
current selected directory. Make sure the selected directory is the root hard disk or a well known one. Press the System hard key
and the File hard key to get access to the Explorer in order to change the directory selection.
-is used for few fiber testing. The script will save the test results of one fiber and the report summary into one
directory. Each fiber will have its own directory. The directory will be created using the FiberID and the Fiber #, as the name. This
directory will be located under the current selected directory.
-defines the script sequence and synchronization between the 2x T-BERD 8000. It is required when
and/or test parameters are selected.
-defines the script sequence when only one T-BERD 8000 is used in conjunction with a handheld OBS 5x0 at the
far end.
Define the Link Description
The enables to document the information, related to the link being tested.
Fill-in all the information using the USB key board: Local Cable Id / Local Fiber Id / Origin & End Location / Job Ticket
-: select the expected bit rate in the drop down menu. This will pre-define the alarm thresholds for CD and PMD testing.
-Add a which will be loaded into each test application and save with each test results.
-Define the of your fiber under test.
a. Set the of the measurement between O->E and E->O (Origin and End).
b. If the Origin fiber number or cable Id is different from the far end, check mark in order to have
access to the local and distant information using the soft key.
Configuring the "Results" Summary table
This summary table enables to review selected values at the end of the test sequence. A pass/Fail status is associated to the table.
1
Press to access the selection list.
2
Highlight one parameter in the column .
3
Press the soft key in order to select the parameter and see it in the column .
4
Repeat steps 1 to 3 until you have selected all the parameters. Maximum 7.
Press the soft key in order to acknowledge the selection.
5
1
8000 Platform - Quick Card “Fiber Characterization Script” – V1.3 - September 2011 – Ref.: E8000M02QCFC1 - Copyright 2011 JDSU. All rights reserved

Other Viavi Test Equipment manuals

Viavi AVX-10K User manual

Viavi

Viavi AVX-10K User manual

Viavi T-BERD/MTS-5800 Parts list manual

Viavi

Viavi T-BERD/MTS-5800 Parts list manual

Viavi FCOMP/-PRO T-BERD/MTS-2000V2 User manual

Viavi

Viavi FCOMP/-PRO T-BERD/MTS-2000V2 User manual

Viavi T-BERD MTS 5800 Parts list manual

Viavi

Viavi T-BERD MTS 5800 Parts list manual

Viavi 3900 Series User manual

Viavi

Viavi 3900 Series User manual

Viavi T-BERD/MTS 8000 User manual

Viavi

Viavi T-BERD/MTS 8000 User manual

Viavi OCC-4056 Parts list manual

Viavi

Viavi OCC-4056 Parts list manual

Viavi NSC-100 User manual

Viavi

Viavi NSC-100 User manual

Viavi 3900 Series Owner's manual

Viavi

Viavi 3900 Series Owner's manual

Viavi T-BERD MTS 5800 Parts list manual

Viavi

Viavi T-BERD MTS 5800 Parts list manual

Viavi HST-3000 Parts list manual

Viavi

Viavi HST-3000 Parts list manual

Viavi OneAdvisor ONA-800 User manual

Viavi

Viavi OneAdvisor ONA-800 User manual

Viavi OneAdvisor 800 400G Module User manual

Viavi

Viavi OneAdvisor 800 400G Module User manual

Viavi IFR 4000 User manual

Viavi

Viavi IFR 4000 User manual

Viavi OneAdvisor 1000 User manual

Viavi

Viavi OneAdvisor 1000 User manual

Viavi T-BERD/MTS-580 Installation guide

Viavi

Viavi T-BERD/MTS-580 Installation guide

Viavi IFR 6015 User manual

Viavi

Viavi IFR 6015 User manual

Viavi 4100 Series Parts list manual

Viavi

Viavi 4100 Series Parts list manual

Viavi ComXpert CX100 User manual

Viavi

Viavi ComXpert CX100 User manual

Viavi MTS 2000 User manual

Viavi

Viavi MTS 2000 User manual

Viavi SmartClass Fiber OLTS-85 User manual

Viavi

Viavi SmartClass Fiber OLTS-85 User manual

Viavi T-BERD 5800 User manual

Viavi

Viavi T-BERD 5800 User manual

Viavi T-BERD MTS 5800 Parts list manual

Viavi

Viavi T-BERD MTS 5800 Parts list manual

Viavi OSA-4100 User manual

Viavi

Viavi OSA-4100 User manual

Popular Test Equipment manuals by other brands

Wonwoo Rapport III-Pro manual

Wonwoo

Wonwoo Rapport III-Pro manual

EXFO W2CM Series user guide

EXFO

EXFO W2CM Series user guide

Datacolor SpyderCube user guide

Datacolor

Datacolor SpyderCube user guide

Fluke AIRCHECK Getting started guide

Fluke

Fluke AIRCHECK Getting started guide

Inficon TGF10 user manual

Inficon

Inficon TGF10 user manual

BS BATTERY BST 1000 instruction manual

BS BATTERY

BS BATTERY BST 1000 instruction manual

Wohler Rotary Viper Vent M 10 manual

Wohler

Wohler Rotary Viper Vent M 10 manual

Fluke MicroScanner Pro user manual

Fluke

Fluke MicroScanner Pro user manual

Raytech TR-Mark III 250V instruction manual

Raytech

Raytech TR-Mark III 250V instruction manual

Sennheiser GZT 406 manual

Sennheiser

Sennheiser GZT 406 manual

Keithley 213 Quick reference guide

Keithley

Keithley 213 Quick reference guide

Teledyne FST-040 manual

Teledyne

Teledyne FST-040 manual

Netscout aircheck G2 user manual

Netscout

Netscout aircheck G2 user manual

Aeroflex 3550 Operation manual

Aeroflex

Aeroflex 3550 Operation manual

Ecom CP 400 operating instructions

Ecom

Ecom CP 400 operating instructions

Hakko Electronics 192 instruction manual

Hakko Electronics

Hakko Electronics 192 instruction manual

EPA LEAKWATCH LW-MZ-50 instruction manual

EPA

EPA LEAKWATCH LW-MZ-50 instruction manual

WHALETEQ MECG 2.0 user manual

WHALETEQ

WHALETEQ MECG 2.0 user manual

manuals.online logo
manuals.online logoBrands
  • About & Mission
  • Contact us
  • Privacy Policy
  • Terms and Conditions

Copyright 2025 Manuals.Online. All Rights Reserved.