•B for b ginning,
pl as r ad th s
instructions compl t ly
and car fully.
•DO NOT r mov p rman ntly
affix d lab ls, warnings, or plat s from product. This
may void th warranty.
•All local and national cod s and ordinanc s must b
obs rv d. Installation must conform with local cod s
or in th abs nc of cod s, th National Fu l Gas
Cod ANSI Z223.1 NFPA54-lat st dition.
• Th install r must l av th s instructions with
th consum r for local insp ctor’s us and for
futur r f r nc .
Installation of any gas-fir d quipm nt should b mad
by a lic ns d plumb r. A manual gas shut-off valv
must b install d in th gas supply lin ah ad of th
D A N G E R
Hazar s or unsafe practices
which WILL result in severe personal
injury or eath
Built-In Cooktops
Your safety an the safety of others is
very important.
We have provided many important safety
messages in this manual and on your
appliance. Always read and obey all
safety messages.
This is the safety alert symbol. This symbol
alerts you to hazards that can kill or hurt
you and others.
All safety messages will be preceded by the
safety alert symbol and the word
“DANGER,” “WARNING” or “CAUTION.”
These words mean:
WARNING
Hazar s or unsafe practices
which COULD result in severe personal
injury or eath
C A U T I O N
Hazar s or unsafe practices which
COULD result in minor personal injury or
property amage
All safety messages will identify the
hazard, tell you how to reduce the chance
of injury, and tell you what can happen if
the instructions are not followed.
FIRE/EXPLOSION HAZARD
IF THE INFORMATION IN THIS
MANUAL IS NOT FOLLOWED
EXACTLY, A FIRE OR EXPLOSION
MAY RESULT CAUSING PROPERTY
DAMAGE, PERSONAL INJURY, OR
WARNING
This appliance shall not be used for space
heating. This information is based on safety
considerations.
BURN HAZARD
The use of cabinets for storage above the
appliance may result in a potential burn
hazard. Combustible items may ignite,
metallic items may become hot and cause
burns. If a cabinet storage is to be provided
the risk can be reduced by installing a
CAUTION
Before placing the cooktop into operation,
always check for gas leaks with a soapy
water solution or other acceptable method.
DO NOT USE AN OPEN FLAME TO
CHECK FOR LEAKS.
A qualifi d install r should carry out th following
ch cks:
hCh ck top burn r ignition. Th low flam should
light at v ry port.
hStarting with th l ft
front burn r, turn th corr sponding knob to th HI
position – s drawing for prop r flam h ight.
IMPORTANT: Any conv rsion r quir d must b
p rform d by your d al r or a qualifi d lic ns d
plumb r or gas s rvic company. Th prop r
conv rsion kit must b ord r d from your
authoriz d s rvic ag ncy or d al r.
hR p at st ps for oth r burn rs.
Surfac Op ration
Lighting Burn rs
All burn rs ar ignit d
by l ctric ignition.
Th r ar no op n-flam ,
“standing” pilots.
Surfac Burn rs/
Automatic R -Ignition
To light th surfac burn rs, push and turn th
appropriat control knob count r clockwis to any
position. This control is both a gas valv and an
l ctric switch. Burn rs will ignit at any “ON”
position with th automatic r -ignition syst m. If th
flam go s out for any r ason, th burn rs will
automatically r -ignit if th gas is still flowing. Wh n
gas is p rmitt d to flow to th burn rs, th l ctric
ignit rs start sparking. On all surfac ignit rs you
should h ar a “clicking” sound. If you do not, turn off
th control and ch ck that th unit is plugg d in and
that th fus or circuit br ak r is not blown or tripp d.
Within a f w mom nts, nough gas will hav trav l d
to th burn r to light. Wh n th burn r lights, turn
th burn r control to any position to adjust th flam
siz . S tting th prop r flam h ight for th d sir d
cooking proc ss and s l cting th corr ct cooking
v ss l will r sult in sup rior cooking p rformanc ,
whil also saving tim and n rgy. If any on or mor
surfac burn rs or grill burn rs xtinguish, th
l ctronic ignit r automatically activat s to r -light th
flam . DO NOT TOUCH THE BURNERS WHEN THE
IGNITERS ARE ACTIVE.
It is not uncommon to s xtinguish d flam s, wh n:
• Prop r v ntilation is not us d
• Wh n th ov n door is op n d or clos d rapidly
• Wh n spillov r of liquids or foods occur
• Wh n th incorr ct gas or impur gas is us d
Surfac Cooking Tips
• Us low or m dium flam h ights wh n cooking in
v ss ls that ar poor conductors of h at, such as
glass, c ramic, and cast-iron. R duc th flam
h ight until it cov rs approximat ly 1/3 of th
cooking v ss l diam t r. This will nsur mor v n
h ating within th cooking v ss l and r duc th
lik lihood of burning or scorching th food.
• R duc th flam if it is xt nding b yond th
bottom of th cooking v ss l. A flam that xt nds
along th sid s of th v ss l is pot ntially
dang rous, h ats th ut nsil handl and kitch n
inst ad of th food, and wast s n rgy.
•R duc th flam h ight to th minimum l v l
n c ssary to p rform th d sir d cooking proc ss.
R m mb r that food cooks just as quickly at a
g ntl boil as it do s at a rolling boil. Maintaining a
high r boil than is n c ssary wast s n rgy, cooks
away moistur , and caus s a loss in food flavor and
nutri nt l v l.
•Th minimum pot or pan (v ss l) diam t r
r comm nd d is 6” (15 cm). Us of pots or pans as
small as 4” (10 cm) is possibl but not
r comm nd d.
Surfac H at S ttings
Note: The above information is given as a guide only.
You may need to vary the heat settings to suit your
personal requirements.
H at
S tting Us
Simm r
M lting small quantiti s
St aming ric
Simm ring sauc s
Low
M lting larg quantiti s
M d Low
Low-t mp ratur frying ( ggs, tc.)
Simm ring larg quantiti s
H ating milk, cr am sauc s, gravi s,
and puddings
M d
Saut ing and browning, braising,
and pan-frying
Maintaining slow boil on larg quantiti s
M d High
High-t mp ratur frying
Pan broiling
Maintaining fast boil on larg quantiti s
High
Boiling wat r quickly
D p-fat frying in larg cookwar
CAUTION
DO NOT heat empty cookware or let cookware
boil dry. The cookware can absorb an excessive
amount of heat very quickly, resulting in possible
damage to the cookware and ceramic glass.
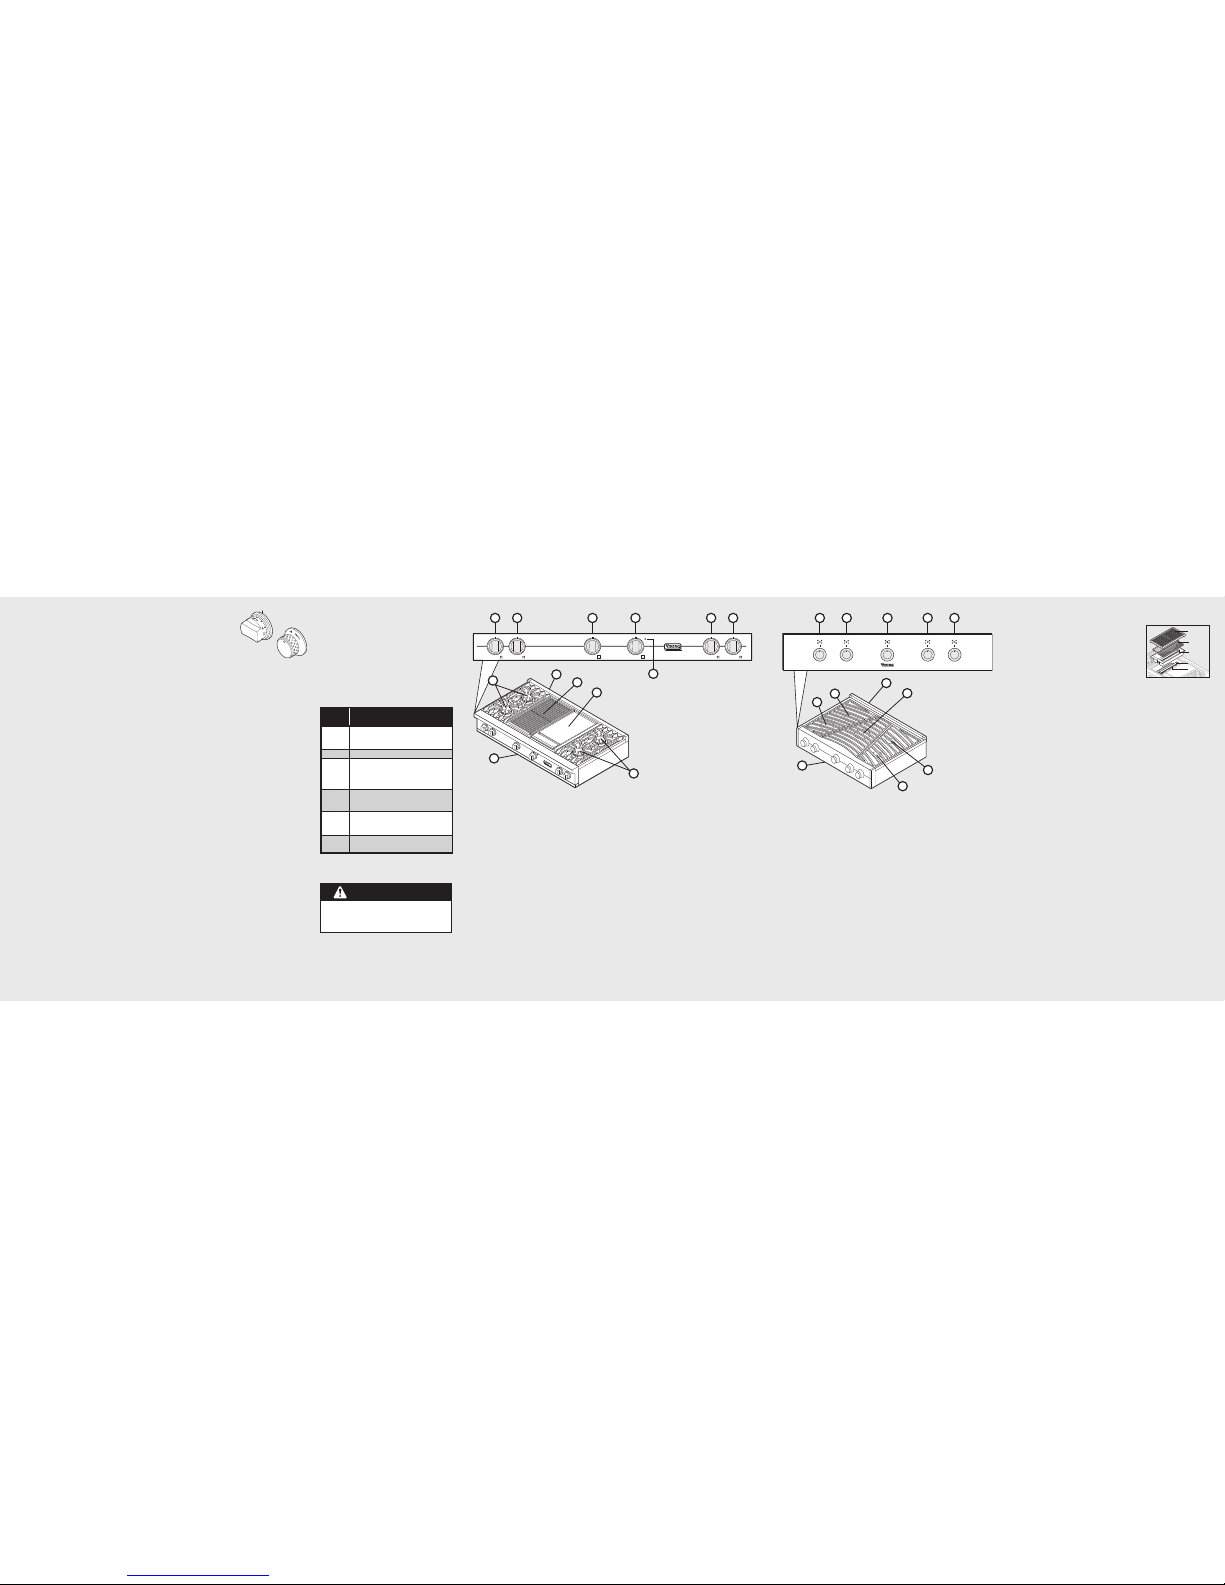
GRIDDLE
21 3 4
7
5 6
10
11
8
9
12
8
1. L ft r ar burn r control knob
2. L ft front burn r control knob
3. Char-Grill control knob
4. Griddl control knob
5. Right r ar burn r control knob
6. Right front burn r control knob
7. Griddl indicator light
8. Four 15,000 BTU s al d burn rs with
porc lain/cast iron caps and automatic
ignition/r -ignition
9. Stainl ss st l island trim
10. Char-Grill (optional)
11. Griddl (optional)
12. Id ntification plat
Rang top F atur s (Prof ssional)
48” four burn r/Char-Grill/griddl mod l shown
VariSimm r™
Simm ring is a cooking t chniqu in which foods ar
cook d in hot liquids k pt at or just bar ly b low th
boiling point of wat r. Simm ring nsur s g ntl r
tr atm nt than boiling to pr v nt food from
tough ning and/or br aking up. Th siz of th pan
and th volum of food can hav a significant ff ct
on how high or low a flam is n d d for simm ring.
For this r ason, Viking rang and rang top burn rs
ar ngin r d with a VariSimm r s tting. Th
VariSimm r s tting is not just on simm r s tting, but
provid s a variabl rang of simm r s ttings. This
variabl rang of simm r s ttings allows you to adjust
th flam h ight to achi v th b st simm r
d p nding on th typ and quantity of food b ing
simm r d. It is this ability that mak s th VariSimm r
s tting th most accurat and trustworthy simm r on
th mark t.
TruPow r Plus™ Burn r (wh r applicabl )
C rtain mod l rang s ar quipp d with a TruPow r
Plus 18,500 BTU burn r in th front right burn r
position. This burn r is d sign d to provid xtra-
high h at output, sp cially wh n using larg pans,
and should b us d for boiling larg quantiti s or if
you n d to bring som thing to a boil quickly. Whil
th TruPow r Plus burn r has th xtra pow r n d d
to bring larg quantiti s of liquid to a boil rapidly, it is
also abl to b turn d down low nough to provid a
v ry low and d licat simm r making this burn r th
most v rsatil on th mark t.
All products ar wip d cl an with solv nts at th
factory to r mov any visibl signs of dirt, oil, and
gr as which may hav r main d from th
manufacturing proc ss. B for starting to cook, cl an
th rang top thoroughly with hot, soapy wat r. Th r
may b som burn off and odors on first us of th
applianc —this is normal.
Cooking V ss ls
Each cook has his or h r own pr f r nc for th
particular cooking v ss ls that ar most appropriat
for th typ of cooking b ing don . Any and all
cooking v ss ls ar suitabl for us in th rang and it
is not n c ssary to r plac your pr s nt dom stic
v ss ls with comm rcial cookwar . This is a matt r of
p rsonal choic . As with any cookwar , yours should
b in good condition and fr from xc ssiv d nts
on th bottom to provid maximum p rformanc and
conv ni nc .
Note: When using big pots and/or high flames, it is
recommended to use the front burners. There is more
room in the front and potential cleanup at rear of
appliance due to staining or discoloration will be
minimized.
B for
Using Rang top
Rang top F atur s (D sign r) Char-Grill (Prof ssional)
Char-Grill (on applicabl mod ls)
Th optional 18,000 BTU
char-grill is quipp d with
a singl pi c , h avy-duty
porc lainiz d cast-iron grill
grat for asy mov m nt
of grilling it ms. B n ath
th grill grat is a slott d
porc lainiz d flavor-
gn rator plat which is
d sign d to catch drippings and circulat a smok
flavor back into th food. B n ath th flavor-g n rator
plat is a two-pi c drip pan which catch s any
drippings that might pass b yond th flavor-g n rator
plat . This uniqu grilling syst m is d sign d to provid
outdoor quality grilling indoors.
Char-Grill Op ration
• Turn th ov rh ad v ntilation on prior to turning th
grill on.
• Turn th grill knob count rclockwis to “HI”.
• Always pr h at th grill for 5-10 minut s b for
placing food on th grill grat .
• Plac food it ms on th grill, cook as d sir d.
• To turn th grill off, turn th grill knob clockwis to
th “OFF” position.
Char-Grill Cooking Tips
• Wh n grilling chick n, roasts, w ll-don st aks or
chops, and thick pi c s of m at, s ar on “HI”. Th n,
r duc th h at s tting to pr v nt xc ssiv flar -up.
This will allow th food to cook through without
burning th outsid .
• Aft r st aks, chops, or hamburg rs hav b n
allow d to s ar for approximat ly on minut , you
may slid a spatula und r th m at and turn it
approximat ly 90 d gr s to cr at a waffl patt rn.
• Us a m tal spatula inst ad of tongs or a fork to turn
th m at. A spatula will not punctur th m at
allowing juic s to scap .
• Turn th m at ov r only onc . Juic s ar lost wh n
st aks, chops or hamburg rs ar turn d s v ral tim s.
Th b st tim to turn th m at is aft r th juic s hav
b gun to bubbl to th surfac .
• To t st for don n ss, mak a small slash in th c nt r
of th m at, not th dg . This will pr v nt loss of
juic s.
• Occasionally th r may b flar -ups or flam s abov
th grill du to drops of fat falling on th flavor-
g n rator plat s. Us a long handl d spatula to mov
food to anoth r ar a until th flam s subsid .
• For as of cl aning, l av th char-grill on for 10
minut s wh n finish d grilling. This will h lp mak
cl anup asi r onc th char-grill has cool d down
and low r th h at b tw n cooking.
1. L ft front burn r control knob
2. L ft r ar burn r control knob
3. C nt r control knob
4. Right r ar burn r control knob
5. Right front burn r control knob
6. 30” mod l – On 12,000 BTU s al d burn rs
with porc lain/cast iron caps and automatic
ignition/r -ignition
36” mod l – On 16,000 BTU s al d burn rs
with porc lain/cast iron caps and automatic
ignition/r -ignition
7. 30” mod l – On 10,000 BTU s al d burn rs
with porc lain/cast iron caps and automatic
ignition/r -ignition
36” mod l – On 12,000 BTU s al d burn rs
with porc lain/cast iron caps and automatic
ignition/r -ignition
8. Stainl ss st l island trim
9. 36” mod l – On 16,000 BTU s al d burn rs
with porc lain/cast iron caps and automatic
ignition/r -ignition
10. Id ntification plat
11. 30” & 36” mod ls – On 6,000 BTU s al d
burn rs with porc lain/cast iron caps and
automatic ignition/r -ignition
12. 30” & 36” mod ls – On 8,000 BTU s al d
burn rs with porc lain/cast iron caps and
automatic ignition/r -ignition
36” fiv burn r mod l shown
Grill
Two-piece
drip pan
BurnerBurnerBurner
Flavor-
generator
plates
Drip trayDrip trayDrip tray


