manuals.online logo
Brands
  1. Home
  2. •
  3. Brands
  4. •
  5. Visionhitech
  6. •
  7. Security Camera
  8. •
  9. Visionhitech VD80SFHD2-VF User manual

Visionhitech VD80SFHD2-VF User manual

Dear Customers!
The lighting flash with an arrowhead symbol, within an equilateral triangle is
intended to alert the user to the presence of uninsulated dangerous voltage
within the product’s enclosure that may be of sufficient magnitude to
constitute a risk of electric shock to persons.
INFORMATION
CAUTION – To prevent electric shock and risk of the fire hazards
This installation should be made by a qualified service person and should conform to
all local codes.
The exclamation point within an equilateral triangle is intended to alert the
user to the presence of important operating and maintenance(servicing)
instructions in the literature accompanying the appliance.
This equipment has been tested and found to comply with limits for a Class A digital
device, pursuant to part 15 of the FCC Rules. These limits are designed to provide
reasonable protection against harmful interference when the equipment is operated
in a commercial environment. This equipment generates, uses, and can radiate radio
frequency energy and, if not installed and used in accordance with the instruction
manual, may cause harmful interference to radio communications.
Operation of this equipment in a residential area is likely to cause harmful interference
in which case the user will be required to correct the interference at his own expense.
WARNING
Changes or modifications not expressly approved by the manufacturer could void the
user’s authority to operate the equipment.
Do NOT use power source other than that specified.
Do NOT expose this appliance to rain or moisture.
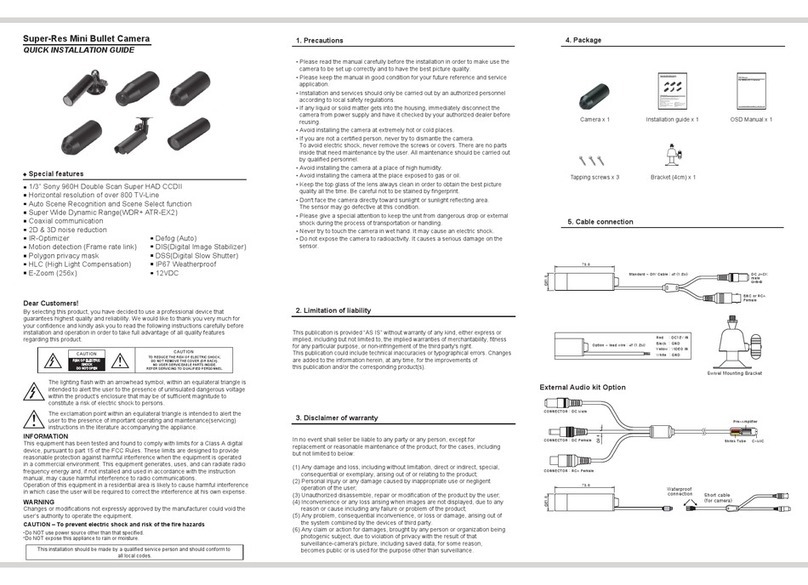
By selecting this product, you have decided to use a professional device that
guarantees highest quality and reliability. We would like to thank you very much for
your confidence and kindly ask you to read the following instructions carefully before
installation and operation in order to take full advantage of all quality features
regarding this product.
3OHDVHUHDGWKHPDQXDOFDUHIXOO\EHIRUHWKHLQVWDOODWLRQLQRUGHUWRPDNHXVHWKH
camera to be set up correctly and to have the best picture quality.
3OHDVHNHHSWKHPDQXDOLQJRRGFRQGLWLRQIRU\RXUIXWXUHUHIHUHQFHDQGVHUYLFH
application.
,QVWDOODWLRQDQGVHUYLFHVVKRXOGRQO\EHFDUULHGRXWE\DQDXWKRUL]HGSHUVRQQHO
according to local safety regulations.
,IDQ\OLTXLGRUVROLGPDWWHUJHWVLQWRWKHKRXVLQJLPPHGLDWHO\GLVFRQQHFWWKH
FDPHUDIURPSRZHUVXSSO\DQGKDYHLWFKHFNHGE\\RXUDXWKRUL]HGGHDOHUEHIRUH
reusing.
$YRLGLQVWDOOLQJWKHFDPHUDDWH[WUHPHO\KRWRUFROGSODFHV
$YRLGLQVWDOOLQJWKHFDPHUDDWDSODFHRIKLJKKXPLGLW\
$YRLGLQVWDOOLQJWKHFDPHUDDWWKHSODFHH[SRVHGWRJDVRURLO
,I\RXDUHQRWDFHUWLILHGSHUVRQQHYHUWU\WRGLVPDQWOHWKHFDPHUD
To avoid electric shock, never remove the screws or covers. There are no parts
inside that need maintenance by the user. All maintenance should be carried out
by qualified personnel.
.HHSWKHWRSJODVVRIWKHOHQVDOZD\VFOHDQLQRUGHUWRREWDLQWKHEHVWSLFWXUH
quality all the time. Be careful not to be stained by fingerprint.
'RQWIDFHWKHFDPHUDGLUHFWO\WRZDUGVXQOLJKWRUVXQOLJKWUHIOHFWLQJDUHD
The sensor may go defective at this condition.
3OHDVHJLYHDVSHFLDODWWHQWLRQWRNHHSWKHXQLWIURPGDQJHURXVGURSRUH[WHUQDO
shock during the process of transportation or handling.
1HYHUWU\WRWRXFKWKHFDPHUDLQZHWKDQG,WPD\FDXVHDQHOHFWULFVKRFN
'RQRWH[SRVHWKHFDPHUDWRUDGLRDFWLYLW\,WFDXVHVDVHULRXVGDPDJHRQWKH
image sensor.
7KLVSXEOLFDWLRQLVSURYLGHG³$6,6´ZLWKRXWZDUUDQW\RIDQ\NLQGHLWKHUH[SUHVVRU
implied, including but not limited to, the implied warranties of merchantability, fitness
IRUDQ\SDUWLFXODUSXUSRVHRUQRQLQIULQJHPHQWRIWKHWKLUGSDUW\VULJKW
This publication could include technical inaccuracies or typographical errors. Changes
are added to the information herein, at any time, for the improvements of
this publication and/or the corresponding product(s).
,QQRHYHQWVKDOOVHOOHUEHOLDEOHWRDQ\SDUW\RUDQ\SHUVRQH[FHSWIRU
replacement or reasonable maintenance of the product, for the cases, including
but not limited to below:
(1) Any damage and loss, including without limitation, direct or indirect, special,
consequential or exemplary, arising out of or relating to the product;
3HUVRQDOLQMXU\RUDQ\GDPDJHFDXVHGE\LQDSSURSULDWHXVHRUQHJOLJHQW
operation of the user;
8QDXWKRUL]HGGLVDVVHPEOHUHSDLURUPRGLILFDWLRQRIWKHSURGXFWE\WKHXVHU
,QFRQYHQLHQFHRUDQ\ORVVDULVLQJZKHQLPDJHVDUHQRWGLVSOD\HGGXHWRDQ\
reason or cause including any failure or problem of the product;
(5) Any problem, consequential inconvenience, or loss or damage, arising out of
the system combined by the devices of third party.
$Q\FODLPRUDFWLRQIRUGDPDJHVEURXJKWE\DQ\SHUVRQRURUJDQL]DWLRQEHLQJ
SKRWRJHQLFVXEMHFWGXHWRYLRODWLRQRISULYDF\ZLWKWKHUHVXOWRIWKDW
VXUYHLOODQFHFDPHUDVSLFWXUHLQFOXGLQJVDYHGGDWDIRUVRPHUHDVRQ
becomes public or is used for the purpose other than surveillance.
1. Precautions
2. Limitation of liability
3. Disclaimer of warranty
4. Package
CAUTION
CAUTION
5,6.2)(/(&75,&
6+2&.
'212723(1
725('8&(7+(5,6.2)(/(&75,&6+2&.
'21275(029(7+(&29(525%$&.
1286(56(59,&($%/(3$576,16,'(
5()(56(59,&,1*7248$/,),('3(56211(/
5. Installation
3ODVWLF.H\
,QVHUWDQGWZLVWWKHSODVWLFNH\WRWKHUHFWDQJXODUJURRYHRQWKHERWWRPRIWKH
GRPHFRYHU7KHFDPHUDLVGHVLJQHGIRU,QGRRUXVHRQO\
*
5-1. How to open the dome
Drilling template
x 1
,QVWDOODWLRQJXLGH
x 1
Camera x 1
Tapping screws x 3
3ODVWLF
.H\ x 1
3ODVWLFDQFKRU
x 3
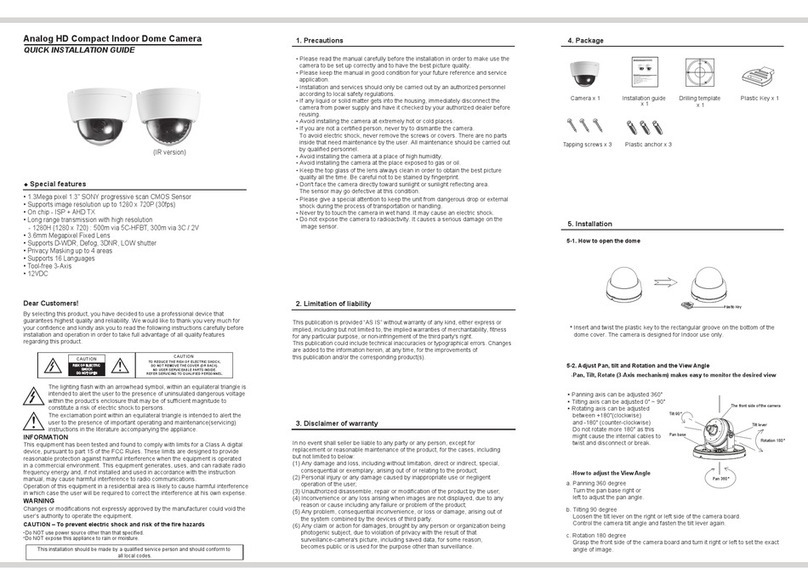
5-2. Adjust Pan, tilt and Rotation and the View Angle
D3DQQLQJGHJUHH
E7LOWLQJGHJUHH
F5RWDWLRQGHJUHH
Turn the pan base right or
OHIWWRDGMXVWWKHSDQDQJOH
*UDVSWKHIURQWVLGHRIWKHFDPHUDERDUGDQGWXUQLWULJKWRUOHIWWRVHWWKHH[DFW
angle of image.
/RRVHQWKHWLOWOHYHURQWKHULJKWRUOHIWVLGHRIWKHFDPHUDERDUG
Control the camera tilt angle and fasten the tilt lever again.
G
3DQQLQJD[LVFDQEHDGMXVWHGÛ
G
7LOWLQJD[LVFDQEHDGMXVWHGÛaÛ
G
5RWDWLQJD[LVFDQEHDGMXVWHG
EHWZHHQÛFORFNZLVH
DQGÛFRXQWHUFORFNZLVH
'RQRWURWDWHPRUHÛDVWKLV
might cause the internal cables to
twist and disconnect or break.
-How to adjust the View Angle
OSD Controller
x 1
QUICKINSTALLATION GUIDE
Hi-Res Indoor Dome Camera
◆Specialfeatures
Ɣ
´+,*+5(62/87,21683(56(16,7,9(&&'
(IRversion)
Ɣ
Widerange of Auto White Balance
※237,219DULIRFDO/HQVaPP
Ɣ
79/LQHV&RORU79/LQHV%:
Ɣ
Demoire
D-WDR
Ɣ
6PDUW,5,5YHUVLRQ
Ɣ
2DDNR / Dead pixel compensation
-Pan, Tilt, Rotate (3-Axis mechanism) makes easy to monitor the desired view
(IR version)
QUICK INSTALLATION GUIDE
FULL HD Dome Camera
Tilt lever
5RWDWLRQÛ
3DQÛ
7LOWÛ
3DQEDVH
The front side of the camera
- Varifocal Lens adjustment (Zoom and Focus)
< NOTE : >
For Varifocal lens IR Version, if any difficulty with lens adjustment,
you can remove the LED Cover pushing the hooks and adjust the
Zoom and Focus.
386+
386+
/('&29(5
/('&29(5
)RFXV.QRE
=RRP.QRE
0HJDSL[HO621<3URJUHVVLYH6FDQ([PRU&026
,PDJH6HQVRU
PP)L[HGOHQVaPP9DULIRFDO/HQV
:LGH'\QDPLF5DQJH
''15'LJLWDO1RLVH5HGXFWLRQ
6HQVXS
8QFRPSUHVVHGKLJKTXDOLW\)XOO+'YLGHRZLWKIXOOIUDPHV
+'9LGHRWUDQVPLVVLRQXSWR0
6WDQGDUG*V9LGHR,QWHUIDFH,QFDVHRI)L[HG/HQV
SISV6',2XWSXWSISV6HOHFWDEOHRSWLRQ
6WDQGDUG*V9LGHR,QWHUIDFH,QFDVHRI9DULIRFDO/HQV
SISV6',2XWSXW
0,59LHZGLVWDQFH,59HUVLRQ,&50HFKDQLVPEXLOWLQ
◆
Special features
①/RRVHQWKH]RRPNQREDQGDGMXVWWRWKHGHVLUHGYLHZDQJOHEHWZHHQ7HOH
and Wide.
②7LJKWHQWKH]RRPNQRE
③/RRVHQWKHIRFXVNQREDQGDGMXVWWKHIRFXVEHWZHHQ1HDUDQG)DU
④Tighten the focus knob.
140707-1SFHD2
5. Installation
5-4. Application of HD-SDI output
Impedance alliance in the system connection.
Make sure to connect the cable with the power off. Please locate the impedance
switches of each equipment as instructed. Locate the switch to Hi-z position for the
LQWHULPHTXLSPHQWV/RFDWHWKHVZLWFKWRȍIRUWKHODVWHTXLSPHQW
&RD[LDO
&+)%7
0D[0
1HWZRUN6HUYHU
'HFRGHU
1HWZRUN6HUYHU
(QFRGHU
6',0RQLWRU
5HFHLYHU
+'0RQLWRU
3&'95
FK'LJLWDO6SOLWWHU
'95
6WDQG$ORQH'95
2SWLFDO7UDQVPLWWHU
2SWLFDOFDEOH
2SWLFDO5HFHLYHU
.P
5HSHDWHU
&RD[LDO
&+)%7
0D[0
6. Function and operation
LENS DC
SHUTTER
D-WDR
WDR
ATW
AUTO
2DNR
CAM TITLE
LANGUAGE
SHARPNESS
FRAMERATE
FACTORY
3DNR
D-EFFECT
DEFECT
MONITOR
VIDEO.OUT
LSC RESOLUTION RETURN
RETURN
LEVEL
MOTION
RS485
$:&ĺ6(7
COLOR B/W
INDOOR OUTDOOR
SMART NR
PRIVACY
PELCO-C
RETURN
VERSION
RETURN
MANUAL
BLC HSBLC OFF
AGC
DEFOG
SENS-UP BRIGHTNESS RETURN
MANUAL
EXPOSURE
BACKLIGHT
WHITE BAL
DAY&NIGHT
NR
SPECIAL
ADJUST
RESET
EXIT
SETUP
6-1. On Screen Display
6-2. Configure the camera setting
8. Dimension (mm)
9. Specification
MODEL FULL HD Dome Camera
90
Ø113.8
Ø81.4
48.2
120°
120°
120°
Ø5
Ø91.4
DC JACK
BNC Black Color (HD-SDI)
BNC Yellow Color (Analog)
Driling template
Plastic anchor(3EA)
Camera set
Tapping Screw(3EA)
Dome Cover Ass'y
ྙ
Paste a Drilling Template on the ceiling(or wall).
ྚ
Drill screw points which will be done for installation.
Fix the plastic anchors in the holes(in case of masonry ceiling or wall).
ྛ
Mount the camera set by using Tapping Screws with Ø4 provided.
ྜ
Set the position and angle of the cameras to a desired direction and
assemble the dome cover
5-3. How to mount to Ceiling
Function and operation
-For use OSD menu, please connect the OSD control PCB(provide) to the
connector Press the Tack SW(OSD Key) to open OSD menu.
-How to use
Connect an Extra video output(BNC cable) to the camera and connect its
BNC connector to the test monitor for adjustment.
EXT-Video
UP
RIGHTLEFT
DOWN
The backside of
Camera board
OSD Control PCB ①For Fixed Lens, you can configure the camera
setting through RS-485 control terminal only.
This RS-485 control terminal is an option.
②For Varifocal Lens, you can configure the
camera setting by using the external
OSD controller.
< NOTE : >
For detailed information regarding
OSD menu options, refer to the guide
of the OSD Manual.
7. Troubleshooting
Before asking for repairs, refer to the following table.
If the problem persists, please contact the dealer or your service center.
Problems
Nothing appears on the
screen.
The dim image on the
screen.
The dark image on the
screen.
The camera is not
working properly, and
the body of the camera
is hot.
Color is not correct.
The screen is flickering.
Please check that the power cord and line connection
between the camera and monitor are fixed properly.
Please check that you have properly connected VIDEO
cable to the camera VIDEO output jack.
Is lens stained with dirt? Clean your lens with soft,
clean cloth.
Set the monitor to proper condition.
If the camera is exposed to too strong light, change the
camera position.
Please check if the power supply is within the
specification & cables.
(Due to the voltage drop with distance and gauges,
LED will light poor)
Adjust the contrast feature of the monitor.
,IWKHUHLVDQLQWHUPHGLDWHGHYLFHVHWWKHȍ+L=
properly (Please check the impedance)
Please check if the power supply is regulated and is
within the standard requirement of the products
Please check the setting of White Balance setup.
Please check if the camera is facing directly towards
sunlight or fluorescent light.
Troubleshooting
*
*
*
*
*
*
*
*
*
*
*
Sensor Device 1/2.8" SONY Progressive Scan Exmor CMOS Image Sensor
Total Pixels 1952(H) x 1116(V)
Ŷ)L[/HQV1RQ,59HUVLRQ ŶFix Lens IR Version
Effective Pixels 1944(H) x 1104(V)
H. Resolution More than 1100 TVL
Progressive Scan
Scanning system
CVBS output 9SS&RPSRVLWHȍ2SWLRQ
S/N Ratio More than 52dB (AGC Off)
Max. Illumination 0.1Lux (F1.2 @ 30IRE) 0Lux
ICR
Video output 1280 x 720 60p, 1920 x 1080 30p(Mode Select) SDI Output
Video output
format 1.485G/s, HD-SDI Output(SMPTE 292M)
Day&Night AUTO
Communication RS485 (Option)
Power Source 12VDC
Operating current 170mA 170mA(IR Off), 350mA (IR On)
Lens 4mm Board Lens
Operating Temp/
Humidity -10℃~ 50℃(Humidity : 0% RH ~ 90% RH)
Measurement(mm) ĭ[+
Weight (Approx.g) 200g
Function
2D/3DNR Off / On
Sens-up Off / x2 ~ x30
Shutter Speed 1/30 ~ 1/50,000sec
BLC WDR / BLC
White Balance ATW / AWB / MANUAL
Anti-Fog
6SHFLILFDWLRQVDUHVXEMHFWWREHFKDQJHGZLWKRXWQRWLFHIRULPSURYHPHQW
Off / On
IR View Distance 20M at the moonless night
(Leds x 20ea)
IR MTBF 20,000 hours
Video output 1280 x 720 60p/50p/30p/25p,
1920 x 1080 60p/50p/30p/25p(Mode Select) SDI Output
Video output
format 1.485G/s, 2.97G/s HD-SDI Output (SMPTE 292M/424M)
Ŷ9DULIRFDO/HQV1RQ,59HUVLRQ Ŷ9DULIRFDO/HQV,59HUVLRQ
180mA(IR Off), 350mA(IR On)
Operating current 180mA
Lens 2.8~11mm Varifocal Lens
210g
Weight (Approx.g)

Other Visionhitech Security Camera manuals

Visionhitech VD80AHD User manual

Visionhitech

Visionhitech VD80AHD User manual

Visionhitech VN6XEH User manual

Visionhitech

Visionhitech VN6XEH User manual

Visionhitech VPD200SM2i Manual

Visionhitech

Visionhitech VPD200SM2i Manual

Visionhitech VC58EHi Manual

Visionhitech

Visionhitech VC58EHi Manual

Visionhitech VDA100EHi Manual

Visionhitech

Visionhitech VDA100EHi Manual

Visionhitech VC58EP-12 User manual

Visionhitech

Visionhitech VC58EP-12 User manual

Visionhitech VD101SMi Manual

Visionhitech

Visionhitech VD101SMi Manual

Visionhitech VA300 User manual

Visionhitech

Visionhitech VA300 User manual

Visionhitech VN6XSFHD2 User manual

Visionhitech

Visionhitech VN6XSFHD2 User manual

Visionhitech VD70S3 Series User manual

Visionhitech

Visionhitech VD70S3 Series User manual

Visionhitech VQ29SFHD2 User manual

Visionhitech

Visionhitech VQ29SFHD2 User manual

Visionhitech VC58SMi User manual

Visionhitech

Visionhitech VC58SMi User manual

Visionhitech VC58S User manual

Visionhitech

Visionhitech VC58S User manual

Visionhitech VD120TH-12 User manual

Visionhitech

Visionhitech VD120TH-12 User manual

Visionhitech VDA101S3-VFIR User manual

Visionhitech

Visionhitech VDA101S3-VFIR User manual

Visionhitech VB21S3 User manual

Visionhitech

Visionhitech VB21S3 User manual

Visionhitech VD70CS(X) - 36IR User manual

Visionhitech

Visionhitech VD70CS(X) - 36IR User manual

Visionhitech VDA30PN User manual

Visionhitech

Visionhitech VDA30PN User manual

Visionhitech VC56TH -12 User manual

Visionhitech

Visionhitech VC56TH -12 User manual

Visionhitech VD70CSHR-36IR User manual

Visionhitech

Visionhitech VD70CSHR-36IR User manual

Popular Security Camera manuals by other brands

Delta APTI-27V2-36W - 1080p 3.6 mm user manual

Delta

Delta APTI-27V2-36W - 1080p 3.6 mm user manual

i-PRO WV-S1536LT installation guide

i-PRO

i-PRO WV-S1536LT installation guide

i3 International Ax63Z Series user manual

i3 International

i3 International Ax63Z Series user manual

HIK VISION DS-2DF1-77XY Technical manual

HIK VISION

HIK VISION DS-2DF1-77XY Technical manual

Elmo Vandal Resistant Dome Camera TND4204VX instruction manual

Elmo

Elmo Vandal Resistant Dome Camera TND4204VX instruction manual

i-PRO WV-S22600-V2L installation guide

i-PRO

i-PRO WV-S22600-V2L installation guide

Abus TVAC19100C user guide

Abus

Abus TVAC19100C user guide

E-line ELI-EPTZ-27DN Operation manual

E-line

E-line ELI-EPTZ-27DN Operation manual

X-Vision XIR621 instruction manual

X-Vision

X-Vision XIR621 instruction manual

Delta OMEGA-PTZ-22P4-4P user manual

Delta

Delta OMEGA-PTZ-22P4-4P user manual

HIK VISION DS-2DE2103 user manual

HIK VISION

HIK VISION DS-2DE2103 user manual

HIK VISION UD.6L0201B2151A02 quick start guide

HIK VISION

HIK VISION UD.6L0201B2151A02 quick start guide

D-MAX DCC-500D manual

D-MAX

D-MAX DCC-500D manual

x-net Network Box Camera user guide

x-net

x-net Network Box Camera user guide

InMotion in51S3P2D28V22 quick start guide

InMotion

InMotion in51S3P2D28V22 quick start guide

X-Vision VIS430R Start guide

X-Vision

X-Vision VIS430R Start guide

HIK VISION H1T Series user manual

HIK VISION

HIK VISION H1T Series user manual

HIK VISION DS-2CD2712F-I Quick operation guide

HIK VISION

HIK VISION DS-2CD2712F-I Quick operation guide

manuals.online logo
manuals.online logoBrands
  • About & Mission
  • Contact us
  • Privacy Policy
  • Terms and Conditions

Copyright 2025 Manuals.Online. All Rights Reserved.