10 11
SPOOLING
CAUTION
Always spool the rope onto the
drum as indicated by the drum
rotation decal on the winch.
Required for automatic brake to
work and for correct installation
orientation.
Always prestretch rope and respool
under load before use.Tightly
wound rope reduces chances of
“binding”, which is rope working
its way down into a loosely wound
rope layer, and catching or
damaging itself.
SPOOLING
THE FOLLOWING STEPS ARE VERY IMPORTANT
AND IFTHEY ARE NOT COMPLETELY FOLLOWED
THE LIFE OFTHEWINCH AND ROPE MAY BE
COMPROMISED.
1. Mount theWarn Aluminum Hawse Fairlead to
the winch mount using the supplied hardware.
Always mount the fairlead with the labels in
the upright position (labels on top and clearly
visible). Insert a 1/2" x 2" bolt through each of
the two fairleadmounting holes and through
the winch mount. Place a 1/2" flatwasher onto
each bolt. Install a 1/2" lock nut onto each bolt
and tighten to 65 ft/lbs.
2. Slide the abrasion sleeve over the rope from
the end opposite the hook. Slide the sleeve
back to the hook end of the rope.
3. Apply LockTite 271 or equivalent product to
the supplied 3/8-24 x3/4" long button head
fastener.
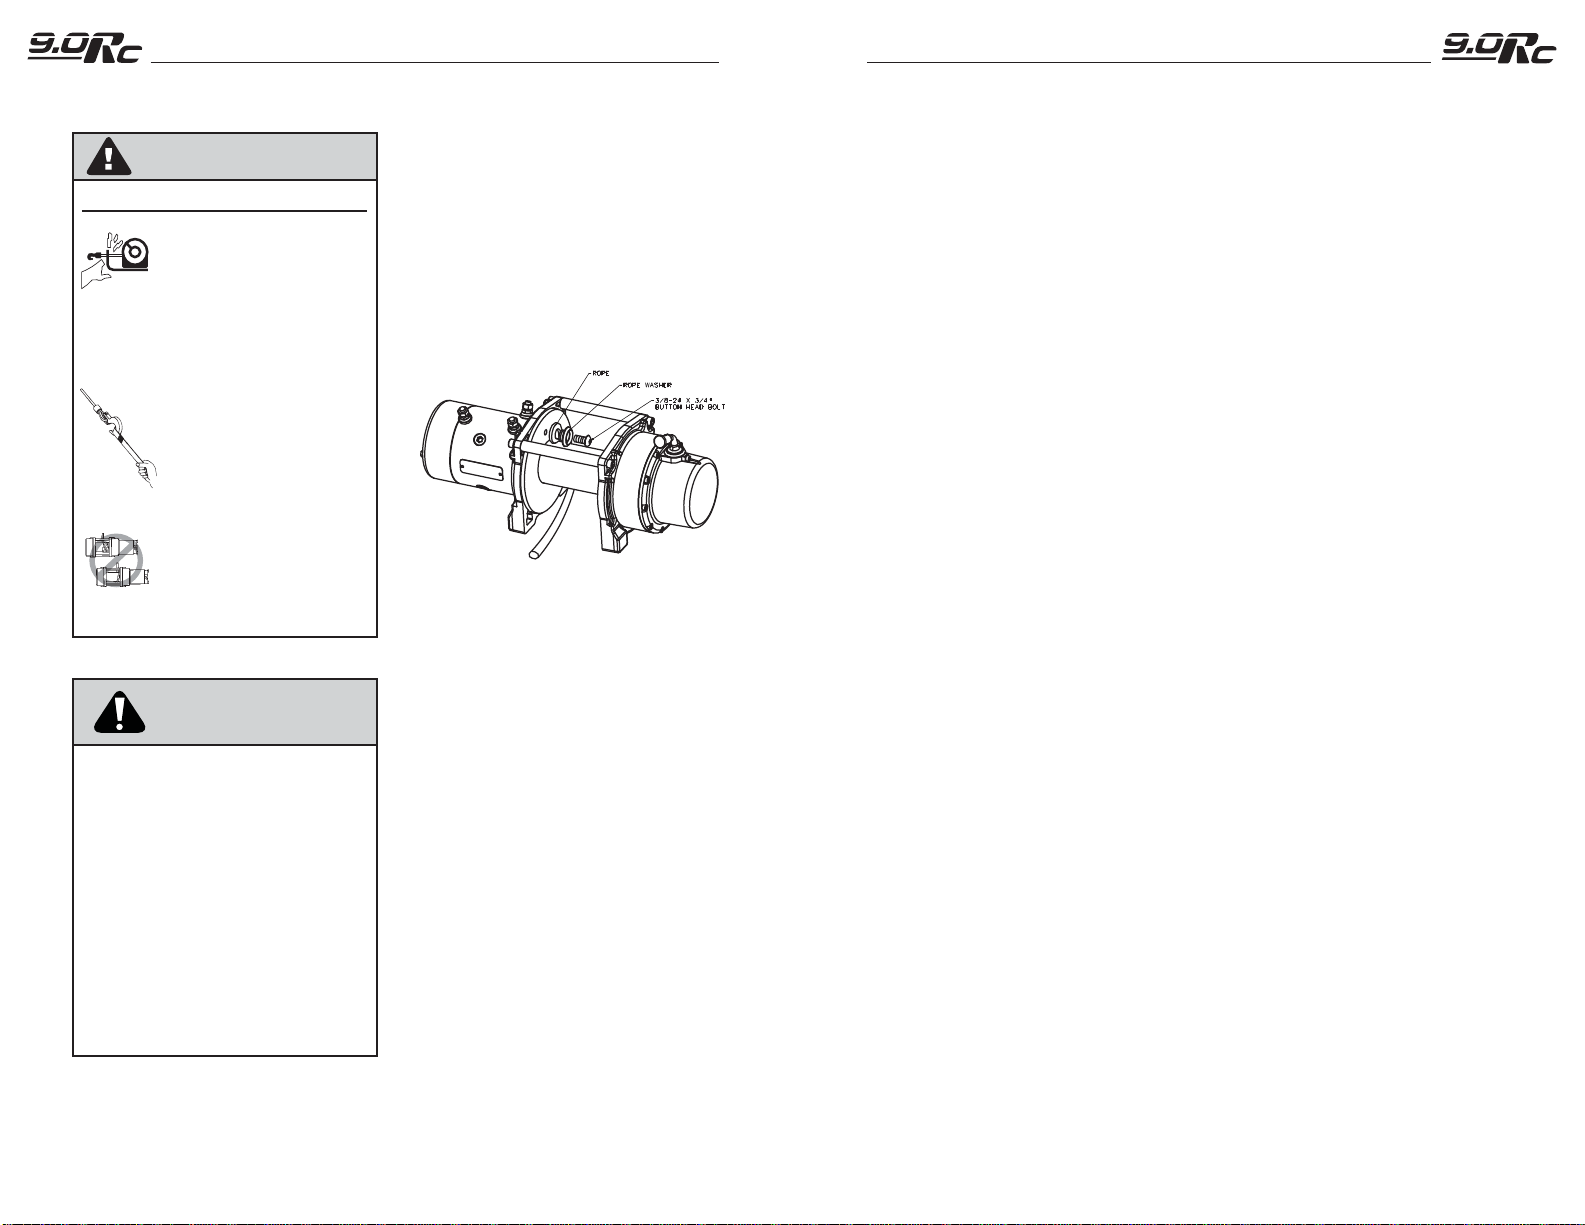
4.
Install the new synthetic rope using the button
head fastener supplied and the machined rope
washer. Insert the synthetic rope through the
aluminum fairlead and around the winch drum
from the bottom. Insert the button head bolt
into the machined rope washer and place the
synthetic rope on the machined rope washer.
Install the button head bolt in the 3/8-24 hole in
the side of the winch drum. See Figure for
detail.
5. Tighten the 3/8-24 button head bolt to
38-42 ft/lbs.Turn the winch clutch level to the
“engaged” position.
6. It is now necessary to spool the remaining
rope onto the winch drum. Choose a FLAT
location that is large enough to run out the
entire length of rope. Attach the hook end of
the rope to a suitable anchor point and back
the vehicle away from the anchor point leaving
approximately 6 ft of slack rope lying on the
ground. Before getting out of the vehicle, set
the parking brake, place the vehicle in gear or
park and turn the vehicle off.
7. Connect the remote control to the winch.
Standing approximately 6 ft away from the
winch, power in the winch until there is 6-8
wraps onto the winch drum. Disconnect the
remote control from the winch. Hold tension on
the rope with one hand; carefully push the rope
to the side of the drum the rope is attached to
so there are no gaps between each coil on the
drum. Be sure to check that the rope is winding
off of the bottom of the drum, not the top, or the
automatic load holding brake will not function
properly. (If the rope is winding off the top you
have powered the winch “out” instead of “in”
on the remote control)
8. If there is still rope laying on the ground, back
the vehicle away until the rope is off of the
ground.
9.
The following steps should be done using two
people for proper safety. If you attempt to tension
your rope alone by sure to always engage the
parking brake, place the transmission in gear and
turn the vehicle off every time you exit the vehicle
to inspect the winch rope. Never exit the vehicle
with a load on the winch rope.Tensioning the rope
is critical to ensure a long product life.Tensioning
the rope prevents the rope from sinking into the
lower layers under load.
10.Use care to evenly wrap each layer to prevent
damage to the rope.
11.Pass the remote control through the driver’s
window for the driver of the vehicle to operate.
Instruct your assistant to stand to the side of
the vehicle and away from the winch rope.Your
assistant should signal you if the rope is winding
correctly by watching it move across the fairlead
as the rope is powered in. Start the vehicle and
place the transmission in neutral. Release the
parking brake while applying moderate brake
pedal pressure. Power the winch remote in.
After winching in for approximately 6 ft, stop
winching. Slowly let up off of the brake pedal
and then apply the parking brake.This will
ensure that there is no load on the winch rope.
Then place the transmission in park or gear and
turn the vehicle off. Exit the vehicle and inspect
the winch rope is being evenly wound onto the
winch drum and not sinking into the lower layer.
If the rope is sinking, power the rope out and
repeat this step from the beginning with more
brake pedal pressure.
12. Once you are convinced the rope is winding on
the winch properly, return to the vehicle. Pass
the remote control through the driver’s window
for the driver of the vehicle to operate. Start
the vehicle and place the transmission in
neutral. Release the parking brake while
applying moderate brake pedal pressure.
Power the winch remote in. After winching in
for approximately 6 ft, stop winching. Slowly
let up off of the brake pedal and then apply the
parking brake.This will ensure that there is no
load on the winch rope.Then place the
transmission in park or gear and turn the
vehicle off. Exit the vehicle and inspect the
winch rope is being evenly wound onto the
winch drum and not sinking into the lower
layer. If the rope is sinking, power the rope out
and repeat this step from the beginning with
more brake pedal pressure.
13. Repeat step 12 until the vehicle is within 6 ft
of the winch anchor. Once within 6 ft, slowly let
up off of the brake pedal and then apply the
parking brake.This will ensure that there is no
load on the winch rope.Then place the
transmission in park or gear and turn the
vehicle off. Exit the vehicle. Disconnect the
hook from the anchor.While holding onto the
supplied hook strap, hold tension on the winch
rope and slowly power in the winch by
“pulsing” the power in on the remote control
until the hook is within 3 ft of the fairlead. Stop
winching in and attach the hook to a suitable
anchor point on the vehicle. DO NOT POWER
THE HOOK INTOTHE FAIRLEAD.This would
cause irreparable damage to the fairlead. Once
the hook is suitably attached to the vehicle,
power in the remaining slack in the winch rope
by “pulsing” the power in on the remote until
there is minimal slack in the winch rope.
OPERATING INSTRUCTIONS
OPERATING INSTRUCTIONS
WARNING
• Always keep hands clear of
wire rope, hook loop, hook
and fairlead opening during
installation, operation, and
when spooling in or out.
• Always use extreme caution
when handling hook and
wire rope during spooling
operations.
• Always use supplied hook
strap whenever spooling
wire rope in or out, during
installation or operation to
avoid injury to hands or
fingers.
• Never operate winch with
less than 8 wraps of rope
around the drum. Rope
could come loose from the
drum, as the rope
attachment to the drum is
not designed to hold a load.
To avoid severe injury or death: