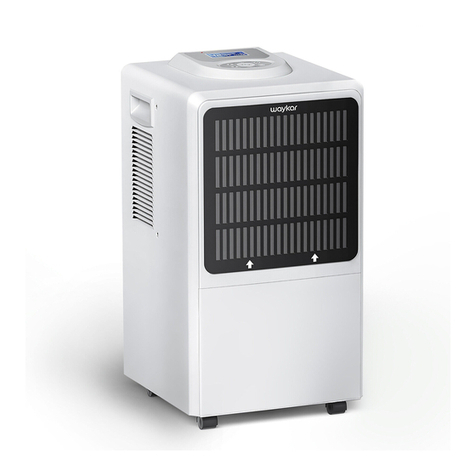
Waykar DP900B User manual

Commercial Dehumidifier
Please read the manual carefully
before using the unit
DP900B
USER MANUAL

Thank you for purchasing our dehumidifier.
Waykar wishes that our products and services can bring convenience to your work
and life.We highly recommend that you keep the manual for reference if you
encounter unexpected events using the unit.
Please read the manual carefully to ensure proper use of the dehumidifier. Our
dehumidifiers are widely used in family bedrooms, bathrooms, basements, offices
and storage rooms, etc.
The dehumidifiers from provide quick and efficient operation to reduce Waykar
room's humidity and bring you a healthy and comfortable life.
If there is any problem of the product, please contact Waykar Customer Service at
support@waykar.com with your Purchase Order ID to help you address the problem
more effectively.
FOR CUSTOMERS
TO ACCESS CUSTOMER SUPPORT FASTER

To prevent any internal damage, it is very important to
keep refrigeration units (like this one) upright throughout
their journey.
Please leave it standing upright and outside the box for
24 HOURS before plugging it in.
BEFORE FIRST USE:

The graphics and functions provided in this manual may not be the same as
the actual product. Please always refer to the actual product.
The model of the machine on the manual is for reference only. Please check
the corresponding content and operate the machine based on the actual
product.
The right to interpret the relevant terms belongs to the company.
TABLE OF CONTENTS
Safety Instructions ........................................................................01
Parts Description ..........................................................................02
Operation Descriptions .................................................................03
Status Descriptions.......................................................................06
Care & Cleaning ...........................................................................08
Common Faults & Solutions .........................................................09
Safety Notes .................................................................................10
Specifications................................................................................11
Warranty & Contact Us .................................................................12

SAFETY
INSTRUCTIONS
For your safety, please read and keep the manual properly before or after using the unit.
Please use the product in accordance with the instructions in this manual.
Unplug the dehumidifier from the power source when cleaning.
Do not splash water into the machine or put it near places where it can be splashed.
Please do not place the machine near a heating device or dangerous inflammable things.
Do not put your fingers or any hard materials into the air inlet or outlet.
Do not sit on the unit.
Drain the water properly (manual or continuous drainage).
Please make sure that the drain hose is installed on a downward slope so that the water can
be drained out properly.
Do not place the machine on uneven surfaces.
Do not spray water on this machine.
Do not spray pesticides or flammable liquid on this machine.
Do not put or place heavy objects on the machine or place children and pets on the unit.
Do not place this machine in a confined space.
If the power cord is damaged, please get a technical staff of the company to replace it. The
replacement must be approved.
When using the laundry mode, please keep 40cm clearance between the clothes and the
unit outlet, to avoid the water drips into the dehumidifier and damaging the unit.
The wiring of the machine must be in accordance with
national wiring regulations. The power cord should be
connected to a reliable external naught wire.
The fixed wiring connected to the machine must be
equipped with an all-pole disconnect device (air switch)
with a contact distance of at least 3mm.
The specification of the fuse: 5A/250V.
At least 1m distance shall be kept from the surround
objects when using the unit.
The minimum clearance between the unit and the
surrounding may be ensured as the following pictures.
P.01
8in
20in

PARTS
DESCRIPTION
P.02
Continuous
Drainage Port
Control Panel

1. Control Panel
Timing Display
(Display timer and working hours)
Temperature Level
(Display temperature level and error)
Power
Setting
Cleaning
Humidity Timer
Power
Timing
Set up
Down
Raise
Clean
Intelligent dehumidifier
Button Instructions
Up Button
Turn up the parameters including
humidity level, timing or cleaning hours.
Power
Turn on or off the unit.
Setting Button
Set up the humidity, timing hours or
cleaning mode, etc.
Down Button
Turn down the parameters including humidity
level, timing or cleaning hours.
Timer Button
Turn on or off the timer function or set up
the timing hours.
Cleaning Button
Turn on or off the cleaning function or set
up the cleaning hours.
P.03
OPERATION
DESCRIPTIONS

P.04
2. Setting
When the unit is ON, press [POWER] to enable Standby mode. Then the unit stops working
and the standby indicator turns on.
When the unit is OFF, press [POWER] to turn on the unit. Then the unit starts working and
the standby indicator turns off.
Power
Humidity Setting
When the unit is ON, press [Up] or [Down] to enter the humidity setting. The humidity
display flashes and humidity " " flashes to show the level. Press [Setting] again or
wait for a while, to exit the setting.
When setting the humidity, press [Up] or [Down] to adjust the humidity level between 10-
90%RH (noncycle setting). Press [Up] once to increase 1%RH of the humidity level, while
press [Down] once to decrease 1%RH of the humidity level. Hold the buttons to
continuously increase/decrease the level. When setting finished, press the [Setting] once or
wait for seconds to exit the humidity setting.
Timer Setting
If setting up the timer in OFF mode, then it's the power-on delay. If setting up the timer in
ON mode, then it’s power-off delay. But if the timing hour is 00h, the setting will be invalid.
When the dehumidifier is on, press [Timer] button to enter timing setting. The timer icon
lights on, and the number " " flashes and shows the remaining working hours. Press
[Timer] again or wait for seconds to exit the setting. In the timer setting, press [Up] or
[Down] to adjust the timing hours between 00-24 (noncycle setting). Press [Up] once to
increase one hour while decrease one hour with button [Down]. Hold the buttons to
continuously increase/decrease the hours. When setting finished, press [Setting] once or
wait for seconds to exit the timer setting.
Continuous Dehumidifying
Set up the humidity level at 10% RH, and the unit will enter continuous dehumidifying mode
(the icon lights). The dehumidifying is not affected by the humidity level has been set
before.
OPERATION
DESCRIPTIONS
MAX

OPERATION
DESCRIPTIONS
● Cleaning Time Setting
When the unit is on, hold the button [Cleaning] to enter cleaning setting. The icon Cleaning
lights up, and the number " "displays the cleaning days. Press the button once again or
wait for seconds to exit the setting.
In the cleaning setting, press [Up] or [Down] to adjust the cleaning time between 01-99 days
(noncycle setting). Press [Up] once to increase 1 day while decreasing 1 day by pressing
[Down] once. Hold the buttons to continuous increase/decrease the days. When setting
finished, press button [Setting] once or wait for seconds to exit the setting.
Cleaning Setting
● Check Running Time
When the unit is OFF, hold the button [Cleaning] to check the cleaning status (the total
working time of the dehumidifier). The time will be shown in the timer and humidity displays.
Press the ON/OFF button once again or wait for seconds to exit the setting.
● Reset Running Time
In the cleaning query mode, press [Setting] once to reset the total cleaning running time
(total working time of the fan).
P.05

P.06
The compressor and fan will stop working successively when turn off the dehumidifier.
The compressor will stop working immediately, and the fan stops working later, whenever the
High/Low-Temperature Protection is triggered, the humidity level set before is reached, or
breakdown occurs.
Compressor 3 Minutes Delay Protection: After the unit has stopped, it can not be restarted in
the first 3 minutes to protect compressor operation. The unit will restart automatically after 3
minutes.
Parameter Memory Function : If the unit stops unexpectedly due to a power cut, it will restart
with the previous function setting such as Cleaning time setting, Humidity level or Power
On/OFF status.
1. Unit Working Description
2.Indicator Descriptions
The icon turns off, while the indicator Smart Dehumidifying lights up when turning on the
unit.
The icon light on, while the indicator Smart Dehumidifying turns off when turning off the
unit.
The icon flashes when the fan starts working in time-delay; the icon lights on when
the fan start working; the icon turns off when the fan stops working.
The icon flashes when the compressor starts working in time-delay; the icon lights
on when the compressor starts working; the icon turns off when the compressor stops
working (Defrost status).
When the ambient humidity level reaches the humidity level set before, the compressor stops
working. Then the icon and humidity meter flash simultaneously.
When the cleaning level is reached, the indicator lights up. When the status is
dismissed, the indicator turns off.
When the unit enters into high-temperature protection mode, the humidity display flashes
and reads .
When the unit enters into low-temperature protection mode, the humidity display flashes and
reads .
When the unit is in defrost mode, the icon lights up;
when the unit exits defrost mode, the icon turns off.
STATUS
DESCRIPTIONS
Run
Run
Run
Dehumidify
Dehumidify
Dehumidify
Run
Clean
Defrost
Defrost

3.Error&protection Code
1. If problems were not solved, please unplug the unit and send the unit back for repairment.
2. When the unit shows E1,E2, E4 error codes, it can still work. But some function are
disabled.
If the malfunction is still present, please don't hesitate to contact Waykar Customer Service
email at .support@waykar.com
Note
Change the sensor and connecting cable of the RHI-112A port.
Change the temperature sensor of PTI port.
Make sure the water tank is well placed, and the WF port is properly
connected.
Change the sensor and connecting cable of the RHI-112A port.
Number Error Code Handling Method
E1
E2
E3
E4
1
2
3
4
Make sure the display circuit has been connected right, and the
DISPLAY port is well connected.
No problem. The unit resumes working when unit temperature goes
down.
No problem. The unit resumes working when unit temperature goes
up.
5
6
7
E6
P.07
STATUS
DESCRIPTIONS

Turn the dehumidifier off and remove the plug from the wall outlet before cleaning.
A. Housing Washing
Do not use volatile chemicals, gasoline, detergent, or other related detergents to clean the
exterior, for they may damage the coating to accurate the corrosion.
B. Filter Cleaning
It's advised to clean the filter regularly and properly. Make sure clean the filter at least once
a month. Clean the unit thoroughly before idling the unit for long time, to prevent bacteria
and mould breed.
1. Remove the inlet panel and get the filter out.
2. Clean the dust on the surface with the vacuum or flush and wash the filter with detergent
and place it at somewhere ventilated. Do not expose the filter to strong sunshine or dry the
filter with high temperature, or the filter may be distorted.
3. Place the filter back first and then the inlet panel back into place.
CARE &
CLEANING
When the breakdown and problems occurs on the dehumidifier, please refer to the
Troubleshooting part in the manual. Do not dismantle or repair the unit yourself, for
improper repair may cause danger.
P.08

Check the information below for troubleshooting steps, it will save you time to resolve
issues that may happen with the unit.
The list includes most of the common cases, but not the results of defective unit, crafts or
materials in the unit.
lf all troubleshooting steps have been exhausted and the issue is still occurring, please feel
free to reach out to Waykar Customer Seryice to get further assistance.
Defrost icon lights up? Defrost function running, and the
light will resume after working.
“ ” icon lights up The unit shall not used in high-
temperature conditions.
“ ” icon lights up The unit shall not used in low-
temperature conditions.
The unit is place at uneven
surface.
Place the unit at somewhere flat
and even.
The inlet or outlet may be
blocked.
COMMON FAULTS &
SOLUTIONS
Not working
Problems Analysis Solutions
Dark Display Check the power cord socket and
the wiring.
Much Noise The filter may be blocked. Refer to the Care and Cleaning
part to clean the filter.
Keep the unit inlet or outlet away
from objects.
Warning
If the dehumidifier is still not working properly as expected and the troubleshooting steps or
solutions above may not resolve the issue, please unplug the power and shut down the
dehumidifier, then contact Waykar Customer Service at .support@waykar.com
P.09

P.10

MODEL
POWER SOURCE
TOTAL INPUT CURRENT
MOISTURE REMOVAL (65℉/60%RH)
MOISTURE REMOVAL (80℉/60%RH)
MOISTURE REMOVAL (86℉/80%RH)
MOISTURE REMOVAL (95℉/90%RH)
INPUT POWER (65℉/60%RH)
INPUT CURRENT (65℉/60%RH)
MOTOR FLA
MOTOR COMPRESSOR (RLA/LRA)
REFRIGERANT
MAXIMUM ALLOWABLE PRESSURE
HIGH PRESSURE
LOW PRESSURE
DP900B
115V~60Hz
11.3A
72 Pints/Day (34L/Day)
115 Pints/Day (54L/Day)
190 Pints/Day (90L/Day)
216 Pints/Day (102L/Day)
790W
8.1A
1.2A
RLA:9.4A LRA:47A
R410a/650g
5.5MPa (800 PSIG)
4.0MPa (580 PSIG)
1.7MPa (247 PSIG)
P.11
SPECIFICATIONS
Working temperature of this product ranges from 41°F(5°C) to 100°F(38°C). In any case of
the room temperature exceeds this range, the machine can not work properly.
The parameters above are subject to modification by the company without further notice.
This product can expose you to chemicals including Styrene and its compounds, which is known
to the State of California to cause cancer and birth defects or other reproductive harm. For more
information go to: www.P65Warnings.ca.gov

P.12
Waykar offers a 12-month warranty to all of our products together with the original
proof of purchase when a defect occured, including those newly purchased and
unused, from Waykar or through an authorized reseller, wholly or substantially, or
as a result of faulty manufacturing parts, or workmanship during the Warranty
Period.
The warranty does not apply if damage is caused by other factors, including but
without limitation of:
*Please fill out all required fields and inlcude your Order ID, Date of Purchased if
applicable.
Warranty
Extend Your Warranty by 1 Year
Customer Support
There are our general terms for the warranty service, but we always encourage
our customers to contact us if any issues, regardless of warranty terms. If you
are experiencing an issue with Waykar product, you can reach out to us at
support@waykar.com, we will dedicate our efforts to resolve it for you.
lf you have any questions or concerns about your product, please feel free to contact
our expert support team.Waykar customer service is here to help.
24 Hours available
13211,Spring Street Baldwin Park, CA,US
Email: support@waykar.com
Live Chat: www.waykar.com
*Please have your Order Number ready before contacting customer support.
WARRANTY &
CONTACT US


We are expecting to see our products fulfill your life and hear your voice.
Your satisfaction means a lot to us.
Please tag us if you share a snap on your social media.
Table of contents
Other Waykar Dehumidifier manuals

Waykar
Waykar KY-10K/04A User manual

Waykar
Waykar PDGT701BA User manual

Waykar
Waykar JD025C-80 User manual

Waykar
Waykar PD606B User manual

Waykar
Waykar JD025C-120 User manual

Waykar
Waykar YDA-858E User manual

Waykar
Waykar CFD2.5D User manual

Waykar
Waykar PD09B User manual

Waykar
Waykar AFD2.5D User manual

Waykar
Waykar YDA-858E User manual