WMF Cafemat 2 3700 Series User manual

73
WMF COFFEE MACHINES
Operating instructions
WMF Cafemat 2
Series
3700
Edition 4 - Printed in 03.08
Item-No.
33 2243 6000

74
Congratulations on your purchase of a
WMF COFFEE MACHINE.
Its advanced technology, long service life, economy
and above all, the quality of the coffee will delight
you.
Are you one of those people who don’t like reading
operating instructions? Please do so anyway!
You will get more pleasure from your WMF
COFFEE MACHINE afterwards and will find it was
worth it after all.
To avoid serious injuries or damage, please be
sure to follow the instructions on a grey
background and indicated by the symbol.
The main safety precautions are summarised on
pages 80 and 81.
Other warnings will be found within the text of
these operating instructions.
Keep these operating instructions near the
machine so that anyone operating the machine
can refer to them at any time.

75
Contents
1General Description .................................................................................................................77
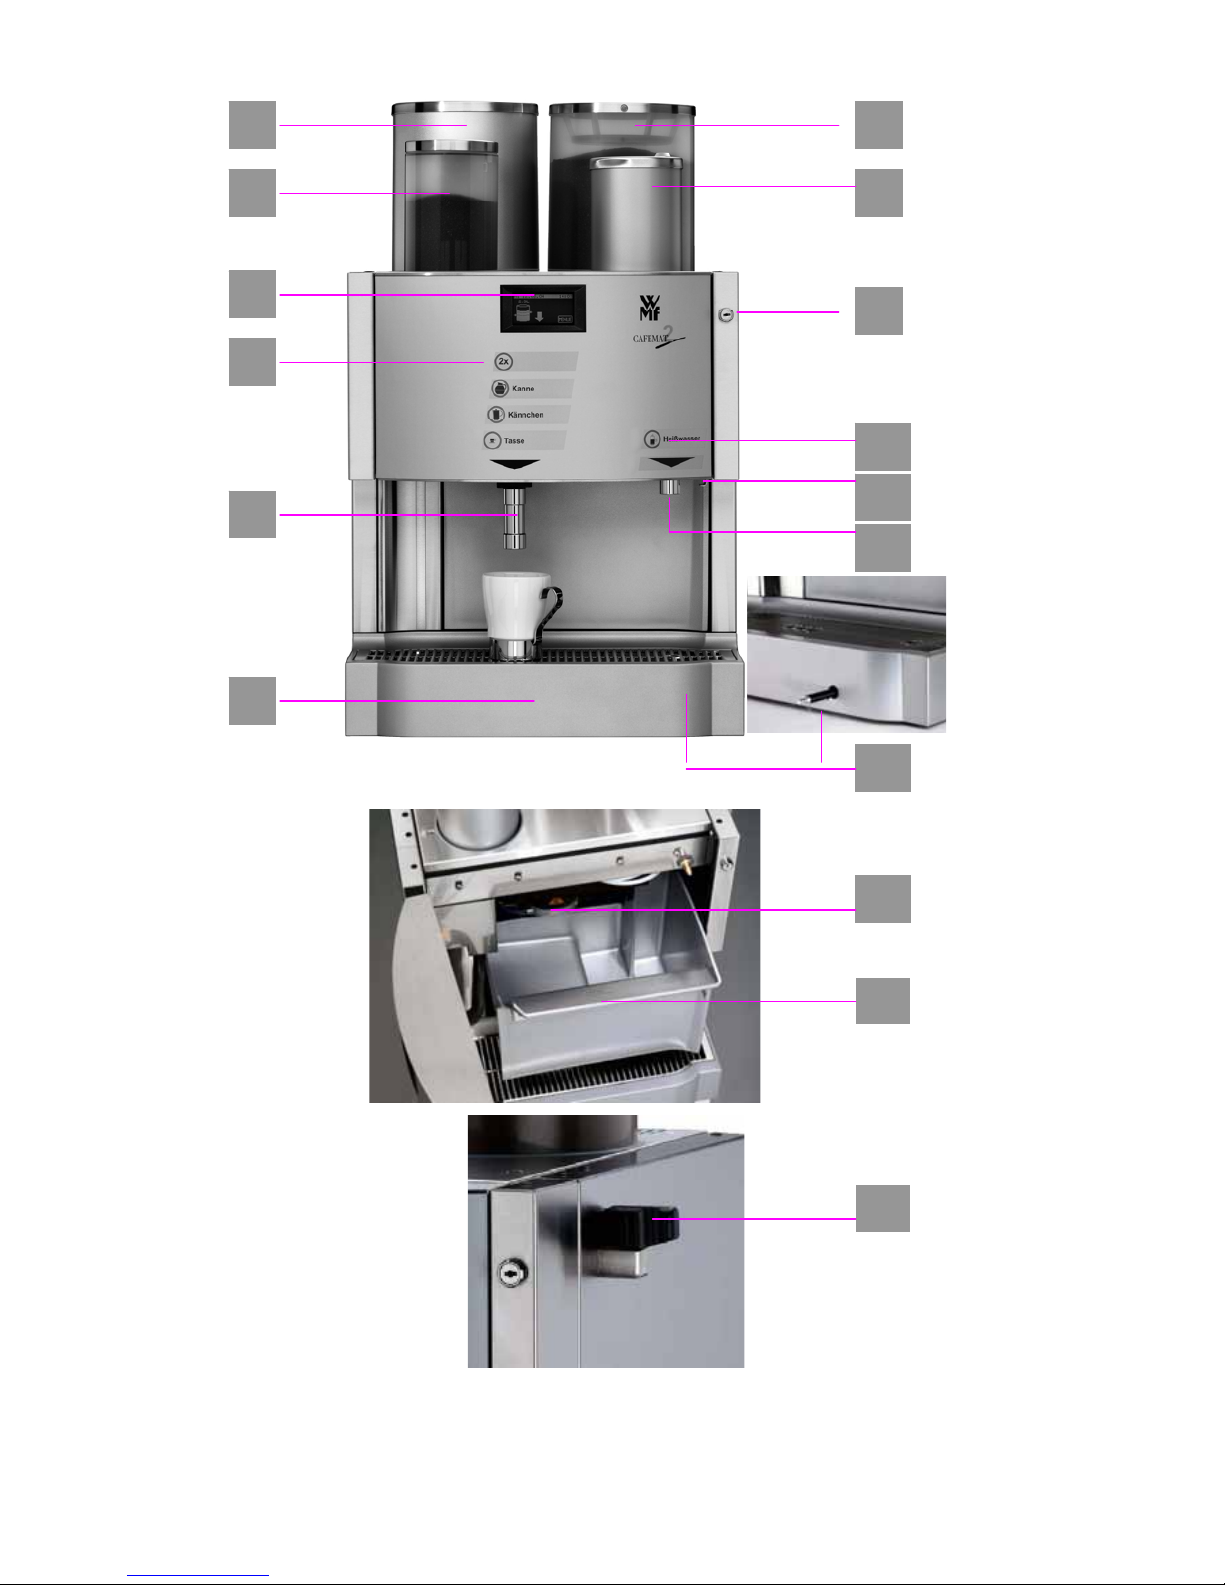
2Designation of Machine Parts .................................................................................................79
3Warnings...................................................................................................................................80
4Safety instructions....................................................................................................................81
5Technical Data..........................................................................................................................83
6Conditions of Use and Installation ......................................................................................... 84
7Operations.................................................................................................................................85
7.1 Starting the Machine...........................................................................................................85
7.2 Filling the Ground Coffee Hopper .....................................................................................86
7.3 Beverage Key Selection and Labelling ..............................................................................86
7.4 Opening the Front Panel.....................................................................................................87
7.5 Coffee Dispensing Options.................................................................................................88
7.6 Selection of Quantity of Coffee for Storage.......................................................................89
7.6.1 Automatic Quantity Control.....................................................................................89
7.6.2 Manual quantity control...........................................................................................90
7.7 Coffee Dispensing from the Storage Reservoir (optional).................................................91
7.8 Coffee Dispensing by Fresh Brewing.................................................................................92
7.9 Quantity Pre-selection ........................................................................................................93
7.10 Manual Input ...................................................................................................................... 93
7.11 Coffee Dispensing Via the Multi-brew Arm (optional) .....................................................94
7.12 Hot Water Dispensing ........................................................................................................ 95
7.13 Grounds Container..............................................................................................................96
7.14 Switching Off the Machine ................................................................................................97
8User Guide ................................................................................................................................98
8.1 Beverage Settings .............................................................................................................100
8.1.1 Quantity of Ground Coffee .................................................................................... 101
8.1.2 Quantity of Water................................................................................................... 101
8.1.3 Testing the Quantity of Ground Coffee and Water................................................ 102
8.2 Setting Storage Reservoir Brewing (optional) .................................................................103
8.3 Setting Multi-Brewing (optional).....................................................................................104
8.4 Machine Settings ..............................................................................................................105
8.4.1 Boiler Temperature ................................................................................................105
8.4.2 Mode (Self-Service)...............................................................................................105
8.4.3 Setting the Date and Time......................................................................................106
8.5 Access Authorisations (PIN code)....................................................................................107
8.5.1 System of Access Authorisations...........................................................................107
8.5.2 Changing Access Authorisations (PIN Numbers) .................................................108
8.6 Unit Number Accounting .................................................................................................110
8.7 Waiter Accounting System...............................................................................................110
8.8 Vending Units...................................................................................................................112
8.8.1 Coin Checker / Token Checker..............................................................................112
8.8.2 (Chip) Card Reader ................................................................................................114
8.8.3 Coin Changer .........................................................................................................115
8.9 Manual Dispensing (with storage reservoir option) .........................................................120
9Timer Functions .....................................................................................................................121

76
9.1 Timer Settings .................................................................................................................. 122
9.1.1 Setting the Operating Times .................................................................................. 122
9.1.2 Setting Coffee Quantities to be Prepared............................................................... 125
9.1.3 Setting Machine Cleaning Times (with automatic granulate cleaner option) ....... 127
9.1.4 Setting Switch Over to Self-Service Mode............................................................ 128
9.2 Timer Check..................................................................................................................... 130
9.3 Making Changes to the Timer.......................................................................................... 131
9.3.1 Copying the Timer................................................................................................. 131
9.3.2 Clearing the Timer................................................................................................. 132
9.4 Timer Information............................................................................................................ 133
10 Care of the Machine .............................................................................................................. 134
10.1 Cleaning the Machine ...................................................................................................... 135
10.1.1Fully Automatic Cleaning (using the granulate cleaning reservoir)..................... 135
10.1.2Semi-Automatic Cleaning (manual cleaner input) ............................................... 137
10.2 General Care of Your Machine........................................................................................ 139
11 Error Messages / Remedial Action....................................................................................... 140
12 WMF Customer Service........................................................................................................ 141
13 Warranty Claims ................................................................................................................... 142

77
1General Description
The WMF Cafemat 2 is a coffee machine for the automatic
preparation of filter coffee and hot water. Cups, mugs, pots and
jugs can be dispensed.
The brewer unit enables up to 0.75 litres of coffee to be prepared
per brewing cycle. Each fresh brew is transferred directly to the
coffee spout, the multi-brew arm or to the storage reservoir,
according to machine version.
The optional multi-brew arm allows freshly brewed coffee to be
dispensed into a heated storage container provided.
Alternatively, large jugs can be filled with the aid of the jug
tray.
The machine user guide is a graphic touch screen display. By
pressing on particular soft keys in the display, you can activate
certain machine functions or call up information.
The used coffee grouts are disposed of using a dry method,
allowing the machine to be installed in a variety of locations.

78
1
2
3
4
5
6
7
8
9
10
11
12
13
14
15
16

79
2Designation of Machine Parts
1 Coffee Storage Reservoir (Optional)
2 Small Ground Coffee Hopper (Optional)
3 Touch Screen Display
4 Beverage Keys
5 Coffee Spout (Fixed Or Folding)
6 Drip Tray
7 Large Ground Coffee Hopper
8 Granulate Cleaner Reservoir (Optional)
9 On/Off Key Switch
10 Hot Water Key
11 Front Panel Lever
12 Hot Water Spout
13 Waiter Lock (Optional)
14 Brewer
15 Grouts Collector
16 Pull-Out Multi-brew Arm (Optional)

80
3Warnings
Maximum machine safety is an integral WMF product characteristic to which we pay particular
attention.
In spite of all our safety precautions, every machine is potentially hazardous if not operated properly.
This is why – for your own safety – we have summarised the warnings below and highlighted them in
grey throughout the instruction manual.
This is why it is important to follow the “Safety instructions” given on page 81.
Important instructions which
must be observed for your
own safety
Connection and commissioning of the coffee machine may
only be undertaken by the WMF customer service team.
Maintenance and repair work on the machine may only be
undertaken by the WMF customer service team using
original spare parts.
Installed safety devices must not be altered for any reason.
No parts of the outside of the machine should be removed.
Caution! Risk of being burned and scalded
At the spout where hot water 12 and coffee 5,16 comes out
there is a risk of being burned and scalded. Always ensure
that there is container placed under the drinks spout! Ensure
that the container is stable and do not leave it unattended.
After switching on it is possible that hot water comes out of
the hot water- 12 and coffee spout 5,16 during the warm
brewing phase. Never reach under the spouts while cleaning
is in progress.
Caution! Health hazard!
Follow the precautions on the packaging when using the
cleaning product. The cleaning granulate is an irritant.
Cleaning fluid flows out of the coffee spout 5while cleaning is
in progress. The protective panel provided should be fitted (see
picture on page 136). Do not leave jugs or cups underneath the
coffee spout 5while cleaning is taking place. Wait until
prompted by the display before placing cleaner granulate in the
brewer.
Caution! Danger of crushing!
Never put your hand into the ground coffee hoppers 2/ 7or
the granulate cleaner reservoir 8 when the machine is in use
and the power is switched on!
Caution! Electric shock hazard!
Moisture can cause short circuits. It is therefore essential not
to allow fluids to enter the inside of the machine housing .
Under no circumstances should the machine be opened up.
Never put your hand inside the machine interior or reach
inside with a tool.

81
4Safety instructions
1Always ensure that the main water tap in the supply line is closed when the machine is switched off
and that the main power switch outside the machine is off or the mains plug is disconnected from
the socket as there is a risk of water escaping from the machine.
2 The installed component approved safety equipment prevents an impermissibly high pressure or
temperature increase in the hot water boiler. If the safety valve is actuated one-time then the
machine must be switched off at the local main switch and the main stop cock on the drinking water
supply line closed. Switch off the machine if any faults arise on the hot water boiler. Inform the
WMF customer service team and do not switch on the machine again before the fault has been
removed.
3 Do not use the machine in the open air. The water system must be emptied if there is frost.
4 The device must not be sprayed with a water hose. Use of steam cleaning, steam jet devices and
similar equipment for cleaning purposes is not permitted. Clean the surface of the coffee machine
using a soft cloth or by using products from our WMF care range.
5 The device must be set on a flat, level and secure surface.
6 Do not let children near the machine!
7 Do not use the machine if it does not work properly or if has been damaged
Shutting down the machine – company holidays
1 If the machine is to be shut down for an extended period, a general cleaning should be carried out
first and the grouts collector should be emptied. Drain the machine first to prevent frost damage if
there is any risk of freezing. A WMF Customer Service Technician must be called promptly in
such cases.
2 After several weeks of shutdown for holidays, we recommend that the full automatic cleaning
program be run at least twice before the machine is started up again.
Regulations
Refer to rating plate for boiler data.
The hot water boiler complies with the Pressure Equipment Directive 97/23/EC, Category 1, Module A.
The hot water boiler is subject to neither notification nor licensing. Each hot water boiler is subjected
to hydrostatic tests before delivery to the customer.
The operator of such plants must ensure that the safety devices are carely serviced and inspected.

82
The machine complies with all the relevant regulations.
The operator must ensure that the electrical equipment and systems are in safe working order, (e.g.
BGV A3).
This device is subject of the directive on waste electrical and electronic equipment
(WEEE/EU directive) and may not be disposed of as domestic waste. Please contact
your WMF Customer Service for information on proper disposal of the device.
Preventative measures against suffering damage to the machine
xThere are always operating dangers associated with every technical device, particularly from large
fully automatic machines which are operating unobserved.
xWe therefore recommend that the operator take reasonable measures to prevent damage occurring to
the machine, for example by installing a suitable water hydrant in the drinking water supply on-site.
xIf the water used in the machine has a carbonate hardness above 9°, a WMF water filter must be
fitted in the supply line. Otherwise limescale can cause damage to the machine.
xMaintenance intervals depend on how heavily the machine is used and on local water conditions, and
should be fixed by agreement with your WMF Customer Service Technician. Even in the case of
light use, maintenance should be carried out at least once a year and the water filter, if fitted, should
be replaced.

83
-Technical Data
Rated power *3.3 kW 6.3 kW
Hourly output **
Filter coffee
200 cups
280 cups
Storage reservoir (optional)
Hourly output with storage reservoir ** - 3.0 litres
300 cups
Hot water output, total 24 l/h 48 l/h
Ground coffee hopper, large
Ground coffee hopper , small
Granulate cleaner reservoir (optional)
1.6 kg each
0.5 kg
1.0 kg
Electricity supply *1/N/PE ~ 50 Hz/230 V 3/N/PE ~ 50 Hz/400 V
External dimensions:
Width
Height with ground coffee hopper
Depth
450 mm
734.5 mm
550 mm
Empty weight:
Machines with storage reservoir approx. 62 kg
Continuous sound pressure level
(Lpa)*** < 70 dB (A)
Heat emission
Stand-by
Full load *
<200 W
<3150 W
<200 W
<6150 W
Technical data is subject to change without notice.
* Values quoted apply to the basic version. For special versions, see rating plate.
** The hourly outputs indicated are GUIDELINES and depend on, among other things, the quantity of ground coffee,
coffee beverage, brewing temperature, brewing pressure, water hardness and general condition of the machine (e.g.
limescale, connections, power, water, drain, wear, etc.)
*** The A-weighted mean sound pressure level Lpa (slow) and Lpa (impulse) at the operator’s workplace is below
70 dB(A) in every operating mode.

84
5Conditions of Use and Installation
The machine operator must arrange for the site preparatory work. This should be carried out by
approved contractors in accordance with general and local regulations. WMF Customer Service
Technicians are only permitted to connect the machine to the prepared connections. They are not
authorised to carry out plumbing or wiring work on site and will not be responsible for such work.
Rated power 3.3 kW 6.3 kW
Connecting cable, site supply * 3 x 1.5² 5 x 2.5²
Fuse, site supply 1 x 16 A 3 x 16 A
Mains voltage tolerance 230 V/400 V + 6 % - 10 %
Power cut < 50 ms does not affect machine operation
Water feed line TW15 (DN 15 /1/2") with dirt filter installed by customer,
min. 0,2 MPa flow pressure at 3 l/min, max. 0,6 MPa
Water quality If the local water has a carbonate hardness over 9°, a
WMF water filter must be fitted in the supply line.
Water drain line Hose DN19, minimum gradient 2 cm/m
Ambient temperature + 5°C to + 35°C (drain water system in case of frost)
Max. humidity
Protection
Protection class
80 % rel. humidity without dewing; do not spray
machine with water; do not use machine out of doors.
IP X0
I (protective earthing)
Installation clearance
For operating, service and safety reasons the machine should
be installed with clearance of not less than 50 mm, back and
side, from walls or non-WMF components. A clear height
of 1100 mm from the top of the supporting surface should be
ensured. The height of the supporting surface from the floor
surface should be not less than 700 mm and not more than
900 mm.
If the machine connections are to be routed down through
the counter, remember also to allow space for the
connections. These may restrict the available space below
the machine.
Water filter installation
dimensions
W x H x D
Standard: 250 × 500 × 400 mm
Jumbo: 290 × 670 × 420 mm
*The site electrical system must comply with IEC 364. For greater safety, an earth leakage circuit breaker with a rated
fault current of 30 mA to EN 61008 should be fitted in the supply line to the machine. There should be a shockproof
socket fitted for a single phase connection and for a three-phase connection a 5-pole CEE/CEKON socket to EN 60309
should be fitted. If the power lead to this machine is damaged, it must be replaced by a WMF Customer Service
Technician or a similarly qualified specialist. If the machine is permanently connected on site, an all-pole circuit
breaker (main switch) to EN 60947 with preferably no less than a 3 mm contact opening should be fitted ahead of the
machine. In the case of a flexible connection, a circuit breaker is recommended. The power lead must not be allowed
to come into contact with hot components. The main switch and socket are part of the customer’s system. The
machine must not be installed with a fixed site connection if used with a trolley (mobile station).

85
6Operations
6.1 Starting the Machine
Before the machine is started up, the main shutoff valve in
the fresh water feed line must be opened and the main
electrical switch supplying the machine must be turned on.
xSwitching on manually
Turn the key switch 9to the “1” (On) position.
After switching on, the machine heats up to operating
temperature (about 4-8 minutes). A hot rinse program is
then executed.
Caution!
There is a danger of burning and scalding in the
hot water 12 and coffee 516 dispensing area.
During the heating-up phase, the display shows the
following:
When the machine has warmed up, the display shows the
following:
In the case of machines without a storage reservoir, the
machine is ready for use as soon as the ground coffee
hopper has been filled (see chapter 7.2 on page 86).
Machines with a storage reservoir are not ready to dispense
coffee. The quantity to be brewed for storage has to be
selected first.
On machines with a storage reservoir that are not operated
in self-service mode, the current level in the storage
reservoir is displayed after heating up.
First of all, the ground coffee hopper has to be filled (see
chapter 7.2 on page 86) and a quantity of coffee selected
for storage (see chapter 6.6 on page 89) before the machine
is ready for operation. Fresh coffee is then brewed into the
storage reservoir, ready for dispensing.
9

86
6.2 Filling the Ground Coffee Hopper
To fill the ground coffee hoppers 7or 2, remove the
hopper lid and fill the hopper with ground coffee. Then
replace the lid to close the hopper. The large ground coffee
hopper 7has a capacity of approx. 1.6 kg and the small
ground coffee hopper 2holds 0,5 kg.
Note:
Always be sure to top up the ground coffee hoppers
7and 2before they are completely empty to ensure
correct operation of the coffee machine.
Caution!
Never put your hand into the ground coffee hoppers
7or 2when power to the machine is switched on.
The mechanism inside the hoppers can cause serious
injury.
6.3 Beverage Key Selection and Labelling
A total of up to 4 beverage keys 4and one hot water key 10
are at your disposal. Two different dispensing quantities
can be set for each key.
Each beverage key can be assigned a different legend and
symbol. A set of pre-printed labels is supplied with the
machine. Consult your WMF Customer Service
Technician about choosing the appropriate press-in labels
for your requirements.
Note:
For machines with two coffee grain portioners there
are three beverage keys and a hot water key
available. There is a special key available for
switching over to the second coffee grain portioner
(e.g. decaffeinated coffee).
7
2
4
10

87
6.4 Opening the Front Panel
Note:
The front panel has to be opened in order to empty
the grouts collector and to manually add cleaning
granulate.
Caution!
Take care not to trap your fingers when opening and
closing the front panel. Beware the danger of
crushing. When closing the front panel, make sure
that it clicks firmly into position in the locking
device.
Caution!
There is a danger of burning and scalding in the
hot water 12 and coffee 516 dispensing area. Do not
touch the hot water spout 12 or the coffee spout 516.
Press the lever 11 upwards to open the front panel.
When closing the front panel, make sure that it clicks
firmly into position in the locking device.
Important!
For safety reasons it is not possible to dispense a
coffee or hot water beverage while the front panel is
open. On closing the front panel, the keys are
enabled again.
11

88
6.5 Coffee Dispensing Options
There are various options for coffee preparation and
dispensing, depending on your machine version and the
individual beverage settings.
Machines without a 3L storage reservoir
On pressing a beverage key, the coffee beverage is
freshly brewed and dispensed directly at the coffee
spout.
xWith optional multi-brew arm
If larger quantities are required, you can use the
multi-brew arm to brew larger quantities in a storage
container or insulated jug.
Machines with an integral 3L storage reservoir
xWithout fresh brewing
Coffee beverages are dispensed from the integral
storage reservoir. Once you have set the desired
quantity to be brewed and stored, fresh coffee is
brewed into the storage reservoir. You can then
dispense coffee from the storage reservoir by using
the beverage keys.
The machine carries out refill brewing into the storage
reservoir automatically until the desired quantity has been
replenished.
xWith fresh brewing (optional)
This machine version enables coffee beverages to be
freshly brewed and dispensed directly via the
machine spout. In this case, the freshly brewed
coffee beverage is not sent to the storage reservoir.
This allows you to dispense small quantities of coffee even
without selecting a storage step (in stand-by mode).
A further option is a small ground coffee hopper (optional,
capacity 500g) which allows you to prepare beverages
automatically using a different type of coffee such as mild
coffee (decaf).

89
6.6 Selection of Quantity of Coffee for Storage
(only available on machines with an integral storage reservoir)
Due to the design of the machine, a quantity for storage
has to be selected before coffee can be brewed in the
storage reservoir and dispensed.
The brewer unit in the WMF Cafemat 2 allows brewing
quantities of up to 0.75 litres of coffee to be prepared.
One or more brewing cycles are carried out until the
storage reservoir contains the desired quantity.
By pressing the soft key you can access a second
level, where a Selection menu can be found. On self-
service machines, first press the black area to see the
soft key. The following display appears:
Now press the soft key to select a quantity of coffee
to be prepared.
You can also access quantity selection by pressing directly
on the storage reservoir in the previous display.
Quantity pre-selections are available and can be selected
by means of the soft keys:
6.6.1 Automatic Quantity Control
There is a choice of two alternatives: half full or full.
Half Full
1.5 litres of coffee are transferred to the storage
reservoir to begin with. If the coffee level in the
reservoir falls below 1.2 litres, the WMF Cafemat 2
starts an automatic refill brewing of fresh coffee
(0.75 litres). Should the coffee level fall below
0.75 litres, coffee dispensing is disabled. No more
coffee will be dispensed until refill brewing of fresh
coffee has taken place.
Press to confirm your selection.
If you choose “Half Full” as the quantity pre-
selection, then instead of the empty storage reservoir
the display shows:

90
If coffee has already been brewed into the storage reservoir,
the display shows the current level in the reservoir. In this
example, the pre-selection is half full and the storage
reservoir contains 1.3 litres of coffee:
Note:
Up to 3.0 litres of the actual contents of the storage
can be displayed.
The quantity of coffee currently stored in the storage
reservoir is displayed in litres in every quantity pre-
selection stage (except for coffee machines in self-service
operation mode, see chapter 8.4.2 on page 105).
Full
3.0 litres are transferred to the storage reservoir to
begin with. If the coffee level in the storage reservoir
falls below 2.3 litres, the WMF Cafemat 2 starts an
automatic refill brewing of fresh coffee (0.75 litres).
Should the coffee level fall below 0.75 litres, coffee
dispensing is disabled.
No more coffee will be dispensed until refill brewing of
fresh coffee has taken place.
Press to confirm your selection.
6.6.2 Manual quantity control
Stand-by (zero litres)
This setting should be selected if you want to empty the
storage reservoir completely and no refill brewing is
required.
Coffee stored in the reservoir will continue to be
dispensed until the level reaches approx. 0.3 litres, at
which time dispensing will be disabled. The remaining
coffee can then be dispensed manually (see chapter 7.9
on page 120)
Press to confirm your selection.
If you choose “Stand-by (zero litres)” as the quantity
pre-selection, the display shows.

91
6.7 Coffee Dispensing from the Storage Reservoir (optional)
Once the machine is ready for operation and the desired
quantity has been selected for storage, coffee can be
dispensed by pressing one of the beverage keys 4.
Caution!
There is a danger of burning and scalding in the
area of the coffee spout 5.and 16!
Coffee can be dispensed via the coffee spout 5in three
different ways:
1. Portioned Dispensing
Press one of the beverage keys 4to start dispensing
coffee. Dispensing stops automatically when a pre-
defined quantity has been dispensed (see chapter 7.1 on
page 100).
2. Start-Stop Function
Press one of the beverage keys 4to start dispensing
coffee. Press again to stop.
3. Free Flow
Coffee dispensing continues as long as the beverage
key 4is pressed or the amount limit is reached.
Your WMF Customer Service Technician will set your
preferences as required.
If there is no coffee in the storage reservoir 1to start with
or if the storage reservoir has been emptied to the level at
which dispensing is disabled, the following display
appears:
4
5

92
6.8 Coffee Dispensing by Fresh Brewing
(not possible on machines without fresh brewing option)
Caution!
There is a danger of scalding in the area of the
coffee spout 5and 16!
When the corresponding beverage key is pressed, a
brewing cycle begins, using the specified quantities of
ground coffee and brewing water.
On machines with an integral storage reservoir and the
fresh brewing option, a coffee beverage can be freshly
brewed without passing through the storage reservoir.
This can be useful if:
1. the storage reservoir has already been emptied but
coffee is still required.
2. a coffee beverage is required which has to be prepared
using a different type of ground coffee which is in the
ground coffee hopper.
If the ground coffee hoppers have been filled and the
machine is ready for operation, coffee beverages can be
dispensed by pressing a beverage key.
The display shows the following:
Only the beverage keys for beverages that can be dispensed
at the time are active. Otherwise, please refer to the
messages in your WMF coffee machine display.
Press the appropriate beverage key.
2. While brewing is taking place the name of the coffee
beverage selected and the progress of brewing are
indicated in the display by a cup filling up. Quantity
pre-selection is possible (see chapter 6.9, page 93).
The used coffee grounds are collected in the integral grouts
collector 15. All the beverage keys are now activated again
and the display shows that the machine is ready. The
machine is now ready for the next brewing cycle.
Table of contents
Other WMF Coffee Maker manuals
Popular Coffee Maker manuals by other brands

Espressione
Espressione Espression Supremma CA4815 Technical specifications

U-Line
U-Line ULABACKBARCOFFEE3 user guide

VKI Technologies
VKI Technologies Eccellenza touch Operation manual

Rommelsbacher
Rommelsbacher EKS 2000 instruction manual

EFBE-SCHOTT
EFBE-SCHOTT KA 1050 manual

DèLonghi
DèLonghi DC300 Owner's instructions