WMF Bistro easy 8300 User manual

41
WMF COFFEE MACHINES
Operating Instructions
WMF BISTRO easy
Series
8300
Edition 6 – Printed in 03.08
Item-No.
33 2191 7000

42
Congratulations on the purchase of your
WMF COFFEE MACHINE.
Its advanced technology, long service life,
economy and above all, the quality of the
coffee will delight you.
No-one likes reading operating instructions.
Please do so anyway!
You will get more pleasure from your
WMF COFFEE MACHINE afterwards and
will find it was worth it after all!
In your own interest, please follow all
safety and cautionary instructions. This
will help to avoid accidents and technical
malfunctions.
Never entrust the machine to anyone who
is not familiar with the operating
instructions.
Keep these operating instructions near the
machine. This will allow your operating
personnel easy access to information at any
time, and will enable them to take the
appropriate action should any technical
malfunctions occur.

43
CONTENTS
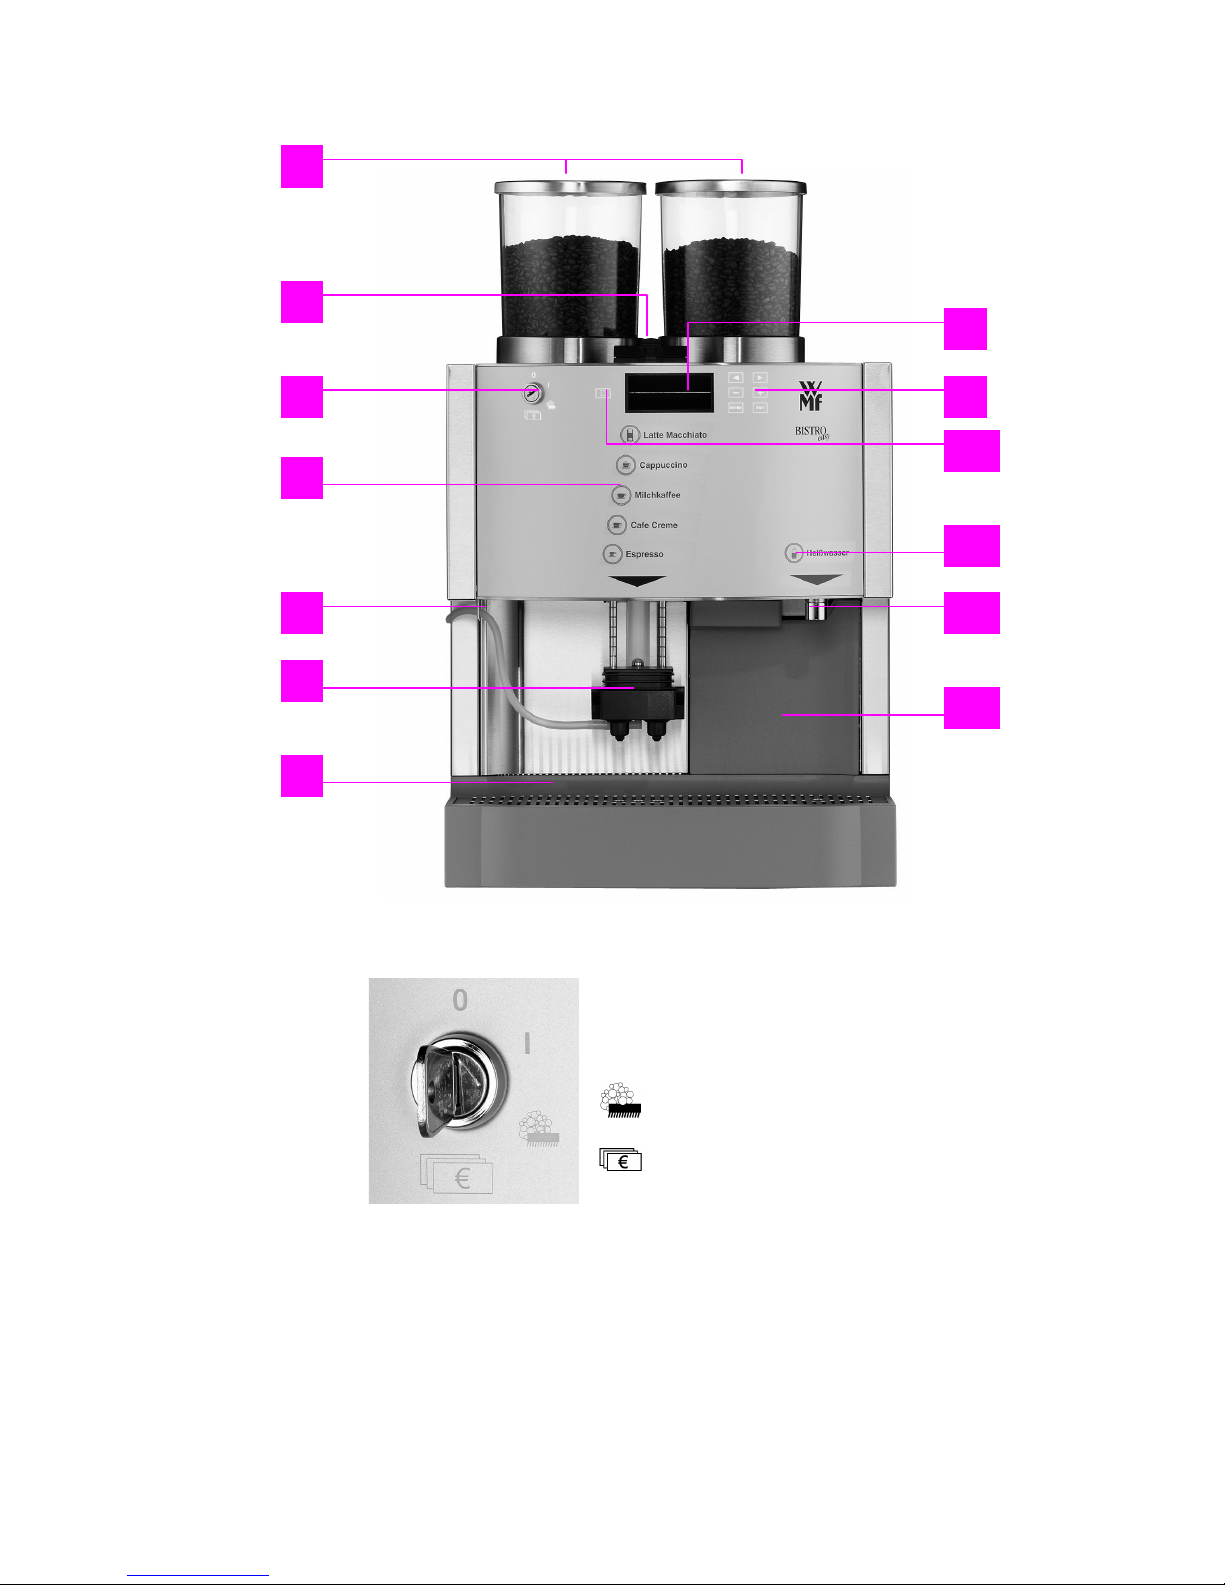
1 Machine features and components .................................................................................................. 45
2 General description........................................................................................................................... 46
3 Warnings............................................................................................................................................ 47
4 Safety instructions............................................................................................................................. 48
5 Technical data ................................................................................................................................... 49
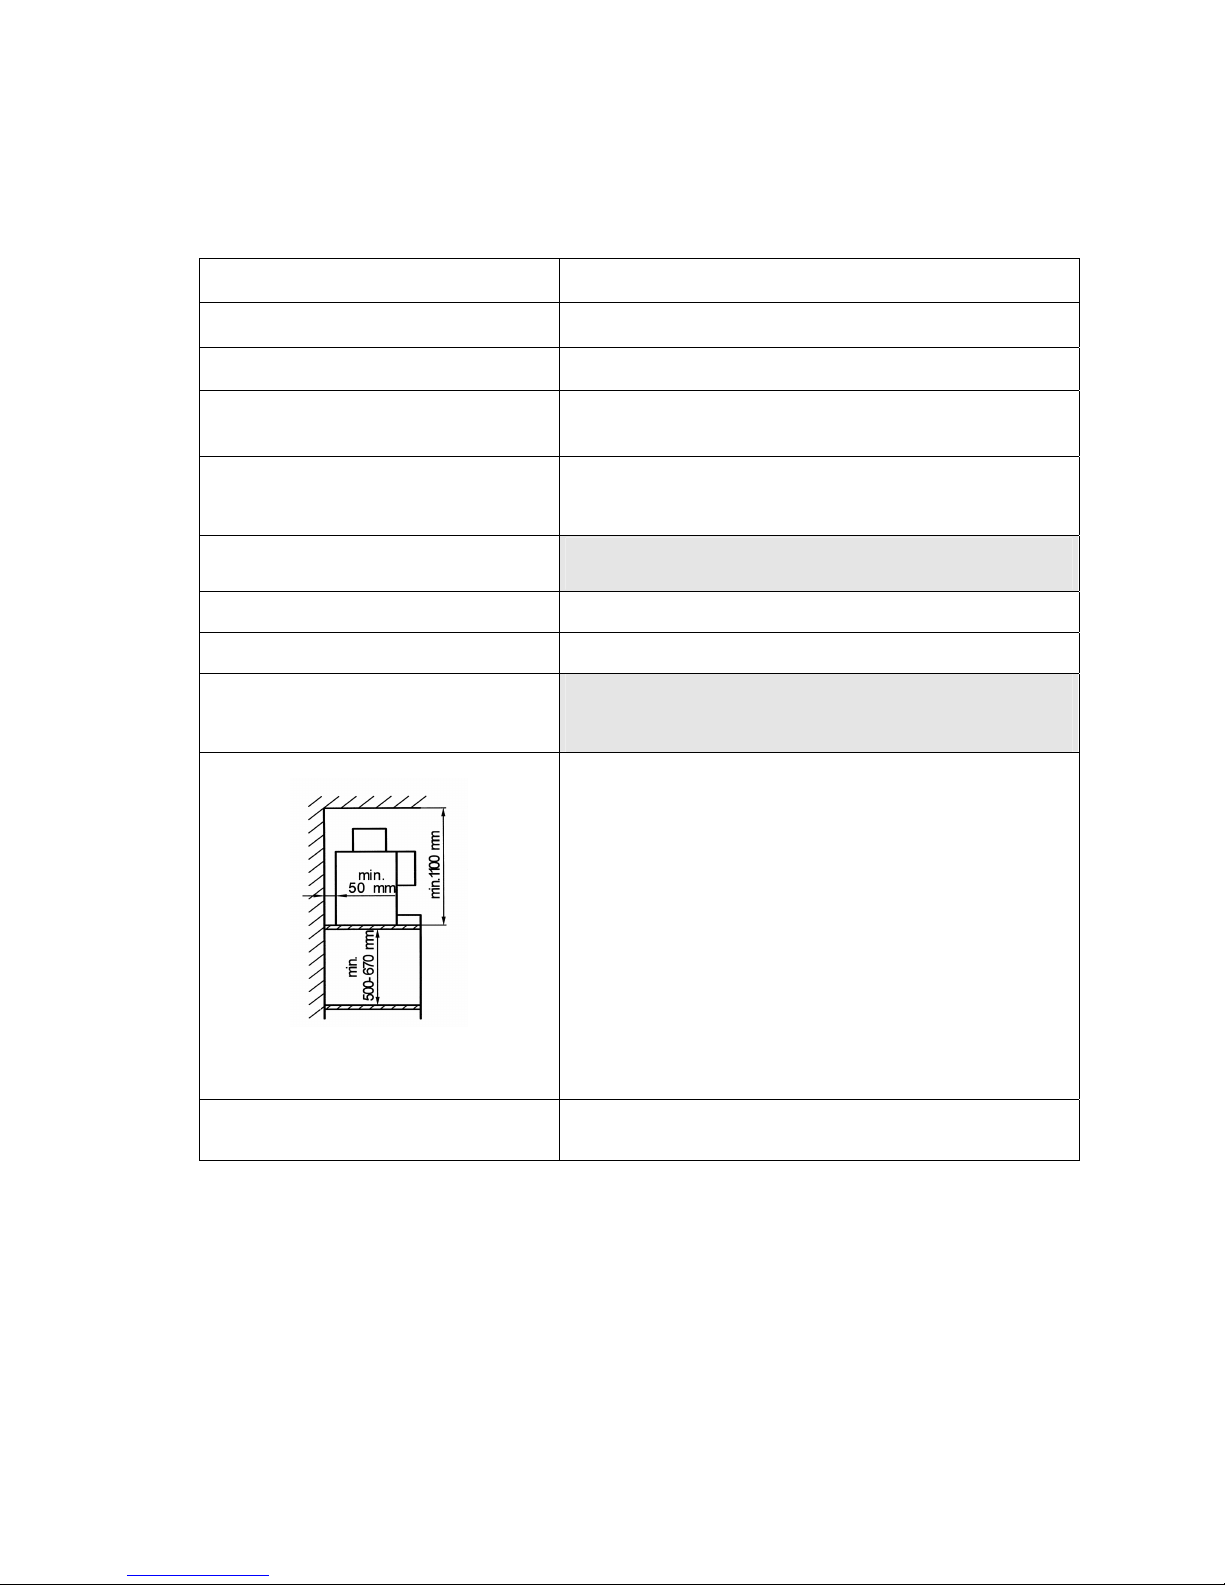
6 Conditions for Installation and Operation ..................................................................................... 50
7 Operation ........................................................................................................................................... 51
7.1 Starting the machine.................................................................................................................... 51
7.2 Filling the coffee beans hopper ................................................................................................... 51
7.3 Preparing to dispense milk .......................................................................................................... 52
7.4 Adjusting the height of the combination spout............................................................................ 53
7.5 Preparing coffee........................................................................................................................... 53
7.5.1 Coffee beverages (Espresso, Café Crème etc.)................................................................. 54
7.5.2 Coffee beverages with added milk (White Coffee, Cappuccino, Latte
Macchiato,etc.) ............................................................................................................................ 55
7.5.3 Manual input ..................................................................................................................... 56
7.5.4 Quantity selection ............................................................................................................. 56
7.6 Hot water dispensing ................................................................................................................... 57
7.7 Coffee grouts container ............................................................................................................... 58
7.8 Display of quantities dispensed................................................................................................... 60
7.9 Sales systems............................................................................................................................... 61
7.10 Switching off the machine........................................................................................................... 62
8 Settings ............................................................................................................................................... 62
8.1 Setting the milk froth quality....................................................................................................... 63
8.2 Setting quantities ......................................................................................................................... 64
9 Care of the machine .......................................................................................................................... 65
9.1 Daily cleaning.............................................................................................................................. 65
9.1.1 Cleaning the machine........................................................................................................ 66
9.1.2 Cleaning the combination spout........................................................................................ 67
9.2 General cleaning.......................................................................................................................... 70
10 Error messages and displays............................................................................................................ 71
10.1 Error messages............................................................................................................................. 71
10.2 Error messages for the operator................................................................................................... 72
10.3 Information for the operator ........................................................................................................ 73
11 WMF customer service..................................................................................................................... 74
12 Liability.............................................................................................................................................. 74
13 HACCP cleaning concept ................................................................................................................. 76

44
O
I
Off
On
Cleaning
Accounting/programming
1
2
8
3
4
5
6
9
10
12
13
11
7

45
1 Machine features and components
1 Coffee beans hopper
2 Manual input/cleaning duct
3 Key switch
4 Beverage keys
5 Hose device
6 Combination spout
7 Drip tray, removable
8 Display
9 Setting keys
10 Milk frother key
11 Hot water key
12 Hot water spout
13 Grouts container
The following numbers only appear on illustrations in the
text:
14 Coin slot
15 Coin return chute
16 Coin return button
17 Control indicator “ON”
18 On/Off switch (inside coin box)
19 Lockable coin box

46
2 General description
The WMF Bistro easy coffee machine is a fully
automatic single-cup machine for making Espresso,
Café Crème, Cappuccino, White Coffee and Latte
Macchiato. Hot water dispensing is also possible.
Both coffee beans and ground coffee can be used,
coffee beans via the grinders and ground coffee via
the manual input.
All the coffee and milk drinks are dispensed via a
specially designed combination spout, which also
enables perfect milk froth and hot milk to be
prepared.
Each portion is freshly brewed at the touch of a
button to guarantee high quality for your beverages.
Take it easy!

47
3 Warnings
Maximum machine safety is an integral WMF product characteristic to which we pay particular
attention.
In spite of all our safety precautions however, every machine is potentially hazardous if not
operated properly.
This is why – for your own safety – we have summarised the warnings below and highlighted
them in grey throughout the instruction manual.
Please also follow the “Safety Instructions” on page 48.
For your own safety,
please observe the following
instructions at all times:
Connection of the machine to site services and starting up
for the first time must only be carried out by WMF
customer service technicians.
All maintenance and repair work must only be carried
out by WMF customer services, using original parts.
In no circumstances should the safety devices fitted be
tampered with.
Caution! Scalding hazard!
In the dispensing area for coffee 6and hot water 12 there
is a scalding hazard. Take care when the spout is raised:
always make sure a cup is in position before dispensing
any beverage.
Caution! Health hazard!
Follow the instructions on the pack when using the
cleaning product. The cleaner is corrosive. Cleaning fluid
flows out of the combination spout 6while cleaning is in
progress.
For machines with no drain connection, a container
(capacity at least 1.4 litres) must be put in place to collect
the cleaning fluid safely.
Caution! Scalding hazard!
Never reach under the spouts while cleaning is in
progress.
Caution! Injury hazard!
When the machine is on, never put your hand into the
coffee beans hopper or brewer dispensing area.

48
4 Safety instructions
General notes
1. At the end of the working day always ensure that the shut-off device on the water pipe
supplying the machine is closed and the main power switch to which the machine is
connected is switched off and/or the plug is removed from the socket.
2. The component-tested safety devices fitted prevent inadmissible pressure and temperature rise
in the boiler. If the safety valve is activated, the machine should be switched off immediately
at the customer’s main switch. Switch off the machine if a boiler malfunction occurs.
Contact the WMF customer service department and do not switch the machine on again until
the fault has been remedied.
3. This machine is not for use out of doors. In case of freezing the machine should be drained
beforehand to prevent frost damage.
3. Never spray the machine with a hose. Steam cleaners, steam-jet cleaners and similar
equipment must not be used to clean the machine. Clean the surface by wiping with a damp
cloth, or use products from our WMF care range.
4. The unit must stand safe at a ground level, on a horizontal and stable base.
Machine shutdown – holidays
1. If the machine is to be shut down for an extended period, a general clean should be carried out
beforehand and the grouts container must be emptied. If there is any risk of freezing, the
machine should be drained beforehand to prevent frost damage. In such cases, call in the
WMF customer service personnel in good time.
2. After several weeks of shutdown for holidays, we recommend that the fully automatic cleaning
program be run at least twice before the machine is started up again.
Hot water boiler data - see rating plate
The hot water boiler complies with the Pressure Equipment Directive 97/23/EC - Category 1,
Module A.
The hot water boiler is subject to neither notification nor licensing. Each hot water boiler is
subjected to hydrostatic tests before delivery to the customer.
The owner / operator of such plants must ensure that the safety facilities are carefully serviced and
inspected.
The machine / unit complies with all the relevant regulations.
The owner / operator must ensure that the electrical equipment and systems are in safe working
order.
This device is subject of the directive on waste electrical and electronic equipment
(WEEE/EU directive) and may not be disposed of as domestic waste.

49
Preventive measures to avoid consequential machine damage
Any technical devices, particularly large fully automatic machines, are a potential source of
danger when operated without supervision.
We therefore recommend that the operator takes appropriate action to prevent damage, for
instance installing a suitable water detector in the site water supply line.
If the local water has a carbonate hardness of more than 5° (German hardness), a WMF water
filter must be installed in the supply line to the machine.
Maintenance intervals depend on how heavily the machine is used and on local water
conditions, and should be fixed by agreement with your service engineer. Even in the case of
light use, maintenance should be carried out at least once a year and the water filter, if fitted,
should be replaced.
5 Technical data
Rated power * 3.3 kW
Hourly output **
Espresso
Café Crème
200 cups
140 cups
Hot water output, total 18 l/h
Coffee beans hoppers each 1.1 kg
Electricity supply * 1/N/PE ~ 50 Hz/230 V
External dimensions
Width
Height with coffee beans hopper
Depth
450 mm
724 mm
550 mm
Empty weight approx. 61 kg
Continuous sound pressure level (Lpa)*** < 70 dB (A)
Subject to technical change without notice.
* See rating plate for special versions. The figures quoted refer to the basic version.
** The hourly outputs indicated are GUIDELINES and depend, among other things, on the quantity of ground
coffee, type of coffee, fineness, brewing temperature, brewing aperture size, brewing pressure, water hardness
and general condition of the machine (e.g. limescale, connections, power, water, sequence, wear, etc.)
*** The A-weighted mean sound pressure level Lpa (slow) and Lpa (impulse) at the operator’s workplace is
below 70 dB(A) in every operating mode.

50
6 Conditions for Installation and Operation
The machine operator must arrange for the site preparatory work. This should be carried out by
approved contractors in accordance with general and local regulations. WMF customer service
technicians are only permitted to connect up the machine to the prepared connections. They are
not authorised to carry out plumbing or wiring work on site and will not be responsible for such
work!
Rated power 3.3 kW
Connecting cable, site supply* 3 x 1.52
Fuse, site supply 1 x 16 A
Mains voltage tolerance 230 V + 6 % - 10 %
Power cut < 50 ms does not affect machine operation
Water supply line TW 15 (min. DN 6 or 1/4") with main shutoff valve
and dirt filter installed by customer, 0,2 MPa flow
pressure at 2 l/min, max. 0,6 MPa
Water quality If the local water has a carbonate hardness over 5° a
WMF water filter must be fitted in the supply line.
Water drain line Hose, DN 19, minimum gradient 2 cm/m
Ambient temperature + 5°C to + 35°C (drain water system in case of frost)
Max. humidity
80 % rel. humidity without dewing. Do not spray
machine with water. Do not use machine out of
doors!
Installation clearance
For operating, service and safety reasons the machine
should be installed with clearance of not less than 50
mm from the back and sides from the building or non-
WMF components.
A clear height of 1100 mm from the top of the
supporting surface should be ensured. The height of
the supporting surface from the floor surface should be
not less than
700 mm and not more than 900 mm.
If the machine connections are to be routed down
through the counter, remember to also allow space for
the connections. These may restrict the available space
below the machine.
Water filter installation dimensions
W x H x D
Standard: 250 x 500 x 400 mm
Jumbo: 290 x 670 x 420 mm
* The on-site electrical system must comply with IEC 364. An e.l.c.b. switch with 30 mA rated fault current to
EN 61008 should be installed upstream of the unit for increased safety. An earthed socket outlet must be installed
near the unit for one-phase connection. A 5-pole CEE/CEKON socket outlet to EN 60309 must be installed for
three-phase connection. If the mains power cable of this unit is damaged, it must be replaced by our customer
service engineer or a similarly qualified person. If the machine is permanently connected on site, a disconnecting
device (master switch) to EN 60947 acting on all poles and with a contact gap of at least 3 mm must be installed
upstream. The disconnecting device is also recommended for flexible connection. The mains power cable must not
be allowed to come into contact with hot parts of the machine. Master switch and socket outlet are part of the on-
site installation. The machine must not be installed with permanent on-site connection when mounted on a trolley.

51
7 Operation
7.1 Starting the machine
Before the machine is started up, the main shutoff valve in
the fresh water supply line must be opened and the main
electrical switch supplying the machine must be turned on.
Turn the key switch 3to position “I”(On).
The machine is now switched on and will heat up to
operating temperature (about 12 minutes).
During the heating-up phase the display alternately shows
the following:
LOCKED 11:21
20.04. ^
--Warm up--
When the machine has warmed up, the display shows the
following message:
READY
Pre-sel 01
11:21
20.04.
“READY”: The machine is ready for use.
“11:21”: Current time.
“20.04”: Current date.
“Pre-sel 01”: Only one brew is carried out for
each key press.
See page 56,
7.5.4 Quantity selection.
7.2 Filling the coffee beans hopper
To fill the coffee beans hopper 1remove the hopper lid and
fill the hopper with coffee beans. Then replace the lid to
close the hopper. Each coffee beans hopper has a capacity
of approx. 1.1 kg.

52
It is important to refill the coffee beans hopper 1 before it
is completely empty, to ensure correct operation of the
coffee machine.
Special version (‘empty’ message):
A display 8requests you to refill the coffee beans hopper 1.Refill
coffee beans left!
Coffee dispensing is disabled when the coffee beans
hopper 1 is empty.
Refill
coffee beans right!
Simply refill the hopper with coffee beans and the message
will disappear.
7.3 Preparing to dispense milk
In order to dispense coffee beverages with milk from the
machine, the milk container (e.g. the Tetra Pak as shown
here) has to be connected to the combination spout 6of the
machine by the milk intake hose.
If this is not the case, proceed as follows:
The milk intake hose has a plastic connector on one end
(bottom left in the picture) and a metal nozzle on the other
end (top right in the picture).
Insert the connector of the milk intake hose into the
connection provided on the underside of the combination
spout 6. Then push the milk intake hose into the guide on
the underside of the combination spout 6, to fasten the milk
intake hose to the combination spout 6.
6

53
Now pass the metal nozzle of the milk intake hose through
the hose device 5and insert the metal nozzle of the milk
intake hose into the milk container.
Always make sure the milk containers are topped up or
replaced in good time, to ensure correct operation of the
coffee machine.
7.4 Adjusting the height of the combination spout
You can adjust the height of the combination spout 6
depending on the size of the coffee cups you use.
Grasp the combination spout and slide it upwards or
downwards as required.
Caution!
Scalding hazard!
in the area of the combination spout 6
7.5 Preparing coffee
Depending on the machine version chosen, you have a
choice of 1-5 beverage keys 4one hot water key 11 and
one milk frother key 10.
Each key is individually programmable.
WMF customer service will set up the machine according
to your requirements.
Please note: It is not possible to dispense coffee and hot
water at the same time.
5
4

54
The two-cup function enables 2 cups of a coffee beverage
to be prepared at the same time.
To operate, press the desired beverage key twice quickly in
succession.
Example: Espresso
+
1 cup of Espresso
2 cups of Espresso
are prepared
at the same time
7.5.1 Coffee beverages (Espresso, Café Crème etc.)
Caution!
Scalding hazard in the dispensing area of the
combination spout 6.
If the coffee beans hoppers have been filled (see 7.2
Filling the coffee beans hopper on page 51) and the
machine is ready for use, coffee beverages can be
dispensed by pressing one of the beverage keys 4.
Example: brewing 2 cups of Café Crème:
1. Place two cups beneath the combination spout 6.
You may need to adjust the height of the combination
spout, depending on the size of cup used (see 7.4
Adjusting the height of the combination spout
on page 53).
2. Then press the beverage key labelled Café Crème
twice quickly in succession.
The following display appears while brewing is taking
place:
2 CAFE CREME
Pre-sel 01
11:21
20.04.
3. At the end of the brewing process, the freshly prepared
coffee beverage is ready. The used coffee grouts are
collected in the built-in coffee grouts container 13.

55
7.5.2 Coffee beverages with added milk (White Coffee, Cappuccino, Latte Macchiato, etc.)
Caution!
Scalding hazard in the dispensing area of the
combination spout 6
If the coffee beans hoppers have been filled (see 7.2
Filling the coffee beans hopper on page 51) and
milk dispensing is set up (see 7.3 Preparing to dispense
milk on page 52), coffee beverages can be dispensed by
pressing one of the beverage keys 4.
Example: preparing 2 cups of Cappuccino:
1. Place two Cappuccino cups beneath the combination
spout 6. You may need to adjust the height of the
combination spout, depending on the size of cups used
(see 7.4 Adjusting the height of the combination
spout on page 53).
2. Then press the beverage key labelled Cappuccino
twice quickly in succession.
The following display appears while brewing is taking
place:
2 CAPPUCCINO
Pre-sel 01
11:21
20.04.
3. At the end of the brewing process, the freshly prepared
coffee beverage is ready. The used coffee grouts are
collected in the built-in coffee grouts container 13 .
If you wish to add extra milk froth on top of the
Cappuccino, the milk frother key 10 is provided for
this purpose.
Important!
The milk should be used within 12 hours;
otherwise it should be replaced.
Please see the cleaning instructions in chapter
9 Care of the machine on page 65.

56
7.5.3 Manual input
The machine is equipped with a manual input 2for ground
coffee to prepare additional coffee beverages (e.g. mild
coffee or decaffeinated coffee). To use the manual input,
proceed as follows:
1. Open the manual input 2. The coffee grinders 1are
now switched off.
The following message appears in the display:: Insert ground coffee
Press button!
2. Insert in the appropriate quantity of ground coffee for
the brewing quantity required, using the measuring
spoon (order no. 33 0742 4000) (max. 20g).
The following request appears in the display:
Please close
input opening!
3. Close the manual input 2and press the appropriate
beverage key 4. The desired beverage will now be
prepared from the ground coffee. Quantity selection
(see chapter 7.5.4Quantity selection on page 56) is not
possible in this mode.
4. At the end of the brewing process the freshly prepared
coffee beverage is ready.
The used coffee grouts are collected in the built-in
coffee grouts container 13.
5. If no beverage keys are pressed within 20 seconds of
opening the manual input 2, the ground coffee that was
Ready
Pre-sel 01
11:21
20.04.
inserted, is ejected into the grouts container and the
machine is ready for operation again.
7.5.4 Quantity selection
If you wish to prepare several cups in sequence, you can
have every key repeat automatically up to 6 times:

57
In this way you can prepare 6 x 2 = 12 beverages in
succession by using quantity selection and pressing one of
the beverage keys twice (two cup function).
Press the key to select the required number of repeats,
for example: 6 x . The following display appears: Ready
Pre-sel 06
11:21
20.04.
Press the desired beverage key, e.g. Café Crème twice
quickly in succession (two cups).
2 Café Crème
Pre-sel 06
11:21
20.04.
Six brewing cycles are now performed one after the other.
When brewing is complete, the display again shows:
Ready
Pre-sel 01
11:21
20.04.
Remember to place a fresh cup under the combination
spout 6in time. The quantity selected can be altered while
brewing is in progress by pressing the - or keys.
7.6 Hot water dispensing
Caution!
Scalding hazard in the vicinity of the hot water
spout 12.
Hot water can be dispensed in three different ways via the
hot water spout 12:
Measured quantities:
Dispensing starts automatically when the hot water key 11
is pressed and stops automatically after a predefined
quantity has been dispensed.
Start-stop function:
Pressing the hot water key 11 starts the dispensing process
and pressing it again stops it.
Free flow:
Dispensing continues for as long as the hot water key 11 is
pressed.
The preferred mode is set by your WMF customer service
personnel, according to your requirements.
Note: It is not possible to dispense hot water and
coffee at the same time.
12

58
7.7 Coffee grouts container
The used coffee grouts are collected in the coffee grouts
container 13 inside the machine. The grouts container has a
capacity of approx. 60 brews.
The display 8draws attention to a full grouts container 13.
If the coffee grouts container is almost full,
the following alternating message appears in the display: Please empty grouts
container!
Ready
Pre-sel 01
11:21
20.04.
When this message appears, a further 5 brews (approx.) are
possible before coffee dispensing is blocked.
Locked 11:21
20.04.
Remove the coffee grouts container 13 and empty it. The
following message appears in the display 8:
Please re-insert
grouts container!
Replace the empty grouts container 13. The following
message appears in the display 8:
Grouts container empty?
Yes/ENTER No/EXIT
Press ENTER to confirm if you have emptied the coffee
grouts container 13 or press EXIT if you have merely
checked the level in the container.
If you press ENTER to confirm, the coffee grouts container
13 must have been removed from the machine for at least
5 seconds, otherwise the confirmation of emptying
(ENTER) will not be accepted.
The following message then appears in the display: Grouts not emptied
– Please empty! -
If this message appears, the coffee grouts container 13
must be removed from the machine again for at least 5
seconds and emptied.
If the coffee grouts container 13 is removed, the following
message appears again:
Please re-insert
grouts container!
Important!
Always empty the coffee grouts container 13 before
replacing it.
Replacing the coffee grouts container 13 without
emptying it will dirty the machine and can cause
damage to the machine.

59
If your WMF Bistro easy coffee machine has been set to
empty mode “R” by WMF customer service, the following
differences apply:
If the following display 8appears, turn the key switch 3to
“ ”.
Please empty grouts
container!
Now empty the coffee grouts container 13. The following
message appears in the display:
Please re-insert
grouts container!
Replace the empty container 13. The following message
appears in the display 8:
Grouts container empty?
Yes/ENTER No/EXIT
Press ENTER to confirm if you have emptied the coffee
grouts container 13 or press EXIT if you have merely
checked the level in the container.
On pressing ENTER to confirm, the following message
appears:
Turn key switch
to “I”!
Turn the key switch 3back to position “I”.
The machine is ready again.
Important!
In this mode, in key position “I”,the confirmation
that the coffee grouts container has been emptied
cannot be registered. ENTER or EXIT cannot be
pressed.
The following message will still appear in the display 8
even though the coffee grouts container 13 has been
removed and emptied as directed: Please empty grouts
container!
3
3

60
Turn the key switch 3to “ ” and press ENTER to
confirm that the coffee grouts container 13 has been
emptied.
Then turn the key switch 3back to position “I”. The
machine is ready again.
7.8 Display of quantities dispensed
With the key in position “ ”the quantities dispensed
for every beverage key can be displayed.
1. Turn the key switch 3to position “ ” (Accounting).
The display shows the following: Accounting... /ENTER
[Set/->]
2. Press the ENTER key to enter the accounting program.
3. You can call up the quantities for each beverage by
pressing the beverage keys 4:
1 Espresso 001895
/EXIT/->
+
2 Espresso 001092
/EXIT/->
1 Café Crème 010277
/EXIT/->
4. Pressing the key allows you to reset the quantity
displays to “0”.
5. EXIT takes you to the initial menu.
3
Table of contents
Other WMF Coffee Maker manuals

WMF
WMF Presto 1400 Series User manual

WMF
WMF 2000 S User manual

WMF
WMF LONO User manual

WMF
WMF 150 F User manual

WMF
WMF WMF 1000 S User manual

WMF
WMF 9440 Series User manual

WMF
WMF combiNation F2 8700 Series User manual

WMF
WMF PERFECTION 800L Series User manual

WMF
WMF Bueno Pro Glas User manual

WMF
WMF Filter Coffee Maker User manual