WMF 500 User manual

User manual
Coffee machine WMF 500
en - Type 030 300

Press briefly: 1x Espresso
Keep pressed down:
2x Espresso
Press briefly: 1x Café Crème
Keep pressed down:
2x Café Crème
Press: 1x Capuccino
Preparing milk
Start: Press button
Stop: Press button
Preparing hot water
Start: Press button
Stop: Press button
C-button
Stop the procedure
Back without change
P-button
Call up programs
Confirm selection
Minus-button
Browse backwards
Reduce value
Reduce strength of coffee
Plus-button
Browse forwards
Increase value
Increase strength of coffee
Ready-to-operate display
The descriptions in this user manual always assume
that coffee-machine is ready to operate.

1
14
12
9
8
10
2
3
6
7
11
4
15
13
5
Legend
1 Cup storage
2 On/Off -switch
3Functionkeys
4 All-in-one spout
5 Cover for mains plug
6Watertank
7 Drip tray with drip tray grid
8 Coffee grounds container
9 Hot water spout
10 Beverage buttons
11 Display
12 Bean container lid
13 Lid for ground coffee insert
14 Brewing unit lid
15 Brewing unit
Leave this page folded out while reading the user manual.
This will give you an overview of the complete coffee machine, including all its components.
The positions 1 15
... are dealt with again in the individual chapters.

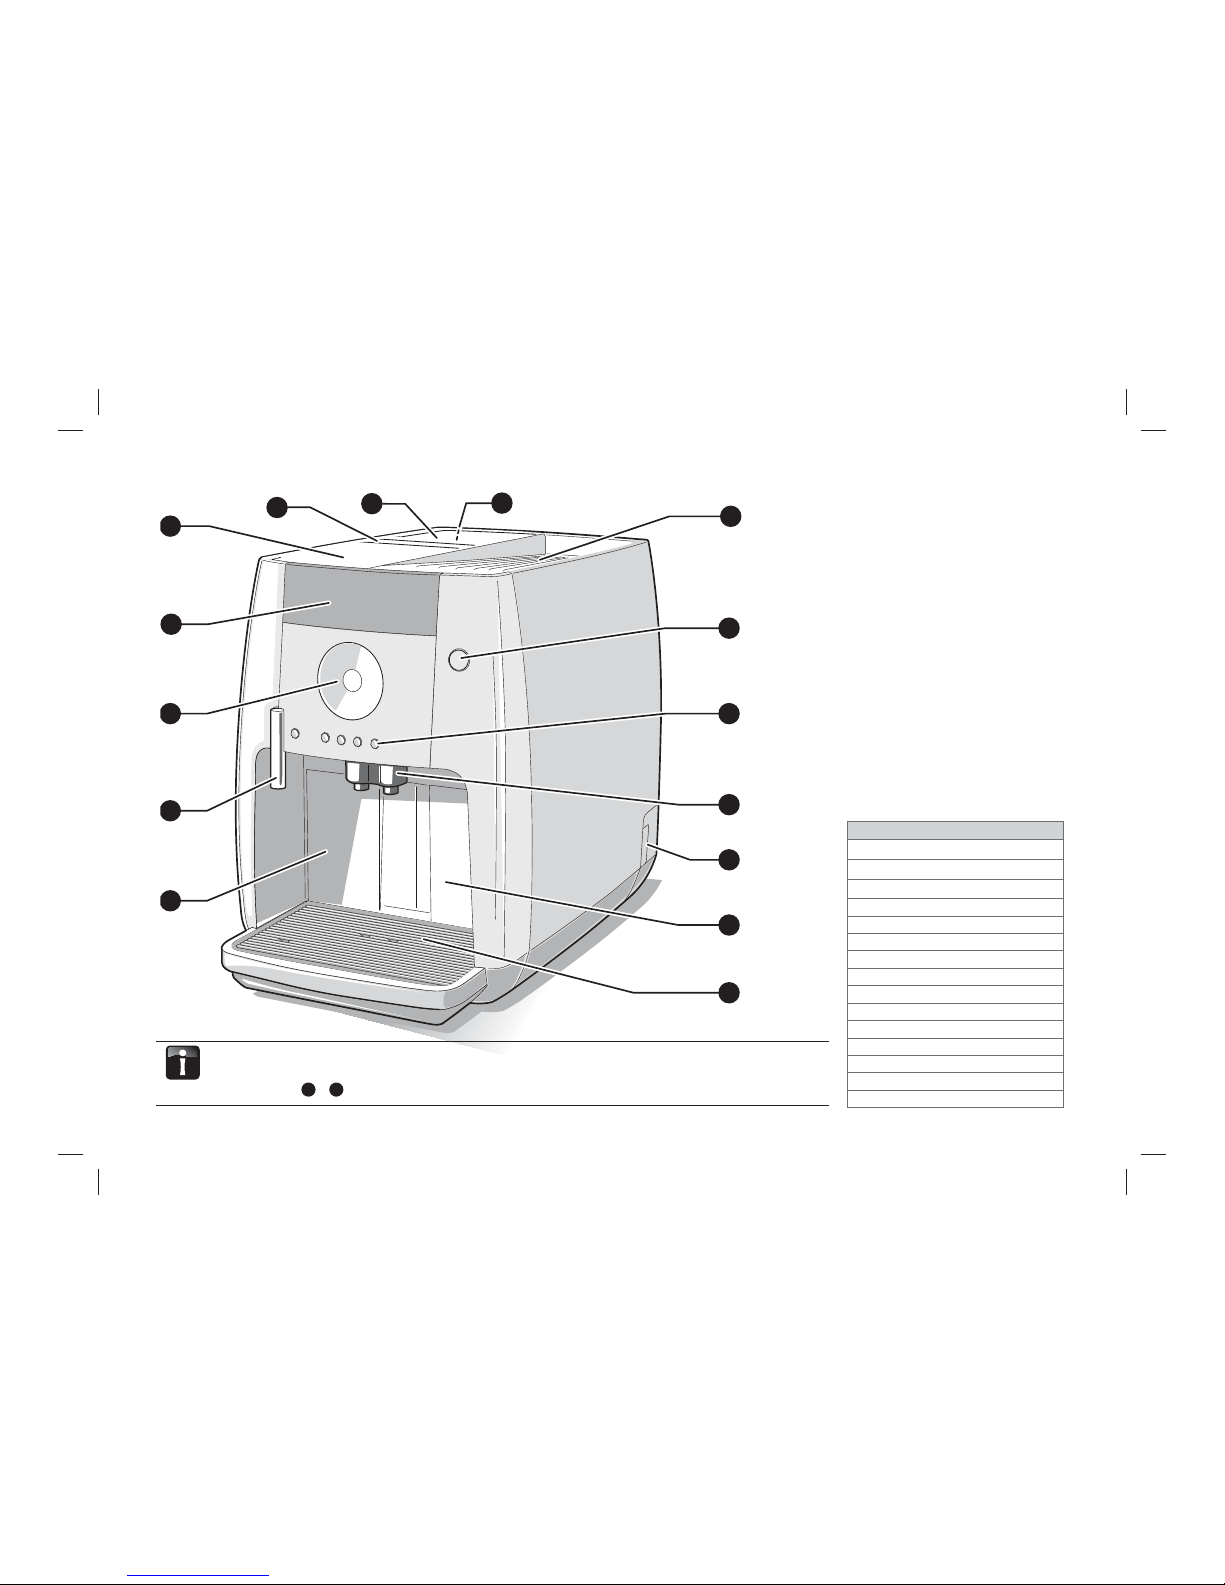
1 For your safety . . . . . . . . . . . . . . . . 1
1.1 Intended use . . . . . . . . . . . . . . . . . . . . . . . . . 1
1.2 Hazard instructions. . . . . . . . . . . . . . . . . . . . 2
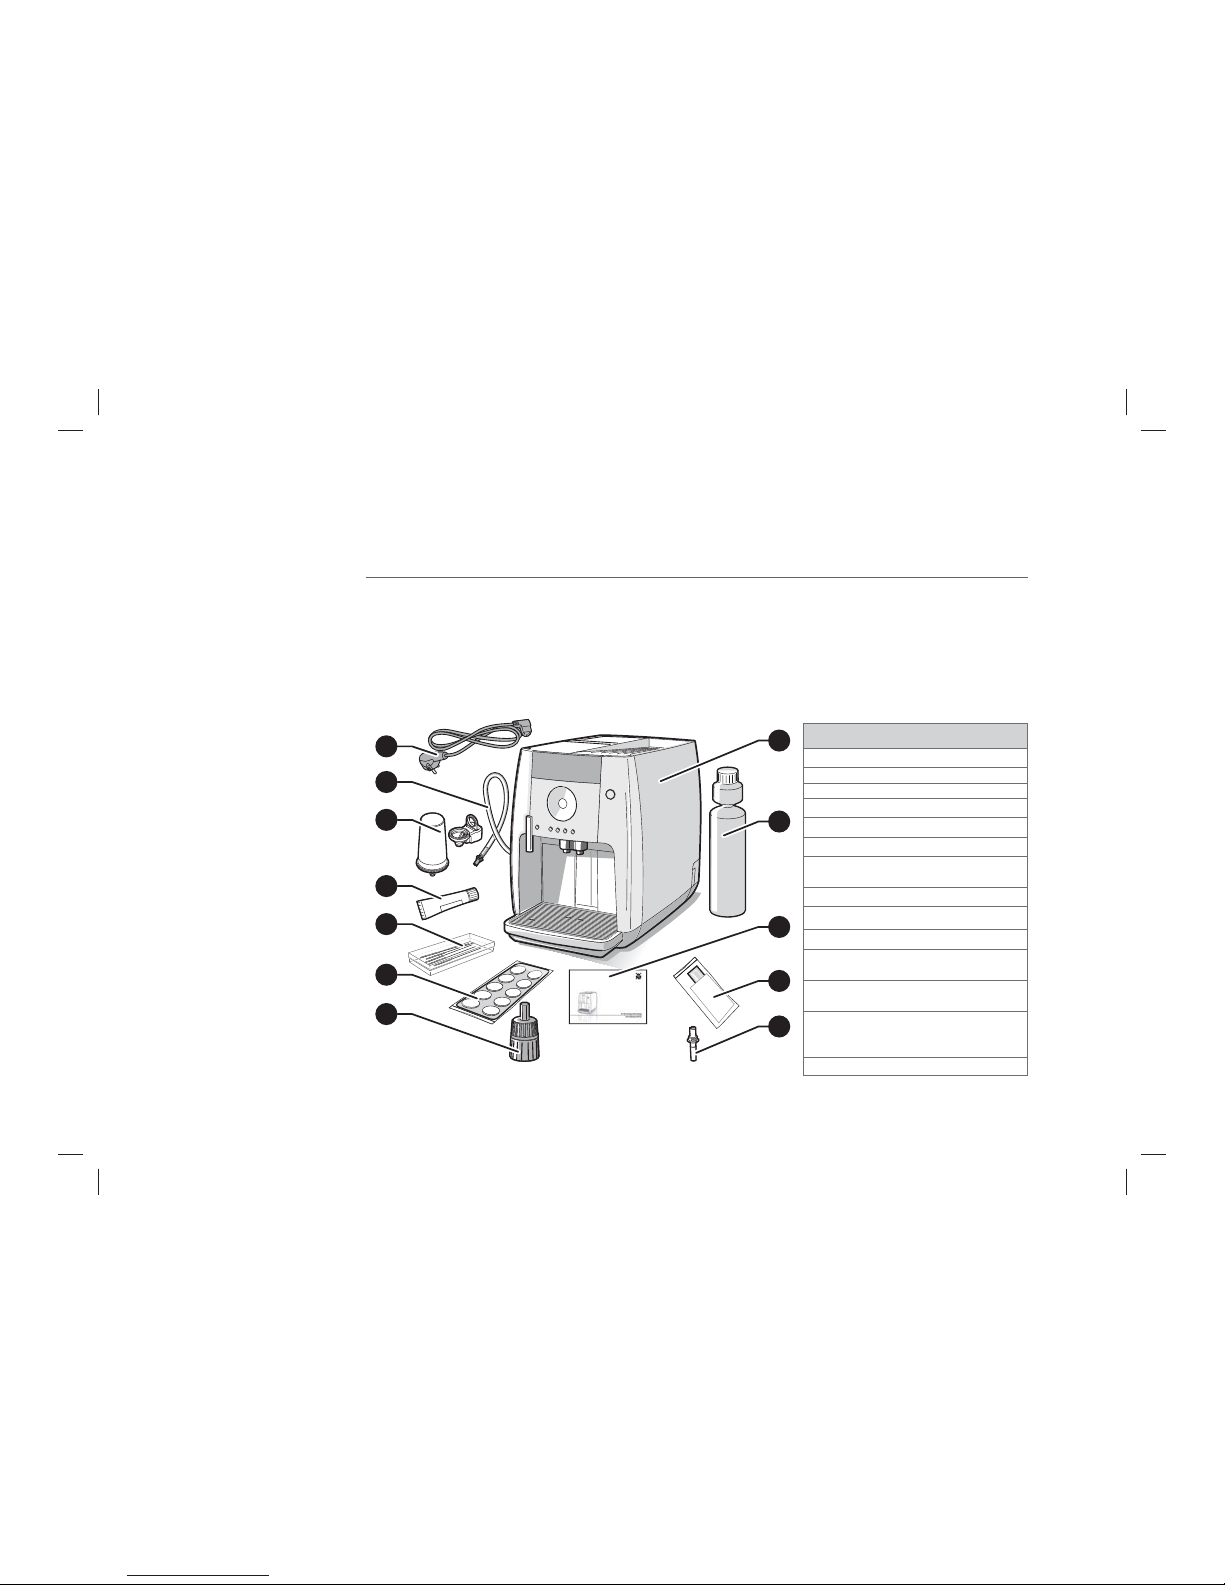
2 Initial setup . . . . . . . . . . . . . . . . . . 5
2.1 Scope of supply . . . . . . . . . . . . . . . . . . . . . . . 5
2.2 Installation and connection . . . . . . . . . . . . . 6
2.3 Testing the water hardness. . . . . . . . . . . . . . 6
2.4 Insert the WMF water filter . . . . . . . . . . . . . 7
2.5 Filling the water tank . . . . . . . . . . . . . . . . . . 8
2.6 Filling the coffee bean hopper. . . . . . . . . . . 8
2.7 Initial setting . . . . . . . . . . . . . . . . . . . . . . . . 10
3 Operation . . . . . . . . . . . . . . . . . . . 15
3.1 Switching on or switching off the
automatic coffee machine . . . . . . . . . . . . . 15
3.1.1 Switching on . . . . . . . . . . . . . . . . . . . . . . . . 16
3.1.2 Switching off . . . . . . . . . . . . . . . . . . . . . . . 17
3.2 Preparing beverages . . . . . . . . . . . . . . . . . . 17
3.2.1 Preparing milk . . . . . . . . . . . . . . . . . . . . . . . 18
3.2.2 Coffee at the touch of a button . . . . . . . . 18
3.2.3 Set the coffee strength for the next
beverage. . . . . . . . . . . . . . . . . . . . . . . . . . . . 19
3.2.4 Coffee preparation using ground coffee . 20
3.2.5 Preparing milk and milk foam . . . . . . . . . . 21
3.2.6 Hot water dispensing . . . . . . . . . . . . . . . . . 22
3.2.7 Cancel beverage preparation . . . . . . . . . . . 22
3.3 Carry out the settings. . . . . . . . . . . . . . . . . 22
3.3.1 Beverage settings . . . . . . . . . . . . . . . . . . . . 23
3.4 Basic settings . . . . . . . . . . . . . . . . . . . . . . . . 25
3.5 Set the grinding degree . . . . . . . . . . . . . . . 28
3.6 Read counters . . . . . . . . . . . . . . . . . . . . . . . 29
4 Care . . . . . . . . . . . . . . . . . . . . . . . 31
4.1 Care overview . . . . . . . . . . . . . . . . . . . . . . . 31
4.2 Customer Care programmes. . . . . . . . . . . . 32
4.2.1 Calling up the customer care
programmes . . . . . . . . . . . . . . . . . . . . . . . . . 33
4.2.2 Warm-up rinse. . . . . . . . . . . . . . . . . . . . . . . 34
4.2.3 Milk system rinse. . . . . . . . . . . . . . . . . . . . . 34
4.2.4 Machine-cleaning - Cleaning
programme. . . . . . . . . . . . . . . . . . . . . . . . . . 35
4.2.5 Replace water filter. . . . . . . . . . . . . . . . . . . 38
4.2.6 Descale automatic coffee machine . . . . . 40
4.3 Manual cleaning . . . . . . . . . . . . . . . . . . . . . 45
4.3.1 Clean the milk system. . . . . . . . . . . . . . . . . 45
4.3.2 Clean the steam nozzle. . . . . . . . . . . . . . . . 47
4.3.3 Clean the brewing unit. . . . . . . . . . . . . . . . 48
4.3.4 General cleaning . . . . . . . . . . . . . . . . . . . . . 51
4.4 Lubricating the O-rings . . . . . . . . . . . . . . . 53
4.4.1 Lubricating O-Ring on the water tank . . . 53
4.4.2 Lubricating O-ring of brewing unit. . . . . . 54
5 Display messages and
malfunctions . . . . . . . . . . . . . . . . 55
5.1 Messages on the display . . . . . . . . . . . . . . . 55
5.2 Problems without error display . . . . . . . . . 63
6 Transport and Disposal . . . . . . . . . 66
7 Guarantee, warranty and
customer service . . . . . . . . . . . . . 67
8 Technical data . . . . . . . . . . . . . . . 68
9 Index . . . . . . . . . . . . . . . . . . . . . . 69
10 Publisher Information. . . . . . . . . . 72
Table of contents

ii
Preliminary comments
Congratulations on choosing your new WMF 500 coffee machine.
The WMF 500 is equipped with the key components of a professional WMF coffee machine - the basis for your enjoyment of a perfect coffee.
Before starting
Read this user manual before you start preparing the coffee. Only then you can use all the functions, operate your WMF 500 safely and treat
yourself to a wonderful cup of coffee.
Signs and symbols
The symbols used for hazard instructions and their significance
Hazard!
Hazard of being injured!
Hazard!
Risk of burns and scalding!
Hazard!
Potentially lethal hazard due to electric
shock!
Caution!
Risk of possible material damage!
Tips and instructions
Useful information and tips Cross reference

For your safety
1
1 For your safety
Maximum possible safety of devices is one of the characteristics of WMF products to which we give our
special attention. The integrated safety devices of WMF 500 are, however, only effective if you follow the
following safety instructions.
1.1 Intended use
The WMF 500 coffee machine is a single-cup coffee machine for espresso and café crème as well as milk
coffee specialities such as cappucino, for private use. Each portion is freshly brewed at the touch of a
button. Hot water, milk foam and milk are added by the start-stop function.
Both coffee beans can be used via the grinder as well as ground coffee via a feed chute.
The WMF 500 coffee machine is to be exclusively used for preparing espresso/coffee, the foaming and
dispensing of milk and for preparing hot water.
The device is designed for the preparation of a max. of 20 cups of coffee a day, and at most 6000 brews
in 2 years.
The WMF 500 is not to be used by children or persons with reduced physical, sensory or mental
capabilities, or lack of experience and knowledge, unless they have been given supervision or instruction.
Children should be supervised to ensure they do not play with the appliance. The WMF 500 is intended to
be used in household and similar applications as staff kitchen areas in shops, offices and other working
environments; farm houses; by clients in hotels, motels and other residential type environments; bed and
breakfast type environments.
After 6000 brews the device should be serviced at the WMF Service Centre.
In case of misuse, incorrect connection, incorrect operation, improper repair or non-compliance with
the above specifications, no liability will be accepted for any damage. No liability whatsoever is accepted
for damage caused by neglecting cleaning or descaling or by using other cleaning products or scaling
products than those supplied by WMF. In such cases, all warranty claims are void.

For your safety
2
1.2 Hazard instructions
Despite all safety precautions, there is a hazard potential associated with each device if handled
improperly. Therefore, follow the instructions below when handling your automatic coffee machine to
avoid injuries and health hazards:
Hazard!
Possible injuries due to the grinders!
As long as your coffee machine is switched on and connected to the power supply, the grinder of your
coffee machine can start up and you may suffer injury.
>When you want to clean the coffee bean hopper, switch off the automatic coffee machine and remove
the mains plug.
Hazard!
Possible risk to life due to electric shock!
Water or other fluids that have seeped into your coffee machine can lead to life-threatening electric
shocks.
>Do not clean your automatic coffee machine under running water, with steam cleaners or with steam
jets.
>Appliance must not be immersed.
>Do not use any tools or similar instruments.
>In case the mains cable gets damaged, it must be replaced by a special mains cable that is available
from WMF.

For your safety
3
Hazard!
Probable risk of burns or scalding due to hot components or steam and hot liquids!
The all-in-one spout and the hot water spout are very hot while in operation and on contact can cause
burns. Hot beverages and escaping steam can scald you.
>Do not touch the all-in-one spout, the hot water spout or the direct adjoining surfaces of your
automatic coffee machine.
>Avoid contact with the escaping steam and handle the hot beverage with care.
Hazard!
Possible health hazard!
If you neglect to clean the milk unit or the water tank, or if you use comestibles or liquids other than cof-
fee, drinking water or milk, your health may be impaired.
>Clean the machine regularly in accordance with the instructions in Chapter “4 Care” on page 31.
>Use only clean, cold drinking water to fill the water tank and use only milk in the milk system of your
automatic coffee machine.

For your safety
4
Hazard!
Possible health hazard due to cleaning agents or descaling agents.
Cleaning agents and descaling agents are irritants and become very hot while executing the cleaning
programmes. Cleaning agents and descaling agents can affect your health. Cleaning agents and descaling
agents can damage the plastic parts of the automatic coffee machine and other articles and textiles.
>Use only the WMF cleaning agent and descaling agent.
>Avoid any contact with cleaning agent or descaling agent.
>Keep the cleaning agent and descaling agent away from children.
>Never ingest the cleaning agent and descaling agent or mix them with other cleaning agents and
descaling agents or other chemicals.
>Even if you are only breaking off from the cleaning activity briefly, wash your hands after cleaning
your automatic coffee machine.
>Do not eat or drink during the cleaning programmes.
>Ensure that there is adequate ventilation when the cleaning programmes are running.

5
Initial setup
2 Initial setup
Now you are only few steps away from preparing a perfect cup of coffee.
In this chapter you can learn step-by-step how you can start operating your WMF 500.
2.1 Scope of supply
>Check the scope of supply for completeness.
Legend
1 WMF 500 Automatic coffee machine
2 WMF Milk system cleaner
WMF 500 document set
3Usermanual
4 Carbonate hardness test
WMF 500 accessories
5Brown milk nozzle for
non-refrigerated milk
6Multitool
7 WMF cleaning tablets
8 Small cleaning brushes
9WMF lubricant/grease
for sealing rings
10 WMF water filter with
cartridge adapter
11
Milk hose with white milk
nozzle for refrigerated milk
(preinstalled)
12 Mains cable
1
2
3
4
5
9
8
7
6
12
11
10

Initial setup
6
2.2 Installation and connection
>Unpack the automatic coffee machine.
>Place the automatic coffee machine on a stable, horizontal surface that is waterproof and
heat-resistant.
5a 7a
5b
>Remove the cover (5a) from the back.
>Connect the mains cable (5b) provided with the automatic coffee machine.
>Connect the plug to an earthed socket.
>Insert the drip tray with drip tray grid (7a) into the automatic coffee machine.
2.3 Testing the water hardness
>Dip the carbonate hardness-test strip provided (for about 5 seconds) in your tap water.
30 seconds later, you can read the degree of hardness with the help of the colour scale on the test strip
package.
5
7

Initial setup
7
Enter this value during setup.
2.4 Insert the WMF water filter
The optional WMF water filter protects your automatic coffee machine from scaling.
There is no need for a water filter if the water hardness range is between 0 and 4.
>Remove the water tank from the automatic coffee machine.
>Remove the water filter accessory parts from the coffee grounds container.
6a
6b 6d
6c
>Remove the sieve (6a) from the water tank and put in a safe place.
>Pull the locking device (6b) on the cartridge adapter upwards.
6

Initial setup
8
>Clip the cartridge adapter (6c) onto the water outlet spout from above.
>Press the locking device on the cartridge adapter downwards.
>Attach the new water filter cartridge (6d) to the cartridge adapter.
2.5 Filling the water tank
Caution!
Possible damage to your automatic coffee machine due to unsuitable liquids!
Liquids other than drinking water can damage your coffee machine or can result in clogging.
>Fill the water tank of your automatic coffee machine only with clean, cold drinking water.
>Never fill the water tank with hot water, mineral water or milk.
>Remove the water tank from the automatic coffee machine.
>Rinse the water tank thoroughly with tap water.
>Fill the water tank with cold tap water.
>Slide the water tank into the coffee machine with the lid fitted in position.
2.6 Filling the coffee bean hopper
Once unpacked, roasted coffee loses its aroma in few days.
Therefore, pour only as many coffee beans in the coffee bean hopper as you expect to use in the next
few days. So that you can enjoy the full aroma of your coffee, it is better to frequently refill with beans.

Initial setup
9
Each coffee machine is thoroughly inspected and tested before delivery, therefore there may be coffee
grounds in the grinders.
Hazard!
Possible injuries due to the grinders!
As long as your automatic coffee machine is switched on and connected to the power supply, the grinder
of your automatic coffee machine can start up and you may suffer injury.
>Do not reach into the coffee bean hopper of your automatic coffee machine.
Caution!
Possible damage to your automatic coffee machine due to foreign bodies!
Foreign bodies that are present in the coffee bean hopper can damage the grinders.
>Make sure that no foreign bodies (e.g metal parts) are present in the coffee bean hopper.
>Pour only appropriate coffee beans into the coffee bean hopper.
12a
12b
12c
12

Initial setup
10
>Open the lid (12a) of the coffee bean hopper.
>Fill the hopper (12b) with coffee beans.
>Close the lid (12c).
2.7 Initial setting
>Press the On/Off switch for about 3 seconds.
The setup program begins.
>Set the desired language with – or + .
>Confirm the language with P button.
The setup program now guides you through the basic settings.
>Set the current time with – or +
(hh = hours in two digits, mm = Minutes in two digits).
>Confirm the time with P button.
Cup volume: max. 250 g
Setting the time

Initial setup
11
>Set the current date with – or +
(dd = day in two digits, mm = Month in two digits,
yyyy = Year in four digits).
>Confirm the date with P button.
>Set the time after which the machine automatically switches off
after the last beverage preparation with – or + .
>Confirm your selection with P button.
For a setting at "0 Minutes" the machine does not switch off
automatically.
You can choose between 4 energy saving modes.
>Please note the following information.
>Set the energy saving mode with – or + .
>Confirm your selection with P button.
Setting the date
Switch off time
Energy saving modes

Initial setup
12
The WMF 500 is equipped with 4 different energy saving modes:
>Set the result of the carbonate hardness test with – or + .
>Confirm the water hardness with P button.
Energy saving mode Method of working of the WMF 500 Percentage of maximum
consumption
(determined as per
SAFE*)
1Both heaters are continuously ready for use.
Coffee, milk, milk foam and hot water can be dispensed without having to wait. 100 %
2
(Factory setting)
Hot water is held at operating temperature continuously. Coffee, milk,
milk foam and hot water can be dispensed without having to wait.
The steam heater goes to stand-by after 5 minutes. 89 %
3Both heaters go to stand-by after 5 minutes. Coffee, milk, milk foam
and hot water can be dispensed after a short waiting period. 83 %
4The coffee heater goes to stand-by after 5 minutes. Coffee and hot water
can be dispensed after a short waiting period. The steam heater is off.
Milk and milk foam can be dispensed after a short waiting period. 52 %
* Measuring method as per SAFE
Setting water hardness

Initial setup
13
>With – or + , select whether you use a water filter (recommended
for water hardness greater than 5 °dKH).
>Confirm your selection with P button.
If water filter is set to "Yes", the filter will then be rinsed:
>Place a collecting vessel with approximately 2 litres capacity
under the hot water spout.
While rinsing the filter unusual noises are heard. This is normal. The
noises end during the filter rinse.
>Fill the water tank with cold tap water.
>Place the lid on the water tank.
>Slide the water tank gently into the automatic coffee machine.
Is water filter used?
Rinsing water filter

Initial setup
14
Caution!
Danger of scalding!
After the coffee system is rinsed, a strong jet of steam may be emitted from the machine.
After the machine is heated up, the coffee system is rinsed. This
warms up all the pipes.
>Place a collecting vessel for the rinse water (approx. 60 ml) under
the all-in-one spout.
The coffee system rinsing procedure lasts for about. 60 seconds.
At the end of the setup program, a test brew is carried out.
>Place an appropriate suitable drinking vessel under the all-in-one
spout.
>Confirm with P .
The test brewing starts. During this test brewing, coffee grinder is
filled with coffee beans.
>Throw this first cup of coffee away.
The WMF500 is now ready for use.

Operation
15
3 Operation
In this chapter, you can learn all about the easy method of coffee preparation with the WMF 500 and
how you can individually customise your WMF 500 - entirely according to your preferences!
Hazard!
Possible risk of burns or scalding due to hot components or steam and hot liquids!
The all-in-one spout and the hot water spout are very hot while in operation and on contact can cause
burns. Hot beverages and escaping steam can scald you.
>Do not touch the all-in-one spout or hot water spout!
>Avoid contact with the escaping steam and handle the hot beverage with care.
3.1 Switching on or switching off the automatic coffee machine
While switching the automatic coffee machine on or off, the machine automatically starts a coffee
system rinse. This requires an adequate volume of water in the water tank at all times.
>Empty the drip tray regularly, since the rinse water (approx. 60 ml) is emptied into the drip tray
through the all-in-one spout.
You can also put a collection vessel under the spout to catch the rinsing water.
This manual suits for next models
1
Table of contents
Other WMF Coffee Maker manuals

WMF
WMF Presto 1400 Series Configuration guide

WMF
WMF 1500S User manual

WMF
WMF cafemat! User manual

WMF
WMF BUENO Aroma User manual

WMF
WMF KITCHENminis 0412270011 User manual

WMF
WMF AromaMaster User manual

WMF
WMF Presto 1400 Series User manual

WMF
WMF Bistro! User manual

WMF
WMF 1100S User manual

WMF
WMF prestolino User manual
Popular Coffee Maker manuals by other brands

Ninja
Ninja DUALBREW GROUNDS & PODS CFP400 Series owner's guide

Fisher & Paykel
Fisher & Paykel EB24DSX installation guide

Rocket Espresso Limited
Rocket Espresso Limited Giotto Instructions for use

Krups
Krups EA810B70 manual

Eversys
Eversys e'2ct User & installation manual

Sunbeam
Sunbeam Intuitive EM8910 Instruction booklet